ESX
VMworld 2012 – Public Voting Now Open – Vote for my sessions!
For the first time I submitted sessions for VMworld 2012.
Please support me by going to vmworld.com and voting for my sessions…
Please visit VMworld 2012
vExpert 2012 – Four years in a row!
I was fortunate enough these past weeks to be elected as a vExpert for 2012 based on my blogging, virtualization community involvement, and leading the Advanced Technology Network Groups (ATNG).
Thank you very much to Alex Maier, John Troyer, and the internal vExpert staff for doing a fine job with this program. I’m proud and flatter to be part of this great program as it has so many prodigious virtualization folk as members.
Looking forward to 2012-2013:
Blog —
Recently (06/2011) my role has changed from end-user to employee at VMware and blogging material has become a bit more narrowed. I can’t exactly blog about my customers, that is strictly taboo and I have too much respect for them to do so. Finding good content to blog has proven to be a bit more of a challenge. However I still strive to keep an open mind and I know I will find my ultimate niche eventually.
ATNG —
ATNG has been a great group and it has been a blast running it. The foundation members have changed since the original charter and we’re finding it a bit harder to meet, but still there is a desire to be a group that meets regularly and talk technology not sales… (More info – www.atngroups.com)
This Year what will I be up to? —
I am asking myself what will next year bring for me in the way of sustaining a vExpert into 2013? I do know this… I will keep my blog up, I will keep ATNG growing, I will organize a give back event in Phoenix, and I’m always glad to help out Phoenix VMUG (if they need me). If this qualifies me as a vExpert for next 2013 then great, if not no worries I know I’ve done my part J
Thanks for reading… Feel free to comment as I always enjoy reading your feedback and suggestions!
PS – If you want to know more about the vExpert program, check it out here > http://communities.vmware.com/docs/DOC-18314
Never assume Windows 2008 is Aligned out of the box
I hear this topic come up from MANY and I mean MANY VMware folk. When I say VMware folk, I mean just about every person who interfaces with the product – Yes it’s that many
I believe it is a common misconception that Windows 2008 is aligned out of the box.
*The crowd goes silent as a distance ‘Ahh..’ and ‘No’ silently streams through the audience*
I also believe that Windows 2008 has a better chance of being aligned out of the box then most – But Don’t Trust it.
Still don’t believe me? Then read this from the horse’s mouth…
http://msdn.microsoft.com/en-us/library/dd758814(v=sql.100).aspx << Look for the topic “Partition Alignment in Windows Operating Systems”
From the above Microsoft link about alignment –
Partition Alignment in Windows Operating Systems
The way partition alignment works depends on the version of Windows being used and the version in which the partition alignment was created. The following sections describe how partition alignment works in Windows Server 2008, the Windows Vista® operating system, and Windows Server 2003 and earlier.
Windows Server 2008 and Windows Vista: New Partitions
In Windows Vista as well as Windows Server 2008, partition alignment is usually performed by default. The default for disks larger than 4 GB is 1 MB; the setting is configurable and is found in the registry at the following location:
HKLM\SYSTEM\CurrentControlSet\Services\VDS\Alignment
However, if OEM setups are delivered (for example, with recovery partitions), even fresh installations of Windows Server 2008 having partitions with undesirable partition starting offsets have been observed.
Whatever the operating system, confirm that new partitions are properly aligned.
I’m guessing at this point you still have doubt… But wait here’s more proof… I’ve seen misalignment in production environments… *No Way – Yes Way*
https://vmexplorer.com/2011/03/11/vm-check-alignment-tool/
Do you believe now?
If so maybe the best approach to this topic is to start stating “Windows 2008 is a better aligned OS but it needs to be checked just like ever Windows OS out there.”
Update to my Home Lab with VMware Workstation 8 – Part 3 Installation of Workstation 8
Okay so now that we have a sound hardware and OS, its now time to install Workstation 8.
Here’s the brief version – Next, Custom, Next, Change, Next, Change, Next, Change, Next, Continue, Enter, Finish… Well it’s almost that simple there is a bit more thought behind this….
Pre-Plan –
Make sure you have Workstation 8 downloaded
Read the release notes https://www.vmware.com/support/ws80/doc/releasenotes_workstation_80.html
Why read them… Lots of goodies and gotcahs in there. I checked my hardware prior to purchase so I know I’m okay, you should check yours too
I needed to know two things to get the base Program installed:
- Where will I install Workstation 8? Do I choose one of my SATA disks or my SSD?
- Where will my default VM direction go? Do I choose one of my SATA disks or my SSD
The Steps I took –
First thing I did was check my network settings…
Why is this important, for most it’s probably not, but for me I always like to see the before and after effects
Workstation 8 will install “virtual” network adapters, below is the before and at the end is the after…
From this screen shot you can see ‘Ethernet Adapter Local Area Network’ is my primary single pNIC in my PC.

Download and install the Workstation 8 executable… Lunch it and click next…

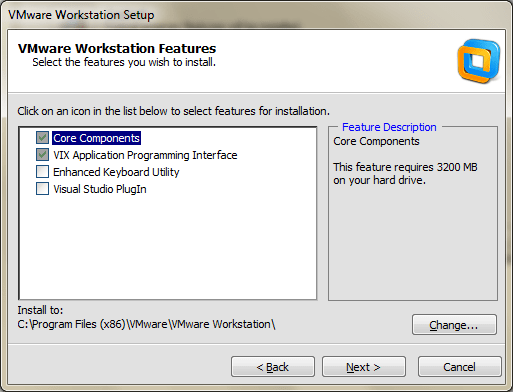
I Choose Custom to see some options for directory customization.

This is a good screen and is something you should think about…
If you have some SSD drives and PLEANTY of space (for VM’s and Workstation) you might want to consider placing the install there.
TIP – I did install Workstation 8 on my SSD and the boot time for the program was very FAST!
However I really needed the SSD space so I moved it to my 500GB 3gb/s disk. It doesn’t boot as fast but once it’s loaded there really no difference.
This is another good screen and is something you should think about…
Where do you want your default VM’s to be stored?
For Me I had choices for 500GB, 300GB SATA disks or my 60GB SSD
At this point I clicked on change…
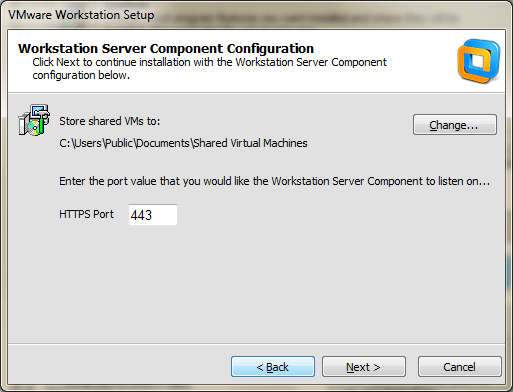
I choose the D: disk which was my 300GB SATA disk to get started…
By default your new VM will be placed in this folder and you can choose a different path if you wish.
Just like Fashion what’s in today is history tomorrow and so are default paths… you make a good choice now but want to change it later.
Don’t sweat this too much, changing the default VM path is easy in Workstation 8 and I do just that in an upcoming post.

Click Next…
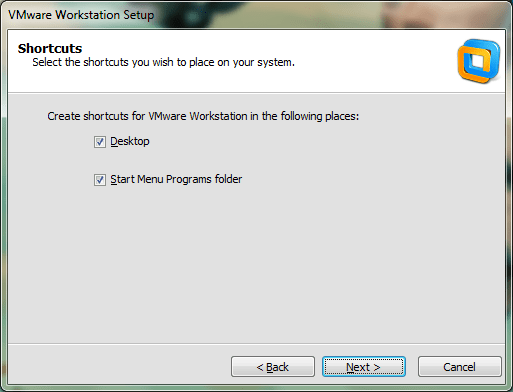
Click Continue…

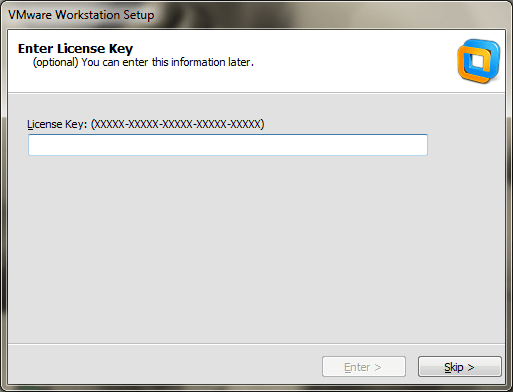
Enter your License Key…
TIP – Want a free copy of Workstation 8? When I got my VCP5 I got a free copy, get yours too, and get certified!
Click Finish and you’re done…

Going back to the network settings… you can now see Workstation 8 installed two new adapters.
VMware Network Adapter VMnet1 and VMnet8

Summary –
This went smooth no real issues; however as I later discovered some of the choices I made (Installation directories had to be changed)
Passed my VCP5 Test
Just last month (12/2011) I passed my VCP5, it was a nice Christmas Present, and the month prior (11/2011) I passed my VCP4.
It was a lot of fun preparing for a VCP4, passing that test, then updating everything I just learned to pass my VCP5.
It was a good thing I only got one maximum question, no telling how I would have answered it ![]()
What do I have to add for all of you taking the test?
– Read those documents, know your stuff, take the mock exams, follow the blue prints
– If you’re a partner or VMware employee and have access to the VTSP 5.0 Training, I would highly suggest using this as a study guide
– This guide (http://www.vreference.com/vsphere-5-notes/) I found to be the most useful as it was a culmination of the blue print material. Funny thing is I started to write my own cram notes based on the blue print documents and then I found this one, problem solved!
Final Thoughts and a word to the wise…
If you are just studying questions from TestKing, Cerfityme, etc… Good Luck – You’ll need it — Its plain and simple – Study hard = Passing the test
Update to my Home Lab with VMware Workstation 8 – Part 2 Fun with a Windows 7 Installer
Part 1 of this series outlined the hardware I wanted to purchase and some of the ideas I had around the products.
I created an image of the current install of Windows 7, then booted it to my new hardware, and to my surprise there were not any hidden files or drivers that needed adjusted.
It worked quite well, so well it was scary but simply Impressive…. Sure beats those old XP days when you had to just about tear it apart to get it to work.
However I would like this install of Workstation 8 to run on a fresh copy of Windows 7 so I have decided to reinstall it.
Now this shouldn’t warrant a blog post however they way I had to get Windows 7 to behave is why I’m posting.
In this post I go into getting Windows 7 to install properly when you don’t have proper installation CD.
The CD I own for Windows 7 is an Windows based Installation only, you cannot create boot CD to install the OS fresh.
Trust me I tired many ways but it just doesn’t work…
Here is what I wanted to accomplish –
1. I’d like a fresh copy of Windows 7 Installed on to my system
2. I need to enable AHCI in my system BIOS (for more info see here http://en.wikipedia.org/wiki/Advanced_Host_Controller_Interface)
I found on the corsair blogs that my SSD drive will run much better if you enable AHCI in your BIOS.
Unfortunately this pretty much deems a reinstall. I’m okay with this because it is what I’m wanting to do.
Issues –
1. The version of Windows 7 I have is an upgrade or restore only version.
2. Currently AHCI is not enabled in my BIOS
Here’s how I did it… Oh, did it take some trickery and learning but it worked..
Know this…
Windows 7 will do a recovery install to your current HD (C:) or to a new HD (E:).
If you install to your current HD, C:, then it will install in to a WINDOWS.001 folder, and leave lots of old files laying around.
Not ideal as I want a pristine Install
Do this…
From Windows I initiated the install, choose custom install and choose my E: drive (At the time E: was just a blank HD)

Windows did it typical install, Copying files, and they rebooted the system.
During the reboot I enabled AHCI on ALL controllers in the BIOS << THIS IS VERY important step, if you miss this Windows will install in IDE Mode
Windows completed the install and boots to your E: drive.
Having E:\ be the boot and E:\Windows is not ideal. I really want Windows 7 on my C: drive.
I formatted my C: drive and ran the windows install, only this time choose the C: HD.
Windows completes the install and reboots.
When I was done Windows 7 is a fresh install and running on the C: drive.
Summary…
I got to tell you it was a chore figuring this out, it seems very simple now but I went through imaging processes, partition changing, drive renames, lots of blog posts, KB’s, etc…
Nothing worked well and it took up hours of my time. This pattern worked for me, Windows 7 installed properly and its working quite well.
Now its on to installing Workstation 8…
Update to my Home Lab with VMware Workstation 8 – Part 1 Why
Over the couple of years my home lab running VMware Workstation 7 has served me quite well. I’ve been able to deploy VM’s as needed (Windows, ESX, etc) and attach it to my shared storage.
However as my role has changed to a TAM at VMware I’ve needed to depend on my lab to interface with my customers and keep my technical skills up. VMware supplies labs and access to many of their products and this approach is a good one, however there is something said for building it yourself.
Before I just start setting up software, hardware, SAN’s, network, etc I needed to reevaluate my current home lab and setup my new objectives / goals —
“To update a home lab one must look back to move forward” – Matt Mancini ![]()
What were some of the objectives and goals I chose back then?
What do you want to accomplish by setting up a home lab or work test environment?
I wanted to setup a home lab with a couple of ESX servers and shared storage
I wanted to do this so I could testing basic ESX functions and new versions
What are the expectations for uptime and performance?
I’d like the system to perform well as a home PC and a test lab
I’d like to use it to do basic functions and run my lab quickly keeping delays to a minimum
What equipment do I have access to and what do would I need to purchase?
Have – High End PC, Home Network
Purchase – More RAM, Shared Storage, Workstation Software
I built the following environment based on my objectives and goals–
Hardware / Software –

Network –
Internal networks to support vMotion and ESX Management Network
External Single NIC to support VM’s

Storage —
iSCSI, NFS – To support ESX Hosts
CIFS Shares – for a Public Share
Single NIC from home lab to support connection to IX4
500GB HD – Boot OS and Some Workstation VM’s
300GB HD – For Workstation VM’s
160GB HD – For Workstation VM’s
Current VM’s –
Web Safe – XP VM’s used for surfing the web
Home VM – Used for Home / Personal Use
ESX 3.5 Cluster – built but rarely used
ESX 4.0 Cluster – Used but not fully configured
vCenter Server VM – Windows 2003 x32 running vCenter Server 4.0

Outcomes for 09/2011 –
Currently my home lab is struggling to keep up. As my role has changed the demands on my home lab have increased. The main constraint appears to be RAM, 8GB of RAM won’t cut it anymore. So now I’m faced with updating or replacing my home lab.
The Update Plan 10/2011 –
Generally the home lab is doing okay but it is struggling with local RAM. If I run more then 3 VM’s (1 – vCenter Server, and 2 – ESX) there isn’t really much left and paging begins.
I start to look to update my current Mother board (MoBo) to 16GB of RAM, it’s MAX. As I start to research 4 x 4GB DDR2, I find that DDR3 has consumed the market. and DDR2 is so far past its prime that updating it would cost about ~$250 for RAM.
It’s time for a major overhaul for my home lab – What are the new objectives and considerations?
What do you want to accomplish by setting up a home lab or work test environment?
I wanted to setup my home lab to be able to run One vCenter Server, 2 – ESX servers w/ shared storage iSCSI and NFS, maybe on other XP VM, at the same time with out paging to disk
I to test basic ESX functions, new versions, explore options for customers, work with beta code, etc
What are the expectations for uptime and performance?
I’d like the system to perform well as a home PC and a test lab
I’d like to use it to do basic functions and run my lab quickly keeping delays to a minimum
What equipment do I have access to and what do would I need to purchase?
Have – High End PC, Home Network, Shared Storage, Workstation Software
What newer hardware update should be considered?
i7 Core CPU, MoBo with 32GB support, USB 3.0, onboard mSATA, SSD Drives, SATA 6.0 Support
With these things in mind I decided on the following items…

Let chats a bit about the Buy items and reasons why I choose them…
Gigabyte GA-Z68XP-UD3 Mobo
Here are the key drivers why I choose this motherboard –
Price and options were my number one driver, I had looked at other MoBo’s but when I narrowed it down this one kept coming up…
4 x SATAIII – 6.0Gbs Support – Really the MoBo out there with this (Note – this MoBo uses 2 different Chipsets to achieve this (2 x on the Intel Z68 and 2 x on the Marvell chipset)
4 x SATAII – 3.0Gbs Support – Uses the Z68 Chipset
32GB RAM Max
USB 3.0 Support
Good PCI Support – PCI Express 2.0 x16 2 (x16, x8), PCI Express x1, 3 PCI Slots 2 (I did look at PCI Express 3.0 boards but at this point they are more of a fad then reality)
Here are the details on this board — http://www.newegg.com/Product/Product.aspx?Item=N82E16813128512
60GB SSD SATAIII aka 6.0Gbs
The key driver for this product was Speed and Price.
I got the “Corsair Force Series 3 CSSD-F60GB3A-BK 2.5″ 60GB SATA III Internal Solid State Drive (SSD)”
I got this drive at Fry’s for $80 and it stated it could do 500MB/s Read and Write.
Come to find out it can only do 250MB/s RorW however if you buy the GT Model it will.
Don’t take my word for it read about it on the Corsair forums — http://forum.corsair.com/v3/forumdisplay.php?f=188
Other Caveats – Don’t use SSD for your boot drive, before you buy read reviews
I’m not happy about this but the drive still preforms well and I use it to boot VM’s it flys!
Here are the deailts on the SSD – http://www.newegg.com/Product/Product.aspx?Item=N82E16820233223
16GB DDR3 RAM
Key driver here was Size and Price
Once again Frys had the best price and it got 16GB of RAM for $79
Here are the details on the RAM – http://www.newegg.com/Product/Product.aspx?Item=N82E16820233143
With new hardware in hand, let the fun and rebuilding begin – I’m off to Part II of this blog “Update to my Home Lab with VMware Workstation 8 – Part 2 Fun with a Windows 7 Installer“
Passed the VCP4
I recently passed my VCP4 today. It’s been a long road getting here but I’m glad it’s behind me.
I was slated to take it 12/2009 time frame, but we had 4 deaths in the family within a 4 month period!
Needless to say that delay caused me to miss the opportunity to take the test without taking training
However at some point I thought I would get the training I needed to take the VCP but this never came to pass and I remained uncertified until most recently.
Last Summer I took a job with VMware as a TAM and I got the vSphere 4 training I needed. Finally I can say I am a VCP4!
With this behind me it’s time to study for my VCP5, which needs to be completed by end of year 2011 :) or in less than 2 months!
What do I have to add for all of you taking the test?
– Read those documents, know your stuff, take the mock exams, follow the blue prints
– Notice this about the questions… There are plays on words and metrics
Example –
A VM has the following performance counters – paging reads 0 and ballooning reads 240
Or I’ve seen it as
A VM has the following performance counters – paging reads 240 and ballooning reads 0
Also, I’ve seen a bunch of play on words like changing is to isn’t – This changes the answer you choose.
So word to the wise – I believe they are doing this to counter potential VCP’s just studying questions from TestKing, Cerfityme, etc… So if you are, Good Luck – You’ll need it — Its plain and simple – Study hard = Passing the test
9 Great vSphere 5 documents everyone should read
Here are 9 Great vSphere 5 documents everyone should read! Enjoy!
- What’s New in VMware vSphere 5.0 Platform
- What’s New in VMware vSphere 5.0 Storage
- What’s New in VMware vSphere 5.0 Networking
- What’s New in VMware vSphere 5.0 Performance
- What’s New in VMware vSphere 5.0 Availability
- vSphere Storage Appliance
- What’s New in VMware Data Recovery 2.0
- What’s New in VMware vCenter Site Recovery Manager 5.0
- What’s New in VMware vCloud Director 1.5
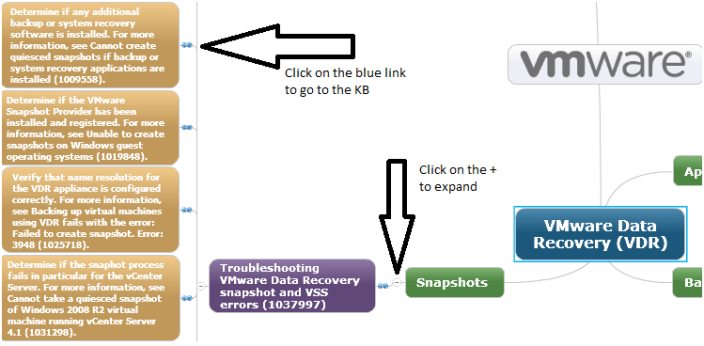
18 of the best VMware Resolution Path KB Articles
You might be asking yourself what are a Resolution Path KB articles? Resolution path articles are product specific PDF’s that lead you to common answers.
They help you to resolve common issues visually and link you to the KB to help in resolution.
In their own words –
“Mind Maps are a visualization of our Resolution Path KB articles, which are collections of modular steps that can be used to solve tech support issues. Being modular, they can be re-used in other resolution paths. A good example is using the ping command to test network connectivity. This step is used in all kinds of troubleshooting procedures. Put a number of these steps together, and you have a method.”
Here is the URL to the articles –
http://blogs.vmware.com/kb/2011/08/index-of-resolution-path-kb-articles.html
Here’s a quick screenshot but basically expand a category, and choose a link to a KB.