Windows
Tips for installing Windows 7 x32 SP1 on Workstation 16.1.2
This past weekend I needed to install Windows 7 x32 to support some older software. After installing Windows 7 x32 I noticed VMware tools is grayed out. I then tried to install VMware tools manually but it failed. There are a few tricks to overcome this issue and in this blog I’ll cover the steps I took to resolve.
So what changed and why all these extra steps?
You may recall that Workstation 16.0.0 could install Windows 7SP1 x32 without any additional intervention. Starting September 2019, Microsoft added SHA-2 algorithm requirements for driver signing. As Workstation 16 released updates it too included updated VMtools that were complaint with the Microsoft SHA-2 requirements. So if you deploy the Windows 7 SP1 x32 ISO (which doesn’t have the SHA-2 patch) the vmtools install will fail because it cannot validate the drivers. For a bit more information See VMware KB 78655.
What are options to fix this?
By default Windows 7×32 SP1 doesn’t include the needed SHA-2 updates. Users have 2 options when doing new installs.
Option 1: Create an updated Windows 7SP1 ISO by slip streaming in the Convenience Rollup Patch (More details here) and then use this slipstreamed ISO to do the install on Workstation. From there you should be able to install VMTools.
Option 2: After Windows 7 SP1 installation is complete, manually install the SHA-2 update, and then install VMtools. See steps below.
Steps for Option 2:
- First I created a new Workstation VM. When creating it I made sure the ISO path pointed to the Windows 7 SP1 ISO and Workstation adjusted the VM hardware to be compatible with Windows 7 SP1. I allowed the OS installation to complete.
- After the OS was installed I applied the following MS Patch.
- VMware Tools requires Windows 7 SP1 to have KB4474419 update installed, See https://kb.vmware.com/s/article/78708
- I downloaded this patch (2019-09 Security Update for Windows 7 for x86-based Systems (KB4474419)) directly to the newly create Windows 7 VM and installed it.
- Download TIP – To download this update, I needed to right click on the *.msu link > choose save link as > pushed the up arrow next to ‘Discard’ and choose ‘Keep’ > and saved it to a folder

- After the rebooted, I went into Workstation and did the following:
- Right clicked on the VM > Settings > CD/DVD
- Made sure ‘Devices status’ was check for connected and connect at power on
- Clicked on ‘Use ISO Image’ > Browse
- Browsed to this folder ‘C:\Program Files (x86)\VMware\VMware Workstation’
- Choose ‘windows.iso’
- Choose OK to closed the VM Settings
- Back in the Windows 7 VM I went into File Explorer opened up the CD and ran setup.exe
- From there I followed the default steps to install VM Tools and rebooted
- Screenshot of the final outcome


How to disable the Windows 10 Weather App
During a recent windows update I noticed weather information appear in the lower right hand corner. It showed it was 78f and Sunny! Clicking on it displayed a bunch of news stories and they all seem to link to MSN sites. Not exactly what I need in a office based OS. In this very short and straight to the point blog I’ll show how to hide this information from displaying.

To disable this function, simply right click on the taskbar > News and Interests > choose Turn off.

Once you select ‘Turn off’ the next time you look at the ‘News and interests’ you’ll notice the optional items have gone to gray.

There might be a home user base out there that would love this ‘New and Interests’, but its just not for me.
If you like my ‘no-nonsense’ videos and blogs that get straight to the point… then post a comment or let me know… Else, I’ll start posting really boring content!
Shutting down Windows 10 leaves PC on but display off
If you have ever shutdown an unmodified version of Windows 10 then you’ve been there >> PC still powered on and your display is at a black screen. Then a bit later the PC powers off. From my point, I’d prefer the monitor to stay active until the PC powers off. Shutting down the monitor early is a bit annoying and leads me to believe the PC is off when it’s not.
I’ve created this blog post so I won’t forget how to disable this functionality as I’m sure in time I will forget.
Changing the setting is quite easy:
- In the Control Panel go to Power Options and click on ‘Choose what the power button does’
- From there choose ‘Change Settings that are currently unavailable’

- You should notice the options below are no longer grayed out.
- Remove the checkmark by ‘Turn on fast startup’

After changing these settings my PC shutdown normally, the display stated active, and then the PC powered off. For good measure, I power on my PC I didn’t notice any change in the amount of time for it to startup.
If you like my ‘no-nonsense’ blog articles that get straight to the point… then post a comment or let me know… Else, I’ll start writing boring blog content.
P2V GOLD – Remove all Windows Non-Present devices at once via GUI and CLI!
Issue >> If you’ve done any type of Windows P2V (Physical 2 Virtual) then you’d know all about the value in removing non-present or ghosted devices. Normally non-present devices are harmless but from time to time they can cause you an issue or two. P2V best practice is to remove non-present devices enabling a pristine OS. The issue with removing non-present devices is the time to complete the task. Currently, with the manual way, you’d have to go to command line, enter a few commands, and then manually remove each non-present device from device manager. If you have to remove 200+ non-present devices that could take several hours to complete.
Manual Way:
Go to Start – Run and type CMD and press Enter.
At the CMD Prompt type:
- set devmgr_show_nonpresent_devices=1 (this will enable hidden devices)
- start devmgmt.msc (this will start device manager)
In device manager go to View > Show Hidden Devices
Manually look for and remove each device that is greyed out.
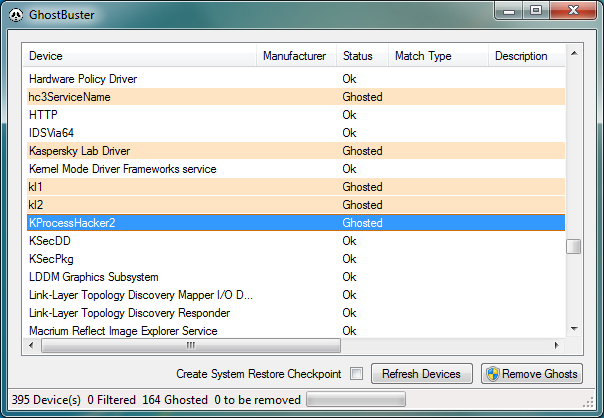
Automated Solution >> I located 3 great tools that remove all the non-present devices at once — Device Clean up Tool GUI based, Device Clean up Tool CLI based, and Ghostbuster GUI based. All the links are below.
Other Notes >> Personally, I used the Device Cleanup Tool GUI and I was able to remove 213 devices from my recent P2V. Not only did it clean up my OS but it also fixed a pesky USB issue I was having.
Device Cleanup Tool V0.5 – removes non-present devices from the Windows device management


If you like my ‘no-nonsense’ blog articles that get straight to the point… then post a comment or let me know… Else, I’ll start writing boring blog content.
Pathping for windows – think of it as a better way to ping
I was working on a remote server today and I needed better stats around ping and trace route. I could not install additional software and then I came across the windows command ‘pathping’. Its hard to believe this tool has been around since NT4 days and I don’t recall ever hearing about it. Give it a go when you get a chance and I’m adding it to my “virtual” tool belt.

More information here… https://en.wikipedia.org/wiki/PathPing
If you like my ‘no-nonsense’ blog articles that get straight to the point… then post a comment or let me know…
Else, I’ll start writing boring blog content.
Wiggle it just a little bit– Keeping your computer awake and avoiding timeouts
We have been there so many times: You’re working on one PC, then suddenly, the screen dims on your other PC and you get locked out. Not to mention if you use IM programs it can show you away quite frequently. As an IT admin it’s hard enough trying to get multiple things done without having to log in an out or move the mouse every so often.
What could be the cause? The usual suspects are either due to a Domain policy or because Windows power-saving / screensaver settings kick in.
The up and downside — If you are lucky enough have non-domain client or a relaxed domain policy you could adjust Windows’ power and screen saver settings. The down side is you most likely want those settings if you’re running a laptop to keep battery life at a maximum. There is nothing worse than traveling with a dead battery, except maybe a flight delay. Additionally, if you are on a domain there might be a policy not allowing you to change these settings. If only you could have a monkey in your office to wiggle the mouse every now and then.
Possible Solution? If your domain policies allow then you might try a software solution like: Jiggler
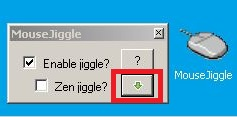
Mouse Jiggler is just a tiny app and as needed will “wiggle” your mouse icon “just a little bit”. Okay, if you haven’t got the reference yet then you need to get up to speed on your early 90’s hip hop.
After the app starts you’ll notice your pointer start to, wiggle and jiggle just a little bit. If this movement keeps Windows active. If the movement isn’t pleasant then enable the Zen Jiggle option, which does the “jiggling” behind the scenes. I prefer to see it “wiggle it just a little bit” as a reminder that it’s active. Finally push the down arrow on the app to minimize the program.
It’s as simple as that, happy computing and if you’ve found other tools to help with this please post up!
Quick ways to check disk alignment for ESXi Datastores and Windows VM’s
There are two simple checks a virtual infrastructure (VI) admin should be doing to ensure ESXi Datastores and the Windows VM’s are properly aligned. If either are misaligned then performance issues will follow. Though I’m not going to get into the whys and how’s of alignment issues I will show you how to quickly check.
1 – ESXi Datastores (DS)
By default if the VI admin formats a target datastore with vCenter Server or directly connected to a host via the VI Client the starting sector will be 2048. A starting sector of 2048 will satisfy nearly all of the storage vendors out there, however a 2048 starting sector should be validated with your storage vendor.
If the VI Admin chose to format the DS via a script then they should choose a starting sector of 2048 or what the storage vendor recommends
Example — partedUtil setptbl \$disk gpt “1 2048…..” More info here on partedUtil
Here is a simple command to check your “Start Sector”. SSH or Direct console into a host that has DSs you want to check and run this command.
~ # esxcli storage core device partition list

Some note about this –
RED Box – Is the local boot disk, so its starting sector will be 64, this is not an issue as this is the ESXi Boot disk
Yellow, Green, and Blue – Are all VSAN Disks and all have a starting sector of 2048 << This is what I’m looking for, I want to make sure all DS disks start at 2048, if not they could experience performance issues.
2 – Windows VM Check
Windows checks are pretty easy too, the starting sector offset should be 2048. Note the screenshot below shows the Partition starting offset of 1,048,576, also note it’s labeled in bytes not sectors. To find the starting sector just divide the Partition Starting Offset by the Bytes/Sector. Simple math tells us its right — 1048576/512 = 2048 Sector. If your Partition Starting offset is anything other than 1,048,576 Bytes or 2048 Sectors then the VM is not aligned and will need adjusted.
To find your Partition Starting offset, from a Windows Command Prompt, type in ‘msinfo32.exe’, go to Components > Storage > Disks, and note your Partition Starting Offset.

Cannot install vCenter Server Appliance 6 Error “No apps are installed to open this type of link”
A requirement for the installation of VCSA 6.0 is installing the Client Integration Plug-in. Normally, this can be done during the time you install the VCSA. However, during a recent installation, I got the error “No apps are installed to open this type of link”
My first thought was there was a browser compatibility issue with IE11 and the installer, so I tried Firefox and Chome but I got the same results. Next was a quick reboot, still same error.
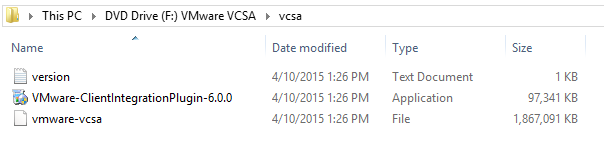
Finally, I tried installing “VMware-ClientIntegrationPlugin-6.0.0” manually and then running the VCSA installer. What do you know it installed without issue.
Simple fix on this one — Manually, install the “VMware-ClientIntegrationPlugin-6.0.0” first and then run the VCSA installer.
You can find the “VMware-ClientIntegrationPlugin-6.0.0” in the ‘vcsa’ folder in the VCSA ISO.
Network port diagram for vSphere 5.x – Poster
This is by far and away my favorite VMware Poster and I use it as a reference quite often.
Benefits –
- Clear representation of all the TCP/IP Ports needed by VMware Products and their dependences
- PDF has a very clear diagram that can be printed on to a large format
- PDF Diagram has reference numbers that correlate to further slides for more information
You can find the PDF Here >>http://kb.vmware.com/selfservice/microsites/search.do?language=en_US&cmd=displayKC&externalId=2054806
PIC of the Reference Link –

Part of a PIC of the Port Diagram

Caching your Windows 8 / 10 Domain Credentials via VPN
I was setting up a fresh Windows 8 Fusion 6 VM last weekend and realized I needed to cache my home domain credentials. I was remote to my home office and the only way I could access the domain was via VPN.
With only the ability to logon locally and then launch the VPN I was prompted for my password and security keys multiple times a day – Not a fun experience. To fix this I really needed my domain user account credentials cached so that I could initially log on to Windows 8 without the VPN, and then launch the VPN connection after logon.
Here is how I solved this issue…
- Logged in with my local account
- Attached to the VPN
- Added my Windows 8 VM to the domain
- Added my domain account to a Local group
- Rebooted (Just adding my Win 8 VM to domain, doesn’t cache my credentials)
- Logged in with my local account
- Attached to the VPN
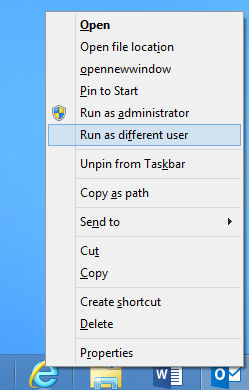
- Closed all Internet Explorer (IE) windows, held down CTRL+Shift, right click on IE, and finally choose ‘Run as Different User’ (PIC1)
- I typed in my domain user account/password and allowed IE to load << This should cache your credentials (PIC2)
- Close all windows, restart, and I was able to logon with my Domain Account
- Attached to the web based VPN and viola… all is working well
Pic 1 – hold down CTRL+Shift then right click on IE, and finally choose ‘Run as Different User’
PIC 2 – Enter your Credentials

Summary – Using ‘Run as Different User’ ensures you have a local account cached from the domain your attempting to log on to. Your experience may vary depending on your rights as a domain user and the security policies enforced in your domain.
** Update 12/18/2017**
Recently I tired this same process with Windows 10 and it worked like a charm!
