Virtual SAN
VMware Workstation 17 Nested vSAN ESA Overview
In this high level video I give an overview of my #VMware #workstation running 3 x nested ESXi 8 Hosts, vSAN ESA, VCSA, and a Windows 2022 AD. Additionally, I show some early performance results using HCI Bench.
I got some great feedback from my subscribers after posting this video. They were asking for a more detailed series around this build. You can find this 8 Part Series under Best of VMX > ‘VMware Workstation Generation 8 : Complete Software Build Series’.
For more information around my VMware Workstation Generation 8 Build check out my latest BOM here

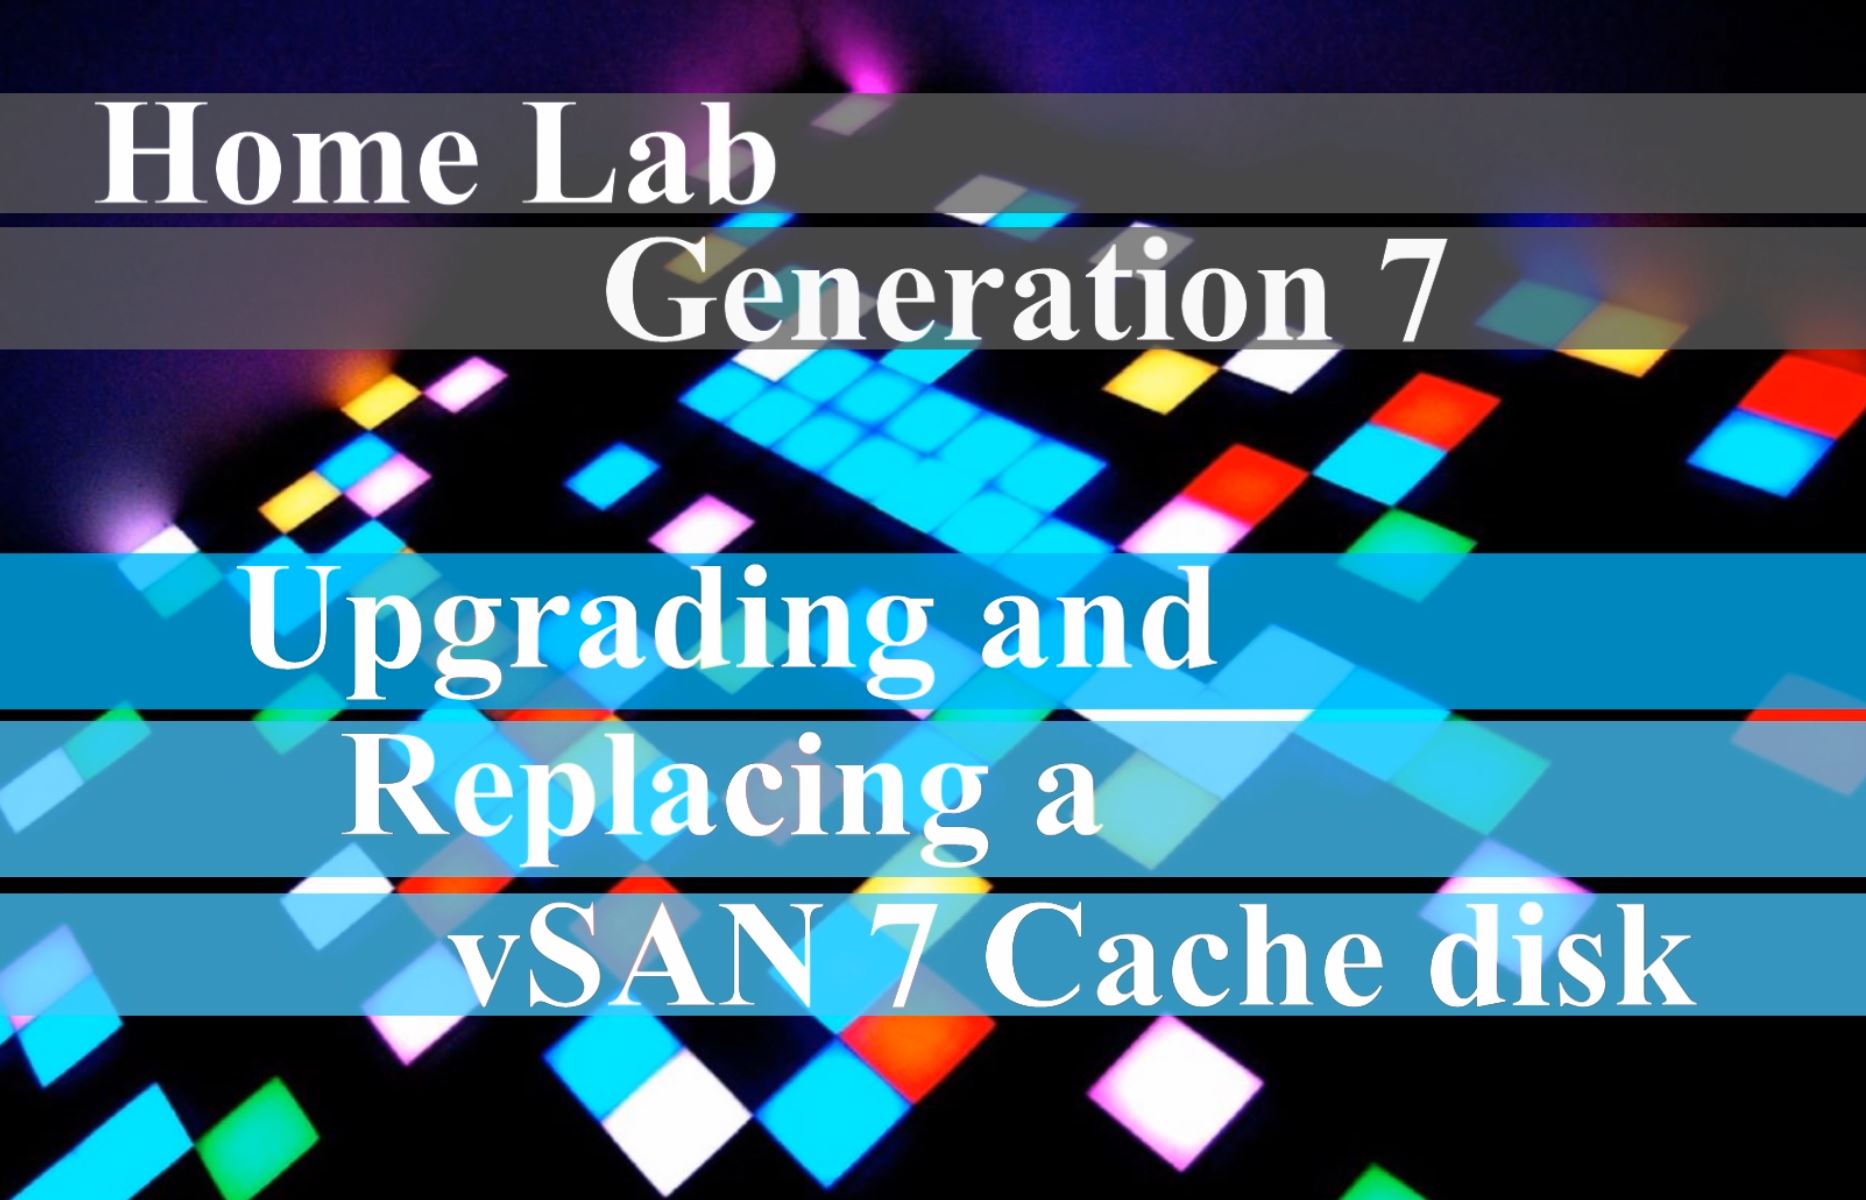
Home Lab Generation 7: Upgrading and Replacing a vSAN 7 Cache Disk
In this video I go over some of the rational and the steps I took to replace the vSAN 7 2 x 200GB SSD SAS cache disks with a 512GB NVMe flash device.
*Products in this video*
Sabrent 512 Rocket – https://www.sabrent.com/product/SB-ROCKET-512/512gb-rocket-nvme-pcie-m-2-2280-internal-ssd-high-performance-solid-state-drive/#description
Dual M.2 PCIe Adapter Card for NVMe/SATA – https://www.amazon.com/gp/product/B08MZGN1C5
Home Lab Generation 7: Updating from Gen 5 to Gen 7
Not to long ago I updated my Gen 4 Home Lab to Gen 5 and I posted many blogs and video around this. The Gen 5 Lab ran well for vSphere 6.7 deployments but moving into vSphere 7.0 I had a few issues adapting it. Mostly these issues were with the design of the Jingsha Motherboard. I noted most of these challenges in the Gen 5 wrap up video. Additionally, I had some new networking requirements mainly around adding multiple Intel NIC ports and Home Lab Gen 5 was not going to adapt well or would be very costly to adapt. These combined adaptions forced my hand to migrate to what I’m calling Home Lab Gen 7. Wait a minute, what happen to Home Lab Gen 6? I decided to align my Home Lab Generation numbers to match vSphere release number, so I skipped Gen 6 to align.
First: I review my design goals:
- Be able to run vSphere 7.x and vSAN Environment
- Reuse as much as possible from Gen 5 Home lab, this will keep costs down
- Choose products that bring value to the goals, are cost effective, and if they are on the VMware HCL that a plus but not necessary for a home lab
- Keep networking (vSAN / FT) on 10Gbe MikroTik Switch
- Support 4 x Intel Gbe Networks
- Ensure there will be enough CPU cores and RAM to be able to support multiple VMware products (ESXi, VCSA, vSAN, vRO, vRA, NSX, LogInsight)
- Be able to fit the the environment into 3 ESXi Hosts
- The environment should run well, but doesn’t have to be a production level environment
Second – Evaluate Software, Hardware, and VM requirements:
My calculated numbers from my Gen 5 build will stay rather static for Gen 7. The only update for Gen 7 is to use the updated requirements table which can be found here >> ‘HOME LABS: A DEFINITIVE GUIDE’

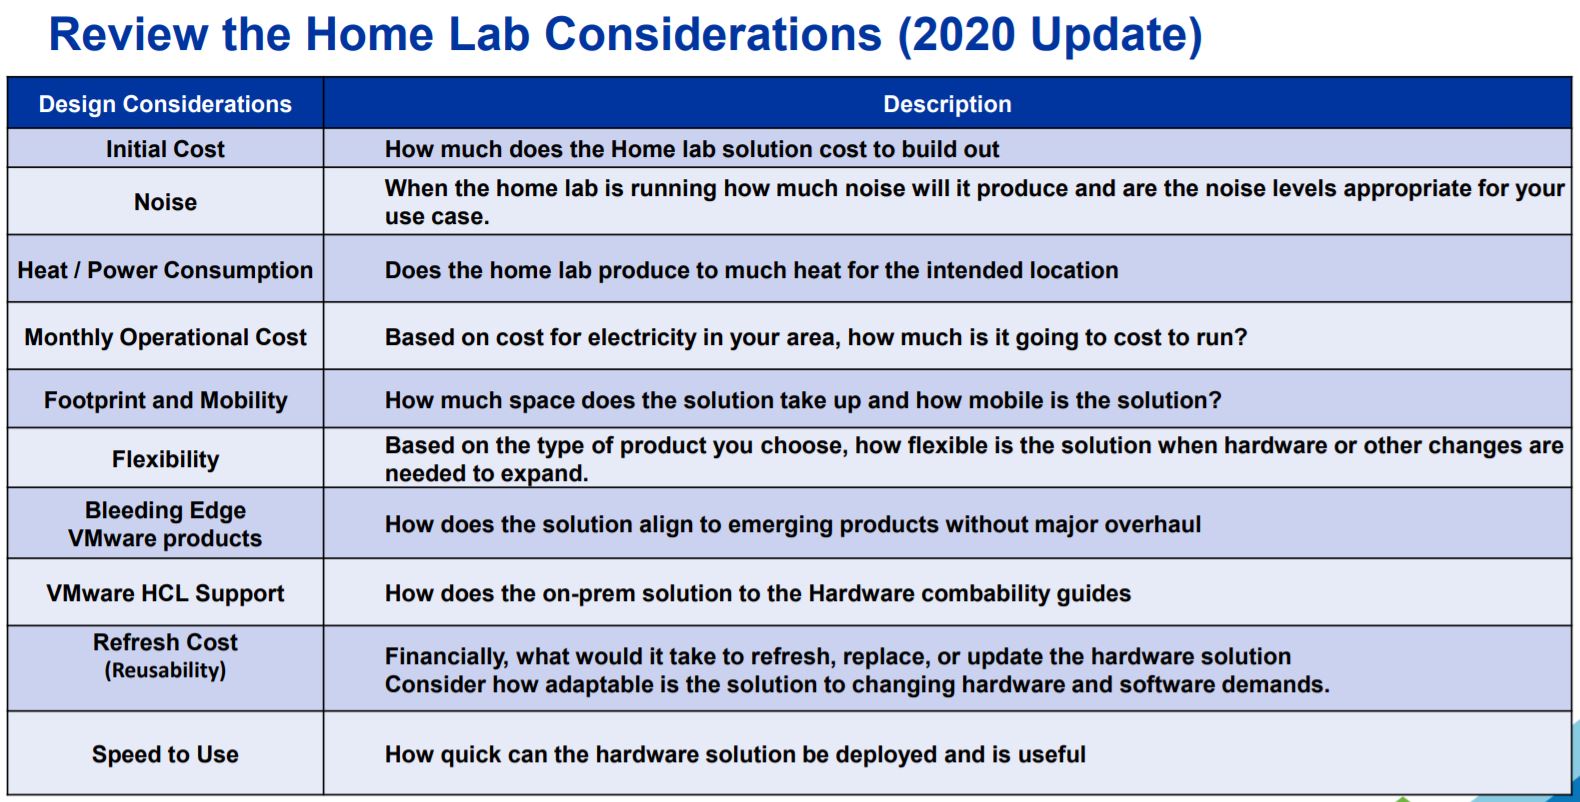
Third – Home Lab Design Considerations
This too will be very similar to Gen 5, but I do review this table and made any last changes to my design
Four – Choosing Hardware
Based on my estimations above I’m going to need a very flexible Mobo, supporting lots of RAM, good network connectivity, and should be as compatible as possible with my Gen 5 hardware. I’ve reused many parts from Gen 5 but the main change came with the Supermicro Motherboard and the addition of 2TB SAS HDD listed below.
Note: I’ve listed the newer items in Italics all other parts I’ve carried over from Gen 5.
Overview:
- My Gen 7 Home Lab is based on vSphere 7 (VCSA, ESXi, and vSAN) and it contains 3 x ESXi Hosts, 1 x Windows 10 Workstation, 4 x Cisco Switches, 1 x MikroTik 10gbe Switch, 2 x APC UPS
ESXi Hosts:
- Case:
- Rosewill RISE Glow EATX (Newegg $54)
- Motherboard:
- Supermicro X9DRD-7LN4F-JBOD (Ebay $159)
- Mobo Stands: 4mm Nylon Plastic Pillar (Amazon $8)
- CPU:
- CPU: Xeon E5-2640 v2 8 Cores / 16 HT (Ebay $30 each)
- CPU Cooler: DEEPCOOL GAMMAXX 400 (Amazon $19)
- CPU Cooler Bracket: Rectangle Socket 2011 CPU Cooler Mounting Bracket (Ebay $16)
- RAM:
- 128GB DDR3 ECC RAM (Ebay $170)
- Disks:
- 64GB USB Thumb Drive (Boot)
- 2 x 200 SAS SSD (vSAN Cache)
- 2 x 2TB SAS HDD (vSAN Capacity – See this post)
- 1 x 2TB SATA (Extra Space)
- SAS Controller:
- 1 x IBM 5210 JBOD (Ebay)
- CableCreation Internal Mini SAS SFF-8643 to (4) 29pin SFF-8482 (Amazon $18)
- Network:
- Motherboard Integrated i350 1gbe 4 Port
- 1 x MellanoxConnectX3 Dual Port (HP INFINIBAND 4X DDR PCI-E HCA CARD 452372-001)
- Power Supply:
- Antec Earthwatts 500-600 Watt (Adapters needed to support case and motherboard connections)
- Adapter: Dual 8(4+4) Pin Male for Motherboard Power Adapter Cable (Amazon $11)
- Adapter: LP4 Molex Male to ATX 4 pin Male Auxiliary (Amazon $11)
- Power Supply Extension Cable: StarTech.com 8in 24 Pin ATX 2.01 Power Extension Cable (Amazon $9)
- Antec Earthwatts 500-600 Watt (Adapters needed to support case and motherboard connections)
Network:
- Core VM Switches:
- 2 x Cisco 3650 (WS-C3560CG-8TC-S 8 Gigabit Ports, 2 Uplink)
- 2 x Cisco 2960 (WS-C2960G-8TC-L)
- 10gbe Network:
- 1 x MikroTik 10gbe CN309 (Used for vSAN and Replication Network)
- 2 ea. x HP 684517-001 Twinax SFP 10gbe 0.5m DAC Cable (Ebay)
- 2 ea. x MELLANOX QSFP/SFP ADAPTER 655874-B21 MAM1Q00A-QSA (Ebay)
Battery Backup UPS:
- 2 x APC NS1250
Windows 10 Workstation:
- Case: Phanteks Enthoo Pro series PH-ES614PC_BK Black Steel
- Motherboard: MSI PRO Z390-A PRO
- CPU: Intel Core i7-8700
- RAM: 64GB DDR4 RAM
- 1TB NVMe
Thanks for reading, please do reach out if you have any questions.
If you like my ‘no-nonsense’ videos and blogs that get straight to the point… then post a comment or let me know… Else, I’ll start posting really boring content!
VMware vSphere 7.0 Update 1 | vCenter, ESXi, vSAN | Information
VMware announced the GA Releases of the following:
- VMware vCenter 7.0 Update 1
- VMware ESXi 7.0 Update 1
- VMware vSAN 7.0 Update 1
See the base table for all the technical enablement links, now including VMworld 2020 OnDemand Sessions
.
| Release Overview |
| vCenter Server 7.0 Update 1 | ISO Build 16860138
ESXi 7.0 Update 1 | ISO Build 16850804 VMware vSAN 7.0 Update 1 | Build 16850804 |
| What’s New vCenter Server | |
Inclusive terminology: In vCenter Server 7.0 Update 1, as part of a company-wide effort to remove instances of non-inclusive language in our products, the vSphere team has made changes to some of the terms used in the vSphere Client. APIs and CLIs still use legacy terms, but updates are pending in an upcoming release.
|
|
| Upgrade/Install Considerations vCenter | |
| Before upgrading to vCenter Server 7.0 Update 1, you must confirm that the Link Aggregation Control Protocol (LACP) mode is set to enhanced, which enables the Multiple Link Aggregation Control Protocol (the multipleLag parameter) on the VMware vSphere Distributed Switch (VDS) in your vCenter Server system.
If the LACP mode is set to basic, indicating One Link Aggregation Control Protocol (singleLag), the distributed virtual port groups on the vSphere Distributed Switch might lose connection after the upgrade and affect the management vmknic, if it is on one of the dvPort groups. During the upgrade precheck, you see an error such as Source vCenter Server has instance(s) of Distributed Virtual Switch at unsupported lacpApiVersion. For more information on converting to Enhanced LACP Support on a vSphere Distributed Switch, see VMware knowledge base article 2051311. For more information on the limitations of LACP in vSphere, see VMware knowledge base article 2051307. Product Support Notices
|
|
| What’s New ESXi | |
What’s New
|
|
| Upgrade/Install Considerations ESXi | |
| In vSphere 7.x, the Update Manager plug-in, used for administering vSphere Update Manager, is replaced with the Lifecycle Manager plug-in. Administrative operations for vSphere Update Manager are still available under the Lifecycle Manager plug-in, along with new capabilities for vSphere Lifecycle Manager.
The typical way to apply patches to ESXi 7.x hosts is by using the vSphere Lifecycle Manager. For details, see About vSphere Lifecycle Manager and vSphere Lifecycle Manager Baselines and Images. You can also update ESXi hosts without using the Lifecycle Manager plug-in, and use an image profile instead. To do this, you must manually download the patch offline bundle ZIP file from the VMware download page or the Product Patches page and use the esxcli software profile command. |
|
| What’s New vSAN | |
| vSAN 7.0 Update 1 introduces the following new features and enhancements:
Scale Without Compromise
Simplify Operations
Note: vSAN 7.0 Update 1 improves CPU performance by standardizing task timers throughout the system. This change addresses issues with timers activating earlier or later than requested, resulting in degraded performance for some workloads. |
|
| Upgrade/Install Considerations vSAN | |
| For instructions about upgrading vSAN, see vSAN Documentation Upgrading the vSAN Cluster Before You Upgrade Upgrading vCenter Server Upgrading Hosts
Note: Before performing the upgrade, please review the most recent version of the VMware Compatibility Guide to validate that the latest vSAN version is available for your platform. vSAN 7.0 Update 1 is a new release that requires a full upgrade to vSphere 7.0 Update 1. Perform the following tasks to complete the upgrade: 1. Upgrade to vCenter Server 7.0 Update 1. For more information, see the VMware vSphere 7.0 Update 1 Release Notes. Note: vSAN retired disk format version 1.0 in vSAN 7.0 Update 1. Disks running disk format version 1.0 are no longer recognized by vSAN. vSAN will block upgrade through vSphere Update Manager, ISO install, or esxcli to vSAN 7.0 Update 1. To avoid these issues, upgrade disks running disk format version 1.0 to a higher version. If you have disks on version 1, a health check alerts you to upgrade the disk format version. Disk format version 1.0 does not have performance and snapshot enhancements, and it lacks support for advanced features including checksum, deduplication and compression, and encryption. For more information about vSAN disk format version, see KB2145267. Upgrading the On-disk Format for Hosts with Limited Capacity During an upgrade of the vSAN on-disk format from version 1.0 or 2.0, a disk group evacuation is performed. The disk group is removed and upgraded to on-disk format version 13.0, and the disk group is added back to the cluster. For two-node or three-node clusters, or clusters without enough capacity to evacuate each disk group, select Allow Reduced Redundancy from the vSphere Client. You also can use the following RVC command to upgrade the on-disk format: vsan.ondisk_upgrade –allow-reduced-redundancy When you allow reduced redundancy, your VMs are unprotected for the duration of the upgrade, because this method does not evacuate data to the other hosts in the cluster. It removes each disk group, upgrades the on-disk format, and adds the disk group back to the cluster. All objects remain available, but with reduced redundancy. If you enable deduplication and compression during the upgrade to vSAN 7.0 Update 1, you can select Allow Reduced Redundancy from the vSphere Client. Limitations For information about maximum configuration limits for the vSAN 7.0 Update 1 release, see the Configuration Maximums documentation. |
|
| Technical Enablement | |
| Release Notes vCenter | Click Here | What’s New | Earlier Releases | Patch Info | Installation & Upgrade Notes | Product Support Notices |
| Release Notes ESXi | Click Here | What’s New | Earlier Releases | Patch Info | Product Support Notices | Resolved Issues | Known Issues |
| Release Notes vSAN | Click Here | What’s New | VMware vSAN Community | Upgrades for This Release | Limitations | Known Issues |
| docs.vmware/vCenter | Installation & Setup | vCenter Server Upgrade | vCenter Server Configuration |
| Docs.vmware/ESXi | Installation & Setup | Upgrading | Managing Host and Cluster Lifecycle | Host Profiles | Networking | Storage | Security
Resource Management | Availability | Monitoring & Performance |
| docs.vmware/vSAN | Using vSAN Policies | Expanding & Managing a vSAN Cluster | Device Management | Increasing Space Efficiency | Encryption
Upgrading the vSAN Cluster Before You Upgrade Upgrading vCenter Server Upgrading Hosts |
| Compatibility Information | Interoperability Matrix vCenter | Configuration Maximums vSphere (All) | Ports Used vSphere (All)
Interoperability Matrix ESXi | Interoperability Matrix vSAN | Configuration Maximums vSAN | Ports Used vSAN |
| Blogs & Infolinks | What’s New with VMware vSphere 7 Update 1 | Main VMware Blog vSphere 7 | vSAN | vSphere | vCenter Server
Announcing the ESXi-Arm Fling | In-Product Evaluation of vSphere with Tanzu vSphere 7 Update 1 – Unprecedented Scalability YouTube A Quick Look at What’s New in vSphere 7 Update 1 | vSphere with Tanzu Overview in 3 Minutes VMware vSphere with Tanzu webpage | eBook: Deliver Developer-Ready Infrastructure Using vSphere with Tanzu What’s New in vSAN 7 Update 1 | PM’s Blog, Cormac vSAN 7.0 Update 1 |
| Download | vSphere | vSAN |
| VMworld 2020 OnDemand
(Free Account Needed) |
Deep Dive: What’s New with vCenter Server [HCP1100] | 99 Problems, But A vSphere Upgrade Ain’t One [HCP1830]
Certificate Management in vSphere [HCP2050] | Connect vSAN Capacity Across Clusters with VMware HCI Mesh [DEM3206] |
| VMworld HOL Walkthrough
(VMworld Account Needed) |
Introduction to vSphere Performance [HOL-2104-95-ISM] |
Create an ESXi installation ISO with custom drivers in 9 easy steps!
Video Posted on Updated on
One of the challenges in running a VMware based home lab is the ability to work with old / inexpensive hardware but run latest software. Its a balance that is sometimes frustrating, but when it works it is very rewarding. Most recently I decided to move to 10Gbe from my InfiniBand 40Gb network. Part of this transition was to create an ESXi ISO with the latest build (6.7U3) and appropriate network card drivers. In this video blog post I’ll show 9 easy steps to create your own customized ESXi ISO and how to pin point IO Cards on the vmware HCL.
** Update 06/22/2022 ** If you are looking to do USB NICs with ESXi check out the new fling (USB Network Native Driver for ESXi) that helps with this. This Fling supports the most popular USB network adapter chipsets ASIX USB 2.0 gigabit network ASIX88178a, ASIX USB 3.0 gigabit network ASIX88179, Realtek USB 3.0 gigabit network RTL8152/RTL8153 and Aquantia AQC111U. https://flings.vmware.com/usb-network-native-driver-for-esxi
NOTE – Flings are NOT supported by VMware
** Update 03/06/2020 ** Though I had good luck with the HP 593742-001 NC523SFP DUAL PORT SFP+ 10Gb card in my Gen 4 Home Lab, I found it faulty when running in my Gen 5 Home Lab. Could be I was using a PCIe x4 slot in Gen 4, or it could be the card runs to hot to touch. For now this card was removed from VMware HCL, HP has advisories out about it, and after doing some poking around there seem to be lots of issues with it. I’m looking for a replacement and may go with the HP NC550SFP. However, this doesn’t mean the steps in this video are only for this card, the steps in this video help you to better understand how to add drivers into an ISO.
Here are the written steps I took from my video blog. If you are looking for more detail, watch the video.
Before you start – make sure you have PowerCLI installed, have download these files, and have placed these files in c:\tmp.
- Download driver –
- LSI Driver: https://my.vmware.com/group/vmware/details?downloadGroup=DT-ESXI60-QLOGIC-QLCNIC-61191&productId=491
- Note: Extract the offline bundle from this package
- Download ESXi –
- ESXi Update ZIP File: vmware.com/downloads
- Note: make sure you download the Update ZIP file and not the ESXi ISO file
I started up PowerCLI and did the following commands:
1) Add the ESXi Update ZIP file to the depot:
Add-EsxSoftwareDepot C:\tmp\update-from-esxi6.7-6.7_update03.zip
2) Add the LSI Offline Bundle ZIP file to the depot:
Add-EsxSoftwareDepot ‘C:\tmp\qlcnic-esx55-6.1.191-offline_bundle-2845912.zip’
3) Make sure the files from step 1 and 2 are in the depot:
Get-EsxSoftwareDepot
4) Show the Profile names from update-from-esxi6.7-6.7_update03. The default command only shows part of the name. To correct this and see the full name use the ‘| select name’
Get-EsxImageProfile | select name
5) Create a clone profile to start working with.
New-EsxImageProfile -cloneprofile ESXi-6.7.0-20190802001-standard -Name ESXi-6.7.0-20190802001-standard-QLogic -Vendor QLogic
6) Validate the LSI driver is loaded in the local depot. It should match the driver from step 2. Make sure you note the name and version number columns. We’ll need to combine these two with a space in the next step.
Get-EsxSoftwarePackage -Vendor q*
7) Add the software package to the cloned profile. Tip: For ‘SoftwarePackage:’ you should enter the ‘name’ space ‘version number’ from step 6. If you just use the short name it might not work.
Add-EsxSoftwarePackage
ImageProfile: ESXi-6.7.0-20190802001-standard-QLogic
SoftwarePackage[0]: net-qlcnic 6.1.191-1OEM.600.0.0.2494585
8) Optional: Compare the profiles, to see differences, and ensure the driver file is in the profile.
Get-EsxImageProfile | select name << Run this if you need a reminder on the profile names
Compare-EsxImageProfile -ComparisonProfile ESXi-6.7.0-20190802001-standard-QLogic -ReferenceProfile ESXi-6.7.0-20190802001-standard
9) Create the ISO
Export-EsxImageProfile -ImageProfile “ESXi-6.7.0-20190802001-standard-QLogic” -ExportToIso -FilePath c:\tmp\ESXi-6.7.0-20190802001-standard-QLogic.iso
That’s it! If you like my ‘no-nonsense’ videos and blogs that get straight to the point… then post a comment or let me know… Else, I’ll start posting boring video blogs!
Cross vSAN Cluster support for FT
Home Lab Gen IV – Part V Installing Mellanox HCAs with ESXi 6.5
The next step on my InfiniBand home lab journey was getting the InfiniBand HCAs to play nice with ESXi. To do this I need to update the HCA firmware, this proved to be a bit of a challenge. In this blog post I go into how I solved this issue and got them working with ESXi 6.5.
My initial HCA selection was the ConnectX aka HP INFINIBAND 4X DDR PCI-E HCA CARD 452372-001, and Mellanox MHGA28-XTC InfiniHost III HCA these two cards proved to be a challenge when updating their firmware. I tried all types of operating systems, different drivers, different mobos, and MFT tools versions but they would not update or be OS recognized. Only thing I didn’t try was Linux OS. The Mellanox forums are filled with folks trying to solve these issues with mixed success. I went with these cheaper cards and they simply do not have the product support necessary. I don’t recommend the use of these cards with ESXi and have migrated to a ConnectX-3 which you will see below.
Updating the ConnectX 3 Card:
After a little trial and error here is how I updated the firmware on the ConnectX 3. I found the ConnectX 3 card worked very well with Windows 2012 and I was able to install the latest Mellanox OFED for Windows (aka Windows Drivers for Mellanox HCA card) and updated the firmware very smoothly.
First, I confirm the drivers via Windows Device Manager (Update to latest if needed)

Once you confirm Windows device functionality then install the Mellanox Firmware Tools for windows (aka WinMFT)
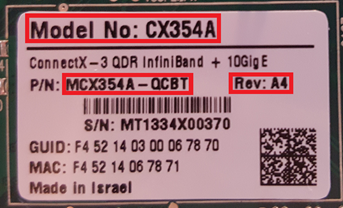
Next, it’s time to update the HCA firmware. To do this you need to know the exact model number and sometimes the card revision. Normally this information can be found on the back of your HCA. With this in hand go to the Mellanox firmware page and locate your card then download the update.
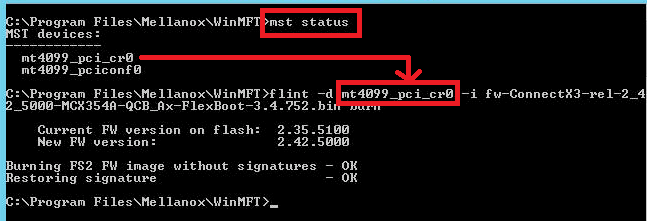
After you download the firmware place it in an accessible directory. Next use the CLI, navigate to the WinMFT directory and use the ‘mst status’ command to reveal the HCA identifier or the MST Device Name. If this command is working, then it is a good sign your HCA is working properly and communicating with the OS. Next, I use the flint command to update my firmware. Syntax is — flint -d <MST Device Name> -i <Firmware Name> burn
Tip: If you are having trouble with your Mellanox HCA I highly recommend the Mellanox communities. The community there is generally very responsive and helpful!
Installation of ESXi 6.5 with Mellanox ConnectX-3
I would love to tell you how easy this was, but the truth is it was hard. Again, old HCA’s with new ESXi doesn’t equal easy or simple to install but it does equal Home lab fun. Let me save you hours of work. Here is the simple solution when trying to get Mellanox ConnextX Cards working with ESXi 6.5. In the end I was able to get ESXi 6.5 working with my ConnectX Card (aka HP INFINIBAND 4X DDR PCI-E HCA CARD 452372-001) and with my ConnectX-3 CX354A.
Tip: I do not recommend the use of the ConnectX Card (aka HP INFINIBAND 4X DDR PCI-E HCA CARD 452372-001) with ESXi 6.x. No matter how I tried I could not update its firmware and it has VERY limited or non-existent support. Save time go with ConnectX-3 or above.
After I installed ESXi 6.5 I followed the following commands and it worked like a champ.
Disable native driver for vRDMA
- esxcli system module set –enabled=false -m=nrdma
- esxcli system module set –enabled=false -m=nrdma_vmkapi_shim
- esxcli system module set –enabled=false -m=nmlx4_rdma
- esxcli system module set –enabled=false -m=vmkapi_v2_3_0_0_rdma_shim
- esxcli system module set –enabled=false -m=vrdma
Uninstall default driver set
- esxcli software vib remove -n net-mlx4-en
- esxcli software vib remove -n net-mlx4-core
- esxcli software vib remove -n nmlx4-rdma
- esxcli software vib remove -n nmlx4-en
- esxcli software vib remove -n nmlx4-core
- esxcli software vib remove -n nmlx5-core
Install Mellanox OFED 1.8.2.5 for ESXi 6.x.
- esxcli software vib install -d /var/log/vmware/MLNX-OFED-ESX-1.8.2.5-10EM-600.0.0.2494585.zip
Ref Links:
After a quick reboot, I got 40Gb networking up and running. I did a few vmkpings between hosts and they ping perfectly.
So, what’s next? Now that I have the HCA working I need to get VSAN (if possible) working with my new highspeed network, but this folks is another post.
If you like my ‘no-nonsense’ blog articles that get straight to the point… then post a comment or let me know… Else, I’ll start writing boring blog content.
Great VSAN 6.6 Network Primer Video!
At VMworld 2017 Cormac Hogan and Andreas Scherr did a great job going over the basics and gotchas around VSAN 6.6 Networking. Additionally, towards the end of the video they went through a Demo on performance and talked about the different VSAN Network topologies. The video is about an hour long and I know finding the time to watch it all can be hard sometimes. However, I took the time to breakdown the video and I listed when each topic started at. (just incase you want to jump to a specific topic of interest)
What I found beneficial was the information around the Network Unicast and vCenter Server new role with VSAN host tracking. Both topics are well work a look and it starts @19:22 in the video.
Here is the link to: VMworld 2017 – STO1193BE – Closer Look at VMware vSAN Networking and Configuration Considerations
https://www.youtube.com/watch?v=h-Ad4OSzS1Y
Here is the topic breakdown if you want to go to a specific section.
- @3:42 – Major Component overview
- @5:09 — Ports and Firewall
- Encryption need 3rd Party KMS provider
- @6:54 — IPv6
- Don’t rung IPv6 and IPv4 mixed mode, okay to run to migrate but not run over a long time
- @7:57 – Min NIC Requirements
- Great chart on min / Max, see attached screen shot
- @10:00 – Discussion around vSS vs vDS
- Major difference is vDS can use lag groups
- @13:17 – Network IO Control with vDS
- Can help with vMotion traffic over whelming VSAN track
- @14:17 – NIC Teaming and Failover Options
- Load balancing options are a bit weak
- LAG tends to be the best for load balancing (vDS and Physical Switch config needed)
- @15:55 – Multicast
- @19:22 – Unicast
- vCenter Server now tracks who is in the cluster and what core info
- @22:15 – Upgrade / Mixed Cluster Considerations with Unicast
- Great chart around upgrading to vSAN 6.6
- @22:24 – Considerations for DHCP
- Not a good idea to run DHCP
- @26:22 – Unicast CLI Commands
- @27:25 – NIC Teaming and Load Balancing
- @28:07 – NIC Teaming Pros/Cons
- @33:58 – Supported Network Topologies
- @36:06 – Layer2, Single site, Single Rack
- @36:55 – Layer2, Single Site, Multi Rack (pre-VSAN-6.6)
- @37:51 – Layer2, Single Site, Multi Rack VSAN 6.6 and later Unicast
- @38:38 – Stretch Cluster (SC) L2 Data, L3 Witness
- @39:37 – SC Why not L2 only traffic?
- @41:15 – 2 Node Robo
- @42:08 – 2 Node Direct Connect and Witness Traffic Separation
- @43:57 – VSAN and Network Performance (General Concept)
- @46:46 – Host Network Performance
- @48:05 – Network Latency Demo
If you like my ‘no-nonsense’ blog articles that get straight to the point… then post a comment or let me know… Else, I’ll start writing boring blog content.
Home Lab Gen IV – Part IV: Overcoming installation challenges
One of the joys of working with a home lab is doing something that no one has done before. Sure, your configuration might be similar to others, but in a way your home lab is unique. However, with this uniqueness comes its share of installation challenges. My new lab was no exception, there were a few challenges and one major issue I uncovered while setting up this new environment. In this blog post I am going review the environment I am working on, break down some of the hardware layout placement challenges, fun using the MAC PowerBook to complete the installation, and finally overcoming ESXi installation challenges.
Here is my new environment:
- Mac Powerbook with macOS Sierra (Used for remote connection into my environment, normally I use a PC)
- Gigabyte MX31-BS0
- Intel Xeon E3-1230 v5
- 32GB DDR4 RAM
- 1 x Mellanox Connectx InfiniBand HCA
- 4 x 200GB SSD, 1 x 64GB USB (Boot)
- 1 x IBM M5210 JBOD SAS Controller
- 1 x Mini SAS SFF-8643 to (4) 29pin SFF-8482
- 1 x 64GB USB Boot Stick:
Hardware layout/placement challanges:
32GB of RAM: Pay attention to the placement of the RAM. As Channel 1 for the RAM are the two closest slots to the CPU, channel 2 being the two farthest away. Normally you would place the RAM pairs in like colors however this Mobo is a bit different
Mellanox Connectx InfiniBand HCA: Placed it in the 16x slot right next to the CPU. The HCA requires an 8x slot so this slot should not slow it down. No BIOS changes were required and I could see this HCA in the BIOS.
IBM M5210 JBOD SAS Controller: Placed it in the 8x slot which goes through the C232 chipset on the motherboard. Next, I needed to update the firmware but this proved to be a challenge. Keep in mind the M5210 with NO cache will not allow you to enter its BIOS management page (aka MegaRAID webbios). This means you’ll need to use the command line or other software to update and view its information. Initially, I tried several command line options (UEFI Shell, DOS CLI, etc.) with the MegaRAID CLI but I just could not find the right combination to get it to work. My solution — I simply used an older SSD drive, installed Windows Server 2012 on it, and used the Windows exe to update the firmware. It worked perfectly with no issues.

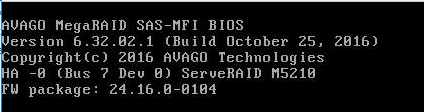
After the update, I had some issues decoding the M5210 running firmware version vs. the vSAN HCL. As you know when running vSAN in a home lab the closer you are to the HCL and vSAN HCL the better. (NOTE: as I’m sure you know production environments MUST match the HCLs). The published firmware version on the vSAN HCL is 4.660.00-8218. However, when the M5210 boots it shows 24.16.0-0104.
Solution: When you are looking at the boot screen you are seeing the FW Package number not the Firmware of your controller. Simply look at the release notes for the ‘FW Package’ and you’ll find the correct MR FW versions that match the vSAN HCL.
IBM / Lenovo doesn’t make it easy to find the firmware for this device.
Here are a few more recent links:
Boot Screen
Release notes

200GB SSD: The Sonata cases I am using are a bit dated but they fully meet my needs so there is no need to replace them. There are 4 x 3.5″ bottom mount disk trays in each case. Bottom mount means you insert your 3.5″ drive into the tray and bolt it to the tray from the bottom. I bought several 3.5″ to 2.5″ converters which will allow me to mount my 2.5″ SSDs. However, the converters didn’t have bottom mount holes that lined up with the standard 3.5″ holes. Fix — I used a hole in the existing tray to secure the converter to the tray. I also made sure I mounted the converter as far back as I could to ensure the SAS cables would not be on the side of the case. This mount position moved the drives back about 1.5″(38mm). The red line in the PIC show where the original mount point was.

Mini SAS SFF-8643 to (4) 29pin SFF-8482: From the PIC above you can see the disk end of the SAS cables. What is nice about them is each one has a disk number labeled and has integrated power and all 4 drives go back to a single connector. The only downside to the cable I bought was they seemed a bit frail, so I’d recommend if you plan to mod your environment frequently look into a better-quality cable. If you interested more in SAS and the associated cables I would recommend this wiki page – https://en.wikipedia.org/wiki/Serial_Attached_SCSI

64GB USB Boot Stick: I decided to use the internal USB port freeing up the rear ports for other items. The USB stick I am using is the SanDisk Ultra Fit 64GB USB 3.0 Flash Drive. ESXi will only take up ~10GB of this stick, so is 64GB overkill? Keep in mind I plan to run vSAN 6.6.x and one of the benefits is the log files now write to RAM and in case of a system failure, they can write these logs to the USB stick. However, the default partition sizes (2.5GB for diags) might not be large enough. The vSAN team as released a nifty script that will estimate and resize you USB partitions. I’ll cover this topic in later posts and show you how to “auto-resize” your USB storage after you have installed vSAN.

Fun with the MAC:
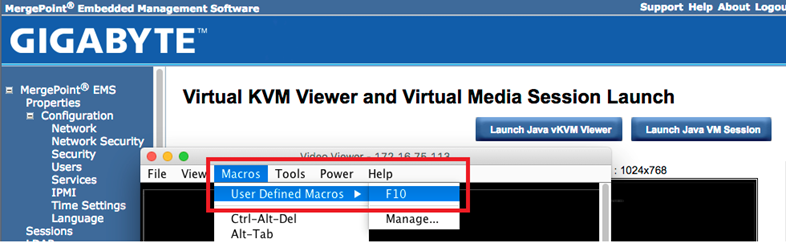
Function Keys: One of the challenges was MAC keyboard mapping into the remote KVM. For some reason, the function keys on a MAC always assume you want to their special function vs. the F# key you are pushing. This proves to be a challenge when you are trying to pass standard function keys. Simple fix: System Preferences > Keyboard > Ensure ‘Use F1, F2, etc. as standard function keys’ is checked.

Another option for F# keys is to create a macro inside of the vKVM Viewer to pass the key. The screenshot below shows where you can setup user defined Macros and in the background is the MeregPoint console for one of my ESXi hosts.
Java: One of the joys of this motherboard is the use of vKVM viewer and VM Media. However, these functions need JAVA installed and up to date to function properly. If your JAVA is behind, trust me just update it’ll save you hours of pain. Here is the remaining gotcha. In the Mergpoint web page, you simply click on the ‘Launch Java vKVM Viewer’ button to start your host remote session. The webpage will download a .jnlp file. If you just click on this file you are presented with an error stating it can’t be opened because it is from an unidentified developer. Solution – After the java app downloads, click on the down arrow next to the file and choose ‘Show in finder’. When finder launches select that file by holding down the control key and right-clicking on it. A pop-up window will appear, release the control key and finally choose open. This allows you to override the ‘unidentified developer’ error and launch the viewer.

ESXi Installation:
Setting up the ESXi hosts had one big challenge – after the install of ESXi I could not see my SAS disks. I am using the ESXi 6.5U1 Rollup.iso to do my installs and my main goal was to install and boot ESXi from the 64GB USB stick and be able to access the 4 x 200GB SSD attached to the IBM M5210
Problem – During the install of ESXi, I booted the host using the ESXi6.5 ISO via virtual media console. The installer program would recognize the IBM M5210 controller, the attached 4 x SAS disks, and the 64GB USB stick. The installation would complete without issue. However, after ESXi booted the SAS disks and the controller would not appear but I could see the 64GB USB stick.
Other observations –
First, in the ESXi Log files I noticed the megasas was having firmware issues:
2017-09-21T10:26:31.310Z cpu5:66065)<6>megasas: Waiting for FW to come to ready state 2017-09-21T10:26:31.310Z cpu5:66065)<7>megasas: FW in FAULT state!!
ESC[7m2017-09-21T10:26:31.310Z cpu5:66065)WARNING: vmklinux: pci_announce_device:1486: PCI: driver megaraid_sas probe failed for device 0000:07:00.0ESC[0m 2017-09-21T10:26:31.310Z cpu5:66065)LinPCI: LinuxPCI_DeviceUnclaimed:257: Device 0000:07:00.0 unclaimed.
And… even though ESXi saw the M5210 as vmhba1, its status was unknown
vmhba1 Avago (LSI) MegaRAID SAS Invader Controller
vmhba1 0000:07:00.0 PCI 0:0:29:0 PCI 0:7:0:0 Slot1 UNKNOWN
Second, I use Partition Wizard bootable ISO to remove all partitions prior to installing ESXi. I noted that sometimes after I booted to it as virtual media it would see the 4 x SAS disks and other times it would not.
Third, Installation of ESXI onto SAS or SATA SSD as the boot disk worked perfectly. After booting I could see the M5210 and SAS disks but my goal of using the 64GB USB stick for the boot device was not achieved.
Fourth, occasionally when I booted the ESXi host to the USB stick it would work okay, but upon reboot would not
Final Solution – The core reason why I could not see the SAS disks with ESXi or Partition Wizard was the boot type was UEFI and not legacy. During boot time the boot order would sometimes change if I had virtual media connected, meaning sometimes it would boot the 64GB USB stick or Partition Wizard as UEFI and other times as legacy. Apparently, UEFI boot was giving the M5210 firmware issues not allowing the SAS disk to come online.
FIX – I went into the BIOS of the motherboard > Advanced > CSM Configuration > changed ‘Boot option filter’ to ‘Legacy Only’ and all my issues went away.
Summary – I spent a lot of after-hours and weekends working out all various installation tweaks but what can I say, this is the joy of setting up a home lab! My hopes are in some way this post helps you move your home lab forward too. In my next post, I’ll be going over how to enable the InfiniBand HCA in ESXi 6.5.
If you like my ‘no-nonsense’ blog articles that get straight to the point… then post a comment or let me know… Else, I’ll start writing boring blog content.
vSAN – Working with the vSAN HCL Database
The vSAN HCL DB is a local file enabling vCenter Server to validate your vSAN hardware deployment. This local DB file contains information around the supported products on the VMware compatibility guides. Part of the vSAN Health checks is validating the age of the vSAN HCL DB file. The initial release of the health feature ships with a copy of the vSAN HCL DB, which was current when released. This copy of the database will become outdated over time. The file can be updated via an internet connection or through manual download (See KB’s below). However, if the HCL DB file is not updated and is 90 days past you will see a warning and at 180 days past you’ll receive an error. These alerts in no way will affect your vSAN cluster as they are merely non-impactful alarms.
You can find this check by clicking on your vSAN Cluster > Monitor > Virtual SAN > Health and then expand Hardware compatibility (See the PIC below). Under Hardware compatibility, you will see various checks that validate your installation. The ‘vSAN HCL DB up to date’ is the check that will alarm when needed.
You might be thinking –
“I validated my vSAN deployment against the HCL & VCL’s when it was initially built, so why do I need to recheck it over and over?” There are a few good reasons why this validation is important. First off – New firmware and drivers are validated on a routine basis, keeping on top of these will help to ensure your vSAN cluster is able to work optimally and is less problematic. Second – Just because a component was listed on the VGC, doesn’t necessarily mean it will stay on the VGC. Allowing vSAN to self-check itself not only will save you time but will identify any potential issues.
“My vSAN cluster doesn’t have an internet connection and I am pretty good about keeping up to date on the VGC. Do I really need these checks, and if not how can I disable them” Frist off I would not recommend disablement but there may be a need for this. It could be very true that your company does a good job of manually checking the VCG but automating these check would only help your efforts and would be more efficient. However, there are some deployments where automated checks may not be desirable. For those cases follow this guidance to disable: Cluster > Manage > Virtual SAN > General > Internet Connectivity > Disable Auto HCL update
For more information around the vSAN HCL DB, including how to disable and update, please see the following KB’s
- vSAN Health Service – Hardware compatibility – vSAN HCL DB Auto Update (2146132) << Great information on disablement
- vSAN Health Service – vSAN HCL Health – vSAN HCL DB up-to-date (2109870) << Good information on the checks basic functions
In this PIC I’m showing where you can locate the vSAN HCL DB Check status.

If you like my ‘no-nonsense’ blog articles that get straight to the point… then post a comment or let me know… Else, I’ll start writing boring blog content.
VSAN – vSAN 6.6 Release resources
Here is a great list of vSAN 6.6 release resources. Enjoy!
Quotes / Webinars:
- Press Release Partner Quotes Supporting Launch: http://www.vmware.com/company/news/releases/vsan-partner-quotes.html
- On-demand Launch Video – Registration Link: Modernize Your IT with vSAN Innovations
- VMUG Webinar: What’s New Technical Deep dive (Tuesday, April 18, 2017)
Blogs:
- What’s New Blogs: https://blogs.vmware.com/virtualblocks/2017/04/11/whats-new-vmware-vsan-6-6/
- Native Data-at-Rest Encryption: https://blogs.vmware.com/virtualblocks/2017/04/11/vsan-6-6-native-data-at-rest-encryption/
Web Assets / Documentation :
- What’s New Page: http://www.vmware.com/products/whats-new-virtual-san.html
- vSAN 6.6 Datasheet (PDF): http://www.vmware.com/content/dam/digitalmarketing/vmware/en/pdf/products/vsan/vmware-virtual-san-datasheet.pdf
- vSAN Customer Page: http://www.vmware.com/products/virtual-san/customers.html
- Storage Hub: https://storagehub.vmware.com/
- Security Infographic: http://www.vmware.com/content/dam/digitalmarketing/vmware/en/pdf/products/vsan/vmware-vsan66-security-infographic.pdf
