Home Lab Gen IV – Part IV: Overcoming installation challenges
One of the joys of working with a home lab is doing something that no one has done before. Sure, your configuration might be similar to others, but in a way your home lab is unique. However, with this uniqueness comes its share of installation challenges. My new lab was no exception, there were a few challenges and one major issue I uncovered while setting up this new environment. In this blog post I am going review the environment I am working on, break down some of the hardware layout placement challenges, fun using the MAC PowerBook to complete the installation, and finally overcoming ESXi installation challenges.
Here is my new environment:
- Mac Powerbook with macOS Sierra (Used for remote connection into my environment, normally I use a PC)
- Gigabyte MX31-BS0
- Intel Xeon E3-1230 v5
- 32GB DDR4 RAM
- 1 x Mellanox Connectx InfiniBand HCA
- 4 x 200GB SSD, 1 x 64GB USB (Boot)
- 1 x IBM M5210 JBOD SAS Controller
- 1 x Mini SAS SFF-8643 to (4) 29pin SFF-8482
- 1 x 64GB USB Boot Stick:
Hardware layout/placement challanges:
32GB of RAM: Pay attention to the placement of the RAM. As Channel 1 for the RAM are the two closest slots to the CPU, channel 2 being the two farthest away. Normally you would place the RAM pairs in like colors however this Mobo is a bit different
Mellanox Connectx InfiniBand HCA: Placed it in the 16x slot right next to the CPU. The HCA requires an 8x slot so this slot should not slow it down. No BIOS changes were required and I could see this HCA in the BIOS.
IBM M5210 JBOD SAS Controller: Placed it in the 8x slot which goes through the C232 chipset on the motherboard. Next, I needed to update the firmware but this proved to be a challenge. Keep in mind the M5210 with NO cache will not allow you to enter its BIOS management page (aka MegaRAID webbios). This means you’ll need to use the command line or other software to update and view its information. Initially, I tried several command line options (UEFI Shell, DOS CLI, etc.) with the MegaRAID CLI but I just could not find the right combination to get it to work. My solution — I simply used an older SSD drive, installed Windows Server 2012 on it, and used the Windows exe to update the firmware. It worked perfectly with no issues.
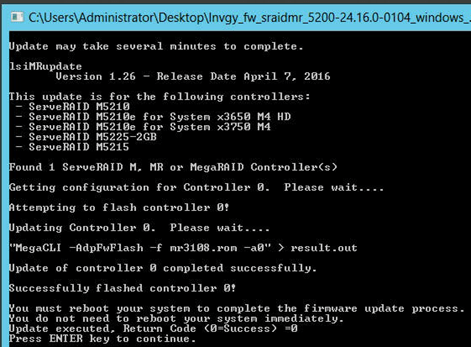
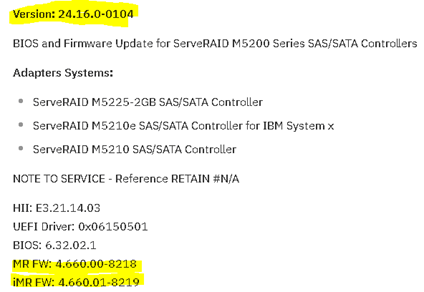
After the update, I had some issues decoding the M5210 running firmware version vs. the vSAN HCL. As you know when running vSAN in a home lab the closer you are to the HCL and vSAN HCL the better. (NOTE: as I’m sure you know production environments MUST match the HCLs). The published firmware version on the vSAN HCL is 4.660.00-8218. However, when the M5210 boots it shows 24.16.0-0104.
Solution: When you are looking at the boot screen you are seeing the FW Package number not the Firmware of your controller. Simply look at the release notes for the ‘FW Package’ and you’ll find the correct MR FW versions that match the vSAN HCL.
IBM / Lenovo doesn’t make it easy to find the firmware for this device.
Here are a few more recent links:
Boot Screen

Release notes
200GB SSD: The Sonata cases I am using are a bit dated but they fully meet my needs so there is no need to replace them. There are 4 x 3.5″ bottom mount disk trays in each case. Bottom mount means you insert your 3.5″ drive into the tray and bolt it to the tray from the bottom. I bought several 3.5″ to 2.5″ converters which will allow me to mount my 2.5″ SSDs. However, the converters didn’t have bottom mount holes that lined up with the standard 3.5″ holes. Fix — I used a hole in the existing tray to secure the converter to the tray. I also made sure I mounted the converter as far back as I could to ensure the SAS cables would not be on the side of the case. This mount position moved the drives back about 1.5″(38mm). The red line in the PIC show where the original mount point was.
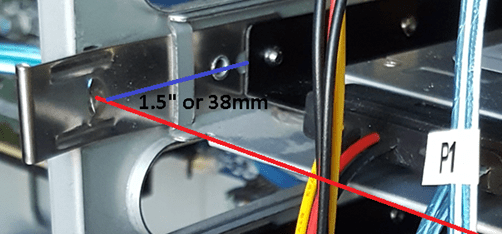
Mini SAS SFF-8643 to (4) 29pin SFF-8482: From the PIC above you can see the disk end of the SAS cables. What is nice about them is each one has a disk number labeled and has integrated power and all 4 drives go back to a single connector. The only downside to the cable I bought was they seemed a bit frail, so I’d recommend if you plan to mod your environment frequently look into a better-quality cable. If you interested more in SAS and the associated cables I would recommend this wiki page – https://en.wikipedia.org/wiki/Serial_Attached_SCSI

64GB USB Boot Stick: I decided to use the internal USB port freeing up the rear ports for other items. The USB stick I am using is the SanDisk Ultra Fit 64GB USB 3.0 Flash Drive. ESXi will only take up ~10GB of this stick, so is 64GB overkill? Keep in mind I plan to run vSAN 6.6.x and one of the benefits is the log files now write to RAM and in case of a system failure, they can write these logs to the USB stick. However, the default partition sizes (2.5GB for diags) might not be large enough. The vSAN team as released a nifty script that will estimate and resize you USB partitions. I’ll cover this topic in later posts and show you how to “auto-resize” your USB storage after you have installed vSAN.

Fun with the MAC:
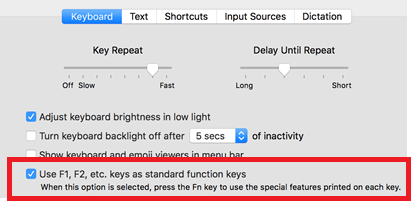
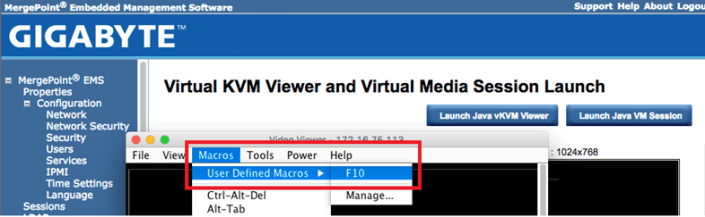
Function Keys: One of the challenges was MAC keyboard mapping into the remote KVM. For some reason, the function keys on a MAC always assume you want to their special function vs. the F# key you are pushing. This proves to be a challenge when you are trying to pass standard function keys. Simple fix: System Preferences > Keyboard > Ensure ‘Use F1, F2, etc. as standard function keys’ is checked.
Another option for F# keys is to create a macro inside of the vKVM Viewer to pass the key. The screenshot below shows where you can setup user defined Macros and in the background is the MeregPoint console for one of my ESXi hosts.
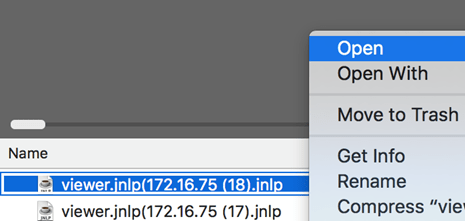
Java: One of the joys of this motherboard is the use of vKVM viewer and VM Media. However, these functions need JAVA installed and up to date to function properly. If your JAVA is behind, trust me just update it’ll save you hours of pain. Here is the remaining gotcha. In the Mergpoint web page, you simply click on the ‘Launch Java vKVM Viewer’ button to start your host remote session. The webpage will download a .jnlp file. If you just click on this file you are presented with an error stating it can’t be opened because it is from an unidentified developer. Solution – After the java app downloads, click on the down arrow next to the file and choose ‘Show in finder’. When finder launches select that file by holding down the control key and right-clicking on it. A pop-up window will appear, release the control key and finally choose open. This allows you to override the ‘unidentified developer’ error and launch the viewer.
ESXi Installation:
Setting up the ESXi hosts had one big challenge – after the install of ESXi I could not see my SAS disks. I am using the ESXi 6.5U1 Rollup.iso to do my installs and my main goal was to install and boot ESXi from the 64GB USB stick and be able to access the 4 x 200GB SSD attached to the IBM M5210
Problem – During the install of ESXi, I booted the host using the ESXi6.5 ISO via virtual media console. The installer program would recognize the IBM M5210 controller, the attached 4 x SAS disks, and the 64GB USB stick. The installation would complete without issue. However, after ESXi booted the SAS disks and the controller would not appear but I could see the 64GB USB stick.
Other observations –
First, in the ESXi Log files I noticed the megasas was having firmware issues:
2017-09-21T10:26:31.310Z cpu5:66065)<6>megasas: Waiting for FW to come to ready state 2017-09-21T10:26:31.310Z cpu5:66065)<7>megasas: FW in FAULT state!!
ESC[7m2017-09-21T10:26:31.310Z cpu5:66065)WARNING: vmklinux: pci_announce_device:1486: PCI: driver megaraid_sas probe failed for device 0000:07:00.0ESC[0m 2017-09-21T10:26:31.310Z cpu5:66065)LinPCI: LinuxPCI_DeviceUnclaimed:257: Device 0000:07:00.0 unclaimed.
And… even though ESXi saw the M5210 as vmhba1, its status was unknown
vmhba1 Avago (LSI) MegaRAID SAS Invader Controller
vmhba1 0000:07:00.0 PCI 0:0:29:0 PCI 0:7:0:0 Slot1 UNKNOWN
Second, I use Partition Wizard bootable ISO to remove all partitions prior to installing ESXi. I noted that sometimes after I booted to it as virtual media it would see the 4 x SAS disks and other times it would not.
Third, Installation of ESXI onto SAS or SATA SSD as the boot disk worked perfectly. After booting I could see the M5210 and SAS disks but my goal of using the 64GB USB stick for the boot device was not achieved.
Fourth, occasionally when I booted the ESXi host to the USB stick it would work okay, but upon reboot would not
Final Solution – The core reason why I could not see the SAS disks with ESXi or Partition Wizard was the boot type was UEFI and not legacy. During boot time the boot order would sometimes change if I had virtual media connected, meaning sometimes it would boot the 64GB USB stick or Partition Wizard as UEFI and other times as legacy. Apparently, UEFI boot was giving the M5210 firmware issues not allowing the SAS disk to come online.
FIX – I went into the BIOS of the motherboard > Advanced > CSM Configuration > changed ‘Boot option filter’ to ‘Legacy Only’ and all my issues went away.
Summary – I spent a lot of after-hours and weekends working out all various installation tweaks but what can I say, this is the joy of setting up a home lab! My hopes are in some way this post helps you move your home lab forward too. In my next post, I’ll be going over how to enable the InfiniBand HCA in ESXi 6.5.
If you like my ‘no-nonsense’ blog articles that get straight to the point… then post a comment or let me know… Else, I’ll start writing boring blog content.
