IOMega
Upgrading or adding New Hard Disks to the IOMega / EMC / Lenovo ix4-200d
I currently have an IOMega ix4-200d with 4 x 500GB Hard Disk Drives (HDD). I am in the process of rebuilding my vSAN Home lab to all flash. This means I’ll have plenty of spare 2TB HDDs. So why not repurpose them to upgrade my IOMega. Updating the HDDs in an IOMega is a pretty simple process. However, documenting and waiting are most of this battle.
There are 2 different ways you can update your IOMega: 1 via Command Line and 2 via the Web client. From what I understand the command line version is far faster. However, I wanted to document the non-command line version as most of the blogs around this process were a bit sparse on the details. I started off by reading a few blog posts on the non-command line version of this upgrade. From there I came up with the basic steps and filled in the blanks as I went along. Below are the steps I took to update mine, your steps might vary. After documenting this process I can now see why most of the blogs were sparse on the details, there are a lot of steps and details to complete this task. So, be prepared as this process can be quite lengthy.
NOTES:
- YOU WILL LOSE YOUR DATA, SO BACK IT UP
- You will lose the IOMega configuration (documenting it might be helpful)
Here are the steps I took:
- Ensure you can logon to the website of your IOMega Device (lost the password – follow these steps)
- Backup the IOMega Configuration
- If needed screen shot the configuration or document how it is setup
-
Backup the data (YOU WILL LOSE YOUR DATA)
- For me, I have an external 3TB USB disk and I used Syncback via my Windows PC to back up the data
-
Firmware: ensure the new HDDs and the IOMega IX4 are up to date
- Seagate Disks ST2000DM001 -9YN164
- Iomega IX4-200d (Product is EOL, no updates from Lenovo)
- After backing up the data, power off the IOMega, unplug the power, and remove the cover
- Remove the non-boot 500GB disks from the IOMega and label them (Disks 2-4), do not remove Disk 1
Special Notes:
- From what I read usually Disk 1 is the “boot” disk for the IOMega
- In my case, it was Disk 1
- For some of you, it may not be. One way to find this out is to remove disks 2-4 and see if the IOMega Boots, if so you found it, if not power off try with only disk 2 and so on till you find this right disk

- Replace Disks 2-4 with the new HDD, in my case I put in the 2TB HDDs
- Power on system (Don’t forget to plug it back in)
- The IOMega display may note there are new disks added, just push the down arrow till you see the main screen
- Also at this point, you won’t see the correct size as we need to adjust for the new disks

-
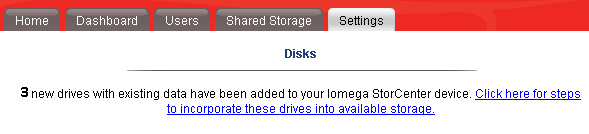
Go into IOMega web client
- Settings > Disks Storage
- Choose “Click here for steps…”
- Check box to authorize overwrite

- About a minute or two later my IOMega Auto Restarted
- Note: Yours may not, give it some time and if not go to the Dashboard and choose restart
- After reboot, I noted my configuration was gone but the Parity was reconstructing with 500GB disks
- This is expected, as the system is replicating the parity to the new disks
- This step took about +12 hours to complete

- After the reconstruction, I went into the Web client and the IOMega configuration was gone. It asked me to type in the device name, time zone, email, and then it auto Rebooted
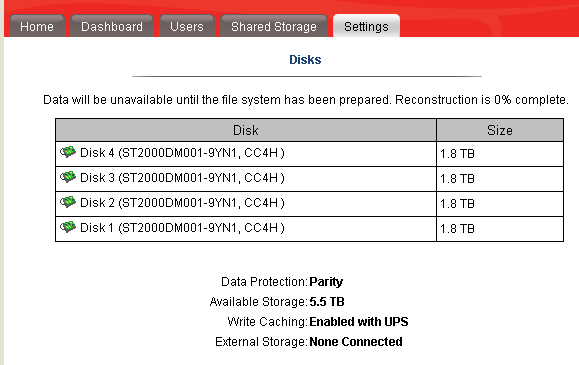
- After Reboot I noted all the disks are now healthy and part of the current 1.4TB parity set. This size is expected.

- Now that the Iomega has accepted the 3 x 2TB disks we need to break parity group and add the final 2TB HDD
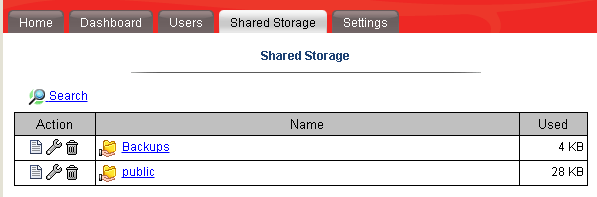
- First, you have to delete the shares before you can change the parity type.
- Shared Storage > Delete both shares and check to confirm delete

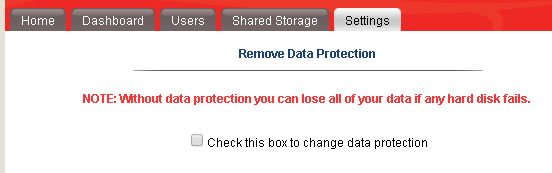
- Now go to — Settings > disks > Manage Disks > Data Protection
- Choose “Without data protection
- Check the box to change data protection

- Once complete the Power off the IOMega
- Dashboard > Shutdown > Allow device to shutdown
- After it powers off, replace Disk 1 with last 2TB Disk
- Power On
- Validate all disks are online
- Go to Settings > Disks > “Click here for steps….” Then check box to authorize overwrite, choose OK.


- After the last step observe the error message below and press ‘OK’

- Go to Dashboard > Restart to restart the IOMega
- After the restart the display should show “The filesystem is being prepared” with a progress bar, allow this to finish
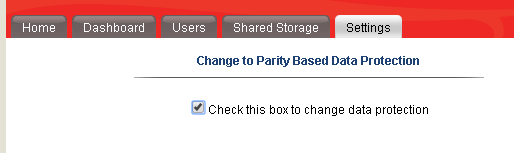
- Now create the Parity set with the new 2TB Disks
- First, remove all Shared folders (See earlier steps if needed)
- Second go to Settings > Disks > Manage Disks > Data Protection > Choose Parity > Next

- Choose “check this box….” then click on apply…
- After clicking apply my screen updated with a reconstruction of 0% and the display screen on the IOMega showed a progress bar too.
- Mine took more than 24+ hours to complete the rebuild.
- After the rebuild is complete then restore the config
- Finally, restore your data. Again, I used syncback to copy my data back
If you like my ‘no-nonsense’ blog articles that get straight to the point… then post a comment or let me know… Else, I’ll start writing boring blog content.
Home Lab – freeNAS build with LIAN LI PC-Q25, and Zotac M880G-ITX
I’ve decided to repurpose my IOMega IX4 and build out a freeNAS server for my ever growing home lab. In this blog post I’m not going to get in to the reasons why I choose freeNAS, trust me I ran through lot of open source NAS software, but rather on the actual hardware build of the NAS device.
Here are the hardware components I choose to build my freeNAS box with…
- LIAN LI PC-Q25 Case – NewEgg ~$120, it goes on sale from time to time…
- Cooler Master 500W PS – ValleySeek ~$34, on sale
Zotac M880G-ITX – Valleyseek ~$203<< 10/07/2013 This MOBO had BIOS issues with detecting HDDs. I moved to a ASRock FM2A85X-ITX- SYBA Dual NIC SY-PEX24028 – NewEgg ~$37
- 8GB Corsair RAM – I owned this bought a Frys in a 16GB Kit for $49
- 5 x Seagate ST2000DM001 2TB SATAIII – Superbiiz ~$89, onsale and free shipping
- 1 x Corsair 60GB SSD SATAIII – I owned this bought at Frys for ~$69
Tip – Watch for sales on all these items, the prices go up and down daily…
Factors in choosing this hardware…
- Case – the Lian LI case supports 7 Hard disks (5 being hotswap) in a small and very quiet case, Need I say more…
- Power supply – Usually I go with a Antec Power supply, however this time I’m tight on budget so I went with a Cooler Master 80PLUS rated Power supply
- Motherboard – The case and the NAS software I choose really drove the Mobo selection, I played with a bunch of Open soruce NAS software on VM’s, once I made my choice on the case and choosing freeNAS it was simple as finding one that fit both. However 2 options I was keen on – 1) 6 SATA III Ports (To support all the Hard disks), 2) PCIex1 slot (to support the Dual Port NIC). Note – I removed the onboard Wireless NIC and the antenna, no need for them on this NAS device
- NIC – the SYBA Dual NIC I have used in both of my ESXi hosts, they run on the Realtek 8111e chipset and have served me well. The Mobo I choose has the same chipset and they should integrate well into my environment.
- RAM – 8GB of RAM, since I will have ~7TB of usable space with freeNAS, the general rule of thumb is to use 1GB of RAM per 1TB of storage, 8GB should be enough.
- Hard Disks – I choose the hard disks mainly on Price, speed, and size. These hard disks are NOT rated above RAID 1 however I believe they will serve my needs accordingly. If you looking for HIGH performance and duty cycle HD’s then go with an enterprise class SAS or SATA disk.
- SSD – I’ll use this for cache setup with freeNAS, I just wanted it to be SATA III
Install Issues and PIC’s
What went well…
- Hard disk installs into case went well
- Mobo came up without issue
- freeNAS 8.3.xx installed without issue
Minor Issues….
- Had to modify (actually drill out) the mounting plate on the LIAN LI case to fit the Cooler Master Power supply
- LIAN LI Mobo Mount points were off about a quarter inch, this leaves a gap when installing the NIC card
- LIAN LI case is tight in areas where the Mobo power supply edge connector meets the hard disk tray
PICS…
LIAN LI Case

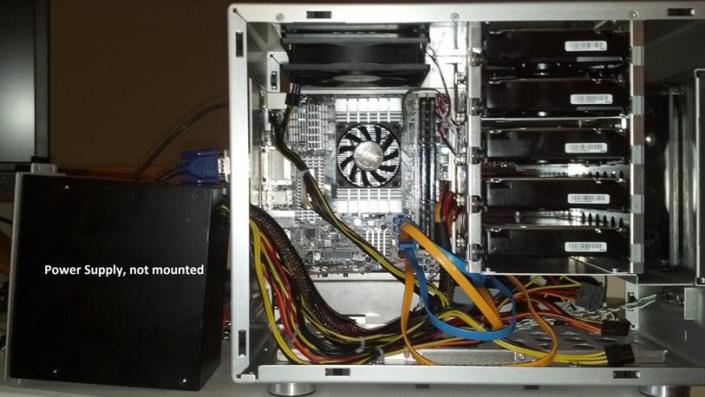
5 Seagate HD’s installed…

Rear view…
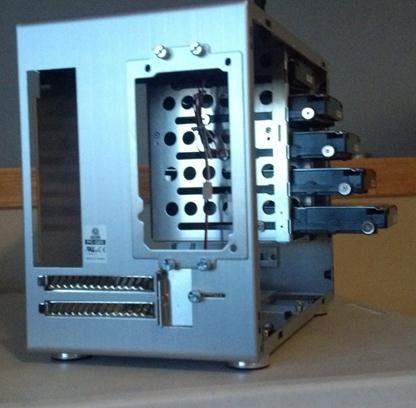
Side Panel…

Zotac Mobo with RAM

Removal of the Wireless NIC….

Zotac Mobo installed in case with dual NIC…

Everything Mounted (Except for the SSD)….
Home Lab – More updates to my design
Most recently I posted about adding a Layer 3 switch to my growing home lab. The Netgear Layer 3 switch I added (GSM7324) is preforming quite well in my home lab. In fact it’s quite zippy compared to my older switches and for the price it was worth it. However my ever growing home lab is having some growing pains, 2 to be exact.
In this post I’ll outline the issues, the solutions I’ve chosen, and my new direction for my home lab.
The issues…
Initially my thoughts were I could use my single ESXi Host and Workstation with specific VM’s to do most of my lab needs.
There were two issues I ran into, 1 – Workstation doesn’t support VLANs and 2 – my trusty IOMega IX4 wasn’t preforming very well.
Issue 1 – Workstation VLANs
Plain and simple Workstation doesn’t support VLANs and working with one ESXi Host is prohibiting me from fully using my lab and switch.
Issues 2 – IOMega IX4 Performance
My IOMega IX4 has been a very reliable appliance and it has done its job quite well.
However when I put any type of load on it (More than One or Two VM’s booting) its performance becomes a bit intolerable.
The Solutions…
Issue 1 – Workstation VLANs
I plan to still use Workstation for testing of newer ESXi platforms and various software components
I will install a second ESXi host similar to the one I built earlier this year only both Hosts will have 32GB of RAM.
The second Host will allow me to test more advanced software and develop my home lab further.
Issues 2 – IOMega IX4 Performance
I’ve decided to separate my personal data from my home lab data.
I will use my IX4 for personal needs and build a new NAS for my home lab.
A New Direction…
My intent is to build out a second ESXi Physical Host and ~9TB FreeNAS server so that I can support a vCloud Director lab environment.
vCD will enable me to spin up multiple test labs and continue to do the testing that I need.
So that’s it for now… I’m off to build my second host and my freeNAS server…
Test Lab – Day 6 Xsigo Redundancy testing with ESXi under load (Final Post)
Today I plan to setup the environment to simulate high disk I/O and re-run most the Xsigo tests from Day 4. My thoughts behind these tests are the Xisgo ran well under a minimal load but how would it perform when stressed.
Note: This blog post only covers how I setup testing but doesn’t have the final results. See A change of plans below for more information.
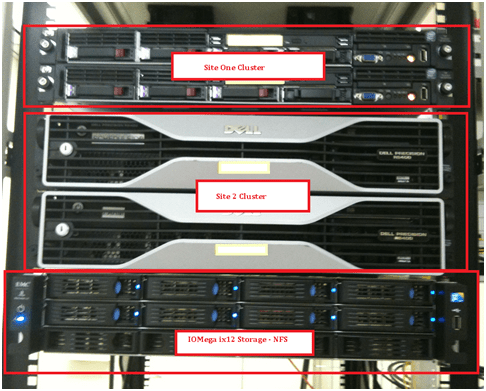
The environment layout will stay the same (4 x ESXi 4.1 hosts, each host with 10 VM’s, 2 Xsigo VP780’s and one IOMega IX12 with a 4 spindle NFS Datastore)
I’ll auto create about ~40 Windows 2003 VM’s and use PassMarks Burin Test to simulate a NFS load.
I plan to drive the IOMega to ~1Gbs of sustained NFS I/O by driving each VM’s hard disk.
While the load simulation is happening I’ll re-run the testing from Day 4, and record the results.
I do wish we could simulate a larger load however our NFS datastores are only across 4 Spindles. If we simulate a heavier load I believe it will “tank” the datastore making our testing pretty much worthless.
Preparing for the load Test.. In this step I setup my default template
I spun up a Windows 2003 server and installed the Burn in Test program.
I launched the BurnIn Test, clicked on Preferences, uncheck all, checked Disks, and entered a duty cycle of 25
Tip: BurnIn Test can be used for a wide range of load testing including CPU & Network (See below)
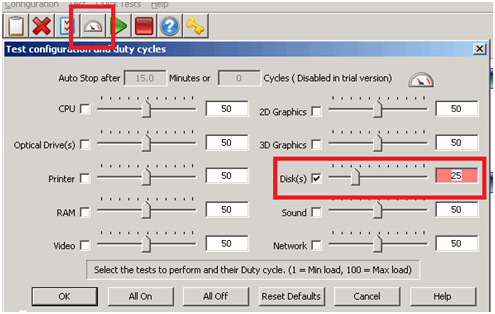
I saved the configuration file in the default folder.
I repeated this process and created 4 more config files driving the Disk to duty cycles of 5, 10, 50 and 100.
Writing the batch file to launch the BurnIn Test config file was simple (see below) and I created one for each duty cycle.

Tip: Before changing this VM into a template I tested my batch files to ensure all was working well.
Next I wrote a simple vSphere PowerCLI script to create the VM’s, it nothing complex but it did the trick..
I simply opened the vSphere PowerCLI prompt and pasted in the following lines…
|
$server_address = “vCenter Server IP” $username = “Administrator” $password = “your password here” $template_name = “w2003Template” $datastore_name = “NFS” $customization = “W23K” $location = “LoadTest” $destination_host = “ESX Host 1 IP Address” New-VM -Name 2003VMT21 -Location $location -Template $template_name -Host $destination_host -Datastore $datastore_name -OSCustomizationSpec $customization New-VM -Name 2003VMT22 -Location $location -Template $template_name -Host $destination_host -Datastore $datastore_name -OSCustomizationSpec $customization New-VM -Name 2003VMT23 -Location $location -Template $template_name -Host $destination_host -Datastore $datastore_name -OSCustomizationSpec $customization New-VM -Name 2003VMT24 -Location $location -Template $template_name -Host $destination_host -Datastore $datastore_name -OSCustomizationSpec $customization New-VM -Name 2003VMT25 -Location $location -Template $template_name -Host $destination_host -Datastore $datastore_name -OSCustomizationSpec $customization New-VM -Name 2003VMT26 -Location $location -Template $template_name -Host $destination_host -Datastore $datastore_name -OSCustomizationSpec $customization New-VM -Name 2003VMT27 -Location $location -Template $template_name -Host $destination_host -Datastore $datastore_name -OSCustomizationSpec $customization New-VM -Name 2003VMT28 -Location $location -Template $template_name -Host $destination_host -Datastore $datastore_name -OSCustomizationSpec $customization New-VM -Name 2003VMT29 -Location $location -Template $template_name -Host $destination_host -Datastore $datastore_name -OSCustomizationSpec $customization New-VM -Name 2003VMT30 -Location $location -Template $template_name -Host $destination_host -Datastore $datastore_name -OSCustomizationSpec $customization $destination_host = “ESX Host 2 IP Address” New-VM -Name 2003VMT31 -Location $location -Template $template_name -Host $destination_host -Datastore $datastore_name -OSCustomizationSpec $customization New-VM -Name 2003VMT32 -Location $location -Template $template_name -Host $destination_host -Datastore $datastore_name -OSCustomizationSpec $customization New-VM -Name 2003VMT33 -Location $location -Template $template_name -Host $destination_host -Datastore $datastore_name -OSCustomizationSpec $customization New-VM -Name 2003VMT34 -Location $location -Template $template_name -Host $destination_host -Datastore $datastore_name -OSCustomizationSpec $customization New-VM -Name 2003VMT35 -Location $location -Template $template_name -Host $destination_host -Datastore $datastore_name -OSCustomizationSpec $customization New-VM -Name 2003VMT36 -Location $location -Template $template_name -Host $destination_host -Datastore $datastore_name -OSCustomizationSpec $customization New-VM -Name 2003VMT37 -Location $location -Template $template_name -Host $destination_host -Datastore $datastore_name -OSCustomizationSpec $customization New-VM -Name 2003VMT38 -Location $location -Template $template_name -Host $destination_host -Datastore $datastore_name -OSCustomizationSpec $customization New-VM -Name 2003VMT39 -Location $location -Template $template_name -Host $destination_host -Datastore $datastore_name -OSCustomizationSpec $customization New-VM -Name 2003VMT40 -Location $location -Template $template_name -Host $destination_host -Datastore $datastore_name -OSCustomizationSpec $customization
This pattern was repeated on the other ESX hosts until ~40 VM’s were created… |
Test Procedure…
Using the Burn In test program I will drive the utilization on the ~40 VM’s until 1Gbs of sustained NFS I/O is achieved.
I’ll use vCenter Server to ensure NFS traffic is passing through XSA and then start the tests below.
All of the ESX Hosts are attached to the IOMega via NFS, this means all traffic has to pass through the Xsigo and our network to get to the IOMega.
I used a Laptop, the ESXi console in tech support, vCenter Server mode to capture and validate the results.
Keep in mind this deployment is a SINGLE site scenario and for accuracy we allowed the environment to settle between tests.
A Change in plans.…
At this point the testing had to stop. Reason why – I put in my two weeks’ notice and had to focus on a transition plan and less on testing.
My hopes are if you’re reading this post it will give you a baseline for testing.
Test Lab – Day 5 Expanding the IOMega ix12-300r
Recently I installed an IOMega ix12-300r for our ESX test lab and it’s doing quite will
However I wanted to push our Iomega to about 1Gbs of sustained NFS traffic of the available 2Gbs.
To do this I needed to expand our 2 drive storage pool to 4 drives.
From a previous post we created 3 storage pools as seen below.
Storage Pool 0 (SP0) 4 Drives for basic file shares (CIFS)
Storage Pool 1 (SP1_NFS) 2 drives for ESX NFS Shares only
Storage Pool 2 (SP2_iSCSI) 2 drives dedicated for ESX iSCSI only
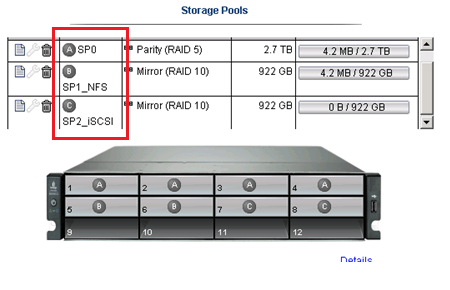
In this post I’m going to delete the unused SP2_iSCSI and add those drives to SP1_NFS
Note: This procedure is simply the pattern I used in my environment. I’m not stating this is the right way but simply the way it was done. I don’t recommend you use this pattern or use it for any type of validation. These are simply my notes, for my personal records, and nothing more.
Under settings select storage pools

Select the Trash Can to delete the storage pools..
It prompted me to confirm and it deleted the storage pool.
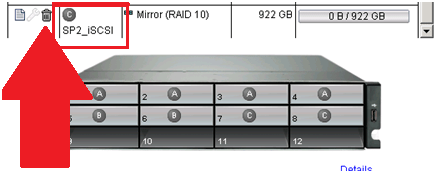
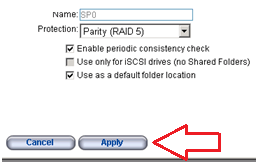
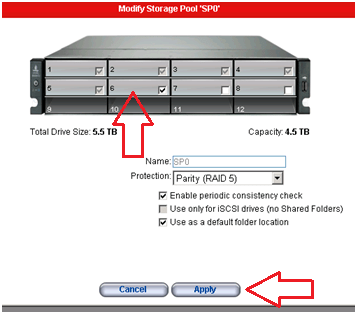
Next I choose the Edit icon on SP2_NFS, selected the drives I wanted, choose RAID 5, and pressed apply.

From there it started to expand the 2 disk RAID1 to a 4 disk RAID5 storage pool..
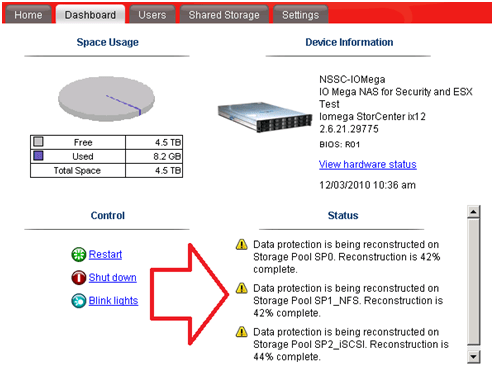
Screenshot from the IOMega ix12 while it is being expanded…

I then went to the Dashboard and under status I can view its progress…

ALL this with NO Down time to ESX, in fact I’m writing this post from a VM at the expansion is happening.
It took about 11 Hours to rebuild the RAID set.
Tip: Use the event log under settings to determine how long the rebuild took.
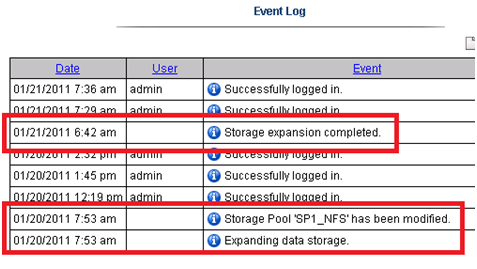
The next day I checked in on ESX and it was reporting the updated store size.

Summary…
To be able to expand your storage pool that houses your ESXi test environment with no down time is extremely beneficial and a very cool feature.
Once again IOMega is living up to its tag line – IOmega Kicks NAS!
Tomorrow we’ll see how it performs when we push a higher load to it.
Test Lab – Day 3 ESXi 4.1 Setup with Xsigo, NFS, and the ix12
During Day 1 and 2 we installed the Xsigo hardware, IOMega ix12, ESXi 4.1, interconnected hardware, and ensure it all communicated well.
Today’s Goals…
- Copy vCenter Server & other VM’s from Production to this test environment
- Configure ESXi with the Xsigo vNIC’s
- Setup the ix12 to communicate via NFS to the ESX Hosts
Day 3 Overview…
On Day 2 we configured the Xsigos to present vNIC’s to the ESXi hosts. This will allow for network and storage (NFS) traffic in our test lab.
Keep in mind the ESXi test network is an isolated network. However I plan to transfer clones of a pre-made vm’s by placing a Test ESXi Host out and in of the test environment..
Today I’ll setup the ESXi hosts to talk to the new vCenter Server and get it communicating with our IOMega Shared storage
Copy vCenter Server & other VM’s from Production to this test environment…
Currently the ESXi Management NIC’s are using the Xsigo vNICs (xna, xnb) for host communication.
However I need to swap ESXi Management Network to a different network so I can transfer a VM clone to its local storage.
The vm clone I’m transferring is a pre-made vCenter Server 4.1 and when transferred it will assist us with configuration.
Basically I am swapping which vCenter Server controls the Test ESXi host by changing the Management NIC from Test to Production and back.
The Swap…
In this step I am selecting the local onboard pNIC (vmnic0) as the Management NIC and deselecting the Xsigo vNIC’s (Xsigo_xna & xnb) from the ESXi host.
This will place the host in a network that will allow for the clone transfer.
- From the ESXi host press F2 to ‘Customize System’
- Logon as root
- Choose Configure Management Network
- Choose Network Adapters
- Select vmnic0 as the Management NIC and disconnect all others
- Save up and it should restart the Management Network

Once I have selected the appropricate pNIC as my management adapter, I attached this ESXi host to the other vCenter Server, and then transfer the VM clone to the local VMFS storage.
Once the VM is transferred I configured its networking adapters to adapt to the new test network and powered up the VM.
I logged in to the VM and ensure it is operational.
With the VM still powered up I transferred the Management Network back to the Xsigo vNIC’s and then RDP into the cloned vCenter Server.
Tip: Make sure you know your local Administrator password. After the transfer AD won’t be around for authentication.
Configure ESXi with the Xsigo vNIC’s…
Once the test vCenter Server is booted, I completed the IP setup of the other ESXi test hosts ensuring their management networks were using their assigned Xsigo_xna and xnb adapters.
I then attached all the ESXi Test Hosts to the test vCenter server and configured their networking.
Here is what ESXi looks like when all the adapters are recognized..

NOTE: the Xsigo adapters are showing 10gig Full. You might be asking yourself “I thought Infiniband was faster than 10gig” It is, we’ll address this note later in my posts..
The next step is to create your vSwitches…
I created vSwitch0 for VM’s, vMotion, and Host Management and vSwitch1 for NFS traffic to my storage.
XNA and XNB will be connected to vSwitch0
XSA and XSB will be connected to vSwitch1

NOTE: As of this writing Xsigo supports vSwitches only, sorry no Distributed Switches at this time.
Setup the IOmega ix12 to communicate via NFS to the ESX Hosts…
First step is to ensure your ix12 is online and the network is functioning properly.
After confirming the network logon to its web admin tool, choose settings, network services, and then network settings.
We choose link aggregation, ensure the IP was correct, and bonded NIC 3 and 4 on this ix12.

Tip: One cool thing about the ix12 is we can allocate NICs for different functions, in this case NIC3 & 4 is for our esxi test environment and nic1 is for another purpose.
Note: By changing the network information usually means a reboot of the device L
I logged into my ESXi host, placed it in Techsupport mode and used ping to test ix12 interface.
Once the network was sound, I enabled NFS on the ix12 and setup a NFS folder
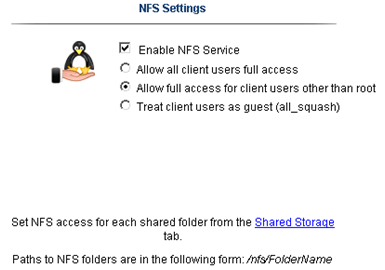
Yes folks, it’s that easy to enable NFS on the ix12…
The only step not show here was setting up a storage pool for NFS and associating the shared folder to it.
Back to ESXi… Let’s setup the NFS Connection…
In vCenter server simply click on the host > Configuration > Storage > Add Storage
A new window appears, choose Network File System then next
Fill in the IP of the ix12, the folder name, and datastore name > click next
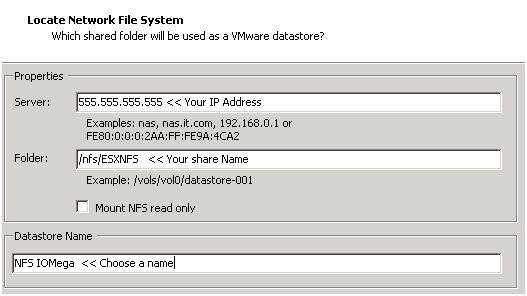
Confirm and you’re done!

Next steps are to use Storage vMotion (aka Migrate Virtual Machines datastore) the Test vCenter Server from local storage to our new NFS Share..
When I completed this step we transferred about 40GB from the local ESXi storage to the IOMega ix12 in about 20Mins.
Summary…
Today was mainly about configuring ESXi and shared storage.
We were able setup all our ESXi hosts to the Xsigo, configured the shared storage, enable NFS and get a vCenter Server VM up and running.
Tomorrow the fun begins… Testing and more Testing!
Test Lab – Day 2 CLI with the Xsigo!
Yesterday I did about 90% of the hardware install. Today, Day 2, our Xsigo SE will be here to assist with the installation and configuration of the Xsigo to the ESX Hosts..
Today’s Goals..
- Install 2nd Xsigo VP780
- Install vmware ESXi 4.1 on 4 servers with Xsigo Drivers
- Configure both Xsigo vp780’s
Install 2nd Xsigo VP780…
Day 2 started out with a gift from Mr. FedEx, it was the parts we needed to install the 2nd Xsigo. Only yesterday afternoon we discovered we were missing some power cords and mounting brackets. A couple quick calls to Xsigo and viola parts are on their way. Props to Xsigo for a VERY quick response to this issue!
Based on the lessons learned from Day 1 we mounted the 2nd Xsigo VP780 and it went much smoother. Notice the WE part of installing the VP780, these things are heavy & large and you’ll need some help or a giant with huge hands to install them into a rack. See their install manual for more information.
When we powered them up I was amazed by the amount of air they moved through the device >> Very NICE!
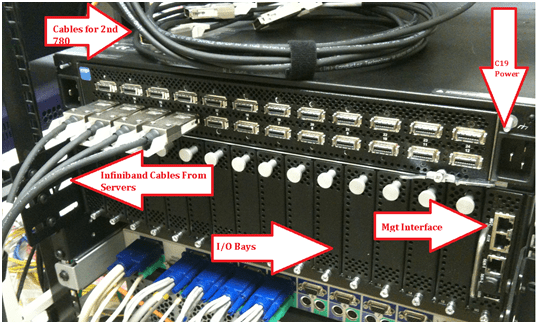
Keep in mind at this point all the test lab hardware including the Xsigo fiber modules (2 x 10gig Fiber modules per device), and networking is mounted and interconnected…

Install vmware ESXi 4.1 on 4 servers with Xsigo Drivers…
You’ll need the Xsigo Drivers installed for ESXi to recognize the infiniband cards and for proper communication.
There are two installation options…
- Install ESXi 4.1 and add the Xsigo Drivers after the install.
- Download the drivers and re-master the ESXi ISO yourself (This is a good option if your building / rebuilding lots of servers)
We chose to re-master the ESXi ISO with the Xsigo drivers.
Here is the link to master the ISO
I won’t bore you with the details of installing ESXi, however the only gotcha I ran into was the Dell R5400 SATA RAID controller.
I setup a SATA RAID group, during the ESXi install it recognized the RAID volume, and ESXi installed to it without issue.
However after the reboot of the host it would not boot to this volume.
I didn’t have time to troubleshoot, for now we just broke the RAID group, reinstalled, and it worked perfectly.
ESXi Management NICS’s..
Our test lab network will be isolated from production network traffic. However, one of our servers will need to be in the production environment. We setup one physical NIC (pNIC) on to our production environment. This will allow us to temporarily transfer VM’s from production to test, we’ll then disconnect this pNIC and setup ESXi to use the Xsigo NIC for management.
(More to come on this on Day 3)
Configure both Xsigo vp780’s…
Configuring the vp780 was very simple. We attached a laptop to the Xsigo and in about 20 commands our Xsigo was up and running..
These are the basic commands we used to setup our pair of Xsigo’s (A and B), the commands below reflect B only.
The commands would be the same for the A Xsigo simply change the appropriate parameters…
NOTE: I don’t recommend you execute these commands in your environment, keep in mind these are for my reference ONLY… I also recommend you contact your Xsigo representative for assistance.
Here are the commands we executed..
Getting into the Xsigo VP780…
We used a standard Xsigo provided rollover cable plugged into Serial1. (Serial2 is for Tech / Debug – Don’t use)
We connected to the console via Putty or Absolute Telnet (COM Settings are 115200,8,1,None,None)
Tip: All default passwords are in the CLI Config Guide by Xsigo
Setup the Xsigo via the Wizard…
Once the connected we used the XgOS config Wizard and entered in the following..
|
Welcome to XgOS Copyright (c) 2007-2010 Xsigo Systems, Inc. All rights reserved.
Enter “help” for information on available commands.
Would you like to use the XgOS Configuration Wizard? [Y/n] Hostname: xsigo-b Domain: YOURDOMAIN.COM Is this Director to be designated as the IB subnet manager (leave as Y unless using an external, non-Xsigo subnet manager) ? [Y/n] Do you want this Director to send diagnostic data to Xsigo periodically? [Y/n] Please input the ‘root’ password: **** Please confirm the ‘root’ password: **** Please input the ‘admin’ password: ***** Please confirm the ‘admin’ password: ***** Please input the ‘recovery-password’: **** Please confirm the ‘recovery-password’: **** IP Address [static/DHCP]: 555.555.555.555 IP Address [static/DHCP]: Enter NTP Server 1: 555.555.555.555 Enter NTP Server 2: Enter Timezone [<Tab><Tab> for the list of Timezones]: America_Phoenix Welcome to XgOS Copyright (c) 2007-2010 Xsigo Systems, Inc. All rights reserved.
Enter “help” for information on available commands. admin@xsigo-b[xsigo] |
Now it’s time to setup the Xsigo…
Place the Xsigo into Trunk Mode..
Port 10 and Port 11 are the 10gig Fibre Modules; this command places them in Trunk Mode
set ethernet-port 10/1 -mode=trunk << Port 10 will be used for our IP Network (Vlans for Guests, vmotion, hosts, etc)
set ethernet-port 11/1 -mode=trunk << Port 11 will be used for our NFS
Rear of VP780

Ensure Trunk Mode is activated..
Use the command ‘show ethernet-port ‘
|
admin@xsigo-b[xsigo] show ethernet-port
name type state descr mode flags lag access-vlan vnics vlans ——————————————————————————- 10/1 nwEthernet10GbPort up/up trunk -s— 1 0 none 11/1 nwEthernet10GbPort up/up trunk -s— 1 0 none 2 records displayed |
Setup Phone Home for Support…
set system phone-home -customer-name=”YOUR COMPANY NAME HERE”
set system phone-home -contact-email-address=YOURNAME@YOURDOMAIN.COM
set system phone-home -contact-phone-numbers=”555-555-5555″
set system phone-home proxy [YOUR PROXY IP HERE] [PROXY PORT if needed, default is 3128]
Note: For this command the syntax is [PROXY IP Address] one space [PROXY PORT], don’t use ‘:’ to as the separator.
Once completed then check confirm your information…
Enter the command ‘show system phone-home’
|
admin@xsigo-b[xsigo] show system phone-home ——————————————————————————- enabled true freq weekly next Fri Jan 14 12:44:52 MST 2011 notify no strip yes alarm yes name COMPANYNAME email EMAIL@EMAIL.com phone 5555555555 copy p-host 555.555.555.555:3128 p-user ——————————————————————————- 1 record displayed admin@xsigo-b[xsigo] |
Check on the Phone Home Log….
admin@xsigo-b[xsigo] showlog phonehome.log
Wed Jan 5 17:30:33 MST 2011: Phone home successful to http://phone-home.xsigo.com:6522
Wed Jan 5 18:04:14 MST 2011: Phone home successful to http://phone-home.xsigo.com:6522
Wed Jan 5 18:04:38 MST 2011: Phone home successful to http://phone-home.xsigo.com:6522
[Press CRTL-C to Exit]
admin@xsigo-b[xsigo]
Tip: your log might be empty until it has something to send
Ensure your Physical servers are attached…
As expected all 4 servers are attached to this Xsigo.. (If they don’t show up here it could be an interconnect or ESXi issue)
Enter the command ‘show physical-server’ to view your connected servers.
|
admin@xsigo-b[xsigo] show physical-server ——————————————————————————- name localhost <<< This is the ESXi Hostname guid 2c903000b4df5 descr port xsigo-001397001:ServerPort2 << This is the Xsigo Port the Server is connected to os VMware/ESXi-4.1.0:xg-3.5.0-1-246491/x86_64 << This is the version of ESX & Xsigo Driver version 2.7.0/3.0.0 server-profile << Notice this is blank, We configured it next ——————————————————————————- name localhost guid 2c903000b4ea5 descr port xsigo-001397001:ServerPort3 os VMware/ESXi-4.1.0:xg-3.5.0-1-246491/x86_64 version 2.7.0/3.0.0 server-profile ——————————————————————————- name localhost guid 2c903000b4ea9 descr port xsigo-001397001:ServerPort4 os VMware/ESXi-4.1.0:xg-3.5.0-1-246491/x86_64 version 2.7.0/3.0.0 server-profile ——————————————————————————- name localhost guid 2c903000b5095 descr port xsigo-001397001:ServerPort1 os VMware/ESXi-4.1.0:xg-3.5.0-1-246491/x86_64 version 2.7.0/3.0.0 server-profile ——————————————————————————- 4 records displayed |
Create Server Profiles…
Creating a server profile enables you to assign devices to your specific host.
In our case we used the ESX Hostname as the Xsigo Server Profile name.
This will help us to keep the profiles well organized.
Keep in mind YOURSERVERNAME# equals your ESX Hostname and it will become your Xsigo Server Profile Name…
Long way to create a Server Profile…
add server-profile [server profile name]
View the new server profile…
|
admin@xsigo-b[xsigo] show server-profile name state descr connection def-gw vnics vhbas ——————————————————————————- YOURSERVER1 up/unassigned 0 0 1 record displayed |
Assign the server profile to a port on the Xsigo…
set server-profile YOURSERVER1 connect localhost@xsigo-001397001:ServerPort1
Short way to create a Server Profile…
add server-profile YOURSERVER2 localhost@xsigo-001397001:ServerPort2
add server-profile YOURSERVER1 localhost@xsigo-001397001:ServerPort3
add server-profile YOURSERVER1 localhost@xsigo-001397001:ServerPort4
Then use show server-profile to confirm your entries…
|
admin@xsigo-b[xsigo] show server-profile name state descr connection def-gw vnics vhbas ——————————————————————————- Yourserver3 up/up localhost@xsigo-001397001:ServerPort3 0 0 Yourserver4 up/up localhost@xsigo-001397001:ServerPort4 0 0 Yourserver1 up/up localhost@xsigo-001397001:ServerPort1 0 0 Yourserver2 up/up localhost@xsigo-001397001:ServerPort2 0 0 4 records displayed admin@xsigo-b[xsigo] |
Set Up and attach the virtual NICS to your server profile…
In this step we created our Xsigo vNICS, attached them to the appropriate server profiles, and the 10gig Modules.
When complete each of our ESXi servers will have 4 Xsigo vNICS.
(2 vNICs for IP Network, 2 vNICs for Storage network)
Decoding the command…
The command ‘add vnic xnb.yourservername1 10/1 -mode=trunk’ breaks down to…
add vnic << Add vNIC Command
xnb << The vNIC Name (xnb = Xsigo, IP Network, B Xsigo Device, Xsb = Xsigo, Storage Network, B Xsigo Device)
yourservername1 << Which profile to attach to
10/1 << Which Module on the Xsigo to attach to
-mode=trunk << What transport mode
These are the command we entered..
|
IP Network vNICS admin@xsigo-b[xsigo] add vnic xnb.yourservername1 10/1 -mode=trunk admin@xsigo-b[xsigo] add vnic xnb.yourservername2 10/1 -mode=trunk admin@xsigo-b[xsigo] add vnic xnb.Yourservername3 10/1 -mode=trunk admin@xsigo-b[xsigo] add vnic xnb.Yourservername4 10/1 -mode=trunk
Storage vNICS admin@xsigo-b[xsigo] add vnic xsb.Yourservername1 11/1 -mode=trunk admin@xsigo-b[xsigo] add vnic xsb.Yourservername2 11/1 -mode=trunk admin@xsigo-b[xsigo] add vnic xsb.Yourservername3 11/1 -mode=trunk admin@xsigo-b[xsigo] add vnic xsb.Yourservername4 11/1 -mode=trunk |
Results from ESXi…

Other Information…
Set System back to factory Defaults…
If needed, you can set the System back to factory Defaults by the following command.
When complete you will need to access the system via Serial Cable.
Here are the steps:
set system factory-default
confirm << type in Confirm, my Putty will exited and the system will shutdown
NOTE: This command will erase the configuration from the Xsigo. Do it with caution
Tip: Note this will cause the system to shutdown, this means someone will have to manually power it back on.
Upgrade the XgOS via USB…
Download the GOS 2.8.5 to a USB Stick..
We inserted the stick into the USB Port on the VP780, then executed this command
system upgrade file://usb/xsigo-2.8.5.xpf
Other Handy commands…
show system status
show system
show system version
show system warnings
show serial
show system info
history
CLI Fun…
One thing I like about the CLI for Xsigo is TAB at the end of the command (most modern CLI’s have this and it sure is handy)
If I type in set system phone-home[Press TAB] it displays possible completions and qualifiers and then it displays the last command I typed in.
admin@ xsigo-b[xsigo] set system phone-home [Press TAB]
Possible completions:
disable Disable phone home
enable Enable phone home
noproxy Don’t use HTTP Proxy
proxy HTTP Proxy config
snooze Hit the snooze button
[Optional qualifiers]
-contact-email-address Email address for Xsigo technical support to contact when a problem is discovered. (or ‘none’)
-contact-phone-numbers Telephone number for Xsigo technical support to contact when a problem is discovered. (comma separated, or ‘none’)
-copy-url URL to send audit copy to
-customer-name Customer name (or ‘none’)
-frequency Phone home frequency (relative to when it is set)
-notify Will Xsigo notify you when problems are detected?
-send-alarms Send major alarms to Xsigo?
-strip-private Strip private information from phone-home data
Repeat ‘?’ for detailed help.
admin@xsigo-b[xsigo] set system phone-home
Day 2 Summary..
The pair of Xsigo’s were very easy to configure and install. I enjoyed working with Xsigo CLI, it is very well thought out, and I plan do to write additional blog about it alone.
Besides for the very few and sometime self-inflicted gotchas things went smooth.
It was nice to have a Xsigo SE on site to assist with the initial install and I’m looking forward to tomorrow when we spin up some VM’s and then test!
Still to do…
- Copy vCenter Server & other VM’s from Production to this test environment
- Test, Test, Test and more testing..
Test Lab – End of Day 1
Day one was pretty simple it mostly comprised of hardware installation.
Below are my notes from todays adventure!
Work completed…
- Network team mounted and configured the EX4200 switches with appropriate vlans (NFS, VM Service Console, vMotion, and others)
- Severs were mounted and remounted to make room (see Installation gotchas below)
- One Xsigo was mounted, and due to some missing brackets the other will have to be mounted tomorrow
- Ethernet CAT and Infiniband cables were all cabled and routed
- Physical Servers for VMware ESXi 4.1 were installed
Installation Gotchas…
Installing & Mounting the Xsigo VP780 proved harder then I expected, this in no way is a slam against Xsigo, and it is totally my fault for not fully reading the manual.
I suggest you run through the Quick Install Manual prior to installing the VP780. There are a LOT of brackets and about 5-8 bolt packages. All are necessary for their intended purpose.
My mistake was I just looked at the VP780 which is 4U in size and planned out 8U for both.
However the mounting / support bracket requires 1U of space… This brings the total to 5U per Xsigo or 10U for both.

This miscalculation caused a bit of a delay and I had to remount some servers to make up this space.
Lesson learned, read the manual before installing.
Xsigo Stuff..
From a DC cooling and cabling perspective the Xsigo is designed very well. In the front there are 4 massive primary fans and 4 smaller fans for the Power Supplies.
This design puts the intake in the front pulling cool air though the Xsigo and out the rear. All the cabling is done in the rear and cable management is a breeze as I can directly cable the rear of my servers to the rear of theXsigo.
Front View

Rear View
Physical Server Front..
Physical Server Rear (Look Mom No Cables!!) – It’s Pretty Sweet that 2 Cables can do so much

Still to do…
- Install Vmware on site 1 and 2 cluster with Xsigo Drivers
- Install 2nd Xsigo into rack
- Copy vCenter Server & other VM’s from Production to this test environment
- Test, Test, Test and more testing..
Test Lab – The Plan and Layout with Xsigo, juniper, IOMega, vmware, and HP/Dell servers)
This week I have the pleasure of setting up a pretty cool test lab with Xsigo, juniper, IOMega, vmware, and HP/Dell servers.
I’ll be posting up some more information as the days go on…
The idea and approval for the lab came up pretty quickly and we are still defining all the goals we’d like to accomplish.
I’m sure with time the list will grow, however here are the initial goals we laid out.
Goals…
-
Network Goals
- Deploy the vChissis solution by Juniper (Server Core and WAN Core)
- Deploy OSPF Routing (particularly between sites)
- Multicast Testing
- Layer 2 test for vm’s
- throughput Monitoring
-
VMware Goals
- Test EVC from Old Dell QuadCores Servers to new HP Nehalem
- Test Long Distance vMotion & long distance cluster failures from Site1 to Site 2
- Play around with ESXi 4.1
-
Xsigo Goals
- Test Redundant Controller failover with vmware
- Throughput between sites, servers, and storage
Caveats…
- We don’t have a dual storage devices to test SAN replication, however the IOMega will be “spanned” across the metro core
- Even though this is a “Site to Site” design, this is a lab and all equipment is in the same site
- The Simulated 10Gbs Site to Site vChassis Connection is merely a 10Gbs fibre cable (We are working on simulating latency)
- Xsigo recommends 2 controllers per site and DOES NOT recommend this setup for a production enviroment, however this is a test lab — not production.
The Hardware..
2 x Xsigo VP780’s with Dual 10Gbs Modules, All Server hardware will be Dual Connected
2 x HP DL360 G6, Single Quad Core Nehalem , 24GB RAM, Infinband DDR HBA, gNic’s for Mgt (Really not needed but nice to have)
2 x Dell Precision Workstation R5400, Dual QuadCore, 16GB RAM, Infiniband DDR HBA, gNic’s for Mgt (Really not needed but nice to have)
6 x Juniper EX4200’s (using Virtual Chassis and Interconnect Stacking Cables)

Working with the IOMega ix12-300r
I installed an IOMega ix12-300r for our ESX test lab and I must say it’s just as feature rich as my personal ix4 and ix2.
I enjoy working with this device for its simplicity and feature depth. It’s very easy to deploy and it’s a snap to integrate with ESX.
Here are some of the things I like about ix12 and a high level overview to enable it with esx.
Note: Keep in mind most of the
features below are available on the ix2 and ix4 line but not all..
See http://iomega.com/nas/us-nas-comp.html for more information about the ix line and their features…
The Drives…
Our ix12 (the ix## is the amount of possible drives in the unit, ie ix2 = 2 drives, ix4 = 4drives) is populated with 8 x 1TB drives.
By default the 8TB unit will come with 4 x 2TB drives, I opted to buy a 4TB unit and expand it by 4TB, giving us the 8 x 1TB drives.
The drives are Seagate Barracuda Green SATA 3Gb/s 1TB Hard Drive – ST31000520AS – SATA II (Rev 2.6 Drives) 5.9K RPM, they should perform nicely for our environment…
(Buts like most techies, I wish they were faster)
More information here about the drives and SATA 2.6 vs 3.x
http://www.serialata.org/documents/SATA-6-Gbs-The-Path-from-3gbs-to-6gbs.pdf
Storage Pools…
A storage pool is not a new concept but in a device this cost effective it’s unheard of.
Basically, I’m dividing up my 8 drives like this..
Storage Pool 0 (SP0) 4 Drives for basic file shares (CIFS)
Storage Pool 1 (SP1_NFS) 2 drives for ESX NFS Shares only
Storage Pool 2 (SP2_iSCSI) 2 drives dedicated for ESX iSCSI only

I could have placed all 8 drives into one Storage pool but…
One of our requirements was to have SP0 isolated from SP1 and SP2 for separation reasons…
NO Down time for RAID Expansion… Sweet…
Another great feature is NO down time to expand your RAID5 Set..
Simply edit the Storage pool, Choose your new drive, and click apply.

The Raid set will rebuild and you’re all done!
Note: the downside to this… If you decide to remove a drive from a RAID set, you’ll have to rebuild the entire set.
TIP: To check the status of your RAID reconstruction check on the Dashboard under status or the home page at the bottom.
Mine reconstructed the 3 Storage Pools or all 12 drives at the same time in about 4.5 hours…
Teaming your NIC’s!
The ix12 comes with 4 x 1gb NICS, these can be bonded together, stay separate, or a mix of both.
You can setup your bonded NICs as Adaptive Load Balancing, Link Aggregation (LG), or Failover modes.
In our case we bonded NIC 3 and 4 with LG for ESX NFS/iSCSI Traffic and set NIC 1 up for our CIFS traffic.
For the most part setting up the networking is simple and easy to do.
Simply enter your IP’s, choose to bond or not and click apply.

Note: Don’t uncheck DHCP from unused adapters, if you do you’ll get an invalid IP address error when you click apply.
Also, making changes to the network area, usually requires a reboot of the device.. Tip: Setup your Network First..
Adding the NFS Folder to your ESX server
Note: These steps assume you completed the Iomega installation (Enabled iSCSI, NFS, Files shares,etc), networking, and your ESX Environment…
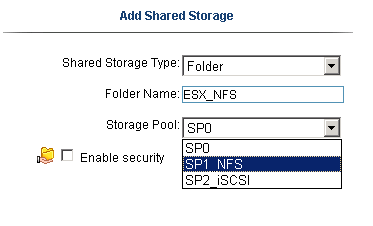
From the ix12 web interface simply add a folder on the correct Storage pool.
In our case I choose the folder name of ESX_NFS and the SP1_NFS storage pool
Tip: ALL Folders are broadcasted on all networks and protocols… I haven’t found a way to isolate folders to specific networks or protocols.
If needed make sure your security is enabled… I plan to talk with IOMega about this…
In vCenter Server, Add NAS storage and point it to the ix12.
Note: use /nfs/[folder name] for the folder name…
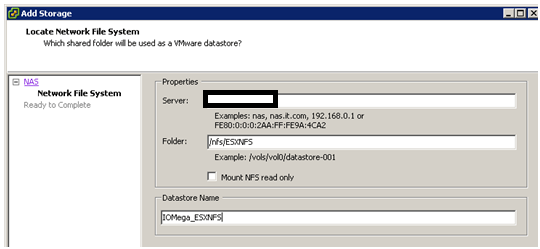
Once it’s connected it will show up as a NFS Data store!

Adding iSCSI to your ESX Server..
Note: This assumes you setup your esx environment to support iSCSI with the ix12…
Add your shared storage as an iSCSI Drive, set your iSCSI Drive name, and Select the correct Storage Pool.
Next is to set the Size of the iSCSI device, in this case we have 922GB free, but can only allocate 921.5GB

After clicking on apply, you should see the information screen…

In vCenter Server ensure you can see the iSCSI drive..

Add the iSCSI disk…
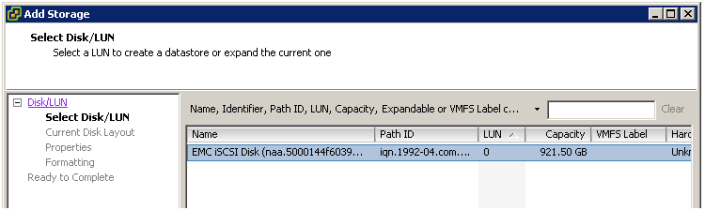
Give this disk a name…

Choose the right block size…

Finally there she is… one 920GB iSCSI disk…

Summary…
From a price vs. performance stand point the IOMega line of NAS devices (ix2, ix4, and our ix12) simply ROCK.
It will be hard to find such a feature rich product that will cost you so little.
This post has merely scratched the features of these devices. It is really hard to believe that 10+ years ago Iomega was known only for ZIP and Jazz Drives…
There new logo is IOMega Kicks NAS, and from what I’ve seen they do!
Follow up posts…
Over the next couple of months I hope to performance test my VM’s against the ix12
I’d like to figure out their protocol multi tendency issue (CIFS, NFS, iSCSI broadcasting over all NICS)
I’ll post of the results as they come in..
