LIAN LI
Home Lab – Adding freeNAS 8.3 iSCSI LUNS to ESXi 5.1
About a half a year ago I setup my freeNAS iSCSI SAN, created 2 x 500GB iSCSI LUNS and attached them to ESXi 5.1. These were ample for quite a while. However I have the need to add additional LUNS…. My first thought was – “Okay, Okay, where are my notes on adding LUNS…” They are non-existent… Eureka! Its time for a new blog post… So here are my new notes around adding iSCSI LUNS with freeNAS to my ESXi 5.1 Home lab – As always read and use at your own risk
J
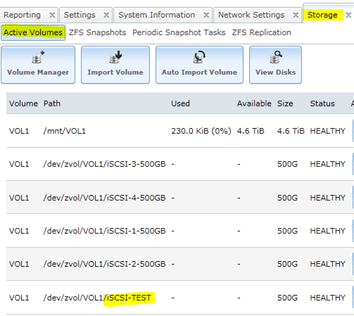
- Start in the FreeNAS admin webpage for your device. Choose Storage > Expand Volumes > Expand the volume you want to work with > Choose Create ZFS volume and fill out the Create Volume Pop up.

When done click on Add and ensure is show up under the Storage Tab
. 
-
On the left-hand pane click on Services > iSCSI > Device Extents > View Device Extents. Type in your Extent Name, Choose the Disk Device that you just created in Step 1 and choose OK

-
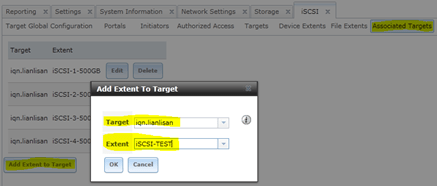
Click on Associated Targets > Add Extent to Target, Choose your Target and select the new Extent
-
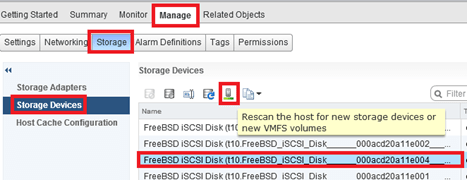
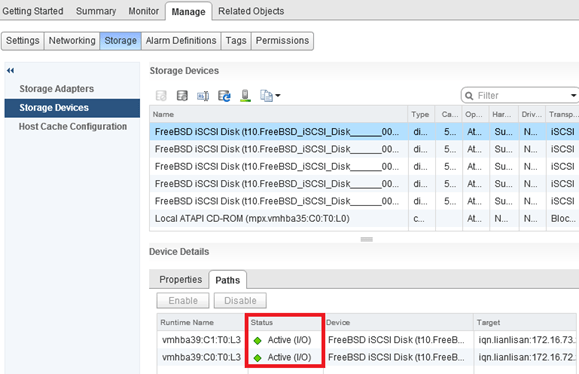
To add to ESXi do the following… Log into the Web Client for vCenter Server, Navigate to a host > Manage > Storage > Storage Devices > Rescan Host
If done correctly your new LUN should show up below. TIP – ID the LUN by its location number, in this case its 4
-
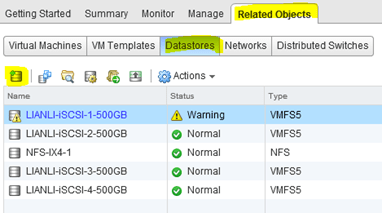
Ensure your on the Host in the left Pane > Related Objects > Datastores > Add Datastore
-
Type in the Name > VMFS Type > Choose the Right LUN (4) > VMFS Version (5) > Partition Lay out (All or Partial), Review > Finish

-
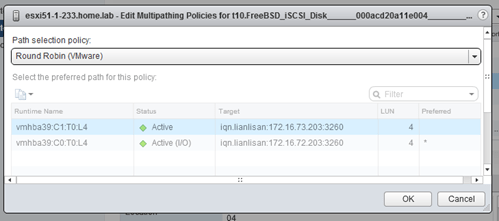
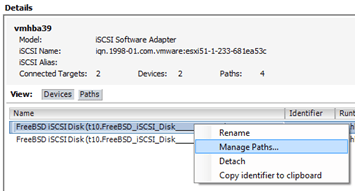
Setup Multi-Pathing – Select a Host > Manage > Storage > Storage Devices > Select LUN > Slide down the Devices Details Property Box and Choose Edit Multipathing

-
Choose Round Robin and Click On Okay
-
Validate all Datastores still have Round Robin enabled. 2 Ways to do this.
- Click on the LUN > Paths. Status should read Active I/O for both paths
- Click on LUN > Properties > Edit Multipathing – Path section Policy should state – Round Robin (See PIC in Step 8)
Summary – These steps worked like a charm for me, then again my environment is already setup, and hopefully these steps might be helpful to you.
Home Lab – VMware ESXi 5.1 with iSCSI and freeNAS
Recently I updated my home lab with a freeNAS server (post here). In this post, I will cover my iSCSI setup with freeNAS and ESXi 5.1.
Keep this in mind when reading – This Post is about my home lab. My Home Lab is not a high-performance production environment, its intent is to allow me to test and validate virtualization software. Some of the choices I have made here you might question, but keep in mind I’ve made these choices because they fit my environment and its intent.
Overall Hardware…
Click on these links for more information on my lab setup…
- ESXi Hosts – 2 x ESXi 5.1, iCore 7, USB Boot, 32GB RAM, 5 x NICS
- freeNAS SAN – freeNAS 8.3.0, 5 x 2TB SATA III, 8GB RAM, Zotac M880G-ITX Mobo
- Networking – Netgear GSM7324 with several VLAN and Routing setup
Here are the overall goals…
- Setup iSCSI connection from my ESXi Hosts to my freeNAS server
- Use the SYBS Dual NIC to make balanced connections to my freeNAS server
- Enable Balancing or teaming where I can
- Support a CIFS Connection
Here is basic setup…
freeNAS Settings
Create 3 networks on separate VLANs – 1 for CIFS, 2 x for iSCSI < No need for freeNAS teaming
CIFS
The CIFS settings are simple. I followed the freeNAS guide and set up a CIFS share.
iSCSI
Create 2 x iSCSI LUNS 500GB each
Setup the basic iSCSI Settings under “Servers > iSCSI”
- I used this doc to help with the iSCSI setup
- The only exception is – Enable both of the iSCSI network adapters in the “Portals” area

ESXi Settings
Setup your iSCSI vSwitch and attach two dedicated NICS
Setup two VMKernel Ports for iSCSI connections
Ensure that the First VMKernel Port group (iSCSI72) goes to ONLY vmnic0 and vice versa for iSCSI73

Enable the iSCSI LUNs by following the standard VMware instructions
Note – Ensure you bind BOTH iSCSI VMKernel Ports

Once you have your connectivity working, it’s time to setup round robin for path management.
Right click on one of the LUNS, choose ‘Manage Paths…’
Change the path selection on both the LUNS to ‘Round Robin’
Tip – After the fact if you make changes to your iSCSI settings, then ensure you check your path selection as it may go back to default

Notes and other Thoughts…
Browser Cache Issues — I had issues with freeNAS updating information on their web interface, even after reboots of the NAS and my PC. I moved to Firefox and all issues went away. I then cleared my cache in IE and these issues were gone.
Jumbo Frames — Can I use Jumbo Frames with the SYBA Dual NICs SY-PEX24028? – Short Answer is NO I was unable to get them to work in ESXi 5.1. SYBA Tech support stated the MAX Jumbo frames for this card is 7168 and it supports Windows OS’s only. I could get ESXi to accept a 4096 frame size but nothing larger. However, when enabled none of the LUNS would connect, once I moved the frame size back to 1500 everything worked perfectly. I beat this up pretty hard, adjusting all types of ESXi, networking, and freeNAS settings but in the end, I decided the 7% boost that Jumbo frames offer wasn’t worth the time or effort.
Summary…
These settings will enable my 2 ESXi Hosts to balance their connections to my iSCSI LUNS hosted by freeNAS server without the use of freeNAS Networking Teaming or aggregation. By far it is the simplest way to setup and the out of the box performance works well.
My advice is — go simple with these settings for your home lab and save your time to beat up more important issues like “how do I shutdown windows 8” J
I hope you found this post useful and if you have further questions or comments feel free to post up or reach out to me.
Home Lab – freeNAS build with LIAN LI PC-Q25, and Zotac M880G-ITX
I’ve decided to repurpose my IOMega IX4 and build out a freeNAS server for my ever growing home lab. In this blog post I’m not going to get in to the reasons why I choose freeNAS, trust me I ran through lot of open source NAS software, but rather on the actual hardware build of the NAS device.
Here are the hardware components I choose to build my freeNAS box with…
- LIAN LI PC-Q25 Case – NewEgg ~$120, it goes on sale from time to time…
- Cooler Master 500W PS – ValleySeek ~$34, on sale
Zotac M880G-ITX – Valleyseek ~$203<< 10/07/2013 This MOBO had BIOS issues with detecting HDDs. I moved to a ASRock FM2A85X-ITX- SYBA Dual NIC SY-PEX24028 – NewEgg ~$37
- 8GB Corsair RAM – I owned this bought a Frys in a 16GB Kit for $49
- 5 x Seagate ST2000DM001 2TB SATAIII – Superbiiz ~$89, onsale and free shipping
- 1 x Corsair 60GB SSD SATAIII – I owned this bought at Frys for ~$69
Tip – Watch for sales on all these items, the prices go up and down daily…
Factors in choosing this hardware…
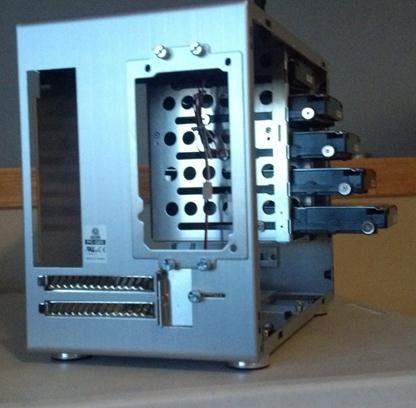
- Case – the Lian LI case supports 7 Hard disks (5 being hotswap) in a small and very quiet case, Need I say more…
- Power supply – Usually I go with a Antec Power supply, however this time I’m tight on budget so I went with a Cooler Master 80PLUS rated Power supply
- Motherboard – The case and the NAS software I choose really drove the Mobo selection, I played with a bunch of Open soruce NAS software on VM’s, once I made my choice on the case and choosing freeNAS it was simple as finding one that fit both. However 2 options I was keen on – 1) 6 SATA III Ports (To support all the Hard disks), 2) PCIex1 slot (to support the Dual Port NIC). Note – I removed the onboard Wireless NIC and the antenna, no need for them on this NAS device
- NIC – the SYBA Dual NIC I have used in both of my ESXi hosts, they run on the Realtek 8111e chipset and have served me well. The Mobo I choose has the same chipset and they should integrate well into my environment.
- RAM – 8GB of RAM, since I will have ~7TB of usable space with freeNAS, the general rule of thumb is to use 1GB of RAM per 1TB of storage, 8GB should be enough.
- Hard Disks – I choose the hard disks mainly on Price, speed, and size. These hard disks are NOT rated above RAID 1 however I believe they will serve my needs accordingly. If you looking for HIGH performance and duty cycle HD’s then go with an enterprise class SAS or SATA disk.
- SSD – I’ll use this for cache setup with freeNAS, I just wanted it to be SATA III
Install Issues and PIC’s
What went well…
- Hard disk installs into case went well
- Mobo came up without issue
- freeNAS 8.3.xx installed without issue
Minor Issues….
- Had to modify (actually drill out) the mounting plate on the LIAN LI case to fit the Cooler Master Power supply
- LIAN LI Mobo Mount points were off about a quarter inch, this leaves a gap when installing the NIC card
- LIAN LI case is tight in areas where the Mobo power supply edge connector meets the hard disk tray
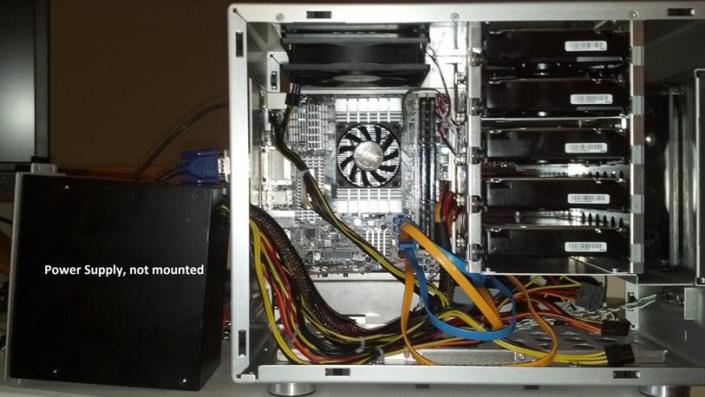
PICS…
LIAN LI Case

5 Seagate HD’s installed…

Rear view…
Side Panel…

Zotac Mobo with RAM

Removal of the Wireless NIC….

Zotac Mobo installed in case with dual NIC…

Everything Mounted (Except for the SSD)….
Home Lab – More updates to my design
Most recently I posted about adding a Layer 3 switch to my growing home lab. The Netgear Layer 3 switch I added (GSM7324) is preforming quite well in my home lab. In fact it’s quite zippy compared to my older switches and for the price it was worth it. However my ever growing home lab is having some growing pains, 2 to be exact.
In this post I’ll outline the issues, the solutions I’ve chosen, and my new direction for my home lab.
The issues…
Initially my thoughts were I could use my single ESXi Host and Workstation with specific VM’s to do most of my lab needs.
There were two issues I ran into, 1 – Workstation doesn’t support VLANs and 2 – my trusty IOMega IX4 wasn’t preforming very well.
Issue 1 – Workstation VLANs
Plain and simple Workstation doesn’t support VLANs and working with one ESXi Host is prohibiting me from fully using my lab and switch.
Issues 2 – IOMega IX4 Performance
My IOMega IX4 has been a very reliable appliance and it has done its job quite well.
However when I put any type of load on it (More than One or Two VM’s booting) its performance becomes a bit intolerable.
The Solutions…
Issue 1 – Workstation VLANs
I plan to still use Workstation for testing of newer ESXi platforms and various software components
I will install a second ESXi host similar to the one I built earlier this year only both Hosts will have 32GB of RAM.
The second Host will allow me to test more advanced software and develop my home lab further.
Issues 2 – IOMega IX4 Performance
I’ve decided to separate my personal data from my home lab data.
I will use my IX4 for personal needs and build a new NAS for my home lab.
A New Direction…
My intent is to build out a second ESXi Physical Host and ~9TB FreeNAS server so that I can support a vCloud Director lab environment.
vCD will enable me to spin up multiple test labs and continue to do the testing that I need.
So that’s it for now… I’m off to build my second host and my freeNAS server…
