Whitebox
3 Interesting DIY PC / Server Case Options for Home Labs
I’ve been building White box PCs since the early 90’s and if you seen my home lab blogs and videos its a passion that has continued on for so many years. When I look for a case, I’m usually looking for practicality and usability as it relates to the indented design. As a DIY home lab builder, using commodity cases is normal but unique cases for home labs are not always easy to find. When I do look for unique Home Lab case ideas, I usually run into lists of the gamer builds that are not so much meant for Home Labs. In this blog I wanted to compile a list of cases that are a bit more unique but someone might want to use for a home lab. For each case, I listed out some of my thoughts around home lab use cases. Of course, deeper research will be needed to determine if they fit your indented use.
#1 – Cryorig TAKU, The PC Monitor Stand Mini ITX PC Case

USE CASE: Could be used for a stackable home lab or workstations
PROS:
- ~1U Formfactor | ++ Coolness factor
- Portability | Light Weight | Low Noise
- The slide out system tray makes for easy access to internal components, especially when stacked
CONS:
- Tight form factor limiting options
- Sometimes limited SFX Power Supplies Options
- ITX Standard might be hard for Home Lab deployments
- Limited to 3 Drives
- When opening cables may have to slide with it or be disconnected
- Company just starting out, hard to find replacement parts
Other Links:
- Cost ~$200
- Video Review
- Amazon
#2 – Fractal Design Define 7

USE CASE: Sure this may look like a standard PC Case, but what’s unique about this case is the MANY ways it can be configured and re-configured. Because of this unique flexibility it would work well as a Workstation or ESXi Host.
PROS:
- MANY case configurations options
- Want even more space? Look at the Define 7 XL
- Supports ATX and some E-ATX configurations
- Clean case design with 3 Color Options
- Horizontal and vertical PCI Slots
- Wire management
- Air Filters
- 9 Fan Connections
- Lots of Disk space
CONS:
- No 5.25″ disk bays
- No front facing USB or external ports (all on top)
- It’s big and the XL even bigger
- Some options sold separately
Other Links:
- Standard ~$140 | XL Version $220
- Amazon
- Video Review
- Manufacture Site
#3 – JONSBO N1 Mini-ITX NAS Chassis

USE CASE: With so many disk options could see this case being used for FreeNAS or even a vSAN cluster
PROS:
- LOTS of disk space 5 x 3.5 and 1 2.5
- MINI-ITX / Small form factor
- PCI Low Profile slot
- Upright or Lie-down configurations
- Check out the manufacture site for more and similar case designs
CONS:
- Does require SFX power supply
- Power/Cables may be hard to work with in the upright position
- The size may limit flexibility
- Only one PCI slot
- No 5.25″ disk bays
Other Links:
Home Lab Generation 7: Part 1 – Change Rational for software and hardware changes
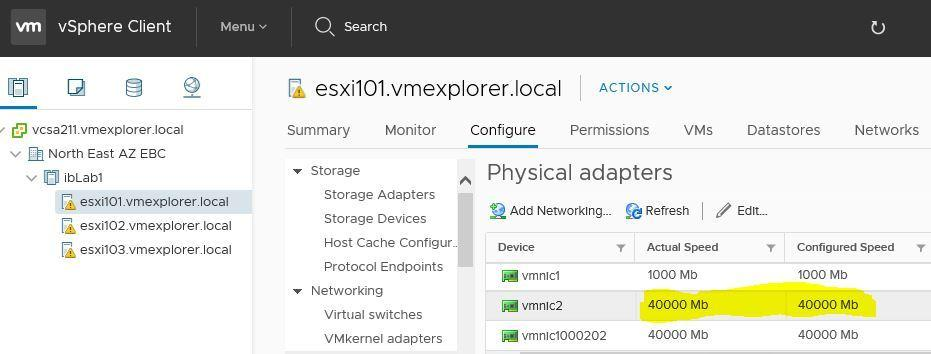
Well its that time of year again, time to deploy new changes, upgrades, and add some new hardware. I’ll be updating my ESXi hosts and vCenter Server to the latest vSphere 7 Update 3a from 7U2d. Additionally, I’ll be swapping out the IBM 5210 JBOD for a Dell HBA330+ and lastly I’ll change my boot device to a more reliable and persistent disk. I have 3 x ESXi hosts with VSAN, vDS switches, and NSX-T. If you want to better understand my environment a bit better check out this page on my blog. In this 2 part blog I’ll go through the steps I took to update my home lab and some of the rational behind it.
There are two main parts to the blog:
- Part 1 – Change Rational for software and hardware changes – In this part I’ll explain some of my thoughts around why I’m making these software and hardware changes.
- Part 2 – Installation and Upgrade Steps – These are the high level steps I took to change and upgrade my Home lab
Part 1 – Change Rational for software and hardware changes:
There are three key changes that I plan to make to my environment:
- One – Update to vSphere 7U3a
- vSphere 7U3 has brought many new changes to vSphere including many needed features updates to vCenter server and ESXi. Additionally, there have been serval important bug fixes and corrections that vSphere 7U3 and 7U3a will address. For more information on the updates with vSphere 7U3 please see the “vSphere 7 Update 3 – What’s New” by Bob Plankers. For even more information check out the release notes.
- Part of my rational in upgrading is to prepare to talk with my customers around the benefits of this update. I always test out the latest updates on Workstation first then migrate those learnings in to Home Lab.
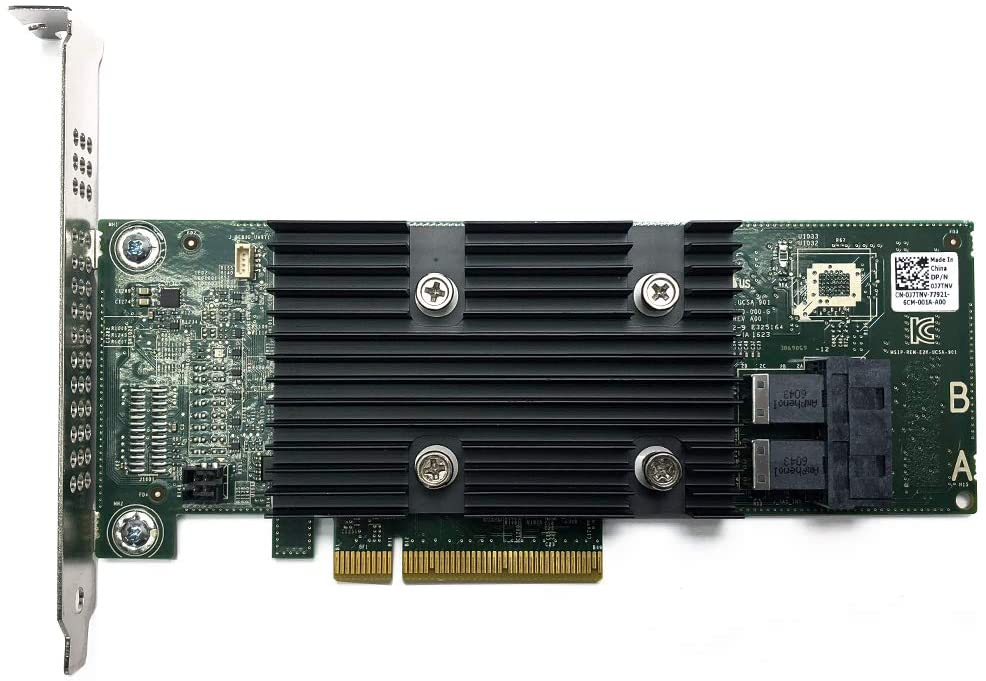
- Two – Change out the IBM 5210 JBOD
- The IBM 5210 JBOD is a carry over component from my vSphere 6.x vSAN environment. It worked well with vSphere 6.x and 7U1. However, starting in 7U2 it started to exhibit stuck IO issues and the occasional PSOD. This card was only certified with vSphere/vSAN 6.x and at some point the cache module became a requirement. My choices at this point are to update this controller with a cache module (~$50 each) and hope it works better or make a change. In this case I decided to make a change to the Dell HBA330 (~$70 each). The HBA330 is a JBOD controller that Dell pretty much worked with VMware to create for vSAN. It is on the vSphere/vSAN 7U3 HCL and should have a long life there too. Additionally, the HBA330 edge connectors (Mini SAS SFF-8643) line up with the my existing SAS break-out cables. When I compare the benefits of the Dell HBA330 to upgrading the cache module for the IBM 5210 the HBA330 was the clear choice. The trick is finding a HBA330 that is cost effective and comes with a full sized slot cover. Its a bit tricky but you can find them on eBay, just have to look a bit harder.
- Three – Change my boot disk
- Last September-2021, VMware announced boot from USB is going to change and customers were advised to plan ahead for these upcoming changes. My current hosts are using cheap SanDisk USB 64GB memory sticks. Its something I would never recommend for a production environment, but for a Home Lab these worked okay. I originally chose them during my Home Lab Gen 5 updates as I need to do testing with USB booted Hosts. Now that VMware has deprecated support for USB/SD devices it’s time to make a change. Point of clarity: the word deprecated can mean different things to different people. However, in the software industry deprecated means “discourage the use of (something, such as a software product) in favor of a newer or better alternative”. vSphere 7 is in a deprecated mode when it comes to USB/SD booted hosts, they are still supported, and customers are highly advised to plan ahead. As of this writing, legacy (legacy is a fancy word for vSphere.NEXT) USB hosts will require a persistent disk and eventually (Long Term Supported) USB/SD booted hosts will no longer be supported. Customers should seek guidance from VMware when making these changes.

-
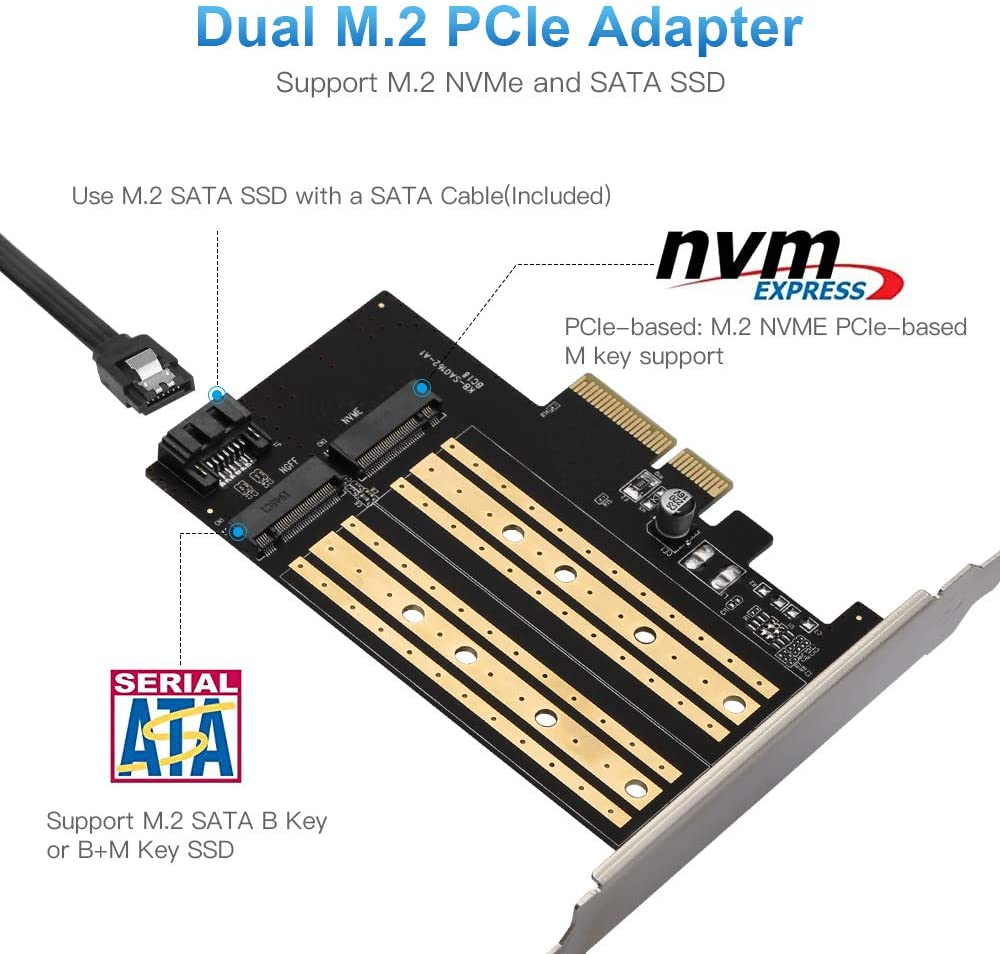
- The requirement to be in a “Long Term Supported” mode is to have a ESXi host be booted from HDD, SSD, or a PCIe device. In my case, I didn’t want to add more disks to my system and chose to go with a PCIe SSD/NVMe card. I chose this PCIe device that will support M.2 (SATA SSD) and NMVe devices in one slot and I decided to go with a Kingston A400 240G Internal SSD M.2 as my boot disk. The A400 with 240GB should be more than enough to boot the ESXi hosts and keep up with its disk demands going forward.

Final thoughts and a important warning. Making changes that affect your current environment are never easy but are sometimes necessary. With a little planning it can make the journey a bit easier. I’ll be testing these changes over the next few months and will post up if issues occur. However, a bit of warning – adding new devices to an environment can directly impact your ability to migrate or upgrade your hosts. Due to the hardware decisions I have made a direct ESXi upgrade is not possible and I’ll have to back out my current hosts from vCenter Server plus other software and do a new installation. However, those details and more will be in Part 2 – Installation and Upgrade Steps.
Opportunity for vendor improvement – If backup vendors like Synology, asustor, Veeam, Veritas, naviko, and Arcoins could really shine. If they could backup and restore a ESXi host to dislike hardware or boot disks this would be a huge improvement for VI Admin, especially when they have tens of thousands of hosts the need to change from their USB to persistent disks. This is not a new ask, VI admins have been asking for this option for years, now maybe these companies will listen as many users and their hosts are going to be affected by these upcoming requirements.
Create an ESXi installation ISO with custom drivers in 9 easy steps!
Video Posted on Updated on
One of the challenges in running a VMware based home lab is the ability to work with old / inexpensive hardware but run latest software. Its a balance that is sometimes frustrating, but when it works it is very rewarding. Most recently I decided to move to 10Gbe from my InfiniBand 40Gb network. Part of this transition was to create an ESXi ISO with the latest build (6.7U3) and appropriate network card drivers. In this video blog post I’ll show 9 easy steps to create your own customized ESXi ISO and how to pin point IO Cards on the vmware HCL.
** Update 06/22/2022 ** If you are looking to do USB NICs with ESXi check out the new fling (USB Network Native Driver for ESXi) that helps with this. This Fling supports the most popular USB network adapter chipsets ASIX USB 2.0 gigabit network ASIX88178a, ASIX USB 3.0 gigabit network ASIX88179, Realtek USB 3.0 gigabit network RTL8152/RTL8153 and Aquantia AQC111U. https://flings.vmware.com/usb-network-native-driver-for-esxi
NOTE – Flings are NOT supported by VMware
** Update 03/06/2020 ** Though I had good luck with the HP 593742-001 NC523SFP DUAL PORT SFP+ 10Gb card in my Gen 4 Home Lab, I found it faulty when running in my Gen 5 Home Lab. Could be I was using a PCIe x4 slot in Gen 4, or it could be the card runs to hot to touch. For now this card was removed from VMware HCL, HP has advisories out about it, and after doing some poking around there seem to be lots of issues with it. I’m looking for a replacement and may go with the HP NC550SFP. However, this doesn’t mean the steps in this video are only for this card, the steps in this video help you to better understand how to add drivers into an ISO.
Here are the written steps I took from my video blog. If you are looking for more detail, watch the video.
Before you start – make sure you have PowerCLI installed, have download these files, and have placed these files in c:\tmp.
- Download driver –
- LSI Driver: https://my.vmware.com/group/vmware/details?downloadGroup=DT-ESXI60-QLOGIC-QLCNIC-61191&productId=491
- Note: Extract the offline bundle from this package
- Download ESXi –
- ESXi Update ZIP File: vmware.com/downloads
- Note: make sure you download the Update ZIP file and not the ESXi ISO file
I started up PowerCLI and did the following commands:
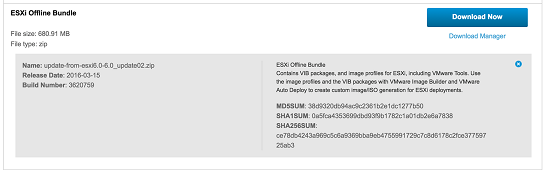
1) Add the ESXi Update ZIP file to the depot:
Add-EsxSoftwareDepot C:\tmp\update-from-esxi6.7-6.7_update03.zip
2) Add the LSI Offline Bundle ZIP file to the depot:
Add-EsxSoftwareDepot ‘C:\tmp\qlcnic-esx55-6.1.191-offline_bundle-2845912.zip’
3) Make sure the files from step 1 and 2 are in the depot:
Get-EsxSoftwareDepot
4) Show the Profile names from update-from-esxi6.7-6.7_update03. The default command only shows part of the name. To correct this and see the full name use the ‘| select name’
Get-EsxImageProfile | select name
5) Create a clone profile to start working with.
New-EsxImageProfile -cloneprofile ESXi-6.7.0-20190802001-standard -Name ESXi-6.7.0-20190802001-standard-QLogic -Vendor QLogic
6) Validate the LSI driver is loaded in the local depot. It should match the driver from step 2. Make sure you note the name and version number columns. We’ll need to combine these two with a space in the next step.
Get-EsxSoftwarePackage -Vendor q*
7) Add the software package to the cloned profile. Tip: For ‘SoftwarePackage:’ you should enter the ‘name’ space ‘version number’ from step 6. If you just use the short name it might not work.
Add-EsxSoftwarePackage
ImageProfile: ESXi-6.7.0-20190802001-standard-QLogic
SoftwarePackage[0]: net-qlcnic 6.1.191-1OEM.600.0.0.2494585
8) Optional: Compare the profiles, to see differences, and ensure the driver file is in the profile.
Get-EsxImageProfile | select name << Run this if you need a reminder on the profile names
Compare-EsxImageProfile -ComparisonProfile ESXi-6.7.0-20190802001-standard-QLogic -ReferenceProfile ESXi-6.7.0-20190802001-standard
9) Create the ISO
Export-EsxImageProfile -ImageProfile “ESXi-6.7.0-20190802001-standard-QLogic” -ExportToIso -FilePath c:\tmp\ESXi-6.7.0-20190802001-standard-QLogic.iso
That’s it! If you like my ‘no-nonsense’ videos and blogs that get straight to the point… then post a comment or let me know… Else, I’ll start posting boring video blogs!
Cross vSAN Cluster support for FT
FIX for Netgear Orbi Router / Firewall blocks additional subnets
**2021-NOV Update** With the release of Orbi Router Firmware Version V2.7.3.22 the telnet option is no longer available in the debug menu. This means the steps below will not work unless you are a earlier router firmware version. I looked for other Orib solutions but didn’t find any. However, I solved this issue by using an additional firewall using NAT between VLAN74 and VLAN 75. If you find an Orbi solution, please post a comment and I’ll be glad to update this blog.
Last April 2019 I decided to update my home network with the Orbi WiFi System (RBK50) AC3000 by Netgear. My previous Netgear Wifi router worked quite well but I really needed something to support multiple locations seamlessly.
The Orbi Mesh has a primary device and allows for satellites to be connected to it. It creates a Wifi mesh that allows devices to go from room to room or building to building seamlessly. I’ve had it up for a while now and its been working out great – that is until I decided to ask it to route more than one subnet. In this blog I’ll show you the steps I took to over come this feature limitation but like all content on my blog this is for my reference. Use at your own risk.
To understand the problem we need to first understand the network layout. My Orbi Router is the Gateway of last resort and it supplies DHCP and DNS services. In my network I have two subnets which are untagged VLANS known as VLAN 74 – 172.16.74.x/24 and VLAN 75 – 172.16.75.x/24. VLAN 74 is used by my home devices and VLAN 75 is where I manage my ESXi hosts. I have enabled RIP v2 on the Orbi and on the Dell 6224 switch. The routing tables are populated correctly, and I can ping from any internal subnet to any host without issue, except when the Orbi is involved.

Issue: Hosts on VLAN 75 are not able to get to the internet. Hosts on VLAN 75 can resolve DNS names (example: yahoo.com) but it cannot ping any host on the Inet. Conversely, VLAN 74 can ping Inet hosts and get to the internet. I’d like for my hosts on VLAN 75 to have all the same functionally as my hosts on VLAN 74.

Findings: By default, the primary Orbi router is blocking any host that is not on VLAN 74 from getting to the INET. I believe Netgear enabled this block to limit the number of devices the Orbi could NAT. I can only guess that either the router just can’t handle the load or this was a maximum Netgear tested it to. I found this firewall block out by logging into the CLI of my Orbi and looking at the IPTables settings. There I could clearly see there was firewall rule blocking hosts that were not part of VLAN 74.
Solution: Adjust the Orbi to allow all VLAN traffic (USE AT YOUR OWN RISK)
- Enable Telnet access on your Primary Orbi Router.
- Go to http://{your orbi ip address}/debug.htm
- Choose ‘Enable Telnet’ (**reminder to disable this when done**)
- Telnet into the Orbi Router (I just used putty)
- Logon as root using your routers main password
- I issued the command ‘iptables -t filter -L loc2net’. Using the output of this command I can see where line 5 is dropping all traffic that is not (!) VLAN74.

- Let’s remove this firewall rule. The one I want to target is the 5th in the list, yours may vary. This command will remove it ‘iptables -t filter -D loc2net 5’
- NOTES:
- Router Firmware Version V2.5.1.16 (Noted: 10.2020) — It appears that more recent firmware updates have changed the targeting steps. I noticed in Router Firmware Version V2.5.1.16 I had to add 2 to the targeted line number to remove it with the ip tables command. This my vary for the device that is being worked on.
- Router Firmware Version V2.5.2.4 (Noted: Jan-2021) — It appears the targeting for steps are now fixed in this version.
- Again, as with all my posts, blogs, and videos are for my records and not for any intended purpose.
- Next, we need to clean up some post routing issues ‘iptables -t nat -I POSTROUTING 1 -o brwan -j MASQUERADE’
- A quick test and I can now PING and get to the internet from VLAN 75
- Disconnect from Telnet and disable it on your router.
Note: Unfortunately, this is not a permanent fix. Once you reboot your router the old settings come back. The good news is, its only two to three lines to fix this problem. Check out the links below for more information and a script.
Easy Copy Commands for my reference:
iptables -t filter -L loc2net
iptables -t filter -D loc2net 7 << Check this number
iptables -t nat -I POSTROUTING 1 -o brwan -j MASQUERADE
If you like my ‘no-nonsense’ blog articles that get straight to the point… then post a comment or let me know… Else, I’ll start writing boring blog content.
REF:
Home Lab Gen IV – Part V Installing Mellanox HCAs with ESXi 6.5
The next step on my InfiniBand home lab journey was getting the InfiniBand HCAs to play nice with ESXi. To do this I need to update the HCA firmware, this proved to be a bit of a challenge. In this blog post I go into how I solved this issue and got them working with ESXi 6.5.
My initial HCA selection was the ConnectX aka HP INFINIBAND 4X DDR PCI-E HCA CARD 452372-001, and Mellanox MHGA28-XTC InfiniHost III HCA these two cards proved to be a challenge when updating their firmware. I tried all types of operating systems, different drivers, different mobos, and MFT tools versions but they would not update or be OS recognized. Only thing I didn’t try was Linux OS. The Mellanox forums are filled with folks trying to solve these issues with mixed success. I went with these cheaper cards and they simply do not have the product support necessary. I don’t recommend the use of these cards with ESXi and have migrated to a ConnectX-3 which you will see below.
Updating the ConnectX 3 Card:
After a little trial and error here is how I updated the firmware on the ConnectX 3. I found the ConnectX 3 card worked very well with Windows 2012 and I was able to install the latest Mellanox OFED for Windows (aka Windows Drivers for Mellanox HCA card) and updated the firmware very smoothly.
First, I confirm the drivers via Windows Device Manager (Update to latest if needed)

Once you confirm Windows device functionality then install the Mellanox Firmware Tools for windows (aka WinMFT)
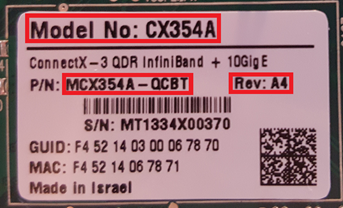
Next, it’s time to update the HCA firmware. To do this you need to know the exact model number and sometimes the card revision. Normally this information can be found on the back of your HCA. With this in hand go to the Mellanox firmware page and locate your card then download the update.
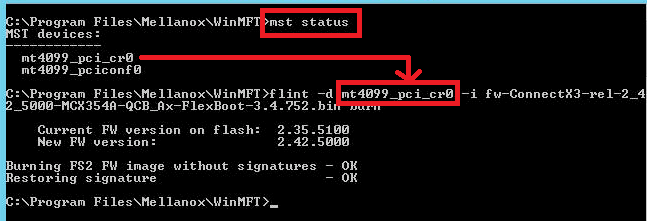
After you download the firmware place it in an accessible directory. Next use the CLI, navigate to the WinMFT directory and use the ‘mst status’ command to reveal the HCA identifier or the MST Device Name. If this command is working, then it is a good sign your HCA is working properly and communicating with the OS. Next, I use the flint command to update my firmware. Syntax is — flint -d <MST Device Name> -i <Firmware Name> burn
Tip: If you are having trouble with your Mellanox HCA I highly recommend the Mellanox communities. The community there is generally very responsive and helpful!
Installation of ESXi 6.5 with Mellanox ConnectX-3
I would love to tell you how easy this was, but the truth is it was hard. Again, old HCA’s with new ESXi doesn’t equal easy or simple to install but it does equal Home lab fun. Let me save you hours of work. Here is the simple solution when trying to get Mellanox ConnextX Cards working with ESXi 6.5. In the end I was able to get ESXi 6.5 working with my ConnectX Card (aka HP INFINIBAND 4X DDR PCI-E HCA CARD 452372-001) and with my ConnectX-3 CX354A.
Tip: I do not recommend the use of the ConnectX Card (aka HP INFINIBAND 4X DDR PCI-E HCA CARD 452372-001) with ESXi 6.x. No matter how I tried I could not update its firmware and it has VERY limited or non-existent support. Save time go with ConnectX-3 or above.
After I installed ESXi 6.5 I followed the following commands and it worked like a champ.
Disable native driver for vRDMA
- esxcli system module set –enabled=false -m=nrdma
- esxcli system module set –enabled=false -m=nrdma_vmkapi_shim
- esxcli system module set –enabled=false -m=nmlx4_rdma
- esxcli system module set –enabled=false -m=vmkapi_v2_3_0_0_rdma_shim
- esxcli system module set –enabled=false -m=vrdma
Uninstall default driver set
- esxcli software vib remove -n net-mlx4-en
- esxcli software vib remove -n net-mlx4-core
- esxcli software vib remove -n nmlx4-rdma
- esxcli software vib remove -n nmlx4-en
- esxcli software vib remove -n nmlx4-core
- esxcli software vib remove -n nmlx5-core
Install Mellanox OFED 1.8.2.5 for ESXi 6.x.
- esxcli software vib install -d /var/log/vmware/MLNX-OFED-ESX-1.8.2.5-10EM-600.0.0.2494585.zip
Ref Links:
After a quick reboot, I got 40Gb networking up and running. I did a few vmkpings between hosts and they ping perfectly.
So, what’s next? Now that I have the HCA working I need to get VSAN (if possible) working with my new highspeed network, but this folks is another post.
If you like my ‘no-nonsense’ blog articles that get straight to the point… then post a comment or let me know… Else, I’ll start writing boring blog content.
The 3 Amigos – NUC, LIAN LI, and Cooler Master
Today I wanted to look at the Cooler Master Elite 110 and compare it a bit to some other cases.
Let’s see how its foot print measures up to some familiar cases. I stacked it up to the Intel NUC5i7RYH and my Lian Li PC-Q25 and surprisingly the Elite 110 is like a big cube that is reminiscent of older Shuttle cases. The size is nice for a small foot print PC but depending on your use it may be too bulky for appliance based work. One thing I did note the manufacture states the case is 20.8 mm but my measurements are coming out close to 21.2 mm
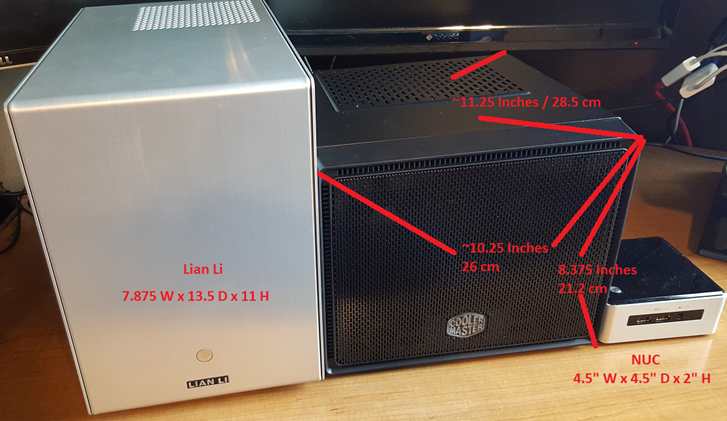
Note: I used my Lian Li case for my FreeNAS build, it’s a great case for those wanting to build a NAS (Click here for more PICS)
Inside the Elite 110, there are your standard edge cables (USB, Audio, Switches, and lights). The Power button is located in front bottom center and is the Cool Master logo. On the right hand side are all your typical USB 3.0, Audio, Reset and HDD LED.

The case allows for a maximum of 3 x 3.5″ or 4 x 2.5″ disk drives. You can also work this into different combinations. For example – 3 x 3.5″ HDD and 1 x 2.5″ SDD, could make a VSAN Hybrid combination or 3 x 2.5″ SDD for VSAN All Flash and 1 x 3.5″ for the boot disk.
The mount point for these disk drives can be mount to the lefthand side and top. When mounting the disks I found it better to mount the SATA and power connectors to the rear.
Top Mount – Allows for 2 x 3.5″ or 2 x 2.5″. In the photo below I’m using 1 x 3.5″ and 1 x 2.5″

Left Side Mount – Only allows for 1 x 3.5″ or 2 x 2.5″ disk drives. In this photo I’m showing the 3.5″ disk mounted in its only position and the 2.5″ disk is unmounted to show some of the mount points.

The Rear of the case will allow for a standard ATX power supply, which sticks out about an inch. The case also supports two PCI Slots which should be enough for most ITX motherboards with one or two PCI Slots.

Inside we find only 4 Motherboard pre-threaded mount points and a 120 mm fan. The fans power cable can connect to the power supply or to your motherboard.

Quick Summary – The Elite 110 is a nice budget case. Depending on your use case it could make a nice case for your home lab, NAS server or even a VSAN box. Its footprint is a bit too big for those appliance-based needs and the case metal is thin. I don’t like the fact there are only 4 mount points for your motherboard, this is great for an ITX Single PCI Slot but not so good for Dual. This is not a fault of the Elite 110 but more of an ATX/mATX/ITX standards problem. With no mount points for the second PCI slot it puts a lot of pressure on your motherboard during insertion. This could lead to cards being miss-inserted.
Overall for the $35 I spent on this case it’s a pretty good value. Further photos can be found here on NewEgg and if you hurry the case is $28 with a rebate.
Manufacture Links:
- Cooler Mater – http://www.coolermaster.com/case/mini-itx-elite-series/elite110/
- Lian Li – http://www.lian-li.com/pc-q25/
- Intel NUC – https://ark.intel.com/products/87570/Intel-NUC-Kit-NUC5i7RYH
If you like my ‘no-nonsense’ blog articles that get straight to the point… then post a comment or let me know… Else, I’ll start writing boring blog content.
Home Lab Gen IV – Part IV: Overcoming installation challenges
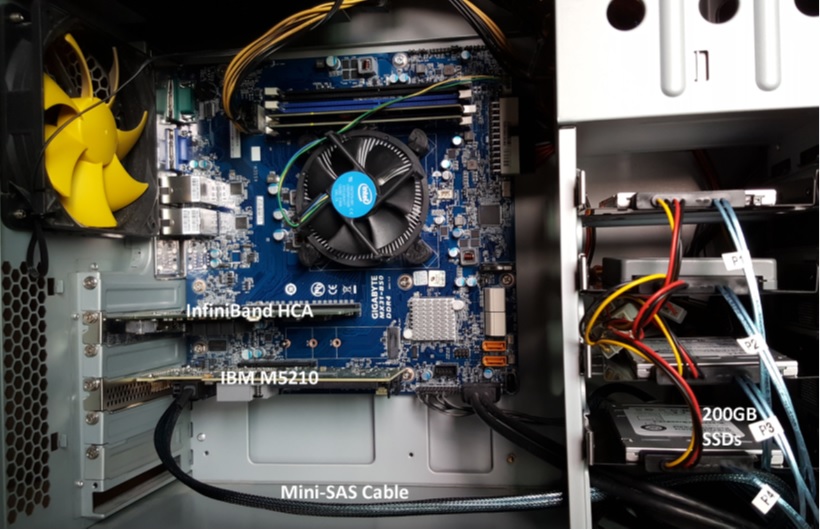
One of the joys of working with a home lab is doing something that no one has done before. Sure, your configuration might be similar to others, but in a way your home lab is unique. However, with this uniqueness comes its share of installation challenges. My new lab was no exception, there were a few challenges and one major issue I uncovered while setting up this new environment. In this blog post I am going review the environment I am working on, break down some of the hardware layout placement challenges, fun using the MAC PowerBook to complete the installation, and finally overcoming ESXi installation challenges.
Here is my new environment:
- Mac Powerbook with macOS Sierra (Used for remote connection into my environment, normally I use a PC)
- Gigabyte MX31-BS0
- Intel Xeon E3-1230 v5
- 32GB DDR4 RAM
- 1 x Mellanox Connectx InfiniBand HCA
- 4 x 200GB SSD, 1 x 64GB USB (Boot)
- 1 x IBM M5210 JBOD SAS Controller
- 1 x Mini SAS SFF-8643 to (4) 29pin SFF-8482
- 1 x 64GB USB Boot Stick:
Hardware layout/placement challanges:
32GB of RAM: Pay attention to the placement of the RAM. As Channel 1 for the RAM are the two closest slots to the CPU, channel 2 being the two farthest away. Normally you would place the RAM pairs in like colors however this Mobo is a bit different
Mellanox Connectx InfiniBand HCA: Placed it in the 16x slot right next to the CPU. The HCA requires an 8x slot so this slot should not slow it down. No BIOS changes were required and I could see this HCA in the BIOS.
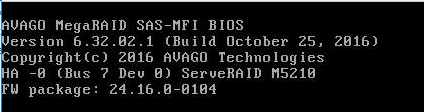
IBM M5210 JBOD SAS Controller: Placed it in the 8x slot which goes through the C232 chipset on the motherboard. Next, I needed to update the firmware but this proved to be a challenge. Keep in mind the M5210 with NO cache will not allow you to enter its BIOS management page (aka MegaRAID webbios). This means you’ll need to use the command line or other software to update and view its information. Initially, I tried several command line options (UEFI Shell, DOS CLI, etc.) with the MegaRAID CLI but I just could not find the right combination to get it to work. My solution — I simply used an older SSD drive, installed Windows Server 2012 on it, and used the Windows exe to update the firmware. It worked perfectly with no issues.

After the update, I had some issues decoding the M5210 running firmware version vs. the vSAN HCL. As you know when running vSAN in a home lab the closer you are to the HCL and vSAN HCL the better. (NOTE: as I’m sure you know production environments MUST match the HCLs). The published firmware version on the vSAN HCL is 4.660.00-8218. However, when the M5210 boots it shows 24.16.0-0104.
Solution: When you are looking at the boot screen you are seeing the FW Package number not the Firmware of your controller. Simply look at the release notes for the ‘FW Package’ and you’ll find the correct MR FW versions that match the vSAN HCL.
IBM / Lenovo doesn’t make it easy to find the firmware for this device.
Here are a few more recent links:
Boot Screen
Release notes

200GB SSD: The Sonata cases I am using are a bit dated but they fully meet my needs so there is no need to replace them. There are 4 x 3.5″ bottom mount disk trays in each case. Bottom mount means you insert your 3.5″ drive into the tray and bolt it to the tray from the bottom. I bought several 3.5″ to 2.5″ converters which will allow me to mount my 2.5″ SSDs. However, the converters didn’t have bottom mount holes that lined up with the standard 3.5″ holes. Fix — I used a hole in the existing tray to secure the converter to the tray. I also made sure I mounted the converter as far back as I could to ensure the SAS cables would not be on the side of the case. This mount position moved the drives back about 1.5″(38mm). The red line in the PIC show where the original mount point was.

Mini SAS SFF-8643 to (4) 29pin SFF-8482: From the PIC above you can see the disk end of the SAS cables. What is nice about them is each one has a disk number labeled and has integrated power and all 4 drives go back to a single connector. The only downside to the cable I bought was they seemed a bit frail, so I’d recommend if you plan to mod your environment frequently look into a better-quality cable. If you interested more in SAS and the associated cables I would recommend this wiki page – https://en.wikipedia.org/wiki/Serial_Attached_SCSI

64GB USB Boot Stick: I decided to use the internal USB port freeing up the rear ports for other items. The USB stick I am using is the SanDisk Ultra Fit 64GB USB 3.0 Flash Drive. ESXi will only take up ~10GB of this stick, so is 64GB overkill? Keep in mind I plan to run vSAN 6.6.x and one of the benefits is the log files now write to RAM and in case of a system failure, they can write these logs to the USB stick. However, the default partition sizes (2.5GB for diags) might not be large enough. The vSAN team as released a nifty script that will estimate and resize you USB partitions. I’ll cover this topic in later posts and show you how to “auto-resize” your USB storage after you have installed vSAN.

Fun with the MAC:
Function Keys: One of the challenges was MAC keyboard mapping into the remote KVM. For some reason, the function keys on a MAC always assume you want to their special function vs. the F# key you are pushing. This proves to be a challenge when you are trying to pass standard function keys. Simple fix: System Preferences > Keyboard > Ensure ‘Use F1, F2, etc. as standard function keys’ is checked.

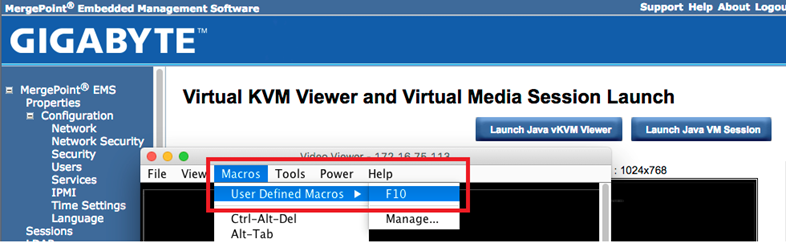
Another option for F# keys is to create a macro inside of the vKVM Viewer to pass the key. The screenshot below shows where you can setup user defined Macros and in the background is the MeregPoint console for one of my ESXi hosts.
Java: One of the joys of this motherboard is the use of vKVM viewer and VM Media. However, these functions need JAVA installed and up to date to function properly. If your JAVA is behind, trust me just update it’ll save you hours of pain. Here is the remaining gotcha. In the Mergpoint web page, you simply click on the ‘Launch Java vKVM Viewer’ button to start your host remote session. The webpage will download a .jnlp file. If you just click on this file you are presented with an error stating it can’t be opened because it is from an unidentified developer. Solution – After the java app downloads, click on the down arrow next to the file and choose ‘Show in finder’. When finder launches select that file by holding down the control key and right-clicking on it. A pop-up window will appear, release the control key and finally choose open. This allows you to override the ‘unidentified developer’ error and launch the viewer.

ESXi Installation:
Setting up the ESXi hosts had one big challenge – after the install of ESXi I could not see my SAS disks. I am using the ESXi 6.5U1 Rollup.iso to do my installs and my main goal was to install and boot ESXi from the 64GB USB stick and be able to access the 4 x 200GB SSD attached to the IBM M5210
Problem – During the install of ESXi, I booted the host using the ESXi6.5 ISO via virtual media console. The installer program would recognize the IBM M5210 controller, the attached 4 x SAS disks, and the 64GB USB stick. The installation would complete without issue. However, after ESXi booted the SAS disks and the controller would not appear but I could see the 64GB USB stick.
Other observations –
First, in the ESXi Log files I noticed the megasas was having firmware issues:
2017-09-21T10:26:31.310Z cpu5:66065)<6>megasas: Waiting for FW to come to ready state 2017-09-21T10:26:31.310Z cpu5:66065)<7>megasas: FW in FAULT state!!
ESC[7m2017-09-21T10:26:31.310Z cpu5:66065)WARNING: vmklinux: pci_announce_device:1486: PCI: driver megaraid_sas probe failed for device 0000:07:00.0ESC[0m 2017-09-21T10:26:31.310Z cpu5:66065)LinPCI: LinuxPCI_DeviceUnclaimed:257: Device 0000:07:00.0 unclaimed.
And… even though ESXi saw the M5210 as vmhba1, its status was unknown
vmhba1 Avago (LSI) MegaRAID SAS Invader Controller
vmhba1 0000:07:00.0 PCI 0:0:29:0 PCI 0:7:0:0 Slot1 UNKNOWN
Second, I use Partition Wizard bootable ISO to remove all partitions prior to installing ESXi. I noted that sometimes after I booted to it as virtual media it would see the 4 x SAS disks and other times it would not.
Third, Installation of ESXI onto SAS or SATA SSD as the boot disk worked perfectly. After booting I could see the M5210 and SAS disks but my goal of using the 64GB USB stick for the boot device was not achieved.
Fourth, occasionally when I booted the ESXi host to the USB stick it would work okay, but upon reboot would not
Final Solution – The core reason why I could not see the SAS disks with ESXi or Partition Wizard was the boot type was UEFI and not legacy. During boot time the boot order would sometimes change if I had virtual media connected, meaning sometimes it would boot the 64GB USB stick or Partition Wizard as UEFI and other times as legacy. Apparently, UEFI boot was giving the M5210 firmware issues not allowing the SAS disk to come online.
FIX – I went into the BIOS of the motherboard > Advanced > CSM Configuration > changed ‘Boot option filter’ to ‘Legacy Only’ and all my issues went away.
Summary – I spent a lot of after-hours and weekends working out all various installation tweaks but what can I say, this is the joy of setting up a home lab! My hopes are in some way this post helps you move your home lab forward too. In my next post, I’ll be going over how to enable the InfiniBand HCA in ESXi 6.5.
If you like my ‘no-nonsense’ blog articles that get straight to the point… then post a comment or let me know… Else, I’ll start writing boring blog content.
Home Lab Gen IV – Part II: Design Considerations
I have decided to move my Home Lab away from Gen III into Gen IV. In doing this I am going to follow my best practices laid out in my ‘Home Lab Generations’ and ‘VMware Home Labs: a Definitive guide’. As you read through the “Home Lab Generations page” you should notice a theme around planning each generation and documenting its outcomes and unplanned items. In this blog post, I am going to start laying out Design Considerations which include the ‘Initial use case/goals and needed Resources as they relate to GEN IV.
Design Considerations:
Initial Use case / goals:
- Support vSphere 6.5 and vSAN 6.6 All Flash Environment
- Move networking vSAN and FT to high-speed InfiniBand
- Support headless ESXi Environment
Resources needed:
- To meet the initial use case/goals I’m will be investing quite a bit into this total refresh.
- Some initial GEN IV resource choices (Still in the works and not all proven)
- Reuse the 3 x Antec Cases / Power Supplies (No cost)
- BitFenix Case to support Windows 10 PC
- Mobo: Gigabyte MX31-BSO ($140 x 3 Ebay)
- RAM: 32GB DDR4 ($144 x 3 Jet.com)
- CPU: E3-1230v5 Xeon ($245 x 3 Jet.com)
- IBM M5210 SAS RAID (Found on Ebay $75 x 3)
- Mini SAS SFF-8643 to (4) 29pin SFF-8482 (Amazon 3 x $18)
- 12 x 200GB Enterprise Class SDD (Found on an Ebay lot deal)
- InfiniBand (All on Ebay)
- Mellanox IS5022 40Gb/s 8 Port Switch ($250) << Do not recommend, no Subnet Manager
- Mellanox ConnectX HCA rebranded as HP INFINIBAND 4X DDR PCI-E HCA CARD 452372-001 ($35 x 3)
- 6 x Infiniband Cables (Mellanox MCC4N26C-003 Cable ($60)
Notes around some of the choices above:
Mellanox IS5022 – I liked the footprint of this device over it not having built-in IB subnet manager. An IB subnet manager is required to manage the “network paths” on an IB network. Without an active IB subnet manager available your IB HCAs will not connect. Since the IS5022 I chose does not have an IB Subnet manager I will need a place to supply this service. I can choose an ESXi Host or a Windows Host. Since my ESXi hosts will be going up and down I plan to use my Windows PC as my subnet manager as it is always on and available.
Mellanox ConnectX HCA rebranded as HP INFINIBAND 4X DDR PCI-E HCA CARD 452372-001 – I initially choose these HCAs based on some other blog posts. They are at an attractive price point but they are much older and no longer have driver support. I was able to get them operational with ESXi 6.0 and will be soon working with them on ESXi 6.5 My advice is Mellanox has great products and support, however, I would recommend if you can afford it to go with a newer card that supports ESXi and save yourself the trouble of modifying ESXi software vibs. I’ll post more on this topic as I start deploying them with ESXi 6.5
Windows PC – I repurposed my Gigabyte Z68XP-UD3, i7 CPU, 90GB SSD, 16GB of DDR3 and then bought a cheap BitFenix case to build out my Windows PC. This PC will serve as my Plex Home Media Server and IB Subnet Manager. I also plan to run Workstation 10 and set up various service VM’s (AD, vCenter Server / VUM, DNS, etc). So far it’s working pretty well but this Mobo has been known to give me issues.
ESXi Hosts – I have 3 Antec Sonata cases, one that I have had since 2003 that I will reuse in this environment. I choose the following parts to make up my new ESXi Hosts: Mobo: Gigabyte MX31-BSO, 32GB DDR4, E3-1230v5 Xeon, and 4 x 200GB SSDs per host. This mobo is a bit limited on the ports but so far it seems to be working out well. For the boot disk, I plan to use the onboard USB port and a 64GB USB Stick. However, the question should be – What am I going to so with those 6 x 1TB SATA disks from GEN III — I put them into my old IX4
Here are a few PICs of the current build:

Next Post I’ll be going over the Gigabyte Motherboard.
If you like my ‘no-nonsense’ blog articles that get straight to the point… then post a comment or let me know… Else, I’ll start writing boring blog content.
Create an ESXi 6.0U2 installation ISO with Realtek 8168 Drivers
02/2021 Update – I was asked to try these steps with ESXi 7.x and I can confirm this driver will not work. I stopped running Realtek NICs quite a while ago. It’s not an issue with the steps but with ESXi 7.0. It does not support drivers with Linux dependencies. The driver ‘net55-r8168 8.045a-napi’ has a Linux dependence that is not part of ESXi 7.0 and this is why it will not install. See the error message below. If you want to install ESXi 7.0, I’d recommend going with NIC that is on the VMware HCL or very close to it.
Add-EsxSoftwarePackage : VIB Realtek_bootbank_net55-r8168_8.045a-napi requires vmkapi_2_2_0_0, but the requirement cannot be satisfied within the ImageProfile.
09/2019 Update – I have created a updated blog and video showing how to create custom ISOs for ESXi. Though it doesn’t include the Realtek drivers, one could use it for the same purpose. Check it out here – Create-an-esxi-installation-iso-with-custom-drivers-in-9-easy-steps
ESXi no longer supports Realtek Network drivers nor are they included on the installation ISO. However, if you want to install ESXi 5.x and 6.x (7.x is not supported) with the Realtek drivers, then users will have to create a custom ISO. Keep in mind these drivers are NOT supported by VMware and should be used at your own risk. Normally, I would use my trusty ESXi-Customizer GUI program but it is no longer supported for ESXi 6. In replacement they offer a CLI supported program. However, instead of learning another 3rd party tool I’d rather rely on the VMware tools provided to me. VMware enables users to create custom ISOs via PowerCLI and in this blog I’ll explain how I used PowerCLI create my ISO. Keep in mind these are the steps that worked for me and your environment may vary.
NOTE: These steps do not work with ESXi 7.0.
— Required Tools and Files —
To get started you will need two files and PowerCLI Installed on a Windows PC. You can skip these steps if you have the ESXi Offline Bundle, PowerCLI installed, and the RealTek Drivers.
STEP1: File 1: Download VMware 6.0U2 Offline Bundle ZIP >> www.vmware.com/download
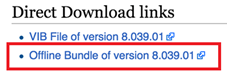
STEP 2: File 2: Download RealTek 8186 Offline bundle >> https://vibsdepot.v-front.de/wiki/index.php/Net55-r8168
STEP 3: If you haven’t yet download and install PowerCLI >> https://communities.vmware.com/community/vmtn/automationtools/powercli
Tip: If you don’t know PowerCLI try starting here
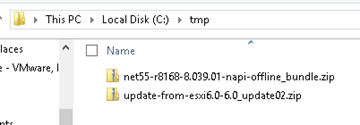
STEP 4: Next Place the files from Step 1 and 2 into c:\tmp folder
–POWERCLI COMMANDS—
Now that you have your files and PowerCLI ready follow these steps. For the steps below I included a screenshot and the actual commands. This will allow you to copy, paste, and edit these commands directly into your environment.
STEP 1: Open PowerCLI (Tip: If you don’t know PowerCLI try starting here)
STEP 2: Add ESXi 6.0u2 and RealTek8186 products to the local Software Depot (Tip: All commands below assume your files are located in the c:\tmp folder)

Add-EsxSoftwareDepot C:\tmp\update-from-esxi6.0-6.0_update02.zip

Add-EsxSoftwareDepot C:\tmp\net55-r8168-8.039.01-napi-offline_bundle.zip
STEP 3: Confirm the products are in the depot

Get-EsxSoftwareDepot
STEP 4: List out the ESXi Image Profiles

Get-EsxImageProfile
TIP: Use ‘Get-EsxImageProfile | select name’ for a better view of the list.
STEP 5: Create a Clone Image to be modified – Ensure you are targeting the “ESXi…..standard” profile from STEP 4

New-EsxImageProfile -cloneprofile ESXi-6.0.0-20160302001-standard -Name “RealTek8186a”
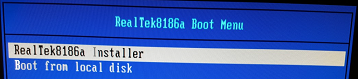
Forward-Looking Tip: Whatever ‘-Name’ you choose, it will show up in your boot ISO
STEP 6: You’ll have 2 entries in this step. First, we’ll Set the Acceptance Level to Community Supported (Remember RealTek is unsupported by VMware, hence “community supported”) and Second, for the ImageProfile you’ll enter the ‘-Name’ you choose in Step 5.

Set-EsxImageProfile -Name RealTek8186a -AcceptanceLevel CommunitySupported
For ImageProfile Enter the ‘-Name’ you choose in Step 5. I entered – RealTek8186a
STEP 7: Ensure the RealTek ‘net55-r8186’ driver is loaded from the local depot (Screenshot shortened)

Get-EsxSoftwarePackage
STEP 8: 3 Entries on this step. First, we add the RealTek software package to the profile. Second, we put in the ImageProfile ‘-Name’ from step 5, and third we enter the SoftwarePackage name.
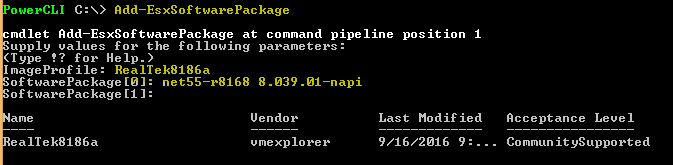
Add-EsxSoftwarePackage
ImageProfile: RealTek8186a
SoftwarePackage[0]: net55-r8168 8.039.01-napi
Tip: For the SoftwarePackage you MUST enter the full name, if you just use the short name it will not work
STEP 9: Validate the RealTek drivers are now part of the RealTek8186a Profile (Screenshot shortened)
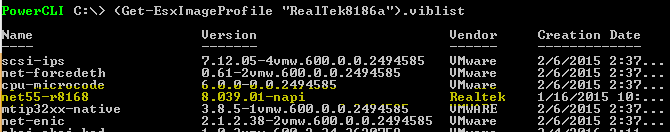
(Get-EsxImageProfile “RealTek8186a”).viblist
STEP 10: Export the profile to an ISO

Export-EsxImageProfile -ImageProfile “RealTek8186a” -ExportToIso -FilePath c:\tmp\RealTek8186a.iso
And that’s it… You should find your new ISO in the c:\tmp folder. From here you can burn your ISO to a media of your choice or boot the ISO via ilo, iDRAC, virtual media etc.
If you like my ‘no-nonsense’ blog articles that get straight to the point… then post a comment or let me know… Else, I’ll start writing boring blog content.
VMware Home Labs: A definitive guide
For nearly 10 years, I’ve compiled lots information about my home labs. From time to time I would blog about items I was working. However, readers of my blog were starting to respond with – “We enjoy your blogs around home labs. However, it’s a bit hard contextualize this information from multiple blog posts.” And “where do I start with home labs” Most recently the VMware User Group asked me to co-record a session for home lab vs. HOL Of course, I did the Home Lab side of the recording but it got me thinking more about the listener and how I could really put a focus on Who, what, why, and how around home labs. After the recording, I realized my “Home Lab Generations page” (HLG)was in major need of an overhaul.
This is when I decided to change my Home Lags Guide to “HOME LABS: A DEFINITIVE GUIDE”. It took me a few months to transform the HLG into this new approach as it puts a strong focus on Home Lab design considerations. From there I used these design considerations to document and measure my 5 Generations of home labs dating back to 2008. In doing this I got a sense this design guide could help others to measure and plan out their home labs too.

Next Steps for the Home Lab Definitive guide:
- I’ll continue to update it as I progress my home labs
-
I’ll continue to improve it over time but I’d love your feedback too
My hopes are you find this new guide useful and of value. Please post up your suggestions to help its continuous growth!
Also, if you are interested in applying these design practices to your home lab or even if you are just starting out, then reach out to me as I’d love to feature your design here on my blog!
If you like my ‘no-nonsense’ blog articles that get straight to the point… then post a comment or let me know… Else, I’ll start writing boring blog content.
