Whitebox
Home Lab: A List of uncommon or niche products (2021 Update)
Part of the joy of building out a home lab or virtualization workstation is finding those one-off items that enable you to build something great, cheap, and unique. Below is a list of some those niche items and distributors I’ve found along the way. I’ll continue to update this post as we go along and I encourage you post up some of your findings too!
** 2021 UPDATE **
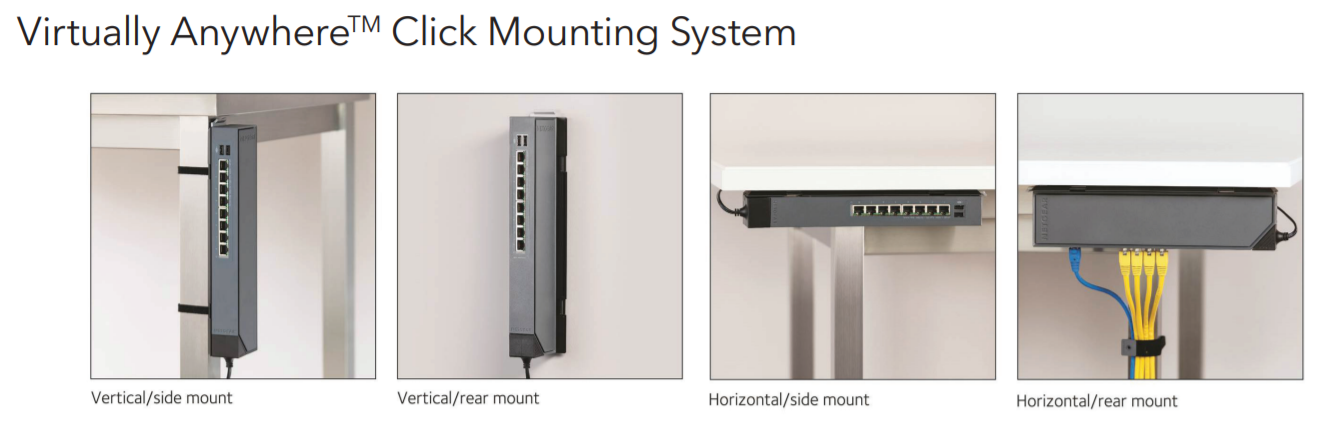
Looking for a partially managed Home or SMB network switch? Then consider the GSS116e by Netgear. I enjoyed working with its simple web interface and immediately found value the simple to setup VLANs. One of the great selling features is the many ways it can be easily mounted, including under things!
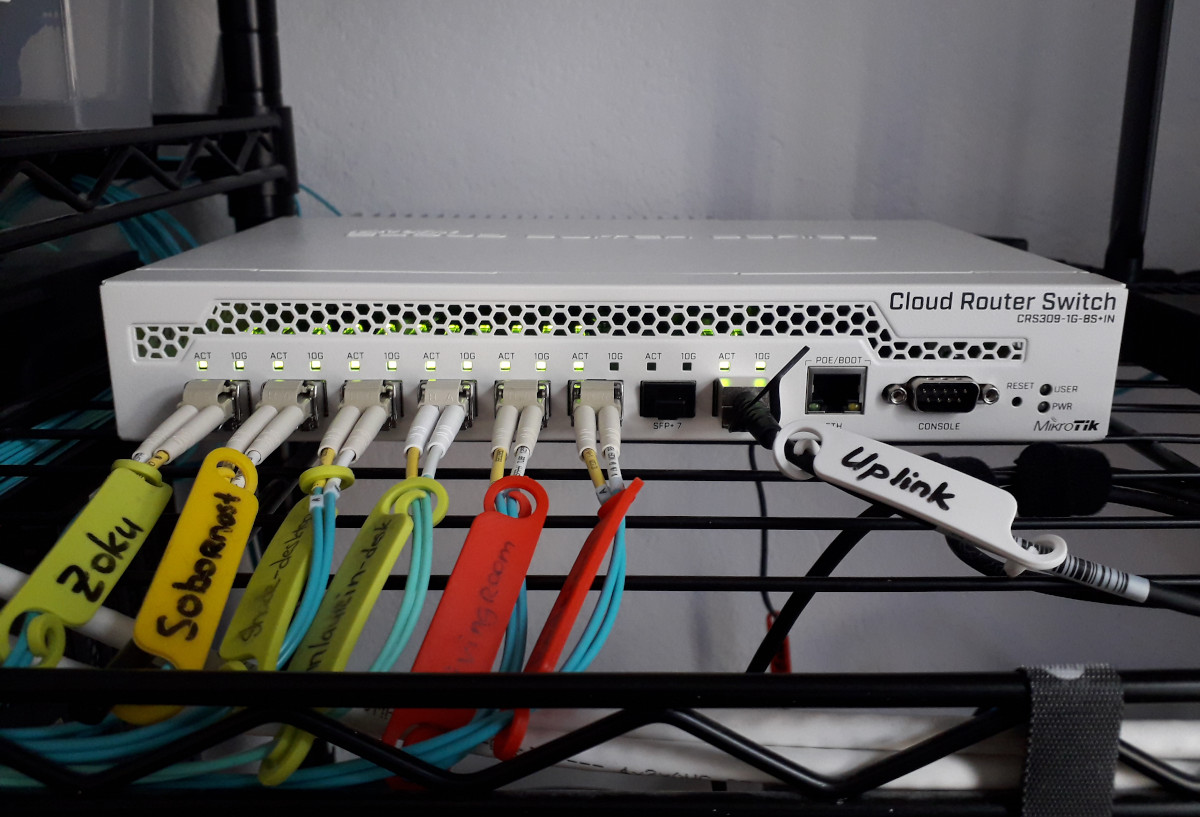
I found these great cable labels while reading shipilev.net I plan to implement them in my lab soon!
Add On Cards (Yes that is their name) sells a good variety of computer components, peripherals and accessories. Mobile phone peripherals. Data storage products. Data center and communication hardware including optical transceivers, DAC cables, AOC cables and fiber optic patch cables. Be advised some of their products ship from overseas which may delay arrival.
** 2020 Update **
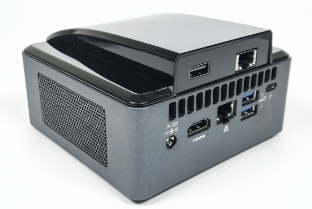
Makes a lot of Intel NUC product modifications that make your NUC even more useful. The product I like are the NUC lid mods — Add RJ45, Wireless, TV Tuner, etc. right to your NUC! Very cool!
** OLDER ITEMS **
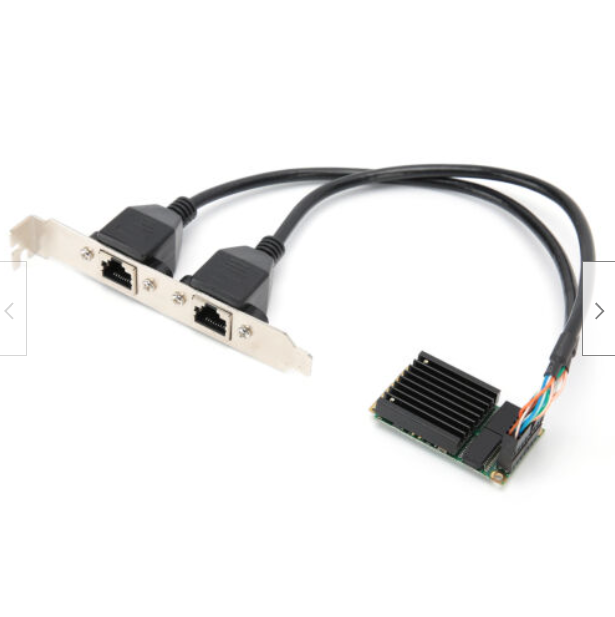
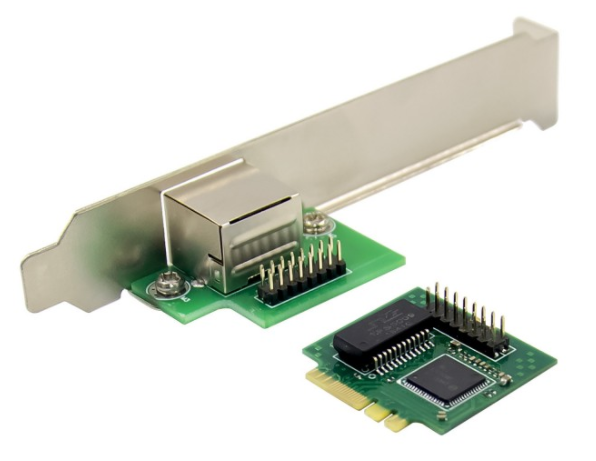
This place is full of all types of unique adapters and gadgets to make your home lab or workstation PC better. What I like about their product line focus is the support of cards with a PCIe x1 slot. Various server based add on cards (example 2/4 port NIC cards) typically require a PCIe x4 or x8 port. However, most home labs typically have plenty of x1 slots and very little to no support for x4 and x8. Syba seems to make a “plethora” of add on cards that support x1. The only downside is poor documentation / support.
Some products I like from them —
- 2 Port Gbe PCIe x1 card (SY-PEX24028): I own and use several of these, they seem to work quite well. Dislikes – No Jumbo frames and it uses a Realtek 8111e chips set which means you must add these drivers to support ESXi
- Another cool item they make is a M.2 to 4-port SATA III Adapter. This little RAID controller allows you to plug directly into a M.2 port and allow for 4 mort SATA devices. I think this would be handy for smaller systems (ie. NUC builds)

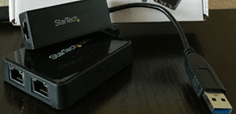
StarTech is really becoming a great company with a very diverse and well supported / documented product line. I think they are really starting to give Blackbox a run for their money. I really like their cable and adapter card lines.
I’ve been using their Startech Null Modem DB9 to USB to run the CLI on my Netgear manage Switch since 2012 and have yet to have an issue with it.

William Lam has blogged many times around the use of NUC style home labs with StarTech Single and Dual USB 3.0 network adapters.
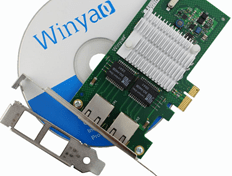
Winyao is a “boutique” distributor specializing in NICs, Fibre adapters, and Transceivers. One item I find of value is their PCIe x1 Dual NIC with Intel or Broadcom chipset. Personally, I don’t know much about this company or own any of their products, but at $40-$60 per brand new adapter I wished I had found them before buying the Syba adapters.
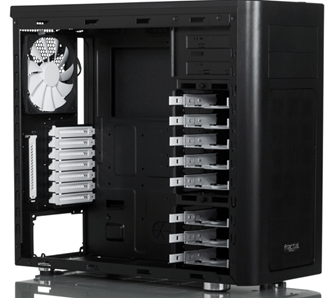
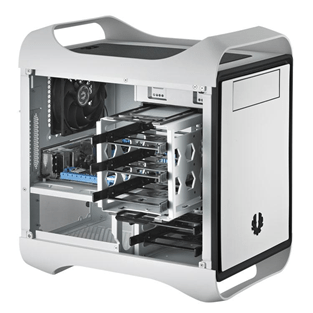
If you are looking for your next server, workstation, media, or top of the line PC case then take a peek at Fractal Design. Founded in 2007 and based out of Sweden they have really started to dominate the custom case design market. Their innovative designs blend elegance with flexibility, which I might add is a hard combination to find. I like their Arc Midi and Arc Mini R2 line of cases for home lab build outs. However, when or if my trusty Antec Sonata from 2003 lets me down, then Fractal will be next on my list. Here is a great blog post from Erik Bussink around his use of Fractal Design for his 2014 Home Lab.
** 09/06/2017 – Here are some updates to this list **
Came across this interesting case / mod company that builds all kinds of custom cases, cables, etc to mod your PC’s. I like the Prodigy Mini-ITX case, with 2 PCI Slots and a spare slot for Disk or other mods it could be a good fit for a NAS project. However I’m not fond of the excessive top and bottom ornaments.
ASUS
ASUS came out with a great M.2 to U.2 option allowing users to interface with SAS disks. They claim this option will help users to interface with SAS SSD and get extreme performance. There are some constraints around this (cables, disks, chipsets, etc) so read up on this before you buy.

If you like my ‘no-nonsense’ blog articles that get straight to the point… then post a comment or let me know… Else, I’ll start writing boring blog content.
Gigabyte MX31-BS0 Firmware / BIOS update for MergePoint Embedded Management Software and Motherboard
** Blog Updates / Notes **
I wrote this post when I first got my MX31-BS0 (2017), since then I have updated my BIOS several times using this process. Here are my notes around my most recent update experiences and blog comments.
- 07/2019 – Updated 1 host with MX-31BS0 BIOS from R10 to R11 and MergePoint EMS 8.73 to 8.85. This update didn’t go smooth and I cannot recommend it.
- Why did I update — I recently installed Java 9 and the vKVM under EMS 8.73 would not work. After installing R11/8.85 Java 9 seemed to work but I had issues
- Notes / Issues:
- Noted EMS 8.85 Changes: I didn’t dig in deep but the install log screen got a new look, and all the rest of the screens seemed to be the same. I had some random quirkiness (as stated int he blog post below) during the update, but nothing out of the ordinary.
- vKVM/vMedia Issues:
- EMS 8.85 with the vKVM or the vMedia would disconnect upon reboot of the host OR it would do this randomly. This is with the ‘Keep PHY link up’ enabled.
- Tested on a system with Java 8 and had the same results
- Downgraded to EMS 8.73 with BIOS R11 all issues went away
- I did not test EMS 8.80 or 8.83
- 09/2018 – Mix of updates for my three hosts — Updated MX-31BS0 BIOS from R03 or R08 to R10 and 2 hosts MergePoint 8.58 to 8.73, as one host was on 8.73 already
- Noted behavior:
- After BIOS update was completed the Mobo powered off vs. rebooting as with previous updates. Had to power on the mobo to complete the BIOS install. Then the mobo rebooted one more time as expected.
- Even though the Mobo had been warm booted the BIOS Version in MergePoint web interface still showed the old version. However, the Boot BIOS screen reflected the update. A full power disconnect of the Mobo and a few ‘refreshes’ of the web browser allowed the MergePoint to report R10. I did not see this behavior with the MergePoint EMS BIOS update, it promptly reported 8.73 properly.
- Noted behavior:
- 05/2018 –Updated on host to MX-31BS0 BIOS from R03 to R08 and MergePoint 8.58 to 8.73.
- Blog readers noted issues going to R08 and could not connect to vKVM, I didn’t have any issues with update. Looks like it was a JAVA 8 Update issue (See post comments for more info)
- 09/2017 – Updated MX-31BS0 BIOS from F10 to R03 and MergePoint 8.41 to 8.58.
- 03/2017 – Original update documented below. Updated MX-31BS0 BIOS from F01 to F10 and MergePoint 8.01 to 8.41.
**** Blog Post ****
You’d think by now manufactures would have a solid and concise process around updating their products. They are quick to warn users to not update their BIOS unless there is a problem and quick to state if there is a problem they usually won’t support it. This total cycle of disservice is a constant for low-end manufacturers, heck even some high server platforms have the same issues. I have these same concerns when I started to look into updating my current MX31-BS0 Motherboard (mobo).
What can soften this blow a bit? How about the ability to update your BIOS remotely? This is a great feature of the MX-31BS0 and in this blog post, I’ll show you how I updated the BIOS and the remote MergePoint EMS (MP-EMS) firmware too.
Initial Steps –
- My system is powered off and the power supply can supply power to the mobo.
- I have setup remote access to the MP-EMS site with an IP address and have access to it via a browser. Additionally, I have validated the vKVM function works without issue
- I downloaded the correct Mobo BIOS and BMC or MP-EMS Firmware and have extracted these files
- Steps below were completed on a Gigabyte MX31-BS0 from BIOS F01 > F10 and MP-EMS 8.01 > 8.41, your system may vary
1 – Access the MergePoint EMS site
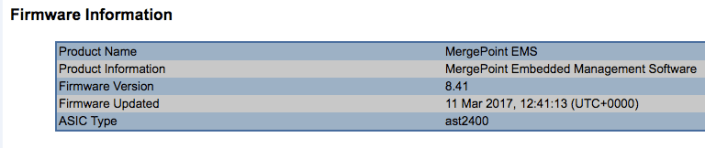
Start out by going to the IP address for MP-EMS site. From the initial display screen, we can see the MP-EMS Firmware versions but not the Platform (or Mobo) BIOS Version. Why not you may ask? Well, the MP-EMS will only display Mobo information when the Mobo is powered on. Before you power on your Mobo I would recommend opening the vKVM session so that you can see the boot screen. When you power on your mobo (MP-EMS > Power > Control > Power On ) use the vKVM screen to halt at the ‘boot menu’ or even go into setup and disable all the boot devices.
In this PIC, we can see my Firmware for the MP-EMS is 8.01 and the BIOS is blank as the Mobo is not powered on.

2- Selecting the Mobo BIOS Update
I choose the following to update the Mobo BIOS. Start out by uploading the file: Update > ‘BIOS & ME’ > Choose File > Image.RBU > Upload

Once the upload is complete, click on ‘Update’ to proceed. NOTE: a warning dialog box appeared for me stating the system would be powered off to update the BIOS. Good thing I’m in the Boot Menu as the system will just directly power off with no regard of the system state

3 – Installing the Mobo BIOS Update: Be Patient for the BIOS install to complete
Once I saw the message the ‘BIOS firmware image has been updated successfully’ I then exited the browser session and vKVM . Note: I’d recommend closing the browser out entirely and then reopening a new session.

Once I restarted my vKVM and MP-EMS sessions and then powered on my Mobo. This allowed the BIOS update to continue.
Here is the patience part – My system was going from BIOS F01 > F10 and it rebooted 2 times to complete the update. Be patient it will complete.
Here is the behavior I noted:
- First Reboot – The system posted normally, it cleared the screen, and then white text stated a warning message about the BIOS booted to default settings. Very shortly after it rebooted again.
- On the 2nd reboot, it posted normally and I pressed F10 to get back to the Boot menu. I did this because next, we’ll need to update the MP-EMS firmware.
Once the system had rebooted I then refreshed my MP-EMS screen and viola there it was BIOS Version F10.

** Note – Not every time but sometimes, I would notice the MP-EMS Screen would show the old BIOS Version #. However, in BIOS the updated BIOS Version # would be present. A cold boot didn’t always fix this, but eventually the MP-EMS would update and would reflect the correct BIOS #**
4 – Selecting the MP-EMS Firmware
While the Mobo is booted and I’m in the boot menu, I went into the MP-EMS session and choose the following Update > BMC > Choose File > 841.img > upload

5 – Installing the MP-EMS firmware update
Once the file was uploaded I could see the Current and New versions. I then choose Update button which promptly disconnected my vKVM session and Status changed from None to a % Completed.
Again, be patient and allow the system to update. For my systems the % Complete seemed to hang a few times but the total process, for me, took about 10 mins.

After the update was complete, the next screen let me know the update was successful, my system did an auto-reboot. When I heard my system beep I then closed my MP-EMS session and started a new browser session.

Shortly after the system booted I went into the MP-EMS and validated the firmware was now 8.41.
Wrapping this up…
Ever heard the saying “It really is a simple process we just make it complicated”? Recent BIOS updates and overall system management sometimes feel this way when trying to do simple processes. Not trying to date myself but BIOS/Firmware updates have been around for decades now. I’ve done countless updates where it was simply extracting an update to simple media and then it completes the update on its own. Now one could argue that systems are more complicated and local boot devices don’t scale well for large environments and I’d say both are very true but that doesn’t mean the process can’t be made more simple.
My recommendation to firmware / bios manufactures — invest in simplicity or make it a requirement for your suppliers. You’ll have happier customers, less service calls, and more $$ in your pocket but then again if you do, what would I have to blog about?
Am I happy with the way I have to update this Mobo? Yes, I am happy with it. For the price I paid it’s really nice to have a headless environment that I can remotely update. I won’t have to do it very often so I’m glad I wrote down my steps in this blog.
If you like my ‘no-nonsense’ blog articles that get straight to the point… then post a comment or let me know… Else, I’ll start writing boring blog content.
Home Lab Gen IV – Part III: Best ESXi White box Mobo yet?
Initially, when I decided to refresh my Home Lab to Generation IV I planned to wipe just the software and add InfiniBand. I would keep most of the hardware. However, as I started to get into this transformation I decided it was time for a hardware refresh too including moving to All Flash vSAN.
In this post, I wanted to write a bit more about my new motherboard (mobo) and why I think it’s a great choice for a home lab. The past workhorse of my home lab has been my trusty MSI Z68MS-G45(B3) Rev 3.0 (AKA MSI-7676). I bought 3 MSI-7676 in 2012 and this mobo has been a solid performer and they treated me very well. However, they were starting to age a bit so I sold them off to a good buddy of mine and I used those resources to fund my new items.
My new workhorse –
Items kept from Home Lab Gen III:
- 3 x Antec Sonata Gen I and III each with 500W PS by Antec: I’ve had one of these cases since 2003, now that is some serious return on investment
New Items:
- 3 x Gigabyte MX31-BS0 – So feature rich, I found them for $139 each, and this is partly why I feel it’s the best ESXi white box mobo
- 3 x Intel Xeon E3-1230 v5 – I bought the one without the GPU and saved some $$
- 3 x 32GB DDR4 RAM – Nothing special here, just 2133Mhz DDR4 RAM
- 3 x Mellanox Connectx InfiniBand cards (More to come on this soon)
- 4 x 200GB SSD, 1 x 64GB USB (Boot)
- 1 x IBM M5210 JBOD SAS Controller
Why I chose the Gigabyte MX31-BS0 –
Likes:
- Headless environment: This Mobo comes with an AST2400 headless chipset environment. This means I no longer am tied to my KVM. With a java enabled browser, I can view the host screen, reboot, go into BIOS, BIOS updates, view hardware, and make adjustments as if I was physically at the box
- Virtual Media: I now can virtually mount ISOs to the ESXi host without directly being at the console (Still to test ESXi install)
- Onboard 2D Video: No VGA card needed, the onboard video controller takes care of it all. Why is this important? You can save money by choosing a CPU that doesn’t have the integrated GPU, the onboard video does this for you
- vSphere HCL Support: Really? Yep, most of the components on this mobo are on the HCL and Gigabyte lists ESXi 6 as a supported OS, its not 100% HCL but for a white box its darn close
- Full 16x PCIe Socket: Goes right into the CPU << Used for the Infiniband HCA
- Full 8x PCIe Socket: Goes into the C232 << Used for the IBM M5210
- M.2 Socket: Supporting 10Gb/s for SSD cards
- 4 x SATA III ports (white)
- 2 x SATA III can be used for Satadom ports (orange) with onboard power connectors
- 2 x Intel i210 1Gbe (HCL supported) NICs
- E3 v5 Xeon Support
- 64GB RAM Support (ECC or Non-ECC Support)
- 1 x Onboard USB 2.0 Port (Great for a boot drive)
Dislikes: (Very little)
- Manual is terrible
- Mobo Power connector is horizontal with the mobo, this made it a bit tight for a common case
- 4 x SATA III Ports (White) are horizontal too, again hard to seat and maintain
- No Audio (Really not needed, but would be nice)
- For some installs, it could be a bit limited on PCIe Ports
Some PICS :
The pic directly below shows 2 windows: Window 1 has the large Gigabyte logo, this is the headless environmental controls. From here you can control your host and launch the video viewer (window 2). The video viewer allows you to control your host just as if you were physically there. In windows 2 I’m in the BIOS settings for the ESXi host.

This is a stock photo of the MX31-BS0. It’s a bit limited on the PCIe ports, however, I don’t need many ports as soon I’ll have 20Gb/s InfiniBand running on this board but that is another post soon to come!

If you like my ‘no-nonsense’ blog articles that get straight to the point… then post a comment or let me know… Else, I’ll start writing boring blog content.
Home Lab Gen IV – Part II: Lab Clean Up and Adding Realtek 8186 NIC Drivers to ESXi 6u2 ISO
To prep my Home Lab for ESXi 6.0U2 with VSAN + IB. I wanted to ensure it was in pristine condition. It had been running ESXi 5.5 + VSAN for many years but it was in need of some updates. I plan to fully wipe my environment (no backups) and reinstall it all. Yes, that’s right I’m going to wipe it all – this means goodbye to those Windows 2008 VM’s I’ve been hanging on to for years now. Tip: If you’d like to understand my different Home lab generations please see my dedicated page around this topic.
In this post, I am going to focus on listing out my current to-do items, then describing how to flattening all SSD/HDD and finally building a custom ESXi 6.0U2 ISO with Realtek 8186 drivers.
Current to Do list –
Completed
- PM the Hosts – While they are off it’s a good time to do some routine PM (Complete)
- BIOS and Firmware – Check all MoBo BIOS, pNIC, and HDD/SDD firmware (Complete)
- Netgear Switch BIOS – It’s doubtful but always worth a check (Complete)
- Flatten all SDD / HDD with Mini-Partition Tool (This Post)
-
Create ISO with ESXi 6.0U2 and Realtek 8168 Drivers (This Post)
- Install Windows 2012 Server VM for DNS and AD Service (Local disk)
- Install vCenter Server Appliance (Local Disk)
- Get Infiniband Functional (Needs work)
- Setup FT and VSAN Networks
- Enable VSAN
- Rebuild VM Environment
Flatten all SDD / HDD with Mini-Partition Tool
Installing VSAN fresh on to an environment requires the SDD / HDD’s to be free of data and partition information. The Mini-Partition tool is a FREE bootable software product allowing you to remove all the partitions on your ESXi Hosts and other PCs. You can download it here >> https://www.partitionwizard.com/partition-wizard-bootable-cd.html
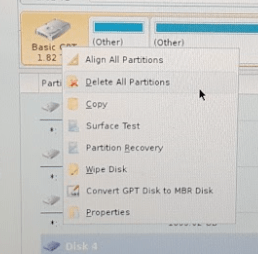
Once I created the BOOT CD and allowed the product to boot. I was quickly able to see all the HDD / SDD’s in my Host.

I simply right clicked on each host and choose ‘Delete All Partitions’
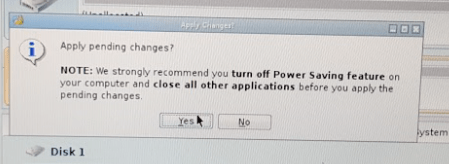
After choosing ‘Delete All Partitions’ for all my disks I clicked on ‘Apply’ in the upper right-hand corner. The following window appeared, I choose ‘Yes’ to Apply pending changes, and it removed all my partitions on all my disks quite quickly.
Create ISO with ESXi 6.0U2 and Realtek 8168 Drivers
ESXi no longer supports RealTek Network drivers, so home lab users who need these drivers will have to create a custom ISO to add these drivers back in. Keep in mind these are unsupported drivers by VMware, so use at your own risk. My trusty ESXi-Customizer GUI program is no more for ESXi 6. It has moved to a CLI based product. However, PowerCLI has all the functionality I need to build my customer ISO. In this section, I’ll be using PowerCLI to create my ISO. Keep in mind these are the steps that worked for me, your environment may vary.
To get started you will need two files and PowerCLI Installed on a Windows PC.
- File 1: VMware Offline ZIP >> www.vmware.com/download

2. RealTek 8186 Offline bundle >> https://vibsdepot.v-front.de/wiki/index.php/Net55-r8168

3. PowerCLI Download and install >> https://communities.vmware.com/community/vmtn/automationtools/powercli
Tip: If you don’t know PowerCLI try starting here
4. Place the files from Step 1 and 2 into c:\tmp folder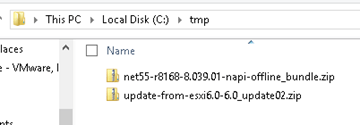
–POWERCLI COMMANDS— For each command, I have included a screenshot and the actual command allowing to copy, paste, and edit into your environment.
- Add ESXi 6.0u2 and RealTek8186 products to the local Software Depot

Add-EsxSoftwareDepot C:\tmp\update-from-esxi6.0-6.0_update02.zip

Add-EsxSoftwareDepot C:\tmp\net55-r8168-8.039.01-napi-offline_bundle.zip
2. Confirm the products are in the depot

Get-EsxSoftwareDepot
3. List out the ESXi Image Profiles

Get-EsxImageProfile4
4. Create a Clone Image to be modified – Ensure you are targeting the “ESXi…..standard” profile from step 3

New-EsxImageProfile -cloneprofile ESXi-6.0.0-20160302001-standard -Name “RealTek8186a”
Forward-Looking Tip: Whatever name you choose it will show up in your boot ISO

5. Set the Acceptance Level to Community Supported – Remember RealTek is unsupported by VMware

Set-EsxImageProfile -Name RealTek8186a -AcceptanceLevel CommunitySupported
For ImageProfile Enter – RealTek8186a
6. Ensure the RealTek net55-r8186 driver is loaded from the local depot (Screenshot shortened)

Get-EsxSoftwarePackage
7. Add the RealTek software package to the profile

Add-EsxSoftwarePackage
ImageProfile: RealTek8186a
SoftwarePackage[0]: net55-r8168 8.039.01-napi
Tip: You MUST enter the full name here if you just use the short name it will not work
8. Validate the RealTek drivers are now part of the RealTek8186a Profile (Screenshot shortened)

(Get-EsxImageProfile “RealTek8186a”).viblist
9. Export the profile to an ISO

Export-EsxImageProfile -ImageProfile “RealTek8186a” -ExportToIso -FilePath c:\tmp\RealTek8186a.iso
And that’s it… now with my clean/updated hosts, flatten HDD/SDD’s, and a newly pressed custom ISO I am ready to install ESXi onto my systems. Next Steps for me will be to install ESXi, AD/DNS VM, and vCenter Server Appliance. However, my next post will be focused on getting InfiniBand running in my environment.
If you like my ‘no-nonsense’ blog articles that get straight to the point… then post a comment or let me know… Else, I’ll start writing boring blog content.
VSAN – The Migration from FreeNAS
Well folks it’s my long awaited blog post around moving my Homelab from FreeNAS to VMware VSAN.
Here are the steps I took to migrate my Home Lab GEN II with FreeNAS to Home Lab GEN III with VSAN.
Note –
- I am not putting a focus on ESXi setup as I want to focus on the steps to setup VSAN.
- My home lab is in no way on the VMware HCL, if you are building something like this for production you should use the VSAN HCL as your reference
The Plan –
- Meet the Requirements
- Backup VM’s
- Update and Prepare Hardware
- Distribute Existing hardware to VSAN ESXi Hosts
- Install ESXi on all Hosts
- Setup VSAN
The Steps –
Meet the Requirements – Detailed list here
- Minimum of three hosts
- Each host has a minimum of one SSD and one HDD
- The host must be managed by vCenter Server 5.5 and configured as a Virtual SAN cluster
- Min 6GB RAM
- Each host has a Pass-thru RAID controller as specified in the HCL. The RAID controller must be able to present disks directly to the host without a RAID configuration.
- 1GB NIC, I’ll be running 2 x 1Gbs NICs. However 10GB and Jumbo frames are recommended
- VSAN VMkernel port configured on every host participating in the cluster.
- All disks that VSAN will be allocated to should be clear of any data.
Backup Existing VMs
- No secret here around backups. I just used vCenter Server OVF Export to a local disk to backup all my critical VM’s
- More Information Here
Update and Prepare Hardware
- Update all Motherboard (Mobo) BIOS and disk Firmware
- Remove all HDD’s / SDD’s from FreeNAS SAN
-
Remove any Data from HDD/SDD’s . Either of these tools do the job
- Windows Tools – “MiniTool Partition Wizard”
- Boot ISO – GParted
Distribute Existing hardware to VSAN ESXi Hosts
- Current Lab – 1 x VMware Workstation PC, 2 x ESXi Hosts boot to USB (Host 1 and 2), 1 x FreeNAS SAN
- Desired Lab – 3 x ESXi hosts with VSAN and 1 x Workstation PC
-
End Results after moves
- All Hosts ESXi 5.5U1 with VSAN enabled
- Host 1 – MSI 7676, i7-3770, 24GB RAM, Boot 160GB HDD, VSAN disks (2 x 2TB HDD SATA II, 1 x 60GB SSD SATA III), 5 xpNICs
- Host 2 – MSI 7676, i7-2600, 32 GB RAM, Boot 160GB HDD, VSAN disks (2 x 2TB HDD SATA II, 1 x 90 GB SSD SATA III), 5 x pNICs
- Host 3 – MSI 7676, i7-2600, 32 GB RAM, Boot 160GB HDD, VSAN disks (2 x 2TB HDD SATA II, 1 x 90 GB SSD SATA III), 5 x pNICs
- Note – I have ditched my Gigabyte z68xp-UD3 Mobo and bought another MSI 7676 board. I started this VSAN conversion with it and it started to give me fits again similar to the past. There are many web posts with bugs around this board. I am simply done with it and will move to a more reliable Mobo that is working well for me.

Install ESXi on all Hosts
-
Starting with Host 1
- Prior to Install ensure all data has been removed and all disk show up in BIOS in AHCI Mode
-
Install ESXi to Local Boot HD
- After the install I experienced the ESXi hanging at Boot – ‘Starting up Services – Running usbarbitrator start’
- Solution – Stop usbarbitrator service
- http://kb.vmware.com/selfservice/microsites/search.do?language=en_US&cmd=displayKC&externalId=1023976
- Setup ESXi base IP address via direct Console, DNS, disable IP 6, enable shell and SSH
- Using the VI Client setup the basic ESXi networking and vSwitch
- Using VI Client I restored the vCSA and my AD server from OVF and powered them on
- Once booted I logged into the vCSA via the web client
- I built out Datacenter and add host 1
- Create a cluster but only enabled EVC to support my different Intel CPU’s
- Cleaned up any old DNS settings and ensure all ESXi Hosts are correct
- From the Web client Validate that 2 x HDD and 1 x SDD are present in Host
- Installed ESXi Host 2 / 3, followed most of these steps, and added them to the cluster
Setup VSAN
-
Logon to the Webclient
-
Ensure on all the hosts
- Networking is setup and all functions are working
- NTP is working
- All expected HDD’s for VSAN are reporting in to ESXi
-
Create a vSwitch for VSAN and attach networking to it
- I attached 2 x 1Gbs NICs for my load that should be enough
-
Assign the VSAN License Key
- Click on the Cluster > Manage > Settings > Virtual SAN Licensing > Assign License Key
-

-
Enable VSAN
- Under Virtual SAN click on General then Edit
- Choose ‘Turn on Virtual SAN’
- Set ‘Add disks to storage’ to Manual
-
Note – for a system on the HCL, chances are the Automatic setting will work without issue. However my system is not on the any VMware HCL and I want to control the drives to add to my Disk Group.

-
Add Disks to VSAN
- Under Virtual SAN click on ‘Disk Management’
- Choose the ICON with the Check boxes on it
- Finally add the disks you want in your disk group

- Allow VSAN to complete its tasks, you can check on its progress by going to ‘Tasks’

- Once complete ensure all disks report in as healthy.

-
Ensure VSAN General tab is coming up correct
- 3 Hosts
- 3 of 3 SSD’s
- 6 of 6 Data disks
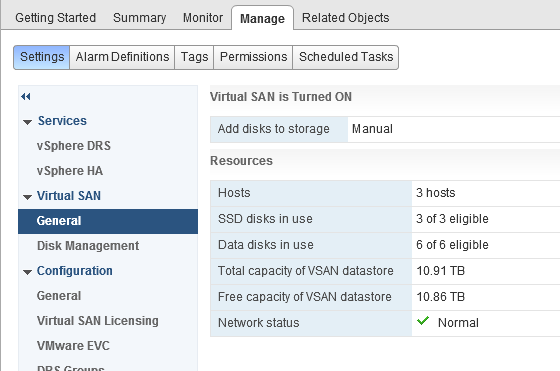
- Check to see if the data store is online

Summary –
Migrating from FreeNAS to VSAN was relatively a simple process. I simply moved, prepared, and installed and the product came right up. My only issue was working with a faulty Gigabyte Mobo which I resolved by replacing it. I’ll post up more as I continue to work with VSAN. If you are interested in more detail around VSAN I would recommend the following book.
Geeks.com – Time to Say goodbye for now
I was a bit shell shocked when I went to one of my favorite online stores, geeks.com, only to find out they had closed.
They had been open for 17 years and they were one of the first sites I trusted to buy quality products from new or used.
They had a lot of common items but every now and then they had something different or unique. It was one of the reasons why I kept coming back.
I had recommended geeks.com many times and everyone I sent there always let me know what excellent service and product they had.
Well Geeks.com – I salute you – you had a good run, I’m sorry to see you go, and I hope one day you return!

Just a quick note, if you liked geeks.com then check out http://www.pacificgeek.com/ they were very similar in product and layout.
Home Lab – VMware ESXi 5.1 with iSCSI and freeNAS
Recently I updated my home lab with a freeNAS server (post here). In this post, I will cover my iSCSI setup with freeNAS and ESXi 5.1.
Keep this in mind when reading – This Post is about my home lab. My Home Lab is not a high-performance production environment, its intent is to allow me to test and validate virtualization software. Some of the choices I have made here you might question, but keep in mind I’ve made these choices because they fit my environment and its intent.
Overall Hardware…
Click on these links for more information on my lab setup…
- ESXi Hosts – 2 x ESXi 5.1, iCore 7, USB Boot, 32GB RAM, 5 x NICS
- freeNAS SAN – freeNAS 8.3.0, 5 x 2TB SATA III, 8GB RAM, Zotac M880G-ITX Mobo
- Networking – Netgear GSM7324 with several VLAN and Routing setup
Here are the overall goals…
- Setup iSCSI connection from my ESXi Hosts to my freeNAS server
- Use the SYBS Dual NIC to make balanced connections to my freeNAS server
- Enable Balancing or teaming where I can
- Support a CIFS Connection
Here is basic setup…
freeNAS Settings
Create 3 networks on separate VLANs – 1 for CIFS, 2 x for iSCSI < No need for freeNAS teaming
CIFS
The CIFS settings are simple. I followed the freeNAS guide and set up a CIFS share.
iSCSI
Create 2 x iSCSI LUNS 500GB each
Setup the basic iSCSI Settings under “Servers > iSCSI”
- I used this doc to help with the iSCSI setup
- The only exception is – Enable both of the iSCSI network adapters in the “Portals” area

ESXi Settings
Setup your iSCSI vSwitch and attach two dedicated NICS
Setup two VMKernel Ports for iSCSI connections
Ensure that the First VMKernel Port group (iSCSI72) goes to ONLY vmnic0 and vice versa for iSCSI73

Enable the iSCSI LUNs by following the standard VMware instructions
Note – Ensure you bind BOTH iSCSI VMKernel Ports

Once you have your connectivity working, it’s time to setup round robin for path management.
Right click on one of the LUNS, choose ‘Manage Paths…’
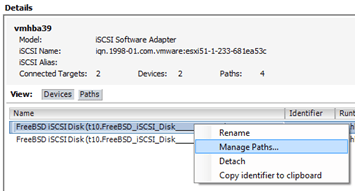
Change the path selection on both the LUNS to ‘Round Robin’
Tip – After the fact if you make changes to your iSCSI settings, then ensure you check your path selection as it may go back to default

Notes and other Thoughts…
Browser Cache Issues — I had issues with freeNAS updating information on their web interface, even after reboots of the NAS and my PC. I moved to Firefox and all issues went away. I then cleared my cache in IE and these issues were gone.
Jumbo Frames — Can I use Jumbo Frames with the SYBA Dual NICs SY-PEX24028? – Short Answer is NO I was unable to get them to work in ESXi 5.1. SYBA Tech support stated the MAX Jumbo frames for this card is 7168 and it supports Windows OS’s only. I could get ESXi to accept a 4096 frame size but nothing larger. However, when enabled none of the LUNS would connect, once I moved the frame size back to 1500 everything worked perfectly. I beat this up pretty hard, adjusting all types of ESXi, networking, and freeNAS settings but in the end, I decided the 7% boost that Jumbo frames offer wasn’t worth the time or effort.
Summary…
These settings will enable my 2 ESXi Hosts to balance their connections to my iSCSI LUNS hosted by freeNAS server without the use of freeNAS Networking Teaming or aggregation. By far it is the simplest way to setup and the out of the box performance works well.
My advice is — go simple with these settings for your home lab and save your time to beat up more important issues like “how do I shutdown windows 8” J
I hope you found this post useful and if you have further questions or comments feel free to post up or reach out to me.
Home Lab – freeNAS build with LIAN LI PC-Q25, and Zotac M880G-ITX
I’ve decided to repurpose my IOMega IX4 and build out a freeNAS server for my ever growing home lab. In this blog post I’m not going to get in to the reasons why I choose freeNAS, trust me I ran through lot of open source NAS software, but rather on the actual hardware build of the NAS device.
Here are the hardware components I choose to build my freeNAS box with…
- LIAN LI PC-Q25 Case – NewEgg ~$120, it goes on sale from time to time…
- Cooler Master 500W PS – ValleySeek ~$34, on sale
Zotac M880G-ITX – Valleyseek ~$203<< 10/07/2013 This MOBO had BIOS issues with detecting HDDs. I moved to a ASRock FM2A85X-ITX- SYBA Dual NIC SY-PEX24028 – NewEgg ~$37
- 8GB Corsair RAM – I owned this bought a Frys in a 16GB Kit for $49
- 5 x Seagate ST2000DM001 2TB SATAIII – Superbiiz ~$89, onsale and free shipping
- 1 x Corsair 60GB SSD SATAIII – I owned this bought at Frys for ~$69
Tip – Watch for sales on all these items, the prices go up and down daily…
Factors in choosing this hardware…
- Case – the Lian LI case supports 7 Hard disks (5 being hotswap) in a small and very quiet case, Need I say more…
- Power supply – Usually I go with a Antec Power supply, however this time I’m tight on budget so I went with a Cooler Master 80PLUS rated Power supply
- Motherboard – The case and the NAS software I choose really drove the Mobo selection, I played with a bunch of Open soruce NAS software on VM’s, once I made my choice on the case and choosing freeNAS it was simple as finding one that fit both. However 2 options I was keen on – 1) 6 SATA III Ports (To support all the Hard disks), 2) PCIex1 slot (to support the Dual Port NIC). Note – I removed the onboard Wireless NIC and the antenna, no need for them on this NAS device
- NIC – the SYBA Dual NIC I have used in both of my ESXi hosts, they run on the Realtek 8111e chipset and have served me well. The Mobo I choose has the same chipset and they should integrate well into my environment.
- RAM – 8GB of RAM, since I will have ~7TB of usable space with freeNAS, the general rule of thumb is to use 1GB of RAM per 1TB of storage, 8GB should be enough.
- Hard Disks – I choose the hard disks mainly on Price, speed, and size. These hard disks are NOT rated above RAID 1 however I believe they will serve my needs accordingly. If you looking for HIGH performance and duty cycle HD’s then go with an enterprise class SAS or SATA disk.
- SSD – I’ll use this for cache setup with freeNAS, I just wanted it to be SATA III
Install Issues and PIC’s
What went well…
- Hard disk installs into case went well
- Mobo came up without issue
- freeNAS 8.3.xx installed without issue
Minor Issues….
- Had to modify (actually drill out) the mounting plate on the LIAN LI case to fit the Cooler Master Power supply
- LIAN LI Mobo Mount points were off about a quarter inch, this leaves a gap when installing the NIC card
- LIAN LI case is tight in areas where the Mobo power supply edge connector meets the hard disk tray
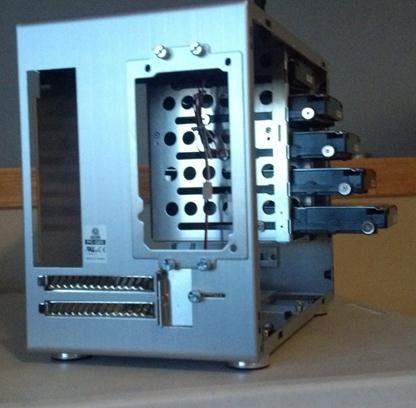
PICS…
LIAN LI Case

5 Seagate HD’s installed…

Rear view…
Side Panel…

Zotac Mobo with RAM

Removal of the Wireless NIC….

Zotac Mobo installed in case with dual NIC…

Everything Mounted (Except for the SSD)….
Home Lab – More updates to my design
Most recently I posted about adding a Layer 3 switch to my growing home lab. The Netgear Layer 3 switch I added (GSM7324) is preforming quite well in my home lab. In fact it’s quite zippy compared to my older switches and for the price it was worth it. However my ever growing home lab is having some growing pains, 2 to be exact.
In this post I’ll outline the issues, the solutions I’ve chosen, and my new direction for my home lab.
The issues…
Initially my thoughts were I could use my single ESXi Host and Workstation with specific VM’s to do most of my lab needs.
There were two issues I ran into, 1 – Workstation doesn’t support VLANs and 2 – my trusty IOMega IX4 wasn’t preforming very well.
Issue 1 – Workstation VLANs
Plain and simple Workstation doesn’t support VLANs and working with one ESXi Host is prohibiting me from fully using my lab and switch.
Issues 2 – IOMega IX4 Performance
My IOMega IX4 has been a very reliable appliance and it has done its job quite well.
However when I put any type of load on it (More than One or Two VM’s booting) its performance becomes a bit intolerable.
The Solutions…
Issue 1 – Workstation VLANs
I plan to still use Workstation for testing of newer ESXi platforms and various software components
I will install a second ESXi host similar to the one I built earlier this year only both Hosts will have 32GB of RAM.
The second Host will allow me to test more advanced software and develop my home lab further.
Issues 2 – IOMega IX4 Performance
I’ve decided to separate my personal data from my home lab data.
I will use my IX4 for personal needs and build a new NAS for my home lab.
A New Direction…
My intent is to build out a second ESXi Physical Host and ~9TB FreeNAS server so that I can support a vCloud Director lab environment.
vCD will enable me to spin up multiple test labs and continue to do the testing that I need.
So that’s it for now… I’m off to build my second host and my freeNAS server…
Thank you Computer Gods for your divine intervention and BIOS Settings
I’ve been in IT for over 20 years now and in my time I’ve seen some crazy stuff like –
- Grass growing in a Unisys Green Screen terminal that was sent in for repair by a Lumber yard
- A Disney Goofy screen saver on a IBM PS/2 running OS/2 kept bringing down Token Ring every time it went in to screen saver mode.
But this friend is one of the more weird issues I’ve come across….
This all started last March 2012. I bought some more RAM and a pair of 2TB Hitachi HD’s for my Workstation 8 PC. I needed to expand my system and Newegg had a great deal on them. I imaged up my existing Windows 7 OS and pushed it down to the new HD. When the system booted I noticed that is was running very slow. I figured this to be an issue with the image process. So I decided to install from Windows 7 from scratch but I ran into various installation issues and slowness problems. I put my old Samsung HD back in my system and it booted fine. When I plugged the new Hitachi HD as a second HD via SATA or USB the problems started again, basically it was decreased performance, programs not loading, and choppy video. I repeated these same steps with the 2nd Hitachi HD that I bought and it had the same issues.
A bit perplexed at this point I figure I have a pair of bad HD’s or bad HD BIOS. Newegg would not take back the HD’s, so I start working with Hitachi. I tried a firmware HD update, I RMA both HD’s and I still have the same issue. Hitachi sends me different model but slower HD and it works fine. So now I know there is something up with this model of HD.
 I start working with Gigabyte – Same deal as Hitachi BIOS Update, RMA for a new System board Revision (Now I’m at a Rev 1.3) and I still have the same issue. I send an HD to Gigabyte in California and they cannot reproduce the problem. I’ll spare you all the details but trust me I try every combination I can think of. At this point I’m now at this for 5 Months, I still cannot use my new HD, and then I discover the following – I put in a PCI (Not PCIe) VGA video card into my system and it works and then it hit me – “I wonder if this is some weird HDMI Video HD conflict problem”
I asked Gigabyte if disabling onboard HDMI video might help. They were unsure but I try it anyway and sure enough I found the solution!

It felt like the computer gods had finally shone down on me from above and preformed a PC miracle – hallelujah. 5 plus months of troubleshooting and I finally have a solution.
Here are the overall symptoms….
Observation 1) Windows 7 x64 Enterprise or Professional the installer fails to load or fully complete OR, the installation does complete, but mouse movements are choppy, and then the system locks up or will not boot.
Observation 2) When booting from a different drive I attach the new Hitachi HD to a booted system via USB, then the PC will start to exhibit performance issues.
Here is what I found out….
Any Combination of the following products will result with these symptoms. Change any one out and it works!
1 x Gigabyte Z68XP-UD3 (Rev 1.0 and 1.3)
1 x Hitachi GST Deskstar 5K3000 HDS5C3020ALA632
1 x PCIe Video Card with HDMI Output (I tried the following card with the same Results – ZOTAC ZT-40604-10L GeForce GT 430 and EVGA – GeForce GT 610)
Here is the solution to making them work together….
In the system board BIOS, under Advanced BIOS Settings – Change On Board VGA to ‘Enable if No Ext PEG’
This simple setting disabled the on board HDMI Video and resolved the conflicts with the products not working together.
Summary….
I got to meet some really talented engineers at Hitachi and Gigabyte. All were friendly and worked with me to solve my issue. One person Danny from Gigabyte was the most responsive and talented MoBo engineer I’ve meet. Even though in the end I found my own solution, I wouldn’t have made it there without some of their expert guidance!
- ← Previous
- 1
- 2
- 3
- Next →
