Home Lab Gen IV – Part II: Lab Clean Up and Adding Realtek 8186 NIC Drivers to ESXi 6u2 ISO
To prep my Home Lab for ESXi 6.0U2 with VSAN + IB. I wanted to ensure it was in pristine condition. It had been running ESXi 5.5 + VSAN for many years but it was in need of some updates. I plan to fully wipe my environment (no backups) and reinstall it all. Yes, that’s right I’m going to wipe it all – this means goodbye to those Windows 2008 VM’s I’ve been hanging on to for years now. Tip: If you’d like to understand my different Home lab generations please see my dedicated page around this topic.
In this post, I am going to focus on listing out my current to-do items, then describing how to flattening all SSD/HDD and finally building a custom ESXi 6.0U2 ISO with Realtek 8186 drivers.
Current to Do list –
Completed
- PM the Hosts – While they are off it’s a good time to do some routine PM (Complete)
- BIOS and Firmware – Check all MoBo BIOS, pNIC, and HDD/SDD firmware (Complete)
- Netgear Switch BIOS – It’s doubtful but always worth a check (Complete)
- Flatten all SDD / HDD with Mini-Partition Tool (This Post)
-
Create ISO with ESXi 6.0U2 and Realtek 8168 Drivers (This Post)
- Install Windows 2012 Server VM for DNS and AD Service (Local disk)
- Install vCenter Server Appliance (Local Disk)
- Get Infiniband Functional (Needs work)
- Setup FT and VSAN Networks
- Enable VSAN
- Rebuild VM Environment
Flatten all SDD / HDD with Mini-Partition Tool
Installing VSAN fresh on to an environment requires the SDD / HDD’s to be free of data and partition information. The Mini-Partition tool is a FREE bootable software product allowing you to remove all the partitions on your ESXi Hosts and other PCs. You can download it here >> https://www.partitionwizard.com/partition-wizard-bootable-cd.html
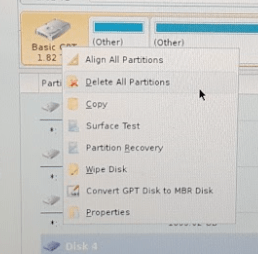
Once I created the BOOT CD and allowed the product to boot. I was quickly able to see all the HDD / SDD’s in my Host.

I simply right clicked on each host and choose ‘Delete All Partitions’
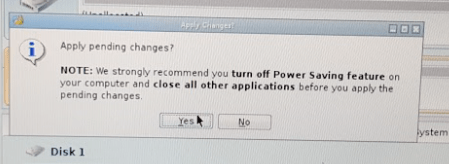
After choosing ‘Delete All Partitions’ for all my disks I clicked on ‘Apply’ in the upper right-hand corner. The following window appeared, I choose ‘Yes’ to Apply pending changes, and it removed all my partitions on all my disks quite quickly.
Create ISO with ESXi 6.0U2 and Realtek 8168 Drivers
ESXi no longer supports RealTek Network drivers, so home lab users who need these drivers will have to create a custom ISO to add these drivers back in. Keep in mind these are unsupported drivers by VMware, so use at your own risk. My trusty ESXi-Customizer GUI program is no more for ESXi 6. It has moved to a CLI based product. However, PowerCLI has all the functionality I need to build my customer ISO. In this section, I’ll be using PowerCLI to create my ISO. Keep in mind these are the steps that worked for me, your environment may vary.
To get started you will need two files and PowerCLI Installed on a Windows PC.
- File 1: VMware Offline ZIP >> www.vmware.com/download

2. RealTek 8186 Offline bundle >> https://vibsdepot.v-front.de/wiki/index.php/Net55-r8168

3. PowerCLI Download and install >> https://communities.vmware.com/community/vmtn/automationtools/powercli
Tip: If you don’t know PowerCLI try starting here
4. Place the files from Step 1 and 2 into c:\tmp folder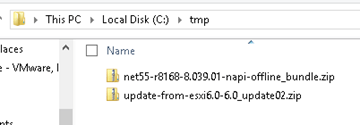
–POWERCLI COMMANDS— For each command, I have included a screenshot and the actual command allowing to copy, paste, and edit into your environment.
- Add ESXi 6.0u2 and RealTek8186 products to the local Software Depot

Add-EsxSoftwareDepot C:\tmp\update-from-esxi6.0-6.0_update02.zip

Add-EsxSoftwareDepot C:\tmp\net55-r8168-8.039.01-napi-offline_bundle.zip
2. Confirm the products are in the depot

Get-EsxSoftwareDepot
3. List out the ESXi Image Profiles

Get-EsxImageProfile4
4. Create a Clone Image to be modified – Ensure you are targeting the “ESXi…..standard” profile from step 3

New-EsxImageProfile -cloneprofile ESXi-6.0.0-20160302001-standard -Name “RealTek8186a”
Forward-Looking Tip: Whatever name you choose it will show up in your boot ISO

5. Set the Acceptance Level to Community Supported – Remember RealTek is unsupported by VMware

Set-EsxImageProfile -Name RealTek8186a -AcceptanceLevel CommunitySupported
For ImageProfile Enter – RealTek8186a
6. Ensure the RealTek net55-r8186 driver is loaded from the local depot (Screenshot shortened)

Get-EsxSoftwarePackage
7. Add the RealTek software package to the profile

Add-EsxSoftwarePackage
ImageProfile: RealTek8186a
SoftwarePackage[0]: net55-r8168 8.039.01-napi
Tip: You MUST enter the full name here if you just use the short name it will not work
8. Validate the RealTek drivers are now part of the RealTek8186a Profile (Screenshot shortened)

(Get-EsxImageProfile “RealTek8186a”).viblist
9. Export the profile to an ISO

Export-EsxImageProfile -ImageProfile “RealTek8186a” -ExportToIso -FilePath c:\tmp\RealTek8186a.iso
And that’s it… now with my clean/updated hosts, flatten HDD/SDD’s, and a newly pressed custom ISO I am ready to install ESXi onto my systems. Next Steps for me will be to install ESXi, AD/DNS VM, and vCenter Server Appliance. However, my next post will be focused on getting InfiniBand running in my environment.
If you like my ‘no-nonsense’ blog articles that get straight to the point… then post a comment or let me know… Else, I’ll start writing boring blog content.
