EMC
Upgrading or adding New Hard Disks to the IOMega / EMC / Lenovo ix4-200d
I currently have an IOMega ix4-200d with 4 x 500GB Hard Disk Drives (HDD). I am in the process of rebuilding my vSAN Home lab to all flash. This means I’ll have plenty of spare 2TB HDDs. So why not repurpose them to upgrade my IOMega. Updating the HDDs in an IOMega is a pretty simple process. However, documenting and waiting are most of this battle.
There are 2 different ways you can update your IOMega: 1 via Command Line and 2 via the Web client. From what I understand the command line version is far faster. However, I wanted to document the non-command line version as most of the blogs around this process were a bit sparse on the details. I started off by reading a few blog posts on the non-command line version of this upgrade. From there I came up with the basic steps and filled in the blanks as I went along. Below are the steps I took to update mine, your steps might vary. After documenting this process I can now see why most of the blogs were sparse on the details, there are a lot of steps and details to complete this task. So, be prepared as this process can be quite lengthy.
NOTES:
- YOU WILL LOSE YOUR DATA, SO BACK IT UP
- You will lose the IOMega configuration (documenting it might be helpful)
Here are the steps I took:
- Ensure you can logon to the website of your IOMega Device (lost the password – follow these steps)
- Backup the IOMega Configuration
- If needed screen shot the configuration or document how it is setup
-
Backup the data (YOU WILL LOSE YOUR DATA)
- For me, I have an external 3TB USB disk and I used Syncback via my Windows PC to back up the data
-
Firmware: ensure the new HDDs and the IOMega IX4 are up to date
- Seagate Disks ST2000DM001 -9YN164
- Iomega IX4-200d (Product is EOL, no updates from Lenovo)
- After backing up the data, power off the IOMega, unplug the power, and remove the cover
- Remove the non-boot 500GB disks from the IOMega and label them (Disks 2-4), do not remove Disk 1
Special Notes:
- From what I read usually Disk 1 is the “boot” disk for the IOMega
- In my case, it was Disk 1
- For some of you, it may not be. One way to find this out is to remove disks 2-4 and see if the IOMega Boots, if so you found it, if not power off try with only disk 2 and so on till you find this right disk

- Replace Disks 2-4 with the new HDD, in my case I put in the 2TB HDDs
- Power on system (Don’t forget to plug it back in)
- The IOMega display may note there are new disks added, just push the down arrow till you see the main screen
- Also at this point, you won’t see the correct size as we need to adjust for the new disks

-
Go into IOMega web client
- Settings > Disks Storage
- Choose “Click here for steps…”
- Check box to authorize overwrite


- About a minute or two later my IOMega Auto Restarted
- Note: Yours may not, give it some time and if not go to the Dashboard and choose restart
- After reboot, I noted my configuration was gone but the Parity was reconstructing with 500GB disks
- This is expected, as the system is replicating the parity to the new disks
- This step took about +12 hours to complete

- After the reconstruction, I went into the Web client and the IOMega configuration was gone. It asked me to type in the device name, time zone, email, and then it auto Rebooted
- After Reboot I noted all the disks are now healthy and part of the current 1.4TB parity set. This size is expected.

- Now that the Iomega has accepted the 3 x 2TB disks we need to break parity group and add the final 2TB HDD
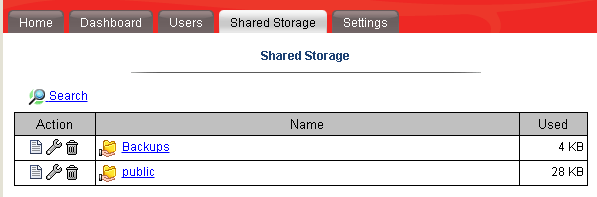
- First, you have to delete the shares before you can change the parity type.
- Shared Storage > Delete both shares and check to confirm delete

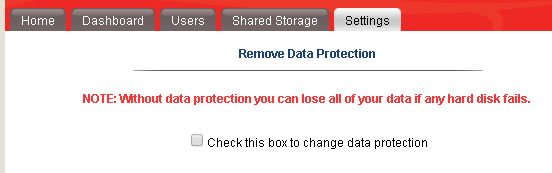
- Now go to — Settings > disks > Manage Disks > Data Protection
- Choose “Without data protection
- Check the box to change data protection

- Once complete the Power off the IOMega
- Dashboard > Shutdown > Allow device to shutdown
- After it powers off, replace Disk 1 with last 2TB Disk
- Power On
- Validate all disks are online
- Go to Settings > Disks > “Click here for steps….” Then check box to authorize overwrite, choose OK.


- After the last step observe the error message below and press ‘OK’

- Go to Dashboard > Restart to restart the IOMega
- After the restart the display should show “The filesystem is being prepared” with a progress bar, allow this to finish
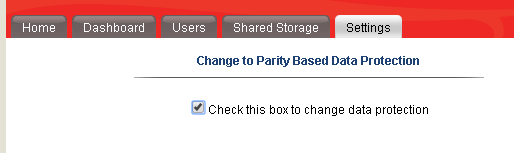
- Now create the Parity set with the new 2TB Disks
- First, remove all Shared folders (See earlier steps if needed)
- Second go to Settings > Disks > Manage Disks > Data Protection > Choose Parity > Next

- Choose “check this box….” then click on apply…
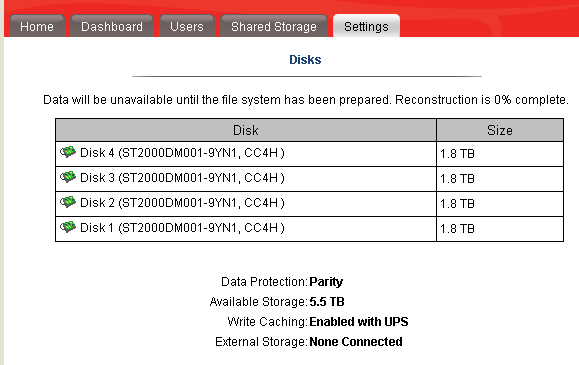
- After clicking apply my screen updated with a reconstruction of 0% and the display screen on the IOMega showed a progress bar too.
- Mine took more than 24+ hours to complete the rebuild.
- After the rebuild is complete then restore the config
- Finally, restore your data. Again, I used syncback to copy my data back
If you like my ‘no-nonsense’ blog articles that get straight to the point… then post a comment or let me know… Else, I’ll start writing boring blog content.
Turning a ‘No you cannot attend’ to a ‘Yes’ for VMworld
 I’ve been lucky enough to make it to every VMworld since 2008 and 2014 will be my 7th. time in a row. In this blog post I wanted to share with you a breakdown of some of the tips and tricks I’ve used to get to these events. Being the former Phoenix VMUG leader I’ve shared these tips with fellow VMUG users and now I’m sharing them with all of you. Users would tell me cost is the number one reason why they don’t go – “My Company sees value in this event but will not pay for it”. This breaks down to Food, Hotel, Travel, and the infamous golden ticket, aka the VMworld pass. So how do users overcome the cost to attend? This is what this blog post is all about…
Working with your employer –
Having your employer pick up the tab not only benefits them as a company but yourself too. As you know VMworld is full of great content and the socialization aspects are second to none. Chances are you’ll be asked to put together a total cost to attend and this cost can be quite high for some companies on a tight budget. My suggestion is if you are getting the big ‘No’ then work with your boss around the total costs. First find out why it’s a ‘No’ and look for opportunities to overcome this. Maybe your company will pay for some of the items. Example – They might be able to cover airfare, but the rest is on you. Don’t forget if your company has a VMware TAM (Technical Account Manager) reach out them. Even if you are not directly working with the TAM they are your best resource not only for VMware Technology but also for getting you to VMworld. They don’t have passes but they usually know the community very well and can assist.
Sometimes I hear “My employer will not allow me to accept gifts”. True your company may have a policy around the type of gifts you can receive and by all means follow this policy. However, keep in mind you may be able to take vacation time and represent yourself at this event not your employer. Then there is a possibility gifts could be accepted but on the premises you don’t represent your company. Some companies are okay with this but just make sure they are. If you are able to do this I would suggest you represent it as ‘personal development’.
How do I get a free VMworld Pass?
This can be your biggest challenge. However here are some ways to get your hands on one.
-
Give-a-ways
- I can’t tell you how many vendors have giveaways contests right now — hit them early and enter as many contests as you can find
-
Tips-
- When you enter, find out who your local vendor contact is and let them know you entered. Then stay in contact with them.
- Keep in mind not all contests are the same, some are based on random drawing and others are not. This is why I say keep in contact with the vendor.
- How do I find give-a-ways >> Google ‘VMworld getting there for free’
-
Get the word out
- Tell your boss, workmates, vendors, and partners. Post on Twitter, Linked-In, etc. and Repeat again and again. By doing this you let others know about your strong interest in getting there, in turn they might get a lead for you.
- Most importantly, reach out to your local VMUG leader and ask them for tips in your area. They are usually well connected and might have a lead for you as well.
-
Follow Twitter and Linked-In – You never know who is going to post up “I have a pass and need to give it to someone”. Yes that is right, before the event you can transfer a pass to someone.
- New to Twitter, need contacts? It’s a pretty simple to get started. Simply find the #VMworld hastag, see who is posting to it and start following them. Then look at all their contacts and follow them too, soon you’ll have a gaggle of folks.
- This sound like work. Why do all this? Simple, distributed coverage model. The more people know the more likely they are to help and in turn the more likely you’ll succeed
-
Don’t forgo an Expo-Only or Solutions Exchange Pass
- If you get offered this pass take it. I can’t tell you how many vendors have these passes and have trouble giving them away, seriously this is gold but folks don’t know how to leverage them.
- First off this pass has great value, there is a TON of value here.
-
Second this pass can get you on to the Solutions Exchange floor where all the vendors and partners are.
- Once there start talking to all the vendors, fellow attendee, all those folks you meet on Twitter, etc. as you never know who has a full pass they couldn’t get rid of, take it and upgrade yours.
- Third, while you are there with an Expo Pass use Twitter and the VMworld hash tags to let folks know you’re here and you are looking for a full pass.
- Stop by the VMUG booth on the Expo floor, you never know who will be there and you never know if users there might be able to help you.
-
Vendors and Partners
-
Find out who is sponsoring VMworld this year, and then…
- Start calling the ones you know well, ask them for support getting there.
- Don’t forget to call the ones you don’t know so well too.
- If you have an upcoming deal on the table with a vendor, inquire if they will throw in passes, travel, etc.
-
What about Food, Hotel, and Travel Costs?
-
Food
- There will be free food everywhere, in-fact feel free to give some to the homeless I usually do.
- If you get a pass then lunch and usually breakfast are included.
- For dinner, find out where the nightly events are as they usually have food.
- Talk with Vendors as they might take you out, you never know.
-
Hotel
- Ask a Vendor to pay for just the room or ask them to gift hotel points to you.
- Room Share with someone at the event << Think about it, you won’t be in the room that often and chances are from 7AM till 10PM you’ll be out of your room.
-
Use travel sites to cut down the cost.
- Secret Hotels: Best Western Carriage Inn and The Mosser. Good if you’re on a budget but chances are they are full this year (2014).
- Use your hotel or other travel points to book the hotel for free.
- Get a low cost hotel away from the event, but watch your travel costs.
-
Travel
-
Airfare
- Ask a vendor to pay for just the airfare, or maybe they have points they can gift you.
- Use your own travel points to pay for this.
-
Rideshare to the event
- See if one of your connections are driving to the event, offer to split fuel costs.
- You drive someone to the event, and they pick up the hotel or vise versa.
-
Local Travel
-
Use the following –
- VMworld Shuttle
- Bus
- Uber
- BART
- Once again hit up those vendors, they might have a way to get you around for free
-
-
Finally here is a breakdown of how I got to so many events and how/who paid for it….
| Year | Pass | Travel | Food | Hotel |
| 2008 VMworld | Vendor Sponsor – Full Pass | Employer Paid | Vendor / Event | Employer Paid |
| 2009 VMworld | VMUG Sponsored – Full Pass | Vendor paid for Airfare with Miles | Vendor / Event | Employer Paid |
| 2010 VMworld | VMUG Sponsored – Full Pass | Vendor paid for Airfare with Miles | Vendor / Event | Vendor Sponsored |
| 2011 VMworld | Vendor Sponsor – Expo Pass but I got an upgrade to Full by asking others | I drove two others and I paid for the fuel | Vendor / Event | Travel Companion paid for room |
| 2012 VMworld | Employee Labs | Employer Paid | Employer Paid | Employer Paid |
| 2013 VMworld | Employee TAM | Employer Paid | Employer Paid | Employer Paid |
| 2014 VMworld | Employee TAM | Employer Paid | Employer Paid | Employer Paid |
Summing it up…
My take is this, if you REALLY want to go you’ll get there but sometimes it takes effort to do so and if you do it right it might not cost you a thing. Don’t let anything stop you and find your way there.
Finally, after you’ve been to the event don’t forget about the folks who got you there and say ‘Thank you’. Then over the next year continue to build this relationship, as you never know if you’ll need help again, or you want to help someone else get there.
vSAN 1.0 Released Home lab update here I come!
In case you missed the vSAN announcement and demo on www.vmware.com/now Here is a quick review…
- General Availability of Virtual SAN 1.0 the week of March 10th
- vSphere 5.5 Update 1 will support VSAN GA
- Support for 32 hosts in a Virtual SAN cluster
-
Support for 3200 VMs in a Virtual SAN cluster
- Note, due to HA restrictions only 2048 VMs can be HA protected
- Full support for VMware Horizon / View
- Elastic and Linear Scalability for both capacity and performance
- VSAN is not a virtual storage appliance (VSA). Performance is much better than any VSA!
- 2 Million IOPS validated in a 32 host Virtual SAN cluster
- ~ 4.5PB in a 32 host cluster
- 13 different VSAN Ready Node configurations between Cisco IBM Fujitsu and Dell available at GA, with more coming soon
Elaboration and analysis: http://www.theregister.co.uk/2014/03/06/vsan_emerges_at_a_whopping_32_nodes_and_two_meeelion_iops/
VSAN Hands-on Labs (already available): https://blogs.vmware.com/hol/2014/03/click-go-take-vsan-hands-labs.html
Cormac as always does a great review as well — http://cormachogan.com/2014/03/06/virtual-san-vsan-announcement-review/
vSAN will be the next direction for my home lab as I plan to move away from in my opinion a buggy FreeNAS product.
High speed networking is required for the replication network and my back plane will be something like this — http://www.bussink.ch/?p=1183
I’ll post up more as it progresses.
Enjoy!
Test Lab – End of Day 1
Day one was pretty simple it mostly comprised of hardware installation.
Below are my notes from todays adventure!
Work completed…
- Network team mounted and configured the EX4200 switches with appropriate vlans (NFS, VM Service Console, vMotion, and others)
- Severs were mounted and remounted to make room (see Installation gotchas below)
- One Xsigo was mounted, and due to some missing brackets the other will have to be mounted tomorrow
- Ethernet CAT and Infiniband cables were all cabled and routed
- Physical Servers for VMware ESXi 4.1 were installed
Installation Gotchas…
Installing & Mounting the Xsigo VP780 proved harder then I expected, this in no way is a slam against Xsigo, and it is totally my fault for not fully reading the manual.
I suggest you run through the Quick Install Manual prior to installing the VP780. There are a LOT of brackets and about 5-8 bolt packages. All are necessary for their intended purpose.
My mistake was I just looked at the VP780 which is 4U in size and planned out 8U for both.
However the mounting / support bracket requires 1U of space… This brings the total to 5U per Xsigo or 10U for both.

This miscalculation caused a bit of a delay and I had to remount some servers to make up this space.
Lesson learned, read the manual before installing.
Xsigo Stuff..
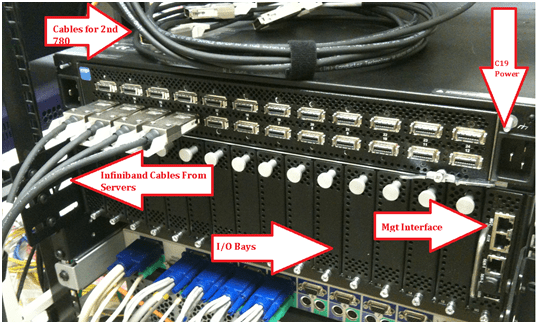
From a DC cooling and cabling perspective the Xsigo is designed very well. In the front there are 4 massive primary fans and 4 smaller fans for the Power Supplies.
This design puts the intake in the front pulling cool air though the Xsigo and out the rear. All the cabling is done in the rear and cable management is a breeze as I can directly cable the rear of my servers to the rear of theXsigo.
Front View

Rear View
Physical Server Front..
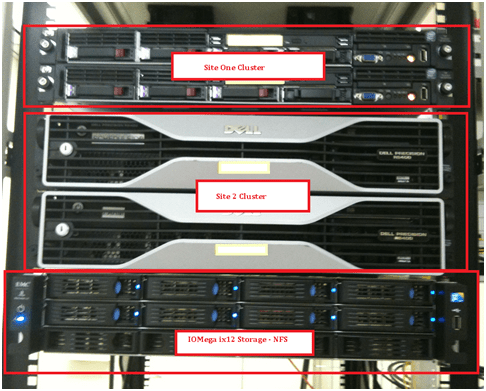
Physical Server Rear (Look Mom No Cables!!) – It’s Pretty Sweet that 2 Cables can do so much

Still to do…
- Install Vmware on site 1 and 2 cluster with Xsigo Drivers
- Install 2nd Xsigo into rack
- Copy vCenter Server & other VM’s from Production to this test environment
- Test, Test, Test and more testing..
EMC VPLEX – vMotion over Distance
Here are some links I’ve been using to research the EMC VPLEX Technology…
VMware and EMC – The Value of EMC VPLEX in the Virtual Data Center
http://www.youtube.com/watch?v=8zf-5NNDFKI&feature=related
EMC VPLEX – Simple, Scalable vMotion over distance
http://www.youtube.com/watch?v=fKKhrI7A7Og&feature=related
vMotion over Distance support with EMC VPLEX Metro
EMC Ionix UIM 2.0 and VMware Project Redwood Preview
I got a chance to review this you video and must say the “cloud” / vblock is starting to take a real form. Imagine if you could provision you servers + storage + networking with simple clicks… with EMC vblock you can…
At vmworld 2010 I plan to sit in as many of the Ionix UIM / Vmware Redwood seminars as I can…
Very cool!
