Dell
First Look GEN8 ESXi/vSAN ESA 8 Home Lab (Part 1)
I’m kicking off my next generation home lab with this first look in to my choice for an ESXi/vSAN 8 host. There will be more videos to come as this series evolves!

FIX for Netgear Orbi Router / Firewall blocks additional subnets
**2021-NOV Update** With the release of Orbi Router Firmware Version V2.7.3.22 the telnet option is no longer available in the debug menu. This means the steps below will not work unless you are a earlier router firmware version. I looked for other Orib solutions but didn’t find any. However, I solved this issue by using an additional firewall using NAT between VLAN74 and VLAN 75. If you find an Orbi solution, please post a comment and I’ll be glad to update this blog.
Last April 2019 I decided to update my home network with the Orbi WiFi System (RBK50) AC3000 by Netgear. My previous Netgear Wifi router worked quite well but I really needed something to support multiple locations seamlessly.
The Orbi Mesh has a primary device and allows for satellites to be connected to it. It creates a Wifi mesh that allows devices to go from room to room or building to building seamlessly. I’ve had it up for a while now and its been working out great – that is until I decided to ask it to route more than one subnet. In this blog I’ll show you the steps I took to over come this feature limitation but like all content on my blog this is for my reference. Use at your own risk.
To understand the problem we need to first understand the network layout. My Orbi Router is the Gateway of last resort and it supplies DHCP and DNS services. In my network I have two subnets which are untagged VLANS known as VLAN 74 – 172.16.74.x/24 and VLAN 75 – 172.16.75.x/24. VLAN 74 is used by my home devices and VLAN 75 is where I manage my ESXi hosts. I have enabled RIP v2 on the Orbi and on the Dell 6224 switch. The routing tables are populated correctly, and I can ping from any internal subnet to any host without issue, except when the Orbi is involved.

Issue: Hosts on VLAN 75 are not able to get to the internet. Hosts on VLAN 75 can resolve DNS names (example: yahoo.com) but it cannot ping any host on the Inet. Conversely, VLAN 74 can ping Inet hosts and get to the internet. I’d like for my hosts on VLAN 75 to have all the same functionally as my hosts on VLAN 74.

Findings: By default, the primary Orbi router is blocking any host that is not on VLAN 74 from getting to the INET. I believe Netgear enabled this block to limit the number of devices the Orbi could NAT. I can only guess that either the router just can’t handle the load or this was a maximum Netgear tested it to. I found this firewall block out by logging into the CLI of my Orbi and looking at the IPTables settings. There I could clearly see there was firewall rule blocking hosts that were not part of VLAN 74.
Solution: Adjust the Orbi to allow all VLAN traffic (USE AT YOUR OWN RISK)
- Enable Telnet access on your Primary Orbi Router.
- Go to http://{your orbi ip address}/debug.htm
- Choose ‘Enable Telnet’ (**reminder to disable this when done**)
- Telnet into the Orbi Router (I just used putty)
- Logon as root using your routers main password
- I issued the command ‘iptables -t filter -L loc2net’. Using the output of this command I can see where line 5 is dropping all traffic that is not (!) VLAN74.

- Let’s remove this firewall rule. The one I want to target is the 5th in the list, yours may vary. This command will remove it ‘iptables -t filter -D loc2net 5’
- NOTES:
- Router Firmware Version V2.5.1.16 (Noted: 10.2020) — It appears that more recent firmware updates have changed the targeting steps. I noticed in Router Firmware Version V2.5.1.16 I had to add 2 to the targeted line number to remove it with the ip tables command. This my vary for the device that is being worked on.
- Router Firmware Version V2.5.2.4 (Noted: Jan-2021) — It appears the targeting for steps are now fixed in this version.
- Again, as with all my posts, blogs, and videos are for my records and not for any intended purpose.
- Next, we need to clean up some post routing issues ‘iptables -t nat -I POSTROUTING 1 -o brwan -j MASQUERADE’
- A quick test and I can now PING and get to the internet from VLAN 75
- Disconnect from Telnet and disable it on your router.
Note: Unfortunately, this is not a permanent fix. Once you reboot your router the old settings come back. The good news is, its only two to three lines to fix this problem. Check out the links below for more information and a script.
Easy Copy Commands for my reference:
iptables -t filter -L loc2net
iptables -t filter -D loc2net 7 << Check this number
iptables -t nat -I POSTROUTING 1 -o brwan -j MASQUERADE
If you like my ‘no-nonsense’ blog articles that get straight to the point… then post a comment or let me know… Else, I’ll start writing boring blog content.
REF:
No web interface on a Dell PowerConnect 6224 Switch
I picked up a Dell Powerconnect 6224 switch the other day as my older Netgear switch (2007) finally died. After connecting via console cable (9600,8,1,none) I updated the Firmware image to the latest revision. I then followed the “Dell Easy Setup Wizard”, which by the way stated the web interface will work after the wizard is completed. After completing the easy wizard I opened a browser to the switch IP address which failed. I then pinged the switch IP address, yep it is replying. Next, rebooted the switch – still no web interface connection.
How did I fix this?
1- While in the console, entered into config mode, and issued the following command.
console(config)#ip http server
2- Next I issued a ‘show run’ to ensure the command was present
console#show run
!Current Configuration:
!System Description “PowerConnect 6224, 3.3.18.1, VxWorks 6.5”
!System Software Version 3.3.18.1
!Cut-through mode is configured as disabled
!
configure
stack
member 1 1
exit
ip address 172.16.74.254 255.255.255.0
ip default-gateway 172.16.74.1
ip http server
username “admin” password HASHCODE level 15 encrypted
snmp-server community public rw
exit
3 – This time I connected to the switch via a browser without issue.

4 – Finally, saved the running-configuration
console#copy running-config startup-config
This operation may take a few minutes.
Management interfaces will not be available during this time.
Are you sure you want to save? (y/n) y
Configuration Saved!
console#
Summary: These were some pretty basic commands to get the http service up and running, but I’m sure I’ll run into this again and I’ll have this blog to refer too. Next, I’m off to setup some VLANs and a few static routes.
If you like my ‘no-nonsense’ blog articles that get straight to the point… then post a comment or let me know… Else, I’ll start writing boring blog content.
Honeywells Next Generation Platform powered by Dell FX2 and VMware vSAN
I wished over these past years I could blog in technical detail about all the great things I’ve experienced working for VMware. A big part of my job as a VMware TAM is being a trusted advisor and helping VMware Embedded OEM Partners build products they can resell to their customers. These past years I’ve worked directly with Honeywell Process Solutions to build a better offering. The entire team (Honeywell, Dell, and VMware) have been working tirelessly to make this product great. It’s been a long haul with so many late nights and deadlines but we were all proud to see this product be released.
The Honeywell Dell VMware Solution I helped Honeywell to create went on to win multiple awards.
- 2016 VMware award for OEM Partner Innovation
- 2017 TAM Customer award for Emerging Technology & Trends
- Q4-2017 Americas Co-Innovation
- 2018 WWKO ‘Best Co-Innovation’ Global Accounts

Just before VMworld 2017 Michael Dell tweeted about the great work we had all accomplished and released a video.

Solved: WARNING: Link is up but PHY type 0x3 is not recognized – Can cause ESXi 6 purple screens
The Error >> When running an Intel x710 NIC with the ESXi i40e driver you notice your vmkernel.log completely full of the error “WARNING: Link is up but PHY type 0x3 is not recognized”
The Solution >> Ensure X710 firmware is at 17.5.11 (aka 5.04 in ESXi) and ESXi i40e Driver to 1.4.26 or 1.4.28 and these errors stop
The Follow-up >> Check out your NIC on the VMWare HCL for the Correct driver/firmware guidance. This is the link I used.
Other notes…
Sending Millions of the PHY errors to your event logs could be causing other issues for your ESXi host. Look for local boot disk latency or Networking errors in your ESXi host event logs. Once you apply this solution these issues should stop. If not, then you may have other issues impacting your boot disks.
*Updates*
- After applying this solution we then noticed the vmkernel started to populate with ‘driver issue detected, PF reset issued’ the solution for this is to disable TSO/LRO. VMWare KB 205140.
- 04-10-2017 There is a new VMware driver listed for the X710, will be testing soon and will post up results. Release notes indicate fixes for the following:
– Fix duplicate mulicast packet issue
– Fix PSOD caused by small TSO segmentation
If you like my ‘no-nonsense’ blog articles that get straight to the point… then post a comment or let me know… Else, I’ll start writing boring blog content.
Updating the Dell FX2 Backplane and Non-Backplane firmware based on VMWare KB 2109665
The Fun:
Recently I was working with a Dell FX2 + VSAN environment and came across this VMware KB (2109665) around updating the Backplane and Non-Backplane Expander firmware. I’m not going to get into the details of this KB as others have rehashed it in multiple blogs. Here is a good example: http://anthonyspiteri.net/vsan-dell-perc-important-driver-and-firmware-updates/
However, what I find is the KB, blogs, and Dell just merely tell you to update the firmware but they don’t tell you how or where to. If you have worked with the FX2 you’d know there are the many ways you can update the firmware but finding the right on one, of the 6 different ways, can be a bit frustrating.
A Simple Solution:
To update the Backplane Expander and Non-Backplane Expander you will need to boot the server into the Lifecycle Controller at boot time. Then I choose to use a USB key to update the firmware.
Glorious Screenshots:
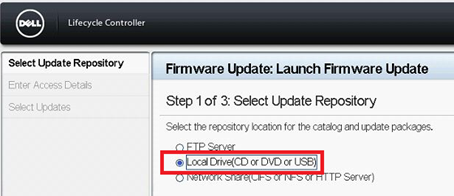
Launch the Lifecycle Controller during boot time then choose Firmware Update >> Launch Firmware Update

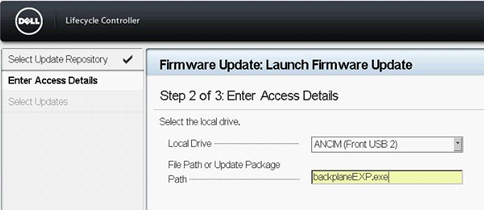
I choose to use USB. Tip: Make sure your USB ports are enabled in the BIOS
Choose your file to be updated. Tip: I renamed the firmware file to something easier to type.
Click on next and let it finish the process…

If you like my ‘no-nonsense’ blog articles that get straight to the point… then post a comment or let me know…
Else, I’ll start writing boring rehashed blog content.
How to find Dell PERC FD332 or H330 Firmware Versions in ESXi 6
Today’s adventure seemed an easy task but ended up taking much too long to find the right answer.
The task… ‘Is there a way to find the firmware version of a Dell Perc FD332 or H330 controller using command line in ESXi 6?’
The answer:
‘zcat /var/log/boot.gz |grep -i firm’

Things that didn’t work –
http://www.yellow-bricks.com/2014/04/08/updating-lsi-firmware-esxi-commandline/
Thanks going out to my fellow VMware TAMs for helping me to locate this answer.
If you like my ‘no-nonsense’ blog articles that get straight to the point… then let me know…
Else, I’ll start writing boring blog content.
