Home Lab Generation 7: Upgrading vSAN 7 Hybrid capacity step by step
My GEN5 Home Lab is ever expanding and the space demands on the vSAN cluster were becoming more apparent. This past weekend I updated my vSAN 7 cluster capacity disks from 6 x 600GB SAS HDD to 6 x 2TB SAS HDD and it went very smoothly. Below are my notes and the order I followed around this upgrade. Additionally, I created a video blog (link further below) around these steps. Lastly, I can’t stress this enough – this is my home lab and not a production environment. The steps in this blog/video are just how I went about it and are not intended for any other purpose.
Current Cluster:
- 3 x ESXi 7.0 Hosts (Supermicro X9DRD-7LN4F-JBOD, Dual E5 Xeon, 128GB RAM, 64GB USB Boot)
- vSAN Storage is:
- 600GB SAS Capacity HDD
- 200GB SAS Cache SDD
- 2 Disk Groups per host (1 x 200GB SSD + 1 x 600GB HDD)
- IBM 5210 HBA Disk Controller
- vSAN Datastore Capacity: ~3.5TB
- Amount Allocated: ~3.7TB
- Amount in use: ~1.3TB
Proposed Change:
- Keep the 6 x 200GB SAS Cache SDD Drives
- Remove 6 x 600GB HDD Capacity Disk from hosts
- Replace with 6 x 2TB HDD Capacity Disks
- Upgraded vSAN Datastore ~11TB
Upgrade Notes:
- I choose to backup (via clone to offsite storage) and power off most of my VMs
- I clicked on the Cluster > Configure > vSAN > Disk Management
- I selected the one host I wanted to work with and then the Disk group I wanted to work with
- I located one of the capacity disks (600GB) and clicked on it
- I noted its NAA ID (will need later)
- I then clicked on “Pre-check Data Migration” and choose ‘full data migration’
- The test completed successfully
- Back at the Disk Management screen I clicked on the HDD I am working with
- Next I clicked on the ellipse dots and choose ‘remove’
- A new window appeared and for vSAN Data Migration I choose ‘Full Data Migration’ then clicked remove
- I monitored the progress in ‘Recent Tasks’
- Depending on how much data needed to be migrated, and if there were other objects being resynced it could take a bit of time per drive. For me this was ~30-90 mins per drive
- Once the data migration was complete, I went to my host and found the WWN# of the physical disk that matched the NAA ID from Step 5
- While the system was still running, removed disk from the chassis, and replaced it with the new 2TB HDD
- Back at vCenter Server I clicked on the Host on the Cluster > Configure > Storage > Storage Devices
- I made sure the new 2TB drive was present
- I clicked on the 2TB drive, choose ‘erase partitions’ and choose OK
- I clicked on the Cluster > Configure > vSAN > Disk Management > ‘Claim Unused Disks’
- A new Window appeared and I choose ‘Capacity’ for the 2TB HDD, ‘Cache’ for the 200GB SDD drives, and choose OK
- Recent Task showed the disk being added
- When it was done I clicked on the newly added disk group and ensured it was in a health state
- I repeated this process until all the new HDDs were added
Final Outcome:
- After upgrade the vSAN Storage is:
- 2TB SAS Capacity HDD
- 200GB SAS Cache SDD
- 2 Disk Groups per host (1 x 200GB SSD + 1 x 2TB HDD)
- IBM 5210 HBA Disk Controller
- vSAN Datastore is ~11.7TB

Notes & other thoughts:
- I was able complete the upgrade in this order due to the nature my home lab components. Mainly because I’m running a SAS Storage HBA that is just a JBOD controller supporting Hot-Pluggable drives.
- Make sure you run the data migration pre-checks and follow any advice it has. This came in very handy.
- If you don’t have enough space to fully evacuate a capacity drive you will either have to add more storage or completely remove VM’s from the cluster.
- Checking Cluster>Monitor>vSAN>Resyncing Objects, gave me a good idea when I should start my next migration. I look for it to be complete before I start. If you have an very active cluster this maybe harder to achieve.
- Checking the vSAN Cluster Health should be done, especially the Cluster > Monitor > Skyline Health > Data > vSAN Object Health, any issues in these areas should be looked into prior to migration
- Not always, but mostly, the disk NAA ID reported in vCenter Server/vSAN usually coincides with the WWN Number on the HDD
- By changing my HDDs from 600GB SAS 10K to 2TB SAS 7.2K there will be a performance hit. However, my lab needed more space and 10k-15K drives were just out of my budget.
- Can’t recommend this reference Link from VMware enough: Expanding and Managing a vSAN Cluster
Video Blog:
Various Photos:
 |
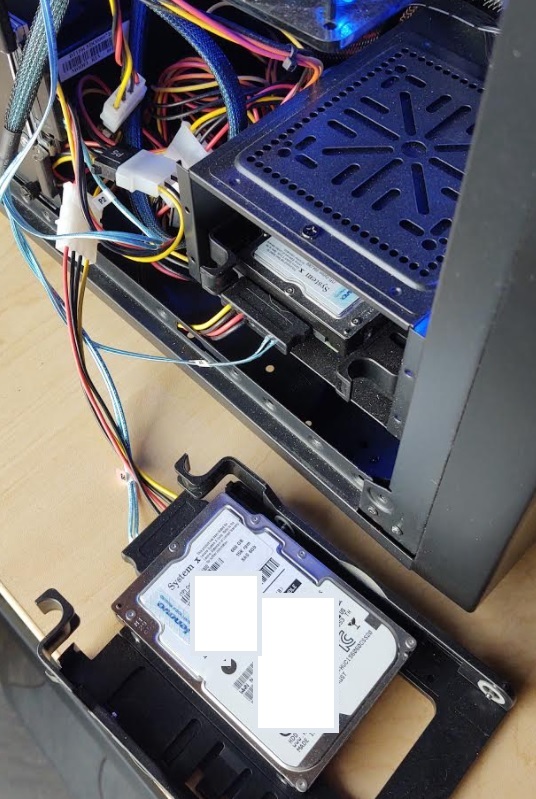 |
If you like my ‘no-nonsense’ videos and blogs that get straight to the point… then post a comment or let me know… Else, I’ll start posting really boring content!

September 26, 2020 at 8:57 am
[…] by Step: Upgrading the capacity disks in a vSAN 7 hybrid cluster This article is really a step by step kind of thing and very helpful if you wish to grow capacity in your vSAN […]
LikeLike
November 3, 2020 at 4:21 pm
[…] 2 x 2TB SAS HDD (vSAN Capacity – See this post) […]
LikeLike
July 12, 2021 at 4:16 pm
Great step by step, i have to do the similar, question how many free space i need to have to migrate data?
i am not sure about this process
LikeLike