cloud
VMware Workstation Performance enhancements
There can be a multitude of factors that could impact performance of your Workstation VMs. Running a VCF 9 stack on VMware Workstation demands every ounce of performance your Windows 11 host can provide. To ensure a smooth lab experience, certain optimizations are essential. In this post, I’ll walk through the key adjustments to maximize efficiency and responsiveness.
Note: There are a LOT of settings I did to improve performance. I take a structured approach by trying things slowly vs. applying all. The items listed below are what worked for my system and it’s recommend for that use case only. Unless otherwise stated, the VM’s and Workstation were powered down during these adjustments.
Items recently covered in my VMware Workstation Gen 9: BOM1 deployment.
- Host BIOS/UFEI Settings
- Check out my blog under the ‘BIOS settings’ for more information.
- Hardware Design:
- Fast Storage: NVMe, SSD, and U.2 all contribute to VM performance
- Placement of VM files: We placed and isolated our ESX VMs on specific disks which helps to ensure better performance
- PCIe Placement: Using the system block diagram I placed the devices in their optimal locations
- Ample RAM: Include more than enough RAM to support the VCF 9 VMs
- CPU cores: Design enough CPU cores to support the VCF 9 VMs
- Video Card: Using a power efficient GPU can help boost VM performance
- VM Design
- Disk Choices: Matched the VM disk type to the physical drive type they are running on. Example – NVMe physical to a VMs NVMe disk
- CPU Settings: Match physical CPU Socket(s) to VM CPU settings.
- vHardware Choices: When creating a VM, Workstation should auto-populate hardware settings. Best vNIC to use is the vmxnet3. You can use the Guest OS Guide to validate which virtual hardware devices are compatible.
- Fresh Installs
- There’s nothing like a fresh install of the base OS to be a reliable foundation for performance improvments.
- When Workstation is installed it adapts to the base OS. There can be performance gains due to this adaption.
- However, if you upgrade the OS (Win10 to Win11) with Workstation already installed, you should always fully uninstall and reinstall Workstation post upgrade for optimal performance.
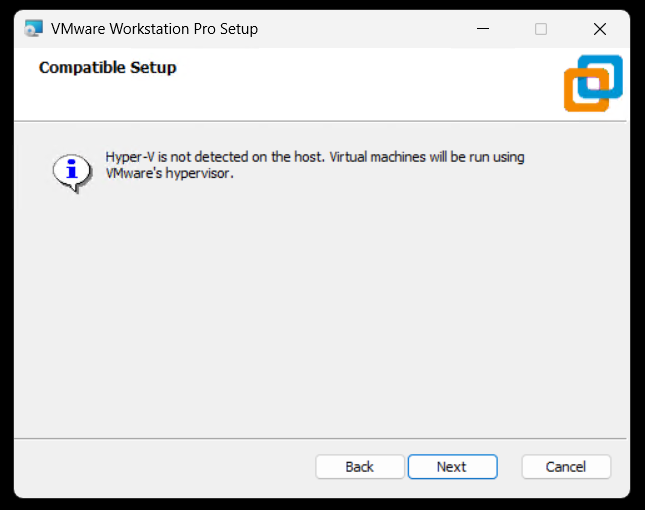
- Additionally, when installing Workstation I ensure that Hyper-V is disabled as it can impact Workstation performance.
- Disable Side-Channel Mitigations (Core Isolation)
- Disabling these can boost performance, especially on older processors, but may reduce security.
New Items to help with performance
Exclude Virtual Machine Directories From Antivirus Tools
NOTE — AV exceptions exclude certain files, folders, and processes from being scanned. By adding these you can improve Workstation performance but there are security risks in enabling AV Exceptions. Users should do what’s best for their environment. Below is how I set up my environment.
- Script:
- Use a script to create AV Exceptions. For an example check out my blog – Using PowerShell to setup AV exceptions for Workstation 25H2u1 and Windows 11.
- Manual Steps:
- Open Virus and Threat Protection
- Virus & threat protection settings > Manage Settings
- Under ‘Exclusion’ choose ‘Add or remove exclusions’
- Click on ‘+ Add an exclusion’
- Choose your type (File, Folder, File Type, Process)
- File Type: Exclude these specific VMware file types from being scanned:
- .vmdk: Virtual machine disk files (the largest and most I/O intensive).
- .vmem: Virtual machine paging/memory files.
- .vmsn: Virtual machine snapshot files.
- .vmsd: Metadata for snapshots.
- .vmss: Suspended state files.
- .lck: Disk consistency lock files.
- .nvram: Virtual BIOS/firmware settings.
- Folder: Exclude the following directories to prevent your antivirus from interfering with VM operations
- VMware Installation folder
- VM Storage Folders: Exclude the main directory where you store your virtual machines
- Installation Folder: Exclude the VMware Workstation installation path (default:
C:\Program Files (x86)\VMware\VMware Workstation\). - VMware Tools: If you have the VMware Tools installation files extracted locally, exclude that folder as well.
- Process: Adding these executable processes to your antivirus exclusion list can prevent lag caused by the AV monitoring VMware’s internal actions:
- vmware.exe: The main Workstation interface.
- vmware-vmx.exe: The core process that actually runs each virtual machine.
- vmnat.exe: Handles virtual networking (NAT).
- vmnetdhcp.exe: Handles DHCP for virtual networks.
Power Plan
Typically by default Windows 11 has the “Balanced” Power plan enabled. Though these settings are good for normal use cases, using your system as a dedicated VMware Workstation requires a better plan.
Below I show 2 ways to adjust a power plan. 1) Using a script to create a custom plan or 2) manually make similar adjustments.
- 1) Script: I created a script that creates a custom power plan named “VMware Workstation Performance Plan” and makes all the needed changes for my system. You can find my blog here.
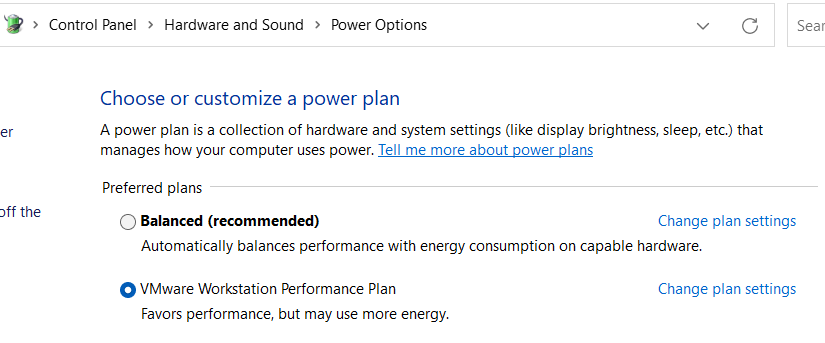
- 2) Manual Adjustments:
- Open the power plan. Control Panel > Hardware and Sound > Power Options > Change settings that are currently unavailable
- You might see on every page “Change settings that are currently unavailable”, just click on it before making changes.
- Set Power Plan:
- Click on ‘Hide Additional Plans’.
- Choose either “Ultimate Performance” or “High Performance” plan and then click on “Change plan settings”
- Hard Disk > 0 Minutes
- Wireless Adapter Settings > Max Performance
- USB > Hub Selective Suspend Time out > 0
- PCI Express > Link State Power Management > off
- Processor power management > Both to 100%
- Display > Turn off Display > Never
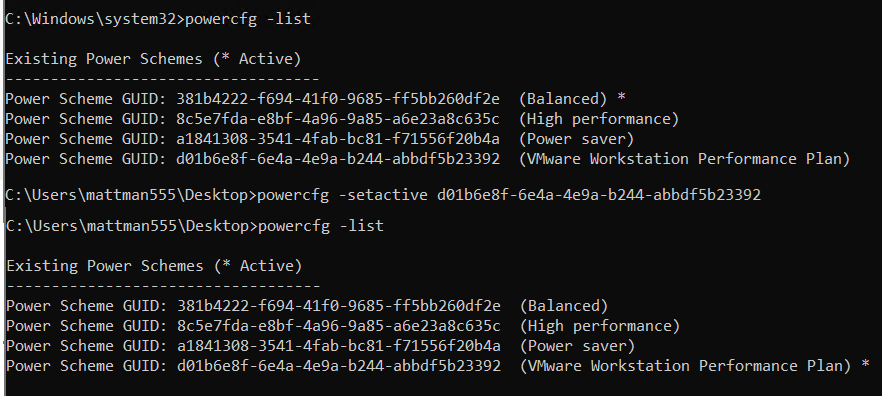
Lastly, make sure the correct power plan is active. I used the commands ‘powercfg -list’ to show the active plan and then ‘powercfg -setactive GUID’, replacing GUID with the plan I wanted.
Power Throttling (Not very common)
Power throttling in Windows 11 is an intelligent, user-aware feature that automatically limits CPU resources for background tasks to conserve energy and extend battery life. By identifying non-essential, background-running applications, it reduces power consumption without slowing down active, foreground apps.
To determine if it is active go in to System > Power and look for Power Mode
If you are using a high performance power plan usually this feature is disabled.
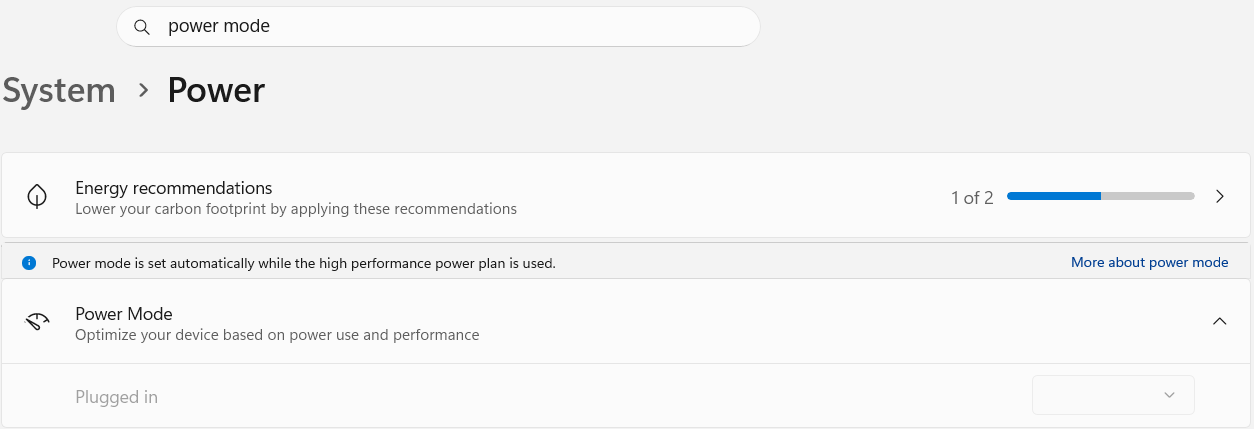
If you are running a power plan where this is enabled, and you don’t want to disable it, then you can maximize your performance by disabling power throttling for the Workstation executable.
powercfg /powerthrottling disable /path “C:\Program Files (x86)\VMware\VMware Workstation\x64\vmware-vmx.exe”
Sleep States
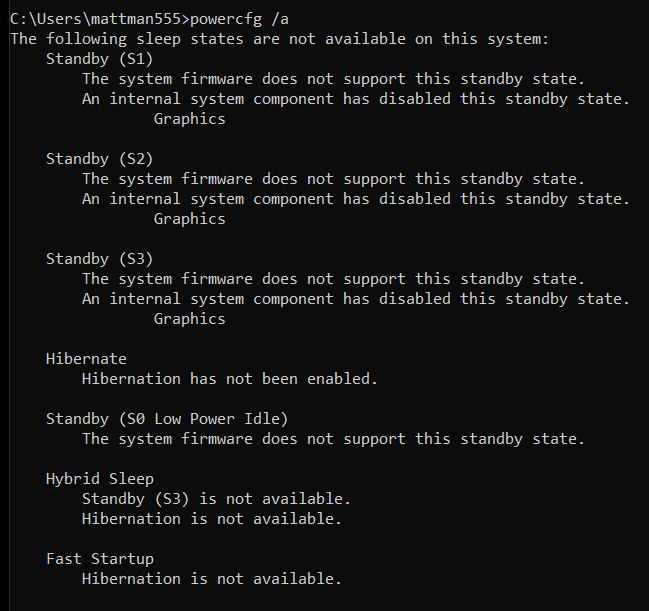
Depending on your hardware you may or may not have different Sleep states enabled. Ultimately, for my deployment I don’t want any enabled.
To check if any are from a command prompt type in ‘powercfg /a’ and adjust as needed.
Workstation Memory Page files
In my design I don’t plan to overcommit physical RAM (640GB ram) for my nested VM’s. To maximize the performance and ensure VMware Workstation uses the physical memory exclusively, I follow these steps: Configure global memory preferences, Disable Memory Trimming for each VM, Force RAM-Only Operation, and adjust the Windows Page Files.
Configure Global Memory Preferences
- This setting tells VMware how to prioritize physical RAM for all virtual machines running on the host.
- Open Workstation > Edit > Preferences > Memory
- In the Additional memory section, select the radio button for “Fit all virtual machine memory into reserved host RAM”.
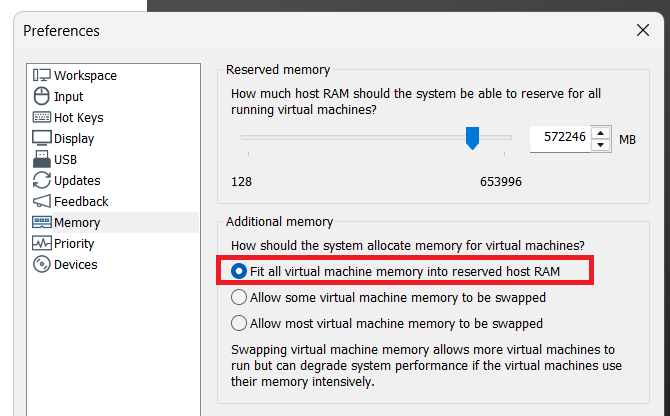
Disable Memory Trimming for each VM:
- Windows and VMware use “trimming” to reclaim unused VM memory for the host. Since RAM will not be overallocated, I disable this to prevent VMs from ever swapping to disk.
- Right-click your VM and select Settings
- Go to the Options tab and select the Advanced category.
- Un-Check the box to disable memory page trimming.
- Click OK and restart the VM
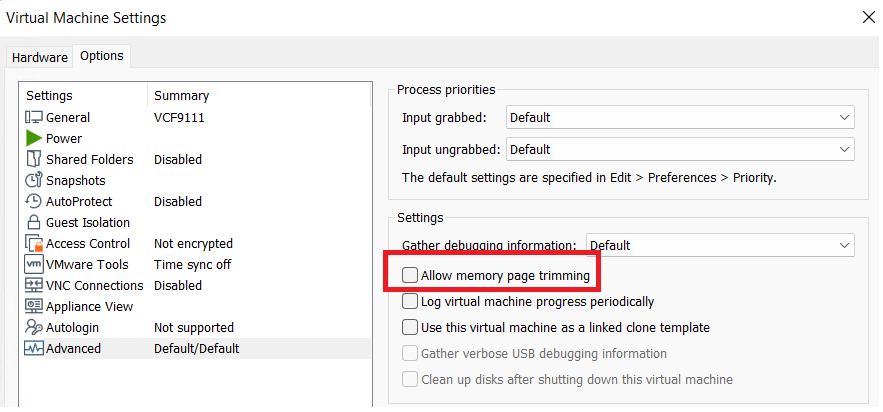
Force RAM-Only Operation (config.ini):
- This is an advanced step that prevents VMware from creating
.vmemswap files, forcing it to use physical RAM or the Windows Page File instead. - Close VMware Workstation completely.
- Navigate to C:\ProgramData\VMware\VMware Workstation\ in File Explorer (Note: ProgramData is a hidden folder).
- Open the file named config.ini with Notepad (you may need to run Notepad as Administrator).
- Add the following lines to the end of the file:
- mainMem.useNamedFile = “FALSE”
- prefvmx.minVmMemPct = “100”
- Save the file and restart your computer
Windows Page Files
- With 640GB of RAM Windows 11 makes a huge memory page file. Though I don’t need one this large I still need one for crash dumps, core functionality, and memory management. According to Microsoft, for a high-memory workstation or server, a fixed page file of 16GB to 32GB is the “sweet spot.” I’m going a bit larger.
- Go to System > About > Advanced system Settings
- System Properties window appears, under Performance choose ‘Settings’
- Performance Options appears > Advanced > under Virtual memory choose ‘change’
- Uncheck ‘Automatically manage paging…’
- Choose Custom size, MIN 64000 and MAX 84000
- Click ‘Set’ > OK
- Restart the computer
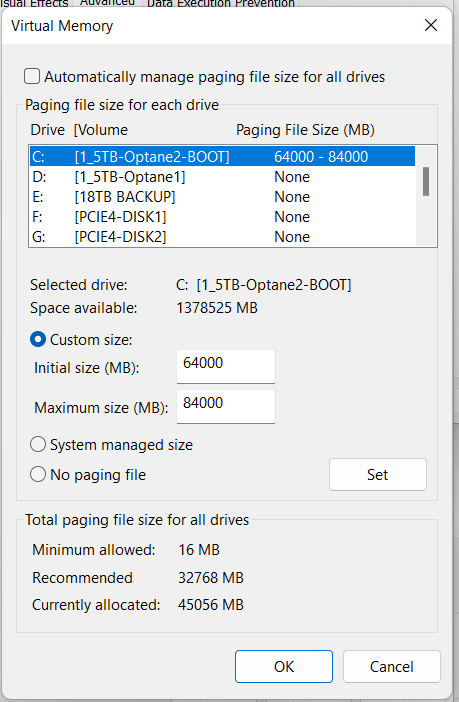
Windows Visual Effects Performance
The visual effects in Windows 11 can be very helpful but they can also minimally slow down your performance. I prefer to create a custom profile and only enable ‘Smooth edges of screen fonts’
- Go to System > About > Advanced system Settings
- System Properties window appears,
- On the Advanced Tab, under Performance choose ‘Settings’
- On the Visual Effect tab choose ‘Custom’ and I chose ‘Smooth edges of screen fonts’
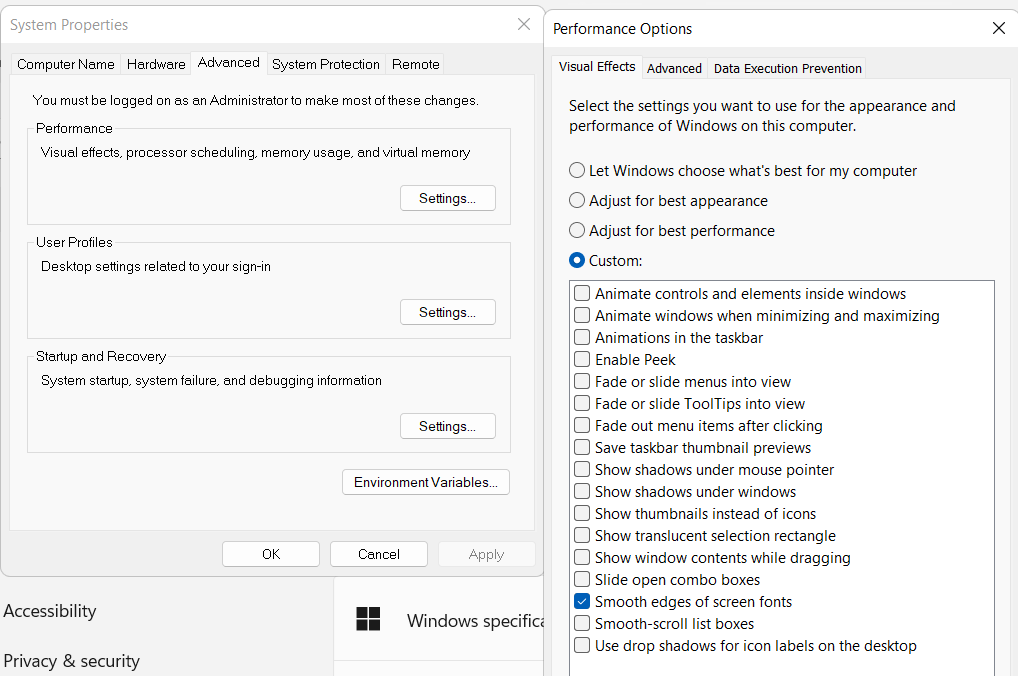
Disable BitLocker
Windows 11 (especially version 24H2 and later) may automatically re-enable encryption during a fresh install or major update. By default to install Windows 11 it requires TPM 1.2 or higher chip (TPM 2.0 recommended/standard for Win11), and UEFI firmware with Secure Boot enabled. BitLocker uses these features to “do its work”. To disable I do the following.
- Registry Edit (Post-Installation – may already be set):
- Press Win + R, type regedit, and press Enter
- Navigate to: HKEY_LOCAL_MACHINE\SYSTEM\CurrentControlSet\Control\BitLocker
- Right-click in the right pane, select New > DWORD (32-bit) Value
- Name it PreventDeviceEncryption and set its value to 1
- Disable the Service:
- Press Win + R, type services.msc, and press Enter.
- Find BitLocker Drive Encryption Service.
- Right-click it, select Properties, set the “Startup type” to Disabled, and click Apply.
Clean out unused Devices:
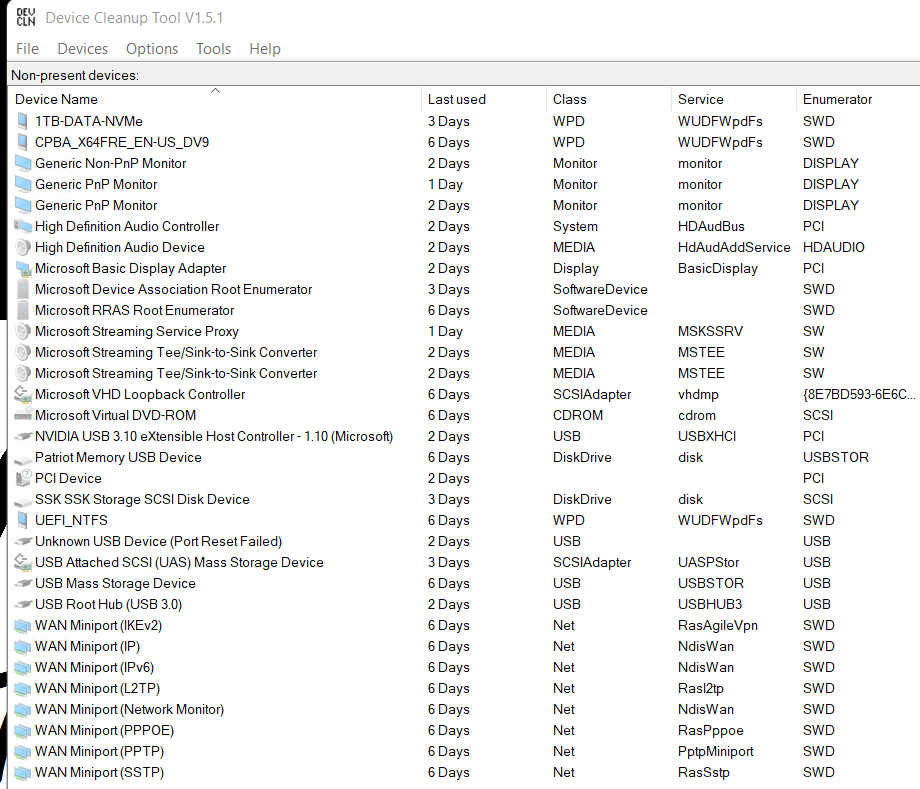
Windows leaves behind all types of unused devices that are hidden from your view in device manager. Though these are usually pretty harmless its a best practice to clean them up from time to time.
The quickest way to do this is using a tool called Device Cleanup Tool. Check out my video for more how to with this tool.
Here is Device Cleanup Tool running on my newly (<2 months) installed system. As you can see unused devices can build up even after a short time frame.
Debloat, Clean up, and so much more
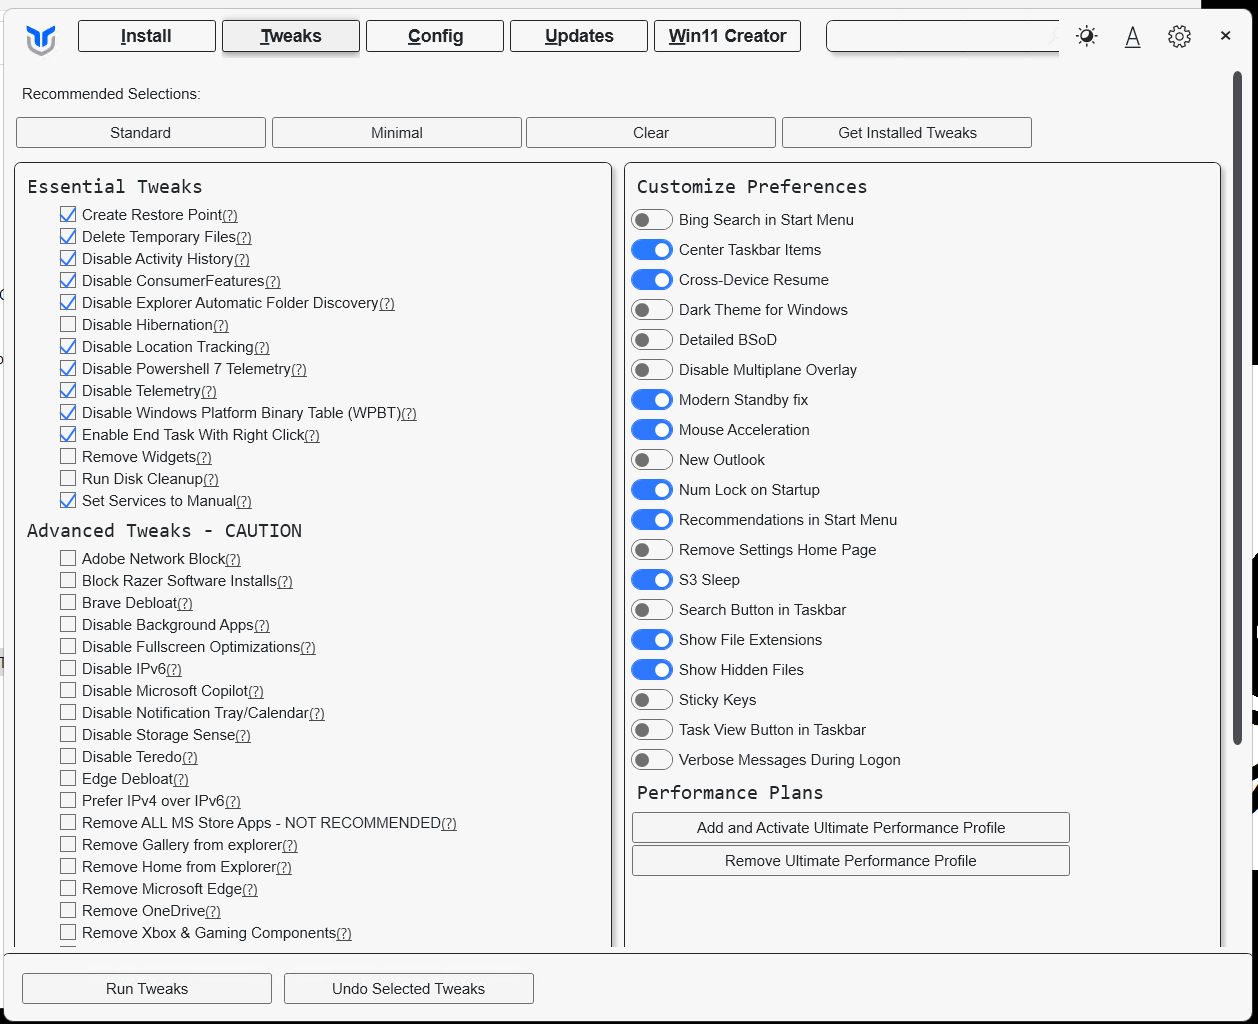
There are several standard Windows based features, software, and cleanup tools that can impact the performance of my deployment. I prefer to run tools that help optimize Windows due to their ability to complete tasks quickly. The tool I use to debloat and clean up my system is Winutil. It’s been a proven util for not only optimizing systems, installing software, updates, but helping to maintain them too. For more information about Winutil check out their most recent update.
For ‘Tweaking’ new installs I do the following:
- Launch the WinUtil program
- Click on Tweaks
- Choose Standard
- Unselect ‘Run Disk Cleanup’
- Click on Run Teaks
Additionally, you may have noticed Winutil can create an Ultimate Preforamnce power plan. That may come in handy.
Remove Windows Programs:
Here is a list of all the Windows Programs I remove, they are simply not needed for a Workstation Deployment. Some of these can be removed using the WinUtil most I remove with Revo Uninstaller Free Edition.
- Cortana
- Co-polit
- Camera
- Game Bar
- Teams
- News
- Mail and Calendar
- Maps
- Microsoft OneDrive
- Microsoft to do
- Movies and TV
- People
- Phone Link
- Solitare
- Sticky Notes
- Tips
- Weather
- Xbox / xbox live
References and Other Performance Articles:
Installing VMware Workstation Pro 26H1
Here are the steps I took to install VMware Workstation Pro 26H1.
Meet the requirements
The number one issue why Workstation doesn’t install is failure to read the requirements. Ensure your hardware and your BIOS settings meet the requirements prior to installation.
Download Workstation
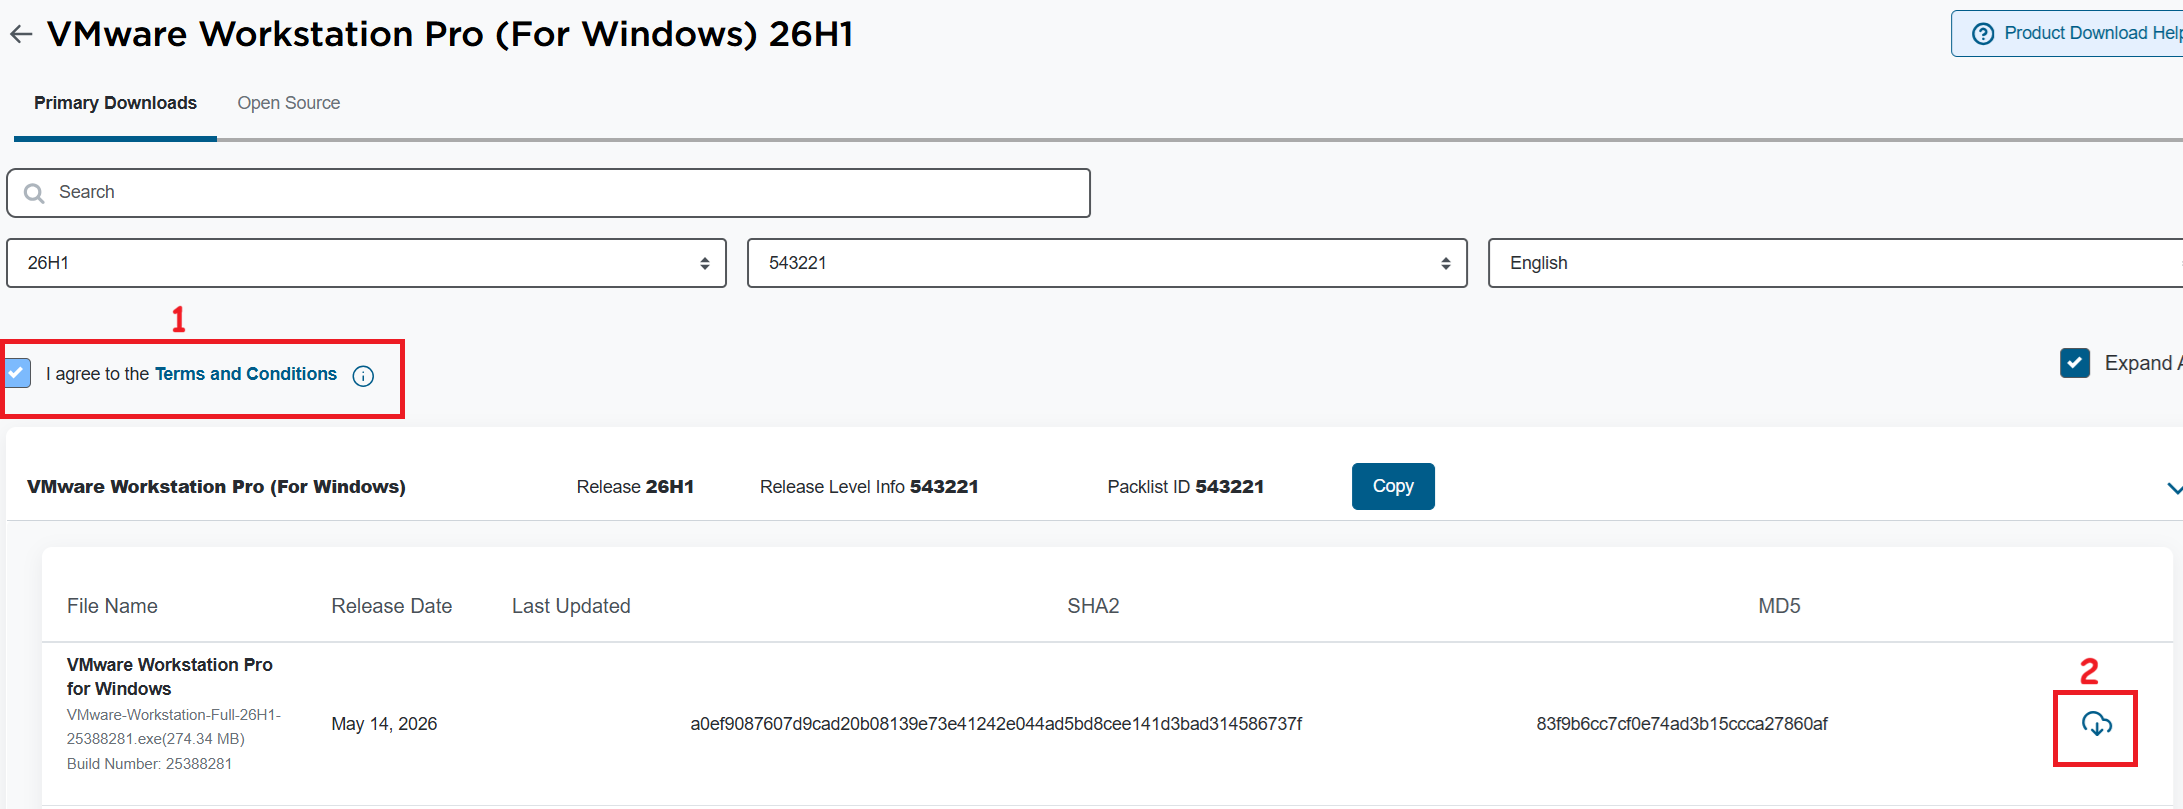
I’ll need to download VMware Workstation Pro 26H1. The good news is, it’s free and users can download it at the Broadcom support portal. Once you log in, you can find it under the downloads section under FREE Downloads. Need more guidance on the portal, see this KB.
Note: Make sure you click on the ‘Terms and Conditions’ plus the check box (1) before you click on the download icon (2).
Windows Settings
Disable Windows Virtualization Settings
If you are deploying Workstation on to Windows the disablement of Hyper-V and Device Guard conflicts are important. Basically, Workstation needs these to be disabled to achieve optimal performance plus support nesting. If they are not disabled the following error will appear during the installation of Workstation.
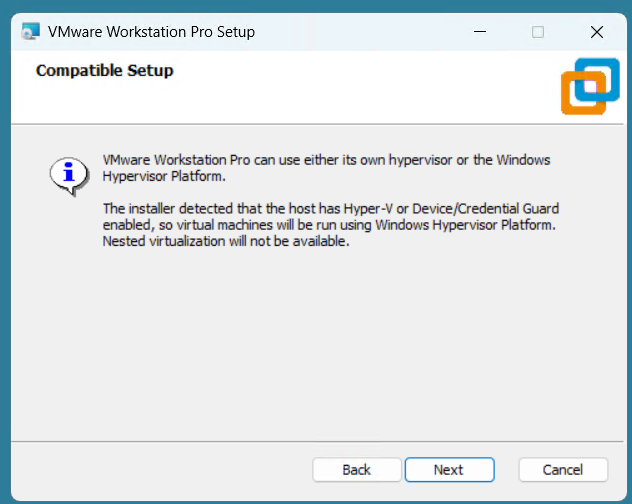
Note: Before starting, I create a current Windows restore point prior to making the following changes.
To resolve this, I used the Microsoft Device Guard and Credential Guard Hardware Readiness Tool.
- Download the Device Guard and Credential Guard hardware readiness tool from Microsoft.
- Extract the downloaded ZIP file.
- Use the tool to disable Device Guard and Credential Guard:
- Open PowerShell window as an administrator.
- Navigate to the folder where you extracted the tool.
- First run this command to get Execution Policy:
- Set-ExecutionPolicy Unrestricted -Scope Process
- Now run the script with the -Disable parameter to disable Device and Credential Guard
- DG_Readiness_Tool_v3.6.ps1 -Disable
- Reboot your computer.
- During the boot process, Windows will ask you to confirm the changes. Follow the on-screen instructions to proceed (Just press F3).
- When complete your computer will reboot.
Workstation Installation
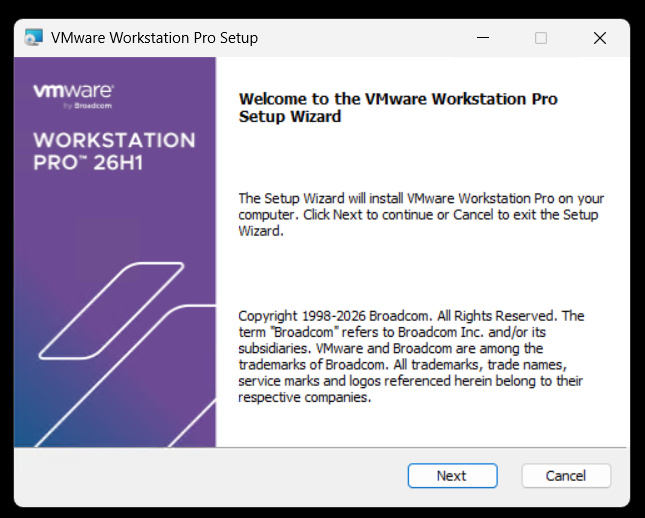
Launch the Workstation program and when prompted click Next.
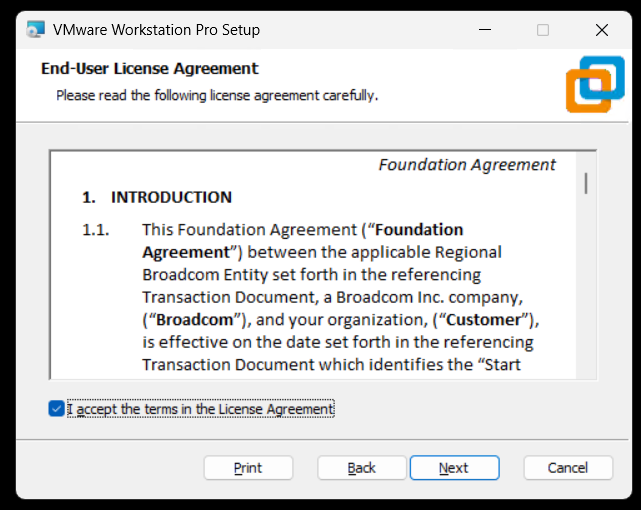
Check Accept and Click Next.
Ensure VMs are running on VMware Hypervisor.
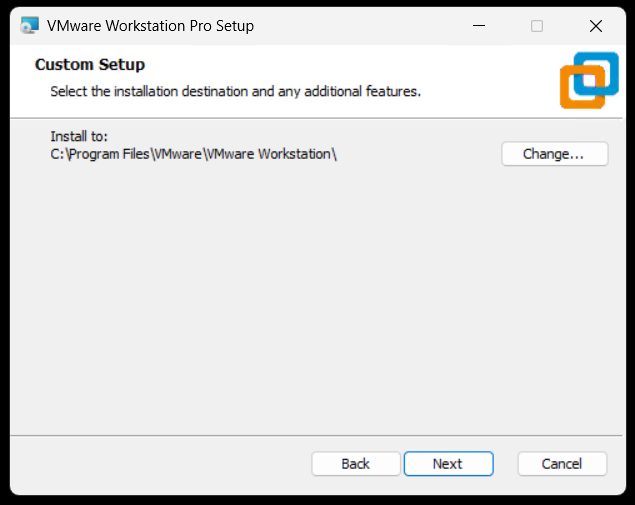
Ensure directory is correct and click next.
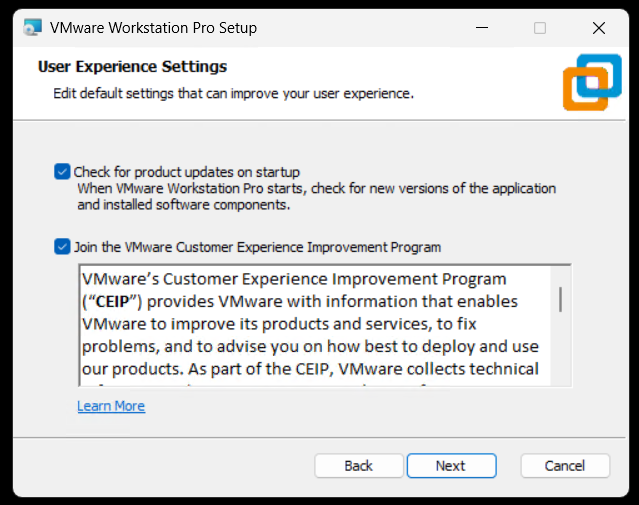
Click next to accept auto updates and joining the CEIP program.
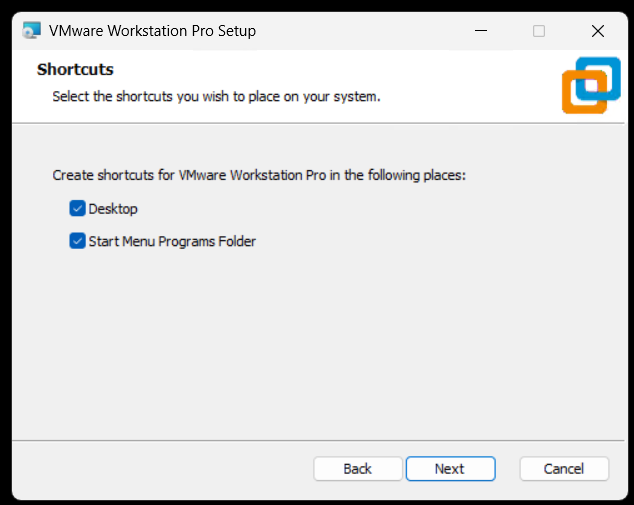
Click next to create shortcuts.
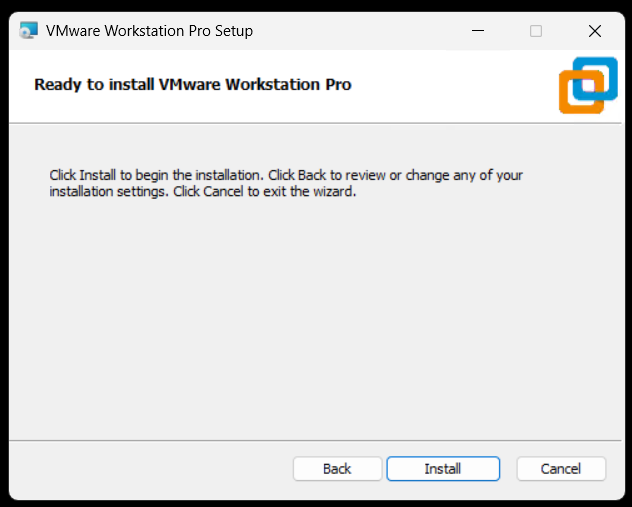
Click Install to install Workstation.
Allow the installer to complete and click Finish to finalize.
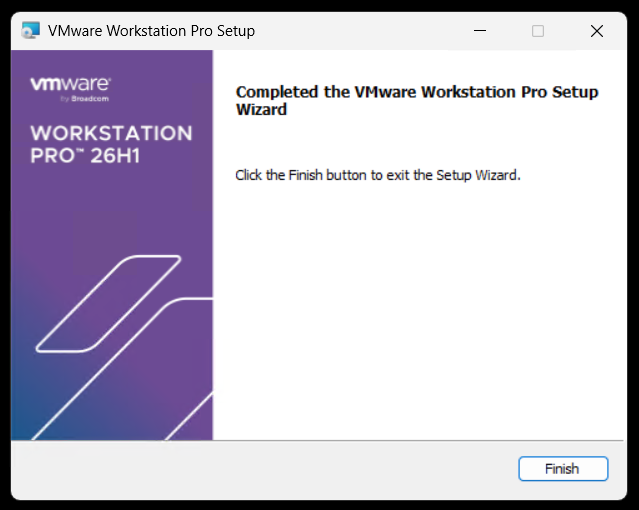
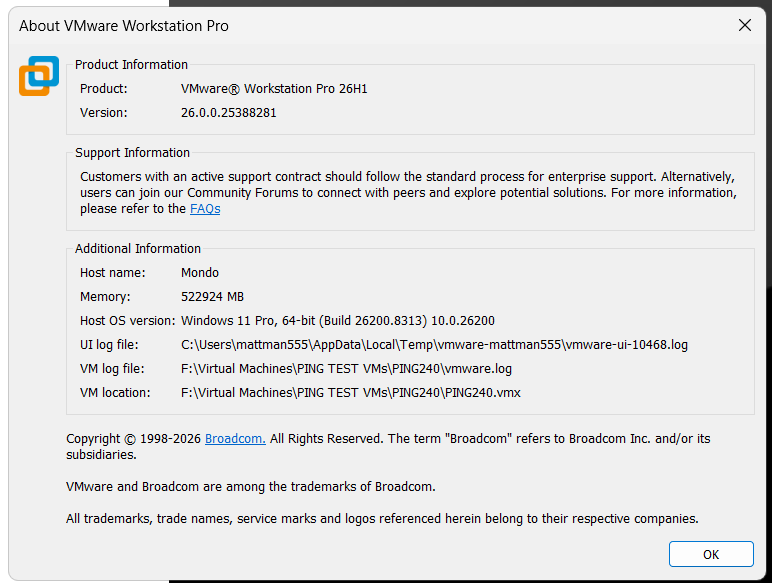
Open Workstation > Help > about to to validate install.
VMware Cloud Foundation 9.1 (VCF 9.1) key events, webinars, and Resources
Below is a summary of some of the great announcements around the VCF 9.1 release.
Discover What’s New in VCF 9.1
Watch this recording to see the new features in action through demo-walkthroughs and discover how the newly announced partnerships will expand VCF 9.1 capabilities.
Modules:
- The New Era of Virtualization: AI-ready Private Cloud
- Solving the AI Memory Crisis with VMware Cloud Foundation
- Exploring VCF 9.1: Private AI and Memory Tiering Insights
- VMware Advanced Cyber Compliance: Bridging the Resilience Gap
Learn More
- VMUG Global Event (June 25th)
- Meet our Experts Register for VMware Explore 2026 (Aug 31 – Sep 3)
- Level Up Get Certified on VCF 9.1
Strategic Roadmap & Training
The following schedule outlines key opportunities to engage with VCF experts and the broader Broadcom ecosystem in 2026. The marquee event, VMware Explore 2026, returns to Las Vegas in late August.
| Date | Event / Webinar Name | Location / Type |
|---|---|---|
| May 5, 2026 | Broadcom’s VMware in 2026: VCF 9, Containers, and AI | Webinar (On-Demand) |
| May 13-15, 2026 | VCF Experience Day (Hosted by TD SYNNEX) | Dallas/Plano, TX |
| Aug 31 – Sep 3, 2026 | VMware Explore 2026 Las Vegas | Las Vegas, NV |
| Sep 29-30, 2026 | VMware Explore on Tour: Mumbai | Mumbai, India |
| Oct 1-2, 2026 | VMware Explore on Tour: Singapore | Singapore |
| Oct 13-14, 2026 | VMware Explore on Tour: Frankfurt | Frankfurt, Germany |
Virtually Speaking Podcast Series and others
Hosted by Pete Flecha and John Nicholson, the Virtually Speaking Podcast provides weekly technical deep dives into the VCF 9.1 ecosystem. The new “VCF 9 Core” series features product engineers explaining the architectural changes.
| Episode 1: Introducing VCF 9.1: Built for Efficiency and Resilience | Episode 6: VCF 9.1: From AI Hype to Production Reality |
| Episode 2: From Infrastructure to Innovation: VCF 9.1 Core Explained | Episode 7: VCF 9.1: Scaling Secure Edge Deployments |
| Episode 3: VCF 9.1: Automation, Kubernetes APIs, and Faster Deployments | Episode 8: VCF 9.1 Cyber Resilience: From Attack to Recovery with Confidence |
| Episode 4: Inside VCF 9.1: Platform, Lifecycle, and What’s Different Now | Episode 9: Designing VCF 9.1: Architecture, Sizing, and Scale in Practice |
| Episode 5: From Rising Costs to Smarter Storage: The VCF 9.1 Reality |
Resources & Documentation
Critical Reference Materials
- Product News Release: Broadcom Announces VMware Cloud Foundation 9.1
- Broadcom TechDocs: TechDocs have been completed updated making it easier to find content.
- Release Notes: The full VCF 9.1 Release Notes detail the specific upgrade paths from VCF 5.x.
- VCF Import Guide: Technical documentation on how to prepare brownfield vSphere clusters for ingestion.
- Private AI Reference Architecture: A comprehensive guide on sizing GPU clusters and configuring vSAN ESA for high-throughput AI training.
Tech Blogs
- Announcing VCF 9.1: Modern Private Cloud Built for Efficiency and Resilience
- Scale Smarter, Save More: Redefining Infrastructure Economics with vSphere in VCF 9.1
- Announcing VCF Edge 9.1 A Scalable, Autonomous Edge Platform
- Continuous Compliance, Integrated Cyber Recovery and Enhanced Platform Security for VCF 9.1
- Streamline, Simplify and Protect all your AI workloads with VCF 9.1
- VCF Professional Services and Lifecycle Support Solution Brief
Coming Soon
HOL
- Test-Drive VCF 9.1 and more for free
- What’s New in VCF 9.1
- Memory Tiering in VCF 9.1
- Native Kubernetes Workloads on VCF 9.1
Solution Architecture Guides
- Self-Service Multi-tenant Private Cloud Consumption
- Private AI Service Deployment and Consumption with VCF 9.1
- VCF Edge Design for Retail, Manufacturing
- Flexible Storage Deployment Models
Next Steps
For organizations planning their upgrade path, the immediate next step is to audit current hardware compatibility against the VCF 9.1 HCL (Hardware Compatibility List), particularly if planning to leverage the new NVMe memory tiering capabilities.
REF: See the follow URL for more updates. https://go-vmware.broadcom.com/whats-new-in-vcf
Managing the SDDC Installer admin@local Account – Password Resets and lockouts
We’ve all been there. We deploy an appliance and then we can’t find the password. We try to log in a few times and the accout gets locked out. For administrators managing VMware Cloud Foundation (VCF), the admin@local account is a critical account. Introduced to provide access to the SDDC Manager APIs and the VCF Installer even when the management vCenter Server or Identity Provider (SSO) is unavailable, it ensures you aren’t locked out of your environment during critical failures.
Phase 1: Resetting the Forgotten Password
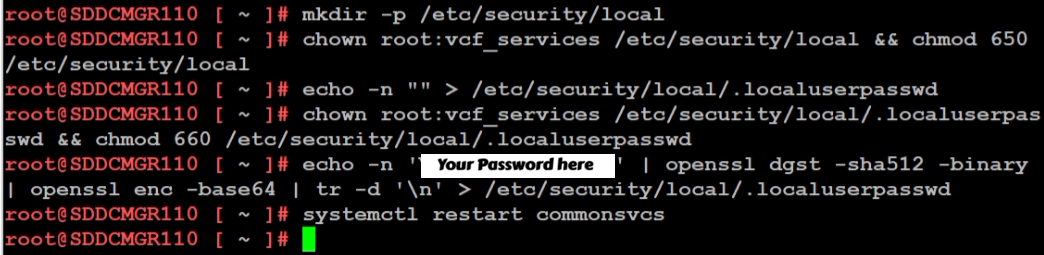
If you don’t know the current password, you must manually inject a new one via the SDDC Manager console. This process involves creating a secure credential file and hashing your new password using OpenSSL.
According to KB 403099, follow these steps on the SDDC Manager VM:
- Access the Console: Log in to the SDDC Manager via SSH as the
vcfuser, then switch to root:su -or simply logon as root. - Initialize the Security Directory: Ensure the local security directory exists with the correct permissions:
mkdir -p /etc/security/local chown root:vcf_services /etc/security/local && chmod 650 /etc/security/local - Create the Password File: Create an empty file to house the secret:
echo -n "" > /etc/security/local/.localuserpasswd chown root:vcf_services /etc/security/local/.localuserpasswd && chmod 660 /etc/security/local/.localuserpasswd - Generate the New Password: Replace
You Password herein the command below with a password that meets the VCF requirements (12-127 characters, including uppercase, lowercase, numbers, and special characters):echo -n 'Your Password Here' | openssl dgst -sha512 -binary | openssl enc -base64 | tr -d '\n' > /etc/security/local/.localuserpasswd - Restart Services: Apply the change by restarting the SDDC Manager services:
/opt/vmware/vcf/operationsmanager/scripts/cli/sddcmanager_restart_services.sh
Phase 2: Unlocking the Account
Even with a fresh password, if the account was previously locked due to too many failed attempts, the system may still reject your login. You must now clear the lockout state.
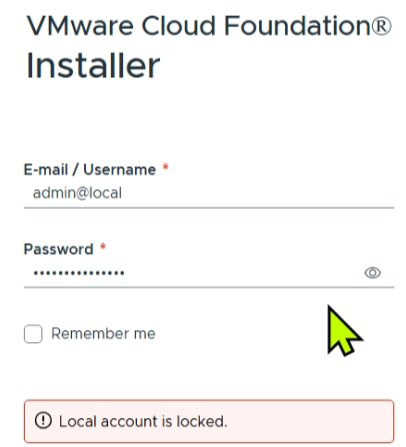
Based on KB 403316, you can clear the lockout by restarting the common services component:
- Stay in the Console: From your existing
rootsession on the appliance (or via the VCF Installer appliance if that is where the lockout occurred). - Clear the Lockout: Run the following command to restart the service responsible for authentication:
systemctl restart commonsvcs - Final Verification: Wait a moment for the service to initialize, then attempt to log in to the web interface using the new password you created in Phase 1.
Summary
When you are locked out of your VCF environment and have forgotten your credentials, the path to recovery is a two-step process. By first following KB 403099 to manually reset the password via the command line, and then following KB 403316 to restart the commonsvcs and clear the lockout, you can regain control of your SDDC Manager and VCF Installer.
VMware Workstation Gen 9: Part 9 Shutting down and starting up the environment
Deploying the VCF 9 environment on to Workstation was a great learning process. However, I use my server for other purposes and rarely run it 24/7. After its initial deployment, my first task is shutting down the environment, backing it up, and then starting it up. In this blog post I’ll document how I accomplish this.
NOTE:
- License should be completed for a VCF 9 environment first before performing the steps below. If not, the last step, vSAN Shutdown will cause an error. There is a simple work around.
- I do fully complete each step before moving to the next. Some steps can take some time to complete.
How to shutdown my VCF Environment.
My main reference for VCF 9 Shut down procedures is the VCF 9 Documentation on techdocs.broadcom.com (See REF URLs below). The section on “Shutdown and Startup of VMware Cloud Foundation” is well detailed and I have placed the main URL in the reference URLs below. For my environment I need to focus on shutting down my Management Domains as it also houses my Workload VMs.
Here is the order in which I shutdown my environment. This may change over time as I add other components.
Note – it is advised to complete each step fully before proceeding to the next step.
| Shutdown Order | SDDC Component |
|---|---|
| In vCenter, shutdown all non-essential guest VM’s | |
| 1 – Not needed, not deployed yet | VCF Automation |
| 2 – Not needed, not deployed yet | VCF Operations for Networks |
| 3 – From VCSA234, locate a VCF Operations collector appliance.(opscollectorapplaince) – Right-click the appliance and select Power > Shut down Guest OS. – In the confirmation dialog box, click Yes. – Wait for it to fully power off | VCF Operations collector |
| 4 – Not needed, not deployed yet | VCF Operations for logs |
| 5 – Not needed, not deployed yet | VCF Identity Broker |
| 6 – From vcsa234, in the VMs and Templates inventory, locate the VCF Operations fleet management appliance (fleetmgmtappliance.nested.local) – Right-click the VCF Operations fleet management appliance and select Power > Shut down Guest OS. – In the confirmation dialog box, click Yes. – Wait for it to fully power off | VCF Operations fleet management |
| 7 – You shut down VCF Operations by first taking the cluster offline and then shutting down the appliances of the VCF Operations cluster. – Log in to the VCF Operations administration UI at the https://vcfcops.nested.local/admin URL as the admin local user. – Take the VCF Operations cluster offline. On the System status page, click Take cluster offline. – In the Take cluster offline dialog box, provide the reason for the shutdown and click OK. – Wait for the Cluster status to read Offline. This operation might take about an hour to complete. (With no data mine took <10 mins) – Log in to vCenter for the management domain at https://vcsa234.nested.local/ui as a user with the Administrator role. – There could be other options for shutting down this appliance. Using Broadcom KB 341964 as a reference, I determined my next step is to simply Right-click the vfccops appliance and select Power > Shut down Guest OS. – In the VMs and Templates inventory, locate a VCF Operations appliance. – Right-click the appliance and select Power > Shut down Guest OS. – In the confirmation dialog box, click Yes. – This operations takes several minutes to complete. – Wait for it to fully power off | VCF Operations |
| 8 – Not Needed, not deployed yet | VMware Live Site Recovery for the management domain |
| 9 – Not Needed, not deployed yet | NSX Edge nodes |
| 10 – I continue shutting down the NSX infrastructure in the management domain and a workload domain by shutting down the one-node NSX Manager by using the vSphere Client. – Log in to vCenter for the management domain at https://vcsa234.nested.local/ui as a user with the Administrator role. – Identify the vCenter instance that runs NSX Manager. – In the VMs and Templates inventory, locate the NSX Manager (nsxmgr.nested.local) appliance. – Right-click the NSX Manager appliance and select Power > Shut down Guest OS. – In the confirmation dialog box, click Yes. – This operation takes several minutes to complete. – Wait for it to fully power off | NSX Manager |
| 11 – Shut down the SDDC Manager appliance in the management domain by using the vSphere Client. – Log in to vCenter for the management domain at https://vcsa234.nested.local/ui as a user with the Administrator role. – In the VMs and templates inventory, expand the management domain vCenter Server tree and expand the management domain data center. – Right-click the SDDC Manager appliance (SDDCMGR108.nested.local) and click Power > Shut down Guest OS. – In the confirmation dialog box, click Yes. – This operation takes several minutes to complete. – Wait for it to fully power off | SDDC Manager |
| 12 – You use the vSAN shutdown cluster wizard in the vSphere Client to shut down gracefully the vSAN clusters in a management domain. The wizard shuts down the vSAN storage and the ESX hosts added to the cluster. – Identify the cluster that hosts the management vCenter for this management domain. – This cluster must be shut down last. – Log in to vCenter for the management domain at https://vcsa234.nested.local/ui as a user with the Administrator role. – For a vSAN cluster, verify the vSAN health and resynchronization status. – In the Hosts and Clusters inventory, select the cluster and click the Monitor tab. – In the left pane, navigate to vSAN Skyline health and verify the status of each vSAN health check category. – In the left pane, under vSAN Resyncing objects, verify that all synchronization tasks are complete. – Shut down the vSAN cluster. – In the inventory, right-click the vSAN cluster and select vSAN > Shutdown cluster. – In the Shutdown Cluster wizard, verify that all pre-checks are green and click Next. – Review the vCenter Server notice and click Next. – Enter a reason for performing the shutdown, and click Shutdown. – Briefly monitor the progress of the vSAN shutdown in vCenter. Eventually, VCSA will be shutdown and connectivity to it will be lost. I then monitor the shut down of my ESX host in Workstation. – The shutdown operation is complete after all ESX hosts are stopped. | Shut Down vSAN and the ESX Hosts in the Management Domain OR Manually Shut Down and Restart the vSAN Cluster If vSAN Fails to shutdown due to a license issue, then under the vSAN Cluster > Configure > Services, choose ‘Resume Shutdown’ (Fig-3) |
| Next the ESX hosts will power off and then I can do a graceful shutdown of my Windows server AD230. In Workstation, simply right click on this VM > Power > Shutdown Guest. Once all Workstation VM’s are powered off, I can run a backup or exit Workstation and power off my server. | Power off AD230 |
(Fig-3)
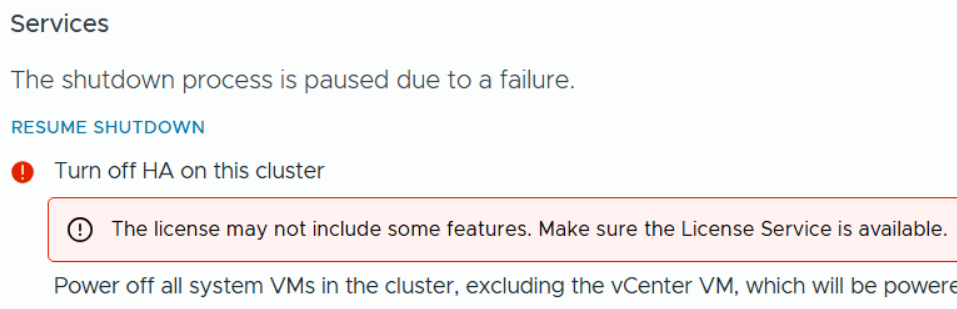
Backing up my VCF Environment
With my environment fully shut down, now I can start the backup process. See my blog Backing up Workstation VMs with PowerShell for more details.
How to restart my VCF Environment.
| Startup Order | SDDC Component |
|---|---|
| PRE-STEP: – Power on my Workstation server and start Workstation. – In Workstation power on my AD230 VM and ensure / verify all the core services (AD, DNS, NTP, and RAS) are working okay. Start up the VCF Cluster: 1 – One at a time power on each ESX Host. – vCenter is started automatically. Wait until vCenter is running and the vSphere Client is available again. – Log in to vCenter at https://vcsa234.nested.local/ui as a user with the Administrator role. – Restart the vSAN cluster. In the Hosts and Clusters inventory, right-click the vSAN cluster and select vSAN Restart cluster. – In the Restart Cluster dialog box, click Restart. – Choose the vSAN cluster > Configure > vSAN > Services to see the vSAN Services page. This will display information about the restart process. – After the cluster has been restarted, check the vSAN health service and resynchronization status, and resolve any outstanding issues. Select the cluster and click the Monitor tab. – In the left pane, under vSAN > Resyncing objects, verify that all synchronization tasks are complete. – In the left pane, navigate to vSAN Skyline health and verify the status of each vSAN health check category. | Start vSAN and the ESX Hosts in the Management DomainStart ESX Hosts with NFS or Fibre Channel Storage in the Management Domain |
| 2 – From vcsa234 locate the sddcmgr108 appliance. – In the VMs and templates inventory, Right Click on the SDDC Manager appliance > Power > Power On. – Wait for this vm to boot. Check it by going to https://sddcmgr108.nested.local – As its getting ready you may see “VMware Cloud Foundation is initializing…” – Eventually you’ll be prompted by the SDDC Manager page. – Exit this page. | SDDC Manager |
| 3 – From the VCSA234 locate the nsxmgr VM then Right-click, select Power > Power on. – This operation takes several minutes to complete until the NSX Manager cluster becomes fully operational again and its user interface – accessible. – Log in to NSX Manager for the management domain at https://nsxmgr.nested.local as admin. – Verify the system status of NSX Manager cluster. – On the main navigation bar, click System. – In the left pane, navigate to Configuration > Appliances. – On the Appliances page, verify that the NSX Manager cluster has a Stable status and all NSX Manager nodes are available. Notes — Give it time. – You may see the Cluster status go from Unavailable > Degraded, ultimately you want it to show Available. – In the Node under Service Status you can click on the # next to Degraded. This will pop up the Appliance details and will show you which item are degraded. – If you click on Alarms, you can see which alarms might need addressed | NSX Manager |
| 4 – Not Needed, not deployed yet | NSX Edge |
| 5 – Not Needed, not deployed yet | VMware Live Site Recovery |
| 6 – From vcsa234, locate vcfops.nested.lcoal appliance. – Following the order described in Broadcom KB 341964. – For my environment I simply Right-click on the appliance and select Power > Power On. – Log in to the VCF Operations administration UI at the https://vcfops.nested.lcoal/admin URL as the admin local user. – You may see ‘Retrieving Cluster Status’ , give it time. Mine took about <2mins – On the System status page, Under Cluster Status, click Bring Cluster Online. – You may see ‘Retrieving Cluster Status’ , give it time. Mine took about <2mins Notes — Give it time. – This operation might take about an hour to complete. – Took <15 mins to come Online – Cluster Status update may read: ‘Going Online’ – To the right of the node name, all of the other columns continue to update, eventually showing ‘Running’ and ‘Online’ – Cluster Status will eventually go to ‘Online’ | VCF Operations |
| 7 – From vcsa234 locate the VCF Operations fleet management appliance (fleetmgmtappliance.nested.local) Right-click the VCF Operations fleet management appliance and select Power > Power On. – In the confirmation dialog box, click Yes. – Allow it to boot Note – Direct access to VCF Ops Fleet Management appliance is disabled. Go to VCF Operations > Fleet Mgmt > Lifecycle > VCF Management for appliance management. | VCF Operations fleet management |
| 8 – Not Needed, not deployed yet | VCF Identity Broker |
| 9 – Not Needed, not deployed yet | VCF Operations for logs |
| 10 – From vcsa234, locate a VCF Operations collector appliance. (opscollectorappliance) Right-click the VCF Operations collector appliance and select Power > Power On. In the configuration dialog box, click Yes. | VCF Operations collector |
| 11 – Not Needed, not deployed yet | VCF Operations for Networks |
| 12 – Not Needed, not deployed yet | VCF Automation |
REF:
VMware Workstation Gen 9: Part 7 Deploying VCF 9.0.1 Fleet
Now that I have set up an VCF 9 Offline depot and downloaded the installation media its time to deploy a Simple VCF 9 Fleet on my Workstation environment. With all my ESX host configured/powered on and the SDDC Installer ready here are the steps I took to complete this.
PRE-Steps
Optional:
1) One of the more important steps is making sure I backup my Workstation environment and delete any Workstation VM snapshots. This way my environment is ready for deployment.
2) Make sure your Windows 11 PC power plan is set to High Performance and does not put the computer to sleep.
3) Review the Planning and Resource Workbook.
Required:
4) Ensure the NTP Service is running on each of your hosts. TIP: Even if you setup the NTP to start and stop with host, you may have to go in to the host client and actually start the NTP service.
5) DNS can be a big issue for the VCF9 installer. I only setup the DNS names for the ESX Hosts and installers appliances. When I am going through the VCF Installer is when I setup the other DNS names. Example – NSX Manager, Automation, Operations appliances. I find this approach helps to minimize errors.
TIP: The VCF installer may show errors during the installation and validation processes. I ensure the ESX hostname case matches how it is registered in DNS. Example – Hostname vcf111.nested.local doesn’t equal VCF111.nested.local.

6) With my ESX Hostnames confirmed in DNS, I need to update their self-signed certificates. See the following URL’s.
- KB: VCF Installer fails to add hosts during deployment due to hostname mismatch with subject alternative name
- DOCS: Regenerate the Self-Signed Certificate on ESX Hosts
- NOTE: Make sure you reboot your host via the DCUI and not via command line. I noted that after I regenerated the self-signed certificate I rebooted the host via command line. This caused the regenerated certificate to not take. If I rebooted the host via the DCUI the new certificate would take.
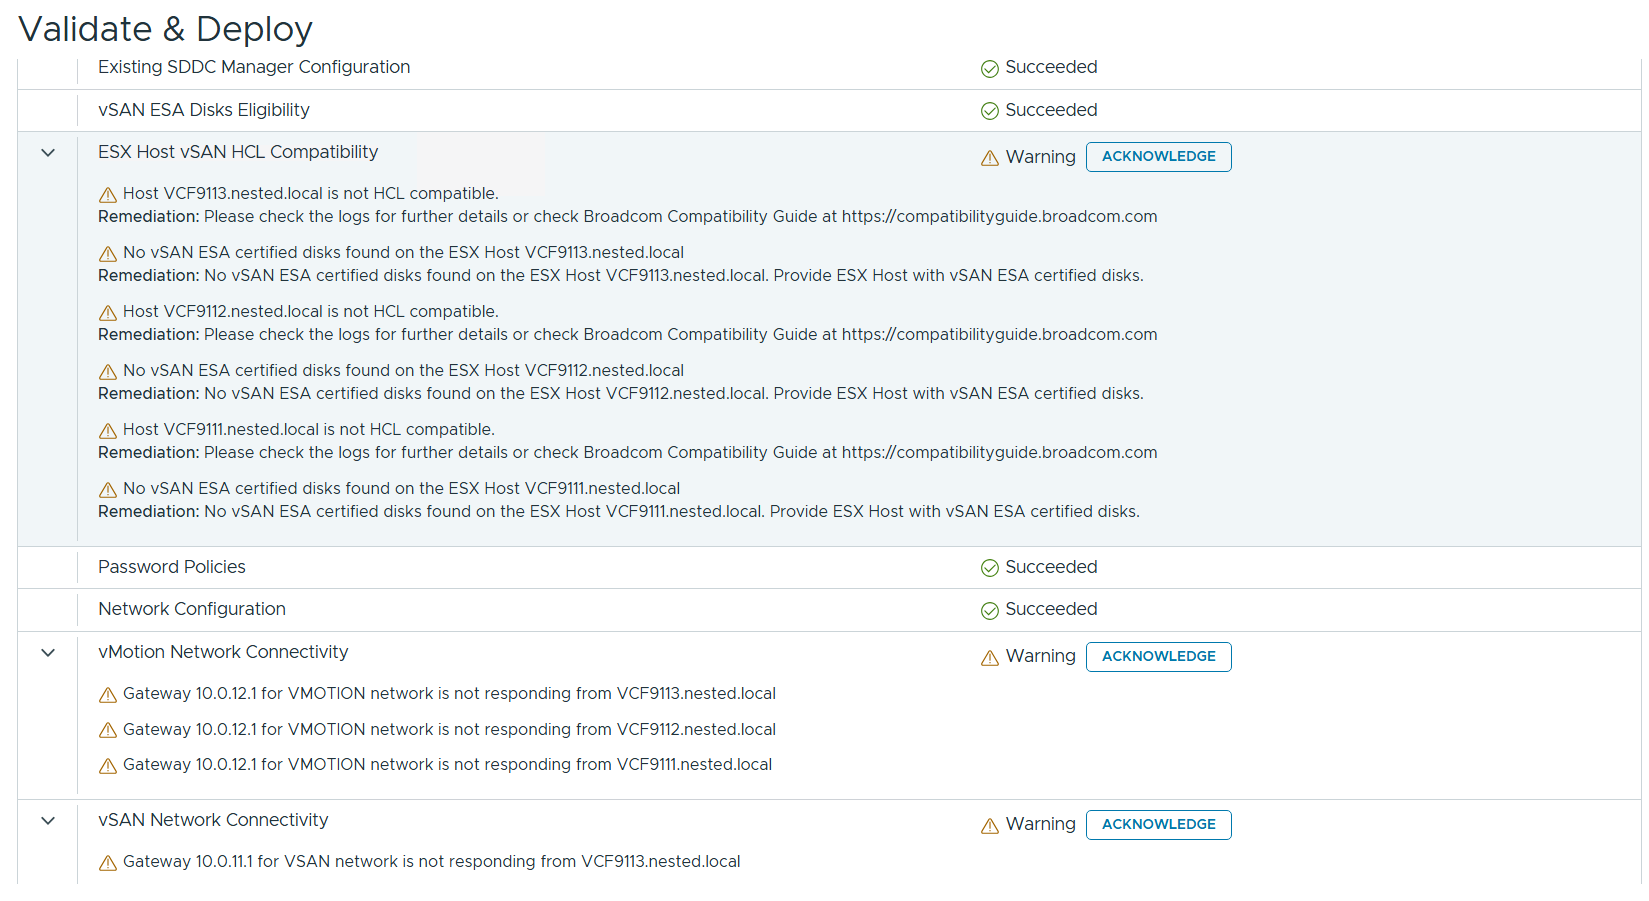
7) The VCF Installer 9.0.1 has some extra features to allow non-vSAN certified disks to pass the validation section. However, nested hosts will fail the HCL checks. Simply add the line below to the /etc/vmware/vcf/domainmanager/application-prod.properties and then restart the SDDC Domain Manager services with the command: systemctl restart domainmanager
This allows me Acknowledge the errors and move the deployment forward.

Installing VCF 9 with the VCF Installer
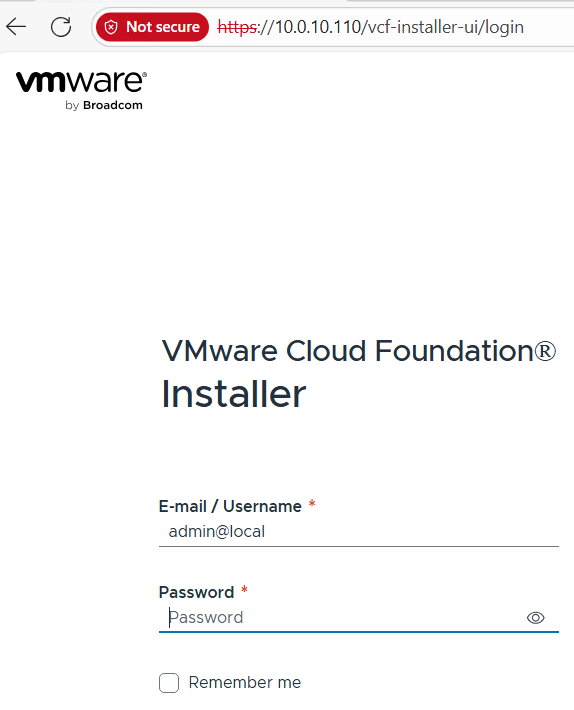
I log into the VCF Installer.
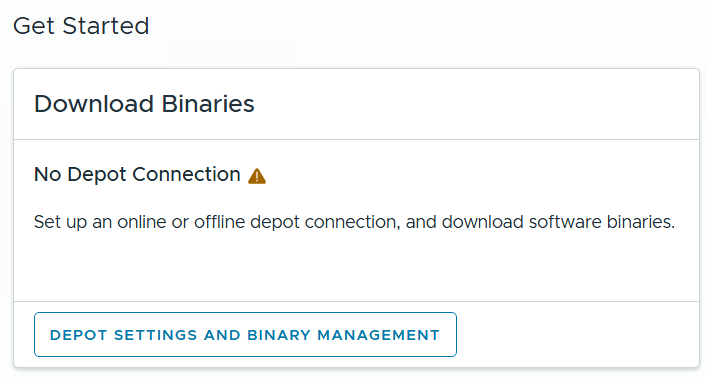
I click on ‘Depot Settings and Binary Management’
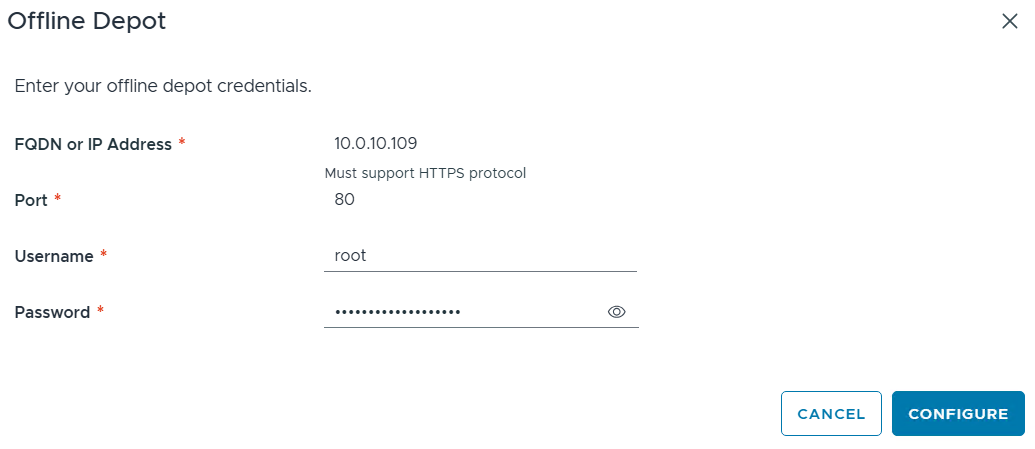
I click on ‘Configure’ under Offline Depot and then click Configure.
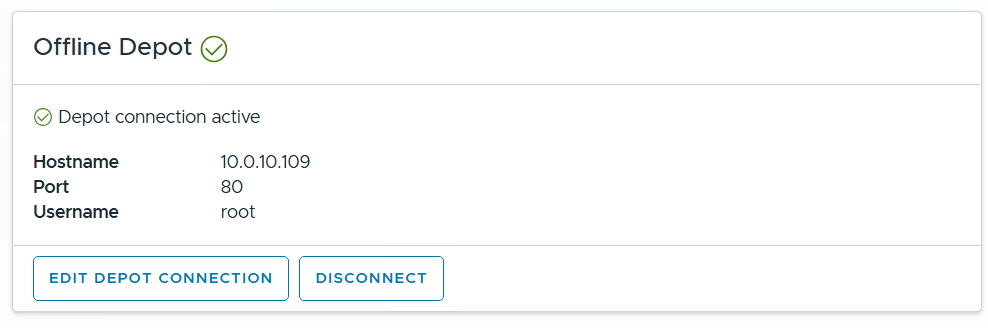
I confirm the Offline Depot Connection if active.
I chose ‘9.0.1.0’ next to version, select all except for VMware Cloud Automation, then click on Download.
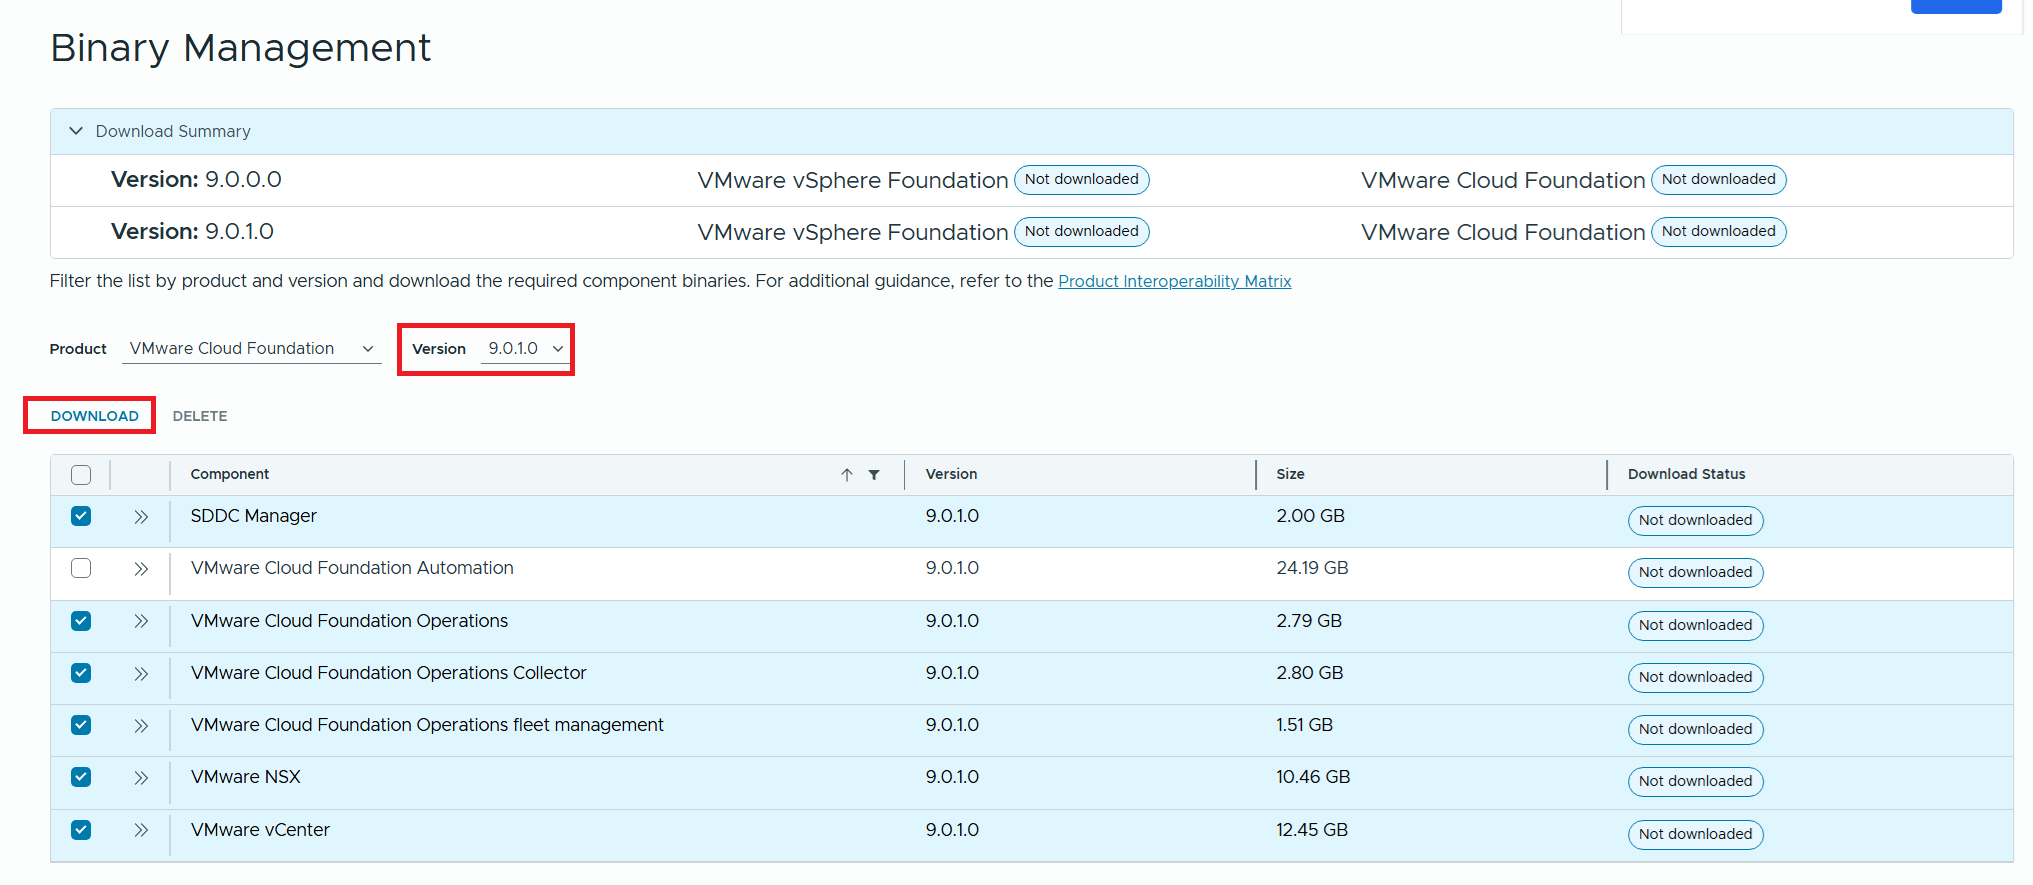
Allow the downloads to complete.

All selected components should state “Success” and the Download Summary for VCF should state “Partially Downloaded” when they are finished.

Click return home and choose VCF under Deployment Wizard.
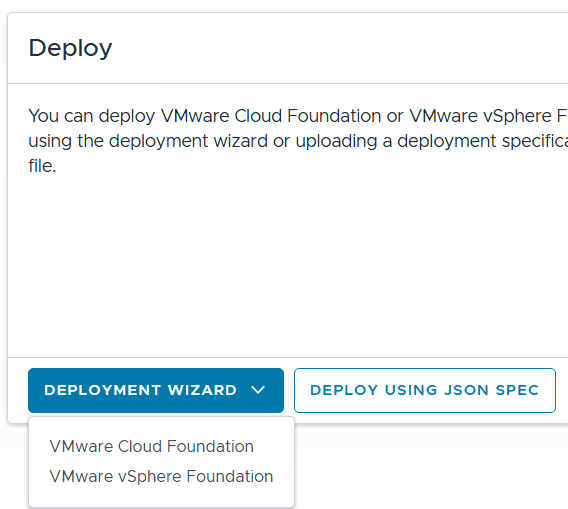
This is my first deployment so I’ll choose ‘Deploy a new VCF Fleet’

The Deploy VCF Fleet Wizard starts and I’ll input all the information for my deployment.
For Existing Components I simply choose next as I don’t have any.
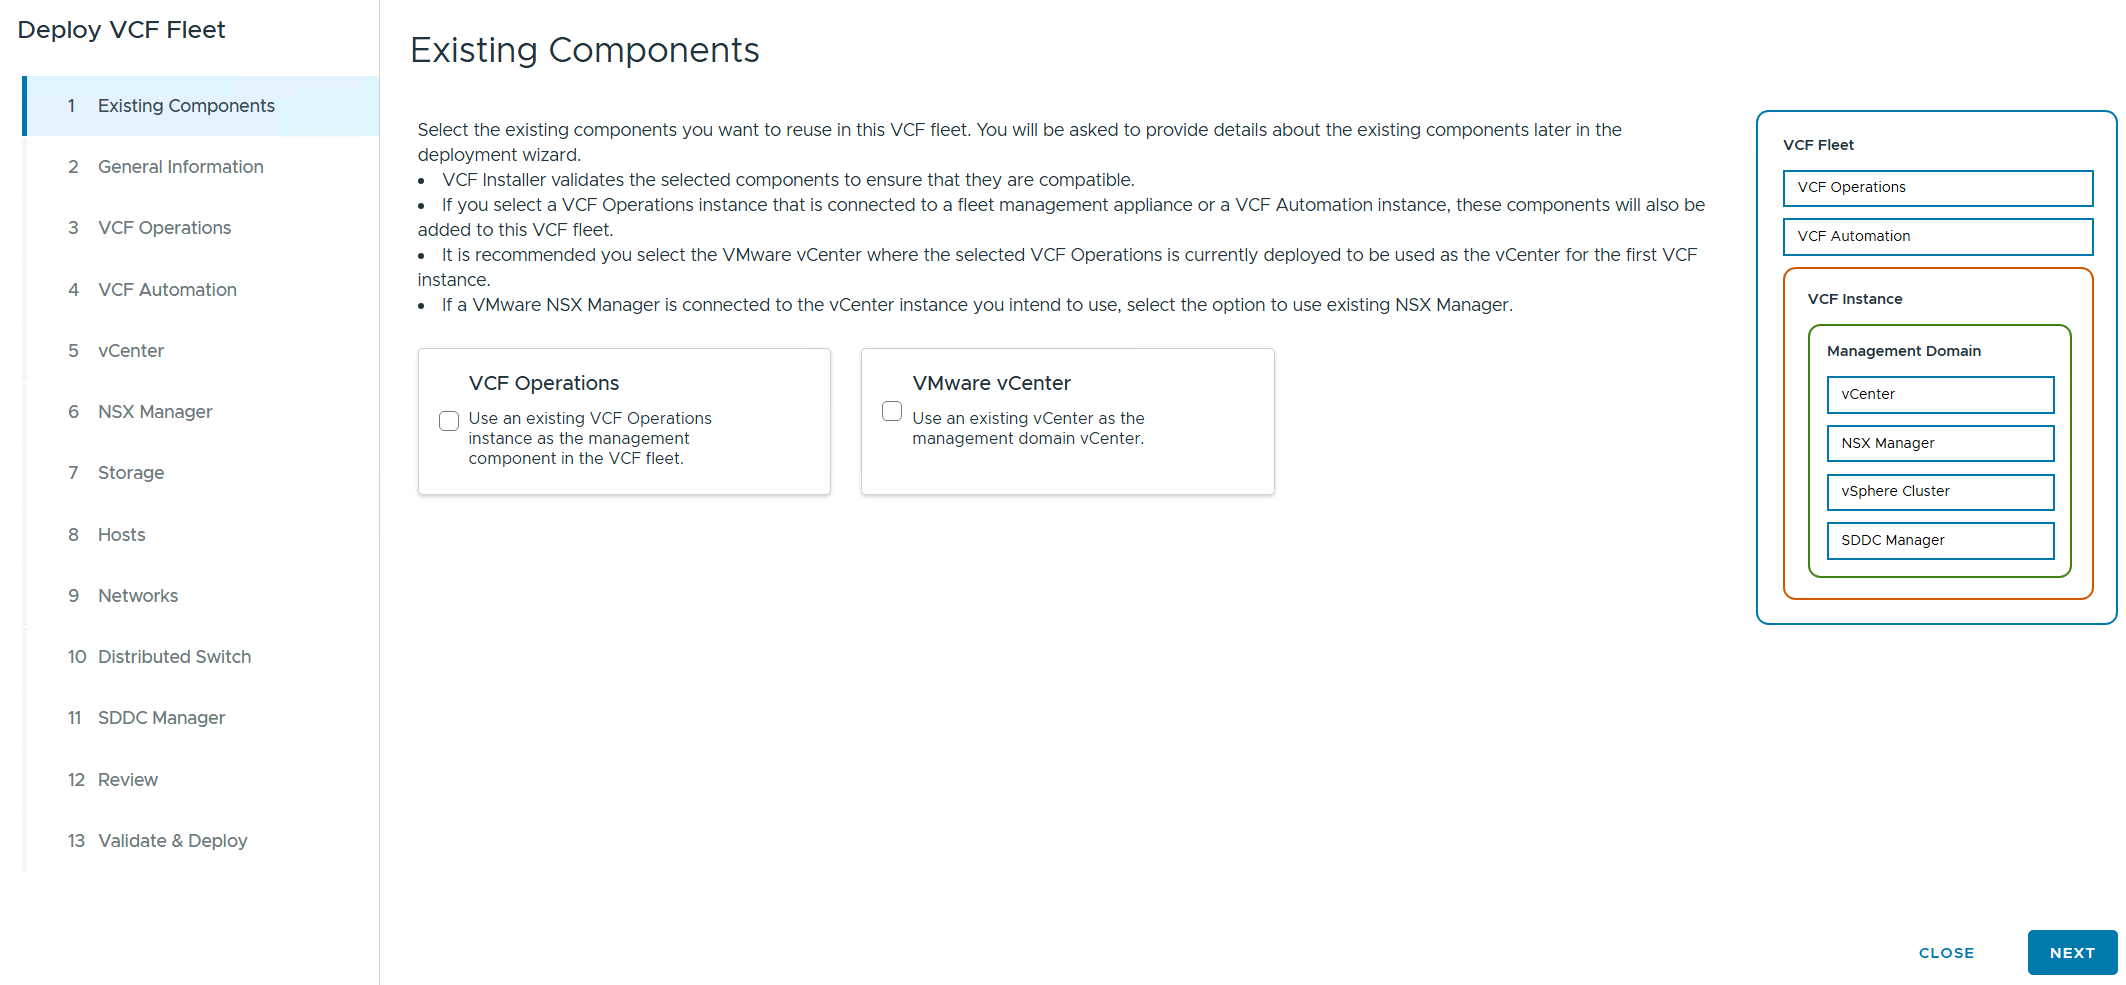
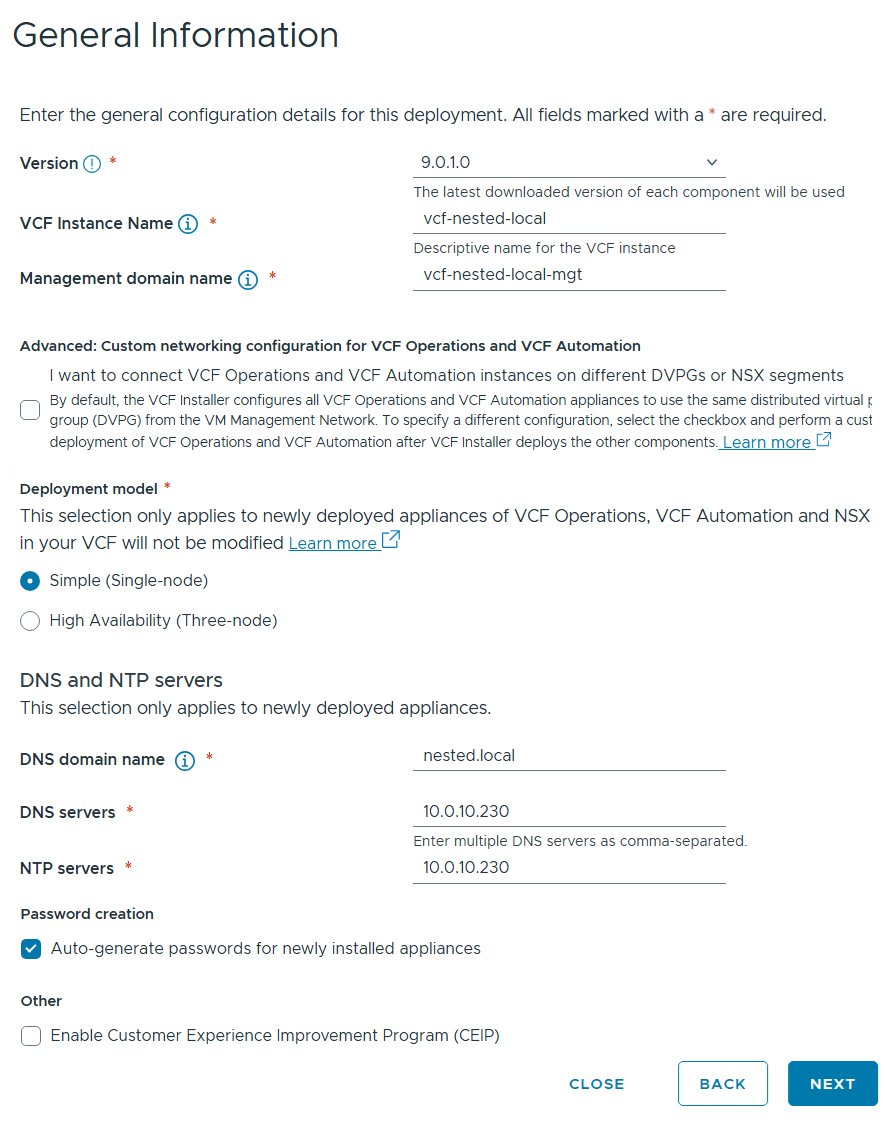
I filled in the following information around my environment, choose simple deployment and clicked on next.
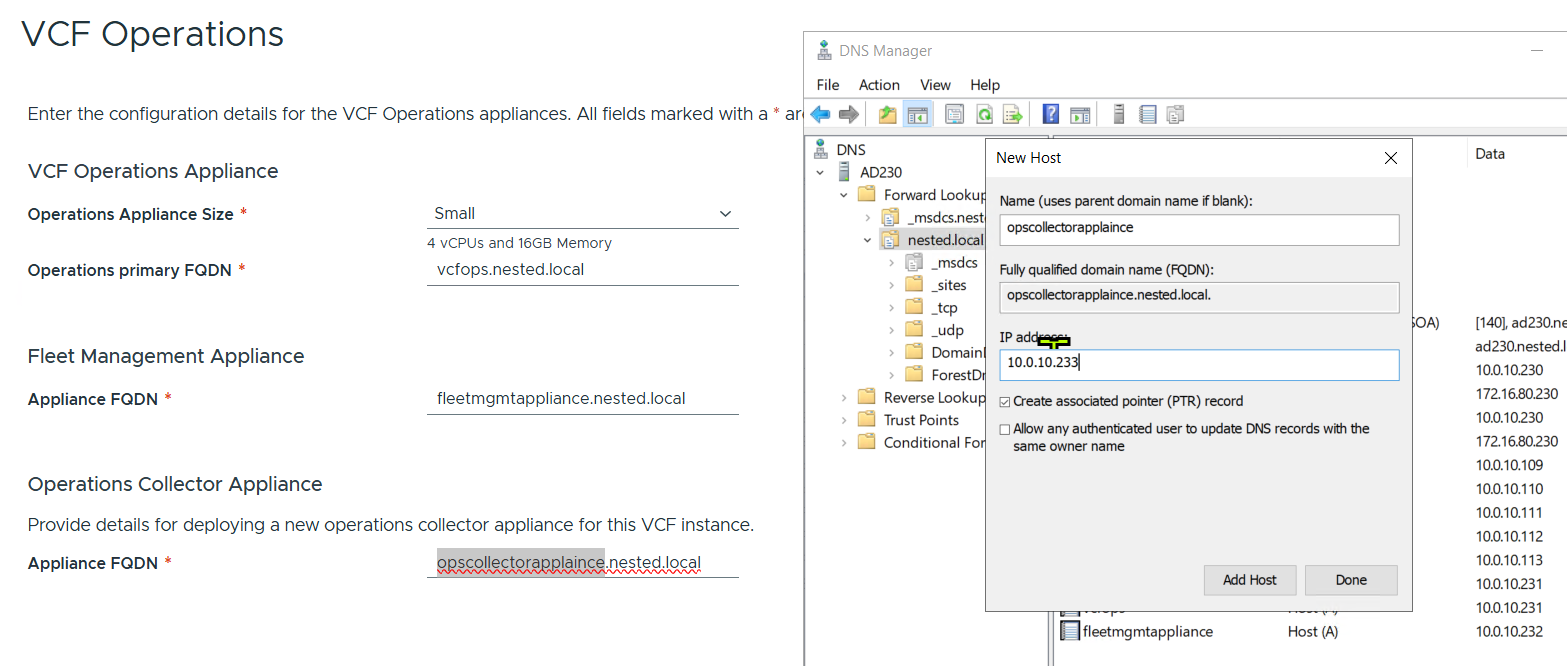
I filled out the VCF Operations information and created their DNS records. Once complete I clicked on next.
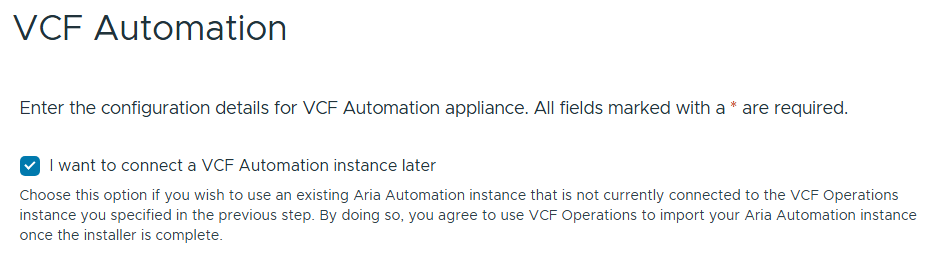
I chose to “I want to connect a VCF Automation instance later” can chose next.
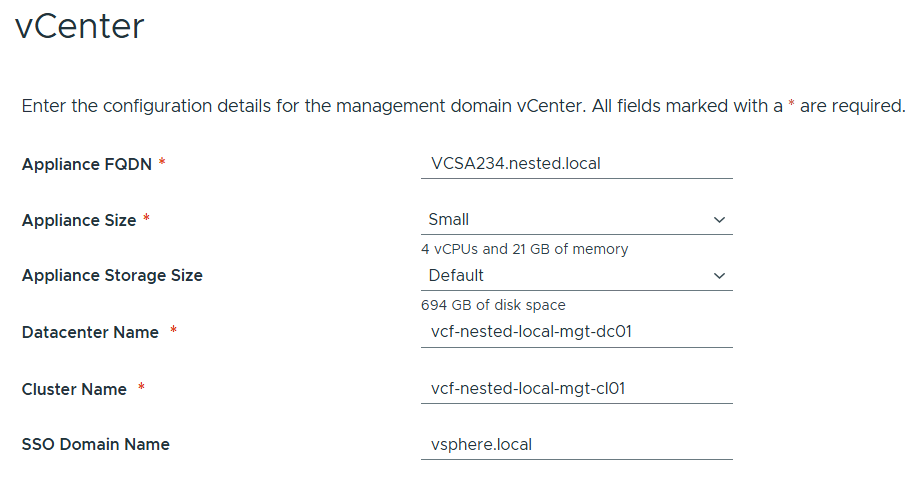
Filled out the information for vCenter
Entered the details for NSX Manager.

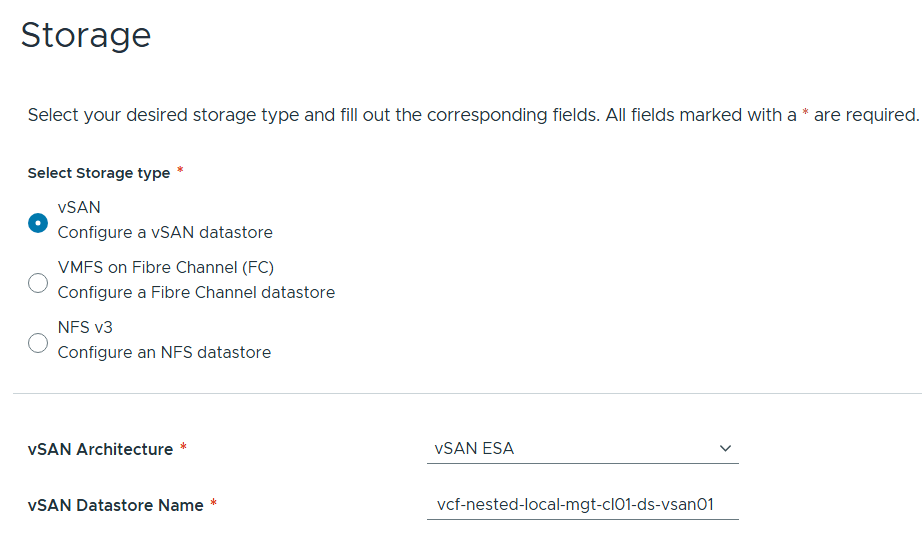
Left the storage items as default.
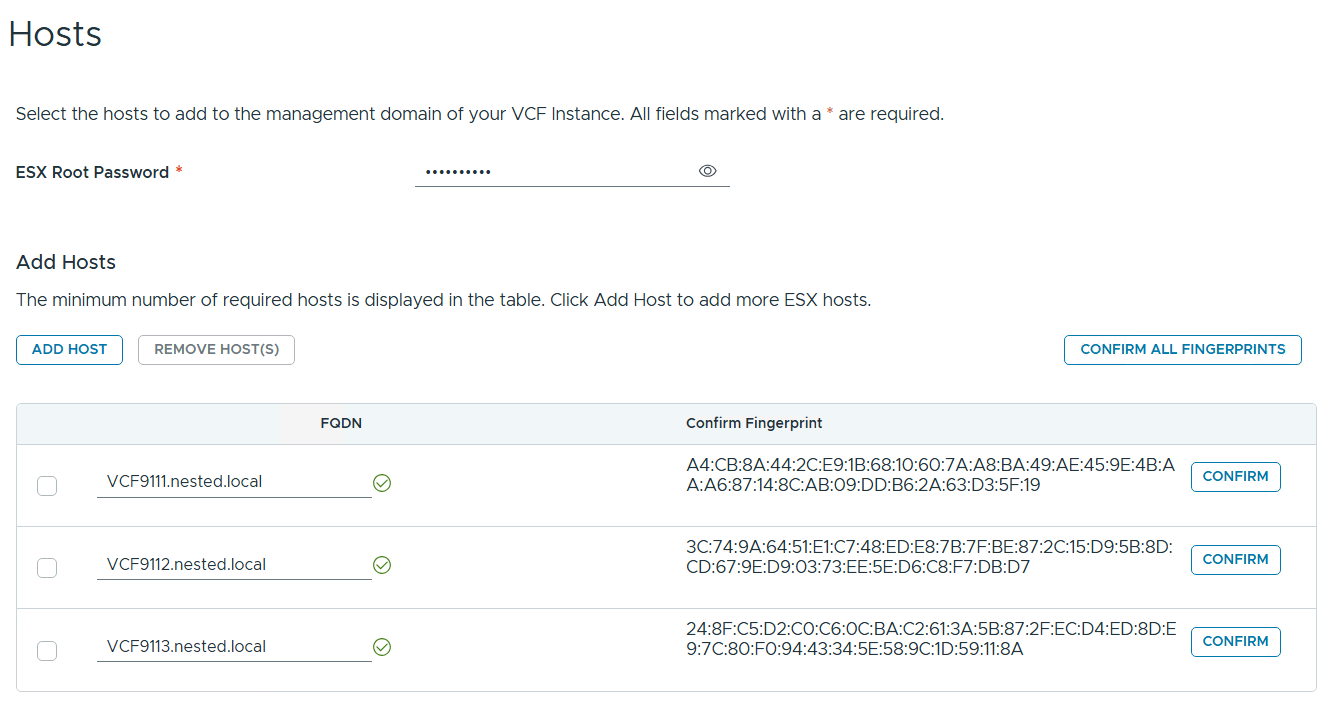
Added in my 3 x ESX 9 Hosts, confirmed all fingerprints, and clicked on next.
Note: if you skipped the Pre-requisite for the self-signed host certificates, you may want to go back and update it before proceeding with this step.
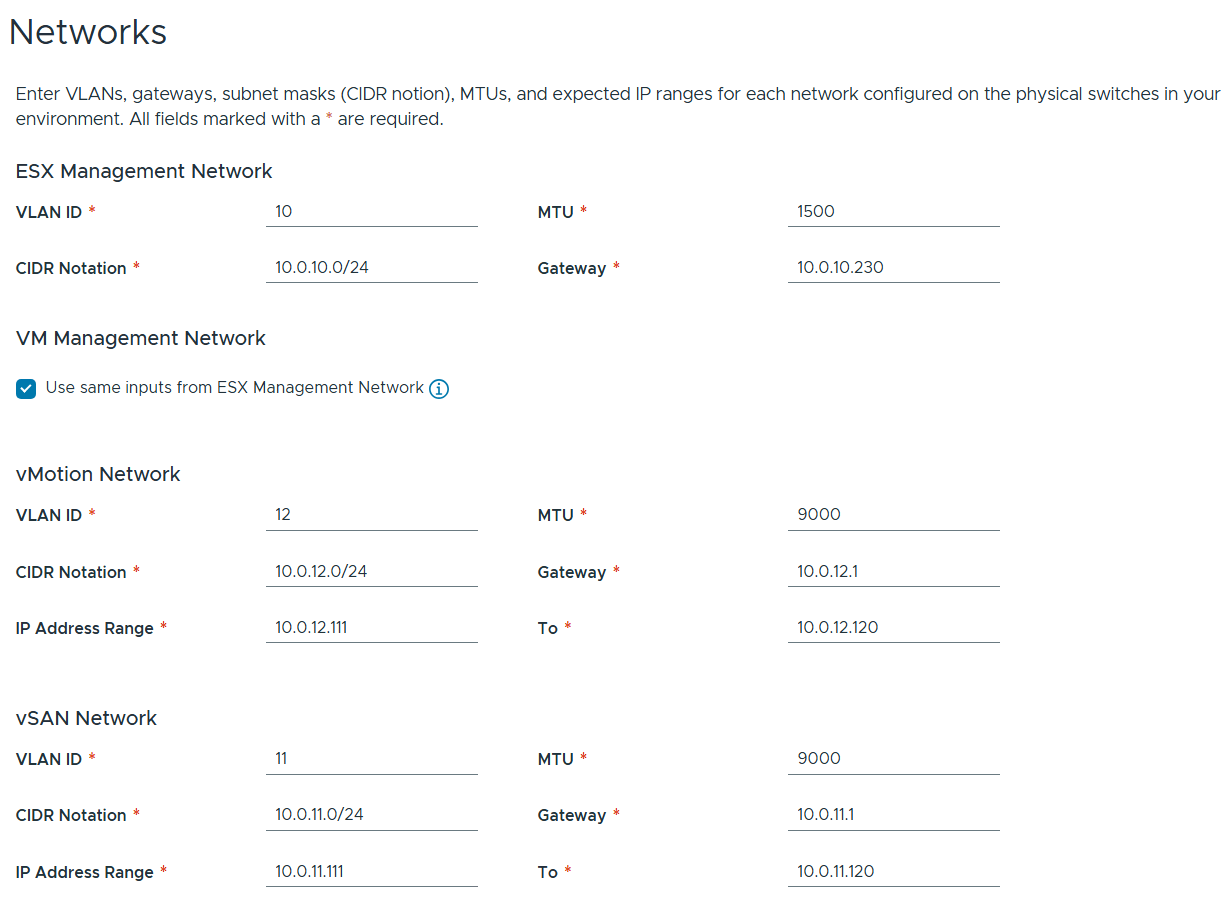
Filled out the network information based on our VLAN plan.
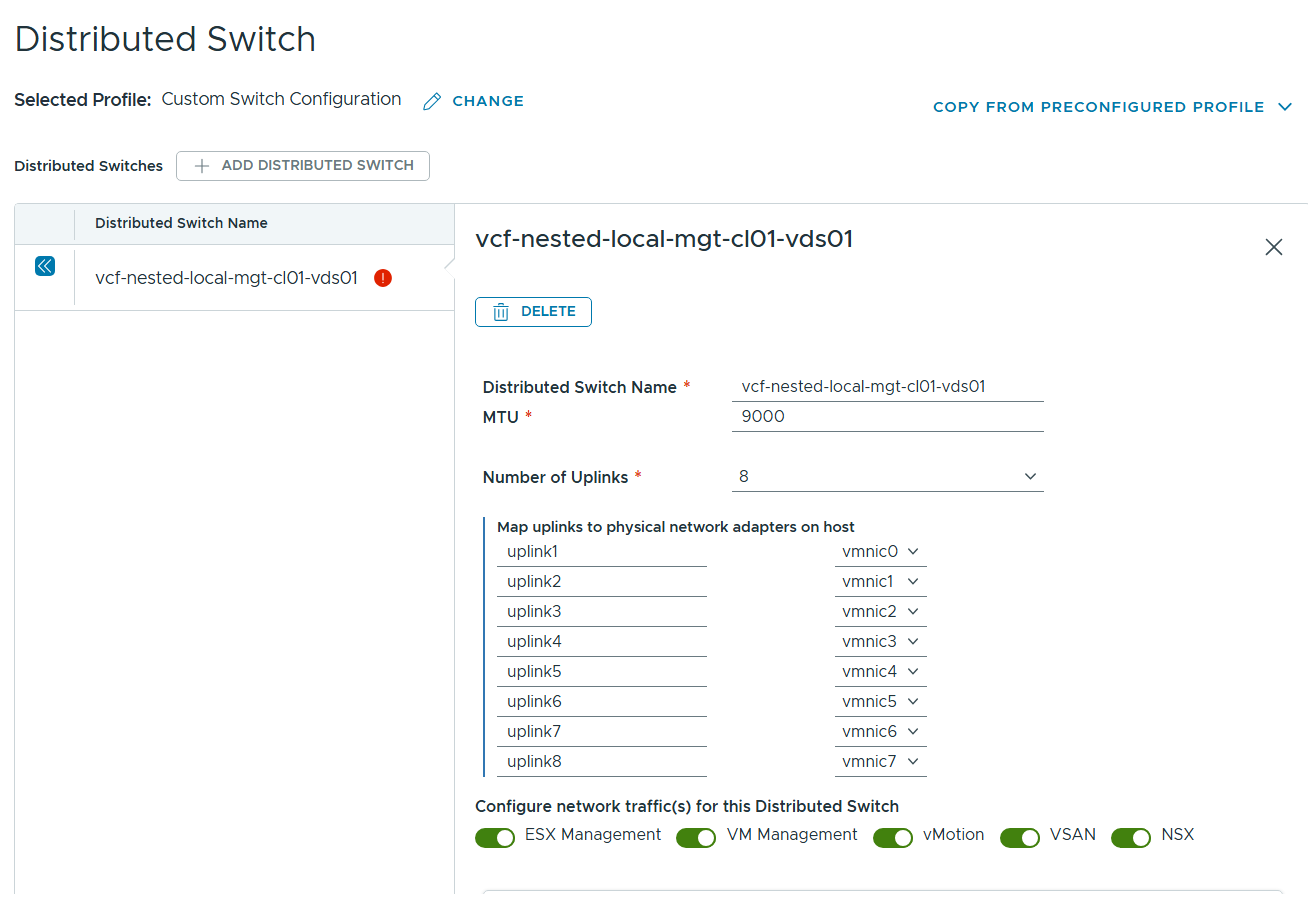
For Distributed Switch click on ‘Select’ under ‘Custom Switch Configuration’
Click on the vDS Switch name. Put in MTU 9000, change uplinks to 8 and chose all switches for ‘Configure network traffic(s) for this Distributed Switch, then scroll down.
Rename each port group, set load balancing to ‘Route based on Physical NIC load’, select the correct uplinks as active, select the correct uplinks ad unused.
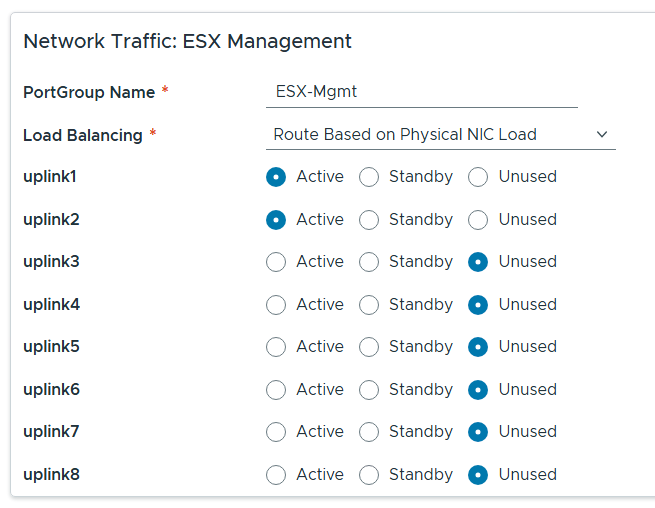
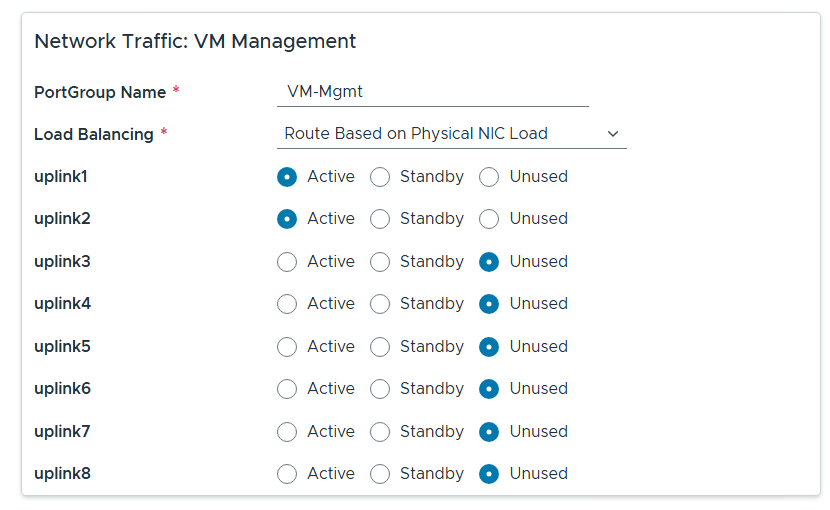
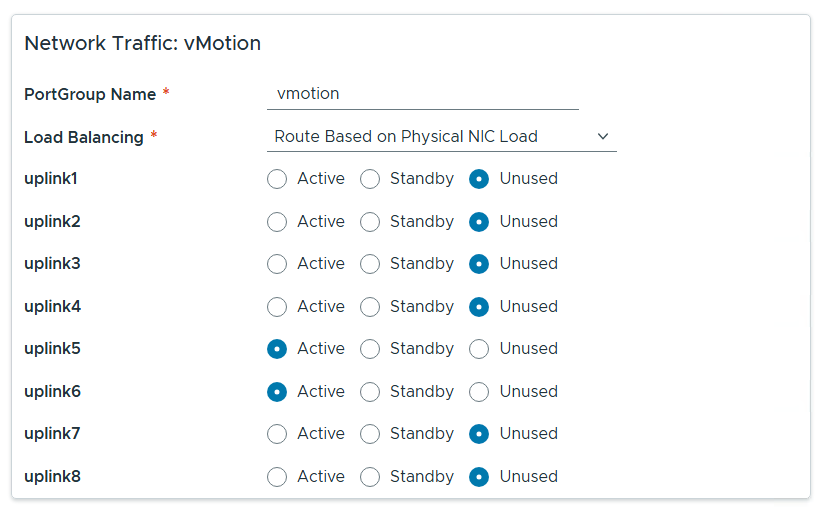
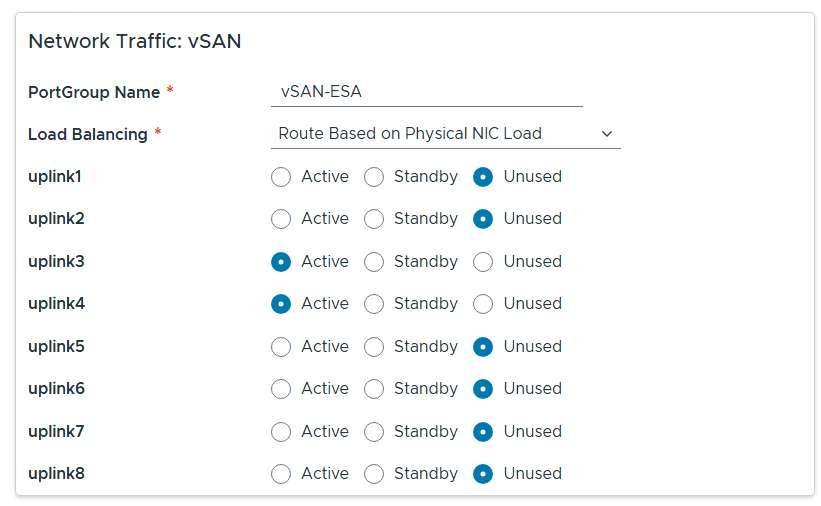
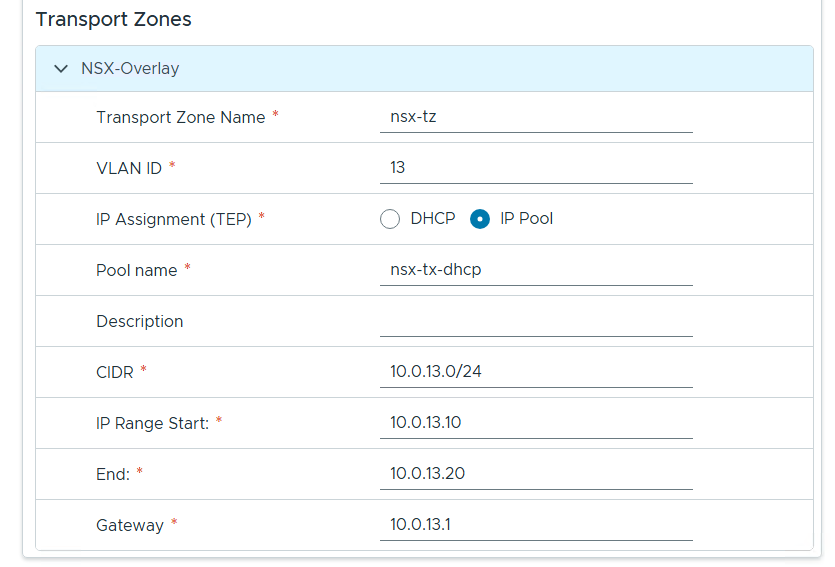
Configure NSX as follows.

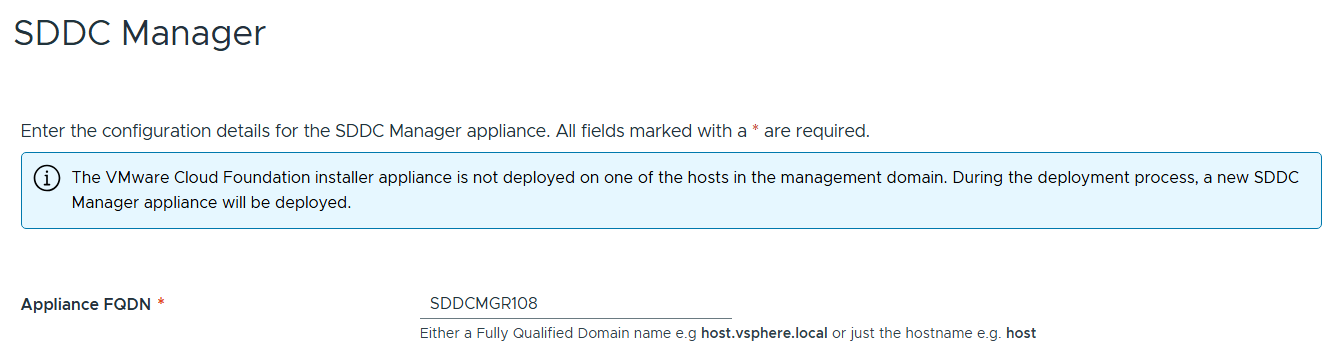
Entered the name of the new SDDC Manager and updated it’s name in DNS, then clicked on next.
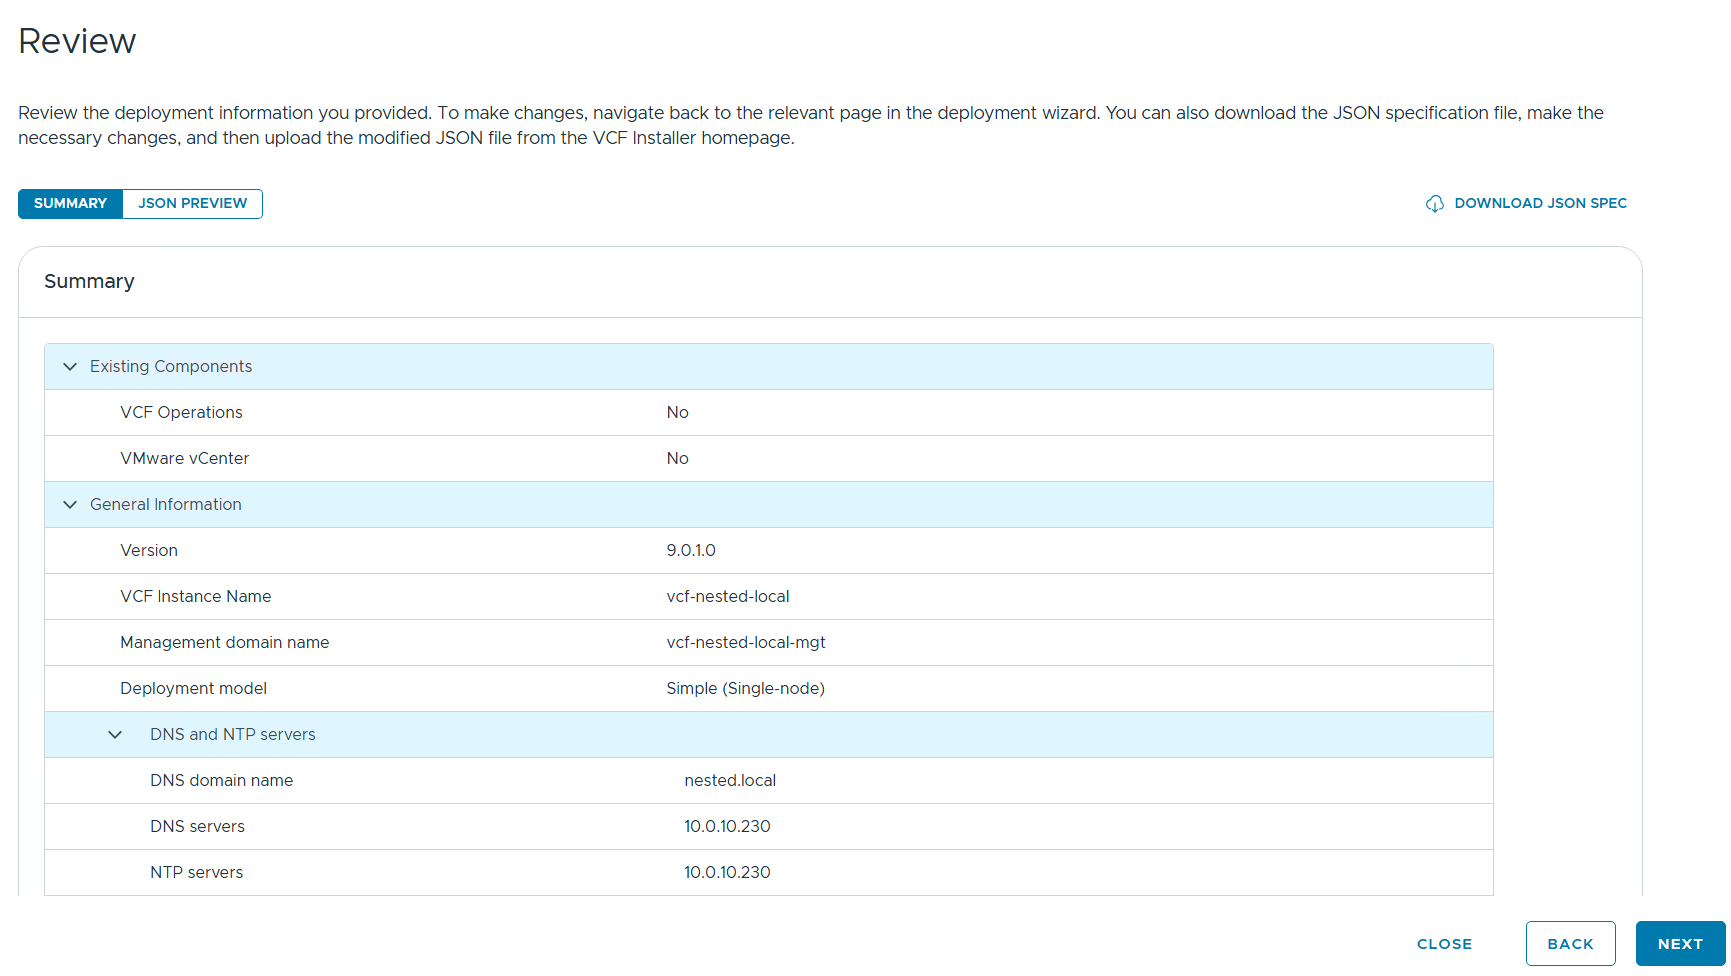
Reviewed the deployment information and chose next.
TIP – Download this information as a JSON Spec, can save you a lot of typing if you have to deploy again.
Allow it to validate the deployment information.

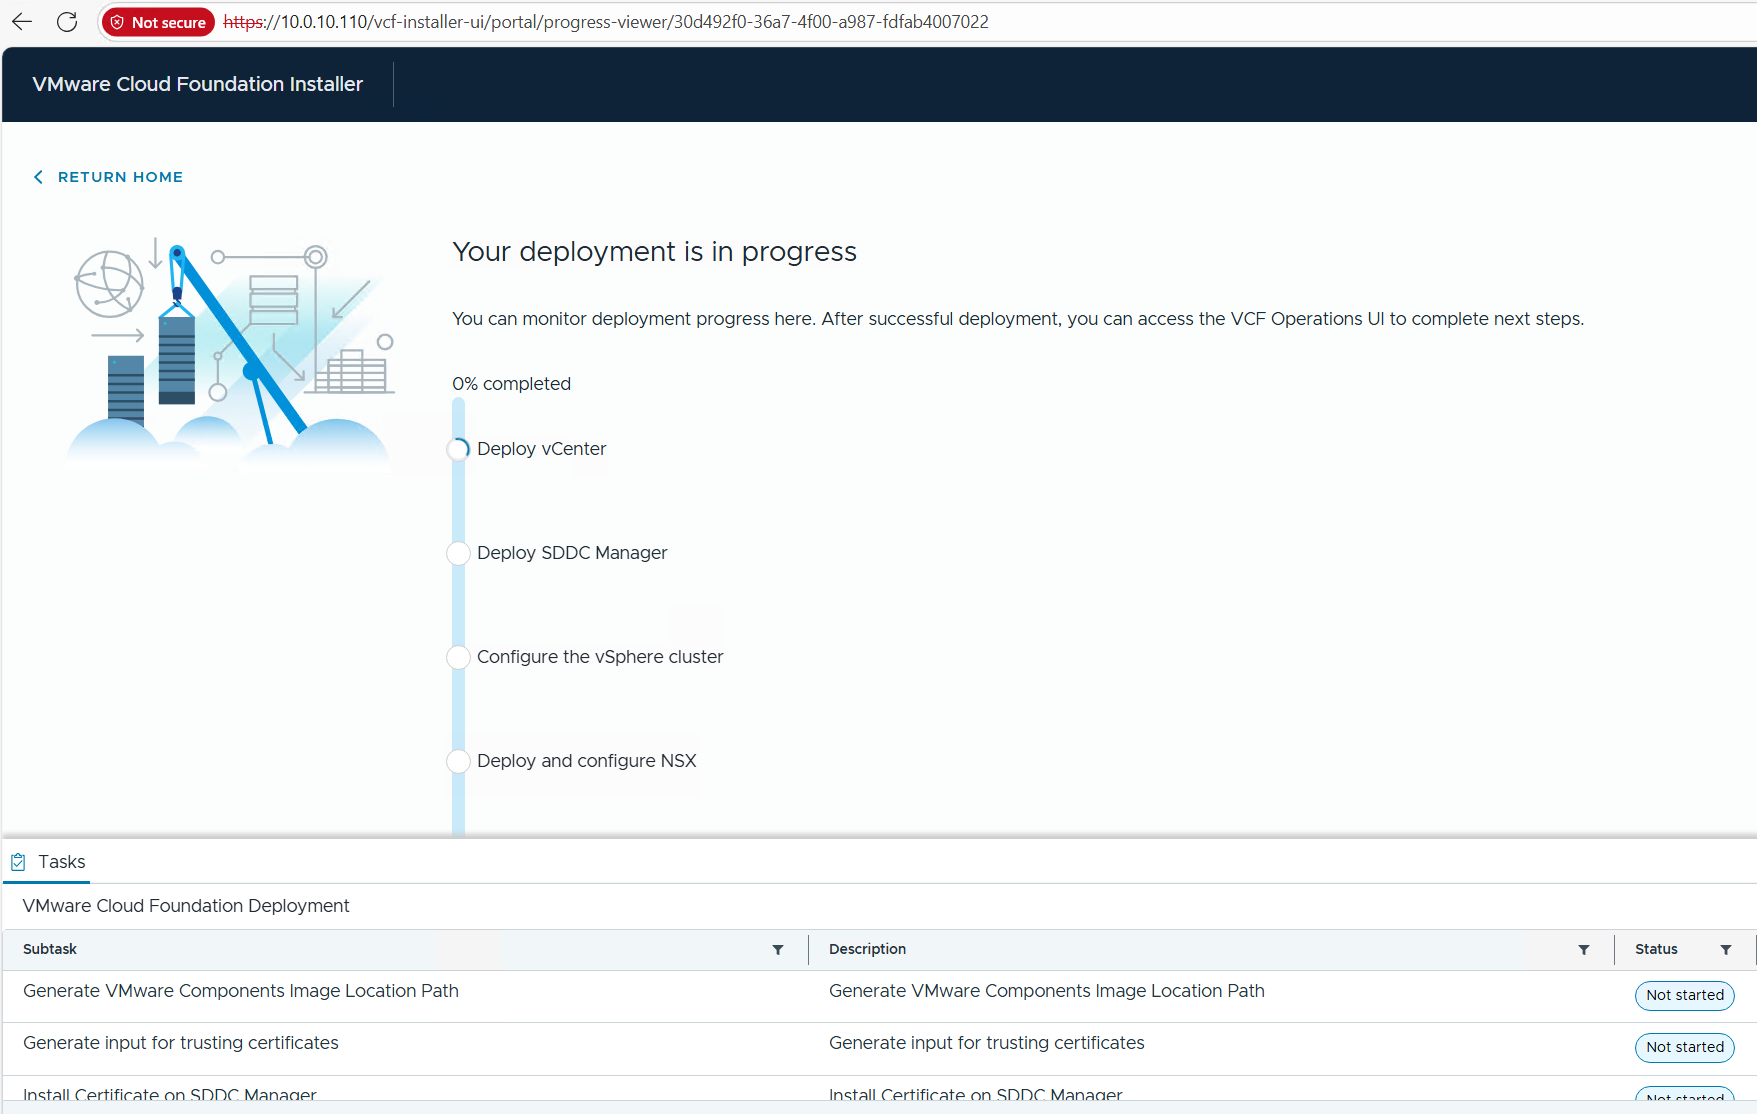
I reviewed the validation warnings, at the top click on “Acknowledge all Warnings” and click ‘DEPLOY’ to move to the next step.

Allow the deployment to complete.
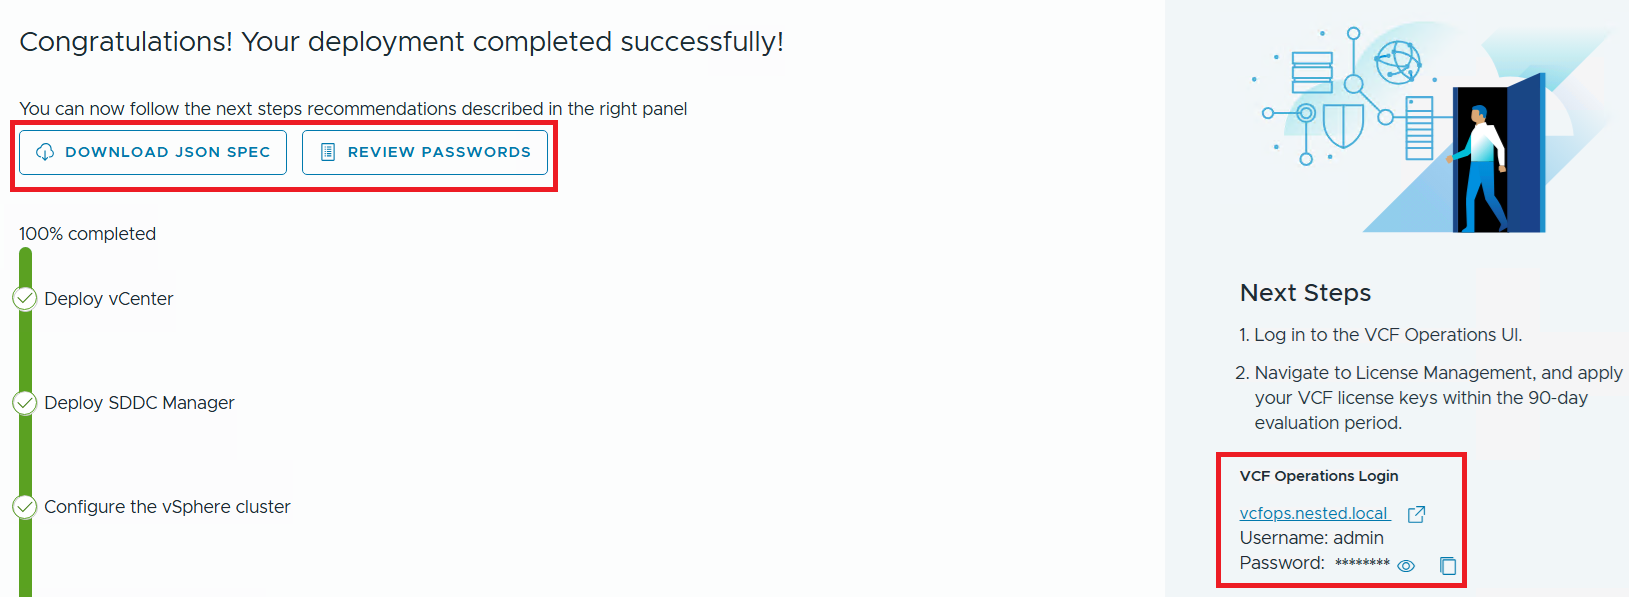
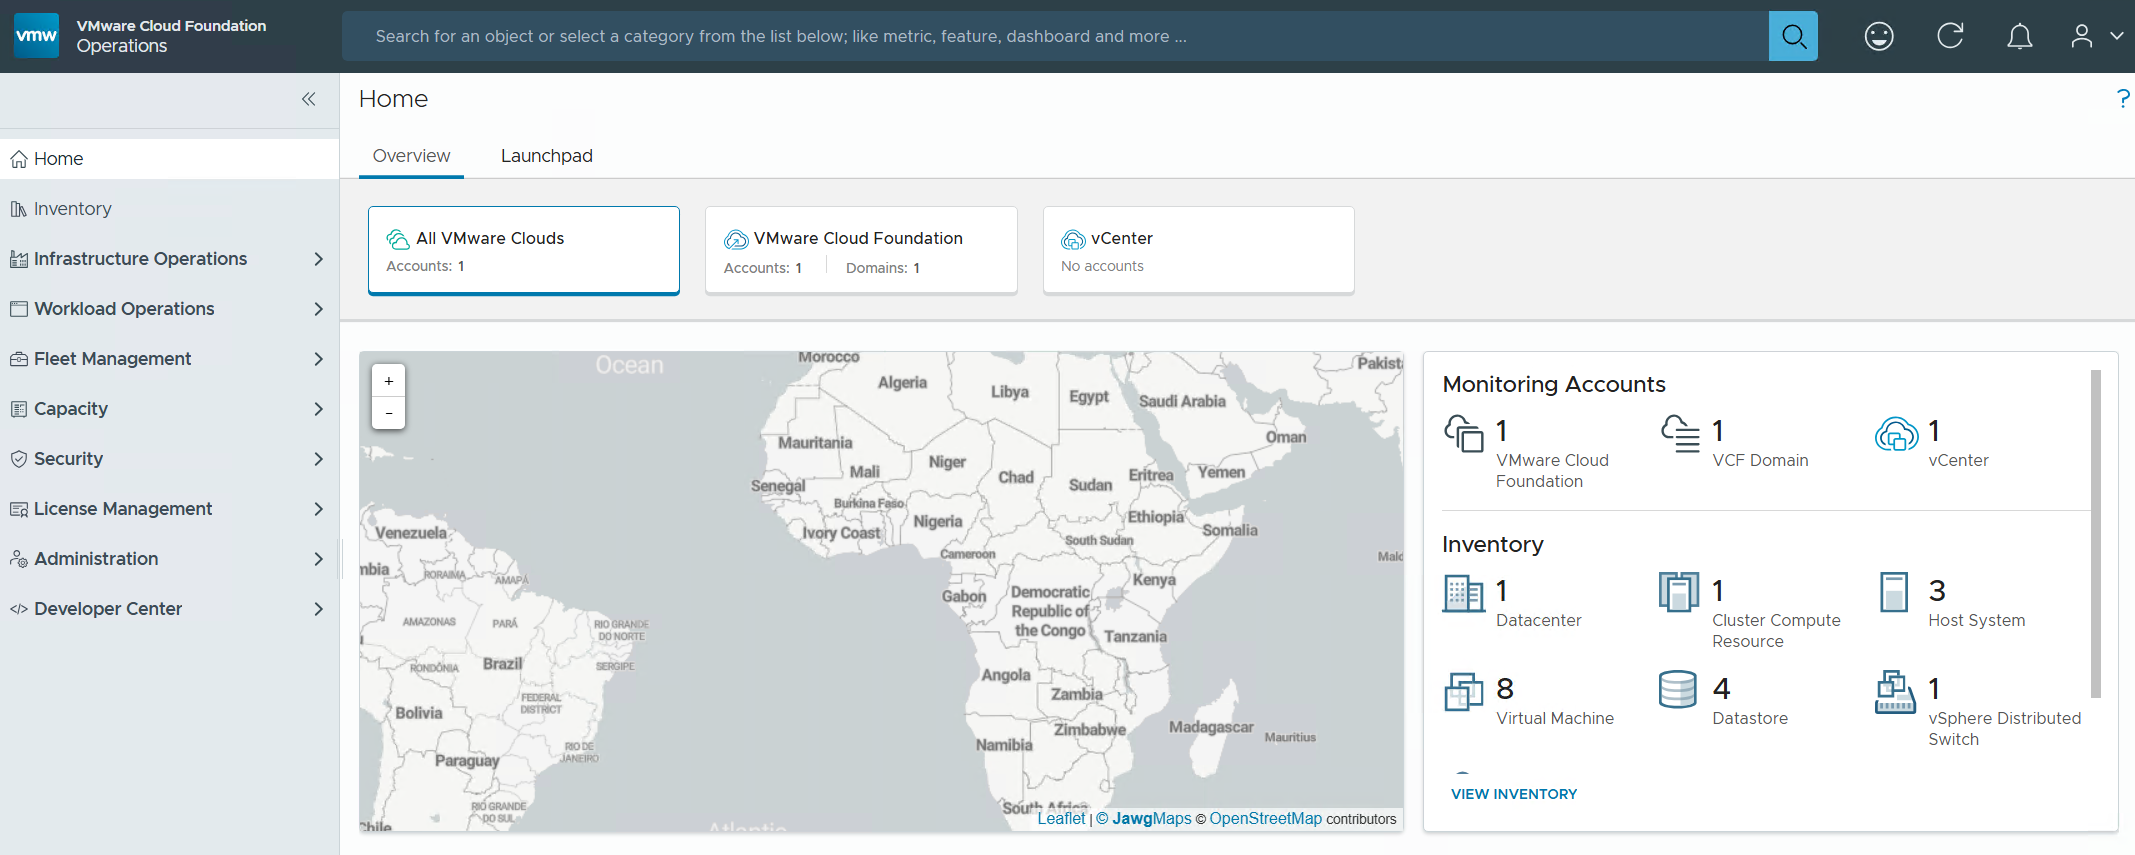
Once completed, I download the JSON SPEC, Review and document the passwords, (Fig-1) and then log into VCF Operations. (Fig-2)
(Fig-1)
(Fig-2)
Now that I have a VCF 9.0.1 deployment complete I can move on to Day N tasks. Thanks for reading and reach out if you have any questions.
VMware Workstation Gen 9: Part 6 VCF Offline Depot
To deploy VCF 9 the VCF Installer needs access to the VCF installation media or binaries. This is done by enabling Depot Options in the VCF Installer. For users to move to the next part, they will need to complete this step using resources available to them. In this blog article I’m going to supply some resources to help users perform these functions.
Why only supply resources? When it comes to downloading and accessing VCF 9 installation media, as a Broadcom/VMware employee, we are not granted the same access as users. I have an internal process to access the installation media. These processes are not publicly available nor would they be helpful to users. This is why I’m supplying information and resources to help users through this step.
What are the Depot choices in the VCF Installer?
Users have 2 options. 1) Connect to an online depot or 2) Off Line Depot

What are the requirements for the 2 Depot options?
1) Connect to an online depot — Users need to have an entitled support.broadcom.com account and a download token. Once their token is authenticated they are enabled to download.
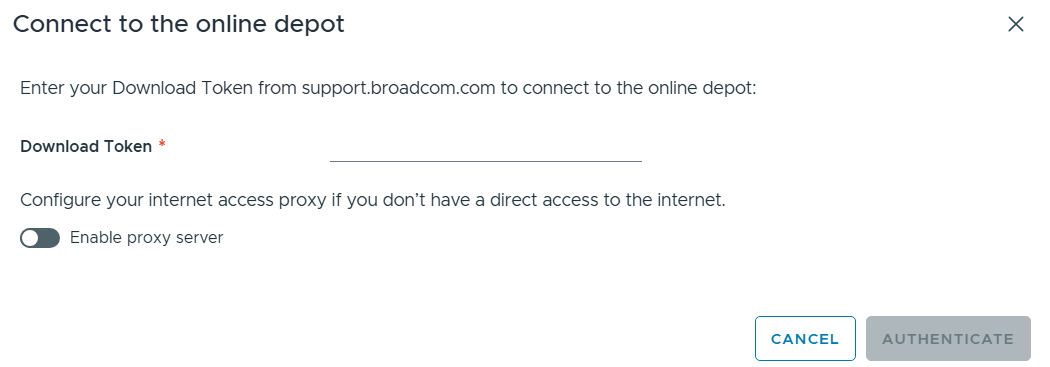
See These URL’s for more information:
2) Offline Depot -The VCF 9 Offline Depot Tool (also known as the VCF Download Tool or VCFDT) is a specialized utility designed for VMware Cloud Foundation 9.0 to enable the deployment, patching, and upgrading of private cloud environments in air-gapped (disconnected) or restricted environments. It acts as an internal mirror of the official Broadcom online depot, allowing administrators to host necessary software binaries and metadata locally.
This option may be more common for users building out Home labs.
I’ll be using the Offline Depot method to download my binaries and in the next part I’ll be deploying VCF 9.0.1.
Where is the Offline Depot tool located?
Go to support.broadcom.com > My Downloads > VMware > Search for Cloud Foundation. Find your version of Cloud foundation and then click on ‘Drivers and Tools’
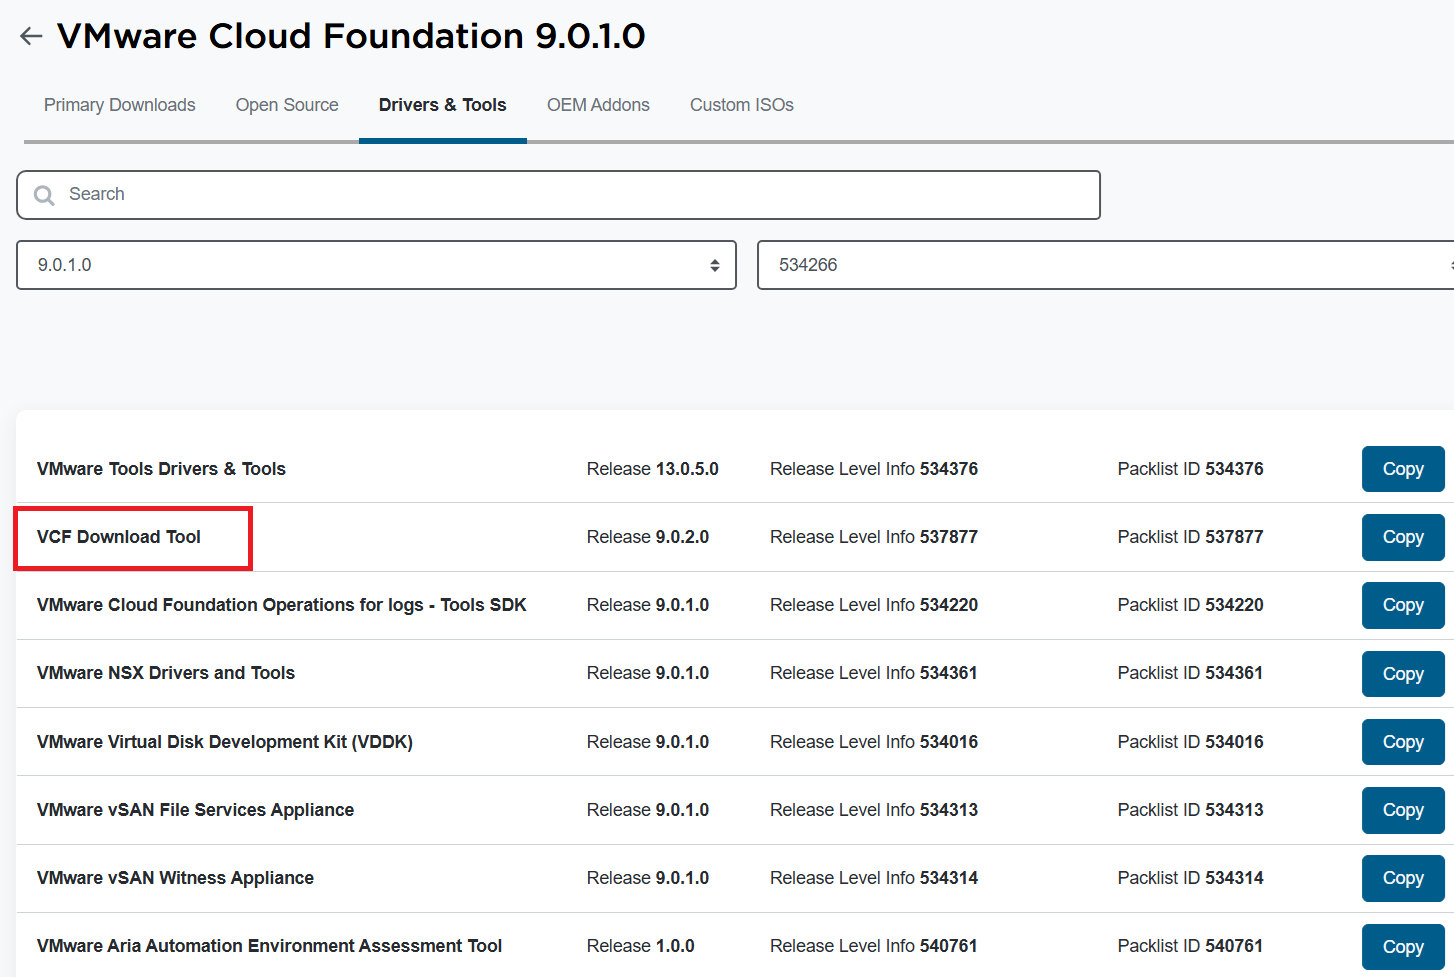
See these URLs for more information:
- Set Up an Offline Depot Web Server for VMware Cloud Foundation
- Set Up an Offline Depot Web Server for VMware Cloud Foundation << Use this method if you want to setup https on the Photon OS.
- How to deploy VVF/VCF 9.0 using VMUG Advantage & VCP-VCF Certification Entitlement
- Setting up a VCF 9.0 Offline Depot
VMware Workstation Gen 9: Part 5 Deploying the VCF Installer with VLANs
The VCF Installer (aka SDDC Manager Appliance) is the appliance that will allow me to deploy VCF on to my newly created ESX hosts. The VCF Installer can be deployed on to a ESX Host or directly on Workstation. There are a couple of challenges with this deployment in my Home lab and in this blog post I’ll cover how I overcame this. It should be noted, the modifications below are strictly for my home lab use.
Challenge 1: VLAN Support
By default the VCF Installer doesn’t support VLANS. It’s a funny quandary as VCF 9 requires VLANS. Most production environments will allow you to deploy the VCF Installer and be able to route to a vSphere environment. However, my Workstation Home Lab uses LAN Segments which are local to Workstation. To communicate over LAN Segments all VMs must have a VLAN ID. To overcome this issue I’ll need to add VLAN support to the VCF Installer.
Challenge 2: Size Requirements
The installer takes up a massive 400+ GB of disk space, 16GB of RAM, and 4 vCPUs. The current configuration of my ESX hosts don’t have a datastore large enough to deploy it to, plus vSAN is not set up. To overcome this issue I’ll need to deploy it as a Workstation VM and attach it to the correct LAN Segment.
In the steps below I’ll show you how I added a VLAN to the VCF Installer, deployed it directly on Workstation, and ensure it’s communicating with my ESX Hosts.
Deploy the VCF Installer
Download the VCF Installer OVA and place the file in a location where Workstation can access it.
In Workstation click on File > Open. Choose the location of your OVA file and click open.
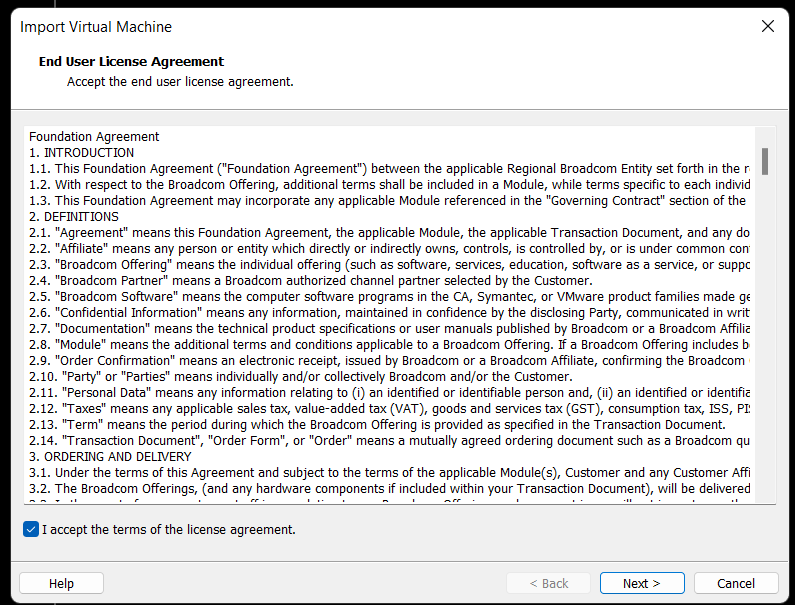
Check the Accept box > Next
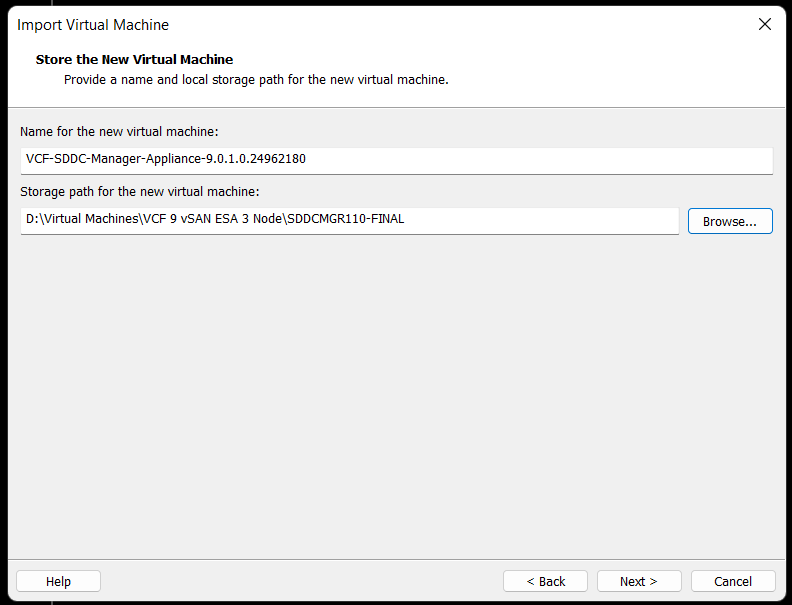
Choose your location for the VCF Installer Appliance to be deployed. Additionally, you can change the name of the VM. Then click Next.
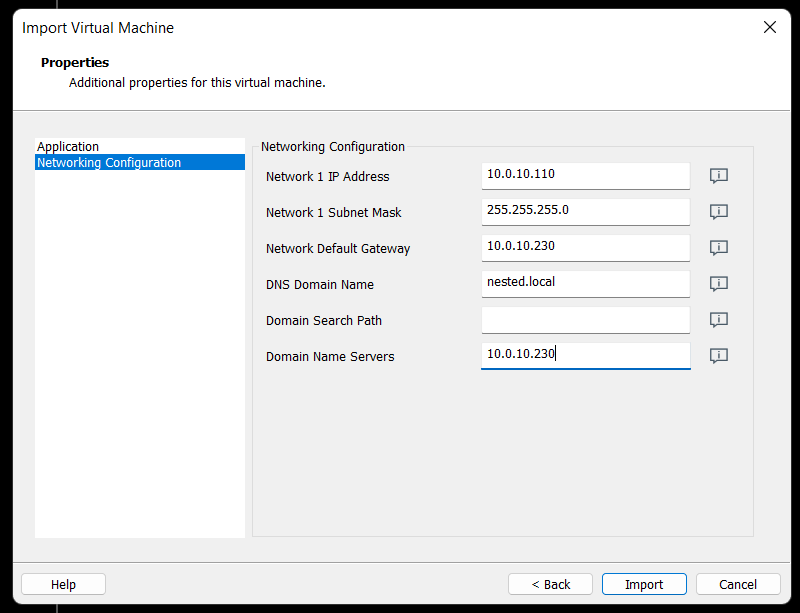
Fill in the passwords, hostname, and NTP Server. Do not click on Import at this time. Click on ‘Network Configuration’.

Enter the network configuration and click on import.
Allow the import to complete.
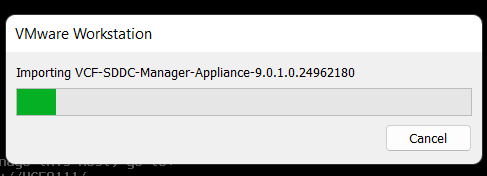
Allow the VM to boot.

Change the VCF Installer Network Adapter Settings to match the correct LAN Segment. In this case I choose 10 VLAN Management.

Enable VLAN support in the VCF Installer
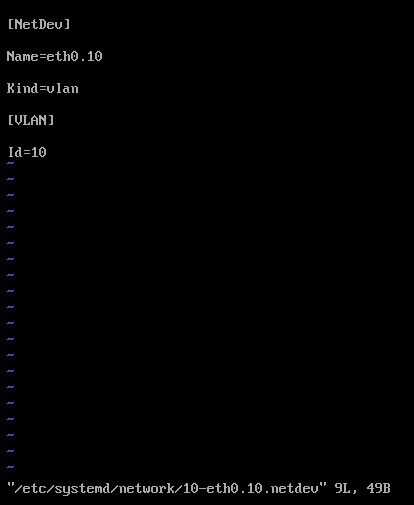
1) Login as root and create the following file.

vi /etc/systemd/network/10-eth0.10.netdev
Press Insert the add the following
[NetDev]
Name=eth0.10
Kind=vlan
[VLAN]
Id=10
Press Escape, Press :, Enter wq! and press enter to save
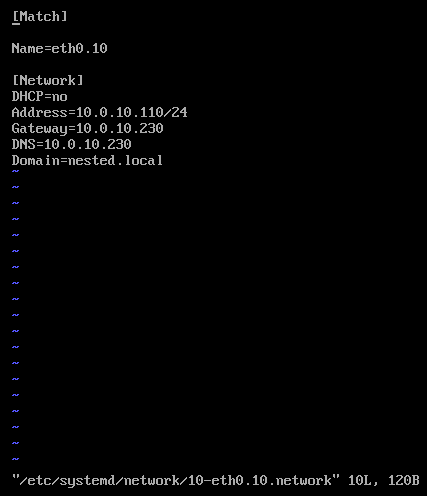
2) Create the following file.
vi /etc/systemd/network/10-eth0.10.network
Press insert and add the following
[Match]
Name=eth0.10
[Network]
DHCP=no
Address=10.0.10.110/24
Gateway=10.0.10.230
DNS=10.0.10.230
Domain=nested.local
Press Escape, Press :, Enter wq! and press enter to save
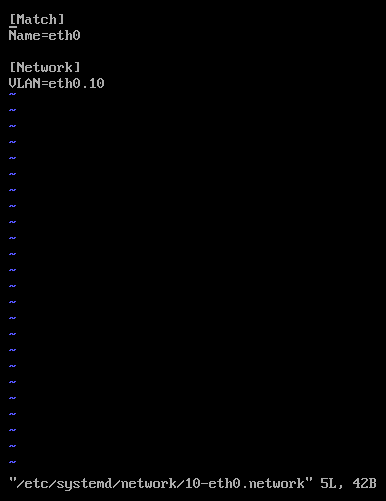
3) Modify the original network file
vi /etc/systemd/network/10-eth0.network
Press Escape, Press Insert, and remove the static IP address configuration and change the configuration as following:
[Match]
Name=eth0
[Network]
VLAN=eth0.10
Press Escape, Press :, Enter wq! and press enter to save
4) Update the permissions to the newly created files
chmod 644 /etc/systemd/network/10-eth0.10.netdev
chmod 644 /etc/systemd/network/10-eth0.10.network
chmod 644 /etc/systemd/network/10-eth0.network
5) Restart services or restart the vm.
systemctl restart systemd-networkd
6) Check the network status of the newly created network eth0.10
nmctl status
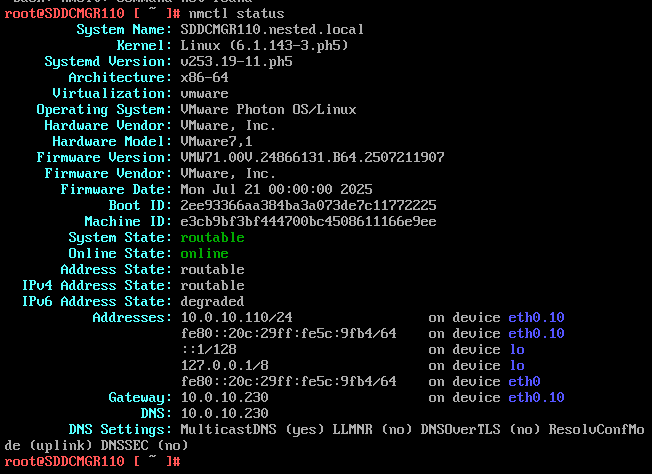
7) Do a ping test from the VCF Installer appliance.
Note – The firewall needs to be adjusted to allow other devices to ping the VCF Installer appliance.
Ping 10.0.10.230
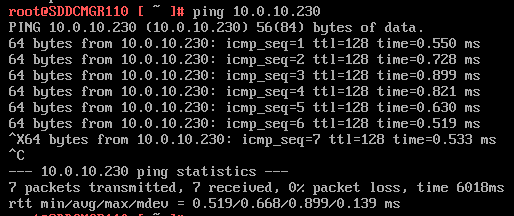
Next I do ping to an internet location to confirm this appliance can route to the internet.

8) Allow SSH access to the VCF Installer Appliance
Follow this BLOG to allow SSH Access.
Once SSH Access is enabled, from the Windows AD server or other device on the same network, putty into the VCF Installer Appliance.
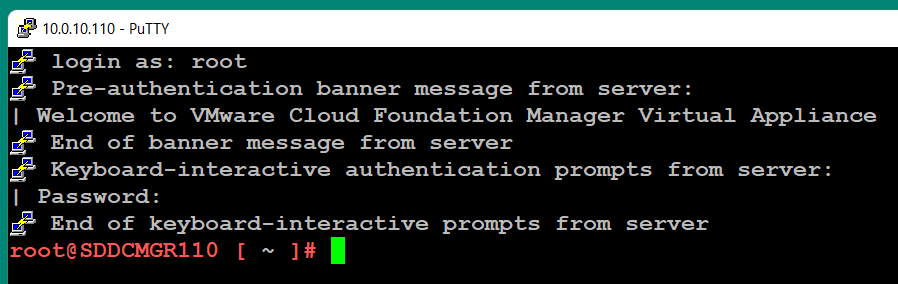
Adjust the VCF Installer Firewall to allow inbound traffic to the new adapter
Note – Might be a good time to make a snapshot of this VM.
1) From SSH check the firewall rules for the VCF Installer with the following command.
iptables -L –verbose –line-numbers (Note: Depending on your version of Photon, this command may be entered this way >> iptables -L –line-numbers –verbose)
From this output I can see that eth0 is set up to allow access to https, ping, and other services. However, there are no rules for the eth0.10 adapter. I’ll need to adjust the firewall to allow this traffic.
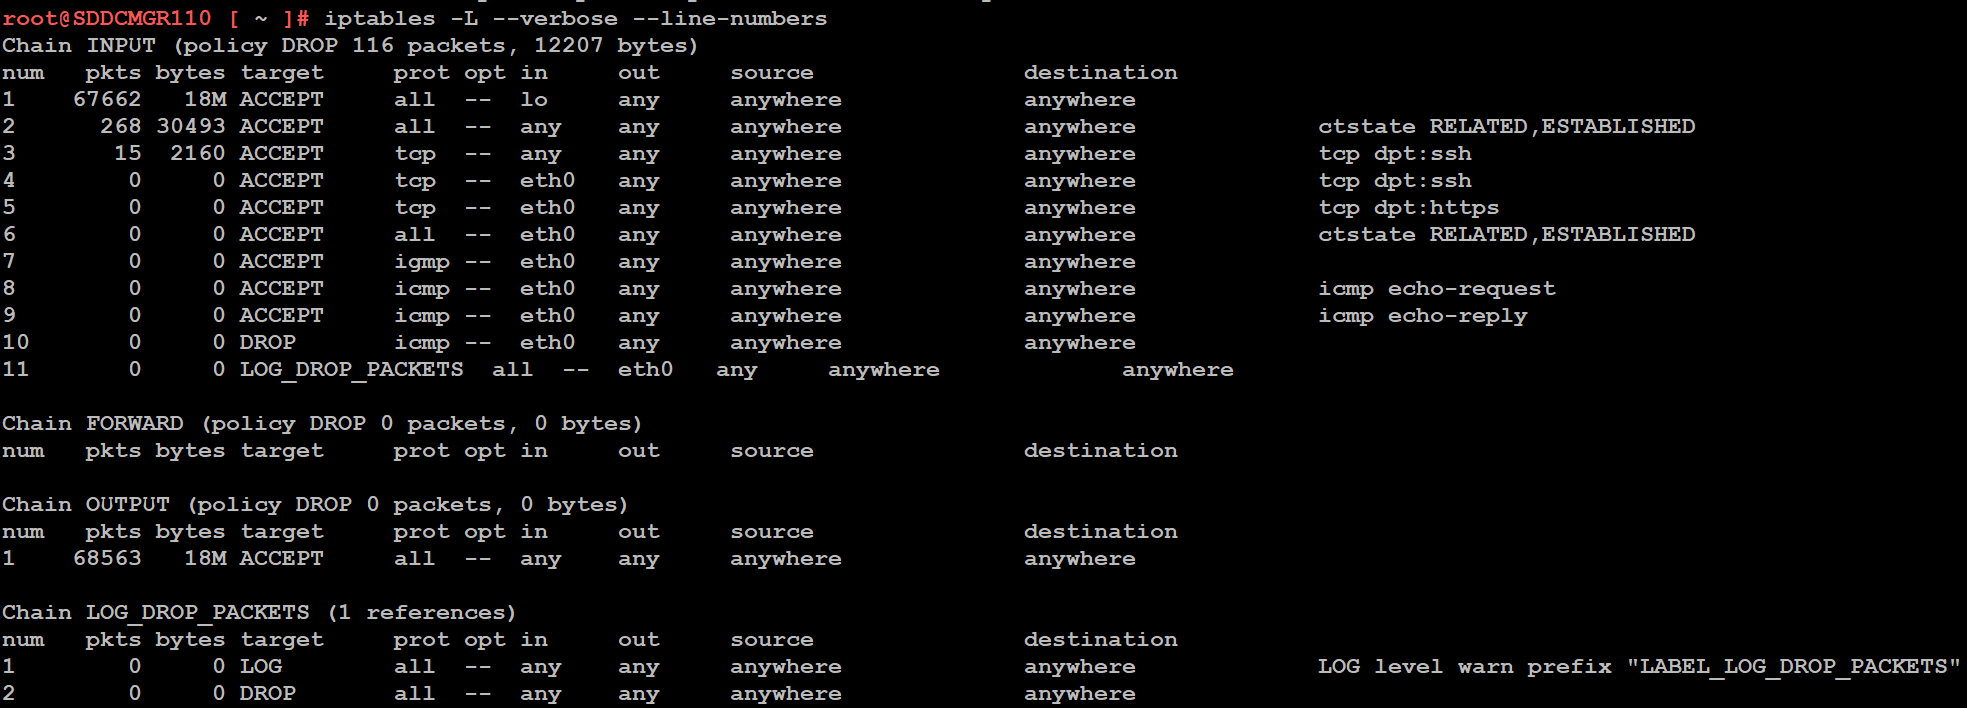
Next I insert a new rule allowing all traffic to flow through e0.10 and check the rule list.
iptables -I INPUT 4 -i eth0.10 -j ACCEPT

The firewall rules are not static. To make the current firewall rules stay static I need to save the rules.
Save Config Commands

Restart and make sure you can now access the VCF Installer webpage, and I do a ping test again just to be sure.
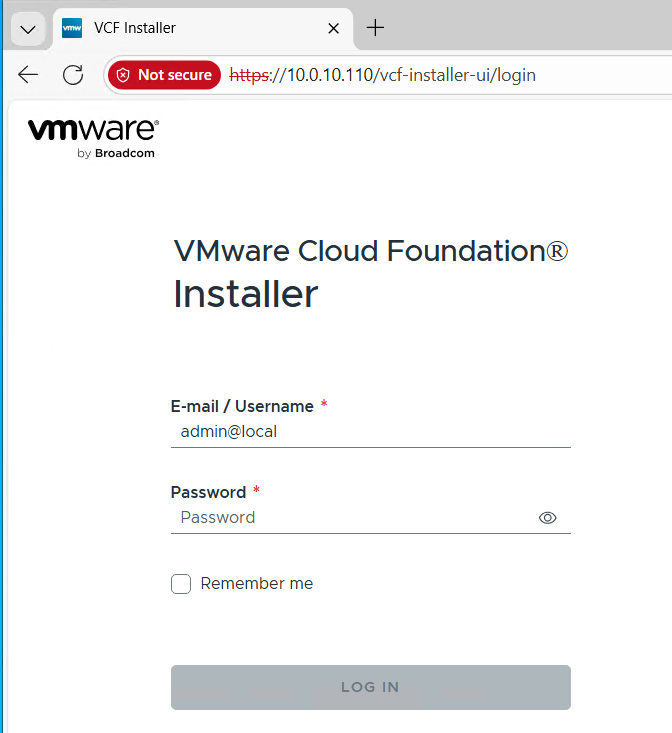
Now that I got VCF Installer installed and working on VLANs I’m now ready to deploy the VCF Offline Depot tool into my environment and in my next blog post I’ll do just that.
VMware Workstation Gen 9 Part 4 ESX Host Deployment and initial configuration
Now that I created 3 ESX hosts from templates it is time to install ESX. To do this I simply power on the Hosts and follow the prompts. The only requirement at this point is my Windows Server and Core Services be up and functional. In this blog we’ll complete the installation of ESX.
Choose a host then click on “Power on this virtual machine”.
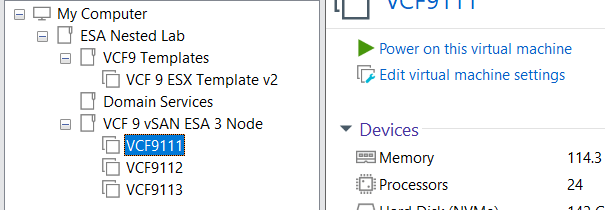
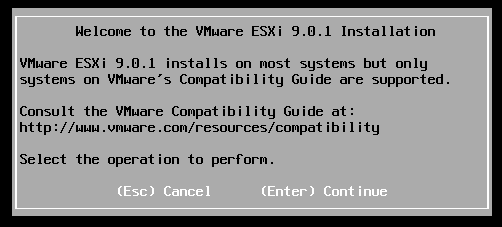
The host should boot to the ESX ISO I choose when I created my template.
Choose Enter to Continue
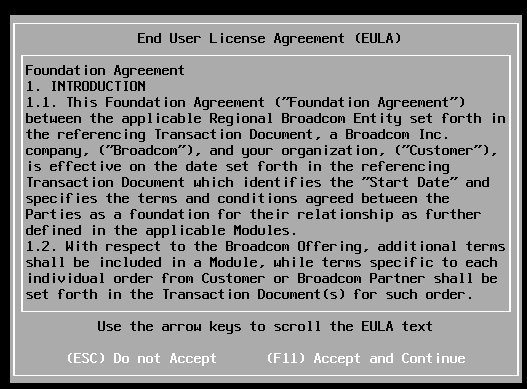
Choose F11 to Accept and Continue
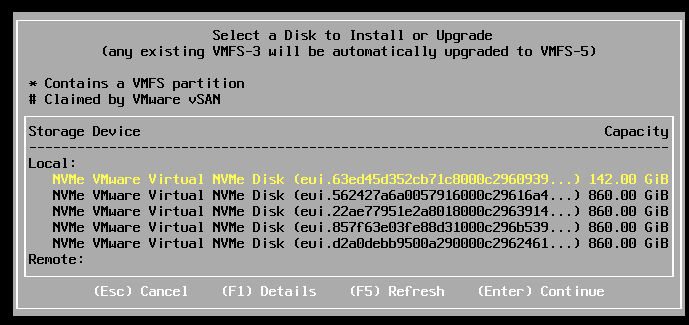
If the correct boot disk is selected, press Enter to continue.
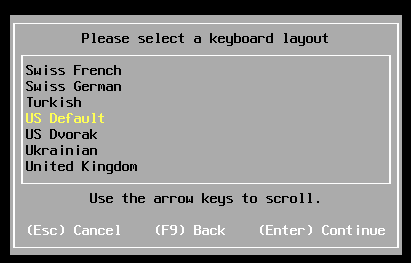
Choose pressed enter to accept the US Default keyboard layout
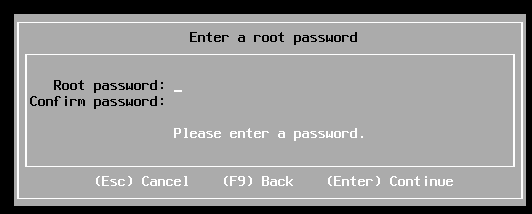
Entered a root password and pressed enter.
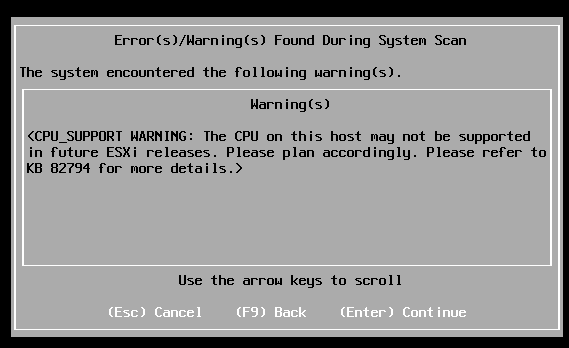
Pressed enter at the warning of CPU support.
Pushed F11 to install
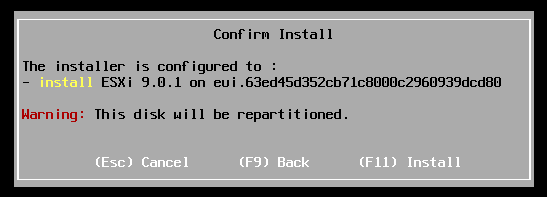
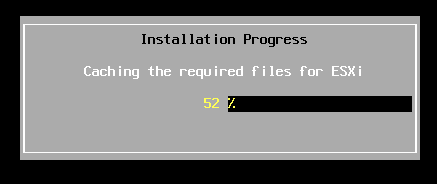
Allowed ESX to install.
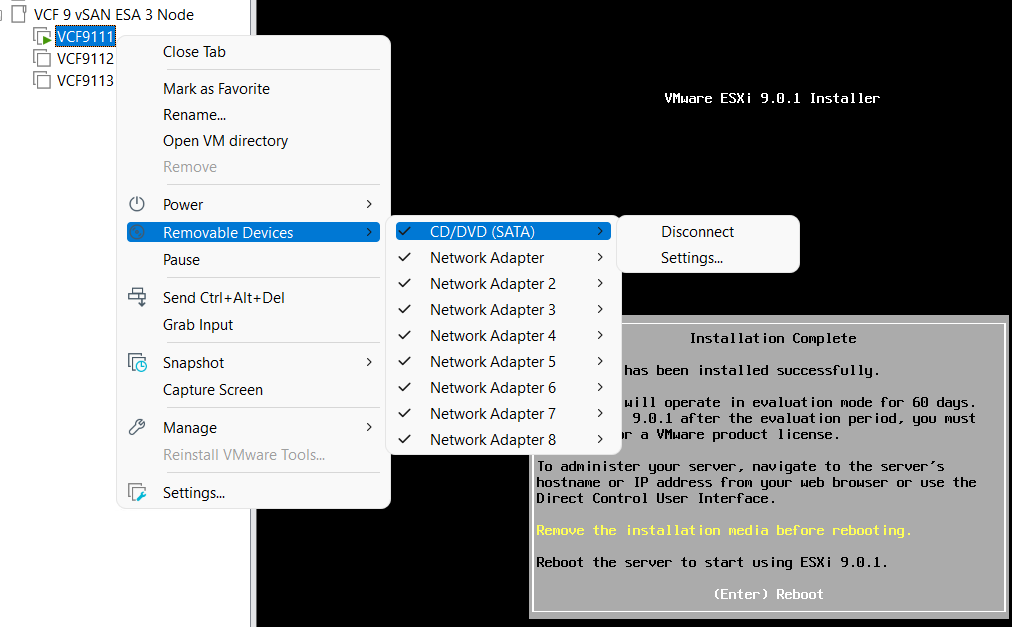
Disconnected the media and pressed enter to reboot
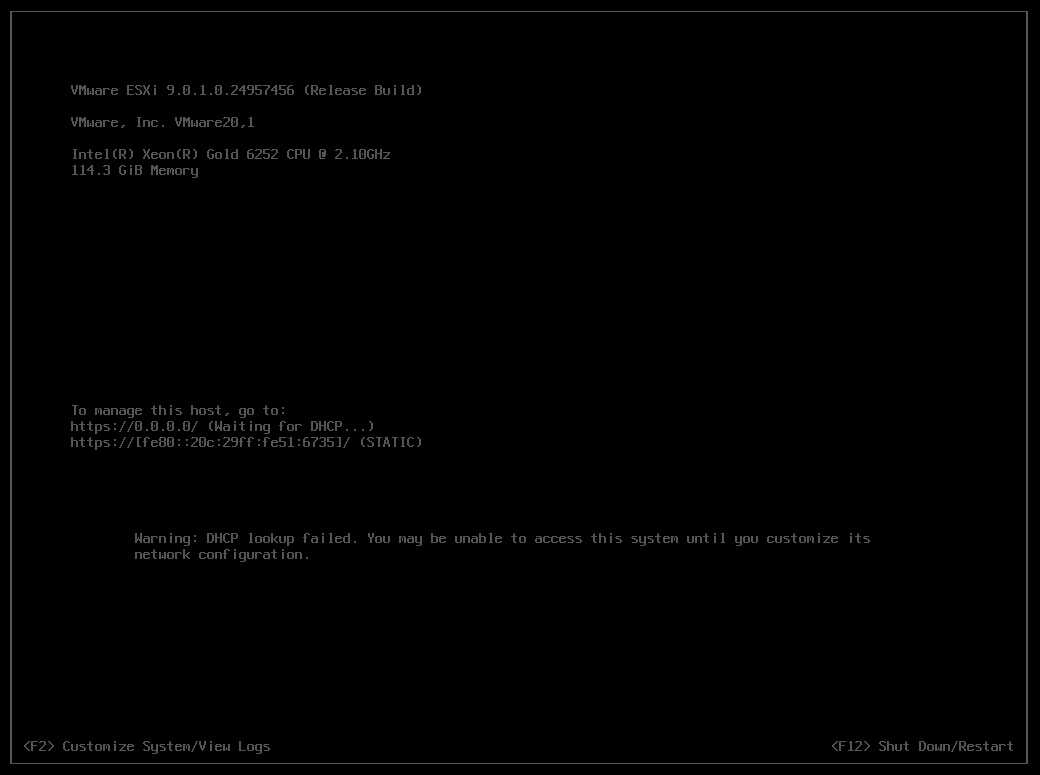
Once rebooted I choose F2 to customize the system and logged in with my root password
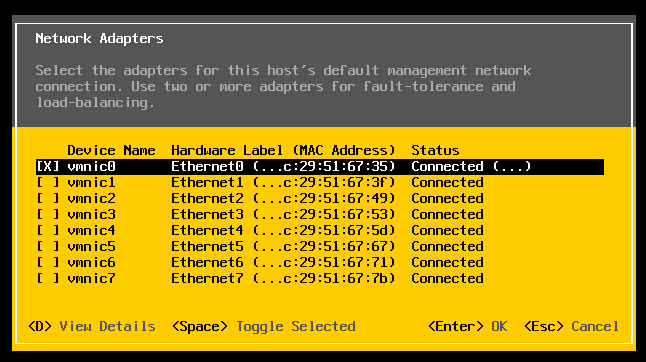
Choose Configure Management Network > Network Adapters, and validate the vmnic0 is selected, then pressed escape
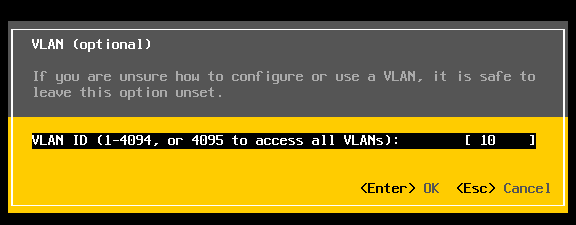
Choose VLAN (optional) > Entered in 10 for my VLAN > pressed enter to exit
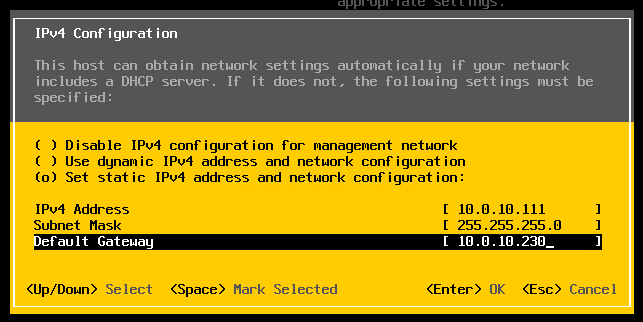
Choose IPv4 Configuration and enter the following for VCF9111 host and then pressed enter.
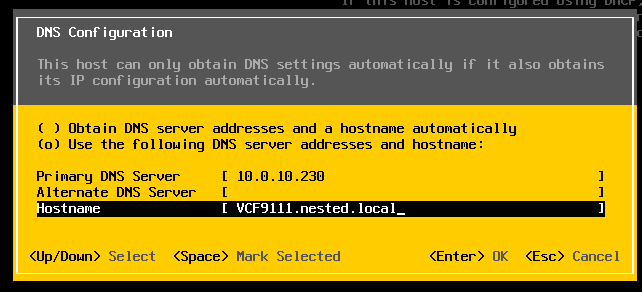
Choose DNS Configuration and enter the following.
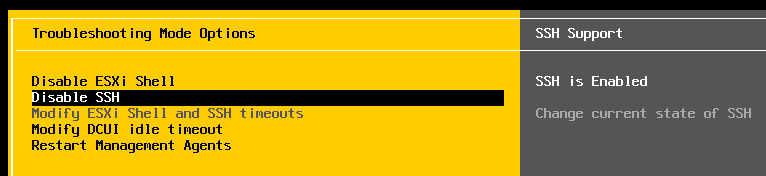
Press Escape to go to the main screen. Press Y to restart management. Arrow down to ‘Enable ESXi Shell” and press enter, then the same for SSH. Both should now be enabled.
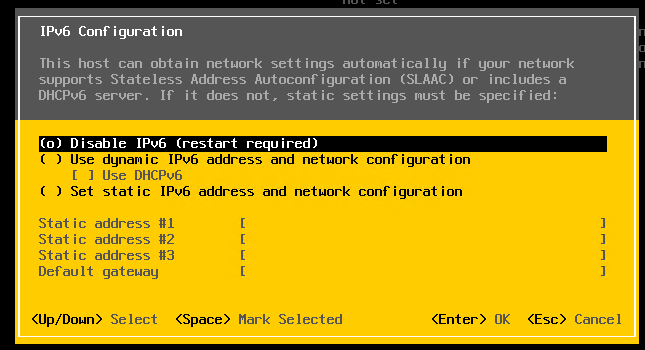
Press Escape and choose Configure Management Network. Next choose IPv6 Configuration, choose “Disable IPv6” and press enter.
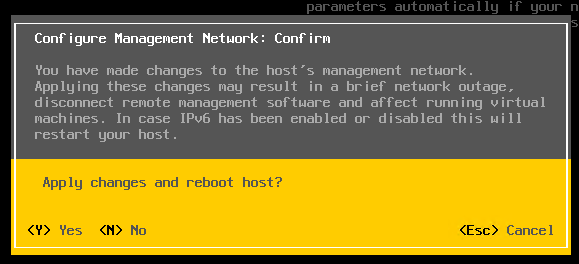
Press Escape and the host will prompt you to reboot, press Y to reboot.
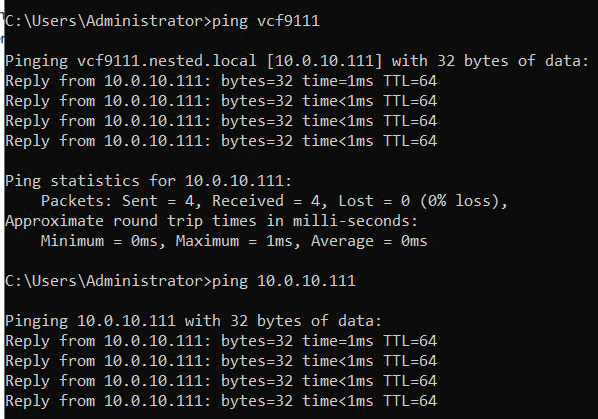
Test connectivity
From the AD server simply ping the VCF9111 host. This test ensures DNS is working properly and the LAN Segment is passing VLAN10.
From here I repeat this process for the other 2 hosts, only assigning them unique IPs.
Next up Deploying the VCF Installer with VLANs.
VMware Workstation Gen 9: Part 3 Windows Core Services and Routing
A big part of my nested VCF 9 environment relies on core services. Core services are AD, NTP, DHCP, and RAS. Core services are supplied by my Windows Server (aka AD230.nested.local). Of those services, RAS will enable routing between the LAN Segments and allow for Internet access. Additionally, I have a VM named DomainTools. DomainTools is used for testing network connectivity, SSH, WinSCP, and other tools. In this blog I’ll create both of these VMs and adapt them to work in my new VCF 9 environment.
Create the Window Server and establish core services
A few years back I published a Workstation 17 YouTube multipart series on how to create a nested vSphere 8 with vSAN ESA. Part of that series was creating a Windows Server with core services. For my VCF 9 environment I’ll need to create a new Windows server with the same core services. To create a similar Windows Server I used my past 2 videos: VMware Workstation 17 Nested Home Lab Part 4A and 4B.
Windows Server updates the VCF 9 environment
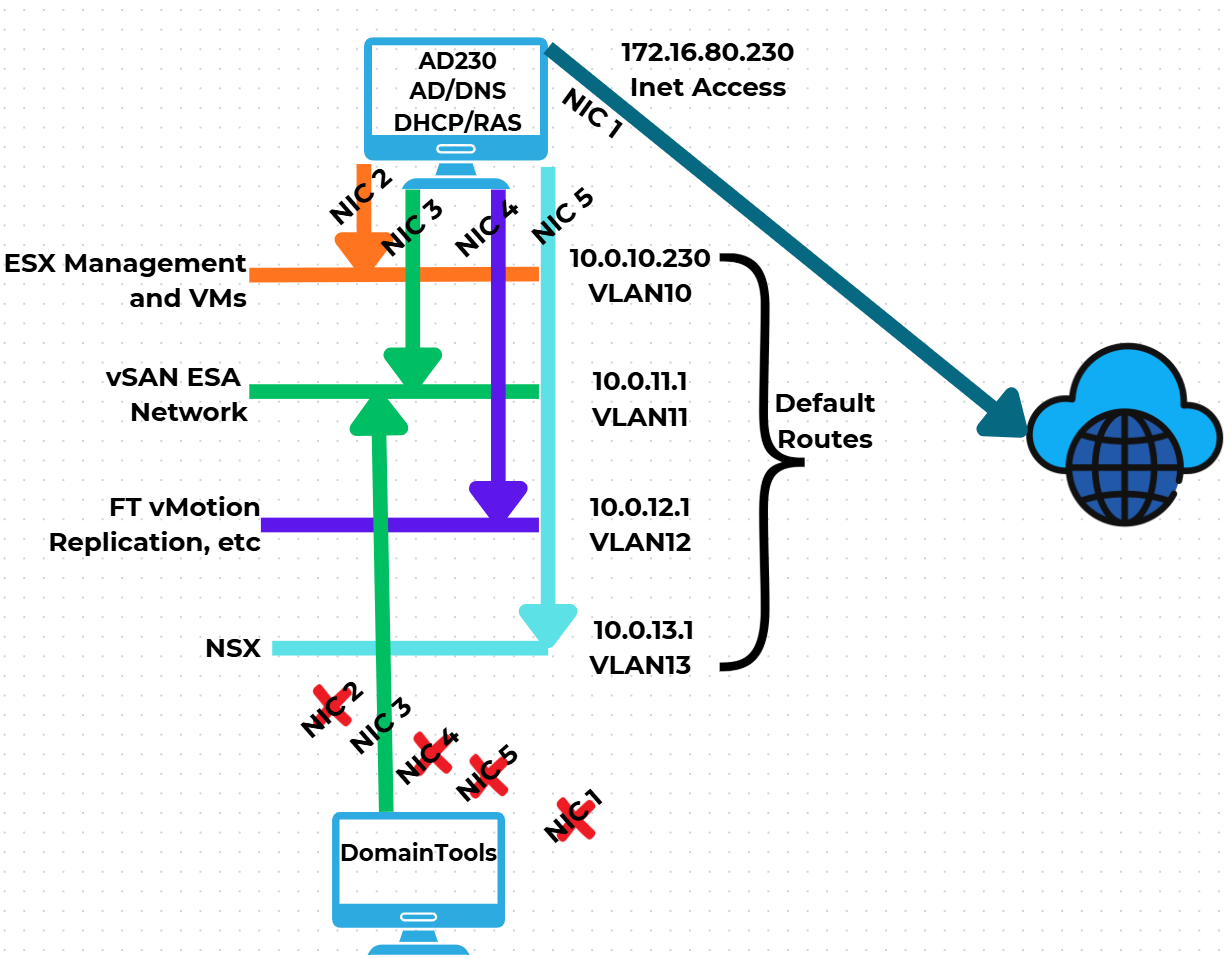
Now that I have established AD230 I need to update it to match the VCF 9 networks. I’ll be adding additional vNICs, attaching them to networks, and then ensuring traffic can route via the RAS service. Additionally, I created a new Windows 11 VM named DomainTools. I’ll use DomainTools for network connectivity testing and other functions. Fig-1 shows the NIC to network layout that I will be following.
(Fig-1)
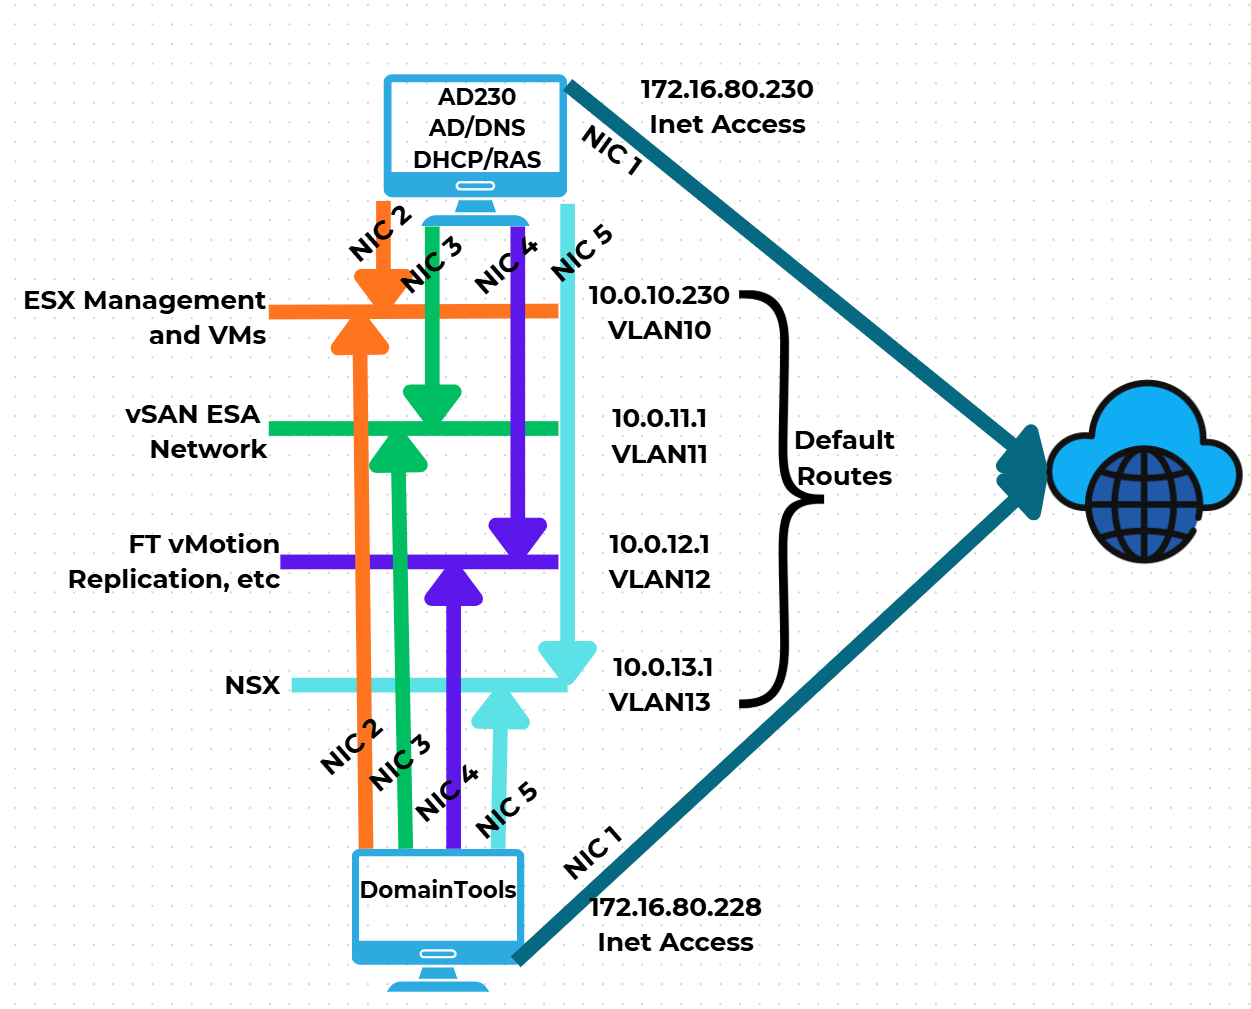
Adjustments to AD230 and DomainTools
I power off AD230 and DomainTools. On both I add the appropriate vNICs and align them to the LAN segments. Next, I edit their VMware VM configuration file changing the vNICs from “e1000e” to “vmxnet3”.

Starting with DomainTools for each NIC, I power it on, input the IPv4 information (IP Address, Subnet, VLAN ID), and optionally disable IPv6. The only NIC to get a Default Gateway is NIC1. TIP – To ID the NICs, I disconnect the NIC in the VM settings and watch for it to show unplugged in Windows Networking. This way I know which NIC is assigned to which LAN Segment. Additionally, in Windows Networking I add a verbose name to the NIC to help ID it.
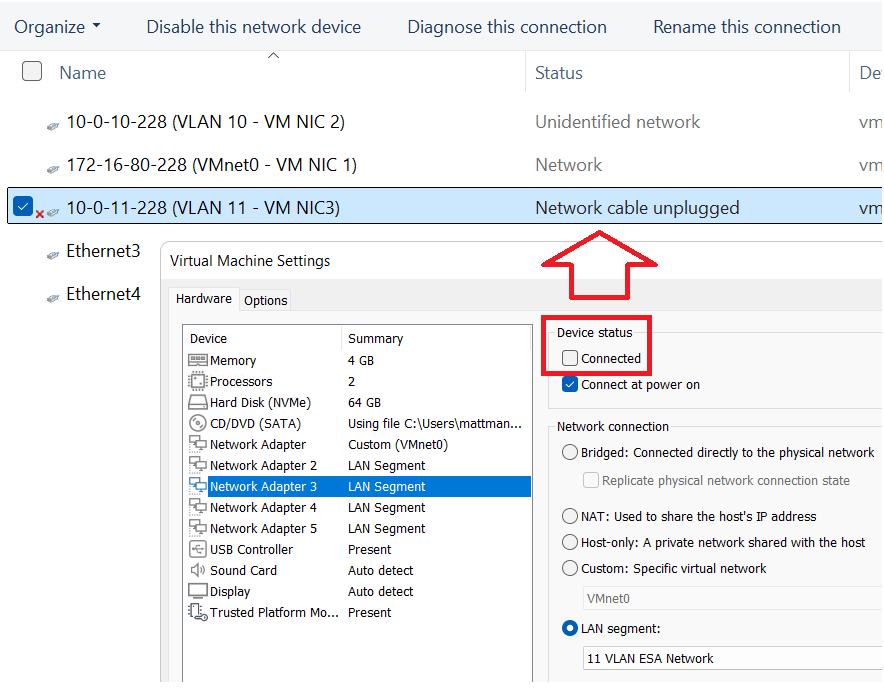
I make the same network adjustments to AD230 and I update its DNS service to only supply DNS from the 10.0.10.230 network adapter.
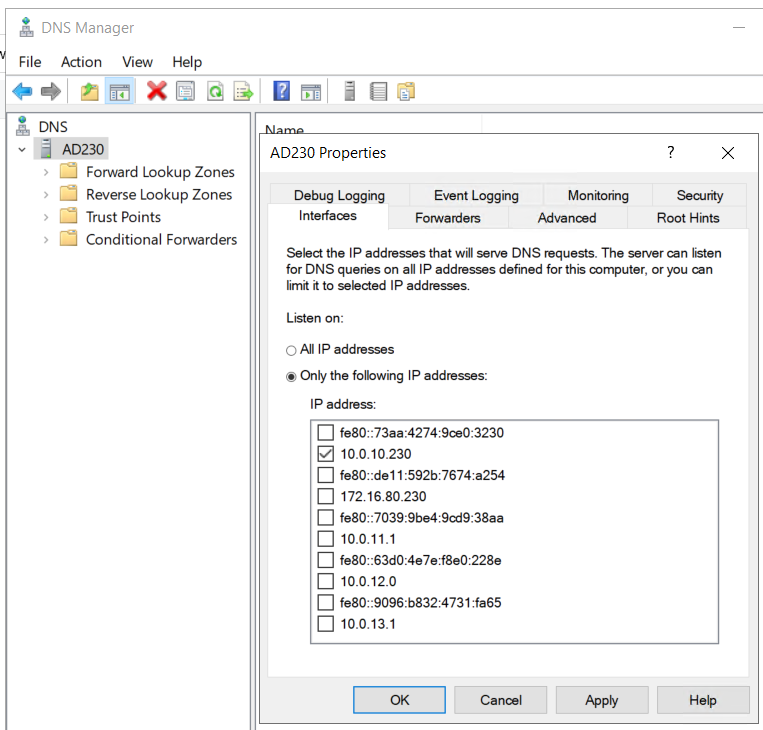
Once completed I do a ping test between all the networks for AD230 and DomainTools to validate IP Connectivity works. TIP – Use ipconfig at the CLI to check your adapter IP settings. If ping is not working there may be firewall enabled.
Setting up RAS on AD230
Once you have your network setup correctly validate that RAS has accepted your new adapters and their information. On AD230 I go in to RAS > IPv4 > General
I validate that my network adapters are present.
Looking ahead — RAS seemed to work right out of the box with no config needed. In all my testing below it worked fine, this may change as I advance my lab. If so, I’ll be sure to update my blog.
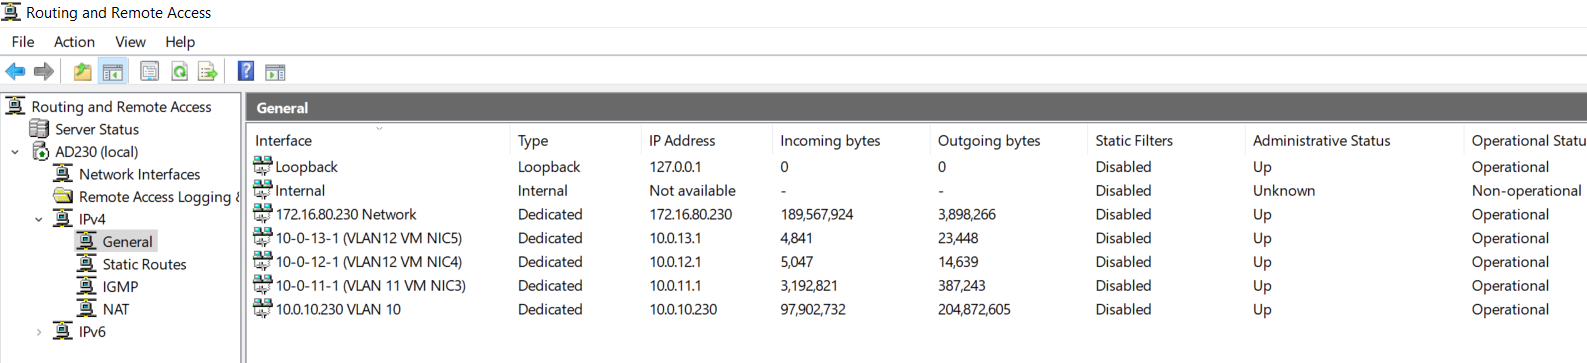
Next I need to validate routing between the different LAN Segments. To do this I’ll use the DomainTools VM to ensure routing is working correctly. You may notice in some of my testing results that VCF Appliances are present. I added this testing part after I had completed my VCF deployment.
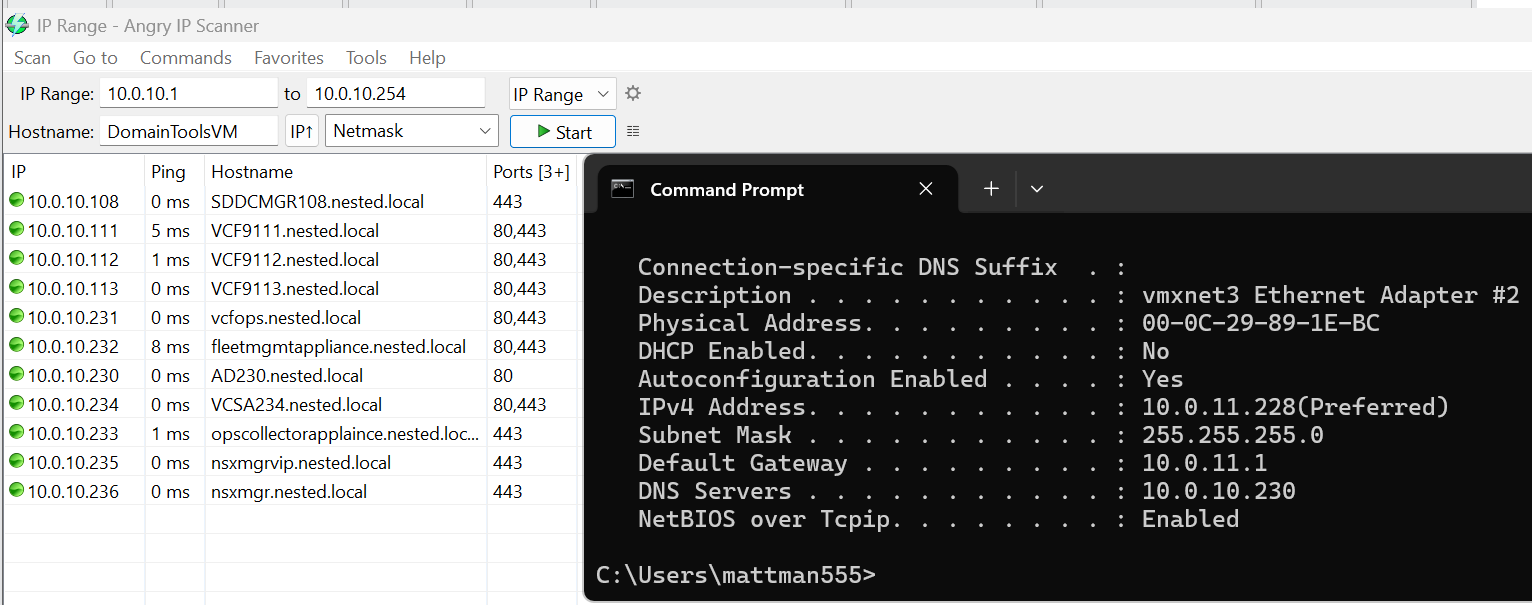
I need to test all of the VLAN networks. On the DomainTools VM, I disable each network adapter except for the one I want to test. In this case I disabled every adapter except for 10-0-11-228 (VLAN 11 – VM NIC3). I then add the gateway IP of 10.0.11.1 (this is the IP address assigned to my AD230 RAS server).
Next I do an ipconfig to validate the IP address, and use Angry IP Scanner to locate devices on the 10.0.10.x network. Several devices responded, plus resolving their DNS name, proving that DomainTools is successfully routing from the 11 network into the 10 network. I’ll repeat this process, plus do an internet check, on all the remaining networks.
Now that we have a stable network and core Window services established we are ready to move on to ESX Host Deployment and initial configuration.
 vmexplorer