Other
Windows 11 Workstation VM asking for encryption password that you did not explicitly set
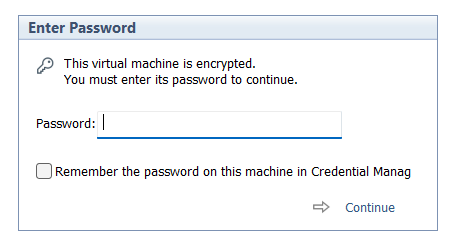
I had created a Windows 11 VM on Workstation 25H2 and then moved it to a new deployment of Workstation. Upon powerup it the VM stated I must supply a password (fig-1) as the VM was encrypted. In this post I’ll cover why this happened and how I got around it.
Note: Disabling TPM/Secure Boot is not recommended for any system. Additionally, bypassing security leaves systems open for attack. If you are curious around VMware system Hardening check out this great video by Bob Plankers.
(Fig-1)
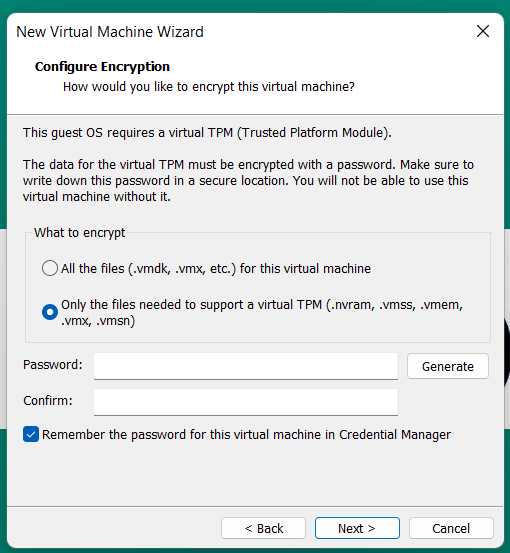
Why did this happen? As of VMware Workstation 17 encryption is required with a TPM 2.0 device, which is a requirement for Windows 11. When you create a new Windows 11×64 VM, the New VM Wizard (fig-2) asks you to set an encryption password or auto-generated one. This enables the VM to support Windows 11 requirements for TPM/Secure boot.
(Fig-2)
I didn’t set a password, where is the auto-generated password kept? If you allowed VMware to “auto-generate” the password, it is likely stored in your host machine’s credential manager. For Windows, open the Windows Credential Manager (search for “Credential Manager” in the Start Menu). Look for an entry related to VMware, specifically something like “VMware Workstation”.
I don’t have access to the PC where the auto-generated password was kept, how did I get around this? All I did was edit the VMs VMX configuration file commenting out the following. Then added the VM back into Workstation. Note: this will remove the vTPM device from the virtual hardware, not recommended.
# vmx.encryptionType
# encryptedVM.guid
# vtpm.ekCSR
# vtpm.ekCRT
# vtpm.present
# encryption.keySafe
# encryption.data
How could I avoid this going forward? 2 Options
Option 1 – When creating the VM, set and record the password.
Option 2 – To avoid this all together, use Rufus to create a new VM without TPM/Secure boot enabled.
- Use Rufus to create a bootable USB drive with Windows 11. When prompted choose the options to disable Secure Boot and TPM 2.0.
- Once the USB is created create a new Windows 11×64 VM in Workstation.
- For creation options choose Typical > choose I will install the OS later > choose Win11x64 for the OS > chose a name/location > note the encryption password > Finish
- When the VM is completed, edit its settings > remove the Trusted Platform Module > then go to Options > Access Control > Remove Encryption > put in the password to remove it > OK
- Now attach the Rufus USB to the VM and boot to it.
- From there install Windows 11.
Wrapping this up — Bypassing security allowed me to access my VM again. However, it leaves the VM more vulnerable to attack. In the end, I enabled security on this vm and properly recorded its password.
HOME LABS: A DEFINITIVE GUIDE (Archived)
01/28/2026 — For many years I published and presented the HOME LABS: A DEFINITIVE GUIDE as a main page on my blog, plus presented this to many groups. However, for now I’m archiving this page. This may change in the future but currently there are no plans.
HOME LABS: A DEFINITIVE GUIDE
The HOME LABS: A DEFINITIVE GUIDE is a culmination of my work from the past 10+ years. Initially, I presented this guide to various VMUG groups and I’ve improved it every year since.
The links below are my most current recorded sessions and slides for you to download. During these sessions I go into detail around Home lab design considerations, which is something we usually don’t think of when building a home lab. I do hope you find this information very useful. Please feel free to ask any questions or post comments… Thanks — Enjoy!
Note – If you want me to present this guide to your group do reach out. As I’m always happy to help.
AUG-2022 Explore 2022 Sessions (Not recorded Slides Only)
JUNE-2022 vExpert Session – Home Labs Definitive Guide
- CLICK HERE to download my slides from this presentation(PDF)
- CLICK HERE for the vExpert Recorded Session
MAY-2021 VMUG Advantage Session – Home Labs Definitive Guide
AUG-2020 VMUG Advantage Session – Home Labs Definitive Guide
MAY-2020 Cedar Park VMUG Session – Home Labs Definitive Guide
MAR-2020 TAM Lab Recorded Session
VMware Workstation Gen 9: FAQs
I complied a list of frequently asked questions (FAQs) around my Gen 9 Workstation build. I’ll be updating it from time to time but do feel free to reach out if you have additional questions.
Last Update: 07/05/2026
General FAQs
Why Generation 9? Starting with the Gen 7 build, the Gen Number aligns to the version of vSphere it was designed for. So, Gen 9 = VCF 9. It also helps my readers to track the Generations that interests them the most.
Why are you running Workstation vs. dedicated ESX servers? I’m pivoting my home lab strategy. I’ve moved from a complex multi-server setup to a streamlined, single-host configuration using VMware Workstation. Managing multiple hosts, though it gives real world experience, wasn’t meeting my needs when it came to quick system recovery or testing different software versions. With Workstation, I can run/deploy multiple types of home labs and do simple backup/recovery, plus Workstation’s snapshot manager allow me to roll back labs quite quickly. I find Workstation more adaptable, and making my lab time about learning rather than maintenance.
What are your goals with Gen 9? To develop and build a platform that is able to run the stack of VCF 9 product for Home Lab use. See Gen 9 Part 1 for more information on goals.
Where can I find your Gen 9 Workstation Build series? All of my most popular content, including the Gen 9 Workstation builds can be found under Best of VMX.
What version of Workstation are you using? Currently, VMware Workstation 26H1, this may change over time see my Home Lab BOM for more details.
How performant is running VCF 9 on Workstation? In my testing I’ve had adequate success with a simple VCF install. Clicks through out the various applications didn’t seem to lag. After I finished writing Gen 9 blog I upgraded my mobo and RAM to some new specifications my Home Lab BOM for more details.
What core services are needed to support this VCF Deployment? Core Services are supplied via Windows Server. They include AD, DNS, NTP, RAS, and DHCP. DNS, NTP, and RAS being the most important.
BOM FAQs
Where can I find your Bill of Materials (BOM)? See my Home Lab BOM page.
What topics does the BOM1 VCF 9.0 Series cover? The BOM1 series provides a comprehensive, step-by-step guide for deploying VMware Cloud Foundation (VCF) 9.0.1 in a nested lab environment. The series covers the full lifecycle, including initial planning and requirements (Part 1), the use of templates (Part 2), and setting up essential core network services (Part 3). Subsequent steps detail the deployment of ESX hosts (Part 4) and configuring the VCF installer with necessary VLAN segmentation (Part 5). To optimize the setup, the guide covers creating an offline repository for VCF components (Part 6), followed by the deployment of VCF 9.0.1 (Part 7).
Finally, the series outlines critical “day-two” operations, such as licensing the environment (Part 8) and managing the proper shutdown and startup procedures for the nested infrastructure (Part 9). This approach creates a fully functional, reproducible lab for testing the latest VMware technologies. For the full series, visit VMExplorer.
What can I run on BOM1 VCF 9.0? I have successfully deployed a simple VCF deployment, but I don’t recommend running VCF Automation on this BOM.
What VCF 9 products are running in BOM1 VCF 9.0? Initial components include: VCSA, VCF Operations, VCF Collector, NSX Manager, Fleet Manager, and SDDC Manager all running on the 3 x Nested ESX Hosts.
What are your plans for BOM2? No plans for a BOM2 at this time, I simply did a mobo swap to update to my Workstation deployment.
Are you running both mobo configurations? No I’m only running the current mobo listed on my Home Lab BOM page.
Do I really need this much hardware? No you don’t. The parts listed on my BOM is just how I did it. I used some parts I had on hand and some I bought used. My recommendation is use what you have and upgrade when you need to.
What should I do to help with performance? Invest in highspeed disk, CPU cores, and RAM. I highly recommend lots of properly deployed NVMe disks for your nested ESX hosts. Make sure you adjust performance in Windows 11.
Note: I highly recommend getting a system with DDR5 RAM and the fastest RAM you can find. When pushing Workstation this far RAM speed is a big factor. DD4 2933Mhz, works but lags under heavy loads.
What do I need for multiple NVMe Drives? If you plan to use multiple NVMe drives into a single PCIe slot you’ll need a motherboard that supports bifurcation OR you’ll need an PCIe NVMe adapter that will support it. Not all NVMe adapters are the same, so do your research before buying.
VMware Workstation Gen 9: Part 9 Shutting down and starting up the environment
Deploying the VCF 9 environment on to Workstation was a great learning process. However, I use my server for other purposes and rarely run it 24/7. After its initial deployment, my first task is shutting down the environment, backing it up, and then starting it up. In this blog post I’ll document how I accomplish this.
NOTE:
- License should be completed for a VCF 9 environment first before performing the steps below. If not, the last step, vSAN Shutdown will cause an error. There is a simple work around.
- I do fully complete each step before moving to the next. Some steps can take some time to complete.
How to shutdown my VCF Environment.
My main reference for VCF 9 Shut down procedures is the VCF 9 Documentation on techdocs.broadcom.com (See REF URLs below). The section on “Shutdown and Startup of VMware Cloud Foundation” is well detailed and I have placed the main URL in the reference URLs below. For my environment I need to focus on shutting down my Management Domains as it also houses my Workload VMs.
Here is the order in which I shutdown my environment. This may change over time as I add other components.
Note – it is advised to complete each step fully before proceeding to the next step.
| Shutdown Order | SDDC Component |
|---|---|
| In vCenter, shutdown all non-essential guest VM’s | |
| 1 – Not needed, not deployed yet | VCF Automation |
| 2 – Not needed, not deployed yet | VCF Operations for Networks |
| 3 – From VCSA234, locate a VCF Operations collector appliance.(opscollectorapplaince) – Right-click the appliance and select Power > Shut down Guest OS. – In the confirmation dialog box, click Yes. – Wait for it to fully power off | VCF Operations collector |
| 4 – Not needed, not deployed yet | VCF Operations for logs |
| 5 – Not needed, not deployed yet | VCF Identity Broker |
| 6 – From vcsa234, in the VMs and Templates inventory, locate the VCF Operations fleet management appliance (fleetmgmtappliance.nested.local) – Right-click the VCF Operations fleet management appliance and select Power > Shut down Guest OS. – In the confirmation dialog box, click Yes. – Wait for it to fully power off | VCF Operations fleet management |
| 7 – You shut down VCF Operations by first taking the cluster offline and then shutting down the appliances of the VCF Operations cluster. – Log in to the VCF Operations administration UI at the https://vcfcops.nested.local/admin URL as the admin local user. – Take the VCF Operations cluster offline. On the System status page, click Take cluster offline. – In the Take cluster offline dialog box, provide the reason for the shutdown and click OK. – Wait for the Cluster status to read Offline. This operation might take about an hour to complete. (With no data mine took <10 mins) – Log in to vCenter for the management domain at https://vcsa234.nested.local/ui as a user with the Administrator role. – There could be other options for shutting down this appliance. Using Broadcom KB 341964 as a reference, I determined my next step is to simply Right-click the vfccops appliance and select Power > Shut down Guest OS. – In the VMs and Templates inventory, locate a VCF Operations appliance. – Right-click the appliance and select Power > Shut down Guest OS. – In the confirmation dialog box, click Yes. – This operations takes several minutes to complete. – Wait for it to fully power off | VCF Operations |
| 8 – Not Needed, not deployed yet | VMware Live Site Recovery for the management domain |
| 9 – Not Needed, not deployed yet | NSX Edge nodes |
| 10 – I continue shutting down the NSX infrastructure in the management domain and a workload domain by shutting down the one-node NSX Manager by using the vSphere Client. – Log in to vCenter for the management domain at https://vcsa234.nested.local/ui as a user with the Administrator role. – Identify the vCenter instance that runs NSX Manager. – In the VMs and Templates inventory, locate the NSX Manager (nsxmgr.nested.local) appliance. – Right-click the NSX Manager appliance and select Power > Shut down Guest OS. – In the confirmation dialog box, click Yes. – This operation takes several minutes to complete. – Wait for it to fully power off | NSX Manager |
| 11 – Shut down the SDDC Manager appliance in the management domain by using the vSphere Client. – Log in to vCenter for the management domain at https://vcsa234.nested.local/ui as a user with the Administrator role. – In the VMs and templates inventory, expand the management domain vCenter Server tree and expand the management domain data center. – Right-click the SDDC Manager appliance (SDDCMGR108.nested.local) and click Power > Shut down Guest OS. – In the confirmation dialog box, click Yes. – This operation takes several minutes to complete. – Wait for it to fully power off | SDDC Manager |
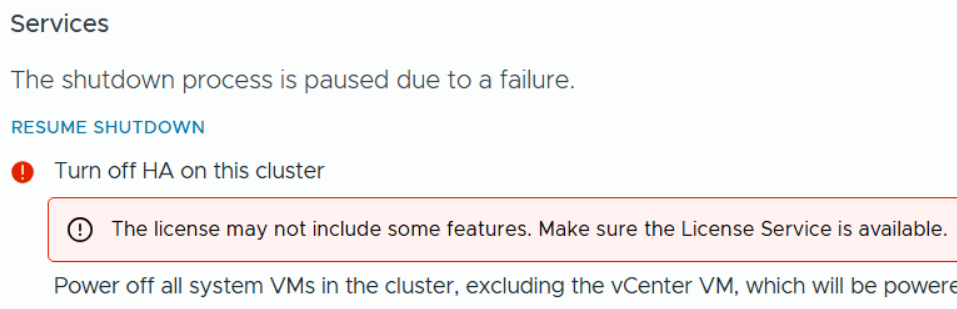
| 12 – You use the vSAN shutdown cluster wizard in the vSphere Client to shut down gracefully the vSAN clusters in a management domain. The wizard shuts down the vSAN storage and the ESX hosts added to the cluster. – Identify the cluster that hosts the management vCenter for this management domain. – This cluster must be shut down last. – Log in to vCenter for the management domain at https://vcsa234.nested.local/ui as a user with the Administrator role. – For a vSAN cluster, verify the vSAN health and resynchronization status. – In the Hosts and Clusters inventory, select the cluster and click the Monitor tab. – In the left pane, navigate to vSAN Skyline health and verify the status of each vSAN health check category. – In the left pane, under vSAN Resyncing objects, verify that all synchronization tasks are complete. – Shut down the vSAN cluster. – In the inventory, right-click the vSAN cluster and select vSAN > Shutdown cluster. – In the Shutdown Cluster wizard, verify that all pre-checks are green and click Next. – Review the vCenter Server notice and click Next. – Enter a reason for performing the shutdown, and click Shutdown. – Briefly monitor the progress of the vSAN shutdown in vCenter. Eventually, VCSA will be shutdown and connectivity to it will be lost. I then monitor the shut down of my ESX host in Workstation. – The shutdown operation is complete after all ESX hosts are stopped. | Shut Down vSAN and the ESX Hosts in the Management Domain OR Manually Shut Down and Restart the vSAN Cluster If vSAN Fails to shutdown due to a license issue, then under the vSAN Cluster > Configure > Services, choose ‘Resume Shutdown’ (Fig-3) |
| Next the ESX hosts will power off and then I can do a graceful shutdown of my Windows server AD230. In Workstation, simply right click on this VM > Power > Shutdown Guest. Once all Workstation VM’s are powered off, I can run a backup or exit Workstation and power off my server. | Power off AD230 |
(Fig-3)
Backing up my VCF Environment
With my environment fully shut down, now I can start the backup process. See my blog Backing up Workstation VMs with PowerShell for more details.
How to restart my VCF Environment.
| Startup Order | SDDC Component |
|---|---|
| PRE-STEP: – Power on my Workstation server and start Workstation. – In Workstation power on my AD230 VM and ensure / verify all the core services (AD, DNS, NTP, and RAS) are working okay. Start up the VCF Cluster: 1 – One at a time power on each ESX Host. – vCenter is started automatically. Wait until vCenter is running and the vSphere Client is available again. – Log in to vCenter at https://vcsa234.nested.local/ui as a user with the Administrator role. – Restart the vSAN cluster. In the Hosts and Clusters inventory, right-click the vSAN cluster and select vSAN Restart cluster. – In the Restart Cluster dialog box, click Restart. – Choose the vSAN cluster > Configure > vSAN > Services to see the vSAN Services page. This will display information about the restart process. – After the cluster has been restarted, check the vSAN health service and resynchronization status, and resolve any outstanding issues. Select the cluster and click the Monitor tab. – In the left pane, under vSAN > Resyncing objects, verify that all synchronization tasks are complete. – In the left pane, navigate to vSAN Skyline health and verify the status of each vSAN health check category. | Start vSAN and the ESX Hosts in the Management DomainStart ESX Hosts with NFS or Fibre Channel Storage in the Management Domain |
| 2 – From vcsa234 locate the sddcmgr108 appliance. – In the VMs and templates inventory, Right Click on the SDDC Manager appliance > Power > Power On. – Wait for this vm to boot. Check it by going to https://sddcmgr108.nested.local – As its getting ready you may see “VMware Cloud Foundation is initializing…” – Eventually you’ll be prompted by the SDDC Manager page. – Exit this page. | SDDC Manager |
| 3 – From the VCSA234 locate the nsxmgr VM then Right-click, select Power > Power on. – This operation takes several minutes to complete until the NSX Manager cluster becomes fully operational again and its user interface – accessible. – Log in to NSX Manager for the management domain at https://nsxmgr.nested.local as admin. – Verify the system status of NSX Manager cluster. – On the main navigation bar, click System. – In the left pane, navigate to Configuration > Appliances. – On the Appliances page, verify that the NSX Manager cluster has a Stable status and all NSX Manager nodes are available. Notes — Give it time. – You may see the Cluster status go from Unavailable > Degraded, ultimately you want it to show Available. – In the Node under Service Status you can click on the # next to Degraded. This will pop up the Appliance details and will show you which item are degraded. – If you click on Alarms, you can see which alarms might need addressed | NSX Manager |
| 4 – Not Needed, not deployed yet | NSX Edge |
| 5 – Not Needed, not deployed yet | VMware Live Site Recovery |
| 6 – From vcsa234, locate vcfops.nested.lcoal appliance. – Following the order described in Broadcom KB 341964. – For my environment I simply Right-click on the appliance and select Power > Power On. – Log in to the VCF Operations administration UI at the https://vcfops.nested.lcoal/admin URL as the admin local user. – You may see ‘Retrieving Cluster Status’ , give it time. Mine took about <2mins – On the System status page, Under Cluster Status, click Bring Cluster Online. – You may see ‘Retrieving Cluster Status’ , give it time. Mine took about <2mins Notes — Give it time. – This operation might take about an hour to complete. – Took <15 mins to come Online – Cluster Status update may read: ‘Going Online’ – To the right of the node name, all of the other columns continue to update, eventually showing ‘Running’ and ‘Online’ – Cluster Status will eventually go to ‘Online’ | VCF Operations |
| 7 – From vcsa234 locate the VCF Operations fleet management appliance (fleetmgmtappliance.nested.local) Right-click the VCF Operations fleet management appliance and select Power > Power On. – In the confirmation dialog box, click Yes. – Allow it to boot Note – Direct access to VCF Ops Fleet Management appliance is disabled. Go to VCF Operations > Fleet Mgmt > Lifecycle > VCF Management for appliance management. | VCF Operations fleet management |
| 8 – Not Needed, not deployed yet | VCF Identity Broker |
| 9 – Not Needed, not deployed yet | VCF Operations for logs |
| 10 – From vcsa234, locate a VCF Operations collector appliance. (opscollectorappliance) Right-click the VCF Operations collector appliance and select Power > Power On. In the configuration dialog box, click Yes. | VCF Operations collector |
| 11 – Not Needed, not deployed yet | VCF Operations for Networks |
| 12 – Not Needed, not deployed yet | VCF Automation |
REF:
VMware Workstation Gen 9: Part 8 Licensing Resources
To move your VCF 9 deployment forward you should consider applying a license. For Home Labs I suggest using the vExpert and VMUG Advantage programs. As a VMware employee I am ineligible for vExpert/VMUG Licensing. This means I can only recommend reading the URLs provided below and apply them to your environment as you see fit.
REF: (** = Highly recommended)
- Licensing in VCF 9
- ** Licensing in VMware Cloud Foundation 9.0 (Blog)
- VMware Cloud Foundation 9.0 Licensing (Tech Docs)
- VMUG Licensing
- ** VMUG Advantage Home Lab License Guide (Blog – With updates)
- ** VCF9 Licenses and Tokens are here for VMUG Advantage Members (Video)
- VMUG Advantage by William Lam (Blog)
- VMUG Advantage Home Lab License Guide (Blog)
- vExpert
- vExpert Home Page (Webpage)
VMware Workstation Gen 9: Part 7 Deploying VCF 9.0.1 Fleet
Now that I have set up an VCF 9 Offline depot and downloaded the installation media its time to deploy a Simple VCF 9 Fleet on my Workstation environment. With all my ESX host configured/powered on and the SDDC Installer ready here are the steps I took to complete this.
PRE-Steps
Optional:
1) One of the more important steps is making sure I backup my Workstation environment and delete any Workstation VM snapshots. This way my environment is ready for deployment.
2) Make sure your Windows 11 PC power plan is set to High Performance and does not put the computer to sleep.
3) Review the Planning and Resource Workbook.
Required:
4) Ensure the NTP Service is running on each of your hosts. TIP: Even if you setup the NTP to start and stop with host, you may have to go in to the host client and actually start the NTP service.
5) DNS can be a big issue for the VCF9 installer. I only setup the DNS names for the ESX Hosts and installers appliances. When I am going through the VCF Installer is when I setup the other DNS names. Example – NSX Manager, Automation, Operations appliances. I find this approach helps to minimize errors.
TIP: The VCF installer may show errors during the installation and validation processes. I ensure the ESX hostname case matches how it is registered in DNS. Example – Hostname vcf111.nested.local doesn’t equal VCF111.nested.local.

6) With my ESX Hostnames confirmed in DNS, I need to update their self-signed certificates. See the following URL’s.
- KB: VCF Installer fails to add hosts during deployment due to hostname mismatch with subject alternative name
- DOCS: Regenerate the Self-Signed Certificate on ESX Hosts
- NOTE: Make sure you reboot your host via the DCUI and not via command line. I noted that after I regenerated the self-signed certificate I rebooted the host via command line. This caused the regenerated certificate to not take. If I rebooted the host via the DCUI the new certificate would take.
7) The VCF Installer 9.0.1 has some extra features to allow non-vSAN certified disks to pass the validation section. However, nested hosts will fail the HCL checks. Simply add the line below to the /etc/vmware/vcf/domainmanager/application-prod.properties and then restart the SDDC Domain Manager services with the command: systemctl restart domainmanager
This allows me Acknowledge the errors and move the deployment forward.

Installing VCF 9 with the VCF Installer
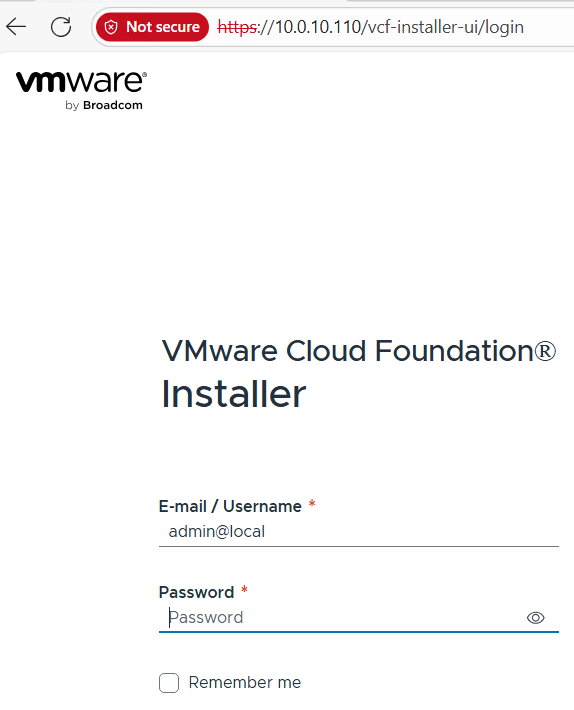
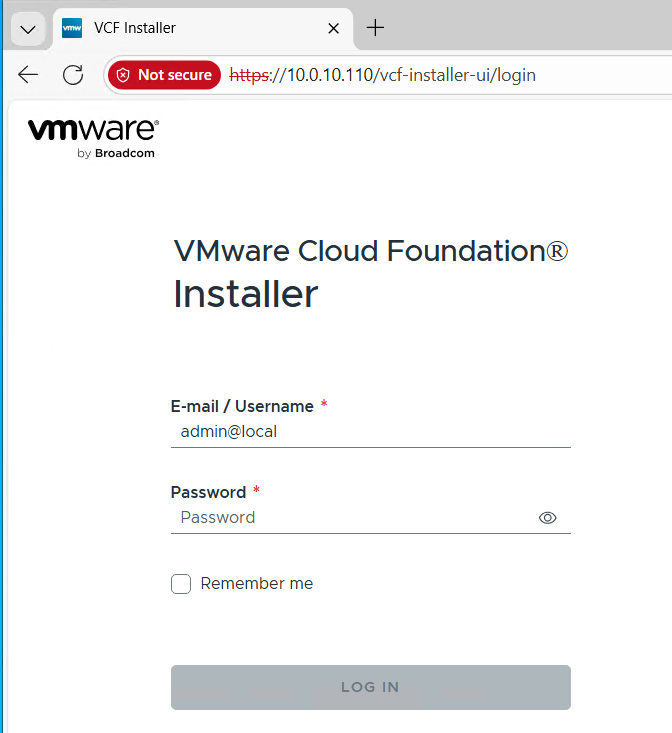
I log into the VCF Installer.
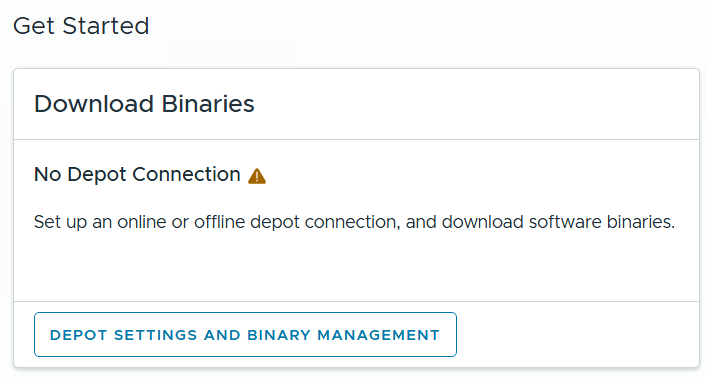
I click on ‘Depot Settings and Binary Management’
I click on ‘Configure’ under Offline Depot and then click Configure.
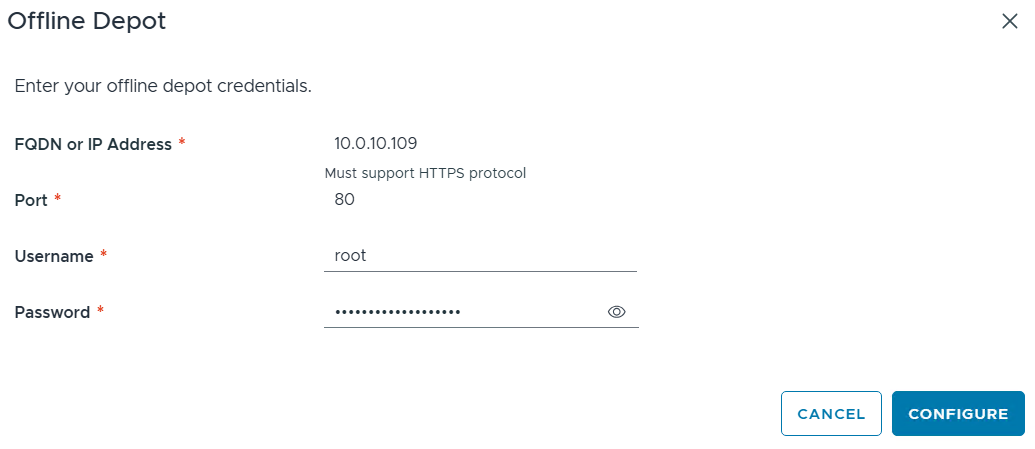
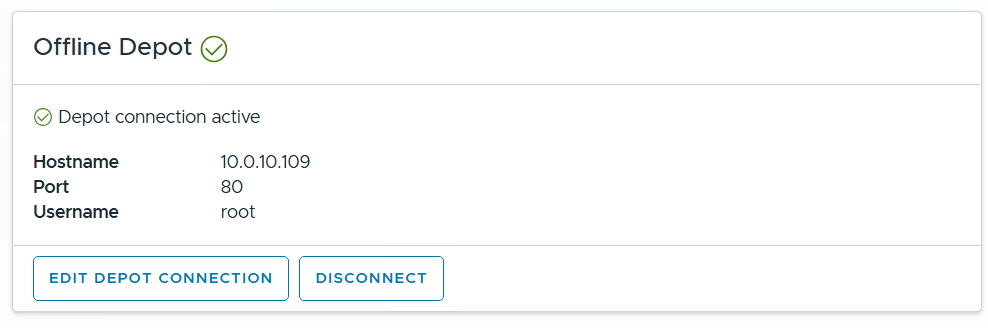
I confirm the Offline Depot Connection if active.
I chose ‘9.0.1.0’ next to version, select all except for VMware Cloud Automation, then click on Download.
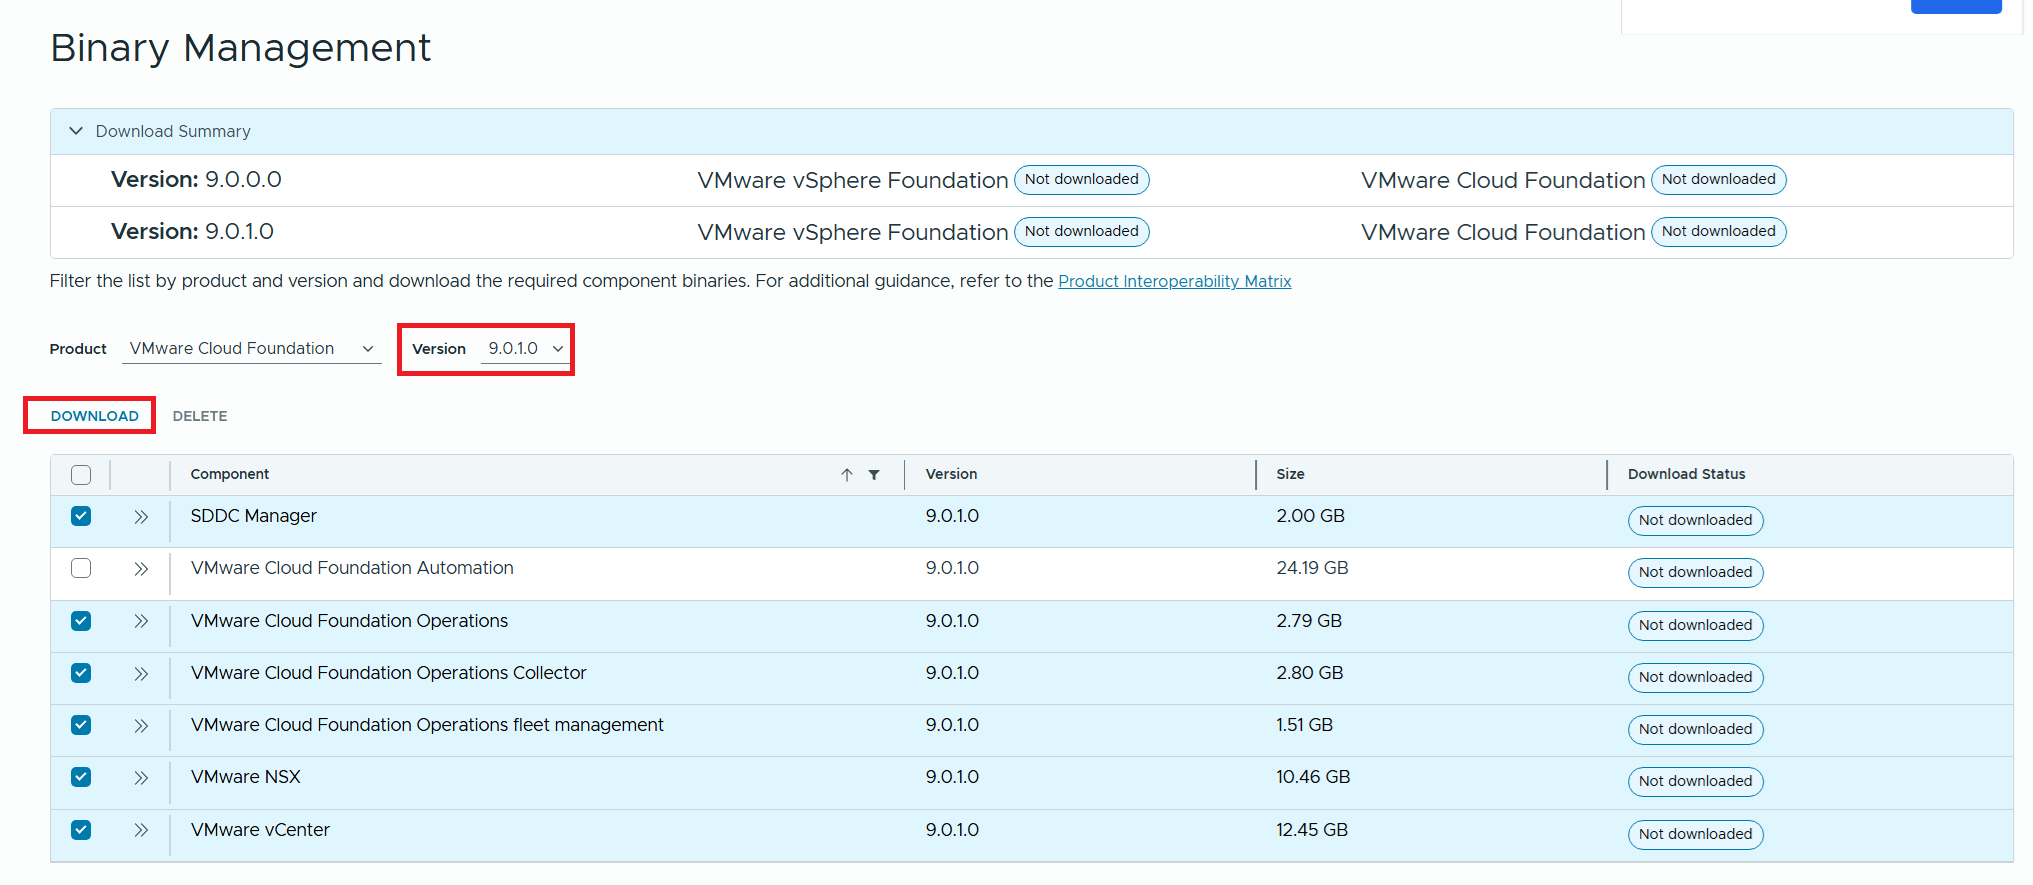
Allow the downloads to complete.

All selected components should state “Success” and the Download Summary for VCF should state “Partially Downloaded” when they are finished.

Click return home and choose VCF under Deployment Wizard.
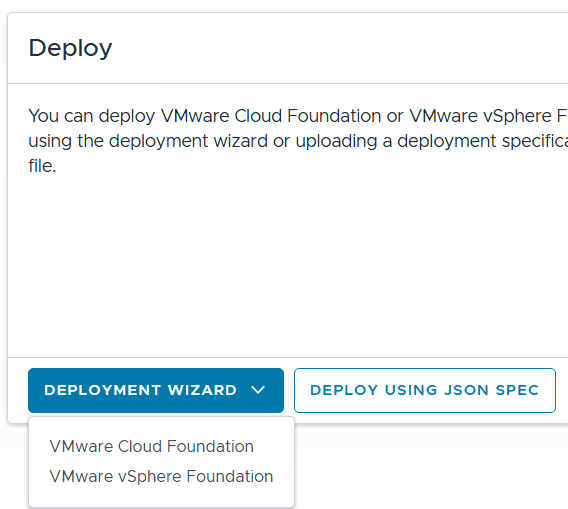
This is my first deployment so I’ll choose ‘Deploy a new VCF Fleet’

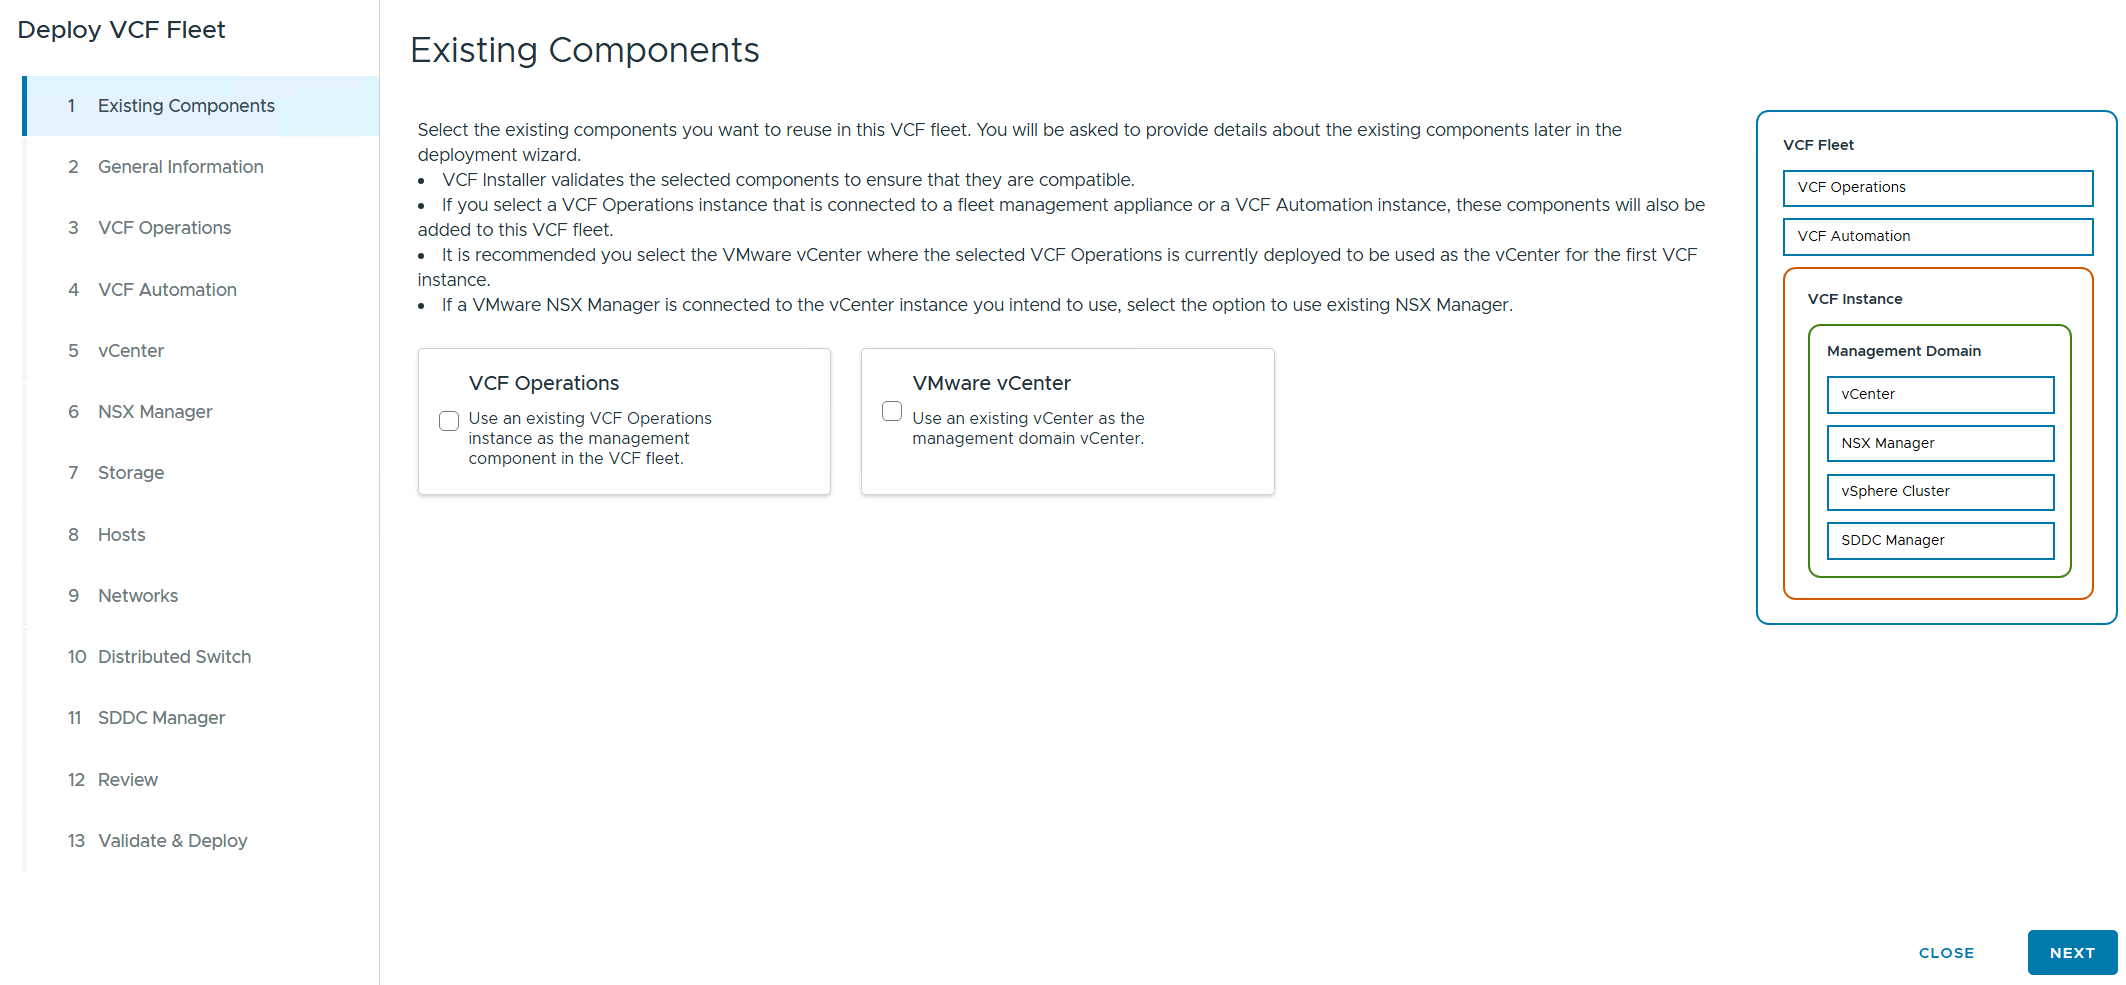
The Deploy VCF Fleet Wizard starts and I’ll input all the information for my deployment.
For Existing Components I simply choose next as I don’t have any.
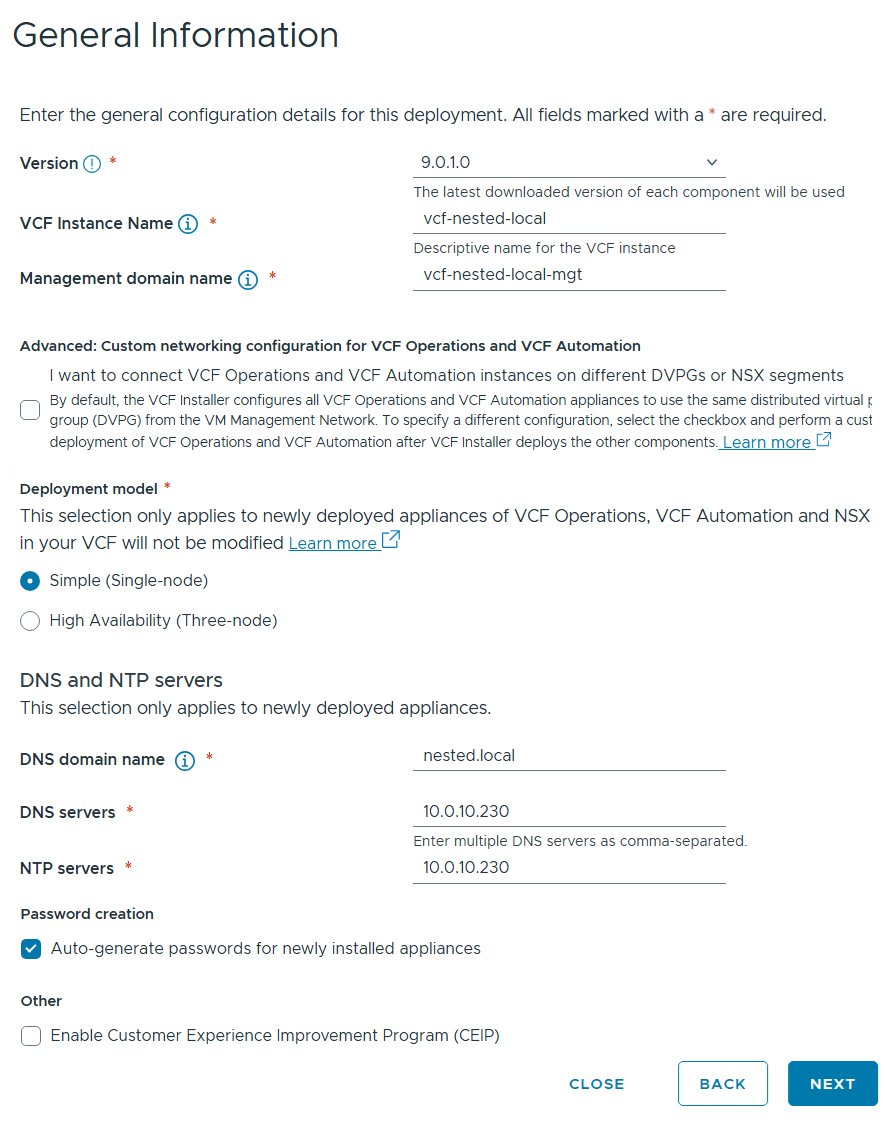
I filled in the following information around my environment, choose simple deployment and clicked on next.
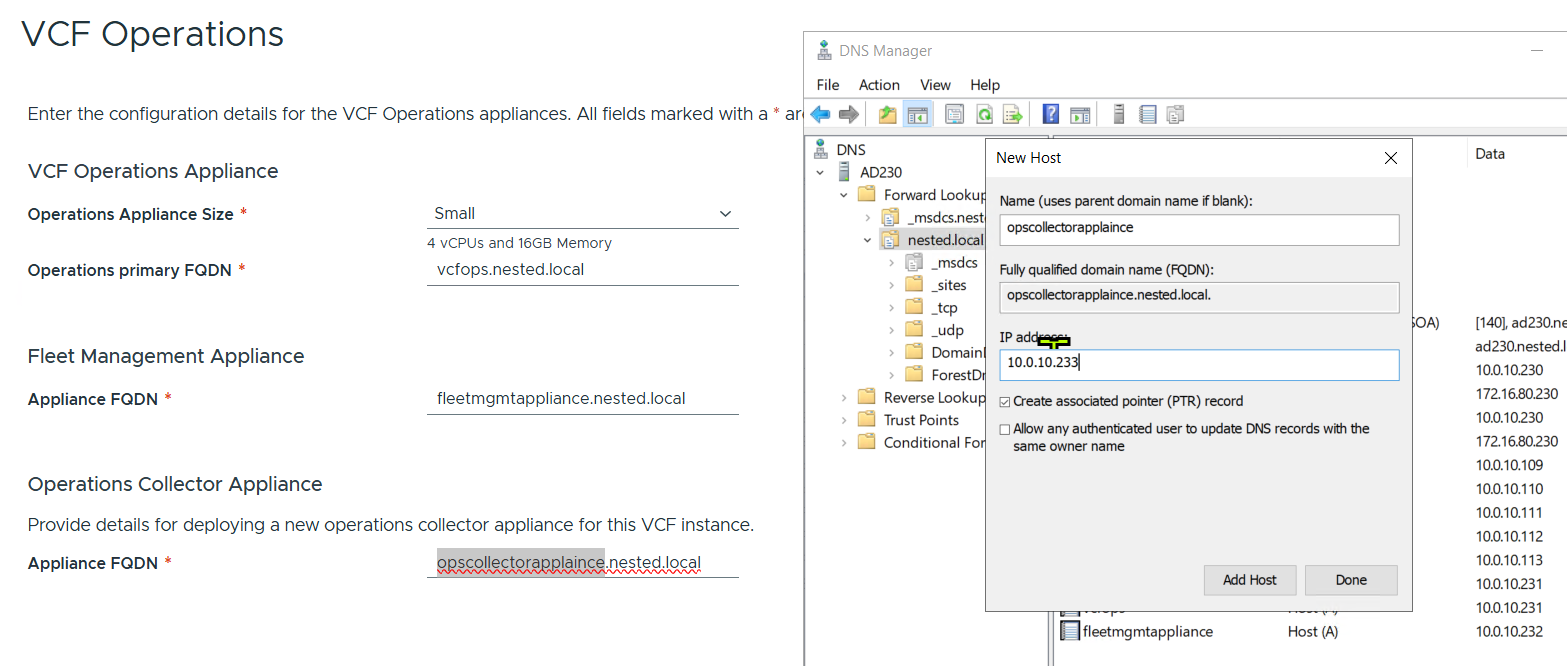
I filled out the VCF Operations information and created their DNS records. Once complete I clicked on next.
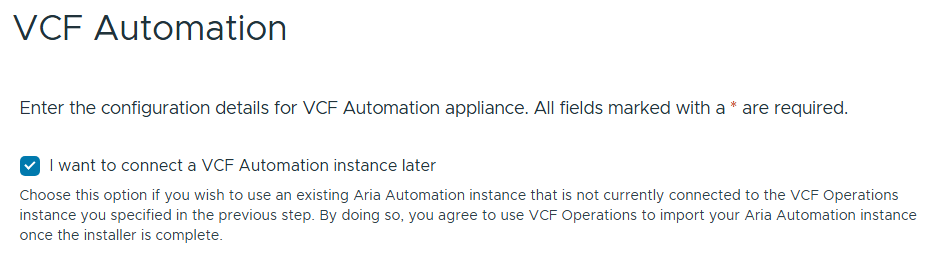
I chose to “I want to connect a VCF Automation instance later” can chose next.
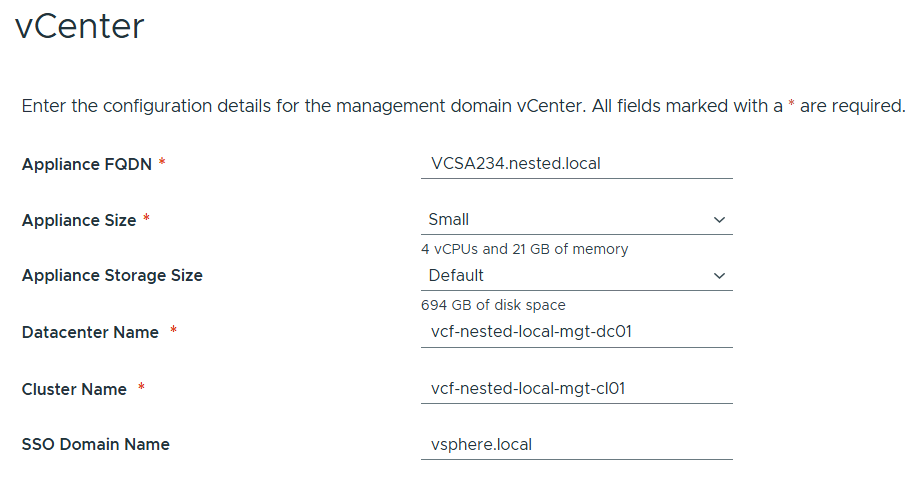
Filled out the information for vCenter
Entered the details for NSX Manager.

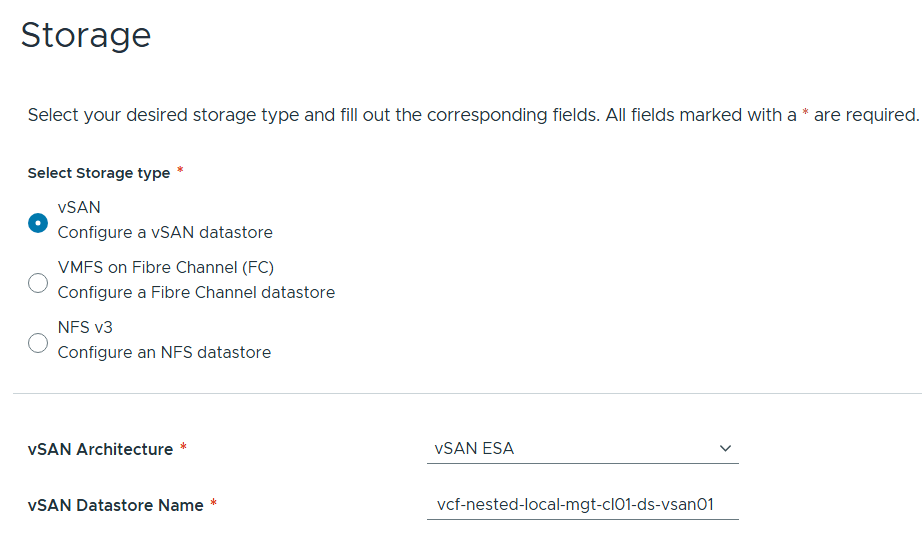
Left the storage items as default.
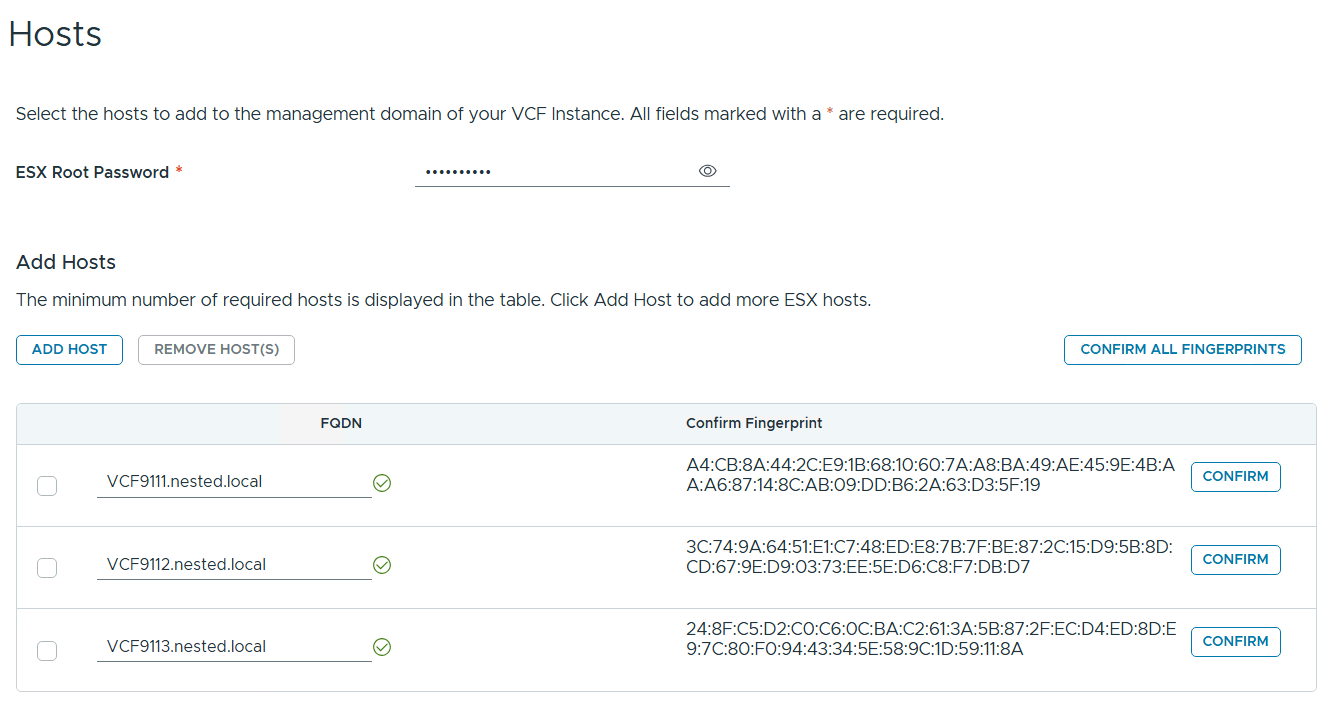
Added in my 3 x ESX 9 Hosts, confirmed all fingerprints, and clicked on next.
Note: if you skipped the Pre-requisite for the self-signed host certificates, you may want to go back and update it before proceeding with this step.
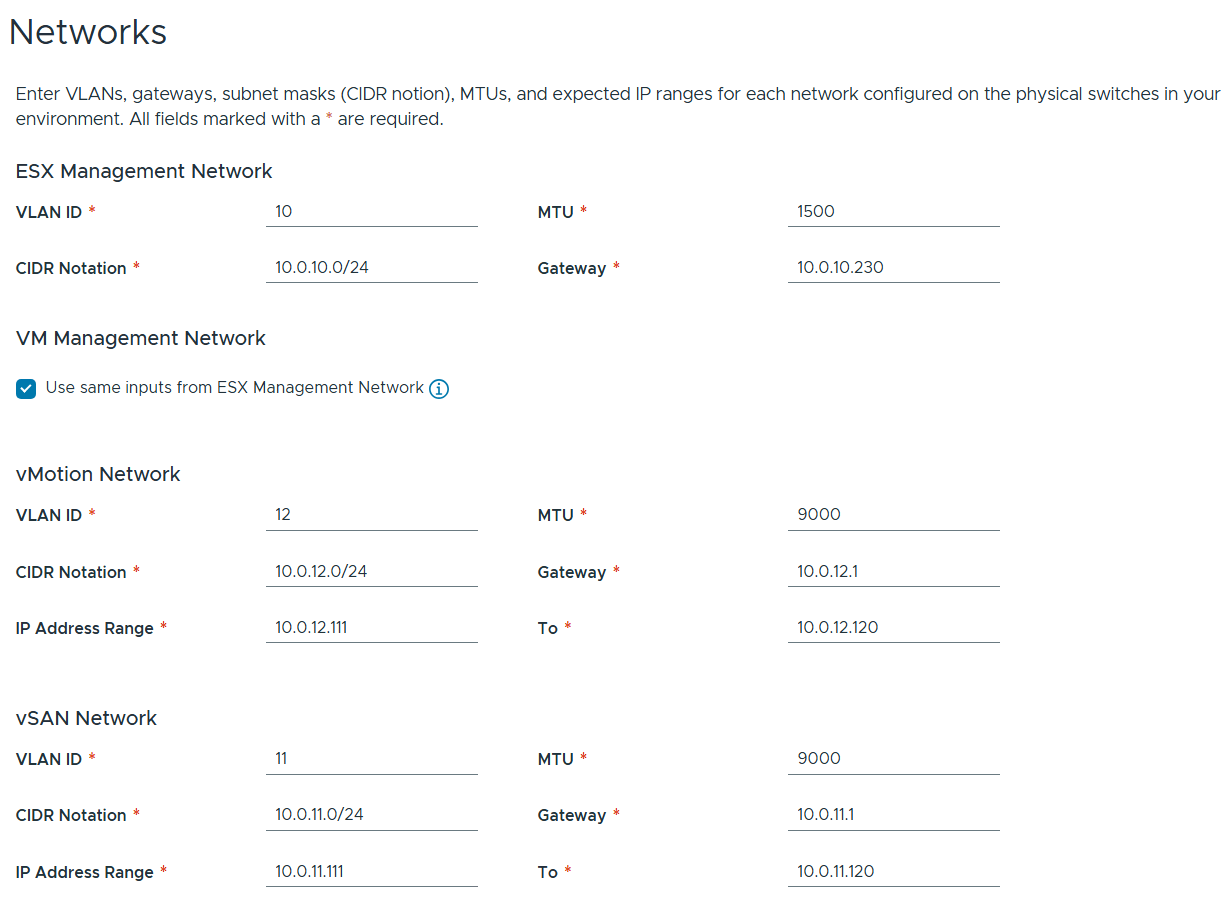
Filled out the network information based on our VLAN plan.
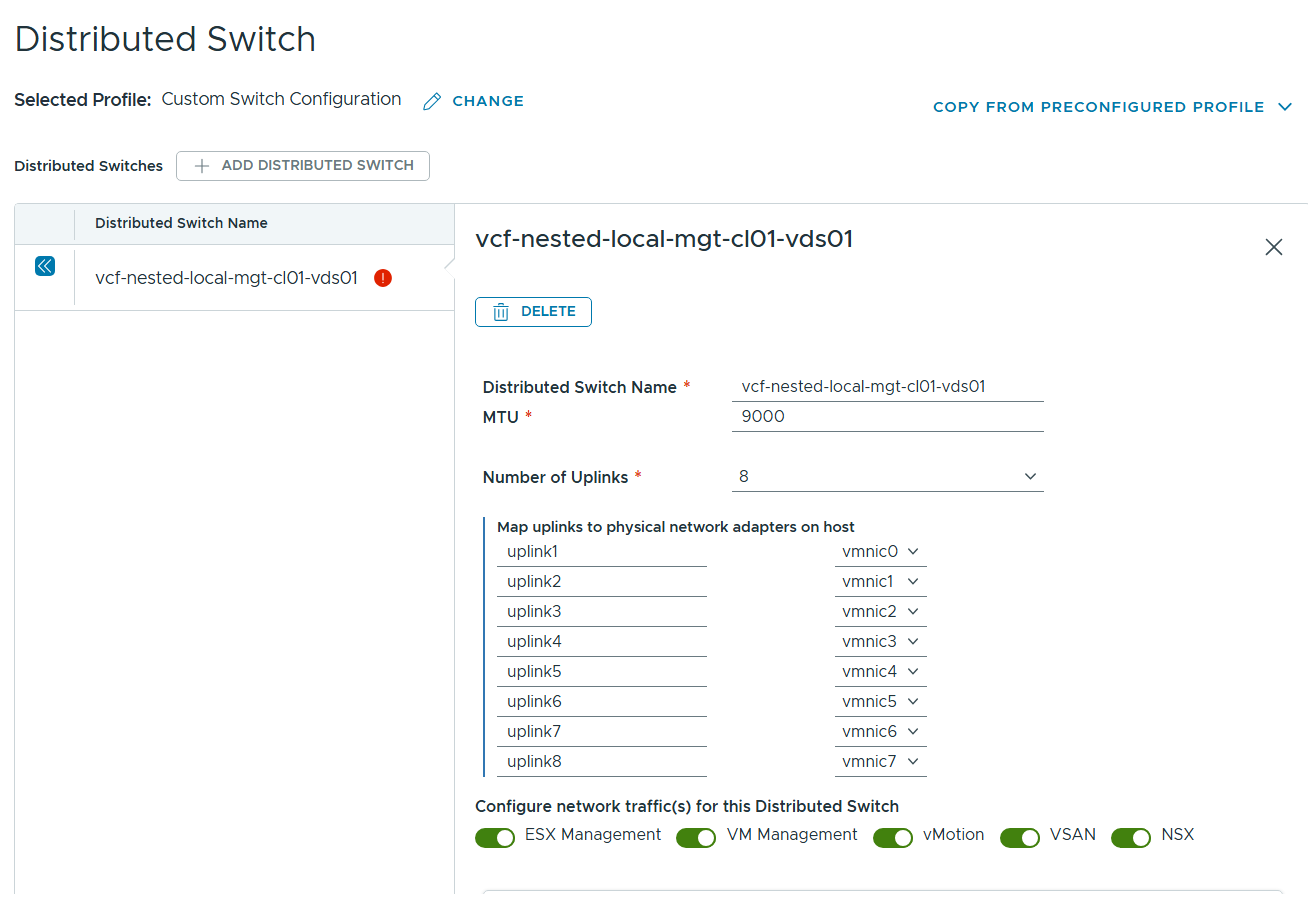
For Distributed Switch click on ‘Select’ under ‘Custom Switch Configuration’
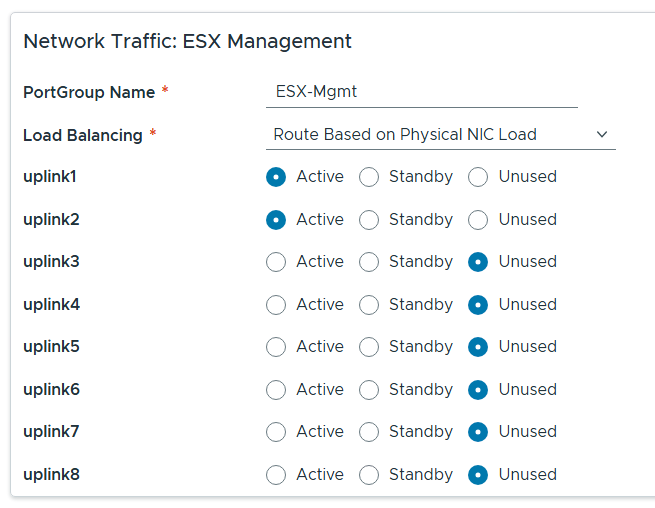
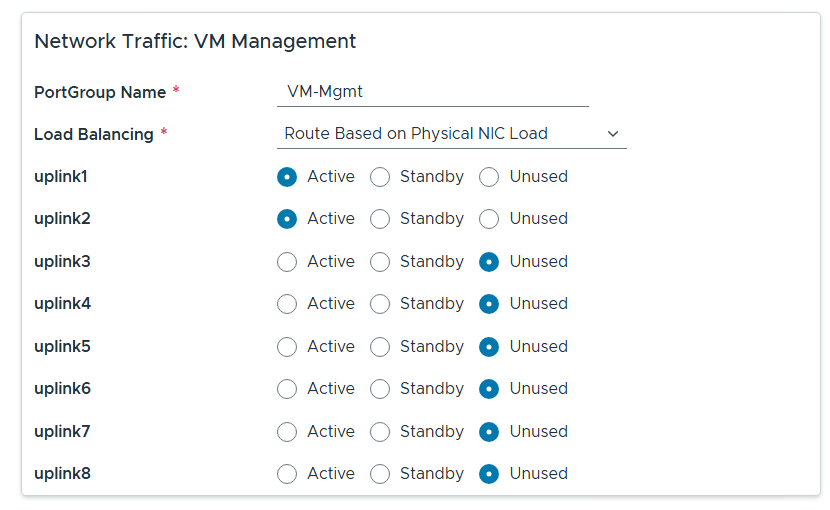
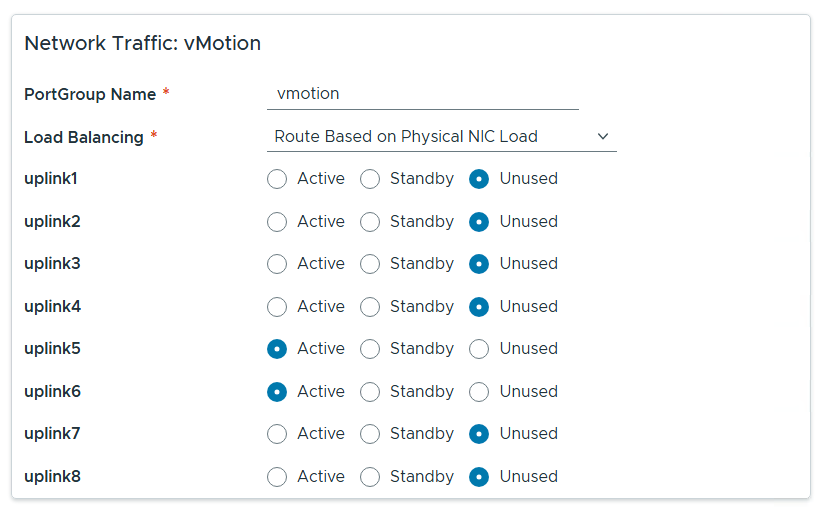
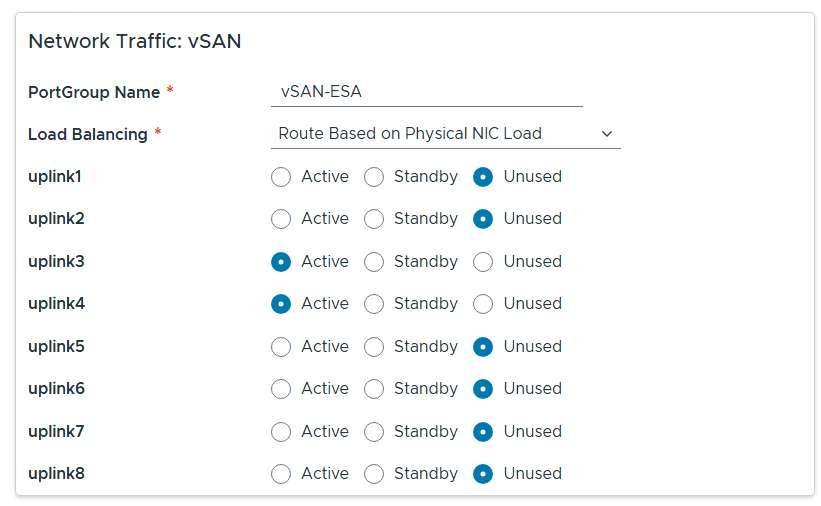
Click on the vDS Switch name. Put in MTU 9000, change uplinks to 8 and chose all switches for ‘Configure network traffic(s) for this Distributed Switch, then scroll down.
Rename each port group, set load balancing to ‘Route based on Physical NIC load’, select the correct uplinks as active, select the correct uplinks ad unused.
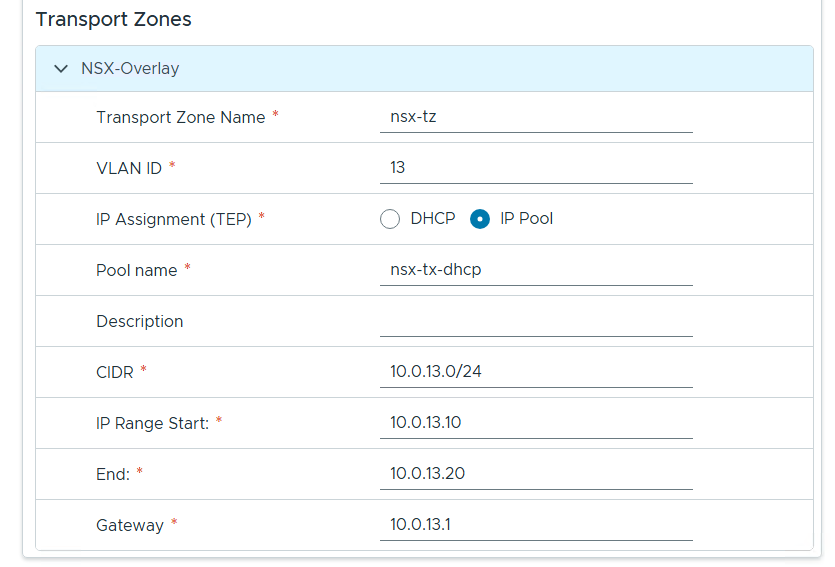
Configure NSX as follows.

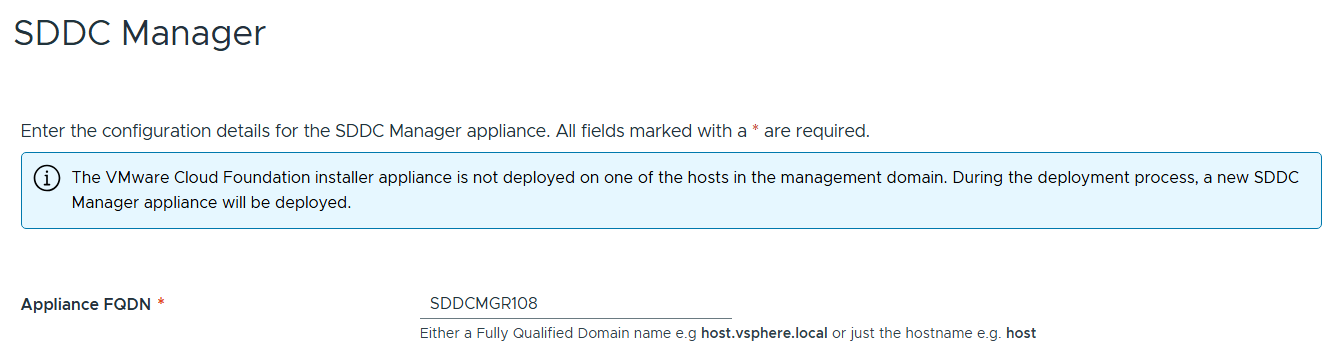
Entered the name of the new SDDC Manager and updated it’s name in DNS, then clicked on next.
Reviewed the deployment information and chose next.
TIP – Download this information as a JSON Spec, can save you a lot of typing if you have to deploy again.
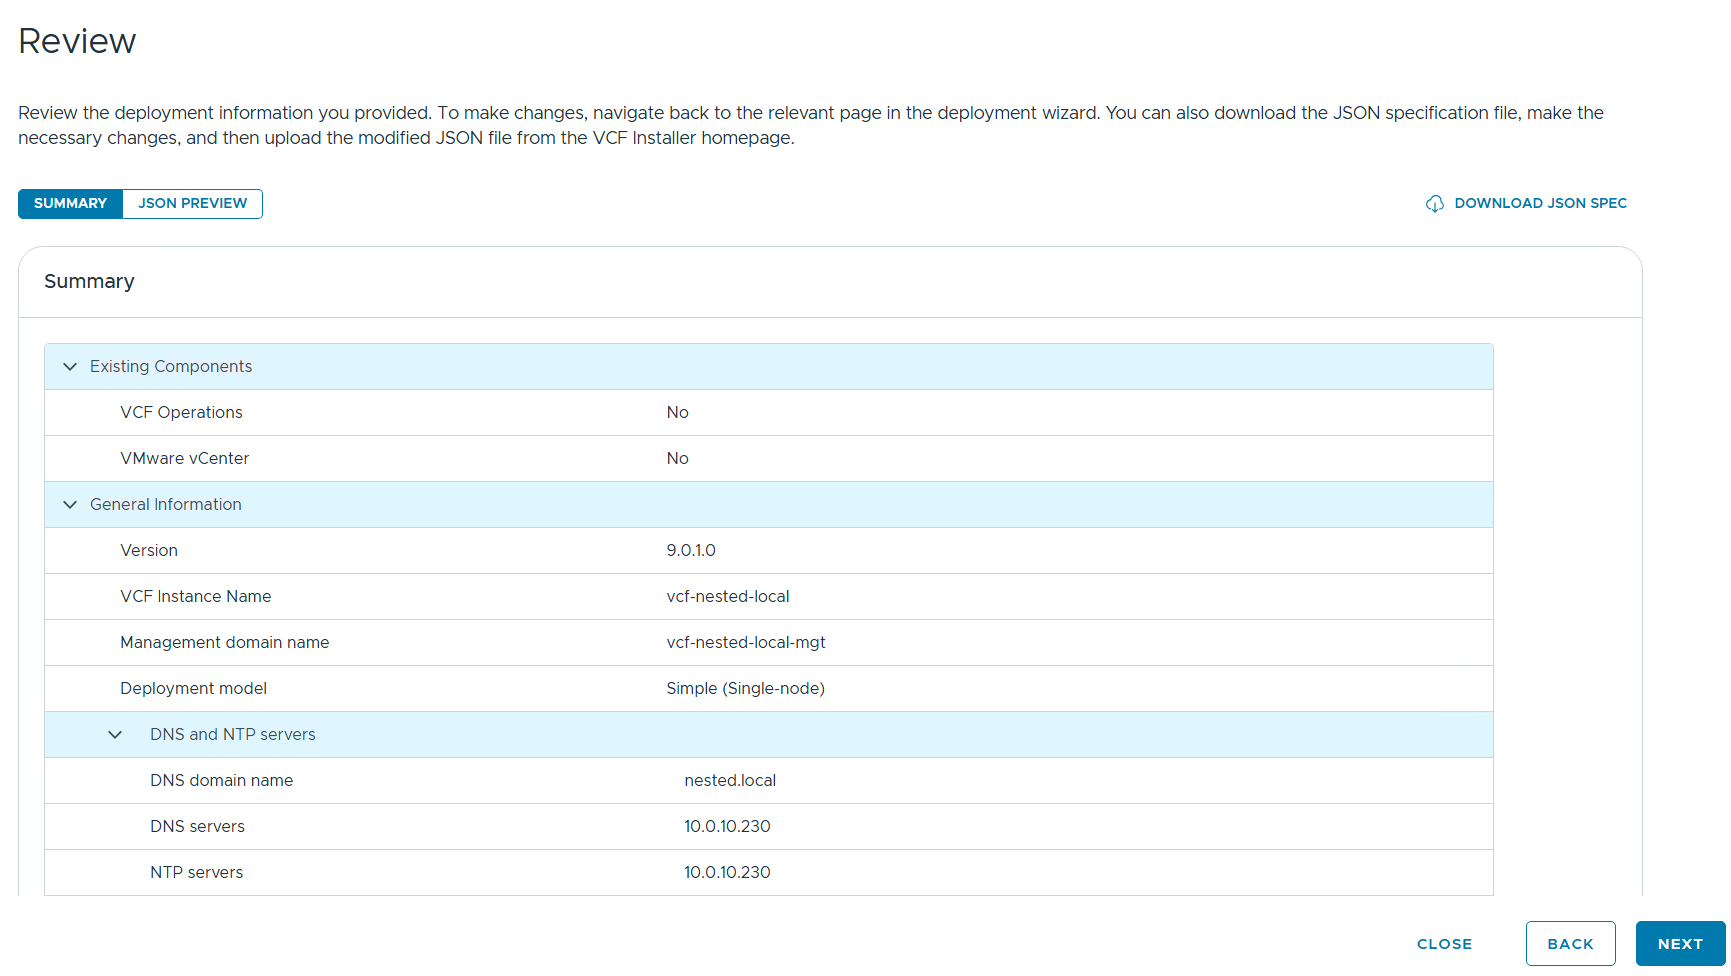
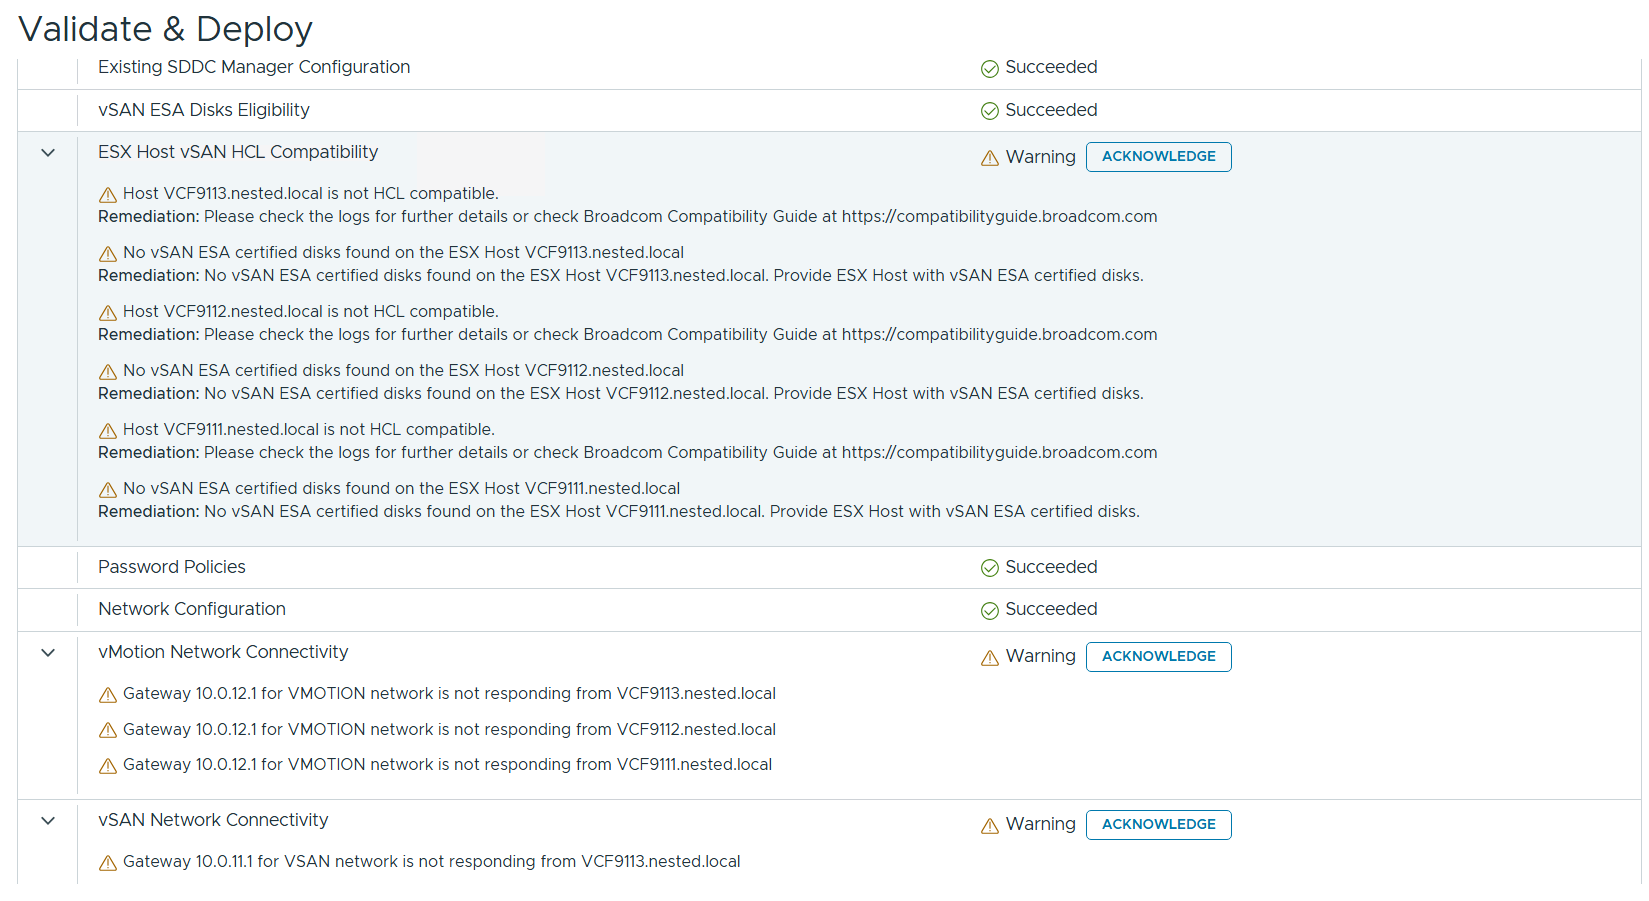
Allow it to validate the deployment information.

I reviewed the validation warnings, at the top click on “Acknowledge all Warnings” and click ‘DEPLOY’ to move to the next step.

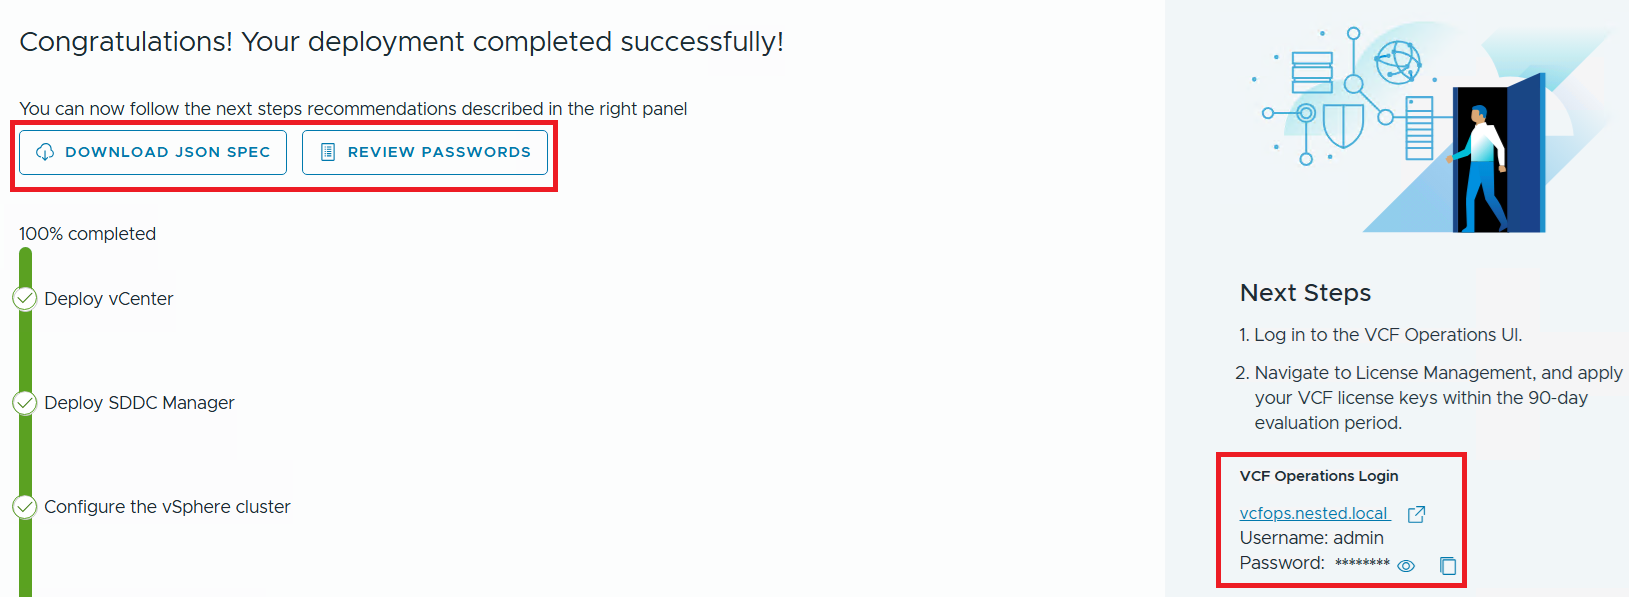
Allow the deployment to complete.
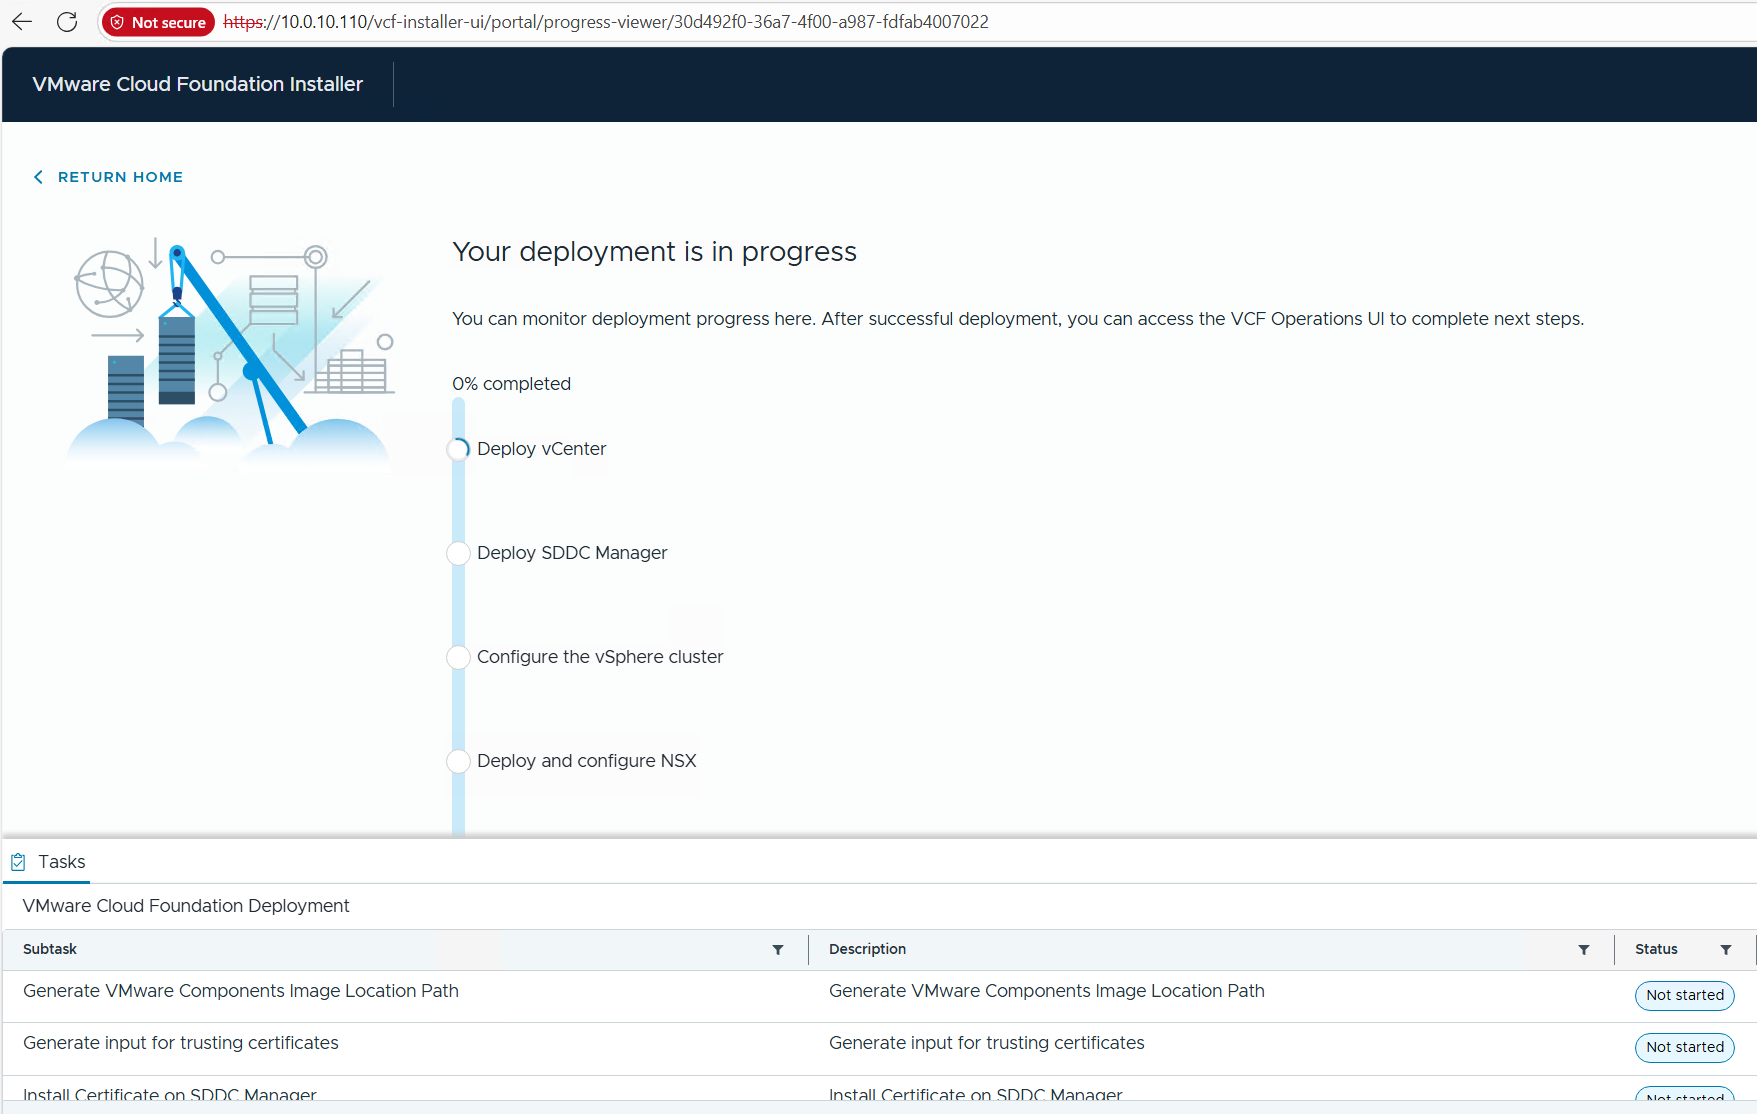
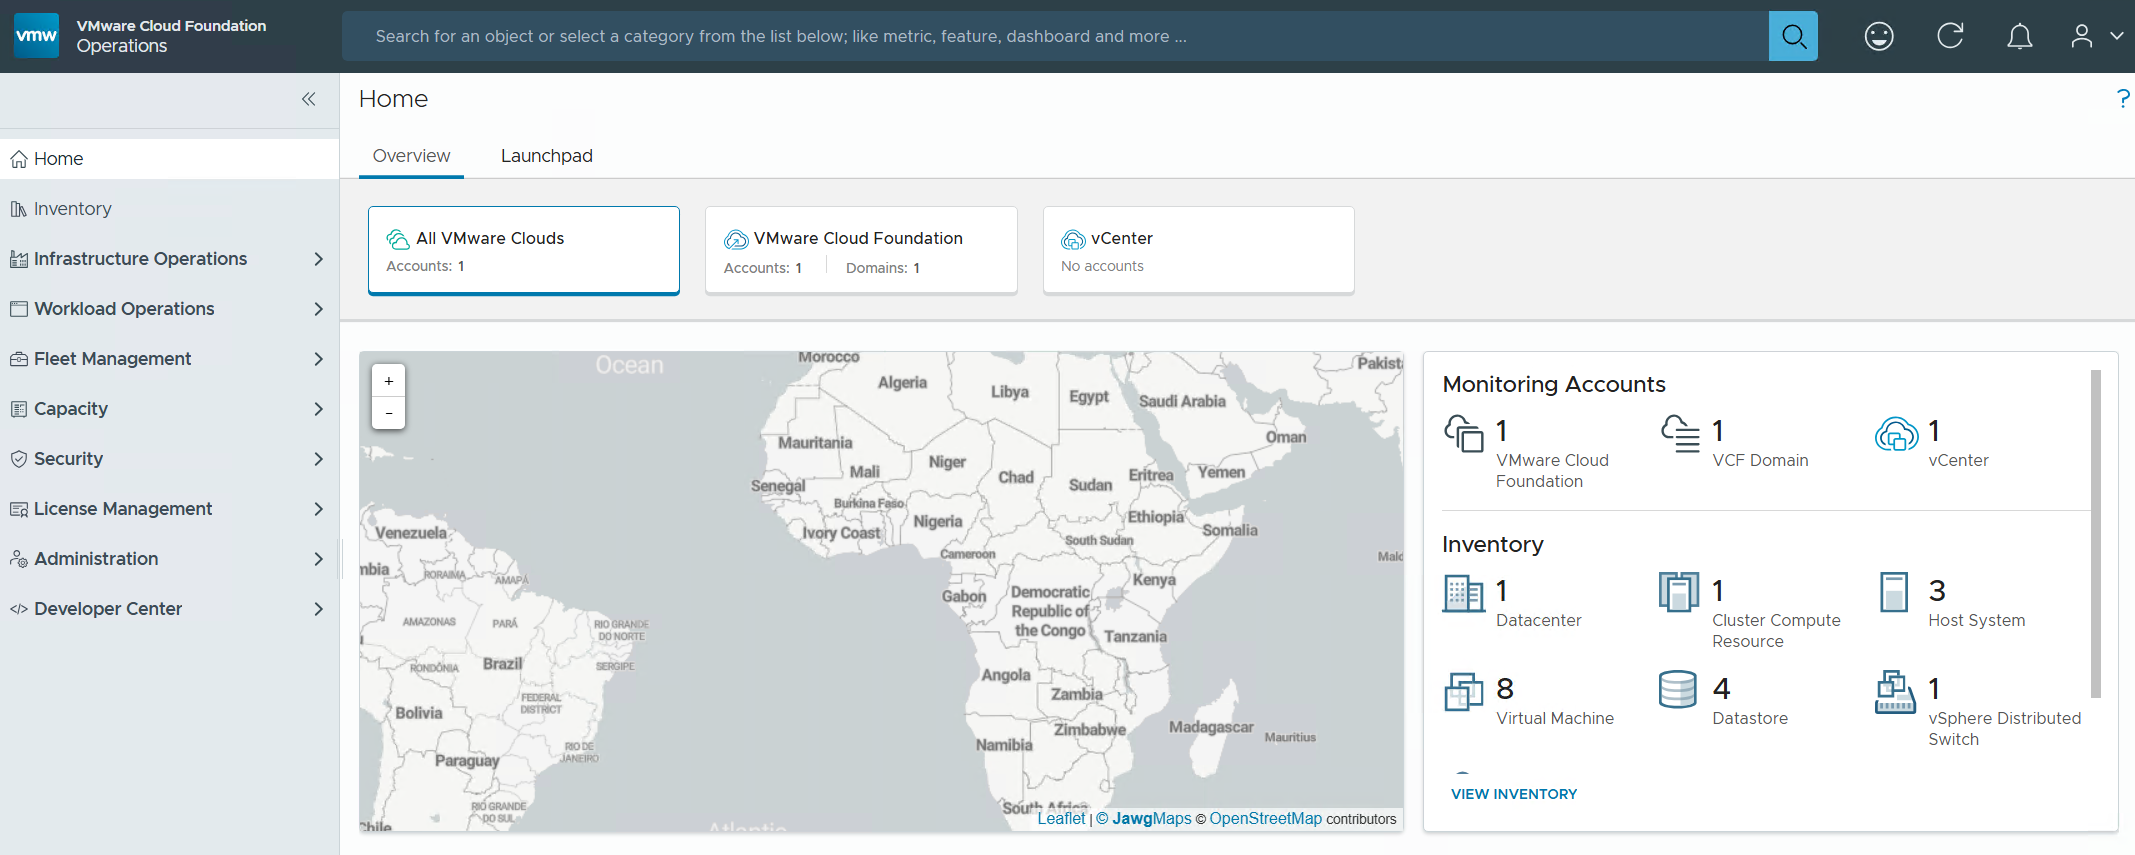
Once completed, I download the JSON SPEC, Review and document the passwords, (Fig-1) and then log into VCF Operations. (Fig-2)
(Fig-1)
(Fig-2)
Now that I have a VCF 9.0.1 deployment complete I can move on to Day N tasks. Thanks for reading and reach out if you have any questions.
VMware Workstation Gen 9: Part 6 VCF Offline Depot
To deploy VCF 9 the VCF Installer needs access to the VCF installation media or binaries. This is done by enabling Depot Options in the VCF Installer. For users to move to the next part, they will need to complete this step using resources available to them. In this blog article I’m going to supply some resources to help users perform these functions.
Why only supply resources? When it comes to downloading and accessing VCF 9 installation media, as a Broadcom/VMware employee, we are not granted the same access as users. I have an internal process to access the installation media. These processes are not publicly available nor would they be helpful to users. This is why I’m supplying information and resources to help users through this step.
What are the Depot choices in the VCF Installer?
Users have 2 options. 1) Connect to an online depot or 2) Off Line Depot

What are the requirements for the 2 Depot options?
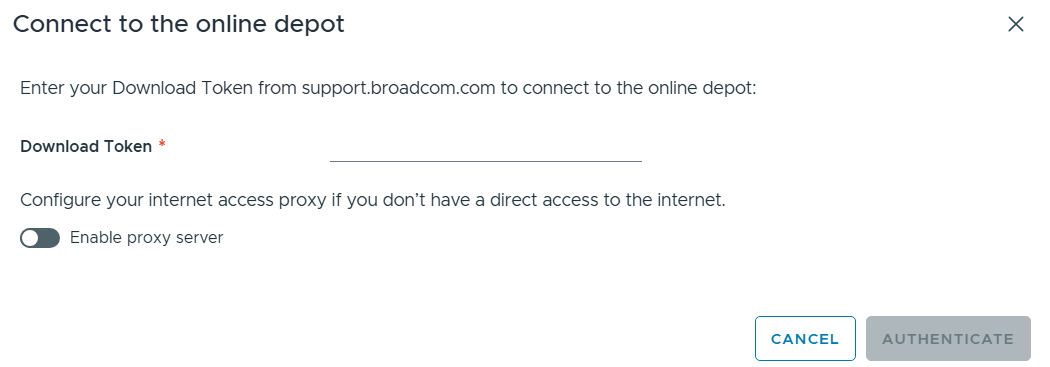
1) Connect to an online depot — Users need to have an entitled support.broadcom.com account and a download token. Once their token is authenticated they are enabled to download.
See These URL’s for more information:
2) Offline Depot -The VCF 9 Offline Depot Tool (also known as the VCF Download Tool or VCFDT) is a specialized utility designed for VMware Cloud Foundation 9.0 to enable the deployment, patching, and upgrading of private cloud environments in air-gapped (disconnected) or restricted environments. It acts as an internal mirror of the official Broadcom online depot, allowing administrators to host necessary software binaries and metadata locally.
This option may be more common for users building out Home labs.
I’ll be using the Offline Depot method to download my binaries and in the next part I’ll be deploying VCF 9.0.1.
Where is the Offline Depot tool located?
Go to support.broadcom.com > My Downloads > VMware > Search for Cloud Foundation. Find your version of Cloud foundation and then click on ‘Drivers and Tools’

See these URLs for more information:
- Set Up an Offline Depot Web Server for VMware Cloud Foundation
- Set Up an Offline Depot Web Server for VMware Cloud Foundation << Use this method if you want to setup https on the Photon OS.
- How to deploy VVF/VCF 9.0 using VMUG Advantage & VCP-VCF Certification Entitlement
- Setting up a VCF 9.0 Offline Depot
VMware Workstation Gen 9: Part 5 Deploying the VCF Installer with VLANs
The VCF Installer (aka SDDC Manager Appliance) is the appliance that will allow me to deploy VCF on to my newly created ESX hosts. The VCF Installer can be deployed on to a ESX Host or directly on Workstation. There are a couple of challenges with this deployment in my Home lab and in this blog post I’ll cover how I overcame this. It should be noted, the modifications below are strictly for my home lab use.
Challenge 1: VLAN Support
By default the VCF Installer doesn’t support VLANS. It’s a funny quandary as VCF 9 requires VLANS. Most production environments will allow you to deploy the VCF Installer and be able to route to a vSphere environment. However, my Workstation Home Lab uses LAN Segments which are local to Workstation. To communicate over LAN Segments all VMs must have a VLAN ID. To overcome this issue I’ll need to add VLAN support to the VCF Installer.
Challenge 2: Size Requirements
The installer takes up a massive 400+ GB of disk space, 16GB of RAM, and 4 vCPUs. The current configuration of my ESX hosts don’t have a datastore large enough to deploy it to, plus vSAN is not set up. To overcome this issue I’ll need to deploy it as a Workstation VM and attach it to the correct LAN Segment.
In the steps below I’ll show you how I added a VLAN to the VCF Installer, deployed it directly on Workstation, and ensure it’s communicating with my ESX Hosts.
Deploy the VCF Installer
Download the VCF Installer OVA and place the file in a location where Workstation can access it.
In Workstation click on File > Open. Choose the location of your OVA file and click open.
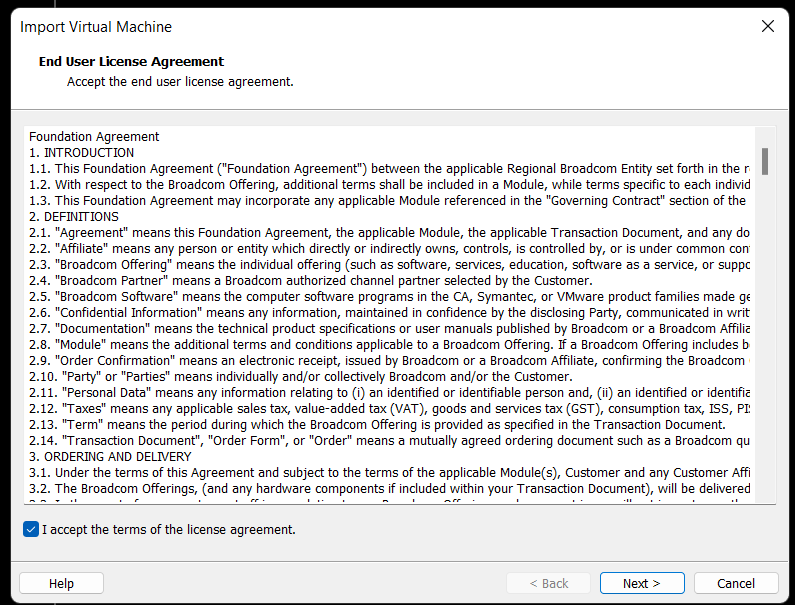
Check the Accept box > Next
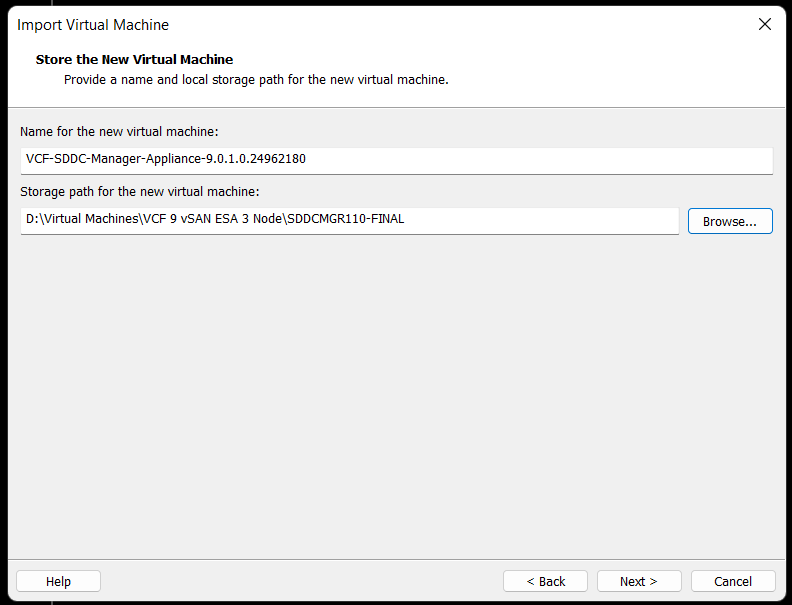
Choose your location for the VCF Installer Appliance to be deployed. Additionally, you can change the name of the VM. Then click Next.
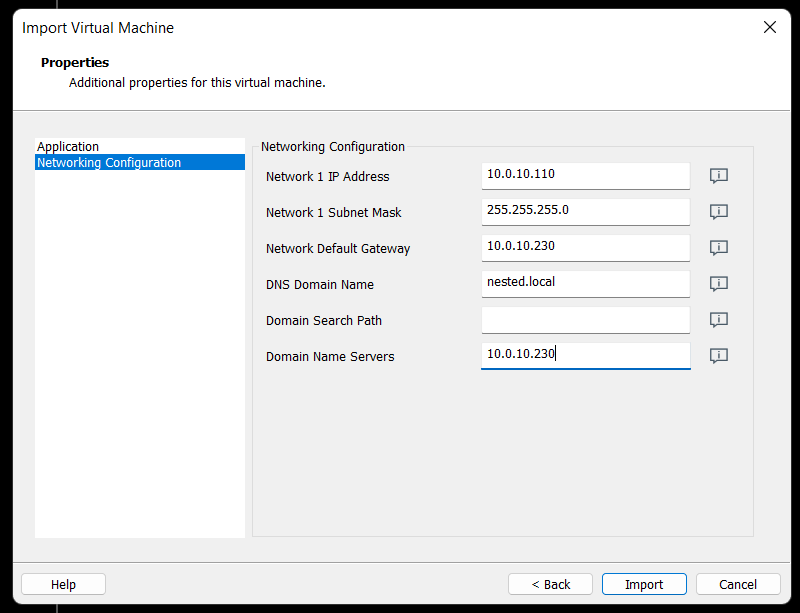
Fill in the passwords, hostname, and NTP Server. Do not click on Import at this time. Click on ‘Network Configuration’.

Enter the network configuration and click on import.
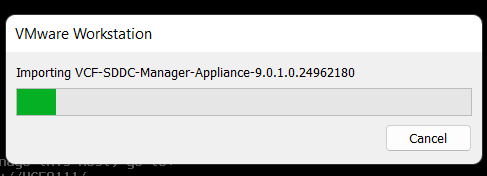
Allow the import to complete.
Allow the VM to boot.

Change the VCF Installer Network Adapter Settings to match the correct LAN Segment. In this case I choose 10 VLAN Management.

Enable VLAN support in the VCF Installer
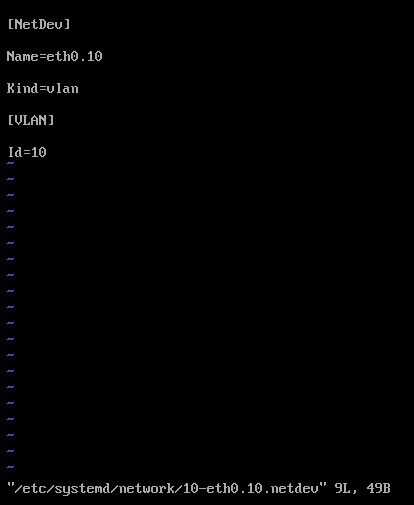
1) Login as root and create the following file.

vi /etc/systemd/network/10-eth0.10.netdev
Press Insert the add the following
[NetDev]
Name=eth0.10
Kind=vlan
[VLAN]
Id=10
Press Escape, Press :, Enter wq! and press enter to save
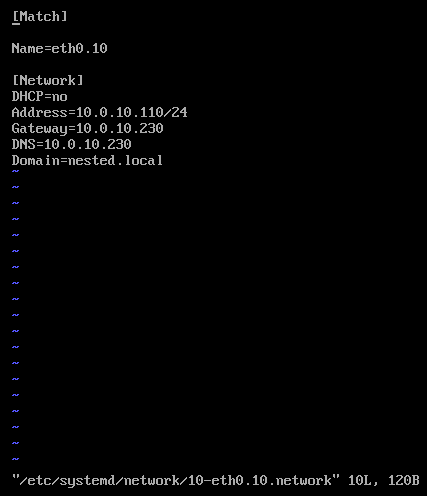
2) Create the following file.
vi /etc/systemd/network/10-eth0.10.network
Press insert and add the following
[Match]
Name=eth0.10
[Network]
DHCP=no
Address=10.0.10.110/24
Gateway=10.0.10.230
DNS=10.0.10.230
Domain=nested.local
Press Escape, Press :, Enter wq! and press enter to save
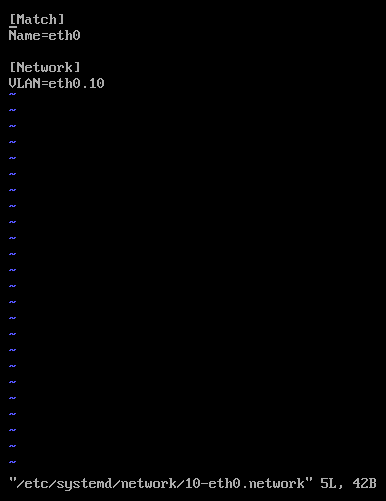
3) Modify the original network file
vi /etc/systemd/network/10-eth0.network
Press Escape, Press Insert, and remove the static IP address configuration and change the configuration as following:
[Match]
Name=eth0
[Network]
VLAN=eth0.10
Press Escape, Press :, Enter wq! and press enter to save
4) Update the permissions to the newly created files
chmod 644 /etc/systemd/network/10-eth0.10.netdev
chmod 644 /etc/systemd/network/10-eth0.10.network
chmod 644 /etc/systemd/network/10-eth0.network
5) Restart services or restart the vm.
systemctl restart systemd-networkd
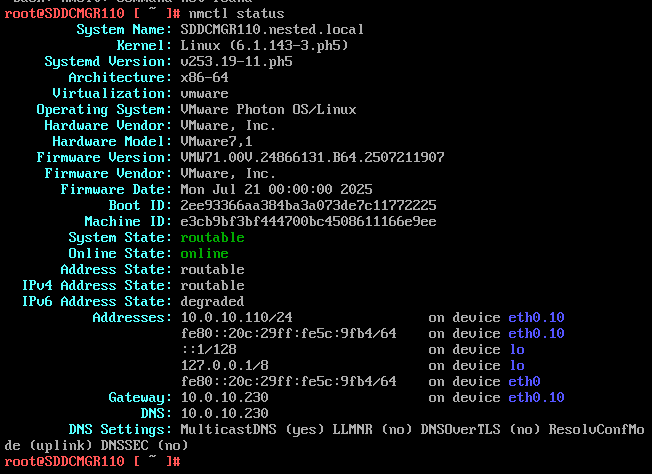
6) Check the network status of the newly created network eth0.10
nmctl status
7) Do a ping test from the VCF Installer appliance.
Note – The firewall needs to be adjusted to allow other devices to ping the VCF Installer appliance.
Ping 10.0.10.230
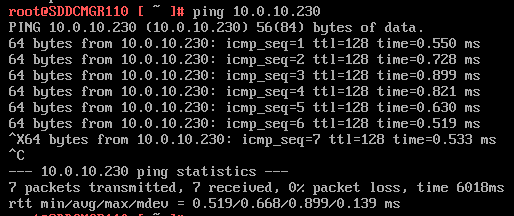
Next I do ping to an internet location to confirm this appliance can route to the internet.

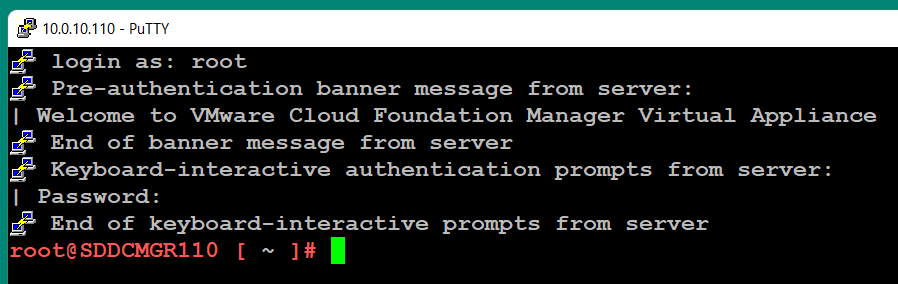
8) Allow SSH access to the VCF Installer Appliance
Follow this BLOG to allow SSH Access.
From the Windows AD server or other device on the same network, putty into the VCF Installer Appliance.
Adjust the VCF Installer Firewall to allow inbound traffic to the new adapter
Note – Might be a good time to make a snapshot of this VM.
1) From SSH check the firewall rules for the VCF Installer with the following command.
iptables -L –verbose –line-numbers
From this output I can see that eth0 is set up to allow access to https, ping, and other services. However, there are no rules for the eth0.10 adapter. I’ll need to adjust the firewall to allow this traffic.
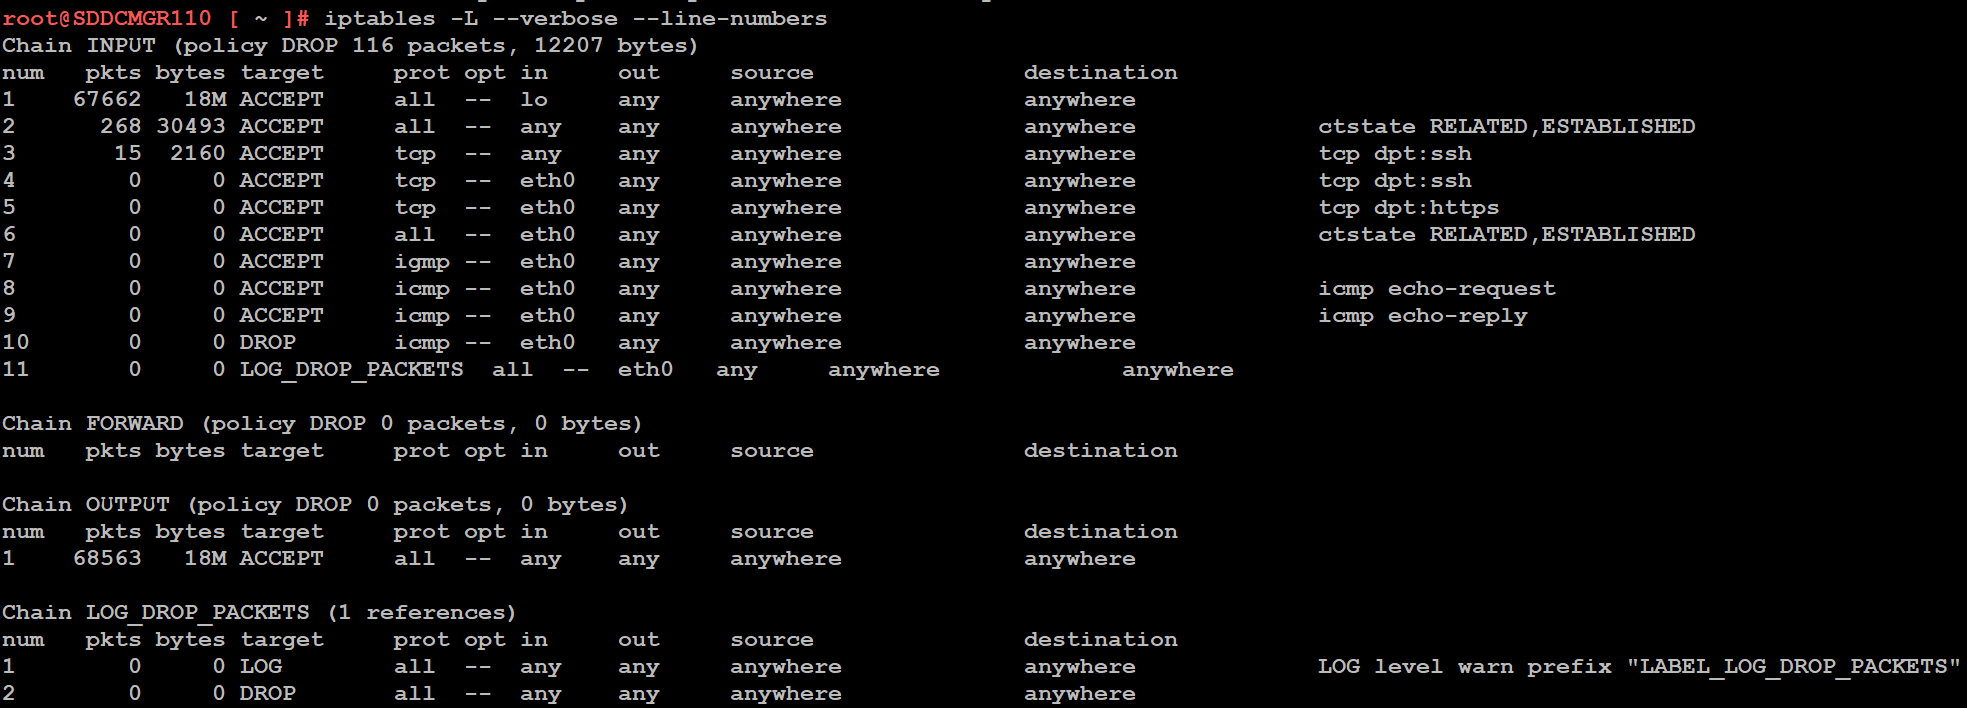
Next I insert a new rule allowing all traffic to flow through e0.10 and check the rule list.
iptables -I INPUT 4 -i eth0.10 -j ACCEPT

The firewall rules are not static. To make the current firewall rules stay static I need to save the rules.
Save Config Commands

Restart and make sure you can now access the VCF Installer webpage, and I do a ping test again just to be sure.
Now that I got VCF Installer installed and working on VLANs I’m now ready to deploy the VCF Offline Depot tool into my environment and in my next blog post I’ll do just that.
VMware Workstation Gen 9 Part 4 ESX Host Deployment and initial configuration
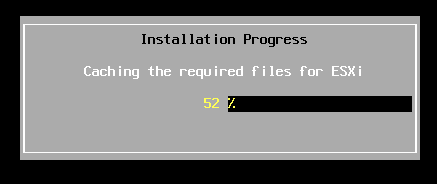
Now that I created 3 ESX hosts from templates it is time to install ESX. To do this I simply power on the Hosts and follow the prompts. The only requirement at this point is my Windows Server and Core Services be up and functional. In this blog we’ll complete the installation of ESX.
Choose a host then click on “Power on this virtual machine”.
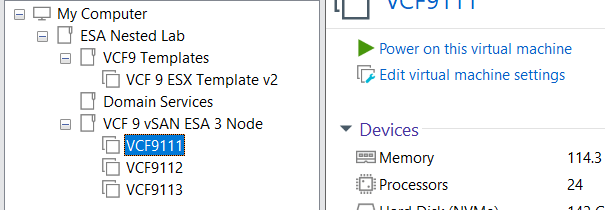
The host should boot to the ESX ISO I choose when I created my template.
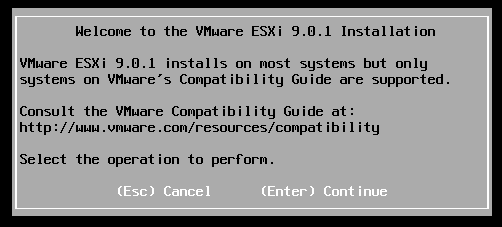
Choose Enter to Continue
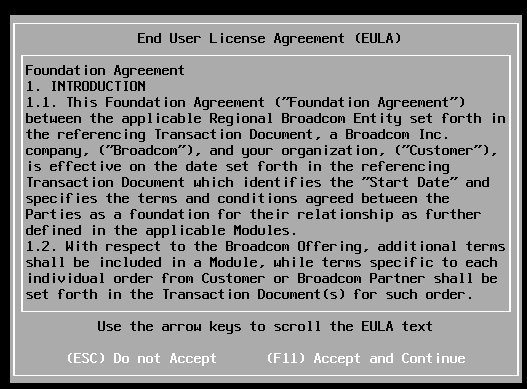
Choose F11 to Accept and Continue
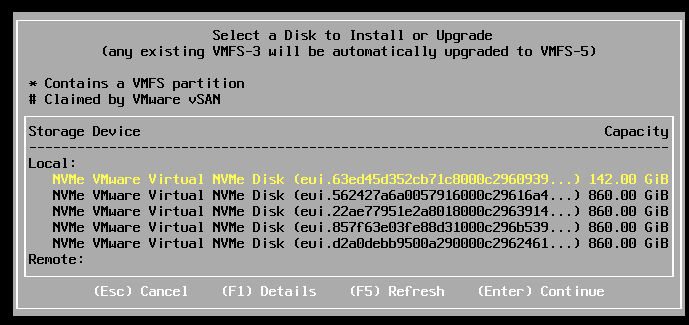
If the correct boot disk is selected, press Enter to continue.
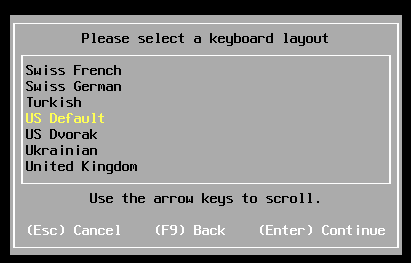
Choose pressed enter to accept the US Default keyboard layout
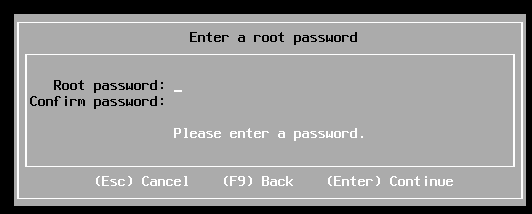
Entered a root password and pressed enter.
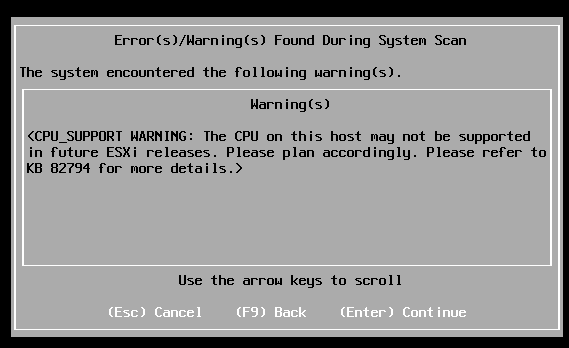
Pressed enter at the warning of CPU support.
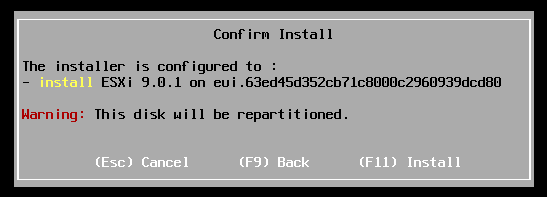
Pushed F11 to install
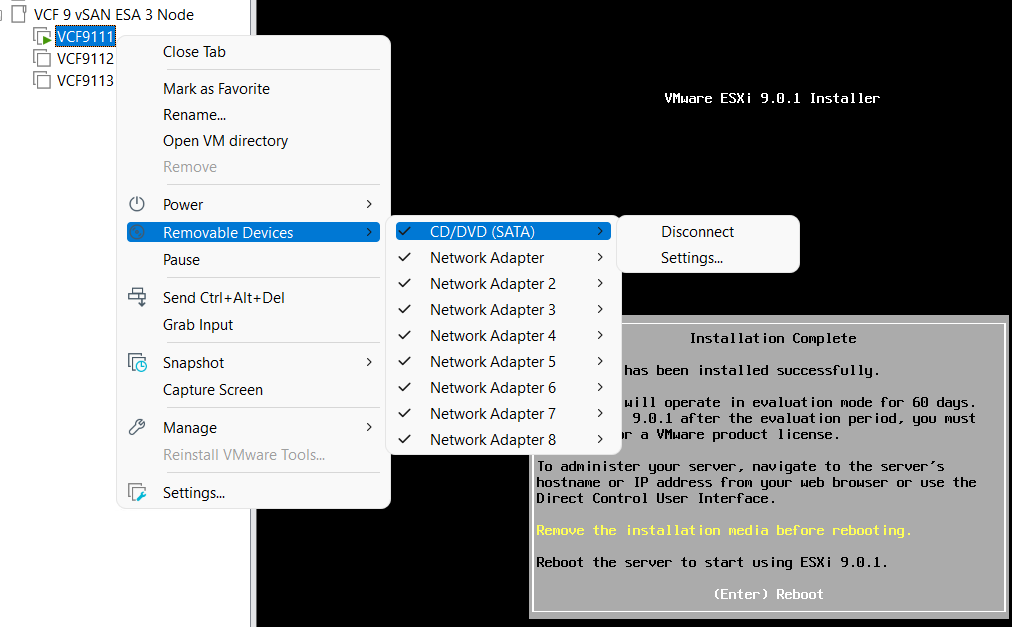
Allowed ESX to install.
Disconnected the media and pressed enter to reboot
Once rebooted I choose F2 to customize the system and logged in with my root password
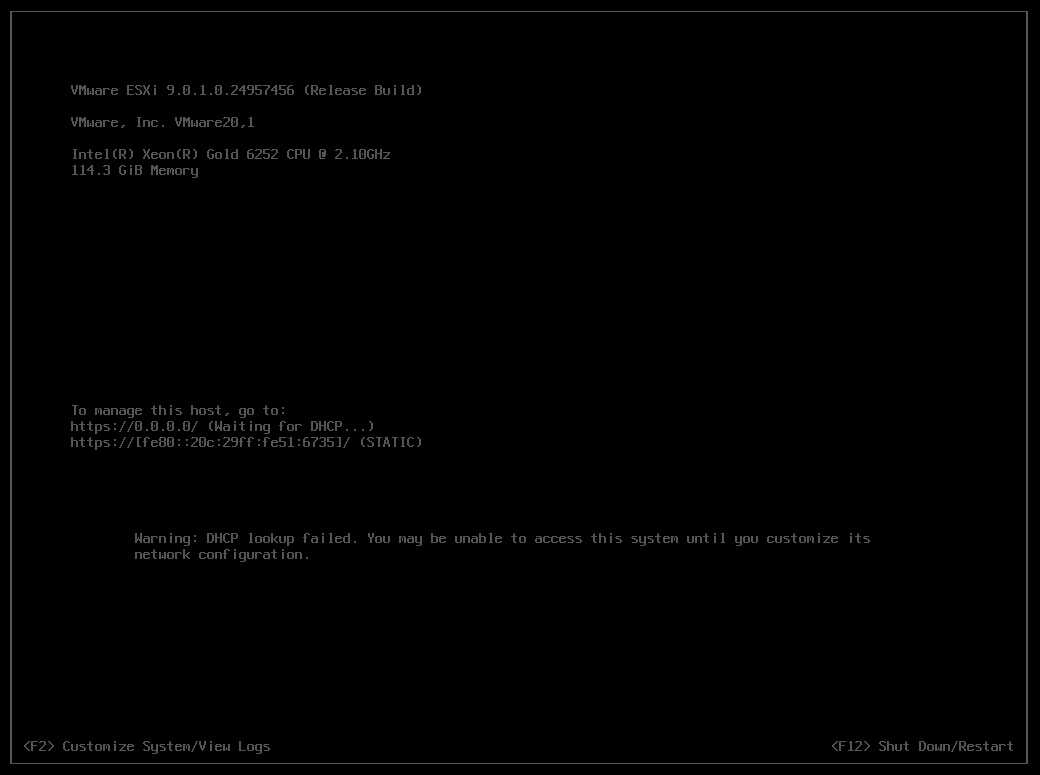
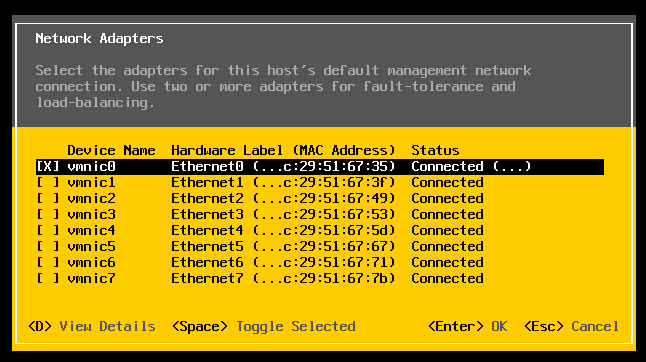
Choose Configure Management Network > Network Adapters, and validate the vmnic0 is selected, then pressed escape
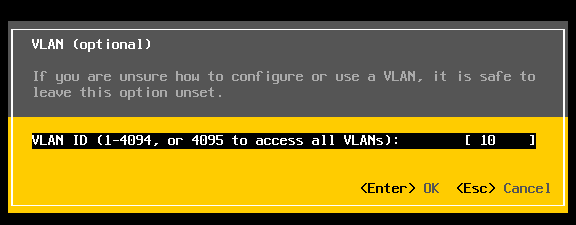
Choose VLAN (optional) > Entered in 10 for my VLAN > pressed enter to exit
Choose IPv4 Configuration and enter the following for VCF9111 host and then pressed enter.

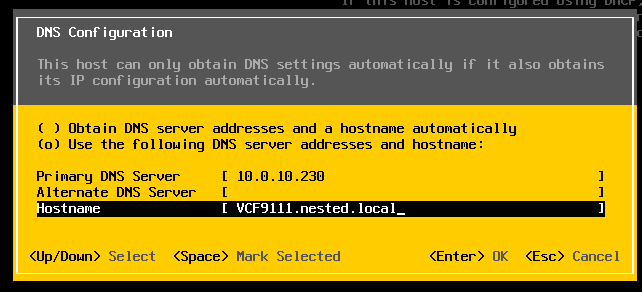
Choose DNS Configuration and enter the following.
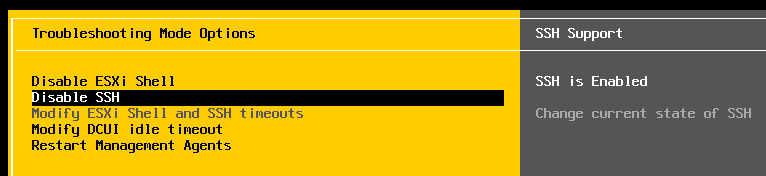
Press Escape to go to the main screen. Press Y to restart management. Arrow down to ‘Enable ESXi Shell” and press enter, then the same for SSH. Both should now be enabled.
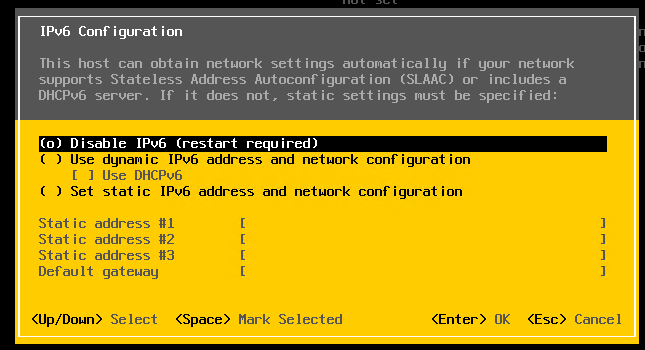
Press Escape and choose Configure Management Network. Next choose IPv6 Configuration, choose “Disable IPv6” and press enter.
Press Escape and the host will prompt you to reboot, press Y to reboot.
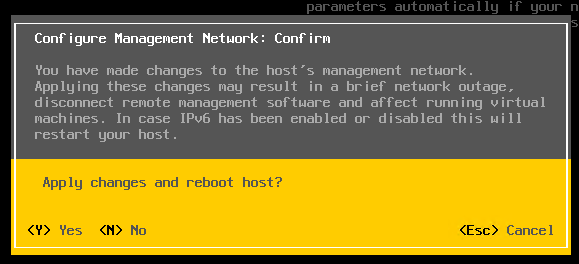
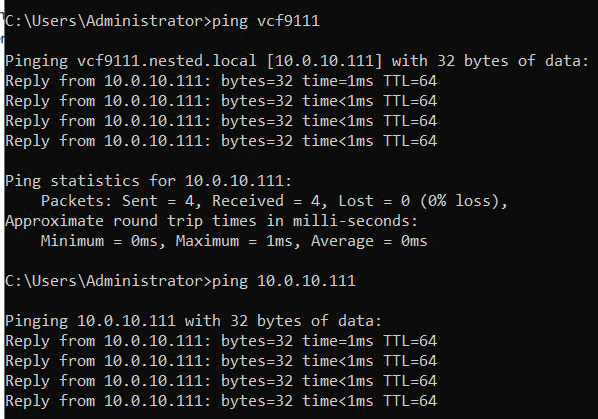
Test connectivity
From the AD server simply ping the VCF9111 host. This test ensures DNS is working properly and the LAN Segment is passing VLAN10.
From here I repeat this process for the other 2 hosts, only assigning them unique IPs.
Next up Deploying the VCF Installer with VLANs.
VMware Workstation Gen 9: Part 3 Windows Core Services and Routing
A big part of my nested VCF 9 environment relies on core services. Core services are AD, NTP, DHCP, and RAS. Core services are supplied by my Windows Server (aka AD230.nested.local). Of those services, RAS will enable routing between the LAN Segments and allow for Internet access. Additionally, I have a VM named DomainTools. DomainTools is used for testing network connectivity, SSH, WinSCP, and other tools. In this blog I’ll create both of these VMs and adapt them to work in my new VCF 9 environment.
Create the Window Server and establish core services
A few years back I published a Workstation 17 YouTube multipart series on how to create a nested vSphere 8 with vSAN ESA. Part of that series was creating a Windows Server with core services. For my VCF 9 environment I’ll need to create a new Windows server with the same core services. To create a similar Windows Server I used my past 2 videos: VMware Workstation 17 Nested Home Lab Part 4A and 4B.
Windows Server updates the VCF 9 environment
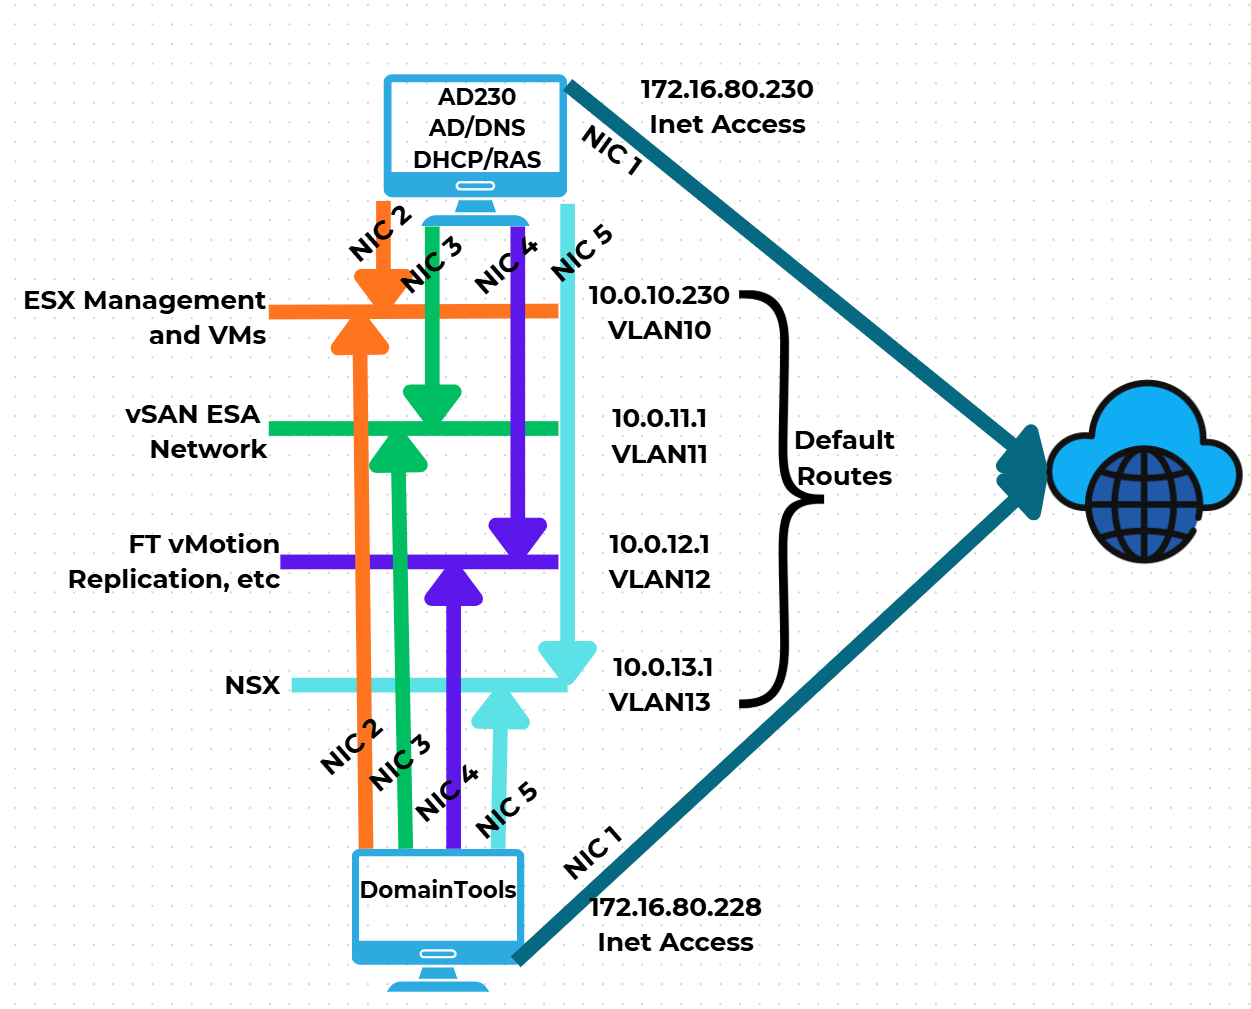
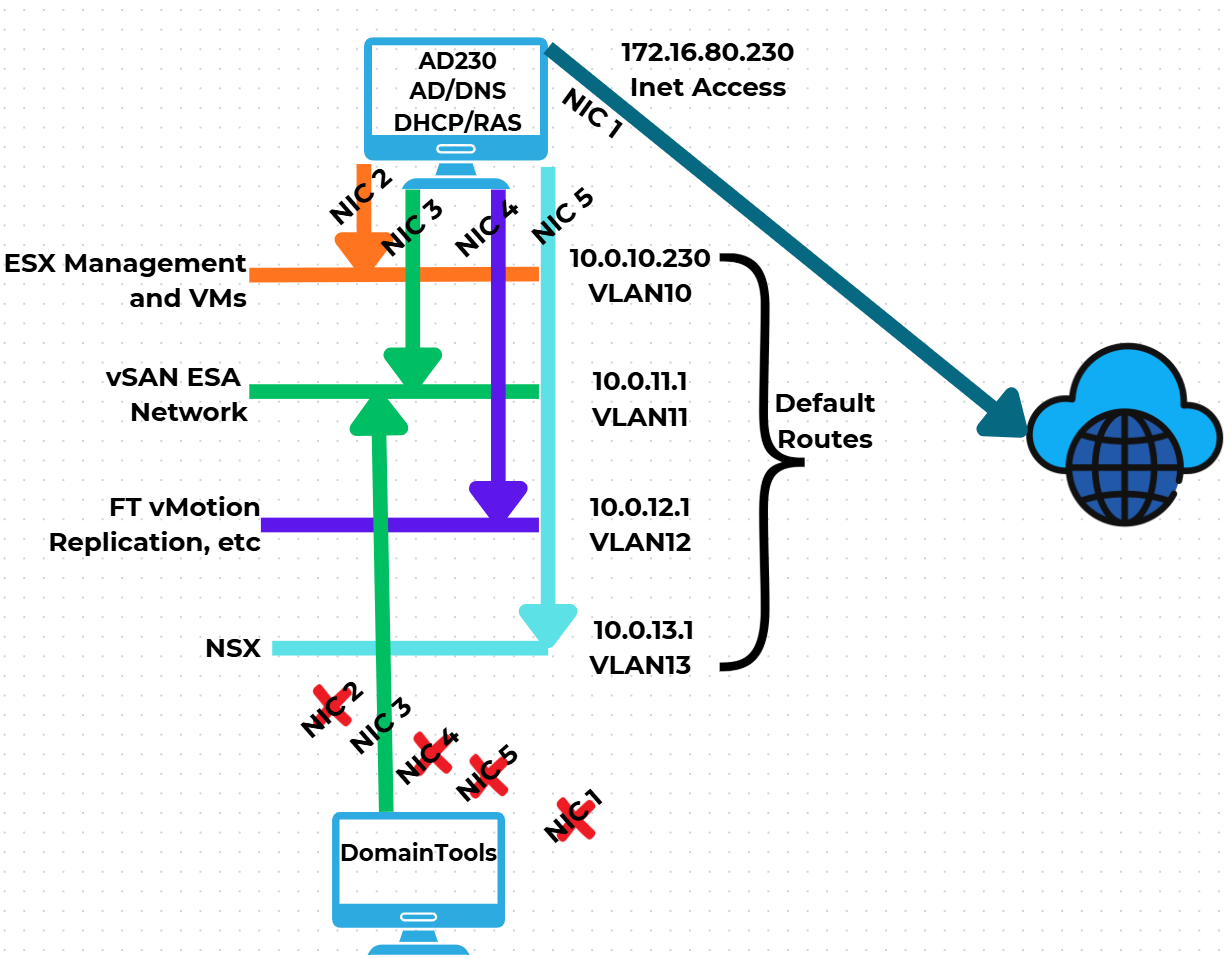
Now that I have established AD230 I need to update it to match the VCF 9 networks. I’ll be adding additional vNICs, attaching them to networks, and then ensuring traffic can route via the RAS service. Additionally, I created a new Windows 11 VM named DomainTools. I’ll use DomainTools for network connectivity testing and other functions. Fig-1 shows the NIC to network layout that I will be following.
(Fig-1)
Adjustments to AD230 and DomainTools
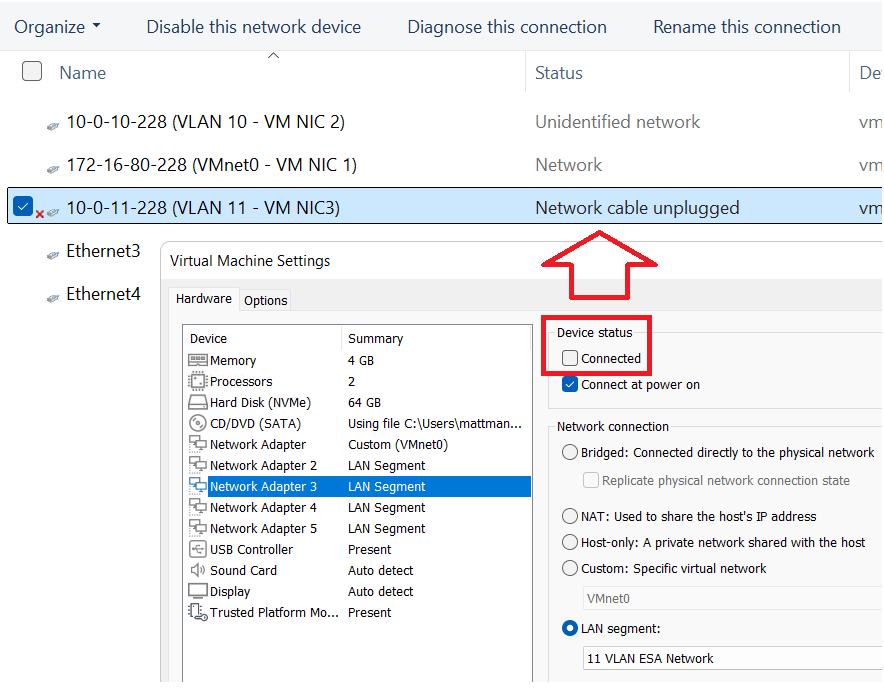
I power off AD230 and DomainTools. On both I add the appropriate vNICs and align them to the LAN segments. Next, I edit their VMware VM configuration file changing the vNICs from “e1000e” to “vmxnet3”.

Starting with DomainTools for each NIC, I power it on, input the IPv4 information (IP Address, Subnet, VLAN ID), and optionally disable IPv6. The only NIC to get a Default Gateway is NIC1. TIP – To ID the NICs, I disconnect the NIC in the VM settings and watch for it to show unplugged in Windows Networking. This way I know which NIC is assigned to which LAN Segment. Additionally, in Windows Networking I add a verbose name to the NIC to help ID it.
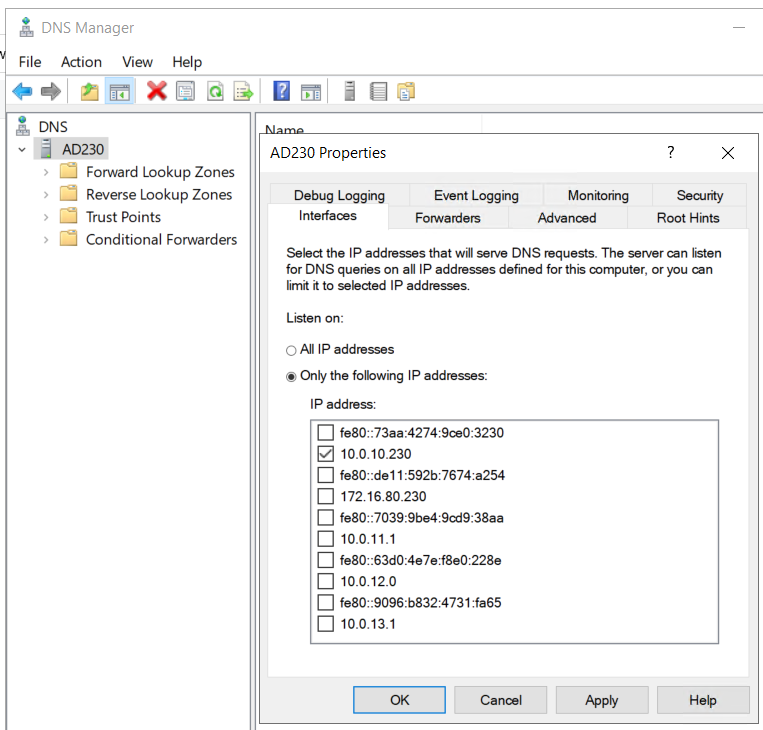
I make the same network adjustments to AD230 and I update its DNS service to only supply DNS from the 10.0.10.230 network adapter.
Once completed I do a ping test between all the networks for AD230 and DomainTools to validate IP Connectivity works. TIP – Use ipconfig at the CLI to check your adapter IP settings. If ping is not working there may be firewall enabled.
Setting up RAS on AD230
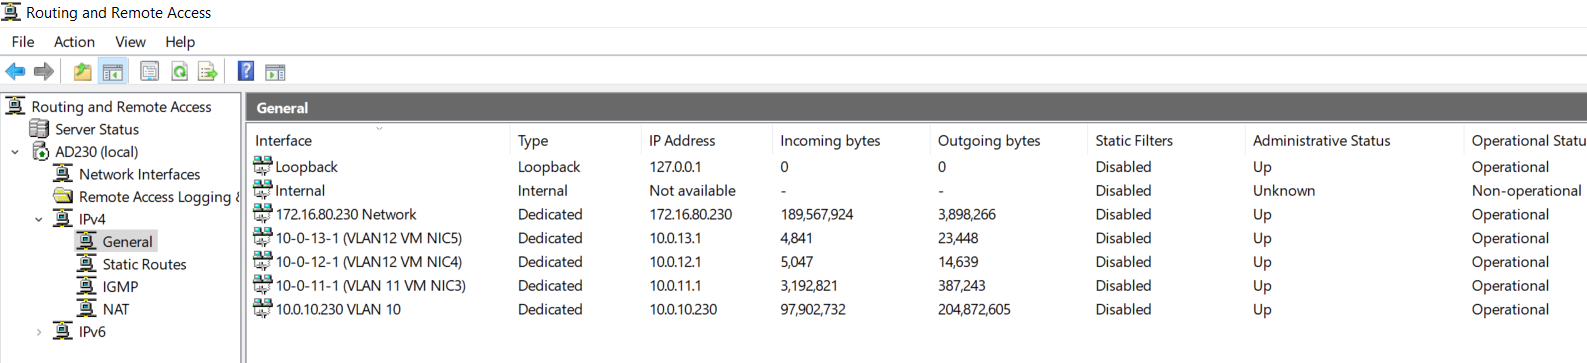
Once you have your network setup correctly validate that RAS has accepted your new adapters and their information. On AD230 I go in to RAS > IPv4 > General
I validate that my network adapters are present.
Looking ahead — RAS seemed to work right out of the box with no config needed. In all my testing below it worked fine, this may change as I advance my lab. If so, I’ll be sure to update my blog.
Next I need to validate routing between the different LAN Segments. To do this I’ll use the DomainTools VM to ensure routing is working correctly. You may notice in some of my testing results that VCF Appliances are present. I added this testing part after I had completed my VCF deployment.
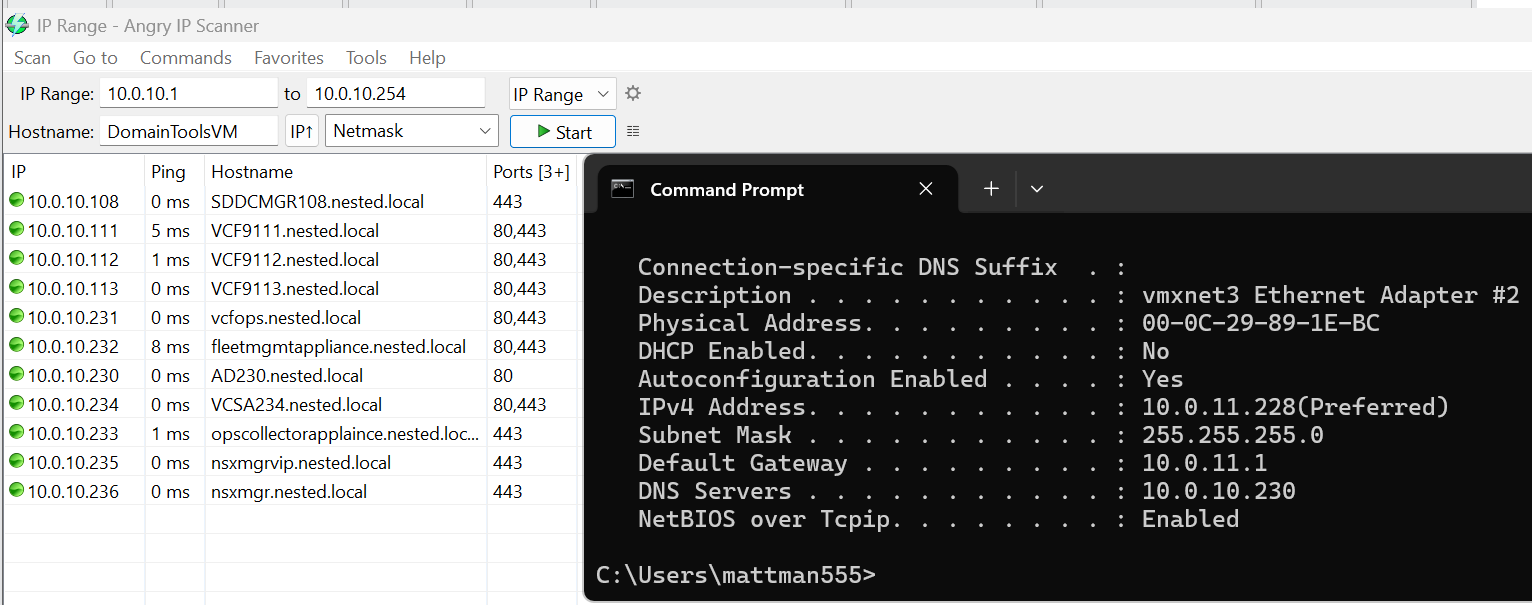
I need to test all of the VLAN networks. On the DomainTools VM, I disable each network adapter except for the one I want to test. In this case I disabled every adapter except for 10-0-11-228 (VLAN 11 – VM NIC3). I then add the gateway IP of 10.0.11.1 (this is the IP address assigned to my AD230 RAS server).
Next I do an ipconfig to validate the IP address, and use Angry IP Scanner to locate devices on the 10.0.10.x network. Several devices responded, plus resolving their DNS name, proving that DomainTools is successfully routing from the 11 network into the 10 network. I’ll repeat this process, plus do an internet check, on all the remaining networks.
Now that we have a stable network and core Window services established we are ready to move on to ESX Host Deployment and initial configuration.
- ← Previous
- 1
- 2
- 3
- …
- 9
- Next →
