Networking
Home Lab Gen IV – Part V Installing Mellanox HCAs with ESXi 6.5
The next step on my InfiniBand home lab journey was getting the InfiniBand HCAs to play nice with ESXi. To do this I need to update the HCA firmware, this proved to be a bit of a challenge. In this blog post I go into how I solved this issue and got them working with ESXi 6.5.
My initial HCA selection was the ConnectX aka HP INFINIBAND 4X DDR PCI-E HCA CARD 452372-001, and Mellanox MHGA28-XTC InfiniHost III HCA these two cards proved to be a challenge when updating their firmware. I tried all types of operating systems, different drivers, different mobos, and MFT tools versions but they would not update or be OS recognized. Only thing I didn’t try was Linux OS. The Mellanox forums are filled with folks trying to solve these issues with mixed success. I went with these cheaper cards and they simply do not have the product support necessary. I don’t recommend the use of these cards with ESXi and have migrated to a ConnectX-3 which you will see below.
Updating the ConnectX 3 Card:
After a little trial and error here is how I updated the firmware on the ConnectX 3. I found the ConnectX 3 card worked very well with Windows 2012 and I was able to install the latest Mellanox OFED for Windows (aka Windows Drivers for Mellanox HCA card) and updated the firmware very smoothly.
First, I confirm the drivers via Windows Device Manager (Update to latest if needed)
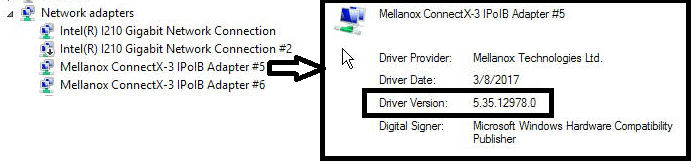
Once you confirm Windows device functionality then install the Mellanox Firmware Tools for windows (aka WinMFT)
Next, it’s time to update the HCA firmware. To do this you need to know the exact model number and sometimes the card revision. Normally this information can be found on the back of your HCA. With this in hand go to the Mellanox firmware page and locate your card then download the update.

After you download the firmware place it in an accessible directory. Next use the CLI, navigate to the WinMFT directory and use the ‘mst status’ command to reveal the HCA identifier or the MST Device Name. If this command is working, then it is a good sign your HCA is working properly and communicating with the OS. Next, I use the flint command to update my firmware. Syntax is — flint -d <MST Device Name> -i <Firmware Name> burn

Tip: If you are having trouble with your Mellanox HCA I highly recommend the Mellanox communities. The community there is generally very responsive and helpful!
Installation of ESXi 6.5 with Mellanox ConnectX-3
I would love to tell you how easy this was, but the truth is it was hard. Again, old HCA’s with new ESXi doesn’t equal easy or simple to install but it does equal Home lab fun. Let me save you hours of work. Here is the simple solution when trying to get Mellanox ConnextX Cards working with ESXi 6.5. In the end I was able to get ESXi 6.5 working with my ConnectX Card (aka HP INFINIBAND 4X DDR PCI-E HCA CARD 452372-001) and with my ConnectX-3 CX354A.
Tip: I do not recommend the use of the ConnectX Card (aka HP INFINIBAND 4X DDR PCI-E HCA CARD 452372-001) with ESXi 6.x. No matter how I tried I could not update its firmware and it has VERY limited or non-existent support. Save time go with ConnectX-3 or above.
After I installed ESXi 6.5 I followed the following commands and it worked like a champ.
Disable native driver for vRDMA
- esxcli system module set –enabled=false -m=nrdma
- esxcli system module set –enabled=false -m=nrdma_vmkapi_shim
- esxcli system module set –enabled=false -m=nmlx4_rdma
- esxcli system module set –enabled=false -m=vmkapi_v2_3_0_0_rdma_shim
- esxcli system module set –enabled=false -m=vrdma
Uninstall default driver set
- esxcli software vib remove -n net-mlx4-en
- esxcli software vib remove -n net-mlx4-core
- esxcli software vib remove -n nmlx4-rdma
- esxcli software vib remove -n nmlx4-en
- esxcli software vib remove -n nmlx4-core
- esxcli software vib remove -n nmlx5-core
Install Mellanox OFED 1.8.2.5 for ESXi 6.x.
- esxcli software vib install -d /var/log/vmware/MLNX-OFED-ESX-1.8.2.5-10EM-600.0.0.2494585.zip
Ref Links:
After a quick reboot, I got 40Gb networking up and running. I did a few vmkpings between hosts and they ping perfectly.

So, what’s next? Now that I have the HCA working I need to get VSAN (if possible) working with my new highspeed network, but this folks is another post.
If you like my ‘no-nonsense’ blog articles that get straight to the point… then post a comment or let me know… Else, I’ll start writing boring blog content.
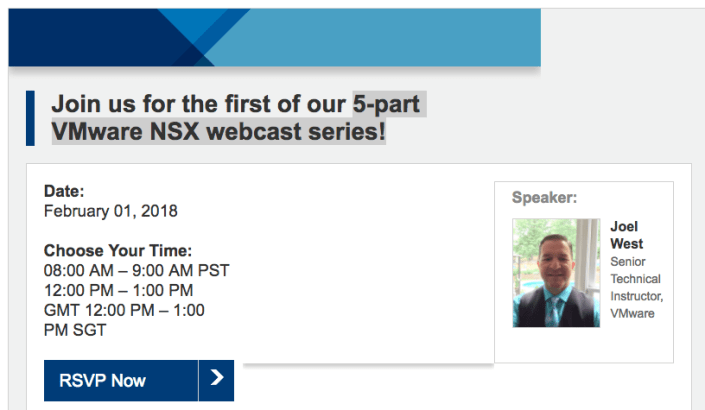
FREE 5-partVMware NSX webcast series!
The VMware education department is starting a 5 Session NSX webcast for free. Below is information on session one starting on February 01, 2018. However, when you click on the RSVP button you’ll have the option to register for all 5 sessions! I’d recommend registering now and take advantage of this great opportunity.
TIP: After going to the RSVP webpage, pay attention to the session description. Because sessions are in different regions (AMER, APJ, and EMEA). I’d suggest choosing one closest to your region.
Here are the Sessions descriptions for AMER. All locations seem to be have the same description, the only exception would be their timezone.
Session 1: Simplify Network Provisioning with Logical Routing and Switching using VMware NSX (AMER Session)
Date: Thursday, February 01, 2018
Time: 08:00 AM Pacific Standard Time
Duration: 1 hour
Did you know it’s possible to extend LANs beyond their previous boundaries and optimize routing in the data center? Or decouple virtual network operations from your physical environment to literally eliminate potential network disruptions for future deployments? Join us to learn how VMware NSX can make these a reality. We’ll also cover the networking components of NSX to help you understand how they provide solutions to three classic pain points in network operations:
- Non-disruptive network changes
- Optimized East-West routing
- Reduction in deployment time through
Session 2: Automate Your Network Services Deployments with VMware NSX and vRealize Automation (AMER Session)
Date: Thursday, February 22, 2018
Time: 08:00 AM Pacific Standard Time
Duration: 1 hour
Can you automate your Software-Defined Data Center (SDDC) without automating network services? Of course not! In this session, we’ll discuss building your vRealize Automation blueprints with automated network services deployments from VMware NSX.
Session 3: Design Multi-Layered Security in the Software-Defined Datacenter using VMware vSphere 6.5 and VMware NSX 6.3 (AMER Session)
Date: Thursday, March 08, 2018
Time: 08:00 AM Pacific Standard Time
Duration: 1 hour
Did you know that more than 1.5 billion data records were compromised in the first half of 2017? Experts are expecting these numbers to grow. Are you prepared? Join us to learn how a design based on VMware vSphere and VMware NSX can help you protect the integrity of your information as well as your organization. Among the areas covered will be the VMware ESXi host within vSphere that includes the host firewall and virtual machine encryption, along with the VMware vCenter layer that provides certificate management. We’ll also dive into a number of features within NSX, including the distributed Logical Router and Distributed Firewall that protect traffic within the data center and the Edge Services Gateway that secures north/south traffic through the edge firewall and virtual private network.
Session 4: Advanced VMware NSX: Demystifying the VTEP, MAC, and ARP Tables (AMER Session)
Date: Thursday, March 29, 2018
Time: 08:00 AM Pacific Daylight Time
Duration: 1 hour
The VMware NSX controllers are the central control point for all logical switches within a network and maintain information for all virtual machines, hosts, logical switches, and VXLANs. If you ever wanted to efficiently troubleshoot end-to-end communications in an NSX environment, it is imperative to understand the role of the NSX controllers, what information they maintain, and how the tables are populated. Well look no further. Give us an hour and you will see the various agents that the NSX controllers use for proper functionality. Use the NSX Central CLI to display the contents of the VTEP, MAC, and ARP tables. We will examine scenarios that would cause the contents of these tables to change and confirm the updates. Finally, we will examine, in detail, Controller Disconnected Operation and how this feature can minimize downtime.
Session 5: That Firewall Did What? Advanced Troubleshooting for the VMware NSX Distributed Firewall (AMER Session)
Date: Thursday, April 19, 2018
Time: 08:00 AM Pacific Daylight Time
Duration: 1 hour
The VMware NSX Distributed Firewall (DFW) is the hottest topic within the NSX community. It is the WOW of micro-segmentation. But many questions arise. Who made the rule? Who changed the rule? Is the rule working? Where are these packets being stopped? Why aren’t these packets getting through? What is happening with my implementation of the DFW? These questions can be answered using the native NSX tools. We will give you an overview on how to track, manage, and troubleshoot packets traveling through the DFW using a combination of User Interface (UI) tools, the VMware Command Line Interface (vCLI) to view logs manually, and integrating with VMware vRealize Log Insight (vRLI) and VMware vRealize Network Insight (vRNI).
If you like my ‘no-nonsense’ blog articles that get straight to the point… then post a comment or let me know… Else, I’ll start writing boring blog content.
Review: Wireless Network Devices All in One vs. Standalone
I’m sure like most of my fellow computer geeks we get asked quite a bit around home wireless networks etc. Well, I’ve been in the market for a new Cable Modem and Router and in the past I’ve never recommended the “all in one” solution (meaning Cable Modem and Router/Firewall in one unit). Mainly this recommendation was based on my field experience back in 2007 and seeing so many of them fail. This week, going against my own advice, I gave the Netgear C3700-100NAS all in one a try for $99. Not a bad deal as it means not as many cables, it has an integrated DOCSIS 3.0 cable modem, and it’s on COX Phoenix AZ supported list. This unit worked well for about 20 mins and as I was reading reviews around its issues, it started having them. Over and Over again it slows down. You’d think by 2016 they’d have the all in one finally figured out, but alas they don’t. My recommendation still stands, avoid the all in one.
What I have been recommending for home users in the Phoenix Area with Cox Cable running their 60-100Mbs Internet are the Arris Motorolla SB6141 Cable Modem and the NETGEAR WNDR4500-100PAS N900 wireless router. I’ve had the combo since 2012 and it’s been very rock solid. If I do have an issue with this combo it is usually outside of their control, meaning the cable company is having an issue.
I bought my pair at NewEgg — WNDR4500 for $89 and the SB6141 for $69,
When I bought mine (Feb-2016) NewEgg gave me a TP-LINK TL-WR841N and a N150 wireless routers.
If there is enough interest in the post, I’ll post up how the other 2 routers work out. Enjoy!
If you like my ‘no-nonsense’ blog articles that get straight to the point… then post a comment or let me know… Else, I’ll start writing boring blog content.
Solved: WARNING: Link is up but PHY type 0x3 is not recognized – Can cause ESXi 6 purple screens
The Error >> When running an Intel x710 NIC with the ESXi i40e driver you notice your vmkernel.log completely full of the error “WARNING: Link is up but PHY type 0x3 is not recognized”
The Solution >> Ensure X710 firmware is at 17.5.11 (aka 5.04 in ESXi) and ESXi i40e Driver to 1.4.26 or 1.4.28 and these errors stop
The Follow-up >> Check out your NIC on the VMWare HCL for the Correct driver/firmware guidance. This is the link I used.
Other notes…
Sending Millions of the PHY errors to your event logs could be causing other issues for your ESXi host. Look for local boot disk latency or Networking errors in your ESXi host event logs. Once you apply this solution these issues should stop. If not, then you may have other issues impacting your boot disks.
*Updates*
- After applying this solution we then noticed the vmkernel started to populate with ‘driver issue detected, PF reset issued’ the solution for this is to disable TSO/LRO. VMWare KB 205140.
- 04-10-2017 There is a new VMware driver listed for the X710, will be testing soon and will post up results. Release notes indicate fixes for the following:
– Fix duplicate mulicast packet issue
– Fix PSOD caused by small TSO segmentation
If you like my ‘no-nonsense’ blog articles that get straight to the point… then post a comment or let me know… Else, I’ll start writing boring blog content.
ESXi Host NIC failure and the Web client vSwitch orange line doesn’t move? — The results are Shocking!
Okay, the title was a bit dramatic, but it got your attention. Now keeping with my quest to deliver no-nonsense blog articles here is what the orange line means…
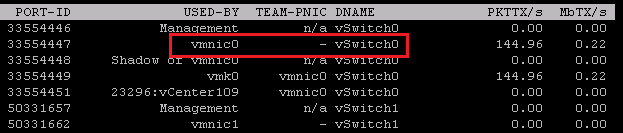
Question 1 – What is the function of the orange line when selecting a vmnic, port group, or vSwitch while viewing them in the Web client network settings?
The orange line is showing you the teaming order for the pNICs or vmnics based on their vSwitch or port group teaming policy. In this screenshot, the policy is Active / Active for both vmnic0 and 1.
The orange line will not move to the other pNIC’s unless they are marked as “active” in the teaming policy. “Active in the teaming policy” vs. “which pNIC is passing traffic” are two different things. The orange line is not a representation of the latter, “pNIC passing traffic”.

Question 2 – How can I tell which pNIC is currently passing traffic?
The Web or Thick client vSwitch display (aka the orange line) doesn’t display the pNIC which is currently passing network traffic. You need to use ESXTOP to determine the active pNIC.
Simply go into ESXTOP, Press N, find your vSwitch and it will lead you to the pNIC currently being used to pass traffic.
Question 3 – I had a pNIC failure why isn’t the Web client moving the orange line to the standby NIC?
Again… the orange line ONLY points to the Active pNIC in the teaming policy. In this screenshot below, the teaming policy is setup for vmnic3 as Active and vmnic2 as stand by.
Even though vmnic3 is down, traffic should be flowing through vmnic2. Use ESXTOP to determine this (See Question 2)

If you like my ‘no-nonsense’ blog articles that get straight to the point… then post a comment or let me know… Else, I’ll start writing boring blog content.
VSAN – The Migration from FreeNAS
Well folks it’s my long awaited blog post around moving my Homelab from FreeNAS to VMware VSAN.
Here are the steps I took to migrate my Home Lab GEN II with FreeNAS to Home Lab GEN III with VSAN.
Note –
- I am not putting a focus on ESXi setup as I want to focus on the steps to setup VSAN.
- My home lab is in no way on the VMware HCL, if you are building something like this for production you should use the VSAN HCL as your reference
The Plan –
- Meet the Requirements
- Backup VM’s
- Update and Prepare Hardware
- Distribute Existing hardware to VSAN ESXi Hosts
- Install ESXi on all Hosts
- Setup VSAN
The Steps –
Meet the Requirements – Detailed list here
- Minimum of three hosts
- Each host has a minimum of one SSD and one HDD
- The host must be managed by vCenter Server 5.5 and configured as a Virtual SAN cluster
- Min 6GB RAM
- Each host has a Pass-thru RAID controller as specified in the HCL. The RAID controller must be able to present disks directly to the host without a RAID configuration.
- 1GB NIC, I’ll be running 2 x 1Gbs NICs. However 10GB and Jumbo frames are recommended
- VSAN VMkernel port configured on every host participating in the cluster.
- All disks that VSAN will be allocated to should be clear of any data.
Backup Existing VMs
- No secret here around backups. I just used vCenter Server OVF Export to a local disk to backup all my critical VM’s
- More Information Here
Update and Prepare Hardware
- Update all Motherboard (Mobo) BIOS and disk Firmware
- Remove all HDD’s / SDD’s from FreeNAS SAN
-
Remove any Data from HDD/SDD’s . Either of these tools do the job
- Windows Tools – “MiniTool Partition Wizard”
- Boot ISO – GParted
Distribute Existing hardware to VSAN ESXi Hosts
- Current Lab – 1 x VMware Workstation PC, 2 x ESXi Hosts boot to USB (Host 1 and 2), 1 x FreeNAS SAN
- Desired Lab – 3 x ESXi hosts with VSAN and 1 x Workstation PC
-
End Results after moves
- All Hosts ESXi 5.5U1 with VSAN enabled
- Host 1 – MSI 7676, i7-3770, 24GB RAM, Boot 160GB HDD, VSAN disks (2 x 2TB HDD SATA II, 1 x 60GB SSD SATA III), 5 xpNICs
- Host 2 – MSI 7676, i7-2600, 32 GB RAM, Boot 160GB HDD, VSAN disks (2 x 2TB HDD SATA II, 1 x 90 GB SSD SATA III), 5 x pNICs
- Host 3 – MSI 7676, i7-2600, 32 GB RAM, Boot 160GB HDD, VSAN disks (2 x 2TB HDD SATA II, 1 x 90 GB SSD SATA III), 5 x pNICs
- Note – I have ditched my Gigabyte z68xp-UD3 Mobo and bought another MSI 7676 board. I started this VSAN conversion with it and it started to give me fits again similar to the past. There are many web posts with bugs around this board. I am simply done with it and will move to a more reliable Mobo that is working well for me.

Install ESXi on all Hosts
-
Starting with Host 1
- Prior to Install ensure all data has been removed and all disk show up in BIOS in AHCI Mode
-
Install ESXi to Local Boot HD
- After the install I experienced the ESXi hanging at Boot – ‘Starting up Services – Running usbarbitrator start’
- Solution – Stop usbarbitrator service
- http://kb.vmware.com/selfservice/microsites/search.do?language=en_US&cmd=displayKC&externalId=1023976
- Setup ESXi base IP address via direct Console, DNS, disable IP 6, enable shell and SSH
- Using the VI Client setup the basic ESXi networking and vSwitch
- Using VI Client I restored the vCSA and my AD server from OVF and powered them on
- Once booted I logged into the vCSA via the web client
- I built out Datacenter and add host 1
- Create a cluster but only enabled EVC to support my different Intel CPU’s
- Cleaned up any old DNS settings and ensure all ESXi Hosts are correct
- From the Web client Validate that 2 x HDD and 1 x SDD are present in Host
- Installed ESXi Host 2 / 3, followed most of these steps, and added them to the cluster
Setup VSAN
-
Logon to the Webclient
-
Ensure on all the hosts
- Networking is setup and all functions are working
- NTP is working
- All expected HDD’s for VSAN are reporting in to ESXi
-
Create a vSwitch for VSAN and attach networking to it
- I attached 2 x 1Gbs NICs for my load that should be enough
-
Assign the VSAN License Key
- Click on the Cluster > Manage > Settings > Virtual SAN Licensing > Assign License Key
-

-
Enable VSAN
- Under Virtual SAN click on General then Edit
- Choose ‘Turn on Virtual SAN’
- Set ‘Add disks to storage’ to Manual
-
Note – for a system on the HCL, chances are the Automatic setting will work without issue. However my system is not on the any VMware HCL and I want to control the drives to add to my Disk Group.

-
Add Disks to VSAN
- Under Virtual SAN click on ‘Disk Management’
- Choose the ICON with the Check boxes on it
- Finally add the disks you want in your disk group

- Allow VSAN to complete its tasks, you can check on its progress by going to ‘Tasks’

- Once complete ensure all disks report in as healthy.

-
Ensure VSAN General tab is coming up correct
- 3 Hosts
- 3 of 3 SSD’s
- 6 of 6 Data disks
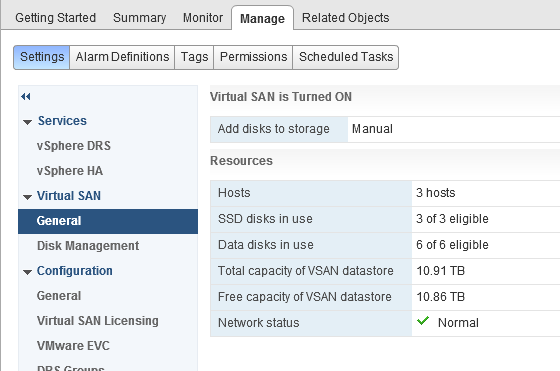
- Check to see if the data store is online

Summary –
Migrating from FreeNAS to VSAN was relatively a simple process. I simply moved, prepared, and installed and the product came right up. My only issue was working with a faulty Gigabyte Mobo which I resolved by replacing it. I’ll post up more as I continue to work with VSAN. If you are interested in more detail around VSAN I would recommend the following book.
Turning a ‘No you cannot attend’ to a ‘Yes’ for VMworld
 I’ve been lucky enough to make it to every VMworld since 2008 and 2014 will be my 7th. time in a row. In this blog post I wanted to share with you a breakdown of some of the tips and tricks I’ve used to get to these events. Being the former Phoenix VMUG leader I’ve shared these tips with fellow VMUG users and now I’m sharing them with all of you. Users would tell me cost is the number one reason why they don’t go – “My Company sees value in this event but will not pay for it”. This breaks down to Food, Hotel, Travel, and the infamous golden ticket, aka the VMworld pass. So how do users overcome the cost to attend? This is what this blog post is all about…
Working with your employer –
Having your employer pick up the tab not only benefits them as a company but yourself too. As you know VMworld is full of great content and the socialization aspects are second to none. Chances are you’ll be asked to put together a total cost to attend and this cost can be quite high for some companies on a tight budget. My suggestion is if you are getting the big ‘No’ then work with your boss around the total costs. First find out why it’s a ‘No’ and look for opportunities to overcome this. Maybe your company will pay for some of the items. Example – They might be able to cover airfare, but the rest is on you. Don’t forget if your company has a VMware TAM (Technical Account Manager) reach out them. Even if you are not directly working with the TAM they are your best resource not only for VMware Technology but also for getting you to VMworld. They don’t have passes but they usually know the community very well and can assist.
Sometimes I hear “My employer will not allow me to accept gifts”. True your company may have a policy around the type of gifts you can receive and by all means follow this policy. However, keep in mind you may be able to take vacation time and represent yourself at this event not your employer. Then there is a possibility gifts could be accepted but on the premises you don’t represent your company. Some companies are okay with this but just make sure they are. If you are able to do this I would suggest you represent it as ‘personal development’.
How do I get a free VMworld Pass?
This can be your biggest challenge. However here are some ways to get your hands on one.
-
Give-a-ways
- I can’t tell you how many vendors have giveaways contests right now — hit them early and enter as many contests as you can find
-
Tips-
- When you enter, find out who your local vendor contact is and let them know you entered. Then stay in contact with them.
- Keep in mind not all contests are the same, some are based on random drawing and others are not. This is why I say keep in contact with the vendor.
- How do I find give-a-ways >> Google ‘VMworld getting there for free’
-
Get the word out
- Tell your boss, workmates, vendors, and partners. Post on Twitter, Linked-In, etc. and Repeat again and again. By doing this you let others know about your strong interest in getting there, in turn they might get a lead for you.
- Most importantly, reach out to your local VMUG leader and ask them for tips in your area. They are usually well connected and might have a lead for you as well.
-
Follow Twitter and Linked-In – You never know who is going to post up “I have a pass and need to give it to someone”. Yes that is right, before the event you can transfer a pass to someone.
- New to Twitter, need contacts? It’s a pretty simple to get started. Simply find the #VMworld hastag, see who is posting to it and start following them. Then look at all their contacts and follow them too, soon you’ll have a gaggle of folks.
- This sound like work. Why do all this? Simple, distributed coverage model. The more people know the more likely they are to help and in turn the more likely you’ll succeed
-
Don’t forgo an Expo-Only or Solutions Exchange Pass
- If you get offered this pass take it. I can’t tell you how many vendors have these passes and have trouble giving them away, seriously this is gold but folks don’t know how to leverage them.
- First off this pass has great value, there is a TON of value here.
-
Second this pass can get you on to the Solutions Exchange floor where all the vendors and partners are.
- Once there start talking to all the vendors, fellow attendee, all those folks you meet on Twitter, etc. as you never know who has a full pass they couldn’t get rid of, take it and upgrade yours.
- Third, while you are there with an Expo Pass use Twitter and the VMworld hash tags to let folks know you’re here and you are looking for a full pass.
- Stop by the VMUG booth on the Expo floor, you never know who will be there and you never know if users there might be able to help you.
-
Vendors and Partners
-
Find out who is sponsoring VMworld this year, and then…
- Start calling the ones you know well, ask them for support getting there.
- Don’t forget to call the ones you don’t know so well too.
- If you have an upcoming deal on the table with a vendor, inquire if they will throw in passes, travel, etc.
-
What about Food, Hotel, and Travel Costs?
-
Food
- There will be free food everywhere, in-fact feel free to give some to the homeless I usually do.
- If you get a pass then lunch and usually breakfast are included.
- For dinner, find out where the nightly events are as they usually have food.
- Talk with Vendors as they might take you out, you never know.
-
Hotel
- Ask a Vendor to pay for just the room or ask them to gift hotel points to you.
- Room Share with someone at the event << Think about it, you won’t be in the room that often and chances are from 7AM till 10PM you’ll be out of your room.
-
Use travel sites to cut down the cost.
- Secret Hotels: Best Western Carriage Inn and The Mosser. Good if you’re on a budget but chances are they are full this year (2014).
- Use your hotel or other travel points to book the hotel for free.
- Get a low cost hotel away from the event, but watch your travel costs.
-
Travel
-
Airfare
- Ask a vendor to pay for just the airfare, or maybe they have points they can gift you.
- Use your own travel points to pay for this.
-
Rideshare to the event
- See if one of your connections are driving to the event, offer to split fuel costs.
- You drive someone to the event, and they pick up the hotel or vise versa.
-
Local Travel
-
Use the following –
- VMworld Shuttle
- Bus
- Uber
- BART
- Once again hit up those vendors, they might have a way to get you around for free
-
-
Finally here is a breakdown of how I got to so many events and how/who paid for it….
| Year | Pass | Travel | Food | Hotel |
| 2008 VMworld | Vendor Sponsor – Full Pass | Employer Paid | Vendor / Event | Employer Paid |
| 2009 VMworld | VMUG Sponsored – Full Pass | Vendor paid for Airfare with Miles | Vendor / Event | Employer Paid |
| 2010 VMworld | VMUG Sponsored – Full Pass | Vendor paid for Airfare with Miles | Vendor / Event | Vendor Sponsored |
| 2011 VMworld | Vendor Sponsor – Expo Pass but I got an upgrade to Full by asking others | I drove two others and I paid for the fuel | Vendor / Event | Travel Companion paid for room |
| 2012 VMworld | Employee Labs | Employer Paid | Employer Paid | Employer Paid |
| 2013 VMworld | Employee TAM | Employer Paid | Employer Paid | Employer Paid |
| 2014 VMworld | Employee TAM | Employer Paid | Employer Paid | Employer Paid |
Summing it up…
My take is this, if you REALLY want to go you’ll get there but sometimes it takes effort to do so and if you do it right it might not cost you a thing. Don’t let anything stop you and find your way there.
Finally, after you’ve been to the event don’t forget about the folks who got you there and say ‘Thank you’. Then over the next year continue to build this relationship, as you never know if you’ll need help again, or you want to help someone else get there.
Network port diagram for vSphere 5.x – Poster
This is by far and away my favorite VMware Poster and I use it as a reference quite often.
Benefits –
- Clear representation of all the TCP/IP Ports needed by VMware Products and their dependences
- PDF has a very clear diagram that can be printed on to a large format
- PDF Diagram has reference numbers that correlate to further slides for more information
You can find the PDF Here >>http://kb.vmware.com/selfservice/microsites/search.do?language=en_US&cmd=displayKC&externalId=2054806
PIC of the Reference Link –
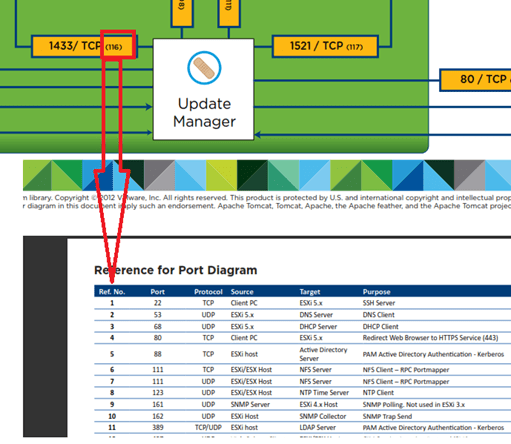
Part of a PIC of the Port Diagram

Geeks.com – Time to Say goodbye for now
I was a bit shell shocked when I went to one of my favorite online stores, geeks.com, only to find out they had closed.
They had been open for 17 years and they were one of the first sites I trusted to buy quality products from new or used.
They had a lot of common items but every now and then they had something different or unique. It was one of the reasons why I kept coming back.
I had recommended geeks.com many times and everyone I sent there always let me know what excellent service and product they had.
Well Geeks.com – I salute you – you had a good run, I’m sorry to see you go, and I hope one day you return!

Just a quick note, if you liked geeks.com then check out http://www.pacificgeek.com/ they were very similar in product and layout.
Network port diagram for vSphere 5.x
Check out this great network port diagram for vSphere 5.x. It was recently released on kb.vmware.com
This is a must have for those doing architecture and design around VMware – Enjoy!

- ← Previous
- 1
- 2
- 3
- Next →
