Networking
Home Lab – VMware ESXi 5.1 with iSCSI and freeNAS
Recently I updated my home lab with a freeNAS server (post here). In this post, I will cover my iSCSI setup with freeNAS and ESXi 5.1.
Keep this in mind when reading – This Post is about my home lab. My Home Lab is not a high-performance production environment, its intent is to allow me to test and validate virtualization software. Some of the choices I have made here you might question, but keep in mind I’ve made these choices because they fit my environment and its intent.
Overall Hardware…
Click on these links for more information on my lab setup…
- ESXi Hosts – 2 x ESXi 5.1, iCore 7, USB Boot, 32GB RAM, 5 x NICS
- freeNAS SAN – freeNAS 8.3.0, 5 x 2TB SATA III, 8GB RAM, Zotac M880G-ITX Mobo
- Networking – Netgear GSM7324 with several VLAN and Routing setup
Here are the overall goals…
- Setup iSCSI connection from my ESXi Hosts to my freeNAS server
- Use the SYBS Dual NIC to make balanced connections to my freeNAS server
- Enable Balancing or teaming where I can
- Support a CIFS Connection
Here is basic setup…
freeNAS Settings
Create 3 networks on separate VLANs – 1 for CIFS, 2 x for iSCSI < No need for freeNAS teaming
CIFS
The CIFS settings are simple. I followed the freeNAS guide and set up a CIFS share.
iSCSI
Create 2 x iSCSI LUNS 500GB each
Setup the basic iSCSI Settings under “Servers > iSCSI”
- I used this doc to help with the iSCSI setup
- The only exception is – Enable both of the iSCSI network adapters in the “Portals” area

ESXi Settings
Setup your iSCSI vSwitch and attach two dedicated NICS
Setup two VMKernel Ports for iSCSI connections
Ensure that the First VMKernel Port group (iSCSI72) goes to ONLY vmnic0 and vice versa for iSCSI73

Enable the iSCSI LUNs by following the standard VMware instructions
Note – Ensure you bind BOTH iSCSI VMKernel Ports

Once you have your connectivity working, it’s time to setup round robin for path management.
Right click on one of the LUNS, choose ‘Manage Paths…’
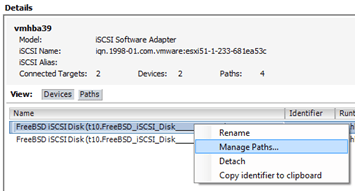
Change the path selection on both the LUNS to ‘Round Robin’
Tip – After the fact if you make changes to your iSCSI settings, then ensure you check your path selection as it may go back to default

Notes and other Thoughts…
Browser Cache Issues — I had issues with freeNAS updating information on their web interface, even after reboots of the NAS and my PC. I moved to Firefox and all issues went away. I then cleared my cache in IE and these issues were gone.
Jumbo Frames — Can I use Jumbo Frames with the SYBA Dual NICs SY-PEX24028? – Short Answer is NO I was unable to get them to work in ESXi 5.1. SYBA Tech support stated the MAX Jumbo frames for this card is 7168 and it supports Windows OS’s only. I could get ESXi to accept a 4096 frame size but nothing larger. However, when enabled none of the LUNS would connect, once I moved the frame size back to 1500 everything worked perfectly. I beat this up pretty hard, adjusting all types of ESXi, networking, and freeNAS settings but in the end, I decided the 7% boost that Jumbo frames offer wasn’t worth the time or effort.
Summary…
These settings will enable my 2 ESXi Hosts to balance their connections to my iSCSI LUNS hosted by freeNAS server without the use of freeNAS Networking Teaming or aggregation. By far it is the simplest way to setup and the out of the box performance works well.
My advice is — go simple with these settings for your home lab and save your time to beat up more important issues like “how do I shutdown windows 8” J
I hope you found this post useful and if you have further questions or comments feel free to post up or reach out to me.
VMware Guest Operating System Installation Guide gets an Online Facelift
At some point in your VMware administrator career you discover you need information around the correct settings to deploy a VM properly.
You find that you need to answer questions like –
What is the supported network adapter for my Guest OS?
Are Paravirtualization adapters supported for my Guest OS?
Can I do Hot memory add?
A few years ago the default standard was the Guest Operating System Installation Guide.
It gave you all the information you needed to setup the virtual hardware or confirm what recommend virtual hardware should be by the OS Type.
Recently the compatibility and OS installation guides have come online and they can lead you to best practices around settings and KB’s too.
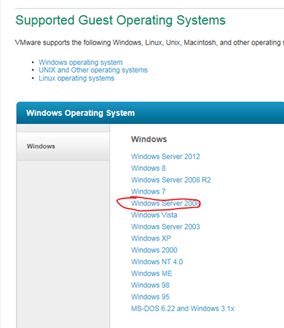
In this blog post I’m going to step you through how to find basic information around a Windows 2008 server.
Start here – http://partnerweb.vmware.com/GOSIG/home.html#other
This link will take you to the Guest Operating System Installation Guide.
Select your OS – In this case I choose Windows 2008 Server
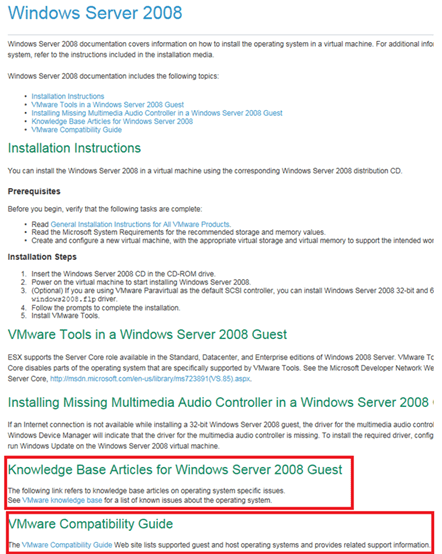
Here are the base install instructions for the Guest OS, note at the bottom the KB Articles and Guest OS Compatibility Guide.
The Guest OS Compatibility Guide can tell you what network drivers etc are support for the guest OS..
Click here to go to the VMware Compatibility Guide, Select your OS Family, OS Type and choose Update & Review…
Then select your ESX / ESXi version to see the details…
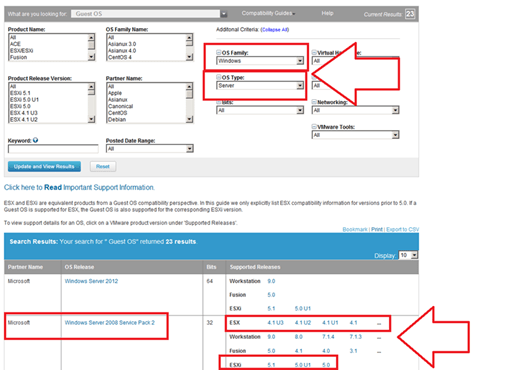
Here are the results… Also from this page you can choose a different product like ESXi 5.0U1 or other…

Home Lab – Adding a Layer 3 Switch to my growing Home Lab
Most recently I expanded my home lab to include a Layer 3 switch.
Why would I choose a Layer 3 switch and what/how would I use it is the topic of this blog post.
Here are my requirements for my home lab –
I would like to setup my home network to support multiple VLANs and control how they route.
This will enable me to control the network traffic and segment my network to allow for different types of testing.
I’d also like to be able to run all of these VM’s on Workstation 9, support remote access, and ESXi Hosts.
Frist thing I did was come up with a drawing of what I wanted. It included all my wants and needs…
This was my chance to brain storm a bit and I just wrote down everything I wanted or really needed.
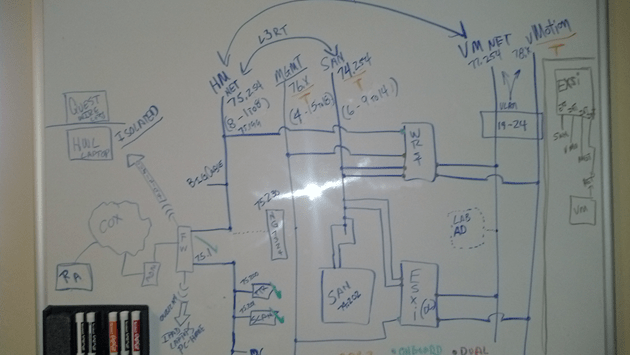
From this drawing I came up with this list…
- Support Remote Access
- VLANS
- VLAN Routing
- VLAN Tagging
- ESXi Host with 5 NICs
- Workstation 9 Host with 5 NICs
- Support 5 Different VLANs
- Support Internet Access for VM’s
- Local Storage support for home files
- Printer / Scanner need to be on the network
- I’m going to need a switch with 24 Ports or better
- Design the network so that I can power down the test lab and allow home devices to print and access the Inet.
Second thing – What do I currently have to work with…
- Windows 7×64, Workstation 9, 32GB RAM, iCore 7, 2 x SATA3 2TB 6gbs HD, 2 x SATA3 SSD (60 & 120), 1 NIC
- IO Mega IX4 with Dual NICs
- Older Netgear 16 Port Gig Layer 2 Switch unmanaged
- Netgear N900 with Guest Network Support
Based on these lists I came up with my shopping list…
- I need a Layer 3 Switch to support all this
- I need some Multiport Giga Bit NICs
Let’s start with the switch…Here is what I looked for in a Switch –
Must Have –
- Layer 3 Routing
- VLANs
- VLAN Routing
- Managed
- Quiet – It is a must for home networking as I work from home and am frequently on calls.
- Cost effective – keep it below a few hundred
Nice to have –
- Quality Brand
- Support
- Community behind the product
- Non-Blocking Switch
- OSPF or RIP
Basically most good Layer 3 switches achieve the requirements for 1-4. However these switches usually run in a Data center or Networking closet and are quite loud
I did some looking around for different switches, mostly used Cisco and Extreme Networks. These are switches that I am familiar with and would fit my home lab. However I’ve seen my share of their innards, I know their fans are loud and cannot easily be replaced. When I was at VMworld 2012 I chatted quite a bit with the Netgear folk about their products and I remember talking with them about their products and how they fit SMB to Enterprise quite nicely. I started to look on Ebay and I found an affordable Netgear Switch. I did some research on line and found how others were modifying the fans to help them run more quietly.
My choice was the Netgear GSM7324. It is a 24 Port Layer 3 Managed Switch from 2008. It meets all my must have needs and it fulfilled all of the “Nice To haves”
I also bought the following to support this switch –
Startech Null Modem DB9 to USB to run the CLI on the Switch
Sunon MagLev HA40201V4-0000-C99, 40x20mm,Super Silent FAN for $10 apiece, they fit perfectly and they run the switch at a tolerable noise level
TIP – And this is important… I had to move the PIN outs on these fans to meet the PIN outs on the Switch. If I didn’t it could have damaged the switch…
Next I started looking for Multi-Port Gigabit NICS…
What do I have to work with?
I’m using the Gigabyte Z68XP-UD3 for Workstation 9 and MSI Z68MA-G45B3 for my ESXi 5.x Host.
What are the Must haves for the NIC’s?
- Dual Gigabit
- VLAN support
- Jumbo Frames
- Support for ESXi and Windows 7×64
- I need about 4 of these cards
I choose the SYBA SY-PEX24028. It’s a Dual NIC Gigabit card that meets my requirements. I found it for $39 on Newegg .
Tip – When choosing a network card I needed to ensure the card will fit into my motherboards, not all x1 PCIe slots are the same and when looking at Dual Gigabit NICs most only work in server class hardware.
Summary –
I achieved what I was looking to accomplish and with some good design work I should have a top notch home lab. All in all I spent about ~$400 to upgrade my home lab. Which is not a bad deal considering most Layer 3 switches cost $400+. All my toys have now come in and I’m off to rework my lab…. But that my friend is a different blog post…
Test Lab – Day 6 Xsigo Redundancy testing with ESXi under load (Final Post)
Today I plan to setup the environment to simulate high disk I/O and re-run most the Xsigo tests from Day 4. My thoughts behind these tests are the Xisgo ran well under a minimal load but how would it perform when stressed.
Note: This blog post only covers how I setup testing but doesn’t have the final results. See A change of plans below for more information.
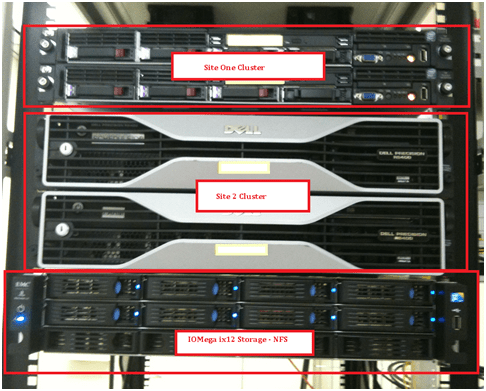
The environment layout will stay the same (4 x ESXi 4.1 hosts, each host with 10 VM’s, 2 Xsigo VP780’s and one IOMega IX12 with a 4 spindle NFS Datastore)
I’ll auto create about ~40 Windows 2003 VM’s and use PassMarks Burin Test to simulate a NFS load.
I plan to drive the IOMega to ~1Gbs of sustained NFS I/O by driving each VM’s hard disk.
While the load simulation is happening I’ll re-run the testing from Day 4, and record the results.
I do wish we could simulate a larger load however our NFS datastores are only across 4 Spindles. If we simulate a heavier load I believe it will “tank” the datastore making our testing pretty much worthless.
Preparing for the load Test.. In this step I setup my default template
I spun up a Windows 2003 server and installed the Burn in Test program.
I launched the BurnIn Test, clicked on Preferences, uncheck all, checked Disks, and entered a duty cycle of 25
Tip: BurnIn Test can be used for a wide range of load testing including CPU & Network (See below)
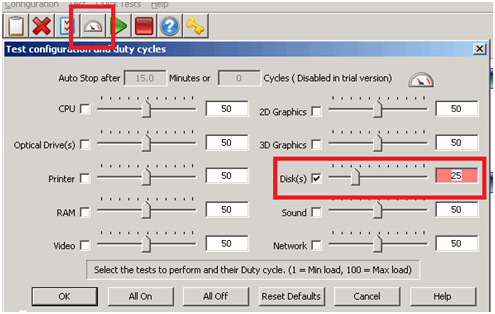
I saved the configuration file in the default folder.
I repeated this process and created 4 more config files driving the Disk to duty cycles of 5, 10, 50 and 100.
Writing the batch file to launch the BurnIn Test config file was simple (see below) and I created one for each duty cycle.

Tip: Before changing this VM into a template I tested my batch files to ensure all was working well.
Next I wrote a simple vSphere PowerCLI script to create the VM’s, it nothing complex but it did the trick..
I simply opened the vSphere PowerCLI prompt and pasted in the following lines…
|
$server_address = “vCenter Server IP” $username = “Administrator” $password = “your password here” $template_name = “w2003Template” $datastore_name = “NFS” $customization = “W23K” $location = “LoadTest” $destination_host = “ESX Host 1 IP Address” New-VM -Name 2003VMT21 -Location $location -Template $template_name -Host $destination_host -Datastore $datastore_name -OSCustomizationSpec $customization New-VM -Name 2003VMT22 -Location $location -Template $template_name -Host $destination_host -Datastore $datastore_name -OSCustomizationSpec $customization New-VM -Name 2003VMT23 -Location $location -Template $template_name -Host $destination_host -Datastore $datastore_name -OSCustomizationSpec $customization New-VM -Name 2003VMT24 -Location $location -Template $template_name -Host $destination_host -Datastore $datastore_name -OSCustomizationSpec $customization New-VM -Name 2003VMT25 -Location $location -Template $template_name -Host $destination_host -Datastore $datastore_name -OSCustomizationSpec $customization New-VM -Name 2003VMT26 -Location $location -Template $template_name -Host $destination_host -Datastore $datastore_name -OSCustomizationSpec $customization New-VM -Name 2003VMT27 -Location $location -Template $template_name -Host $destination_host -Datastore $datastore_name -OSCustomizationSpec $customization New-VM -Name 2003VMT28 -Location $location -Template $template_name -Host $destination_host -Datastore $datastore_name -OSCustomizationSpec $customization New-VM -Name 2003VMT29 -Location $location -Template $template_name -Host $destination_host -Datastore $datastore_name -OSCustomizationSpec $customization New-VM -Name 2003VMT30 -Location $location -Template $template_name -Host $destination_host -Datastore $datastore_name -OSCustomizationSpec $customization $destination_host = “ESX Host 2 IP Address” New-VM -Name 2003VMT31 -Location $location -Template $template_name -Host $destination_host -Datastore $datastore_name -OSCustomizationSpec $customization New-VM -Name 2003VMT32 -Location $location -Template $template_name -Host $destination_host -Datastore $datastore_name -OSCustomizationSpec $customization New-VM -Name 2003VMT33 -Location $location -Template $template_name -Host $destination_host -Datastore $datastore_name -OSCustomizationSpec $customization New-VM -Name 2003VMT34 -Location $location -Template $template_name -Host $destination_host -Datastore $datastore_name -OSCustomizationSpec $customization New-VM -Name 2003VMT35 -Location $location -Template $template_name -Host $destination_host -Datastore $datastore_name -OSCustomizationSpec $customization New-VM -Name 2003VMT36 -Location $location -Template $template_name -Host $destination_host -Datastore $datastore_name -OSCustomizationSpec $customization New-VM -Name 2003VMT37 -Location $location -Template $template_name -Host $destination_host -Datastore $datastore_name -OSCustomizationSpec $customization New-VM -Name 2003VMT38 -Location $location -Template $template_name -Host $destination_host -Datastore $datastore_name -OSCustomizationSpec $customization New-VM -Name 2003VMT39 -Location $location -Template $template_name -Host $destination_host -Datastore $datastore_name -OSCustomizationSpec $customization New-VM -Name 2003VMT40 -Location $location -Template $template_name -Host $destination_host -Datastore $datastore_name -OSCustomizationSpec $customization
This pattern was repeated on the other ESX hosts until ~40 VM’s were created… |
Test Procedure…
Using the Burn In test program I will drive the utilization on the ~40 VM’s until 1Gbs of sustained NFS I/O is achieved.
I’ll use vCenter Server to ensure NFS traffic is passing through XSA and then start the tests below.
All of the ESX Hosts are attached to the IOMega via NFS, this means all traffic has to pass through the Xsigo and our network to get to the IOMega.
I used a Laptop, the ESXi console in tech support, vCenter Server mode to capture and validate the results.
Keep in mind this deployment is a SINGLE site scenario and for accuracy we allowed the environment to settle between tests.
A Change in plans.…
At this point the testing had to stop. Reason why – I put in my two weeks’ notice and had to focus on a transition plan and less on testing.
My hopes are if you’re reading this post it will give you a baseline for testing.
Test Lab – Day 5 Expanding the IOMega ix12-300r
Recently I installed an IOMega ix12-300r for our ESX test lab and it’s doing quite will
However I wanted to push our Iomega to about 1Gbs of sustained NFS traffic of the available 2Gbs.
To do this I needed to expand our 2 drive storage pool to 4 drives.
From a previous post we created 3 storage pools as seen below.
Storage Pool 0 (SP0) 4 Drives for basic file shares (CIFS)
Storage Pool 1 (SP1_NFS) 2 drives for ESX NFS Shares only
Storage Pool 2 (SP2_iSCSI) 2 drives dedicated for ESX iSCSI only
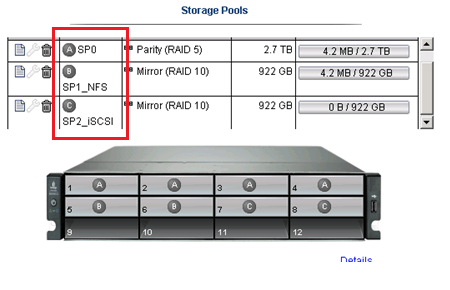
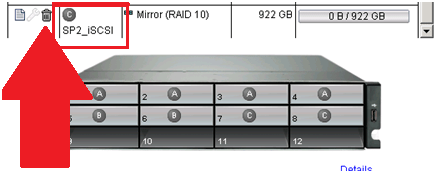
In this post I’m going to delete the unused SP2_iSCSI and add those drives to SP1_NFS
Note: This procedure is simply the pattern I used in my environment. I’m not stating this is the right way but simply the way it was done. I don’t recommend you use this pattern or use it for any type of validation. These are simply my notes, for my personal records, and nothing more.
Under settings select storage pools

Select the Trash Can to delete the storage pools..
It prompted me to confirm and it deleted the storage pool.
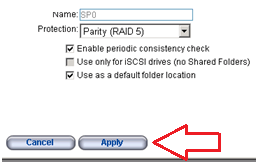
Next I choose the Edit icon on SP2_NFS, selected the drives I wanted, choose RAID 5, and pressed apply.

From there it started to expand the 2 disk RAID1 to a 4 disk RAID5 storage pool..
Screenshot from the IOMega ix12 while it is being expanded…

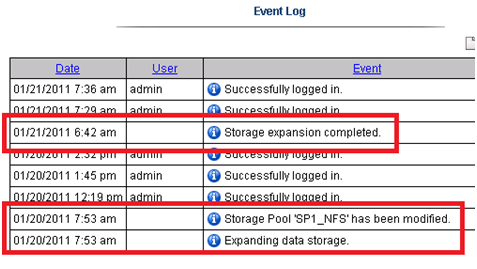
I then went to the Dashboard and under status I can view its progress…

ALL this with NO Down time to ESX, in fact I’m writing this post from a VM at the expansion is happening.
It took about 11 Hours to rebuild the RAID set.
Tip: Use the event log under settings to determine how long the rebuild took.
The next day I checked in on ESX and it was reporting the updated store size.

Summary…
To be able to expand your storage pool that houses your ESXi test environment with no down time is extremely beneficial and a very cool feature.
Once again IOMega is living up to its tag line – IOmega Kicks NAS!
Tomorrow we’ll see how it performs when we push a higher load to it.
Test Lab – Day 4 Xsigo Redundancy testing with ESXi
Today I tested Xsigo redundancy capabilities within the ESXi test environment.
So far I have built up an environment with 4 x ESXi 4.1 hosts, each with a Single VM, and 2 Xsigo VP780’s.
Each VM is pretty much idle for this test, however tomorrow I plan to introduce some heavier IP and NFS traffic and re-run the tests below.
I used a Laptop and the ESXi console in tech support mode to capture the results.
Keep in mind this deployment is a SINGLE site scenario.
This means both Xsigo are considered at the same site and each ESXi host is connected to the A & B Xsigo.

Note: This test procedure is simply the pattern I used to test my environment. I’m not stating this is the right way to test an environment but simply the way it was done. I don’t recommend you use this pattern to test your systems or use it for validation. These are simply my notes, for my personal records, and nothing more.
Reminder:
XNA, XNB are Xsigo Network on Xsigo Device A or B and are meant for IP Network Traffic.
XSA, XSB are Xsigo Storage or NFS on Xsigo Device A or B and are meant for NFS Data Traffic.
Test 1 – LIVE I/O Card Replacement for Bay 10 for IP Networking
Summary –
Xsigo A sent a message to Xsigo support stating the I/O Module had an issue. Xsigo support contacted me and mailed out the replacement module.
The affected module controls the IP network traffic (VM, Management, vMotion).
Usually, an I/O Module going out is bad news. However, this is a POC (Proof of Concept) so I used this “blip” to our advantage and captured the test results.
Device – Xsigo A
Is the module to be affected currently active? Yes
Pre-Procedure –
Validate by Xsigo CLI – ‘show vnics’ to see if vnics are in the up state – OKAY
Ensure ESX Hosts vNICs are in Active mode and not standby – OKAY
Ensure ESX Hosts network configuration is setup for XNA and XNB in Active Mode – OKAY
Procedure –
Follow replacement procedure supplied with I/O Replacement Module
Basic Steps supplied by Xsigo –
- Press the Eject button for 5 seconds to gracefully shut down the I/O card
- Wait LED to go solid blue
- Remove card
- Insert new card
-
Wait for I/O card to come online LED will go from Blue to Yellow/Green
- The Xsigo VP780 will update card as needed Firmware & attached vNIC’s
- Once the card is online your ready to go
Expected results –
All active IP traffic for ESXi (including VM’s) will continue to pass through XNB
All active IP traffic for ESXi (including VM’s) might see a quick drop depending on which XN# is active
vCenter Server should show XNA as unavailable until new I/O Module is online
The I/O Module should take about 5 Minutes to come online
How I will quantify results –
All active IP traffic for ESXi (including VM’s) will continue to pass through XNB
- Active PING to ESXi Host (Management Network, VM’s) and other devices to ensure they stay up
All active IP traffic for ESXi (including VM’s) might see a quick drop depending on which XN# is active
- Active PING to ESXi Host (Management Network, VM’s)
vCenter Server should show XNA as unavailable until new I/O Module is online
- In vCenter Server under Network Configuration check to see if XNA goes down and back to active
The I/O Module should take about 5 Minutes to come online
- I will monitor the I/O Module to see how long it takes to come online
Actual Results –
Pings –
| From Device | Destination Device | Type | Result During | Result coming online / After |
| External Laptop | Windows 7 VM | VM | No Ping Loss | No Ping Loss |
| External Laptop | vCenter Server | VM | One Ping Loss | No Ping Loss |
| External Laptop | ESX Host 1 | ESX | One Ping Loss | One Ping Loss |
| External Laptop | ESX Host 2 | ESX | One Ping Loss | One Ping Loss |
| External Laptop | ESX Host 3 | ESX |
No Loss |
One Ping Loss |
| External Laptop | ESX Host 4 | ESX | No Loss | No Loss |
| ESX Host | IOMega Storage | NFS | No Loss | No Loss |
From vCenter Server –
XNA status showing down during module removal on all ESX Hosts
vCenter Server triggered the ‘Network uplink redundancy lost’ – Alarm
I/O Module Online –
The I/O Module took about 4 minutes to come online.
Test 1 Summary –
All results are as expected. There was only very minor ping loss, which for us is nothing to be worried about
Test 2 – Remove fibre 10gig Links on Bay 10 for IP Networking
Summary –
This test will simulate fibre connectivity going down for the IP network traffic.
I will simulate the outage by disconnecting the fibre connection from Xsigo A, measure/record the results, return the environment to normal, and then repeat for Xsigo B.
Device – Xsigo A and B
Is this device currently active? Yes
Pre-Procedure –
Validate by Xsigo CLI – ‘show vnics’ to see if vnics are in up state
- Xsigo A and B are reporting both I/O Modules are functional
Ensure ESX Host vNICs are in Active mode and not standby
- vCenter server is reporting all communication is normal
Procedure –
Remove the fibre connection from I/O Module in Bay 10 – Xsigo A
Measure results via Ping and vCenter Server
Replace the cable, ensure system is stable, and repeat for Xsigo B device
Expected results –
All active IP traffic for ESXi (including VM’s) will continue to pass through the redundant XN# adapter
All active IP traffic for ESXi (including VM’s) might see a quick drop if it’s traffic is flowing through the affected adapter.
vCenter Server should show XN# as unavailable until fibre is reconnected
How I will quantify results –
All active IP traffic for ESXi (including VM’s) will continue to pass through XNB
- Using PING the ESXi Hosts (Management Network, VM’s) and other devices to ensure they stay up
All active IP traffic for ESXi (including VM’s) might see a quick drop depending on which XN# is active
- Active PING to ESXi Host (Management Network, VM’s)
vCenter Server should show XNA as unavailable until new I/O Module is online
- In vCenter Server under Network Configuration check to see if XNA goes down and back to active
Actual Results –
Xsigo A Results…
Pings –
| From Device | Destination Device | Type | Result During | Result coming online / After |
| External Laptop | Windows 7 VM | VM | No Ping Loss | No Ping Loss |
| External Laptop | vCenter Server | VM | No Ping Loss | One Ping Loss |
| External Laptop | ESX Host 1 | ESX | One Ping Loss | No Ping Loss |
| External Laptop | ESX Host 2 | ESX | No Ping Loss | One Ping Loss |
| External Laptop | ESX Host 3 | ESX |
No Ping Loss |
One Ping Loss |
| External Laptop | ESX Host 4 | ESX | One Ping Loss | One Ping Loss |
| ESX Host | IOMega Storage | NFS | No Ping Loss | No Ping Loss |
From vCenter Server –
XNA status showing down during module removal on all ESX Hosts
vCenter Server triggered the ‘Network uplink redundancy lost’ – Alarm
Xsigo B Results…
Pings –
| From Device | Destination Device | Type | Result During | Result coming on line / After |
| External Laptop | Windows 7 VM | VM | One Ping Loss | One Ping Loss |
| External Laptop | vCenter Server | VM | No Ping Loss | No Ping Loss |
| External Laptop | ESX Host 1 | ESX | No Ping Loss | No Ping Loss |
| External Laptop | ESX Host 2 | ESX | No Ping Loss | No Ping Loss |
| External Laptop | ESX Host 3 | ESX |
No Ping Loss |
No Ping Loss |
| External Laptop | ESX Host 4 | ESX | No Ping Loss | One Ping Loss |
| ESX Host | IOMega Storage | NFS | No Ping Loss | No Ping Loss |
From vCenter Server –
XNB status showing down during module removal on all ESX Hosts
vCenter Server triggered the ‘Network up link redundancy lost’ – Alarm
Test 2 Summary –
All results are as expected. There was only very minor ping loss, which for us is nothing to be worried about
Test 3 – Remove fibre 10g Links to NFS
Summary –
This test will simulate fibre connectivity going down for the NFS network.
I will simulate the outage by disconnecting the fibre connection from Xsigo A, measure/record the results, return the environment to normal, and then repeat for Xsigo B.
Device – Xsigo A and B
Is this device currently active? Yes
Pre-Procedure –
Validate by Xsigo CLI – ‘show vnics’ to see if vnics are in up state
- Xsigo A and B are reporting both I/O Modules are functional
Ensure ESX Host vNICs are in Active mode and not standby
- vCenter server is reporting all communication is normal
Procedure –
Remove the fibre connection from I/O Module in Bay 11 – Xsigo A
Measure results via Ping, vCenter Server, and check for any VM GUI hesitation.
Replace the cable, ensure system is stable, and repeat for Xsigo B device
Expected results –
All active NFS traffic for ESXi (including VM’s) will continue to pass through the redundant XS# adapter
All active NFS traffic for ESXi (including VM’s) might see a quick drop if it’s traffic is flowing through the affected adapter.
vCenter Server should show XS# as unavailable until fibre is reconnected
I don’t expect for ESXi to take any of the NFS datastores off line
How I will quantify results –
All active NFS traffic for ESXi (including VM’s) will continue to pass through XSB
- Active PING to ESXi Host (Management Network, VM’s) and other devices to ensure they stay up
All active NFS traffic for ESXi (including VM’s) might see a quick drop depending on which XN# is active
- Active PING to ESXi Host (Storage, Management Network, VM’s)
vCenter Server should show XS# as unavailable until fibre is reconnected
- In vCenter Server under Network Configuration check to see if XS# goes down and back to active
I don’t expect for ESXi to take any of the NFS datastores offline
- In vCenter Server under storage, I will determine if the store goes offline
Actual Results –
Xsigo A Results…
Pings –
| From Device | Destination Device | Type | Result During | Result coming online / After |
| External Laptop | Windows 7 VM | VM | No Ping Loss | No Ping Loss |
| External Laptop | vCenter Server | VM | No Ping Loss | No Ping Loss |
| External Laptop | ESX Host 1 | ESX | No Ping Loss | No Ping Loss |
| External Laptop | ESX Host 2 | ESX | No Ping Loss | No Ping Loss |
| External Laptop | ESX Host 3 | ESX |
No Ping Loss |
No Ping Loss |
| External Laptop | ESX Host 4 | ESX | No Ping Loss | No Ping Loss |
| ESX Host | IOMega Storage | NFS | No Ping Loss | Two Ping Loss |
From vCenter Server –
XSA & XSB status showing down during fibre removal on all ESX Hosts
vCenter Server triggered the ‘Network uplink redundancy lost’ – Alarm
No VM GUI Hesitation reported
Xsigo B Results…
Pings –
| From Device | Destination Device | Type | Result During | Result coming online / After |
| External Laptop | Windows 7 VM | VM | No Ping Loss | No Ping Loss |
| External Laptop | vCenter Server | VM | No Ping Loss | No Ping Loss |
| External Laptop | ESX Host 1 | ESX | No Ping Loss | No Ping Loss |
| External Laptop | ESX Host 2 | ESX | No Ping Loss | No Ping Loss |
| External Laptop | ESX Host 3 | ESX |
No Ping Loss |
No Ping Loss |
| External Laptop | ESX Host 4 | ESX | No Ping Loss | No Ping Loss |
| ESX Host | IOMega Storage | NFS | No Ping Loss | No Ping Loss |
From vCenter Server –
XNB status showing down during module removal on all ESX Hosts
vCenter Server triggered the ‘Network up link redundancy lost’ – Alarm
No VM GUI Hesitation reported
Test 3 Summary –
All results are as expected. There was only very minor ping loss, which for us is nothing to be worried about
Test 4 – Remove Infiniband cables from the ESXi HBA.
Summary –
During this test, I will remove all the Infiniband cables (4 of them) from the ESXi HBA.
I will disconnect the Infiniband connection to Xsigo A first, measure/record the results, return the environment to normal, and then repeat for Xsigo B.
Pre-Procedure –
Validate by Xsigo CLI – ‘show vnics’ to see if vnics are in upstate
- Xsigo A and B are reporting both I/O Modules are functional
Ensure ESX Host vNICs are in Active mode and not standby
- vCenter server is reporting all communication is normal
Procedure –
Remove the InfiniBand cable from each ESXi Host attaching to Xsigo A
Measure results via Ping, vCenter Server, and check for any VM GUI hesitation.
Replace the cables, ensure system is stable, and repeat for Xsigo B device
Expected results –
ALL active traffic (IP or NFS) for ESXi (including VM’s) will continue to pass through the redundant XNB or XSB accordingly.
All active traffic (IP or NFS) for ESXi (including VM’s) might see a quick drop if it’s traffic is flowing through the affected adapter.
vCenter Server should show XNA and XSA as unavailable until cable is reconnected
I don’t expect for ESXi to take any of the NFS datastores offline
How I will quantify results –
ALL active traffic (IP or NFS) for ESXi (including VM’s) will continue to pass through the redundant XNB or XSB accordingly.
- Active PING to ESXi Host (Management Network, VM’s) and other devices to ensure they stay up
All active traffic (IP or NFS) for ESXi (including VM’s) might see a quick drop if it’s traffic is flowing through the affected adapter.
- Active PING to ESXi Host (Storage, Management Network, VM’s)
vCenter Server should show XNA and XSA as unavailable until cable is reconnected
- In vCenter Server under Network Configuration check to see if XS# goes down and back to active
I don’t expect for ESXi to take any of the NFS datastores offline
- In vCenter Server under storage, I will determine if the store goes offline
Actual Results –
Xsigo A Results…
Pings –
| From Device | Destination Device | Type | Result During | Result coming online / After |
| External Laptop | Windows 7 VM | VM | No Ping Loss | Two Ping Loss |
| External Laptop | vCenter Server | VM | No Ping Loss | No Ping Loss |
| External Laptop | ESX Host 1 | ESX | No Ping Loss | No Ping Loss |
| External Laptop | ESX Host 2 | ESX | No Ping Loss | No Ping Loss |
| External Laptop | ESX Host 3 | ESX |
No Ping Loss |
No Ping Loss |
| External Laptop | ESX Host 4 | ESX | No Ping Loss | No Ping Loss |
| ESX Host | IOMega Storage | NFS | No Ping Loss | No Ping Loss |
From vCenter Server –
XSA & XNA status showing down during fibre removal on all ESX Hosts
vCenter Server triggered the ‘Network uplink redundancy lost’ – Alarm
No VM GUI Hesitation reported
NFS Storage did not go offline
Xsigo B Results…
Pings –
| From Device | Destination Device | Type | Result During | Result coming on line / After |
| External Laptop | Windows 7 VM | VM | No Ping Loss | No Ping Loss |
| External Laptop | vCenter Server | VM | One Ping Loss | One Ping Loss |
| External Laptop | ESX Host 1 | ESX | No Ping Loss | No Ping Loss |
| External Laptop | ESX Host 2 | ESX | No Ping Loss | One Ping Loss |
| External Laptop | ESX Host 3 | ESX |
No Ping Loss |
No Ping Loss |
| External Laptop | ESX Host 4 | ESX | One Ping Loss | No Ping Loss |
| ESX Host | IOMega Storage | NFS | No Ping Loss | No Ping Loss |
From vCenter Server –
XNB & XSB status showing down during module removal on all ESX Hosts
vCenter Server triggered the ‘Network up link redundancy lost’ – Alarm
NFS Storage did not go offline
Test 4 Summary –
All results are as expected. There was only very minor ping loss, which for us is nothing to be worried about
Test 5 – Pull Power on active Xsigo vp780
Summary –
During this test, I will remove all the power cords from Xsigo A.
I will disconnect the power cords from Xsigo A first, measure/record the results, return the environment to normal, and then repeat for Xsigo B.
Pre-Procedure –
Validate by Xsigo CLI – ‘show vnics’ to see if vnics are in up state
- Xsigo A and B are reporting both I/O Modules are functional
Ensure ESX Host vNICs are in Active mode and not standby
- vCenter server is reporting all communication is normal
Procedure –
Remove power cables from Xsigo A
Measure results via Ping, vCenter Server, and check for any VM GUI hesitation.
Replace the cables, ensure system is stable, and repeat for Xsigo B device
Expected results –
ALL active traffic (IP or NFS) for ESXi (including VM’s) will continue to pass through the redundant XNB or XSB accordingly.
All active traffic (IP or NFS) for ESXi (including VM’s) might see a quick drop if it’s traffic is flowing through the affected adapter.
vCenter Server should show XNA and XSA as unavailable until cable is reconnected
I don’t expect for ESXi to take any of the NFS datastores offline
How I will quantify results –
ALL active traffic (IP or NFS) for ESXi (including VM’s) will continue to pass through the redundant XNB or XSB accordingly.
- Active PING to ESXi Host (Management Network, VM’s) and other devices to ensure they stay up
All active traffic (IP or NFS) for ESXi (including VM’s) might see a quick drop if it’s traffic is flowing through the affected adapter.
- Active PING to ESXi Host (Storage, Management Network, VM’s)
vCenter Server should show XNA and XSA as unavailable until cable is reconnected
- In vCenter Server under Network Configuration check to see if XS# goes down and back to active
I don’t expect for ESXi to take any of the NFS datastores offline
- In vCenter Server under storage, I will determine if the store goes offline
Actual Results –
Xsigo A Results…
Pings –
| From Device | Destination Device | Type | Result During | Result coming online / After |
| External Laptop | Windows 7 VM | VM | No Ping Loss | No Ping Loss |
| External Laptop | vCenter Server | VM | One Ping Loss | One Ping Loss |
| External Laptop | ESX Host 1 | ESX | One Ping Loss | One Ping Loss |
| External Laptop | ESX Host 2 | ESX | One Ping Loss | One Ping Loss |
| External Laptop | ESX Host 3 | ESX |
No Ping Loss |
No Ping Loss |
| External Laptop | ESX Host 4 | ESX | No Ping Loss | One Ping Loss |
| ESX Host | IOMega Storage | NFS | No Ping Loss | No Ping Loss |
From vCenter Server –
XSA & XNA status showing down during the removal on all ESX Hosts
vCenter Server triggered the ‘Network uplink redundancy lost’ – Alarm
No VM GUI Hesitation reported
NFS Storage did not go offline
Xsigo B Results…
Pings –
| From Device | Destination Device | Type | Result During | Result coming online / After |
| External Laptop | Windows 7 VM | VM | One Ping Loss | No Ping Loss |
| External Laptop | vCenter Server | VM | One Ping Loss | One Ping Loss |
| External Laptop | ESX Host 1 | ESX | No Ping Loss | No Ping Loss |
| External Laptop | ESX Host 2 | ESX | No Ping Loss | One Ping Loss |
| External Laptop | ESX Host 3 | ESX |
One Ping Loss |
One Ping Loss |
| External Laptop | ESX Host 4 | ESX | One Ping Loss | No Ping Loss |
| ESX Host | IOMega Storage | NFS | One Ping Loss | No Ping Loss |
From vCenter Server –
XNB & XSB status showing down during module removal on all ESX Hosts
vCenter Server triggered the ‘Network uplink redundancy lost’ – Alarm
No VM GUI Hesitation reported
NFS Storage did not go offline
Test 5 Summary –
All results are as expected. There was only very minor ping loss, which for us is nothing to be worried about
It took about 10 Mins for the Xsigo come up and online from the point I pulled the power cords to the point ESXi reported the vnics were online..
Overall Thoughts…
Under very low load the Xsigo it performed as expected with ESXi. So far the redundancy testing is going well.
Tomorrow I plan to place a pretty hefty load on the Xsigo and IOMega to see how they will perform under the same conditions.
I’m looking forward to seeing if the Xsigo can perform just as well under load.
Trivia Question…
How do you know if someone has rebooted and watched an Xsigo boot?
This very cool logo comes up on the bootup screen! Now that’s Old School and very cool!

Test Lab – Day 3 ESXi 4.1 Setup with Xsigo, NFS, and the ix12
During Day 1 and 2 we installed the Xsigo hardware, IOMega ix12, ESXi 4.1, interconnected hardware, and ensure it all communicated well.
Today’s Goals…
- Copy vCenter Server & other VM’s from Production to this test environment
- Configure ESXi with the Xsigo vNIC’s
- Setup the ix12 to communicate via NFS to the ESX Hosts
Day 3 Overview…
On Day 2 we configured the Xsigos to present vNIC’s to the ESXi hosts. This will allow for network and storage (NFS) traffic in our test lab.
Keep in mind the ESXi test network is an isolated network. However I plan to transfer clones of a pre-made vm’s by placing a Test ESXi Host out and in of the test environment..
Today I’ll setup the ESXi hosts to talk to the new vCenter Server and get it communicating with our IOMega Shared storage
Copy vCenter Server & other VM’s from Production to this test environment…
Currently the ESXi Management NIC’s are using the Xsigo vNICs (xna, xnb) for host communication.
However I need to swap ESXi Management Network to a different network so I can transfer a VM clone to its local storage.
The vm clone I’m transferring is a pre-made vCenter Server 4.1 and when transferred it will assist us with configuration.
Basically I am swapping which vCenter Server controls the Test ESXi host by changing the Management NIC from Test to Production and back.
The Swap…
In this step I am selecting the local onboard pNIC (vmnic0) as the Management NIC and deselecting the Xsigo vNIC’s (Xsigo_xna & xnb) from the ESXi host.
This will place the host in a network that will allow for the clone transfer.
- From the ESXi host press F2 to ‘Customize System’
- Logon as root
- Choose Configure Management Network
- Choose Network Adapters
- Select vmnic0 as the Management NIC and disconnect all others
- Save up and it should restart the Management Network

Once I have selected the appropricate pNIC as my management adapter, I attached this ESXi host to the other vCenter Server, and then transfer the VM clone to the local VMFS storage.
Once the VM is transferred I configured its networking adapters to adapt to the new test network and powered up the VM.
I logged in to the VM and ensure it is operational.
With the VM still powered up I transferred the Management Network back to the Xsigo vNIC’s and then RDP into the cloned vCenter Server.
Tip: Make sure you know your local Administrator password. After the transfer AD won’t be around for authentication.
Configure ESXi with the Xsigo vNIC’s…
Once the test vCenter Server is booted, I completed the IP setup of the other ESXi test hosts ensuring their management networks were using their assigned Xsigo_xna and xnb adapters.
I then attached all the ESXi Test Hosts to the test vCenter server and configured their networking.
Here is what ESXi looks like when all the adapters are recognized..

NOTE: the Xsigo adapters are showing 10gig Full. You might be asking yourself “I thought Infiniband was faster than 10gig” It is, we’ll address this note later in my posts..
The next step is to create your vSwitches…
I created vSwitch0 for VM’s, vMotion, and Host Management and vSwitch1 for NFS traffic to my storage.
XNA and XNB will be connected to vSwitch0
XSA and XSB will be connected to vSwitch1

NOTE: As of this writing Xsigo supports vSwitches only, sorry no Distributed Switches at this time.
Setup the IOmega ix12 to communicate via NFS to the ESX Hosts…
First step is to ensure your ix12 is online and the network is functioning properly.
After confirming the network logon to its web admin tool, choose settings, network services, and then network settings.
We choose link aggregation, ensure the IP was correct, and bonded NIC 3 and 4 on this ix12.

Tip: One cool thing about the ix12 is we can allocate NICs for different functions, in this case NIC3 & 4 is for our esxi test environment and nic1 is for another purpose.
Note: By changing the network information usually means a reboot of the device L
I logged into my ESXi host, placed it in Techsupport mode and used ping to test ix12 interface.
Once the network was sound, I enabled NFS on the ix12 and setup a NFS folder
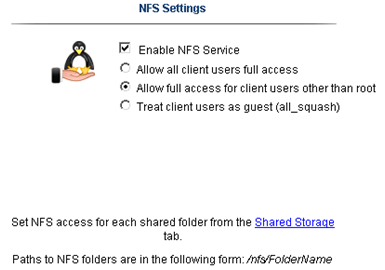
Yes folks, it’s that easy to enable NFS on the ix12…
The only step not show here was setting up a storage pool for NFS and associating the shared folder to it.
Back to ESXi… Let’s setup the NFS Connection…
In vCenter server simply click on the host > Configuration > Storage > Add Storage
A new window appears, choose Network File System then next
Fill in the IP of the ix12, the folder name, and datastore name > click next
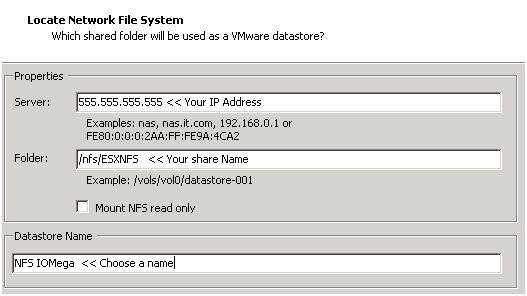
Confirm and you’re done!

Next steps are to use Storage vMotion (aka Migrate Virtual Machines datastore) the Test vCenter Server from local storage to our new NFS Share..
When I completed this step we transferred about 40GB from the local ESXi storage to the IOMega ix12 in about 20Mins.
Summary…
Today was mainly about configuring ESXi and shared storage.
We were able setup all our ESXi hosts to the Xsigo, configured the shared storage, enable NFS and get a vCenter Server VM up and running.
Tomorrow the fun begins… Testing and more Testing!
Test Lab – Day 2 CLI with the Xsigo!
Yesterday I did about 90% of the hardware install. Today, Day 2, our Xsigo SE will be here to assist with the installation and configuration of the Xsigo to the ESX Hosts..
Today’s Goals..
- Install 2nd Xsigo VP780
- Install vmware ESXi 4.1 on 4 servers with Xsigo Drivers
- Configure both Xsigo vp780’s
Install 2nd Xsigo VP780…
Day 2 started out with a gift from Mr. FedEx, it was the parts we needed to install the 2nd Xsigo. Only yesterday afternoon we discovered we were missing some power cords and mounting brackets. A couple quick calls to Xsigo and viola parts are on their way. Props to Xsigo for a VERY quick response to this issue!
Based on the lessons learned from Day 1 we mounted the 2nd Xsigo VP780 and it went much smoother. Notice the WE part of installing the VP780, these things are heavy & large and you’ll need some help or a giant with huge hands to install them into a rack. See their install manual for more information.
When we powered them up I was amazed by the amount of air they moved through the device >> Very NICE!
Keep in mind at this point all the test lab hardware including the Xsigo fiber modules (2 x 10gig Fiber modules per device), and networking is mounted and interconnected…

Install vmware ESXi 4.1 on 4 servers with Xsigo Drivers…
You’ll need the Xsigo Drivers installed for ESXi to recognize the infiniband cards and for proper communication.
There are two installation options…
- Install ESXi 4.1 and add the Xsigo Drivers after the install.
- Download the drivers and re-master the ESXi ISO yourself (This is a good option if your building / rebuilding lots of servers)
We chose to re-master the ESXi ISO with the Xsigo drivers.
Here is the link to master the ISO
I won’t bore you with the details of installing ESXi, however the only gotcha I ran into was the Dell R5400 SATA RAID controller.
I setup a SATA RAID group, during the ESXi install it recognized the RAID volume, and ESXi installed to it without issue.
However after the reboot of the host it would not boot to this volume.
I didn’t have time to troubleshoot, for now we just broke the RAID group, reinstalled, and it worked perfectly.
ESXi Management NICS’s..
Our test lab network will be isolated from production network traffic. However, one of our servers will need to be in the production environment. We setup one physical NIC (pNIC) on to our production environment. This will allow us to temporarily transfer VM’s from production to test, we’ll then disconnect this pNIC and setup ESXi to use the Xsigo NIC for management.
(More to come on this on Day 3)
Configure both Xsigo vp780’s…
Configuring the vp780 was very simple. We attached a laptop to the Xsigo and in about 20 commands our Xsigo was up and running..
These are the basic commands we used to setup our pair of Xsigo’s (A and B), the commands below reflect B only.
The commands would be the same for the A Xsigo simply change the appropriate parameters…
NOTE: I don’t recommend you execute these commands in your environment, keep in mind these are for my reference ONLY… I also recommend you contact your Xsigo representative for assistance.
Here are the commands we executed..
Getting into the Xsigo VP780…
We used a standard Xsigo provided rollover cable plugged into Serial1. (Serial2 is for Tech / Debug – Don’t use)
We connected to the console via Putty or Absolute Telnet (COM Settings are 115200,8,1,None,None)
Tip: All default passwords are in the CLI Config Guide by Xsigo
Setup the Xsigo via the Wizard…
Once the connected we used the XgOS config Wizard and entered in the following..
|
Welcome to XgOS Copyright (c) 2007-2010 Xsigo Systems, Inc. All rights reserved.
Enter “help” for information on available commands.
Would you like to use the XgOS Configuration Wizard? [Y/n] Hostname: xsigo-b Domain: YOURDOMAIN.COM Is this Director to be designated as the IB subnet manager (leave as Y unless using an external, non-Xsigo subnet manager) ? [Y/n] Do you want this Director to send diagnostic data to Xsigo periodically? [Y/n] Please input the ‘root’ password: **** Please confirm the ‘root’ password: **** Please input the ‘admin’ password: ***** Please confirm the ‘admin’ password: ***** Please input the ‘recovery-password’: **** Please confirm the ‘recovery-password’: **** IP Address [static/DHCP]: 555.555.555.555 IP Address [static/DHCP]: Enter NTP Server 1: 555.555.555.555 Enter NTP Server 2: Enter Timezone [<Tab><Tab> for the list of Timezones]: America_Phoenix Welcome to XgOS Copyright (c) 2007-2010 Xsigo Systems, Inc. All rights reserved.
Enter “help” for information on available commands. admin@xsigo-b[xsigo] |
Now it’s time to setup the Xsigo…
Place the Xsigo into Trunk Mode..
Port 10 and Port 11 are the 10gig Fibre Modules; this command places them in Trunk Mode
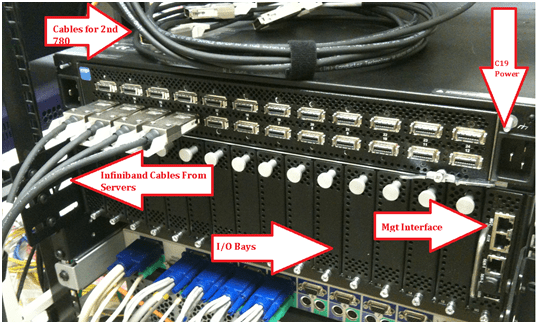
set ethernet-port 10/1 -mode=trunk << Port 10 will be used for our IP Network (Vlans for Guests, vmotion, hosts, etc)
set ethernet-port 11/1 -mode=trunk << Port 11 will be used for our NFS
Rear of VP780

Ensure Trunk Mode is activated..
Use the command ‘show ethernet-port ‘
|
admin@xsigo-b[xsigo] show ethernet-port
name type state descr mode flags lag access-vlan vnics vlans ——————————————————————————- 10/1 nwEthernet10GbPort up/up trunk -s— 1 0 none 11/1 nwEthernet10GbPort up/up trunk -s— 1 0 none 2 records displayed |
Setup Phone Home for Support…
set system phone-home -customer-name=”YOUR COMPANY NAME HERE”
set system phone-home -contact-email-address=YOURNAME@YOURDOMAIN.COM
set system phone-home -contact-phone-numbers=”555-555-5555″
set system phone-home proxy [YOUR PROXY IP HERE] [PROXY PORT if needed, default is 3128]
Note: For this command the syntax is [PROXY IP Address] one space [PROXY PORT], don’t use ‘:’ to as the separator.
Once completed then check confirm your information…
Enter the command ‘show system phone-home’
|
admin@xsigo-b[xsigo] show system phone-home ——————————————————————————- enabled true freq weekly next Fri Jan 14 12:44:52 MST 2011 notify no strip yes alarm yes name COMPANYNAME email EMAIL@EMAIL.com phone 5555555555 copy p-host 555.555.555.555:3128 p-user ——————————————————————————- 1 record displayed admin@xsigo-b[xsigo] |
Check on the Phone Home Log….
admin@xsigo-b[xsigo] showlog phonehome.log
Wed Jan 5 17:30:33 MST 2011: Phone home successful to http://phone-home.xsigo.com:6522
Wed Jan 5 18:04:14 MST 2011: Phone home successful to http://phone-home.xsigo.com:6522
Wed Jan 5 18:04:38 MST 2011: Phone home successful to http://phone-home.xsigo.com:6522
[Press CRTL-C to Exit]
admin@xsigo-b[xsigo]
Tip: your log might be empty until it has something to send
Ensure your Physical servers are attached…
As expected all 4 servers are attached to this Xsigo.. (If they don’t show up here it could be an interconnect or ESXi issue)
Enter the command ‘show physical-server’ to view your connected servers.
|
admin@xsigo-b[xsigo] show physical-server ——————————————————————————- name localhost <<< This is the ESXi Hostname guid 2c903000b4df5 descr port xsigo-001397001:ServerPort2 << This is the Xsigo Port the Server is connected to os VMware/ESXi-4.1.0:xg-3.5.0-1-246491/x86_64 << This is the version of ESX & Xsigo Driver version 2.7.0/3.0.0 server-profile << Notice this is blank, We configured it next ——————————————————————————- name localhost guid 2c903000b4ea5 descr port xsigo-001397001:ServerPort3 os VMware/ESXi-4.1.0:xg-3.5.0-1-246491/x86_64 version 2.7.0/3.0.0 server-profile ——————————————————————————- name localhost guid 2c903000b4ea9 descr port xsigo-001397001:ServerPort4 os VMware/ESXi-4.1.0:xg-3.5.0-1-246491/x86_64 version 2.7.0/3.0.0 server-profile ——————————————————————————- name localhost guid 2c903000b5095 descr port xsigo-001397001:ServerPort1 os VMware/ESXi-4.1.0:xg-3.5.0-1-246491/x86_64 version 2.7.0/3.0.0 server-profile ——————————————————————————- 4 records displayed |
Create Server Profiles…
Creating a server profile enables you to assign devices to your specific host.
In our case we used the ESX Hostname as the Xsigo Server Profile name.
This will help us to keep the profiles well organized.
Keep in mind YOURSERVERNAME# equals your ESX Hostname and it will become your Xsigo Server Profile Name…
Long way to create a Server Profile…
add server-profile [server profile name]
View the new server profile…
|
admin@xsigo-b[xsigo] show server-profile name state descr connection def-gw vnics vhbas ——————————————————————————- YOURSERVER1 up/unassigned 0 0 1 record displayed |
Assign the server profile to a port on the Xsigo…
set server-profile YOURSERVER1 connect localhost@xsigo-001397001:ServerPort1
Short way to create a Server Profile…
add server-profile YOURSERVER2 localhost@xsigo-001397001:ServerPort2
add server-profile YOURSERVER1 localhost@xsigo-001397001:ServerPort3
add server-profile YOURSERVER1 localhost@xsigo-001397001:ServerPort4
Then use show server-profile to confirm your entries…
|
admin@xsigo-b[xsigo] show server-profile name state descr connection def-gw vnics vhbas ——————————————————————————- Yourserver3 up/up localhost@xsigo-001397001:ServerPort3 0 0 Yourserver4 up/up localhost@xsigo-001397001:ServerPort4 0 0 Yourserver1 up/up localhost@xsigo-001397001:ServerPort1 0 0 Yourserver2 up/up localhost@xsigo-001397001:ServerPort2 0 0 4 records displayed admin@xsigo-b[xsigo] |
Set Up and attach the virtual NICS to your server profile…
In this step we created our Xsigo vNICS, attached them to the appropriate server profiles, and the 10gig Modules.
When complete each of our ESXi servers will have 4 Xsigo vNICS.
(2 vNICs for IP Network, 2 vNICs for Storage network)
Decoding the command…
The command ‘add vnic xnb.yourservername1 10/1 -mode=trunk’ breaks down to…
add vnic << Add vNIC Command
xnb << The vNIC Name (xnb = Xsigo, IP Network, B Xsigo Device, Xsb = Xsigo, Storage Network, B Xsigo Device)
yourservername1 << Which profile to attach to
10/1 << Which Module on the Xsigo to attach to
-mode=trunk << What transport mode
These are the command we entered..
|
IP Network vNICS admin@xsigo-b[xsigo] add vnic xnb.yourservername1 10/1 -mode=trunk admin@xsigo-b[xsigo] add vnic xnb.yourservername2 10/1 -mode=trunk admin@xsigo-b[xsigo] add vnic xnb.Yourservername3 10/1 -mode=trunk admin@xsigo-b[xsigo] add vnic xnb.Yourservername4 10/1 -mode=trunk
Storage vNICS admin@xsigo-b[xsigo] add vnic xsb.Yourservername1 11/1 -mode=trunk admin@xsigo-b[xsigo] add vnic xsb.Yourservername2 11/1 -mode=trunk admin@xsigo-b[xsigo] add vnic xsb.Yourservername3 11/1 -mode=trunk admin@xsigo-b[xsigo] add vnic xsb.Yourservername4 11/1 -mode=trunk |
Results from ESXi…

Other Information…
Set System back to factory Defaults…
If needed, you can set the System back to factory Defaults by the following command.
When complete you will need to access the system via Serial Cable.
Here are the steps:
set system factory-default
confirm << type in Confirm, my Putty will exited and the system will shutdown
NOTE: This command will erase the configuration from the Xsigo. Do it with caution
Tip: Note this will cause the system to shutdown, this means someone will have to manually power it back on.
Upgrade the XgOS via USB…
Download the GOS 2.8.5 to a USB Stick..
We inserted the stick into the USB Port on the VP780, then executed this command
system upgrade file://usb/xsigo-2.8.5.xpf
Other Handy commands…
show system status
show system
show system version
show system warnings
show serial
show system info
history
CLI Fun…
One thing I like about the CLI for Xsigo is TAB at the end of the command (most modern CLI’s have this and it sure is handy)
If I type in set system phone-home[Press TAB] it displays possible completions and qualifiers and then it displays the last command I typed in.
admin@ xsigo-b[xsigo] set system phone-home [Press TAB]
Possible completions:
disable Disable phone home
enable Enable phone home
noproxy Don’t use HTTP Proxy
proxy HTTP Proxy config
snooze Hit the snooze button
[Optional qualifiers]
-contact-email-address Email address for Xsigo technical support to contact when a problem is discovered. (or ‘none’)
-contact-phone-numbers Telephone number for Xsigo technical support to contact when a problem is discovered. (comma separated, or ‘none’)
-copy-url URL to send audit copy to
-customer-name Customer name (or ‘none’)
-frequency Phone home frequency (relative to when it is set)
-notify Will Xsigo notify you when problems are detected?
-send-alarms Send major alarms to Xsigo?
-strip-private Strip private information from phone-home data
Repeat ‘?’ for detailed help.
admin@xsigo-b[xsigo] set system phone-home
Day 2 Summary..
The pair of Xsigo’s were very easy to configure and install. I enjoyed working with Xsigo CLI, it is very well thought out, and I plan do to write additional blog about it alone.
Besides for the very few and sometime self-inflicted gotchas things went smooth.
It was nice to have a Xsigo SE on site to assist with the initial install and I’m looking forward to tomorrow when we spin up some VM’s and then test!
Still to do…
- Copy vCenter Server & other VM’s from Production to this test environment
- Test, Test, Test and more testing..
Test Lab – End of Day 1
Day one was pretty simple it mostly comprised of hardware installation.
Below are my notes from todays adventure!
Work completed…
- Network team mounted and configured the EX4200 switches with appropriate vlans (NFS, VM Service Console, vMotion, and others)
- Severs were mounted and remounted to make room (see Installation gotchas below)
- One Xsigo was mounted, and due to some missing brackets the other will have to be mounted tomorrow
- Ethernet CAT and Infiniband cables were all cabled and routed
- Physical Servers for VMware ESXi 4.1 were installed
Installation Gotchas…
Installing & Mounting the Xsigo VP780 proved harder then I expected, this in no way is a slam against Xsigo, and it is totally my fault for not fully reading the manual.
I suggest you run through the Quick Install Manual prior to installing the VP780. There are a LOT of brackets and about 5-8 bolt packages. All are necessary for their intended purpose.
My mistake was I just looked at the VP780 which is 4U in size and planned out 8U for both.
However the mounting / support bracket requires 1U of space… This brings the total to 5U per Xsigo or 10U for both.

This miscalculation caused a bit of a delay and I had to remount some servers to make up this space.
Lesson learned, read the manual before installing.
Xsigo Stuff..
From a DC cooling and cabling perspective the Xsigo is designed very well. In the front there are 4 massive primary fans and 4 smaller fans for the Power Supplies.
This design puts the intake in the front pulling cool air though the Xsigo and out the rear. All the cabling is done in the rear and cable management is a breeze as I can directly cable the rear of my servers to the rear of theXsigo.
Front View

Rear View
Physical Server Front..
Physical Server Rear (Look Mom No Cables!!) – It’s Pretty Sweet that 2 Cables can do so much

Still to do…
- Install Vmware on site 1 and 2 cluster with Xsigo Drivers
- Install 2nd Xsigo into rack
- Copy vCenter Server & other VM’s from Production to this test environment
- Test, Test, Test and more testing..
Test Lab – The Plan and Layout with Xsigo, juniper, IOMega, vmware, and HP/Dell servers)
This week I have the pleasure of setting up a pretty cool test lab with Xsigo, juniper, IOMega, vmware, and HP/Dell servers.
I’ll be posting up some more information as the days go on…
The idea and approval for the lab came up pretty quickly and we are still defining all the goals we’d like to accomplish.
I’m sure with time the list will grow, however here are the initial goals we laid out.
Goals…
-
Network Goals
- Deploy the vChissis solution by Juniper (Server Core and WAN Core)
- Deploy OSPF Routing (particularly between sites)
- Multicast Testing
- Layer 2 test for vm’s
- throughput Monitoring
-
VMware Goals
- Test EVC from Old Dell QuadCores Servers to new HP Nehalem
- Test Long Distance vMotion & long distance cluster failures from Site1 to Site 2
- Play around with ESXi 4.1
-
Xsigo Goals
- Test Redundant Controller failover with vmware
- Throughput between sites, servers, and storage
Caveats…
- We don’t have a dual storage devices to test SAN replication, however the IOMega will be “spanned” across the metro core
- Even though this is a “Site to Site” design, this is a lab and all equipment is in the same site
- The Simulated 10Gbs Site to Site vChassis Connection is merely a 10Gbs fibre cable (We are working on simulating latency)
- Xsigo recommends 2 controllers per site and DOES NOT recommend this setup for a production enviroment, however this is a test lab — not production.
The Hardware..
2 x Xsigo VP780’s with Dual 10Gbs Modules, All Server hardware will be Dual Connected
2 x HP DL360 G6, Single Quad Core Nehalem , 24GB RAM, Infinband DDR HBA, gNic’s for Mgt (Really not needed but nice to have)
2 x Dell Precision Workstation R5400, Dual QuadCore, 16GB RAM, Infiniband DDR HBA, gNic’s for Mgt (Really not needed but nice to have)
6 x Juniper EX4200’s (using Virtual Chassis and Interconnect Stacking Cables)

- ← Previous
- 1
- 2
- 3
