vmware
Test Lab – The Plan and Layout with Xsigo, juniper, IOMega, vmware, and HP/Dell servers)
This week I have the pleasure of setting up a pretty cool test lab with Xsigo, juniper, IOMega, vmware, and HP/Dell servers.
I’ll be posting up some more information as the days go on…
The idea and approval for the lab came up pretty quickly and we are still defining all the goals we’d like to accomplish.
I’m sure with time the list will grow, however here are the initial goals we laid out.
Goals…
-
Network Goals
- Deploy the vChissis solution by Juniper (Server Core and WAN Core)
- Deploy OSPF Routing (particularly between sites)
- Multicast Testing
- Layer 2 test for vm’s
- throughput Monitoring
-
VMware Goals
- Test EVC from Old Dell QuadCores Servers to new HP Nehalem
- Test Long Distance vMotion & long distance cluster failures from Site1 to Site 2
- Play around with ESXi 4.1
-
Xsigo Goals
- Test Redundant Controller failover with vmware
- Throughput between sites, servers, and storage
Caveats…
- We don’t have a dual storage devices to test SAN replication, however the IOMega will be “spanned” across the metro core
- Even though this is a “Site to Site” design, this is a lab and all equipment is in the same site
- The Simulated 10Gbs Site to Site vChassis Connection is merely a 10Gbs fibre cable (We are working on simulating latency)
- Xsigo recommends 2 controllers per site and DOES NOT recommend this setup for a production enviroment, however this is a test lab — not production.
The Hardware..
2 x Xsigo VP780’s with Dual 10Gbs Modules, All Server hardware will be Dual Connected
2 x HP DL360 G6, Single Quad Core Nehalem , 24GB RAM, Infinband DDR HBA, gNic’s for Mgt (Really not needed but nice to have)
2 x Dell Precision Workstation R5400, Dual QuadCore, 16GB RAM, Infiniband DDR HBA, gNic’s for Mgt (Really not needed but nice to have)
6 x Juniper EX4200’s (using Virtual Chassis and Interconnect Stacking Cables)

Using BGInfo to help determine VM Guest partition alignment (Starting offset and allocation unit size)
We use BGInfo quite a bit to help us with basic VM guest information (IP Address, name, HD Space, etc)
Today I was thinking about the partition alignment (Starting offset and allocation unit size) on my Windows guests and wondered about their alignment.
There are programs made for this, some are quite good, but it wouldn’t be more convenient to have it come up with BGinfo?
I thought it would be especially handy because we have multiple templates some are aligned differently, and I could use this as a double check to those programs which correct this issue.
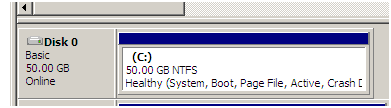
By adding the Starting Offset and volume block size(aka allocation unit size) to our BGinfo.bat file we can now see how are VM guest partitions are aligned!
From this screenshot we see 3 Volumes..
C: has a 32K Offset / 4K Allocation | D: 64K offset / 32K Allocation | E: 64K offset / 4K Allocation
The only volume that is optimal is our D: volume, the rest need some work…

Want to know more about alignment?
Go here >> http://www.vmware.com/pdf/esx3_partition_align.pdf and here >> http://www.vmware.com/pdf/Perf_Best_Practices_vSphere4.0.pdf
Here’s how to setup BGInfo…
- Download BGInfo from sysinsterals
- Create your *.bgi file (this file contains all the fields you want displayed, see below for the offset)
- Create a simple batch file to launch your *.bgi file on logon
- @echo off
- cd\
- CALL “C:\Files\bginfo.exe” “C:\Files\YOUR.bgi” /timer:0 /nolicprompt
-
Place all the files in a simple folder like c:\Files
-
Files Needed
- Bginfo.exe
- YOUR.bgi
- Startbgi.bat
-
- In Windows 2003 – Copy Startbgi.bat into “c:\Documents and Settings\All Users\Start Menu\Programs\Startup”
Every time you logon to the server, bginfo will launch and update your background with useful information..
Once you have created your basic *bgi file, then it’s time to add the WMI Query for Starting Offset and volume block size(aka allocation unit size)
- In BGInfo click on Custom, then New, Enter a name under Identifier, Choose WMI Query, then click on Browse
- Under WMI Class Choose Win32_DiskPatition and under Class Property choose StartingOffset
- Save it up and add it to your *.bgi file
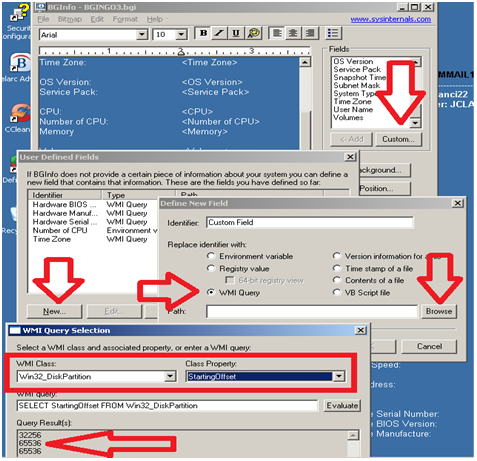
Follow the same steps as above only this time…
Under WMI Class Choose Win32_Volume and under Class Property choose BlockSize (aka allocation unit size)

I hope this works for you as well as it did for me!
Enjoy!
Matt..
Working with the IOMega ix12-300r
I installed an IOMega ix12-300r for our ESX test lab and I must say it’s just as feature rich as my personal ix4 and ix2.
I enjoy working with this device for its simplicity and feature depth. It’s very easy to deploy and it’s a snap to integrate with ESX.
Here are some of the things I like about ix12 and a high level overview to enable it with esx.
Note: Keep in mind most of the
features below are available on the ix2 and ix4 line but not all..
See http://iomega.com/nas/us-nas-comp.html for more information about the ix line and their features…
The Drives…
Our ix12 (the ix## is the amount of possible drives in the unit, ie ix2 = 2 drives, ix4 = 4drives) is populated with 8 x 1TB drives.
By default the 8TB unit will come with 4 x 2TB drives, I opted to buy a 4TB unit and expand it by 4TB, giving us the 8 x 1TB drives.
The drives are Seagate Barracuda Green SATA 3Gb/s 1TB Hard Drive – ST31000520AS – SATA II (Rev 2.6 Drives) 5.9K RPM, they should perform nicely for our environment…
(Buts like most techies, I wish they were faster)
More information here about the drives and SATA 2.6 vs 3.x
http://www.serialata.org/documents/SATA-6-Gbs-The-Path-from-3gbs-to-6gbs.pdf
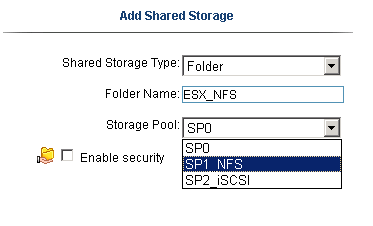
Storage Pools…
A storage pool is not a new concept but in a device this cost effective it’s unheard of.
Basically, I’m dividing up my 8 drives like this..
Storage Pool 0 (SP0) 4 Drives for basic file shares (CIFS)
Storage Pool 1 (SP1_NFS) 2 drives for ESX NFS Shares only
Storage Pool 2 (SP2_iSCSI) 2 drives dedicated for ESX iSCSI only
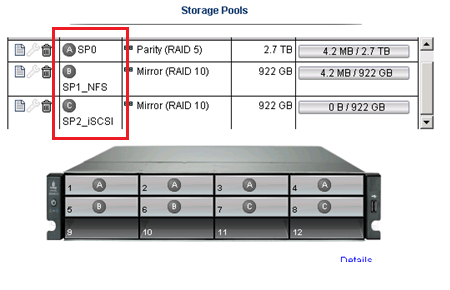
I could have placed all 8 drives into one Storage pool but…
One of our requirements was to have SP0 isolated from SP1 and SP2 for separation reasons…
NO Down time for RAID Expansion… Sweet…
Another great feature is NO down time to expand your RAID5 Set..
Simply edit the Storage pool, Choose your new drive, and click apply.

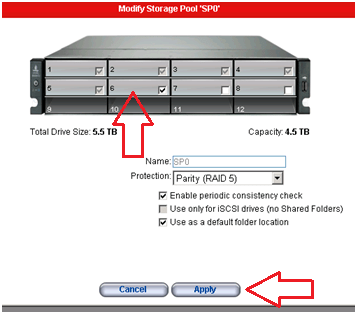
The Raid set will rebuild and you’re all done!
Note: the downside to this… If you decide to remove a drive from a RAID set, you’ll have to rebuild the entire set.
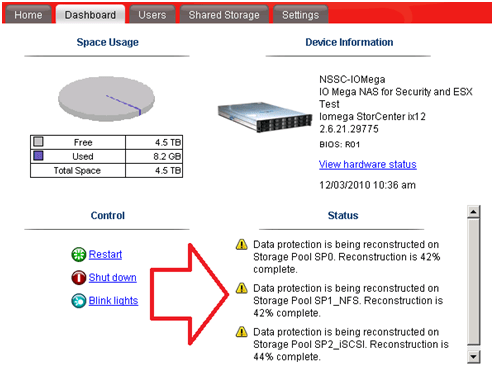
TIP: To check the status of your RAID reconstruction check on the Dashboard under status or the home page at the bottom.
Mine reconstructed the 3 Storage Pools or all 12 drives at the same time in about 4.5 hours…
Teaming your NIC’s!
The ix12 comes with 4 x 1gb NICS, these can be bonded together, stay separate, or a mix of both.
You can setup your bonded NICs as Adaptive Load Balancing, Link Aggregation (LG), or Failover modes.
In our case we bonded NIC 3 and 4 with LG for ESX NFS/iSCSI Traffic and set NIC 1 up for our CIFS traffic.
For the most part setting up the networking is simple and easy to do.
Simply enter your IP’s, choose to bond or not and click apply.

Note: Don’t uncheck DHCP from unused adapters, if you do you’ll get an invalid IP address error when you click apply.
Also, making changes to the network area, usually requires a reboot of the device.. Tip: Setup your Network First..
Adding the NFS Folder to your ESX server
Note: These steps assume you completed the Iomega installation (Enabled iSCSI, NFS, Files shares,etc), networking, and your ESX Environment…
From the ix12 web interface simply add a folder on the correct Storage pool.
In our case I choose the folder name of ESX_NFS and the SP1_NFS storage pool
Tip: ALL Folders are broadcasted on all networks and protocols… I haven’t found a way to isolate folders to specific networks or protocols.
If needed make sure your security is enabled… I plan to talk with IOMega about this…
In vCenter Server, Add NAS storage and point it to the ix12.
Note: use /nfs/[folder name] for the folder name…
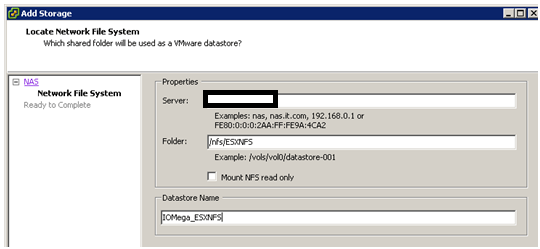
Once it’s connected it will show up as a NFS Data store!

Adding iSCSI to your ESX Server..
Note: This assumes you setup your esx environment to support iSCSI with the ix12…
Add your shared storage as an iSCSI Drive, set your iSCSI Drive name, and Select the correct Storage Pool.
Next is to set the Size of the iSCSI device, in this case we have 922GB free, but can only allocate 921.5GB

After clicking on apply, you should see the information screen…

In vCenter Server ensure you can see the iSCSI drive..

Add the iSCSI disk…
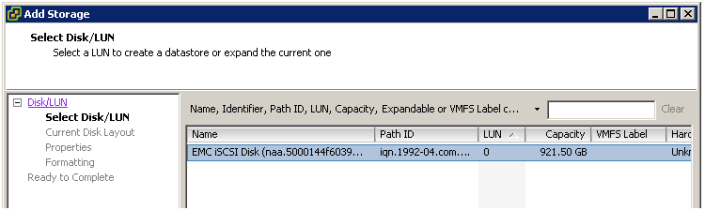
Give this disk a name…

Choose the right block size…

Finally there she is… one 920GB iSCSI disk…

Summary…
From a price vs. performance stand point the IOMega line of NAS devices (ix2, ix4, and our ix12) simply ROCK.
It will be hard to find such a feature rich product that will cost you so little.
This post has merely scratched the features of these devices. It is really hard to believe that 10+ years ago Iomega was known only for ZIP and Jazz Drives…
There new logo is IOMega Kicks NAS, and from what I’ve seen they do!
Follow up posts…
Over the next couple of months I hope to performance test my VM’s against the ix12
I’d like to figure out their protocol multi tendency issue (CIFS, NFS, iSCSI broadcasting over all NICS)
I’ll post of the results as they come in..
VM ESX and ESXi 4.1 Comparison
I’m reposting this for my reference, but I thought you might like it too..
I recommend you go to the link below for the most updated information…
See this URL –
VMware ESX and ESXi 4.1 Comparison
Purpose
This article provides a detailed comparison of VMware ESX and ESXi 4.1. The article is separated into capabilities or features and compared at that level.
Resolution
|
Capability |
VMware ESX |
VMware ESXi |
|
Service Console |
Service Console is a standard Linux environment through which a user has privileged access to the VMware ESX kernel. This Linux-based privileged access allows you to manage your environment by installing agents and drivers and executing scripts and other Linux-environment code. |
VMware ESXi is designed to make the server a computing appliance. Accordingly, VMware ESXi behaves more like firmware than traditional software. VMware has created APIs through which monitoring and management tasks – traditionally done through Service Console agents – can be performed. VMware has provided remote scripting environments such as vCLI and PowerCLI to allow the remote execution of scripts and commands. Tech Support Mode (TSM) provides a command-line interface that can be used by the administrator to troubleshoot and correct abnormal conditions on VMware ESXi hosts. |
|
CLI-Based Configuration |
VMware ESX Service Console has a host CLI through which VMware ESX can be configured. VMware ESX can also be configured using vSphere CLI (vCLI) or vSphere PowerCLI. |
The vSphere CLI (vCLI) is a remote scripting environment that interacts with VMware ESXi hosts to enable host configuration through scripts or specific commands. It replicates nearly all the equivalent COS commands for configuring ESX. VMware vSphere PowerCLI is a robust command-line tool for automathing all aspect of vSphere management, including host, network, storage, virtual machine, guest operating system, and more. Notes:
|
|
Scriptable Installation |
VMware ESX supports scriptable installations through utilities like KickStart. |
VMware ESXi supports scriptable installations using a mechanism similar to Kickstart, and includes the ability to run pre- and post-installation scripts. VMware ESXi also provides support for post installation configuration using PowerCLI- and vCLI-based configuration scripts. |
|
Boot from SAN |
VMware ESX supports boot from SAN. Booting from SAN requires one dedicated LUN per server. |
VMware ESXi may be booted from SAN. This is supported for Fibre Channel SAN, as well as iSCSI and FCoE for certain storage adapters that have been qualified for this capability. Please check the Hardware Compatibility List for supported storage adapters. |
|
Serial Cable Connectivity |
VMware ESX supports interaction through direct-attached serial cable to the VMware ESX host. |
VMware ESXi does not support interaction through direct-attached serial cable to the VMware ESXi host at this time. |
|
SNMP |
VMware ESX supports SNMP. |
VMware ESXi supports SNMP when licensed with vSphere Essentials, vSphere Essential Plus, vSphere Standard, vSphere Advanced, vSphere Enterprise, or vSphere Enterprise Plus. The free vSphere Hypervisor edition does not support SNMP. |
|
Active Directory Integration |
VMware ESX provides native support for Active Directory integration. |
VMware ESXi provides native support for Active Directory integration. |
|
HW Instrumentation |
Service Console agents provide a range of HW instrumentation on VMware ESX. |
VMware ESXi provides HW instrumentation through CIM Providers. Standards-based CIM Providers are distributed with all versions of VMware ESXi. VMware partners include their own proprietary CIM Providers in customized versions of VMware ESXi. These customized versions are available either from VMware’s web site or the partner’s web site, depending on the partner. Remote console applications like Dell DRAC, HP iLO, IBM RSA, and FSC iRMC S2are supported with ESXi. |
|
Software Patches and Updates |
VMware ESX software patches and upgrades behave like traditional Linux based patches and upgrades. The installation of asoftware patch or upgrade may require multiple system boots as the patch or upgrade may have dependencies on previous patches or upgrades. |
VMware ESXi patches and updates behave like firmware patches and updates. Any given patch or update is all-inclusive of previous patches and updates. That is, installing patch version “n” includes all updates included in patch versions n-1, n-2, and so forth. Furthermore, third party components such as OEM CIM providers can be updated independently of the base ESXi component, and vice versa. |
|
vSphere Web Access |
vSphere Web Access is only experimentally supported in VMware ESX. |
VMware ESXi does not support web access at this time. |
|
Licensing |
For licensing information, see the VMware Sphere Editions Comparison. |
For licensing information, see the VMware Sphere Editions Comparison. |
|
Diagnostics and Troubleshooting |
VMware ESX Service Console can be used to issue command that can help diagnose and repair support issues with the server. |
VMware ESXi has several ways to enable support of the product:
|
|
Jumbo Frames |
VMware ESX 4.1 fully supports Jumbo Frames.
|
VMware ESXi 4.1 fully supports Jumbo Frames.
|
Additional Information
- For a comparison of ESX and ESXi 4.0, see VMware ESX and ESXi 4.0 Comparison (1015000).
- For a comparison of ESX and ESXi 3.5, see VMware ESX and ESXi 3.5 Comparison (1006543).
- For a list of new features in vSphere 4.1, see What’s New in VMware vSphere 4.1.
- For a comparison of the different ESX 4.1 editions, see Compare vSphere Editions for Mid-size and Enterprise Businesses.
Storage – LUN Naming Standard
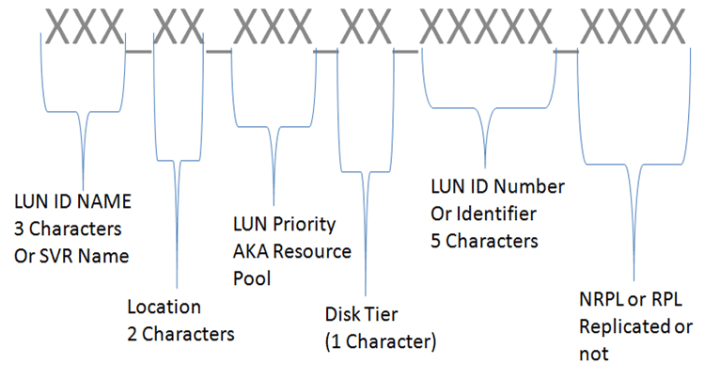
I started working with my networking and storage teams to develop a LUN naming standard in hopes to better organize our LUN names.
We have a Fibre Channel SAN and needed a standard that is easy for us to follow and ID our LUNS quickly.
Some of the information in the standard might seem redundant (Like LUN ID) but we wanted to have a LUN name that was informational and would work for multiple teams.
Here are some Examples…
GP1_AC_MED_02_00ABC_NRPL
General Purpose LUN, Building AC, MED Resource Pool, Disk Tier 02, LUN ID 00ABC, Not Replicated
NOTES02_AB_MAX_1_00CDF_RPL
Notes Server 02, Building AB, MAX Resource Group, Disk Tier 02, LUNC IS 00CDF, Replicated
Here is the breakdown…
LUN ID Name (No more than 10 characters, Normal is 3) – Is the name of the LUN, or specific server, or purpose
Location (2 Characters) – The building where the LUN is normally located
LUN Priority (3 Characters) – Is the name of the resource pool the LUN is attached to, this helps with DR recovery
LUN ID (5 Characters) – This is the LUN ID assigned by the SAN at the time of creation, helps with combination with the SAN team
Replication (4 Characters) – Use NRPL for not replicated and RPL for replicated
vSphere 4 – Increase a VMs Hard disk under Windows 2008
Here’s how I recently changed the C: boot drive on a Windows 2008 VM
One of our older Windows 2008 templates has a 40GB C:\ hard disk, however I’d like it to be 50GB.
With the combination of vCenter Server 4, Windows 2008 and vSphere 4 this couldn’t be easier!
Prerequisites:
- Have admin access to vCenter Server and the Windows server
- A quick snapshot is always a good idea
Steps:
- While the server is still ON, yes I said “While the server is still on”, in vCenter Server right click on the VM
-
Choose Edit Settings, Choose the Hard disk you want to expand and type in the new size, Choose OK

- In Windows 2008 server open Server Manager, Click on Storage, Click on Disk Manager
- Note the extra space on your hard disk

- Right Click on the C: drive and choose Extend Volume
- Choose Next on the Welcome Screen
- Type in the amount you want to extend by or just click next the max
-
Click Finish to start the expansion, in about 2 seconds you’re done…
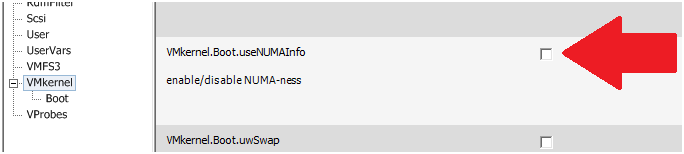
vSphere: NUMA 706: Can’t boot system as genuine NUMA
If you install vSphere on NON-NUMA hardware the following warning message will be displayed on the Service Console splash screen
cpu0:0)NUMA: 706: Can’t boot system as genuine NUMA. Booting with 1 fake node(s)
To resolve the warning message uncheck the option setting vmkernel.boot.usenumainfo
c7000 – Enclosure Interlink
Today I was able to interlink my 3 HP c7000 blade chassis. I used the document listed below as guidance and here are some of my brief note/findings around this.
- Interlinking the HP c7000 blade chassis (BC) is simple as connecting a CAT5e or better network cable to the UP and DOWN interlinks ports on the back of your C7000.
- Keep in mind the BC at the top of the link (or last BC pointing down) will become the master.
- Per the document link below, HP recommends you interlink BC’s per rack vs. across multiple racks and the max BC’s to be interlinked is 7.
- The linked enclosures will enforce a common rack name on all the linked enclosures; however, the enclosure name will remain unique.
- Interlinking the c7000 chassis allowed me to have a one-stop web page for the BC’s. However, the BC’s are still unique in their settings, user accounts, etc.
Note: If you’re using local accounts then the account names and passwords for each BC need to match for single login to work.
Reference Links…
Updated link on 09-20-2017 http://h20565.www2.hpe.com/hpsc/doc/public/display?sp4ts.oid=1844065&docId=emr_na-c00698286&docLocale=en_US
ESX 4.1 Host Profile Copy
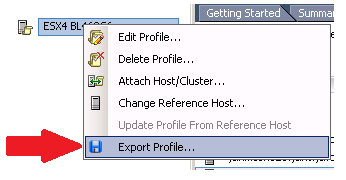
Wouldn’t it be nice be able to make a copy of an existing host profile allowing you to create new profile?
vCenter Server 4.1.0 doesn’t have a copy function but you can export the profile then import it with a different name.
Note – Keep in mind this might not work on your destination hardware, you should use a base profile that is simlar and go fromt there. You also might have to tweek the copied profile for it work properly.
In vCenter Server 4.1.0 go to the Host Profiles area on you vCenter server

Simply right click and choose export profile
Choose ok to this warning…

Choose a good name and click on save

When the creation is complete from the main window Choose “Create a new host profile” > Import Profile >, Browse to the Import location and choose your file > Enter a new Name for the profile > Choose Finish
Once your done you can now edit this profile, updated it, add hosts, etc..
vmworld 2010 – The Schedule
Here is my schedule for vmworld 2010… This year I plan to hit the self-paced labs in the morning, followed up by super-sessions, performance, and cloud computing throughout the week. Hopefully I’ll have time for lunch and the vendor area!
| EA7850 — Design, Deploy, and Optimize Microsoft SQL 2008 |
| SS1055 — Partner Track Super Session |
| TA8102 — Tuning Linux for Virtual Machines |
| EA8210 — Zimbra and The Future for Mission Critical Apps in the Virtualized Enterprise |
| ALT3005 — VMware vCenter™ Orchestrator – Orchestrating the Cloud |
| ALT2004 — Building the VMworld Lab Cloud Infrastructure |
| EA7829 — Panel Discussion: Virtualization’s Impact on the Delivery of Healthcare IT Services |
| TA9420 — vSphere 4.1 Overview |
| SP9820 — Getting the Most Out of Your Storage Infrastructure with Client and Server Virtualization |
| TA6720 — Troubleshooting using ESXTOP for Advanced Users |
| TA8133 — Best Practices to Increase Availability and Throughput for VMware |
| SS1011 — How Cisco, EMC and VMware Are Changing the IT Landscape with Vblock Converged Infrastructure |
| TA8623 — Storage Super-Heavyweight Challenge |
| SP9721 — How to Use Virtual I/O to Provision and Manage Networks and Storage Resources in a Private Cloud |
| TA6944 — PowerCLI Is For Administrators! |
| TA8051 — Infrastructure Technologies to Long Distance VMotion – What Is “VM Teleportation”? |
| TA8101 — Virtual Storage and VMware vSphere: Best Practices and Design Considerations |
| TA7994 — vStorage Update for vSphere 4.1 |
