ESXi
VMworld 2013 – A Quick Rundown…
I’ve been lucky enough to make the past 6 VMworlds and to date this year was my favorite.
Here are some quick notes that a few colleges and I put together, I hope you enjoy it!
Quick Facts about VMworld
- 350 breakout sessions
- 70,000+ VM deployed (also a peek at vC Operations at scale)
- Over 23,000 attendees
Where to start? The best recap is this 11-minute full coverage Demo here. The entire video is 1.5 hours and is part of the Keynote presentation from day 2. Both VMworld General Sessions are available online as well, as are the top 10 sessions from VMworld (hint: click the ‘play’ button on the thumbnail image).
Announcement Highlights
vCloud Suite Sphere 5.5:
vCloud Suite provides all components for building and running a private cloud infrastructure, based on VMware vSphere, that leverages the software-defined data center architecture. This architectural approach delivers virtualized infrastructure services (compute, network, security and availability) with built-in intelligence to automate the on-demand provisioning, placement, configuration and control of applications based on defined policies. vCloud Suite Datasheet
vCloud Suite 5.5 is composed of the following integrated products:
- VMware vSphere®: Compute virtualization platform with policy-based automation
- VMware vCenter™ Site Recovery Manager™: Automated disaster recovery planning, testing, and execution
- VMware vCloud Networking and Security™: Networking and security with ecosystem integration for a virtualized compute environment.
- VMware vCloud® Automation Center™: Self-service and policyenabled cloud service provisioning.
- VMware vCenter™ Operations Management Suite™:integrated, proactive performance, capacity, and configuration management for dynamic cloud environments.
- VMware vCloud Director®: Virtualized data centers with multitenancy and public cloud extensibility
-2x performance and scale improvements (including 64TB VMDK’s)
-Focus on application performance and availability with Big Data Extensions, improved App HA, vFLASH and drastic improvements to SRM including vSphere replication integration
-A whole host of other improvements further validating that the “Compute Layer” of VMware’s SDDC continues to extend its market leadership position
- vSphere 5.5 datasheet
- What’s new in vSphere 5.5
- vCloud Suite 5.5 clickable demos
- It’s all about the applications
- Big Data at VMworld
- vSphere Install, Config, Upg: http://bit.ly/11Qyp24
- Virtualizing Oracle, SQL, Exch, SAP: http://bit.ly/17rZOi8
- vCenter Orchestrator: http://bit.ly/14Q55Ae
- Free Efficiency Tools: http://bit.ly/Zs1dBW
- vSphere w/ Ops Management: http://bit.ly/ZrZtsw
- vCenter/vSphere Upgrades: http://bit.ly/17iPBSC
- http://www.vmware.com/files/pdf/products/vCloud/VMware-vCloud-Suite-Datasheet.pdf
NSX and Network Virtualization:
-NSX does for the network what ESX did for compute: abstract, pool, make automation much easier. This is about agility and simplicity, and services, not the physical medium of the network.
-NSX is a bridging technology just like ESX. It sits on top of the physical Network and doesn’t replace it… just extends and makes it better.
- Introducing VMware NSX platform for network virtualization
- Introducing VMware NSX
- Changing the economics of Firewall services
vSAN and Storage Virtualization (beta announced)
-vSAN takes the local storage in a vSphere cluster and turns it into a big pool that can be used as any other target for storage resources.
- What’s new in vSphere 5.5 Storage
- Strategy for software defined storage
- vSAN Config: http://bit.ly/1fm5zOa
Hybrid Cloud Services (vCHS)
-Our long awaited and highly anticipated public cloud offering is live and available.
-Additional Data Centers in California and Virginia will be coming on-line to compliment the DC in Las Vegas.
-New service offerings such as Cloud Foundry, Desktop as a Service and DR as a Service were announced.
- Hybrid Cloud Services at VMworld
- Now available VMware Hybrid Cloud Services
- vCloud Hybrid Service marketplace
IT Business Management Suite
The ITBM
suite has to be one of the most exciting and least talked about component of the latest releases. Datasheet
- IT Financial Management
- Business Managment for Cloud (Opportunity Cost including AWS, Azure, and vCHS)
- IT Benchmarking
- Service Quality Management
- IT Business Management Suite: http://bit.ly/XXrSVk
End User Computing:
- End user computing meets the Software defined datacenter full session
- EUC Strategy with new DaaS offering (Desktop as a Service)
- Why I am excited about EUC (blog post by Sanjay Poonen, EVP and GM, End-User Computing, VMware)
- First Smart phone available on all major US carriers to launch VMware mobile virtualization solution
- Next generation virtual desktop as a service
- New VMware ready devices
vFabric
- vFabric: http://bit.ly/16bQEHn
Additional Information
- vCenter Log Insight: http://bit.ly/17HrIHz
- Professional Services: http://bit.ly/10Dh7o7
- For Hosting Providers: http://bit.ly/11b4GQv
- Compliance: http://bit.ly/140ZPqt
- vCOPS Install & Config: http://bit.ly/18BpLtS
- vCOPS Post Install Settings: http://bit.ly/14yGAH5
- Customer Stories: http://bit.ly/15zzIUp
New Services and Certifications
– New Certifications are available for cloud (VCA-Cloud), data center virtualization (VCA-DCV), and network virtualization (VCA-NV), these certifications offer a new credential to validate entry-level skills VMware Certified Associate before progressing on to the VMware Certified Professional (VCP) certifications.
VMworld Wrap up
http://blogs.vmware.com/vcloud/2013/08/vmworld-2013-day-1-wrap-up.html
http://blogs.vmware.com/vcloud/2013/08/vmworld-2013-day-2-wrap-up.html
http://blogs.vmware.com/tam/2013/08/vmworld-2013-day-one-recap.html
Press Releases
VMware Unveils Next-Generation Products and Services to Further Enable the Software-Defined Data Center
VMware Delivers vCloud(R) Hybrid Service(TM)
VMware and Pivotal Expand Strategic Partnership
VMware Cloud Management Helps Drive Adoption of Software-Defined Data Center Architecture
Get all of the news at VMworld TV
vCenter Server datastores for heartbeats
I recently did some exploring on my home lab around datastore heatbeats and came up with the following notes around how to determine which ones are active, how to change the defaults, and why vCenter Server might now choose a datastore.
Page 16
vCenter Server selects a preferred set of datastores for heartbeating. This selection is made to maximize the
number of hosts that have access to a heartbeating datastore and minimize the likelihood that the datastores
are backed by the same storage array or NFS server. To replace a selected datastore, use the Cluster Settings
dialog box of the vSphere Client to specify the heartbeating datastores. The Datastore Heartbeating tab lets
you specify alternative datastores. Only datastores mounted by at least two hosts are available. You can also
see which datastores vSphere HA has selected for use by viewing the Heartbeat Datastores tab of the HA
Cluster Status dialog box.

Only use these settings if you want to override the default vCenter Server Choice

Here is an article around why it might not choose a Datastore…
User-Preferred Datastore is Not Chosen
vCenter Server might not choose a datastore that you specify as a preference for vSphere HA storage heartbeating.
Problem
You can specify the datastores preferred for storage heartbeating, and based on this preference, vCenter Server determines the final set of datastores to use. However, vCenter Server might not choose the datastores that you specify.
Cause
This problem can occur in the following cases:
■ The specified number of datastores is more than is required. vCenter Server chooses the optimal number of required datastores out of the stated user preference and ignores the rest.
■ A specified datastore is not optimal for host accessibility and storage backing redundancy. More specifically, the datastore might not be chosen if it is accessible to only a small set of hosts in the cluster. A datastore also might not be chosen if it is on the same LUN or the same NFS server as datastores that vCenter Server has already chosen.
■ A specified datastore is inaccessible because of storage failures, for example, storage array all paths down or permanent device loss.
■ If the cluster contains a network partition, or if a host is unreachable or isolated, the host continues to use the existing heartbeat datastores even if the user preferences change.
Solution
Verify that all the hosts in the cluster are reachable and have the vSphere HA agent running.
Also, ensure that the specified datastores are accessible to most, if not all, hosts in the cluster and that the datastores are on different LUNs or NFS servers.
Meet Trevor –VMware Hands-on Lab
Check out this great video around how VMware Hands-on Labs can enable you to do more with VMware products.
It really goes over the finer points on how customers can logon to HOL, check out our products/technologies, and then deliver them into your environment.
BTW — Great job Doug Baer, oops… I mean Trevor J
http://www.youtube.com/watch?v=xk9716huKG4

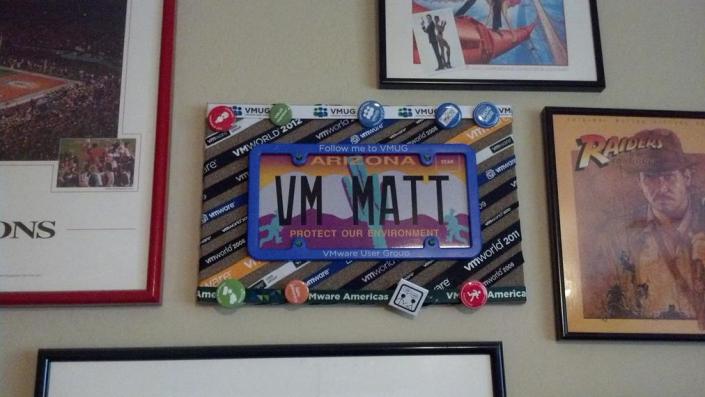
What to do with old Event Lanyards?
Over these past years I’ve collected a bunch of lanyards, buttons and stuff. Mainly I collected them as an end user, VMUG leader, and now as a VMware employee. At one point my car had a custom VM license plate. I hung on to all this stuff because I really liked it or wanted to remember good times. However everything was just starting to pile up and collect dust. This past weekend I made a choice to not box them up or toss them away but do something creative which included a power staple gun. Attached to this post is my creation, they went from being a dust pile to a work of art.
It’s pretty simple to make…
-
You need –
- One Rectangle Cork board (I found my at Wal-Mart)
- Power Staple Gun
- Scissors
- Enough lanyards to create a layout
- Start in the middle, place the first one on an angle, staple them to the back side, and cut off the excess
- Working out from the middle I used two straws as a spacer and placed the next lanyard on an angle. Make sure its square as any deviation will show
- From there repeat, adjust, staple, and cut
-
If you have a plate you want to mount, center it, and I just used push pins to hold it up
Enjoy and Good times!
Network port diagram for vSphere 5.x
Check out this great network port diagram for vSphere 5.x. It was recently released on kb.vmware.com
This is a must have for those doing architecture and design around VMware – Enjoy!

Correlating vCenter Server and ESXi/ESX host build numbers to update levels
Some of the common questions I get from my customers are around build to update levels.
When was VMware product X released? Or I have a build number for Product X but what is version number?
These were questions I ask when I was a customer and I’d spend time using Google to search build numbers to find out want the product was.
This one article provides information on determining which build number represents which Update level.
It currently covers the following products…
- Converter
- ESXi/ESX
- Update Manager (VUM)
- vCenter Server
- VirtualCenter
- vSphere Replication Appliance
- vCenter Chargeback
- vCenter Orchestrator
- vCloud Connector
- vCloud Director
- vShield
- Site Recovery Manager (SRM)
- VMware Data Recovery (VDR)
- View
Enjoy!
Home Lab – Adding freeNAS 8.3 iSCSI LUNS to ESXi 5.1
About a half a year ago I setup my freeNAS iSCSI SAN, created 2 x 500GB iSCSI LUNS and attached them to ESXi 5.1. These were ample for quite a while. However I have the need to add additional LUNS…. My first thought was – “Okay, Okay, where are my notes on adding LUNS…” They are non-existent… Eureka! Its time for a new blog post… So here are my new notes around adding iSCSI LUNS with freeNAS to my ESXi 5.1 Home lab – As always read and use at your own risk
J
- Start in the FreeNAS admin webpage for your device. Choose Storage > Expand Volumes > Expand the volume you want to work with > Choose Create ZFS volume and fill out the Create Volume Pop up.

When done click on Add and ensure is show up under the Storage Tab
. 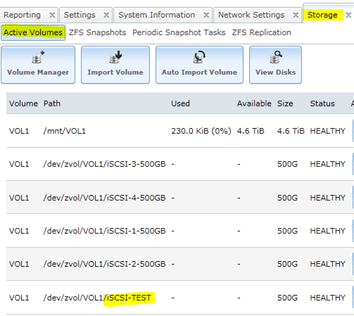
-
On the left-hand pane click on Services > iSCSI > Device Extents > View Device Extents. Type in your Extent Name, Choose the Disk Device that you just created in Step 1 and choose OK

-
Click on Associated Targets > Add Extent to Target, Choose your Target and select the new Extent
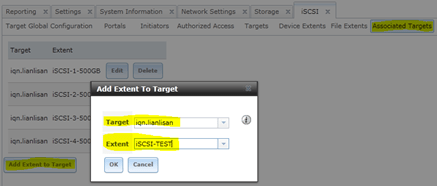
-
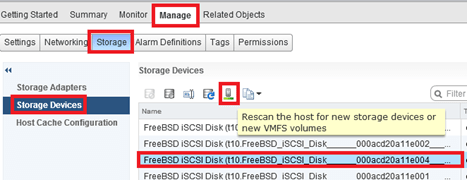
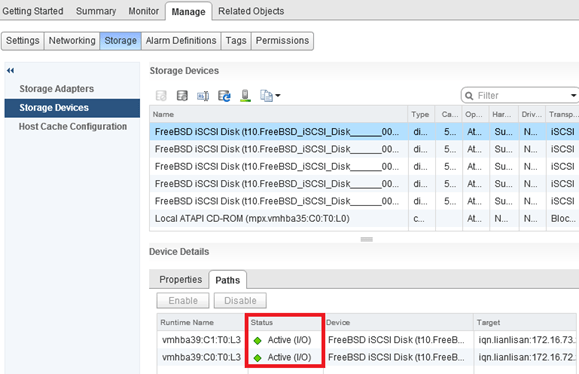
To add to ESXi do the following… Log into the Web Client for vCenter Server, Navigate to a host > Manage > Storage > Storage Devices > Rescan Host
If done correctly your new LUN should show up below. TIP – ID the LUN by its location number, in this case its 4
-
Ensure your on the Host in the left Pane > Related Objects > Datastores > Add Datastore
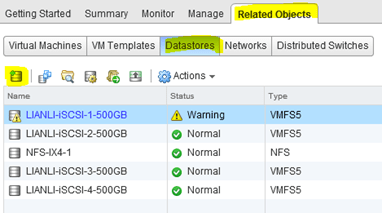
-
Type in the Name > VMFS Type > Choose the Right LUN (4) > VMFS Version (5) > Partition Lay out (All or Partial), Review > Finish

-
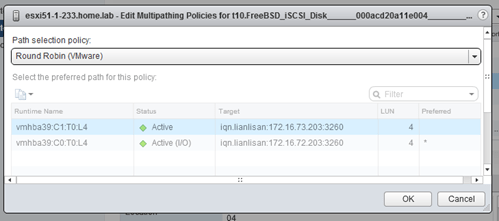
Setup Multi-Pathing – Select a Host > Manage > Storage > Storage Devices > Select LUN > Slide down the Devices Details Property Box and Choose Edit Multipathing

-
Choose Round Robin and Click On Okay
-
Validate all Datastores still have Round Robin enabled. 2 Ways to do this.
- Click on the LUN > Paths. Status should read Active I/O for both paths
- Click on LUN > Properties > Edit Multipathing – Path section Policy should state – Round Robin (See PIC in Step 8)
Summary – These steps worked like a charm for me, then again my environment is already setup, and hopefully these steps might be helpful to you.
Home Lab – VMware ESXi 5.1 with iSCSI and freeNAS
Recently I updated my home lab with a freeNAS server (post here). In this post, I will cover my iSCSI setup with freeNAS and ESXi 5.1.
Keep this in mind when reading – This Post is about my home lab. My Home Lab is not a high-performance production environment, its intent is to allow me to test and validate virtualization software. Some of the choices I have made here you might question, but keep in mind I’ve made these choices because they fit my environment and its intent.
Overall Hardware…
Click on these links for more information on my lab setup…
- ESXi Hosts – 2 x ESXi 5.1, iCore 7, USB Boot, 32GB RAM, 5 x NICS
- freeNAS SAN – freeNAS 8.3.0, 5 x 2TB SATA III, 8GB RAM, Zotac M880G-ITX Mobo
- Networking – Netgear GSM7324 with several VLAN and Routing setup
Here are the overall goals…
- Setup iSCSI connection from my ESXi Hosts to my freeNAS server
- Use the SYBS Dual NIC to make balanced connections to my freeNAS server
- Enable Balancing or teaming where I can
- Support a CIFS Connection
Here is basic setup…
freeNAS Settings
Create 3 networks on separate VLANs – 1 for CIFS, 2 x for iSCSI < No need for freeNAS teaming
CIFS
The CIFS settings are simple. I followed the freeNAS guide and set up a CIFS share.
iSCSI
Create 2 x iSCSI LUNS 500GB each
Setup the basic iSCSI Settings under “Servers > iSCSI”
- I used this doc to help with the iSCSI setup
- The only exception is – Enable both of the iSCSI network adapters in the “Portals” area

ESXi Settings
Setup your iSCSI vSwitch and attach two dedicated NICS
Setup two VMKernel Ports for iSCSI connections
Ensure that the First VMKernel Port group (iSCSI72) goes to ONLY vmnic0 and vice versa for iSCSI73

Enable the iSCSI LUNs by following the standard VMware instructions
Note – Ensure you bind BOTH iSCSI VMKernel Ports

Once you have your connectivity working, it’s time to setup round robin for path management.
Right click on one of the LUNS, choose ‘Manage Paths…’
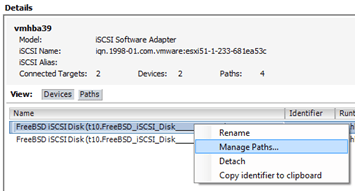
Change the path selection on both the LUNS to ‘Round Robin’
Tip – After the fact if you make changes to your iSCSI settings, then ensure you check your path selection as it may go back to default

Notes and other Thoughts…
Browser Cache Issues — I had issues with freeNAS updating information on their web interface, even after reboots of the NAS and my PC. I moved to Firefox and all issues went away. I then cleared my cache in IE and these issues were gone.
Jumbo Frames — Can I use Jumbo Frames with the SYBA Dual NICs SY-PEX24028? – Short Answer is NO I was unable to get them to work in ESXi 5.1. SYBA Tech support stated the MAX Jumbo frames for this card is 7168 and it supports Windows OS’s only. I could get ESXi to accept a 4096 frame size but nothing larger. However, when enabled none of the LUNS would connect, once I moved the frame size back to 1500 everything worked perfectly. I beat this up pretty hard, adjusting all types of ESXi, networking, and freeNAS settings but in the end, I decided the 7% boost that Jumbo frames offer wasn’t worth the time or effort.
Summary…
These settings will enable my 2 ESXi Hosts to balance their connections to my iSCSI LUNS hosted by freeNAS server without the use of freeNAS Networking Teaming or aggregation. By far it is the simplest way to setup and the out of the box performance works well.
My advice is — go simple with these settings for your home lab and save your time to beat up more important issues like “how do I shutdown windows 8” J
I hope you found this post useful and if you have further questions or comments feel free to post up or reach out to me.
Great vSphere 5.1 Upgrades KB’s & Articles
A few of my fellow TAM’s put together this list of great KB’s / Articles that may help you in the process of upgrading to vSphere 5.1 – Enjoy!
vCenter 5.1:
vSphere 5.1 Misc:
Single Sign On Specific:
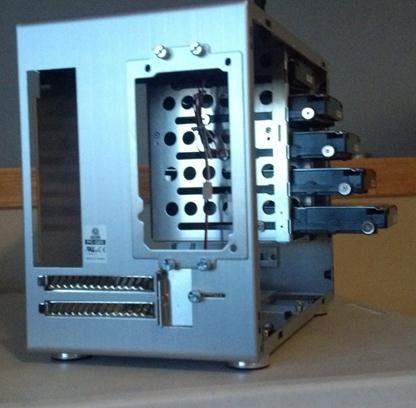
Home Lab – freeNAS build with LIAN LI PC-Q25, and Zotac M880G-ITX
I’ve decided to repurpose my IOMega IX4 and build out a freeNAS server for my ever growing home lab. In this blog post I’m not going to get in to the reasons why I choose freeNAS, trust me I ran through lot of open source NAS software, but rather on the actual hardware build of the NAS device.
Here are the hardware components I choose to build my freeNAS box with…
- LIAN LI PC-Q25 Case – NewEgg ~$120, it goes on sale from time to time…
- Cooler Master 500W PS – ValleySeek ~$34, on sale
Zotac M880G-ITX – Valleyseek ~$203<< 10/07/2013 This MOBO had BIOS issues with detecting HDDs. I moved to a ASRock FM2A85X-ITX- SYBA Dual NIC SY-PEX24028 – NewEgg ~$37
- 8GB Corsair RAM – I owned this bought a Frys in a 16GB Kit for $49
- 5 x Seagate ST2000DM001 2TB SATAIII – Superbiiz ~$89, onsale and free shipping
- 1 x Corsair 60GB SSD SATAIII – I owned this bought at Frys for ~$69
Tip – Watch for sales on all these items, the prices go up and down daily…
Factors in choosing this hardware…
- Case – the Lian LI case supports 7 Hard disks (5 being hotswap) in a small and very quiet case, Need I say more…
- Power supply – Usually I go with a Antec Power supply, however this time I’m tight on budget so I went with a Cooler Master 80PLUS rated Power supply
- Motherboard – The case and the NAS software I choose really drove the Mobo selection, I played with a bunch of Open soruce NAS software on VM’s, once I made my choice on the case and choosing freeNAS it was simple as finding one that fit both. However 2 options I was keen on – 1) 6 SATA III Ports (To support all the Hard disks), 2) PCIex1 slot (to support the Dual Port NIC). Note – I removed the onboard Wireless NIC and the antenna, no need for them on this NAS device
- NIC – the SYBA Dual NIC I have used in both of my ESXi hosts, they run on the Realtek 8111e chipset and have served me well. The Mobo I choose has the same chipset and they should integrate well into my environment.
- RAM – 8GB of RAM, since I will have ~7TB of usable space with freeNAS, the general rule of thumb is to use 1GB of RAM per 1TB of storage, 8GB should be enough.
- Hard Disks – I choose the hard disks mainly on Price, speed, and size. These hard disks are NOT rated above RAID 1 however I believe they will serve my needs accordingly. If you looking for HIGH performance and duty cycle HD’s then go with an enterprise class SAS or SATA disk.
- SSD – I’ll use this for cache setup with freeNAS, I just wanted it to be SATA III
Install Issues and PIC’s
What went well…
- Hard disk installs into case went well
- Mobo came up without issue
- freeNAS 8.3.xx installed without issue
Minor Issues….
- Had to modify (actually drill out) the mounting plate on the LIAN LI case to fit the Cooler Master Power supply
- LIAN LI Mobo Mount points were off about a quarter inch, this leaves a gap when installing the NIC card
- LIAN LI case is tight in areas where the Mobo power supply edge connector meets the hard disk tray
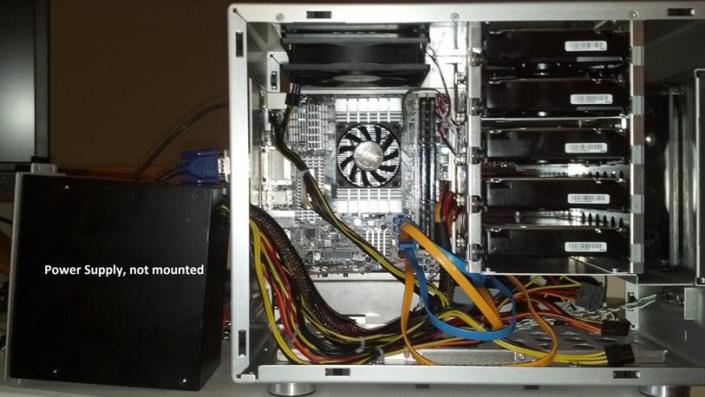
PICS…
LIAN LI Case

5 Seagate HD’s installed…

Rear view…
Side Panel…

Zotac Mobo with RAM

Removal of the Wireless NIC….

Zotac Mobo installed in case with dual NIC…

Everything Mounted (Except for the SSD)….
- ← Previous
- 1
- …
- 7
- 8
- 9
- Next →
