ESX
Test Lab – Day 6 Xsigo Redundancy testing with ESXi under load (Final Post)
Today I plan to setup the environment to simulate high disk I/O and re-run most the Xsigo tests from Day 4. My thoughts behind these tests are the Xisgo ran well under a minimal load but how would it perform when stressed.
Note: This blog post only covers how I setup testing but doesn’t have the final results. See A change of plans below for more information.
The environment layout will stay the same (4 x ESXi 4.1 hosts, each host with 10 VM’s, 2 Xsigo VP780’s and one IOMega IX12 with a 4 spindle NFS Datastore)
I’ll auto create about ~40 Windows 2003 VM’s and use PassMarks Burin Test to simulate a NFS load.
I plan to drive the IOMega to ~1Gbs of sustained NFS I/O by driving each VM’s hard disk.
While the load simulation is happening I’ll re-run the testing from Day 4, and record the results.
I do wish we could simulate a larger load however our NFS datastores are only across 4 Spindles. If we simulate a heavier load I believe it will “tank” the datastore making our testing pretty much worthless.
Preparing for the load Test.. In this step I setup my default template
I spun up a Windows 2003 server and installed the Burn in Test program.
I launched the BurnIn Test, clicked on Preferences, uncheck all, checked Disks, and entered a duty cycle of 25
Tip: BurnIn Test can be used for a wide range of load testing including CPU & Network (See below)
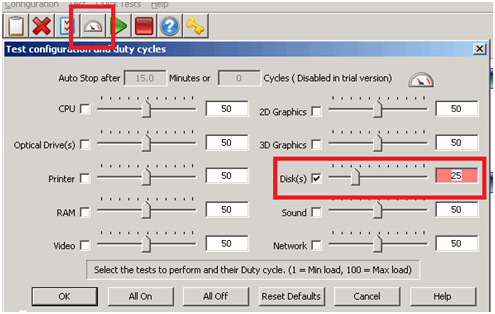
I saved the configuration file in the default folder.
I repeated this process and created 4 more config files driving the Disk to duty cycles of 5, 10, 50 and 100.
Writing the batch file to launch the BurnIn Test config file was simple (see below) and I created one for each duty cycle.

Tip: Before changing this VM into a template I tested my batch files to ensure all was working well.
Next I wrote a simple vSphere PowerCLI script to create the VM’s, it nothing complex but it did the trick..
I simply opened the vSphere PowerCLI prompt and pasted in the following lines…
|
$server_address = “vCenter Server IP” $username = “Administrator” $password = “your password here” $template_name = “w2003Template” $datastore_name = “NFS” $customization = “W23K” $location = “LoadTest” $destination_host = “ESX Host 1 IP Address” New-VM -Name 2003VMT21 -Location $location -Template $template_name -Host $destination_host -Datastore $datastore_name -OSCustomizationSpec $customization New-VM -Name 2003VMT22 -Location $location -Template $template_name -Host $destination_host -Datastore $datastore_name -OSCustomizationSpec $customization New-VM -Name 2003VMT23 -Location $location -Template $template_name -Host $destination_host -Datastore $datastore_name -OSCustomizationSpec $customization New-VM -Name 2003VMT24 -Location $location -Template $template_name -Host $destination_host -Datastore $datastore_name -OSCustomizationSpec $customization New-VM -Name 2003VMT25 -Location $location -Template $template_name -Host $destination_host -Datastore $datastore_name -OSCustomizationSpec $customization New-VM -Name 2003VMT26 -Location $location -Template $template_name -Host $destination_host -Datastore $datastore_name -OSCustomizationSpec $customization New-VM -Name 2003VMT27 -Location $location -Template $template_name -Host $destination_host -Datastore $datastore_name -OSCustomizationSpec $customization New-VM -Name 2003VMT28 -Location $location -Template $template_name -Host $destination_host -Datastore $datastore_name -OSCustomizationSpec $customization New-VM -Name 2003VMT29 -Location $location -Template $template_name -Host $destination_host -Datastore $datastore_name -OSCustomizationSpec $customization New-VM -Name 2003VMT30 -Location $location -Template $template_name -Host $destination_host -Datastore $datastore_name -OSCustomizationSpec $customization $destination_host = “ESX Host 2 IP Address” New-VM -Name 2003VMT31 -Location $location -Template $template_name -Host $destination_host -Datastore $datastore_name -OSCustomizationSpec $customization New-VM -Name 2003VMT32 -Location $location -Template $template_name -Host $destination_host -Datastore $datastore_name -OSCustomizationSpec $customization New-VM -Name 2003VMT33 -Location $location -Template $template_name -Host $destination_host -Datastore $datastore_name -OSCustomizationSpec $customization New-VM -Name 2003VMT34 -Location $location -Template $template_name -Host $destination_host -Datastore $datastore_name -OSCustomizationSpec $customization New-VM -Name 2003VMT35 -Location $location -Template $template_name -Host $destination_host -Datastore $datastore_name -OSCustomizationSpec $customization New-VM -Name 2003VMT36 -Location $location -Template $template_name -Host $destination_host -Datastore $datastore_name -OSCustomizationSpec $customization New-VM -Name 2003VMT37 -Location $location -Template $template_name -Host $destination_host -Datastore $datastore_name -OSCustomizationSpec $customization New-VM -Name 2003VMT38 -Location $location -Template $template_name -Host $destination_host -Datastore $datastore_name -OSCustomizationSpec $customization New-VM -Name 2003VMT39 -Location $location -Template $template_name -Host $destination_host -Datastore $datastore_name -OSCustomizationSpec $customization New-VM -Name 2003VMT40 -Location $location -Template $template_name -Host $destination_host -Datastore $datastore_name -OSCustomizationSpec $customization
This pattern was repeated on the other ESX hosts until ~40 VM’s were created… |
Test Procedure…
Using the Burn In test program I will drive the utilization on the ~40 VM’s until 1Gbs of sustained NFS I/O is achieved.
I’ll use vCenter Server to ensure NFS traffic is passing through XSA and then start the tests below.
All of the ESX Hosts are attached to the IOMega via NFS, this means all traffic has to pass through the Xsigo and our network to get to the IOMega.
I used a Laptop, the ESXi console in tech support, vCenter Server mode to capture and validate the results.
Keep in mind this deployment is a SINGLE site scenario and for accuracy we allowed the environment to settle between tests.
A Change in plans.…
At this point the testing had to stop. Reason why – I put in my two weeks’ notice and had to focus on a transition plan and less on testing.
My hopes are if you’re reading this post it will give you a baseline for testing.
4 Books in 4 Weeks – Book 3 How to compare Terminator 2 to VMware vSphere 4.1 HA and DRS Technical Deepdive
I got a chance over the past few weeks to complete Book 3 VMware vSphere 4.1 HA and DRS Technical Deepdive by Duncan Epping and Frank Dennerman
I’ve read a lot of the reviews about this book and I must say they say about the same thing.
- This book makes the HA/DRS VMware white paper easier to read and understand
- I learned a bit more about HA/DRS then the VMware white paper
- The book is well-organized and makes great sense.
- Buy this book and read it
I agree with all of these basic statements. However I never read the white paper, shame on me :), as I felt the cluster I administrated never really needed in-depth settings HA or DRS provided. When I changed jobs to a much larger environment I needed the advanced functions of HA/DRS and I needed to get up to speed quite quickly. I read this book, and then I went back and read the white paper. What an eye opener.
This scenario reminded me of how I saw Terminator 2. How does T2 fit in to a book review about HA and DRS you might ask. Simple, when T2 was released I didn’t want to know anything about it, kind of like the VMware HA/DRS White paper I knew it was there but ignored it. All I wanted to know about T2 was its release date, I didn’t let anyone tell me about it, and I turned off any marketing about it. When I finally saw the movie it was awesome. What a surprise to find out that Arnie was reprogrammed for aiding and not killing, TOTAL Surprise. This book VMware vSphere 4.1 HA and DRS Technical Deepdive was my in-depth technical intro to HA/DRS, and like the way I viewed T2 it was awesome! It was nice to really learn this topic in reverse order (Book first then Whitepaper) as the book really does a great job laying it all out in an easy to follow and understand format.
As I was reading this book I noticed how physically easy it was to read. Here’s what I mean. The book and font size with large Left/Right paragraph indentations made the book easy to read visually. With most books you would have to flatten or shift the book around to reveal words hidden by the crease or binding of the book. The large paragraph indentations meant I didn’t have to shift the book around to see the words. This made it less physical to read which helped me to read it quite quickly. I noticed this when I was on airplane and the space was pretty tight. Not sure if this is by design, but just the same it made a difference for me.
Summary…
Read this book, suggest others do, buy it and buy the next version!
Up next Book 4 – Mr. Lowe and Friends, sorry to keep you waiting but your book (VMware vSphere Design) is up next!
4 Books in 4 Weeks – Book 2 VMware ESX and ESXi in the Enterprise 2nd Edition
The task to complete 4 books in 4 weeks reminded me of a joke. A guy walks up to a 7/11 store and the clerk is locking the entrance. The guy asks “I thought you were open 24 hours?” The Clerk replies “Yes we are open 24 hours, just not in a row!” With that said I’m still on course to finish my books in 4 weeks, just not 4 weeks in a row!
About 4 years ago I purchased VMware ESX in the Enterprise. Back then it was based on ESX 3.x. It was a well written book and I had recommended it many times. When I saw the 2nd Edition published I knew I had to read it. This book covers ESX 3 – 4 and ESXi – Very cool!
Book Review / Summary
The book is comprised of 12 chapters ranging from hardware considerations through disaster recovery & backup. Like the previous book it includes lots of best practice guides, well written how to’s and superior charts/tables. According to the author the book is an attempt at a “Soup to Nuts” description of ESX/ESXi best practices, from what I read he did just fine at his attempt!
TIP: Read the Preface, usually I skip this part but I found this one to be worth the 6 pages, at least breeze through it. Also, there is a nice reference to my beloved Commodore 64.
Things I liked about this book….
- Book is not limited to VMware only, it covers some 3rd party tools as well
- Charts and Tables – I don’t think I’ve seen a technical book having more well written and meaningful charts and tables then this one.
- Throughout the book there are nicely highlighted Best Practices and tips – you would benefit if you just read these alone
- I can’t say this enough, and so do did the book – Check the VMware HCL prior to buying hardware
- 20 vCPU per pCPU core — of course don’t take my word read this book and find out why
- Nice tips on NUMA based pCPU’s and vCPU’s that will make you rethink your design
- Real world Examples throughout the book that get you thinking about your environment
- Great tips on BIOS settings, Especially around APCI
-
Chapter 7 Networking is pretty detailed and has some great comparison charts
Things I didn’t like about this book…
- The occasional entire page or two of text without breaks in the flow, sorry I’m a sucker for charts and graphs
- Some of the how to guides seemed right from the manuals you get from VMware
- Chapter 3 – about 40+ pages in painstaking detail of how to install ESX/ESXi and boot it to SAN/iSCSI but less the 3 pages on Automating the process
- The writing style of the book sometimes drags on with play by play explanations and multiple versions of the play by play, for a beginner okay I get it, but for others it’s a bit painful
Quick Summary…
This books is worth every dollar you buy it for, granted you actually read it. 541 Pages is a bit long and it drags in places. However the Charts, graphs, and pics are PRICELESS.
If your new to VM this books is up your alley, if you’ve been around for a while you’ll pick up some good tips and tricks, and if your experienced suggest others read it.
Thanks for reading my post… I’m off to read my 3rd book of 4 VMWare vSphere 4.1 HA and DRS Technical Deepdive 215 Pages by Duncan Epping and Frank Dennerman
Paging Dr. Epping and Dr. Dennerman, your up…
GS3 Network IOS and more Emulator
Thank you to my friend Teed for the tip below on this great little program… VERY Cool!
This website looked cool so I bookmarked it a couple months ago. Haven’t gone through the website much yet but some of the pages have helped me with some AAA config on a switch awhile back. I liked to sound of (FREE) and 100 hands-on labs etc. using their GNS3 config.
http://www.freeccnaworkbook.com/
Blurb:
The Free CCNA Workbook provides over 100 hands on labs utilizing GNS3 (Graphic Network Simulator v3) to provide you a realistic hands on CCNA training experience at configuring Cisco devices. GNS3 in and of its self is a GUI for the core application, known as dynamips. Dynamips in a nut shell is a Cisco Router hardware emulator that executes REAL Cisco IOS images and allows you to virtualize multiple routers on a single desktop for educational purposes. By utilizing GNS3 and the free CCNA labs provided to you absolutely free at Free CCNA workbook dot com; you can prepare you for the CCNA certification exam without investing any of your hard earned money into Cisco hardware.
Blurb:
What is GNS3 ?
GNS3 is a graphical network simulator that allows simulation of complex networks.
To allow complete simulations, GNS3 is strongly linked with:
- Dynamips, the core program that allows Cisco IOS emulation.
- Dynagen, a text-based front-end for Dynamips.
- Qemu, a generic and open source machine emulator and virtualizer.
GNS3 is an excellent complementary tool to real labs for network engineers, administrators and people wanting to pass certifications such as CCNA, CCNP, CCIP, CCIE, JNCIA, JNCIS, JNCIE.
It can also be used to experiment features of Cisco IOS, Juniper JunOS or to check configurations that need to be deployed later on real routers.
This project is an open source, a free program that may be used on multiple operating systems, including Windows, Linux, and MacOS X.
Features overview
- The design of high quality and complex network topologies.
- Emulation of many Cisco IOS router platforms, IPS, PIX and ASA firewalls, JunOS.
- Simulation of simple Ethernet, ATM and Frame Relay switches.
- The connection of the simulated network to the real world!
- Packet capture using Wireshark.
Important notice: users have to provide their own IOS/IPS/PIX/ASA/JunOS to use with GNS3

4 Books in 4 Weeks
Over the next month or so I plan to read 4 technical books and write up a review / cliff notes. I choose the books below based on current needs as a VMware Senior Engineer. However one was chosen as a personal goal (okay its unfinished business). Another reason for reading (except the obvious – staying current) is the training budget over the past years has been non-existent and I felt it was time for me to move my education forward by reading up.
Here are the FANTASTIC 4 –
Book 1 Storage Area for Dummies (2003) 380 pages by Christopher Poelker and Alex Nikitin (both of Hitachi Data Systems) – Okay this is the unfinished business I was talking about. Back in 2004 I got my first vmware position. I was asked to help re-design and deploy a failing nationwide project based on VMware 2.5. Back then we were using a pair of DL380s with 8GB of RAM connected to an EMC SAN. I had a pretty good idea about SANs but I needed a general guide hence this book. I read the first hundred pages and feel off track. However the project went on and was a big success.
Book 2 VMware ESX and ESXi in the Enterprise 2nd Edition 541 pages by Edward Halekty – I read VMware ESX Server (3.X) in the Enterprise in late 2007 and I must say it was one of the better books of its time. This is why I choose to read the updated version covering ESXi and vSphere.
Book 3 VMware vSphere 4.1 HA and DRS Technical Deepdive 215 Pages by Duncan Epping and Frank Dennerman – If you are in certain VMware social circles (Twitter) you know this is one of the “must” read books of its time. Though currently they are writing an update to it I felt it best to read the original. My hopes are to get a better understating of HA and DRS for some upcoming challenges I’m facing at work.
Book 4 VMware vSphere Design 340 Pages by Forbes Guthrie, Maish Saidel-kessing and Scott Lowe – Of these authors I have meet fellow vExpert Scott Lowe and I must say he’s the nicest person you could ever meet. Not only does he author many books, work a full time job, donate his time/talents to VMUGs but he’s also a father too. By reading this book I hope to gain a better understanding of design processes around vSphere.
So those are the 4 books I plan to read…. Wish me luck I’m off to start reading Book 1 Storage Area for Dummies!
The future is only ESXi
Here is a great document that I found on ESXi, good reference…
http://communities.vmware.com/docs/DOC-11113
ESXi vs Full ESX VERSION 14  Created on: Oct 31, 2009 3:07 AM by AndreTheGiant – Last Modified: Jul 25, 2010 12:50 AM by AndreTheGiant
The future is only ESXi
With the new release of vSphere 4.1 there are some changes and news:
- the terminology as changed and now ESXi is ESXi Hypervisor Architecture
- the “old” ESX (or full ESX or legacy ESX or ESX with the service console) is available in the last release, from next version ONLY ESXi will be available.
VMware suggest to migrate to ESXi, the preferred hypervisor architecture from VMware. ESXi is recommended for all deployments of the new vSphere 4.1 release. For planning purposes, it is important to know that vSphere 4.1 is the last vSphere release to support both ESX and ESXi hypervisor architectures; all future releases of vSphere will only support the ESXi architecture.
On how to migrate see: http://www.vmware.com/products/vsphere/esxi-and-esx/
–
ESX vs ESXi
ESX and ESXi official comparison:
http://kb.vmware.com/kb/1006543 – VMware ESX and ESXi 3.5 Comparison
http://kb.vmware.com/kb/1015000 – VMware ESX and ESXi 4.0 Comparison
Probably the big difference is that ESXi has a POSIX Management Appliance that runs within the vmkernel and ESX has a GNU/Linux Management Appliance that runs within a VM.
ESX vs. ESXi which is better?
http://communities.vmware.com/blogs/vmmeup/2009/04/07/esx-vs-esxi-which-is-better
Dilemma: buy vSphere with ESXi4 or with ESX4?
http://www.vknowledge.nl/2009/01/15/to-esxi-or-not-to-esxi-thats-the-question/
ESXi vs. ESX: A comparison of features
http://blogs.vmware.com/esxi/2009/06/esxi-vs-esx-a-comparison-of-features.html
Note that HCL can be differed from ESX and ESXi:
ESX vs ESXi on the HCL
–
ESXi limitations
- No official interactive console (there is only a “unsupported” hidden console: http://www.virtualizationadmin.com/articles-tutorials/vmware-esx-articles/general/how-to-access-the-vmware-esxi-hidden-console.html) – With 4.1 the Tech mode support is now fully supported
- ESXi 4.0 has no official supported SSH access (there is only a “unsupported” access: http://www.yellow-bricks.com/2008/08/10/howto-esxi-and-ssh/) – Changed in 4.1, where SSH is a service
- No /etc/ssh/sshd_config file for SSH non-root access (but is still possible: http://www.yellow-bricks.com/2008/08/14/esxi-ssh-and-non-root-users/)
- No support for some 3th part backup programs (see also Backup solutions for VMware ESXi) – Resolved with “last” version of those programs
- No support for some 3th part programs
- ESXi 4.0 hasn’t Active Directory authentication for “local” user – Implemented in 4.1
- No full crontab for schedule jobs and scripts locally (but there is a root crontab in /var/spool/cron/crontabs/root)
- No hot-add feature for virtual disk in ESXi 4.0, but only on ESXi 3.5 (or also on ESXi Advanced with hot-add license) – resolved with first updates
- No SNMP “get” polling”
- No virtual Serial or Parallel port
- No USB disk in the “console”
- No support for mount ext2/ext3/ntfs/cifs filesystem in the console
- No fully functional esxtop
- No fully functional esxcfg-mpath
- No vscsiStats tool
- ESXi 4.0 has only experimental support for boot from SAN – Resolved with 4.1
- ESXi 4.0 has limited PXE install or scriptable installation (but seems that there is a solution: http://www.vmware.com/pdf/vsp_4_pxe_boot_esxi.pdf and http://www.mikedipetrillo.com/mikedvirtualization/2008/11/howto-pxe-boot-esxi.html) – Resolved with ESXi 4.1
- Normally with a standalone ESXi host you’ll get 1 hour of performance data, the graph should be set to reset every 20 seconds (you can also extend the performance data to 36 hours will a simple hack – http://www.vm-help.com/esx/esx3i/extending_performance_data.php)
–
Free ESXi (or VMware vSphere Hypervisor 4.1) limitations
- ESXi 4.x free can not be connected to a vCenter Center (it required a VC agent license)
- VCB does not work (it require a VCB license)
- Lot of 3th part backup programs does not work with free ESXi (see also: Backup solutions for VMware ESXi)
- RCLI and VMware Infrastructure toolkit are limited to read-only access for ESXi free
- Free ESXi does not support SNMP
- Free ESXi does not support Active Directory integration at this time
- Free ESXi does not support Jumbo Frame – http://kb.vmware.com/kb/1012454
- Free ESXi EULA has some interesting restrictions including enforced read only mode for v4 and later versions of v3.5.
See also: What’s the difference between free ESXi and licensed ESXi?
VMware ESX/ESXi EULA – http://www.vmware.com/download/eula/esx_esxi_eula.html
Re: EULA restrictions for free ESXi 4
–
ESXi advantages
- Fast to install / reinstall
- Can be installed on a SD flash card or USB key (there is also an embedded version that is pre-installed) – ESXi installation – Flash memory vs Hard disk
- Easy to configure (there is a simple configuration menu)
- Small footprint = fast and easy to patch + (maybe) more secure
- Extremely thin = fast installation + faster boot
- Does not use a vmdk for console filesystems (as ESX 4.0 does)
- There is a tool for dump ESXi configuration
- Near to be “plug and play” (for example with the embedded version and the Host Profile feature)
VM Check Alignment Tool
**Update 09/2016 — This 2011 version of the alignment tool wasn’t quite accurate, it was solely based sector alignment for EMC storage and I believe the author made several adjustments based on user feedback and comments. The current version seems to do a better job, but you don’t need any tools to check alignment just read this blog I wrote as it’s so simple to check **
Original Post below —
A work colleague led me to this program the other day.
This tool couldn’t be simpler to use. Download the EXE, place it on our VM and Click Check Alignment.
It’s a real quick way to ensure your aligned…
TIP: Don’t assume Windows 2008 is aligned out of the box, as you can see here this VM needs to be aligned… It’s out of alignment because of the deployment/unified server image process used to push the OS to the VM. READ this blog for more information
2008 R2

2003

Unforutnally, this tool is no longer availible for download.
Staying Current with VMware Technology
One of the common question I’m asked is- How do I stay current with virtualization technology
The answer is – Staying current takes time and work. Here are my Tips for staying current…
1. Join your Local User Group, show up, and get to know “Who are the People in your Neighborhood”
- In Phoenix we have one of the best VMware Users group in the world. 800+ Strong and they come from all over the state
- There are MANY vendors from all types of technologies (Storage, Backups, Networking, Server hardware, etc)
- User and Vendors alike present information in a Technical Fashion
- Phoenix VMUG regional meeting draws about ~300 Attendees from all types of industry
- Use these meetings to find out Who’s Who in the virtualization community and then starting asking LOTS of questions
2. Blog Sites – Read these sites frequently…
- Duncan Epping’s Blog – Yellow Bricks – http://www.yellow-bricks.com/ << TOP Rated VMware Blog
- Vaughan Stewart – The Virtual Storage Guy — http://blogs.netapp.com/virtualstorageguy/ << Mr. Vmware for NetApp
- Chad Sakac’s Blog – Virtual Geek – http://virtualgeek.typepad.com/virtual_geek/ <<< Mr. VMware for EMC (Has an army called Chad Army)
- Gabe Van Zanten’s Blog – Gabe’s Virtual World – http://www.gabesvirtualworld.com/
- Mike Laverick’s Blog – RTFM Ed. – http://www.rtfm-ed.co.uk/
- Scott Lowe’s Blog – ScottLowe.org – http://blog.scottlowe.org/ << Great author of many books and an EMC vSpecialist
- Jason Boche – Vmware Virtualization Evangelist – http://www.boche.net/blog/ << Old VMUG Minneapolis Leader, now works for Dell
- Local guy(Arizona) – Adam Baum – http://itvirtuality.wordpress.com/ <<< works for VCE and knows Cisco UCS
3. RSS Feeds
- Setup RSS Feeds to your Favorite Blogs sites – AND read them – Put your Smart Phone to use…
- VMWare has done a great job with Planetv12n. It is a blog consolidation of top bloggers
4. PodCasts
- John Troyer with VMware has done a great job putting together a weekly podcast around VMware based topics — http://www.talkshoe.com/talkshoe/web/talkCast.jsp?masterId=19367
- One thing I like about TalkShoe is all the previous pod casts are there for you to review.
5. LinkedIN
- Join a group, build your network, and start communicating
- This is a great way to track those people you meet
6. Twitter
- Twitter Really? Yes Really…. Companies like VMware use twitter to get information out to customers
- Find your favorite companies, find out their twitter feeds and follow them.
- If used properly Twitter is a great resource for valuable information
7. YouTube
- YouTube Really? Yes Really… Like Twitter YouTube is a great resource for quality information.
- Do simple searches for information or product, you’ll be surpised how much information you’ll find
- Companies like VMware have specific YouTube Channels and they frequently post Product and How To information
Here is my last link… This link contains most of the VMware Bloggers, Twitter Accounts, and RSS feeds in one spot.. http://vlp.vsphere-land.com/ << Priceless
All of this might seem a bit overbearing, and it can be at first. My recommendation is — start out small, read a few blogs, view some online content, ask questions, and repeat..
Before you know it you’ll be on the right track to staying current with virtualization.
What are some of the ways you stay current? Please post up!
Slow Windows 2008 VM Video Performance when viewing through an ESX console
Today one of my colleagues mentioned he was experiencing poor video performance with a windows 2008 VM. When he accessed the VM via vCenter Server Console the mouse was performing poorly..
We did a bit of research and found the article below… it fixed our issue in a jiffy..
Note: This post/notes are simply for my reference and I don’t recommend you apply this to your environment…
Troubleshooting SVGA drivers installed with VMware Tools on Windows 7 and Windows 2008 R2 running on ESX 4.0
Details
- You receive a black screen on the virtual machine when using Windows 7 or Windows 2008 R2 as a guest operating system on ESX 4.0.
- You experience slow mouse performance on Windows 2008 R2 virtual machine.
Solution
This issue can occur due to the XPDM (SVGA) driver provided with VMware Tools. This is a legacy Windows driver and is not supported on Windows 7 and Windows 2008 R2 guest operating systems.
To workaround this issue, replace the Display Adapter default-installed driver within the virtual machine with the driver contained in the wddm_video folder. In vCenter Server 4.1 (for Windows 2008 R2 operating systems), the wddm_video folder is in C:\Program Files\Common Files\VMware\Drivers.
To move a copy of this driver from the vCenter Server to the virtual machine:
- Open a command line share to the vCenter Server from the virtual machine:
c$ share
- Navigate to C:\Program Files\Common Files\VMware\Drivers and copy the driver to a location on the virtual machine (C:\, for example).
- Within the virtual machine, right-click Computer > Manage > Diagnostics > Device Manager, then expand the Display Adapters selection.
- Right-click the Driver that is currently installed and choose Update Driver Software. Browse to the folder that you copied from vCenter Server, select it, then follow the wizard.
- When the wizard completes, reboot the virtual machine.
To resolve this issue, update to ESX 4.0 Update 1. A new WDDM driver is installed with the updated VMware Tools and is compatible with Windows 7 and Windows 2008 R2.
If you are able to update to ESX 4.0 Update 1, but receive a black screen on the virtual machine after changing to the new driver, click Edit Settings and change the video settings to 32MB.
If you cannot update to ESX 4.0 Update 1:
- Deselect the driver included with ESX 4.0.
- When you install VMware Tools, select Custom or Modify in the VMware Tools installation wizard
- Deselect the SVGA (XPDM) driver.
You can also remove the VMware Tools SVGA driver from the Device Manager after installing VMware Tools.
Note: To install the drivers successfully, ensure that the virtual machine hardware version is 7.
Test Lab – Day 5 Expanding the IOMega ix12-300r
Recently I installed an IOMega ix12-300r for our ESX test lab and it’s doing quite will
However I wanted to push our Iomega to about 1Gbs of sustained NFS traffic of the available 2Gbs.
To do this I needed to expand our 2 drive storage pool to 4 drives.
From a previous post we created 3 storage pools as seen below.
Storage Pool 0 (SP0) 4 Drives for basic file shares (CIFS)
Storage Pool 1 (SP1_NFS) 2 drives for ESX NFS Shares only
Storage Pool 2 (SP2_iSCSI) 2 drives dedicated for ESX iSCSI only
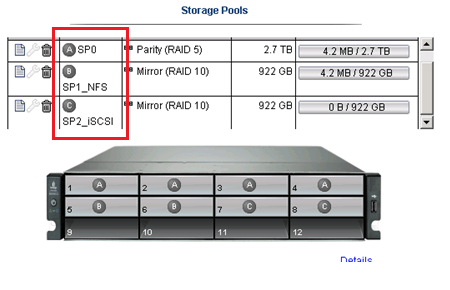
In this post I’m going to delete the unused SP2_iSCSI and add those drives to SP1_NFS
Note: This procedure is simply the pattern I used in my environment. I’m not stating this is the right way but simply the way it was done. I don’t recommend you use this pattern or use it for any type of validation. These are simply my notes, for my personal records, and nothing more.
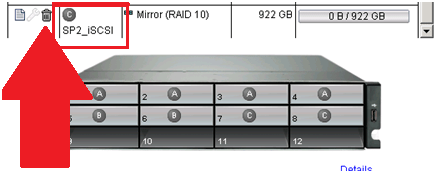
Under settings select storage pools

Select the Trash Can to delete the storage pools..
It prompted me to confirm and it deleted the storage pool.
Next I choose the Edit icon on SP2_NFS, selected the drives I wanted, choose RAID 5, and pressed apply.

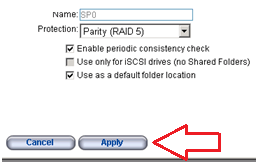
From there it started to expand the 2 disk RAID1 to a 4 disk RAID5 storage pool..
Screenshot from the IOMega ix12 while it is being expanded…

I then went to the Dashboard and under status I can view its progress…

ALL this with NO Down time to ESX, in fact I’m writing this post from a VM at the expansion is happening.
It took about 11 Hours to rebuild the RAID set.
Tip: Use the event log under settings to determine how long the rebuild took.
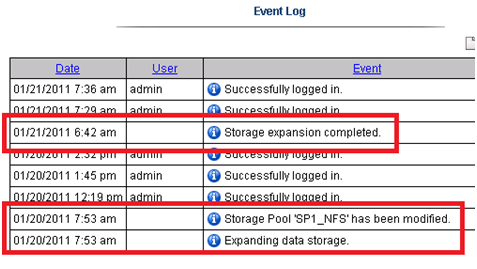
The next day I checked in on ESX and it was reporting the updated store size.

Summary…
To be able to expand your storage pool that houses your ESXi test environment with no down time is extremely beneficial and a very cool feature.
Once again IOMega is living up to its tag line – IOmega Kicks NAS!
Tomorrow we’ll see how it performs when we push a higher load to it.
