Other
VMware Workstation Gen 9: Part 7 Deploying VCF 9.0.1
Now that I have set up an VCF 9 Offline depot and downloaded the installation media its time to move on to installing VCF 9 on my Workstation environment. In this blog all document the steps I took to complete this.
PRE-Steps
1) One of the more important steps is making sure I backup my environment and delete any VM snapshots. This way my environment is ready for deployment.
2) Make sure your Windows 11 PC power plan is set to High Performance and does not put the computer to sleep.
3) Next since my hosts are brand new they need their self-signed certificates updated. See the following URL’s.
- VCF Installer fails to add hosts during deployment due to hostname mismatch with subject alternative name
- Regenerate the Self-Signed Certificate on ESX Hosts
4) I didn’t setup all of DNS names ahead of time, I prefer to do it as I’m going through the VCF installer. However, I test all my current DNS settings, and test the newly entered ones as I go.
5) Review the Planning and Resource Workbook.
6) Ensure the NTP Service is running on each of your hosts.
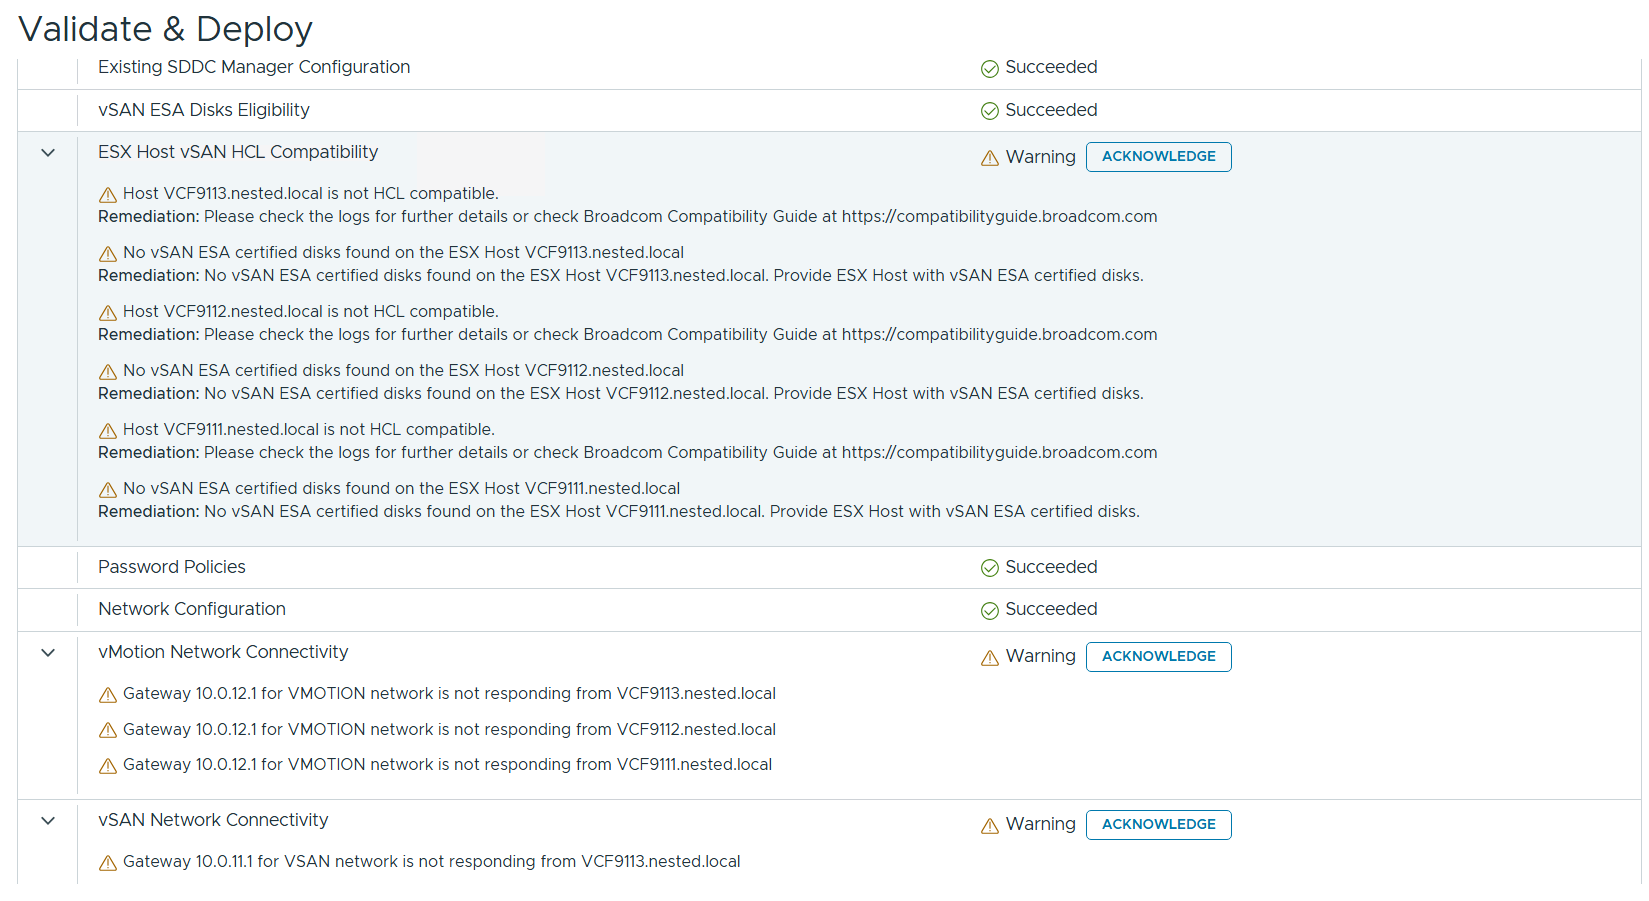
7) The VCF Installer 9.0.1 has some extra features to allow non-vSAN certified disks to pass the validation section. However, nested hosts will fail the HCL checks. Simply add the line below to the /etc/vmware/vcf/domainmanager/application-prod.properties and then restart the SDDC Domain Manager services with the command: systemctl restart domainmanager
This allows me Acknowledge the errors and move the deployment forward.

Installing VCF 9 with the VCF Installer
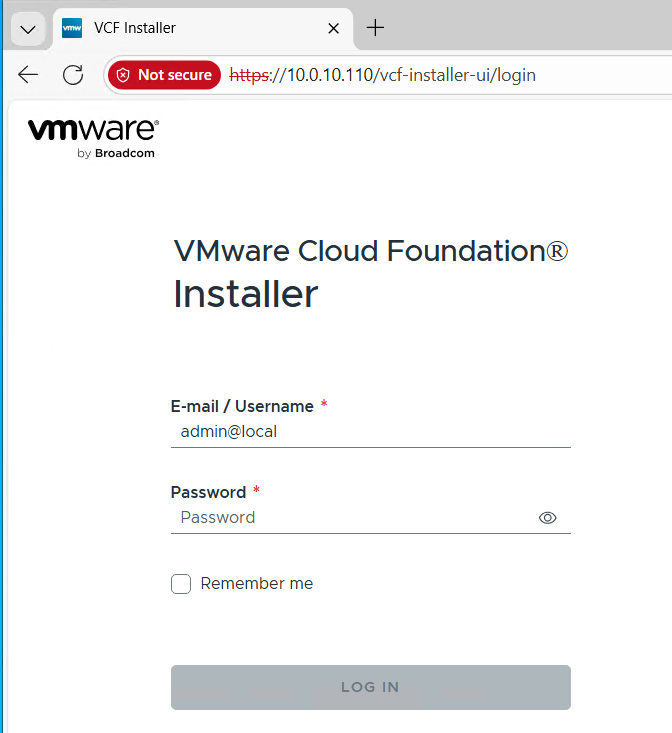
I log into the VCF Installer.
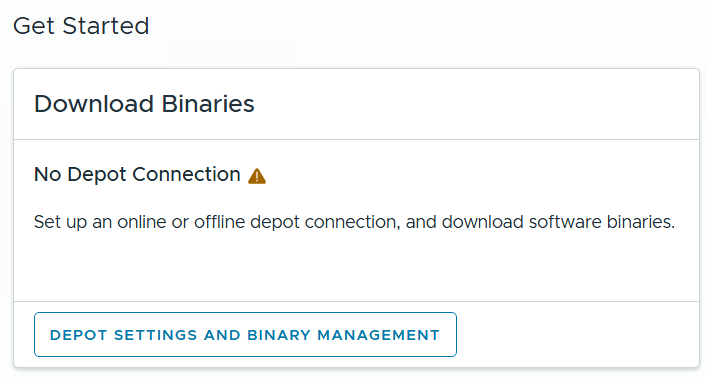
I click on ‘Depot Settings and Binary Management’
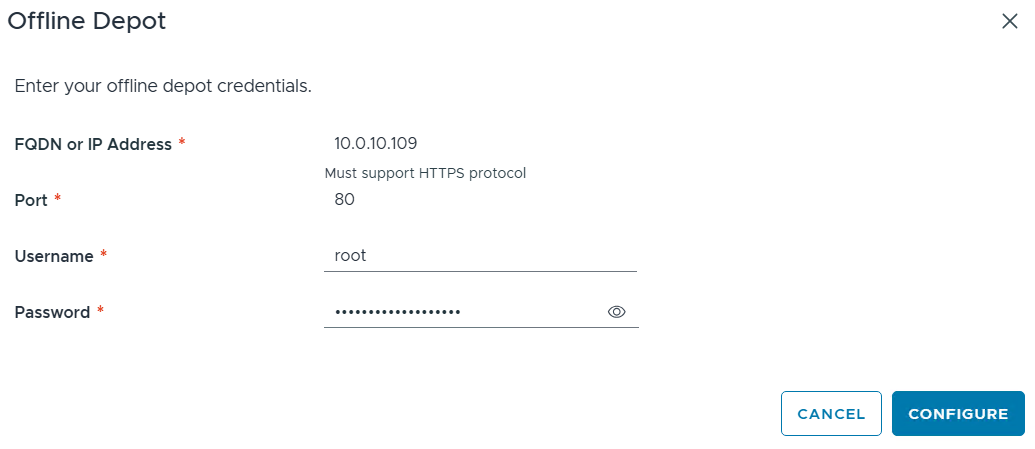
I click on ‘Configure’ under Offline Depot and then click Configure.
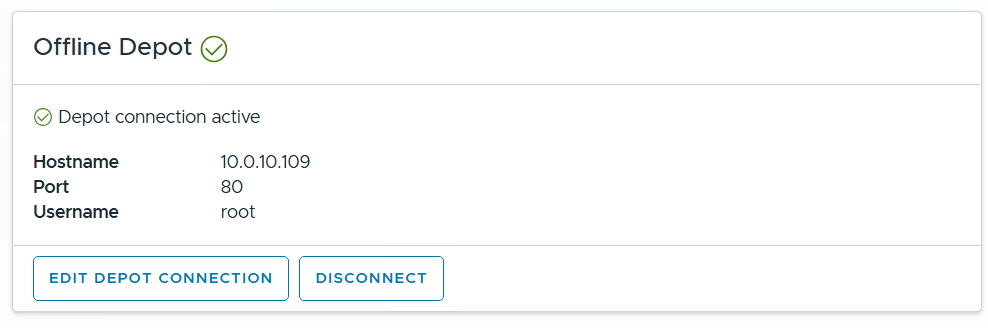
I confirm the Offline Depot Connection if active.
I chose ‘9.0.1.0’ next to version, select all except for VMware Cloud Automation, then click on Download.
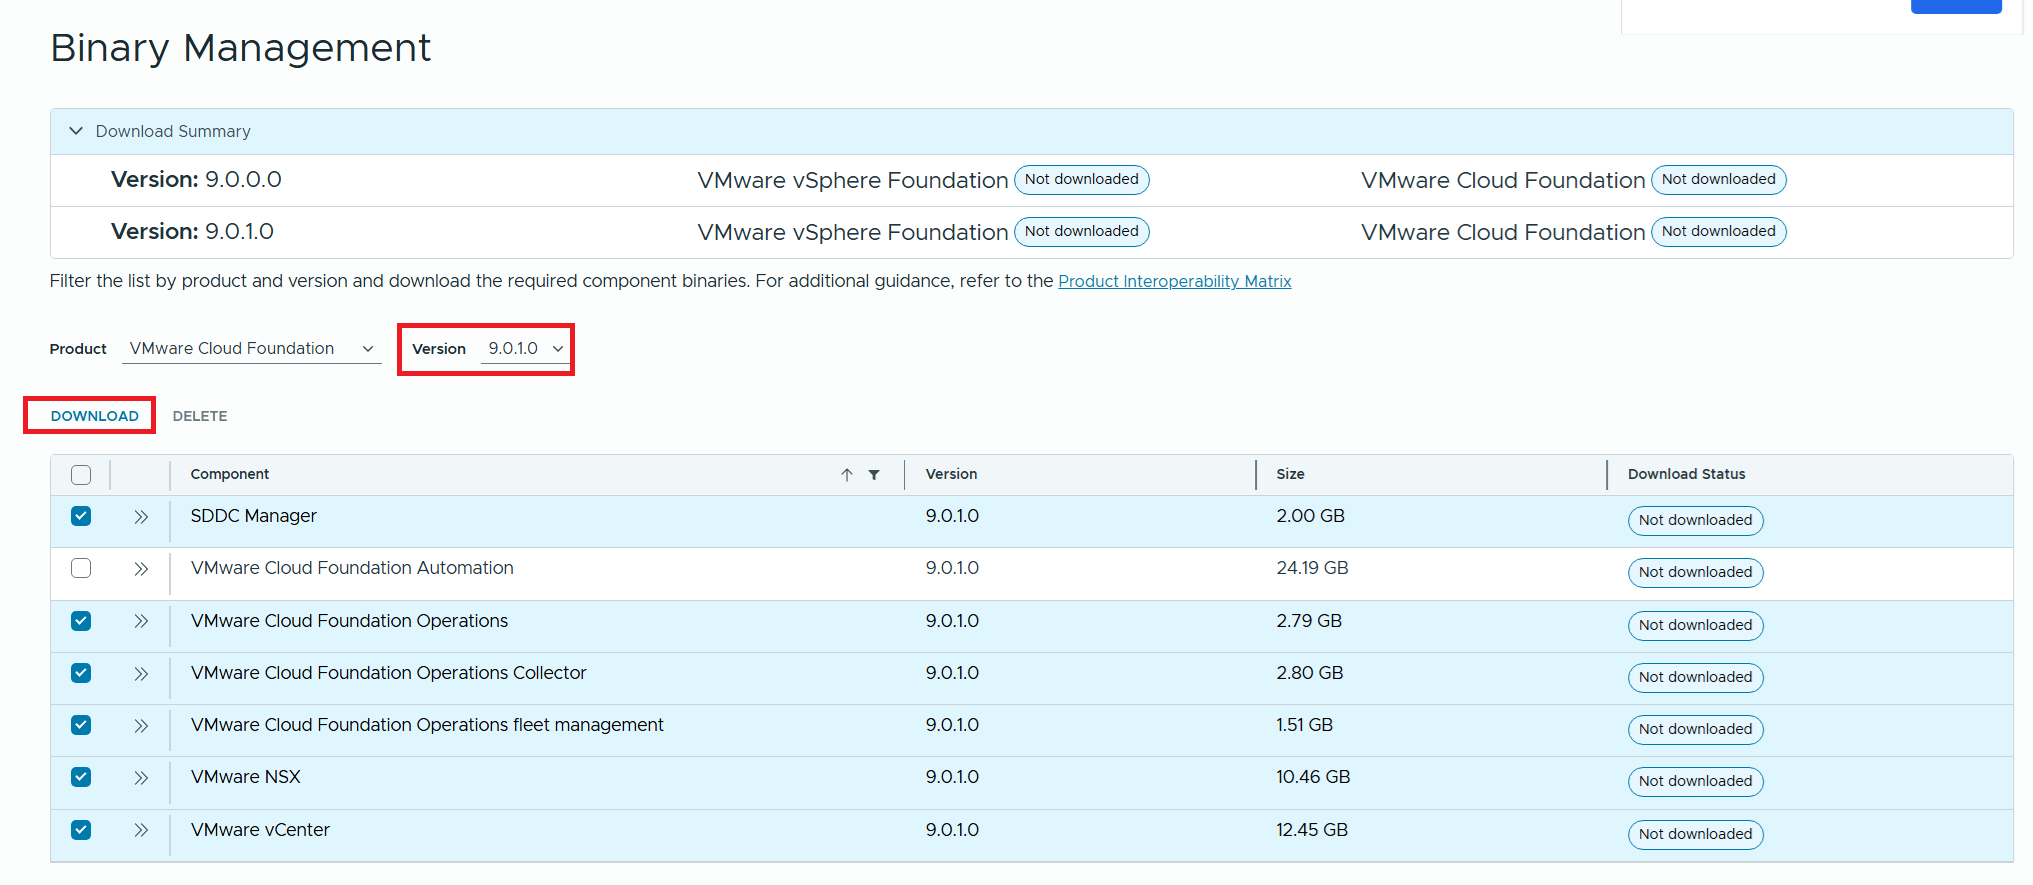
Allow the downloads to complete.

All selected components should state “Success” and the Download Summary for VCF should state “Partially Downloaded” when they are finished.

Click return home and choose VCF under Deployment Wizard.
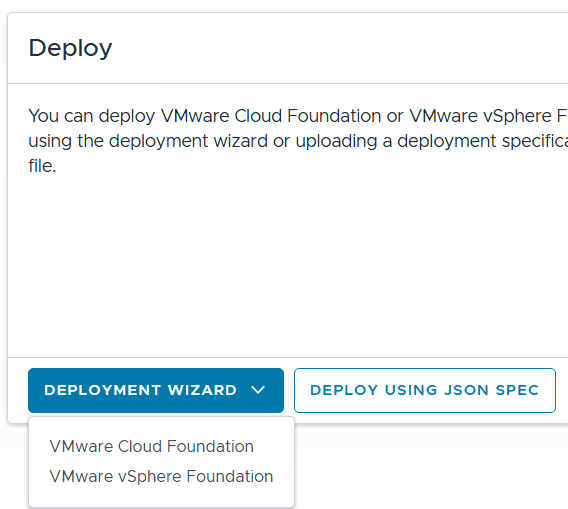
This is my first deployment so I’ll choose ‘Deploy a new VCF Fleet’

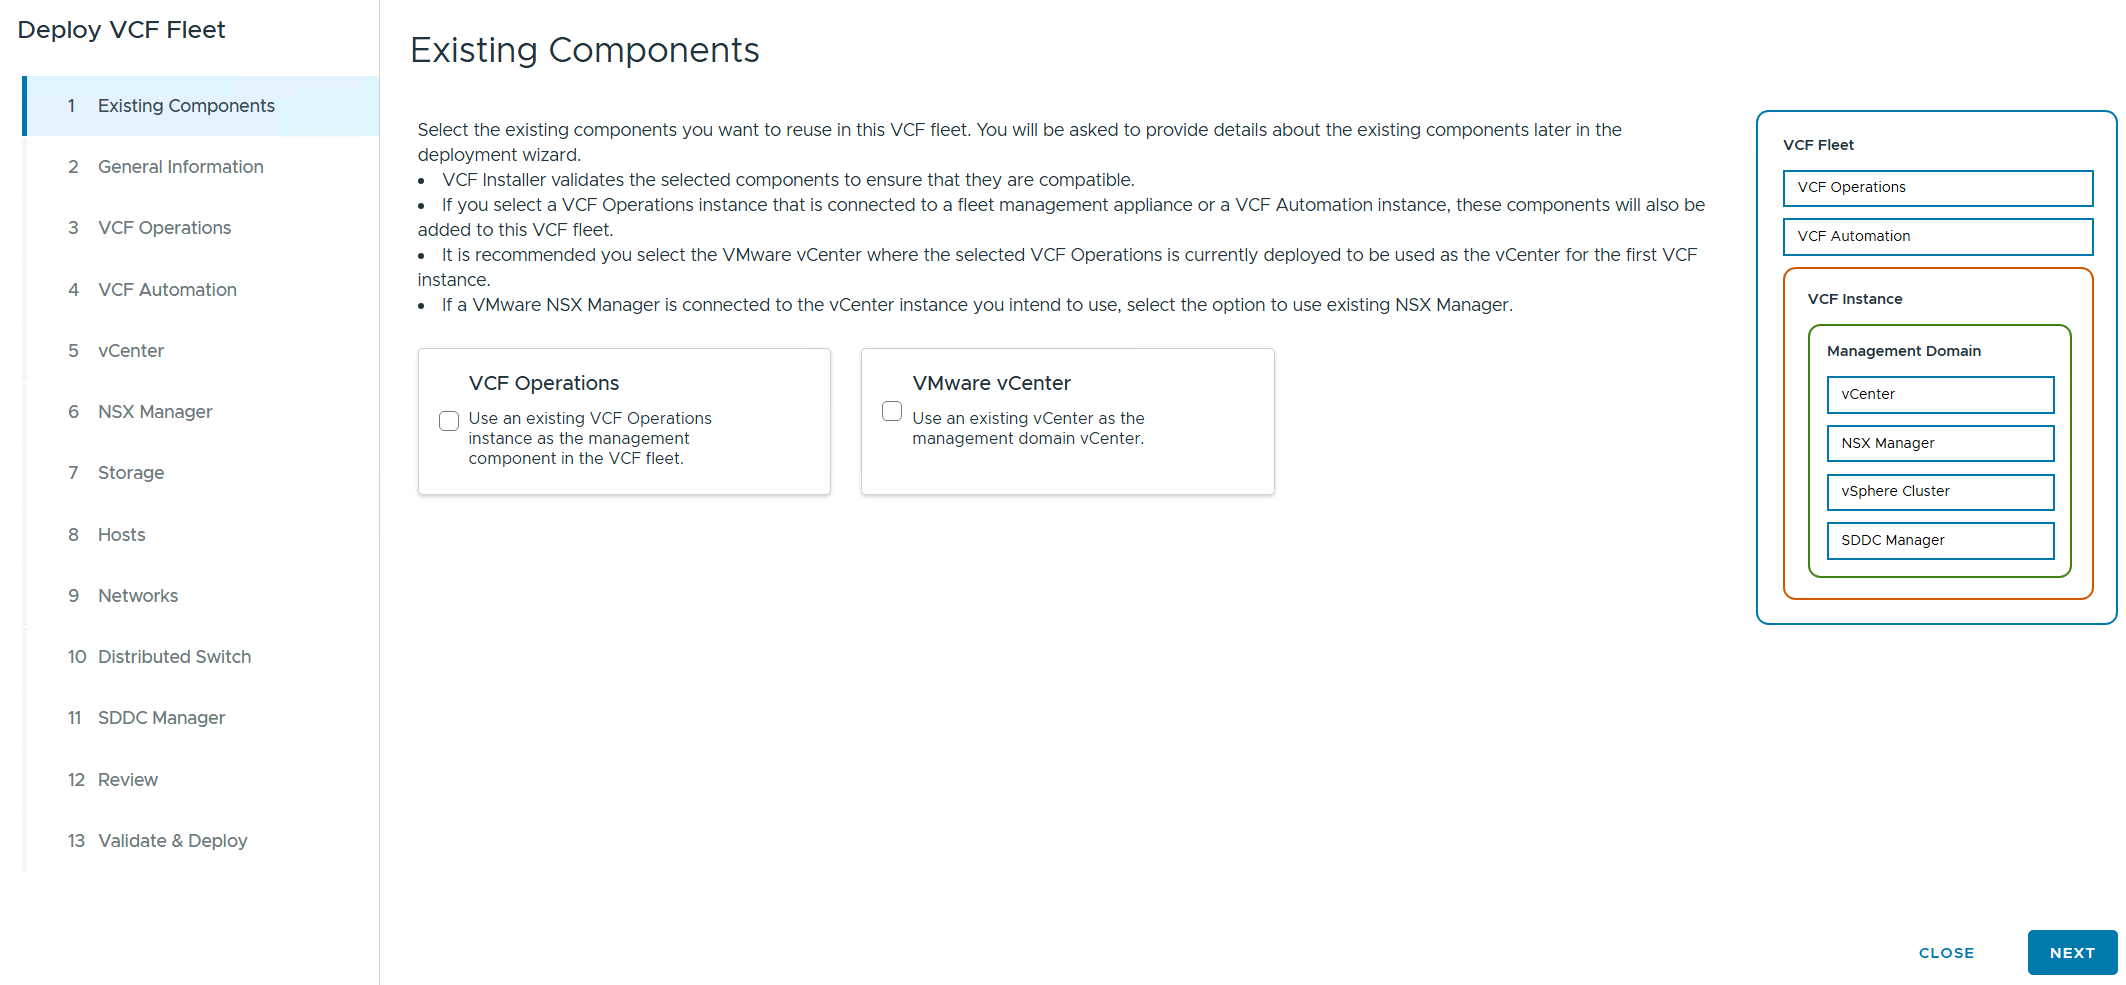
The Deploy VCF Fleet Wizard starts and I’ll input all the information for my deployment.
For Existing Components I simply choose next as I don’t have any.
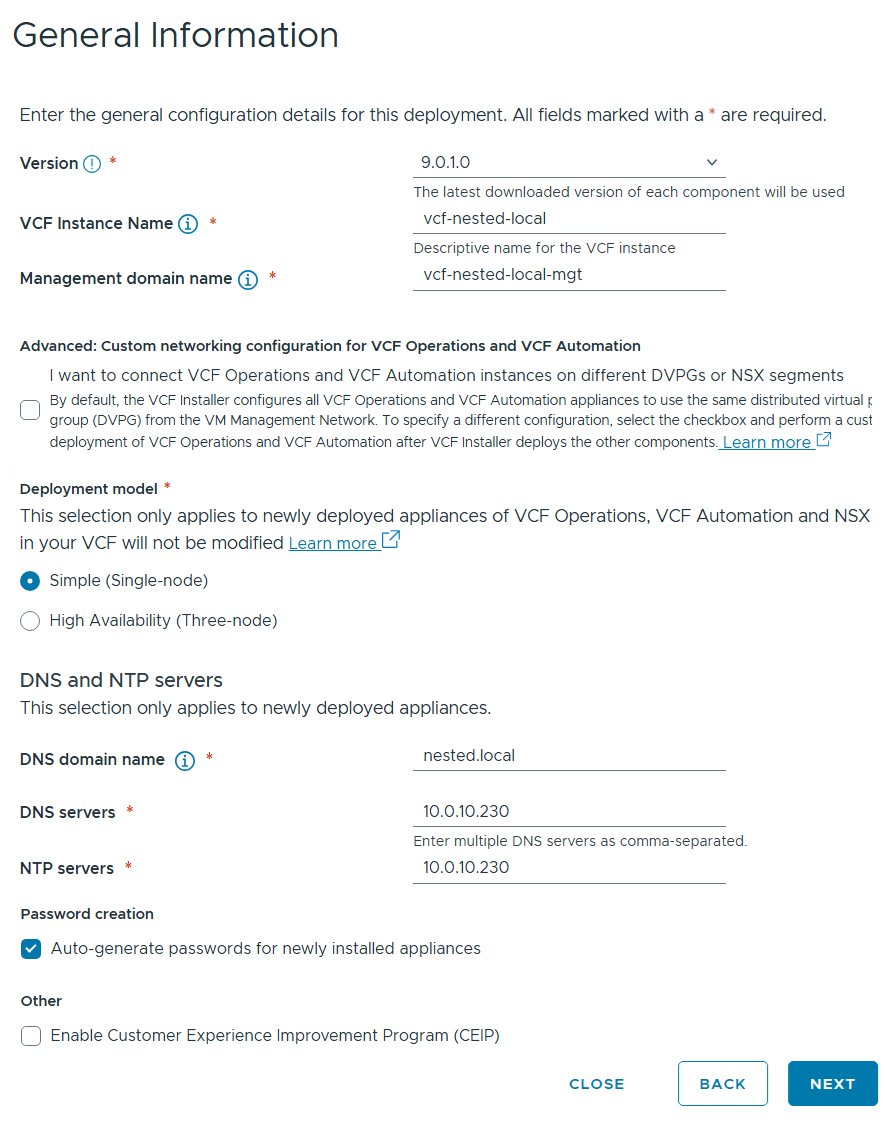
I filled in the following information around my environment, choose simple deployment and clicked on next.
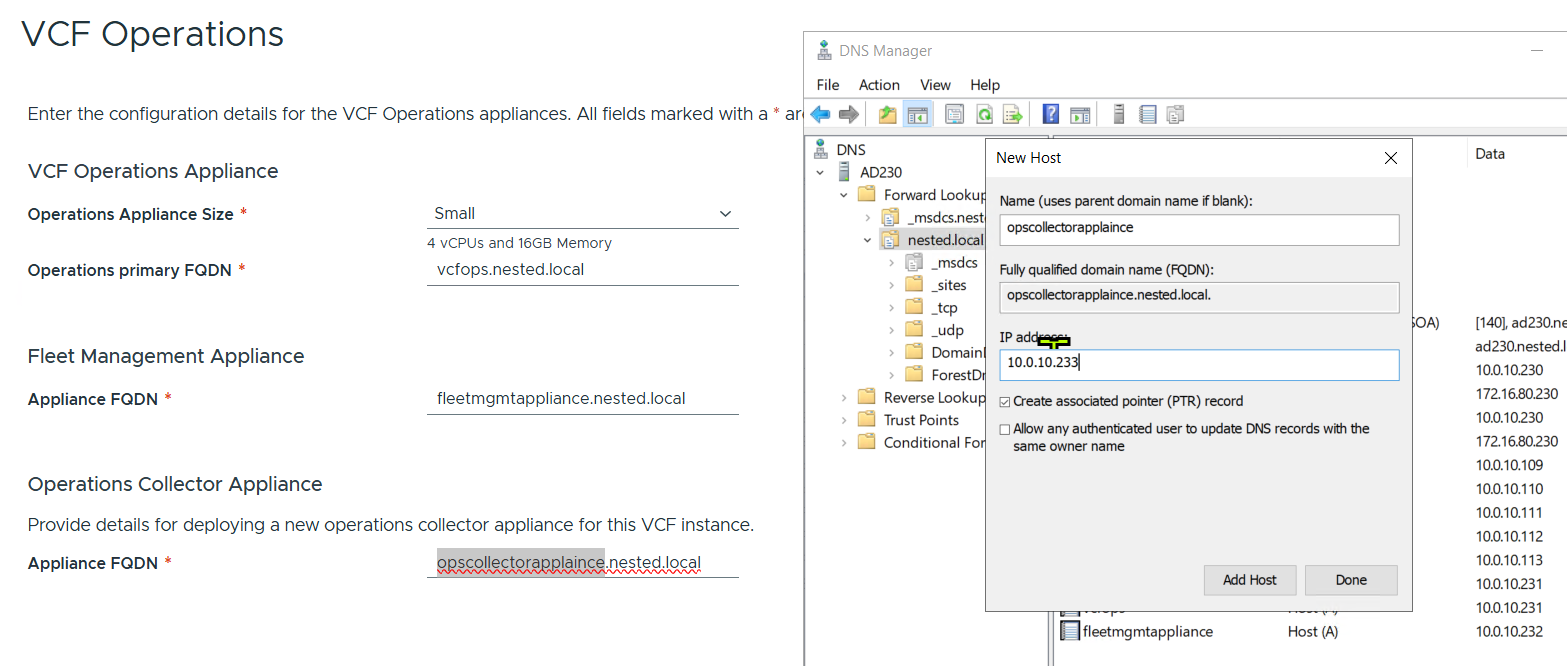
I filled out the VCF Operations information and created their DNS records. Once complete I clicked on next.
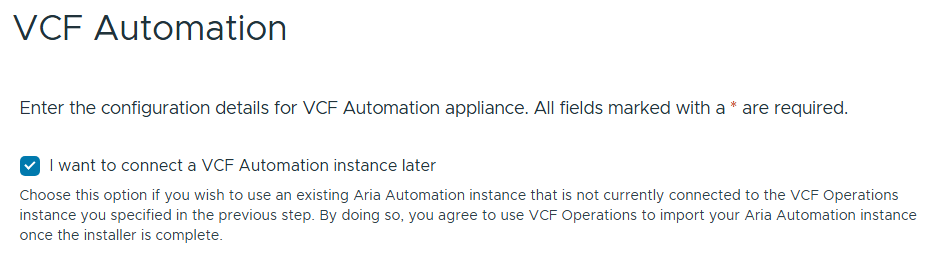
I chose to “I want to connect a VCF Automation instance later” can chose next.
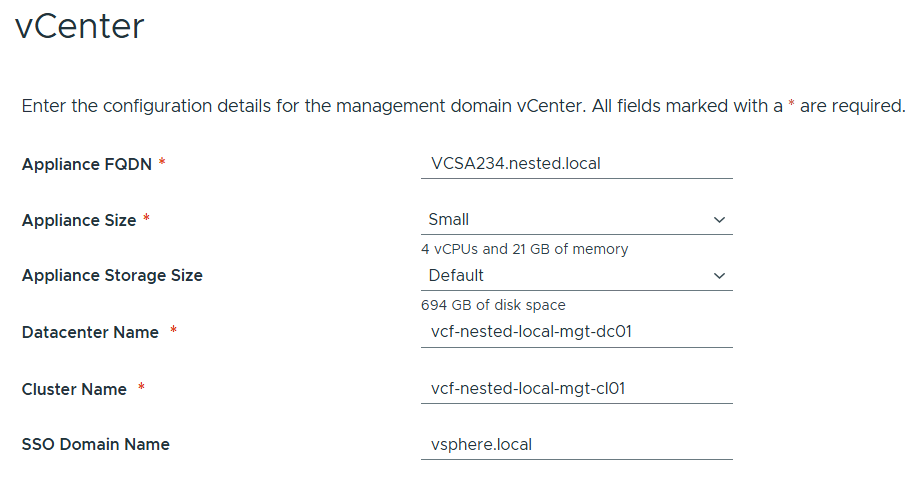
Filled out the information for vCenter
Entered the details for NSX Manager.

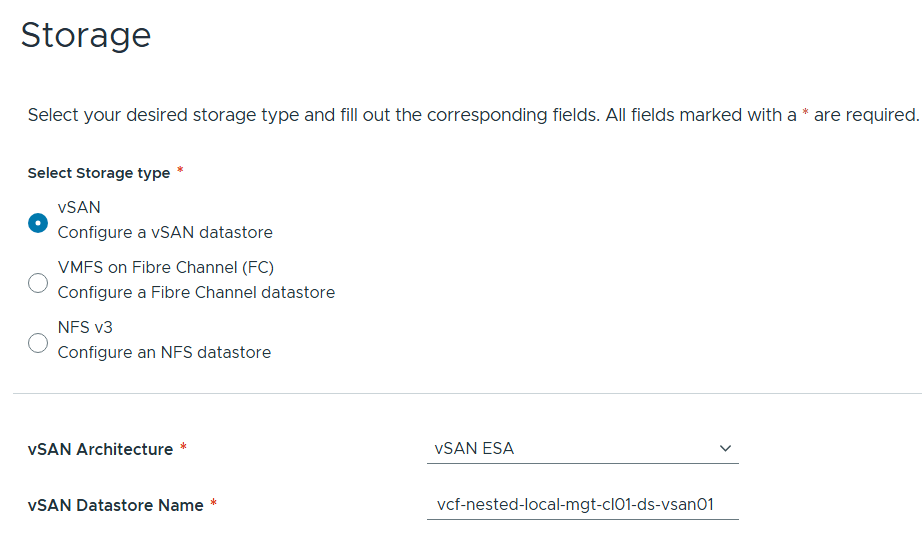
Left the storage items as default.
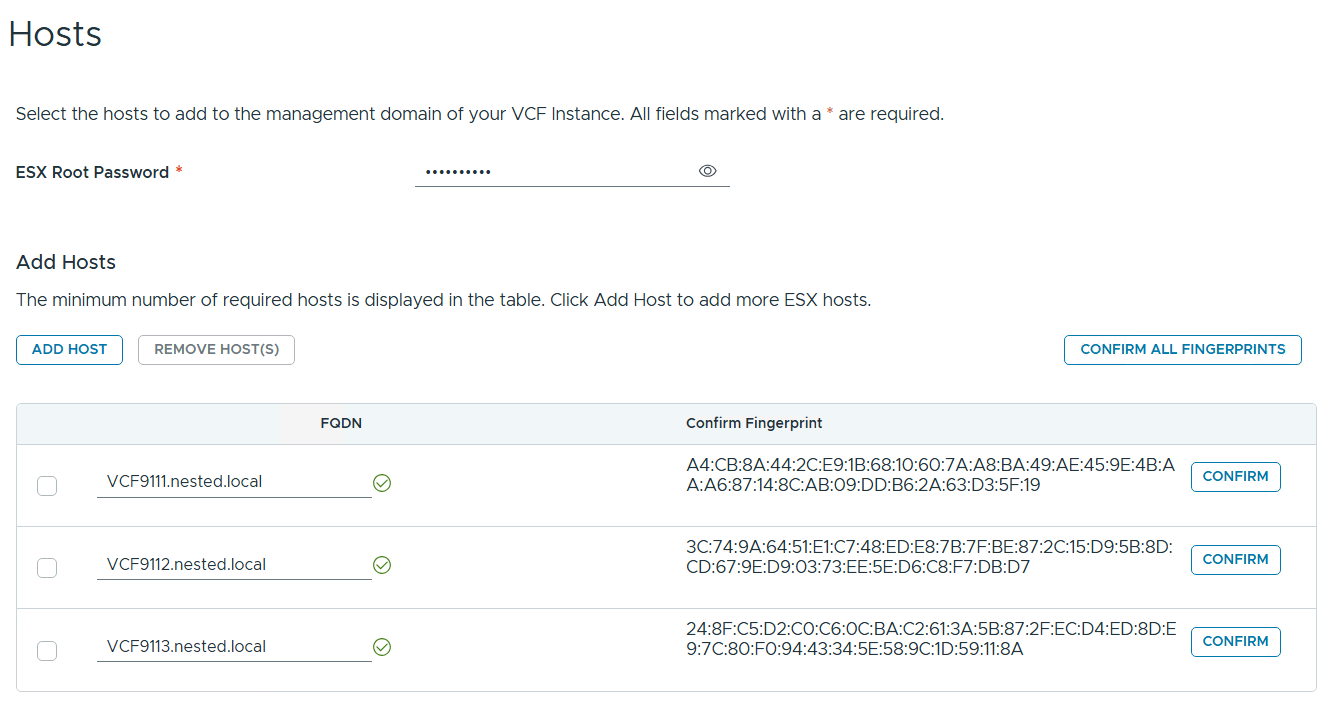
Added in my 3 x ESX 9 Hosts, confirmed all fingerprints, and clicked on next.
Note: if you skipped the Pre-requisite for the self-signed host certificates, you may want to go back and update it before proceeding with this step.
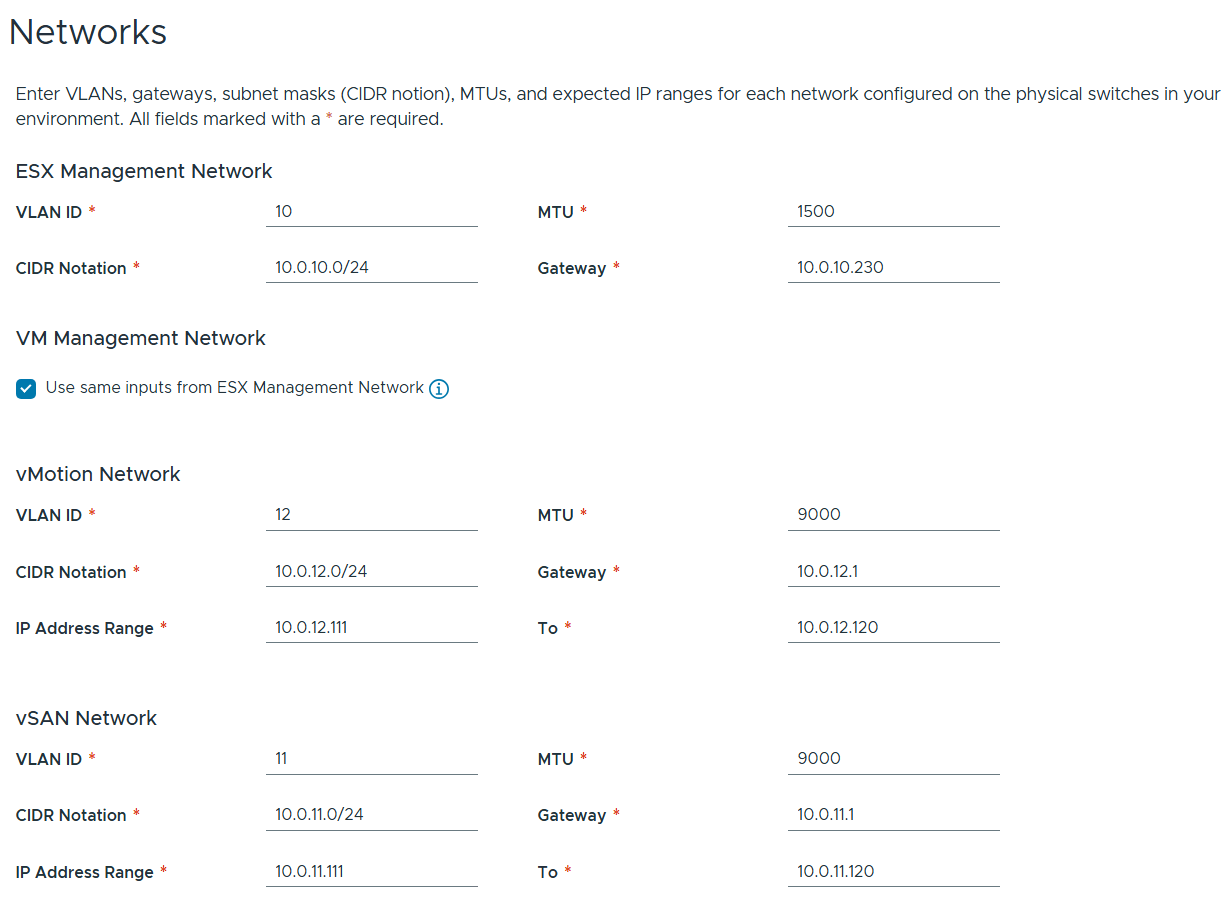
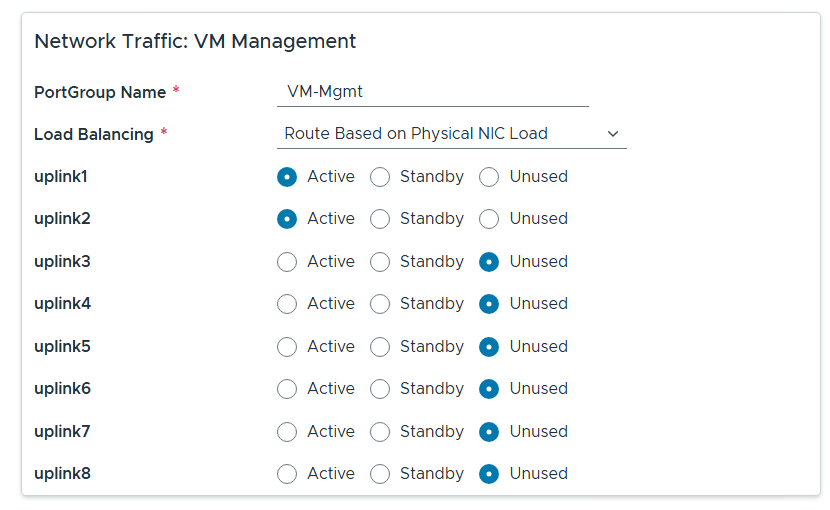
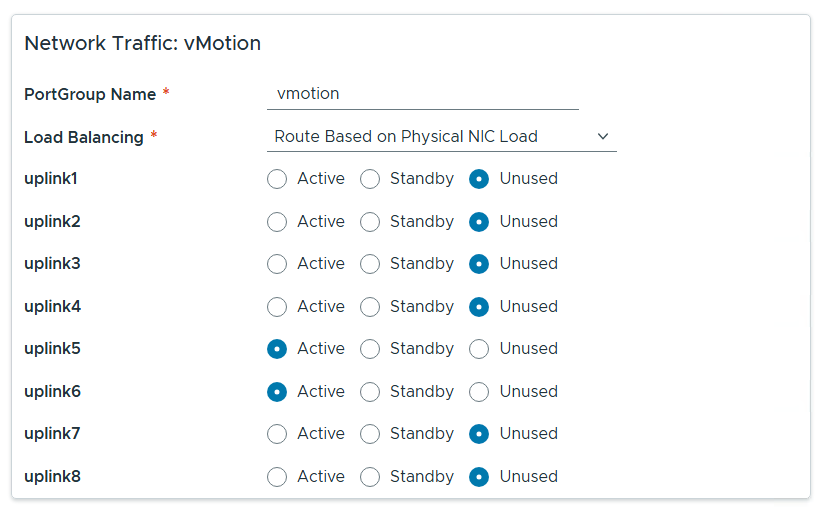
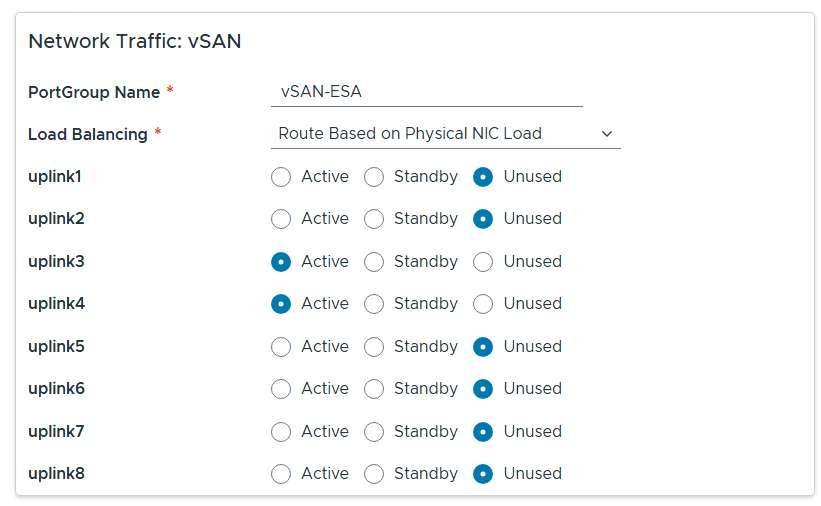
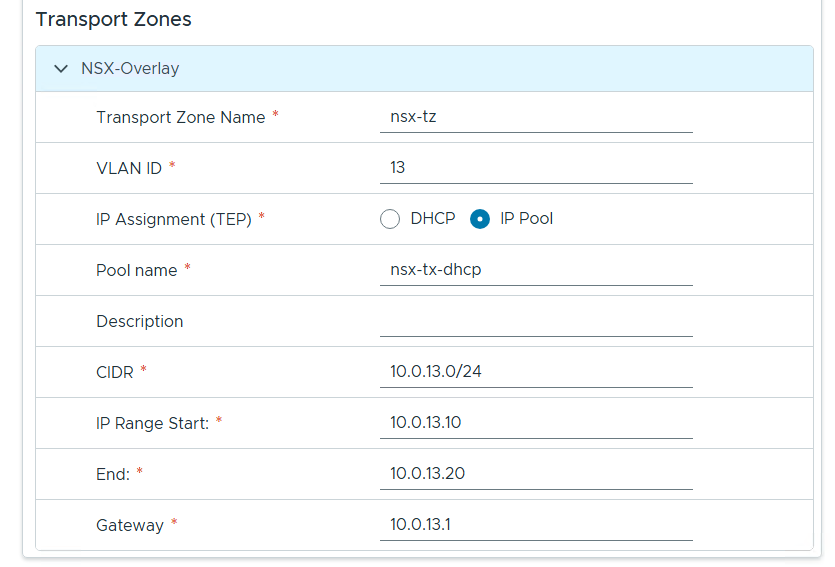
Filled out the network information based on our VLAN plan.
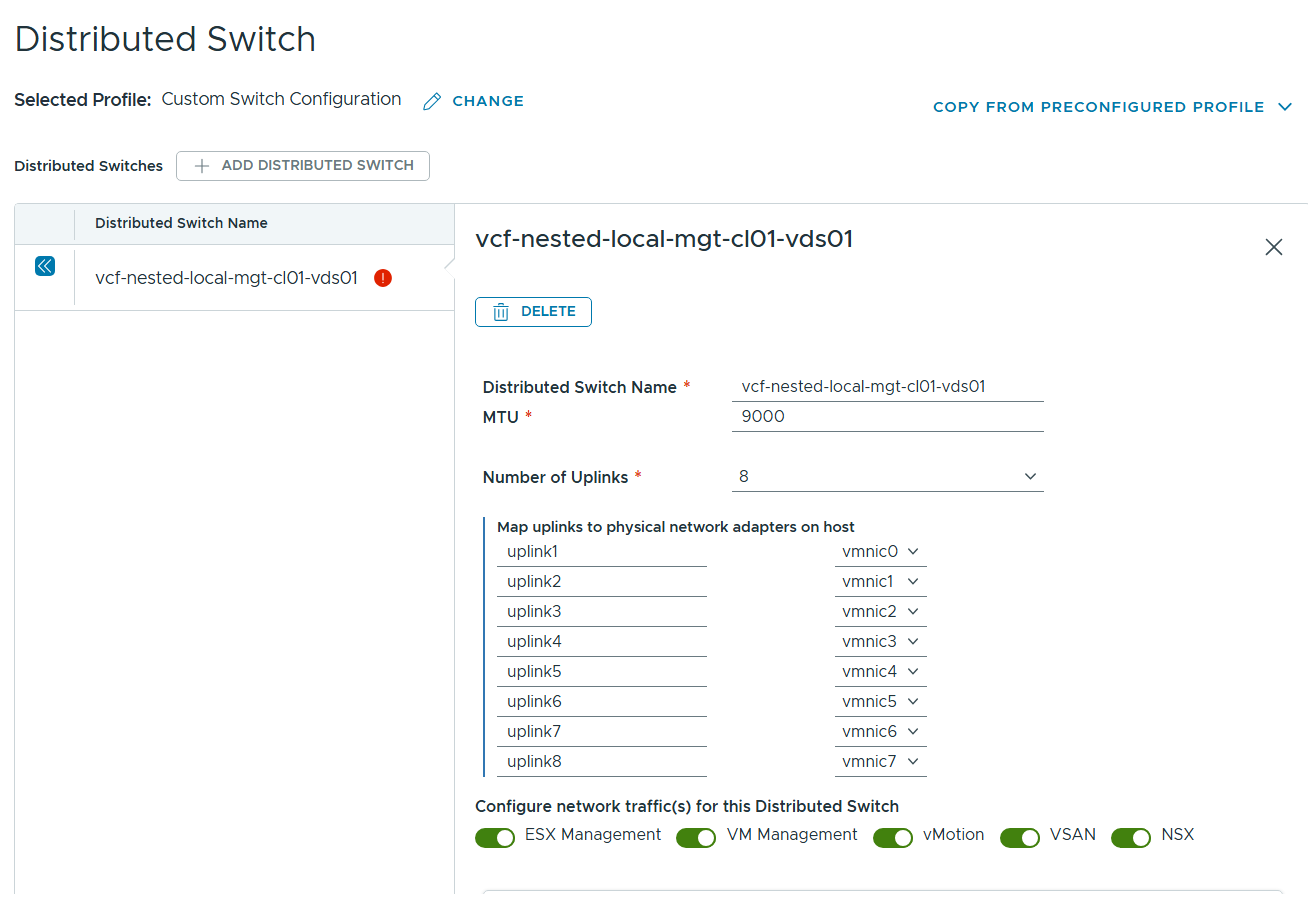
For Distributed Switch click on Select for Custom Switch Configuration, MTU 9000, 8 Uplinks and chose all services, then scroll down.
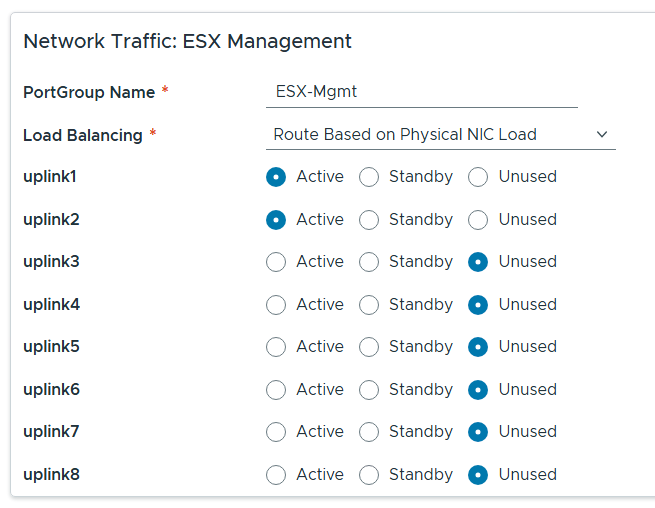
Renamed each port group and chose the following network adapters, chose their networks, updated NSX settings then chose next.

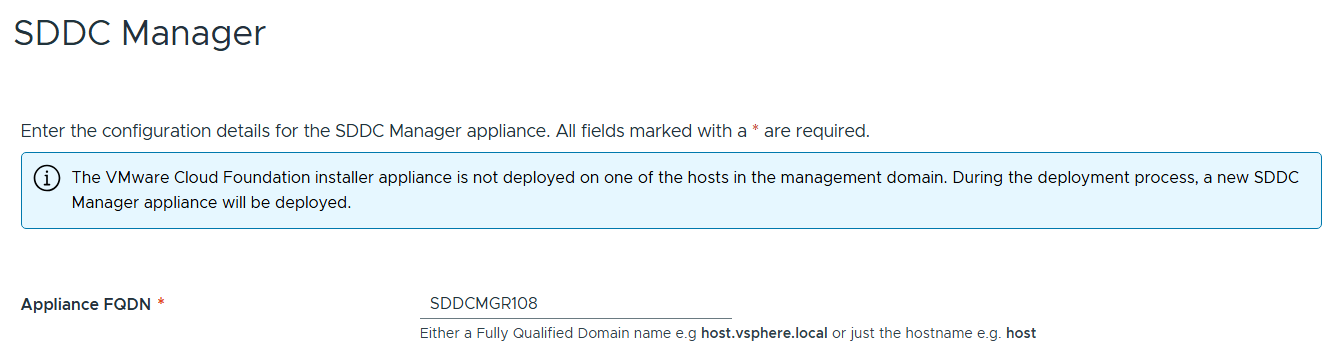
Entered the name of the new SDDC Manager and updated it’s name in DNS, then clicked on next.
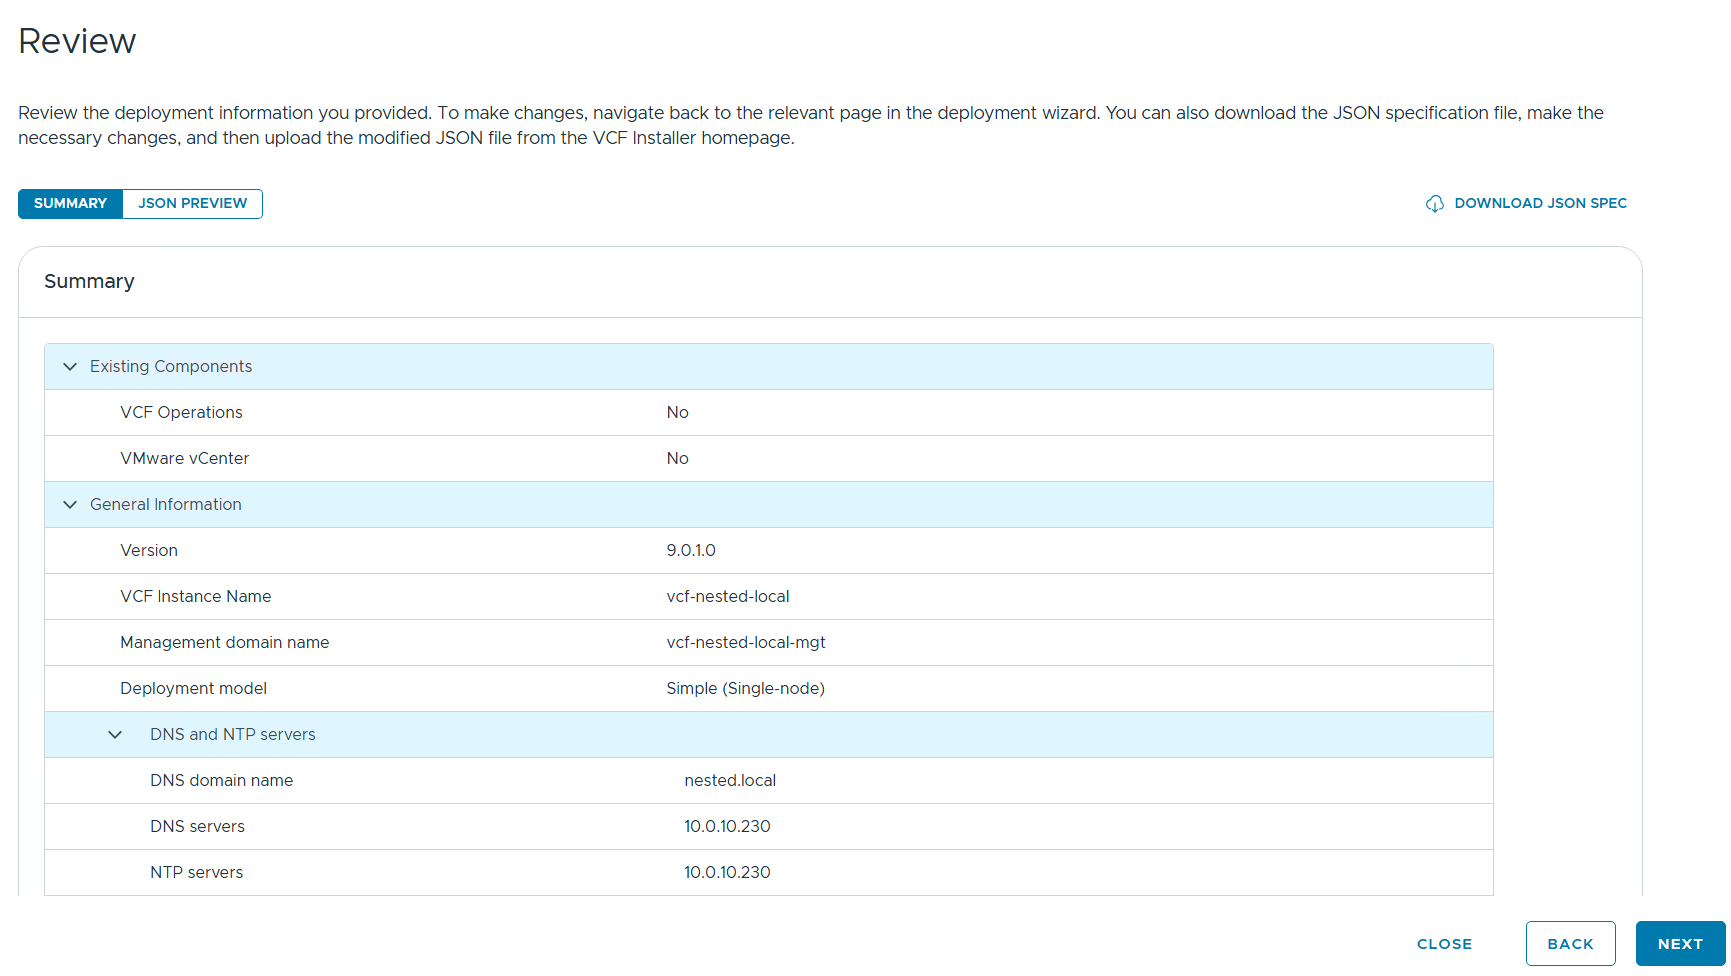
Reviewed the deployment information and chose next.
TIP – Download this information as a JSON Spec, can save you a lot of typing if you have to deploy again.
Allow it to validate the deployment information.

I reviewed the validation warnings, at the top click on “Acknowledge all Warnings” and click ‘DEPLOY’ to move to the next step.

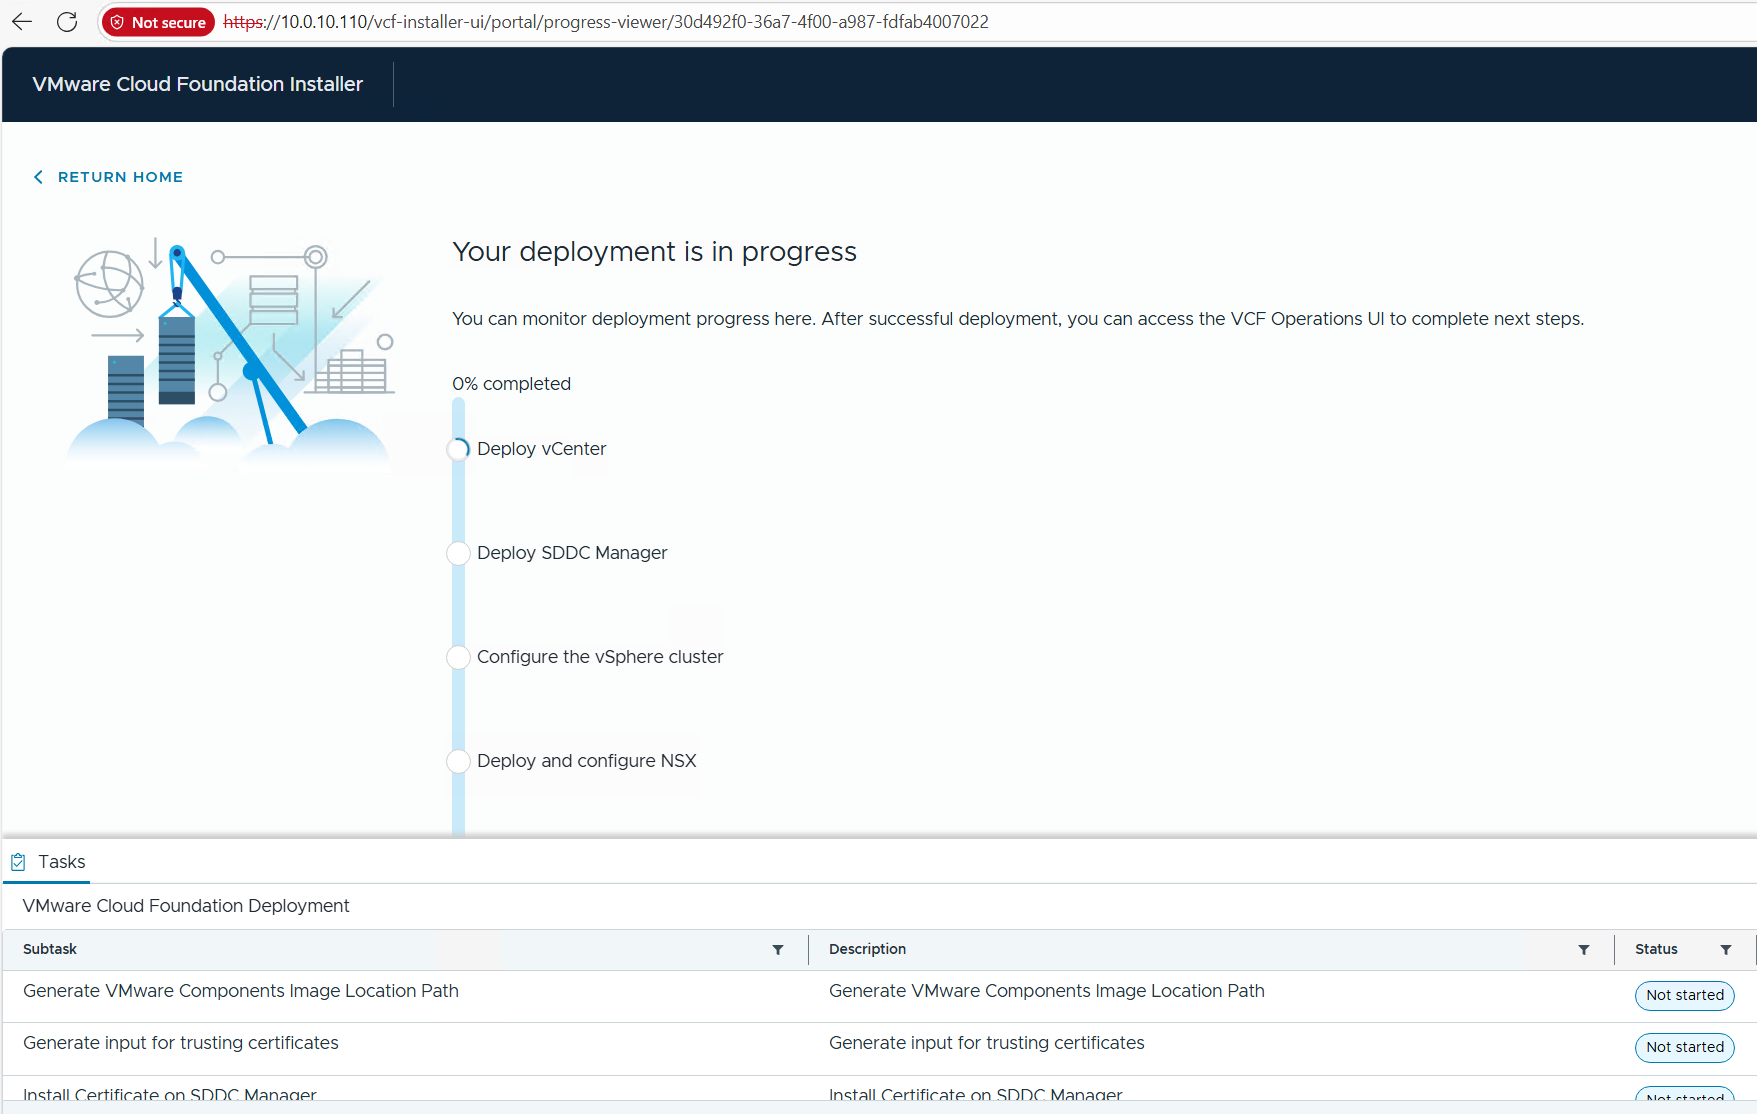
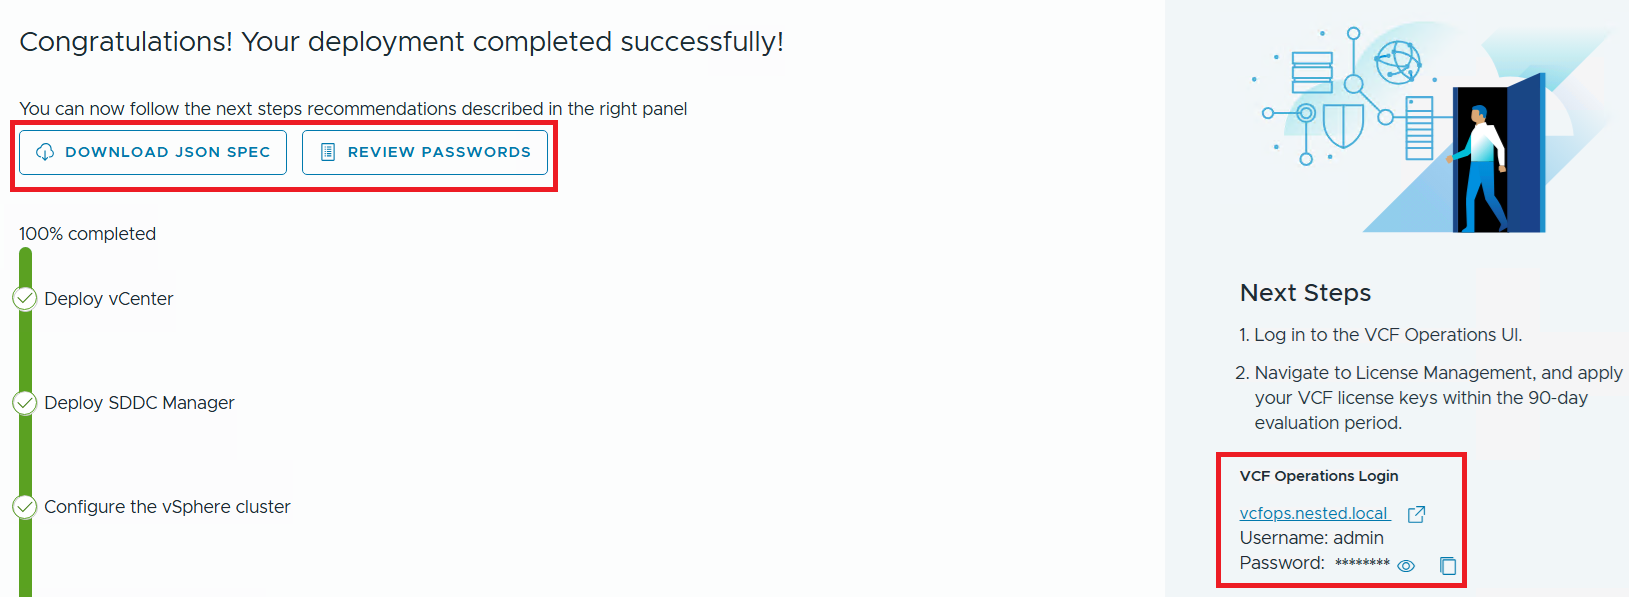
Allow the deployment to complete.
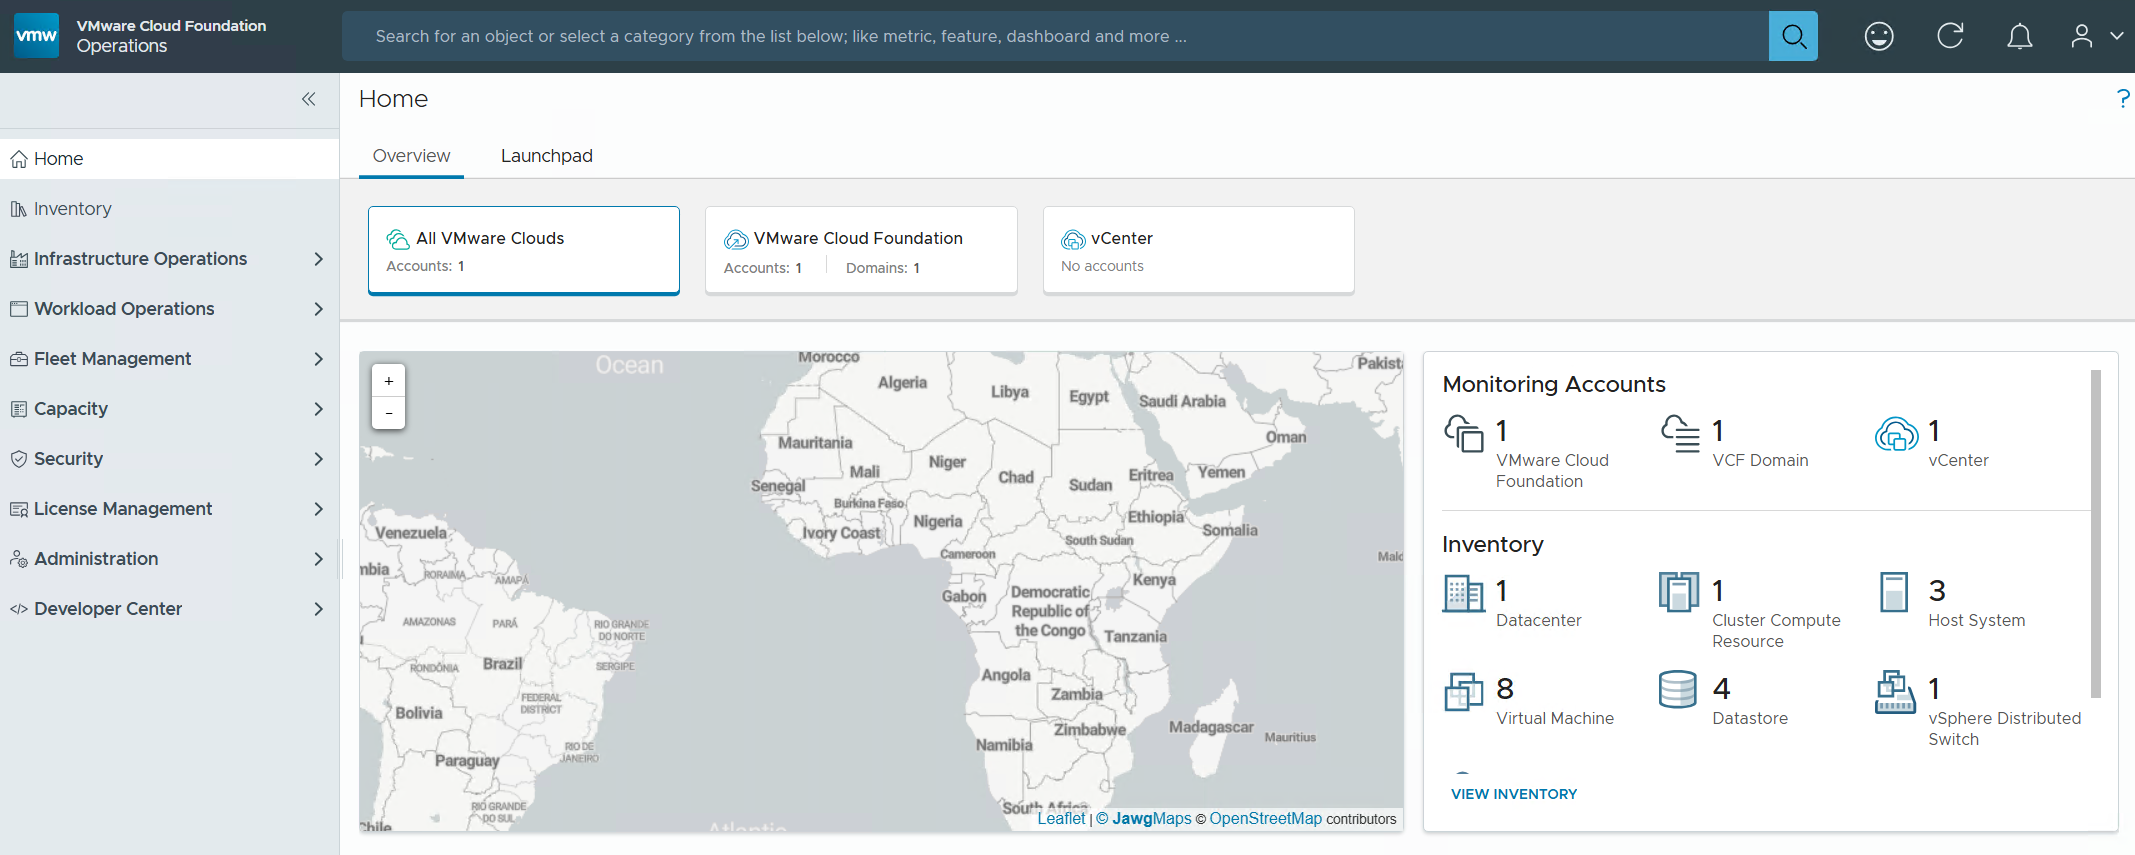
Once completed, I download the JSON SPEC, Review and document the passwords, (Fig-1) and then log into VCF Operations. (Fig-2)
(Fig-1)
(Fig-2)
Now that I have a VCF 9.0.1 deployment complete I can move on to Day N tasks. Thanks for reading and reach out if you have any questions.
VMware Workstation Gen 9: Part 6 VCF Offline Depot
To deploy VCF 9 the VCF Installer needs access to the VCF installation media or binaries. This is done by enabling Depot Options in the VCF Installer. For users to move to the next part, they will need to complete this step using resources available to them. In this blog article I’m going to supply some resources to help users perform these functions.
Why only supply resources? When it comes to downloading and accessing VCF 9 installation media, as a Broadcom/VMware employee, we are not granted the same access as users. I have an internal process to access the installation media. These processes are not publicly available nor would they be helpful to users. This is why I’m supplying information and resources to help users through this step.
What are the Depot choices in the VCF Installer?
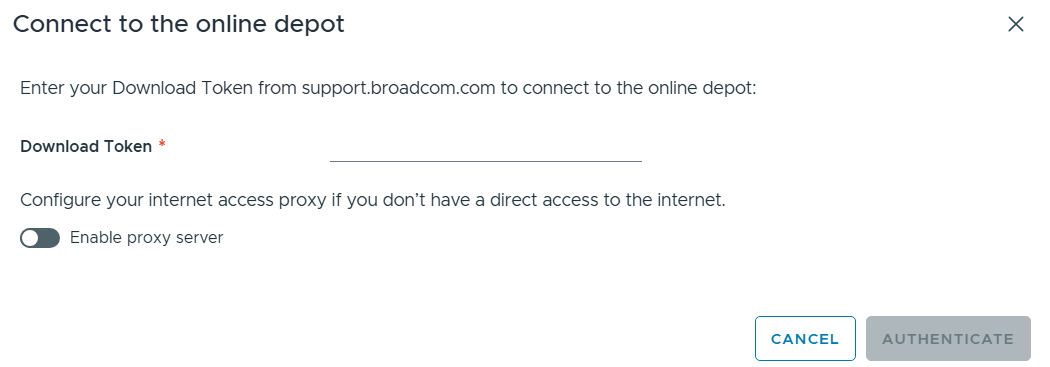
Users have 2 options. 1) Connect to an online depot or 2) Off Line Depot

What are the requirements for the 2 Depot options?
1) Connect to an online depot — Users need to have an entitled support.broadcom.com account and a download token. Once their token is authenticated they are enabled to download.
See These URL’s for more information:
2) Offline Depot – This option may be more common for users building out Home labs.
See these URLs for more information:
- Set Up an Offline Depot Web Server for VMware Cloud Foundation
- Set Up an Offline Depot Web Server for VMware Cloud Foundation << Use this method if you want to setup https on the Photon OS.
- How to deploy VVF/VCF 9.0 using VMUG Advantage & VCP-VCF Certification Entitlement
- Setting up a VCF 9.0 Offline Depot
I’ll be using the Offline Depot method to download my binaries and in the next part I’ll be deploying VCF 9.0.1.
VMware Workstation Gen 9: Part 5 Deploying the VCF Installer with VLANs
The VCF Installer (aka SDDC Manager Appliance) is the appliance that will allow me to deploy VCF on to my newly created ESX hosts. The VCF Installer can be deployed on to a ESX Host or directly on Workstation. There are a couple of challenges with this deployment in my Home lab and in this blog post I’ll cover how I overcame this. It should be noted, the modifications below are strictly for my home lab use.
Challenge 1: VLAN Support
By default the VCF Installer doesn’t support VLANS. It’s a funny quandary as VCF 9 requires VLANS. Most production environments will allow you to deploy the VCF Installer and be able to route to a vSphere environment. However, my Workstation Home Lab uses LAN Segments which are local to Workstation. To communicate over LAN Segments all VMs must have a VLAN ID. To overcome this issue I’ll need to add VLAN support to the VCF Installer.
Challenge 2: Size Requirements
The installer takes up a massive 400+ GB of disk space, 16GB of RAM, and 4 vCPUs. The current configuration of my ESX hosts don’t have a datastore large enough to deploy it to, plus vSAN is not set up. To overcome this issue I’ll need to deploy it as a Workstation VM and attach it to the correct LAN Segment.
In the steps below I’ll show you how I added a VLAN to the VCF Installer, deployed it directly on Workstation, and ensure it’s communicating with my ESX Hosts.
Deploy the VCF Installer
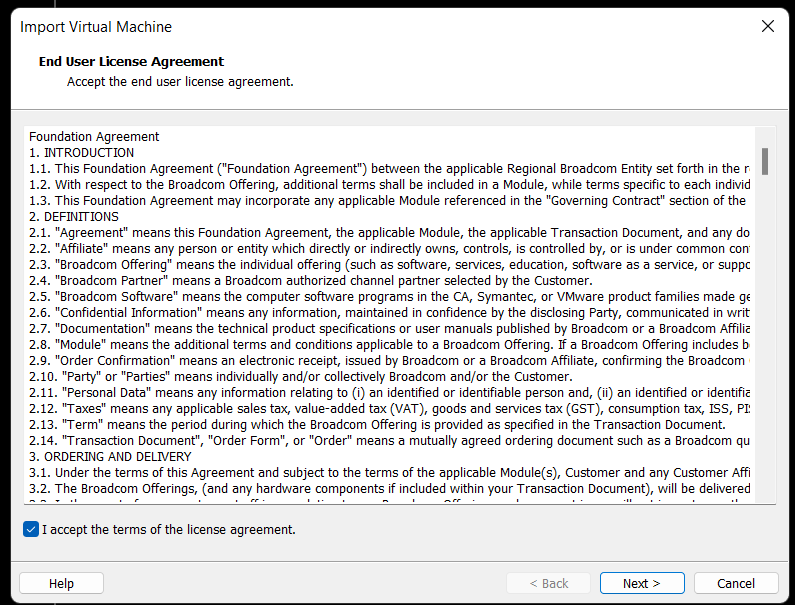
Download the VCF Installer OVA and place the file in a location where Workstation can access it.
In Workstation click on File > Open. Choose the location of your OVA file and click open.
Check the Accept box > Next
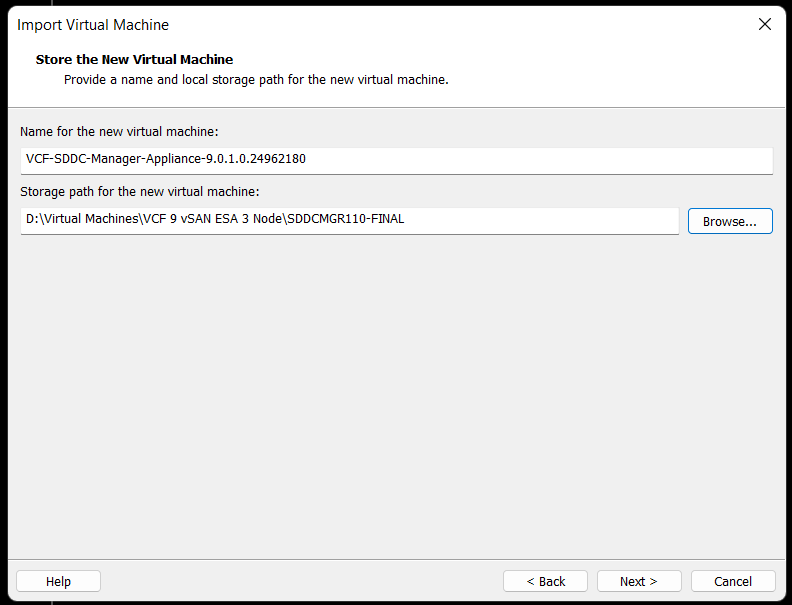
Choose your location for the VCF Installer Appliance to be deployed. Additionally, you can change the name of the VM. Then click Next.
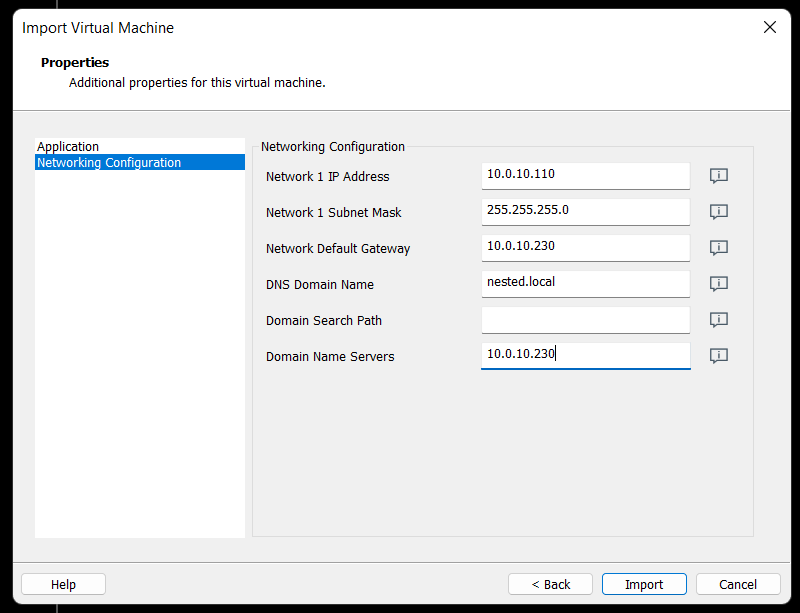
Fill in the passwords, hostname, and NTP Server. Do not click on Import at this time. Click on ‘Network Configuration’.

Enter the network configuration and click on import.
Allow the import to complete.
Allow the VM to boot.

Change the VCF Installer Network Adapter Settings to match the correct LAN Segment. In this case I choose 10 VLAN Management.

Enable VLAN support in the VCF Installer
1) Login as root and create the following file.

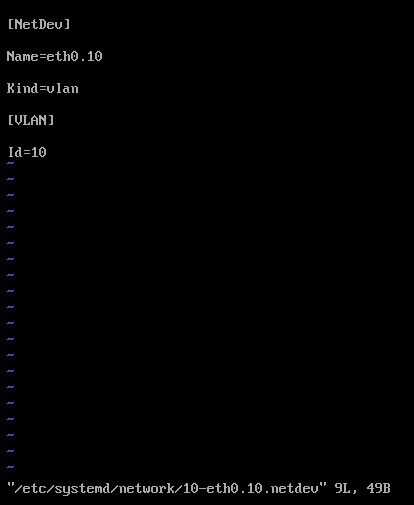
vi /etc/systemd/network/10-eth0.10.netdev
Press Insert the add the following
[NetDev]
Name=eth0.10
Kind=vlan
[VLAN]
Id=10
Press Escape, Press :, Enter wq! and press enter to save
2) Create the following file.
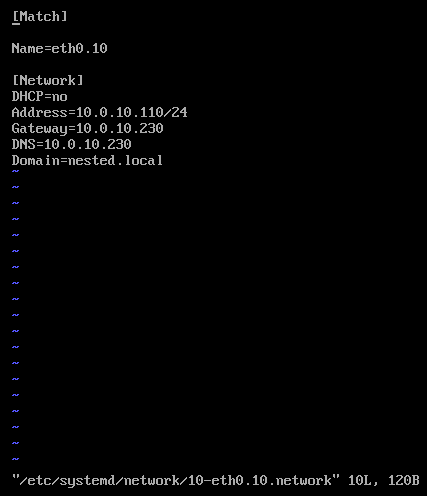
vi /etc/systemd/network/10-eth0.10.network
Press insert and add the following
[Match]
Name=eth0.10
[Network]
DHCP=no
Address=10.0.10.110/24
Gateway=10.0.10.230
DNS=10.0.10.230
Domain=nested.local
Press Escape, Press :, Enter wq! and press enter to save
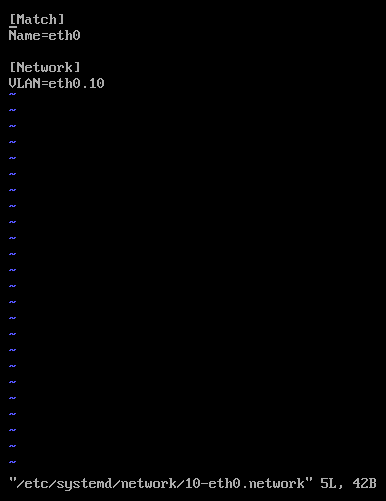
3) Modify the original network file
vi /etc/systemd/network/10-eth0.network
Press Escape, Press Insert, and remove the static IP address configuration and change the configuration as following:
[Match]
Name=eth0
[Network]
VLAN=eth0.10
Press Escape, Press :, Enter wq! and press enter to save
4) Update the permissions to the newly created files
chmod 644 /etc/systemd/network/10-eth0.10.netdev
chmod 644 /etc/systemd/network/10-eth0.10.network
chmod 644 /etc/systemd/network/10-eth0.network
5) Restart services or restart the vm.
systemctl restart systemd-networkd
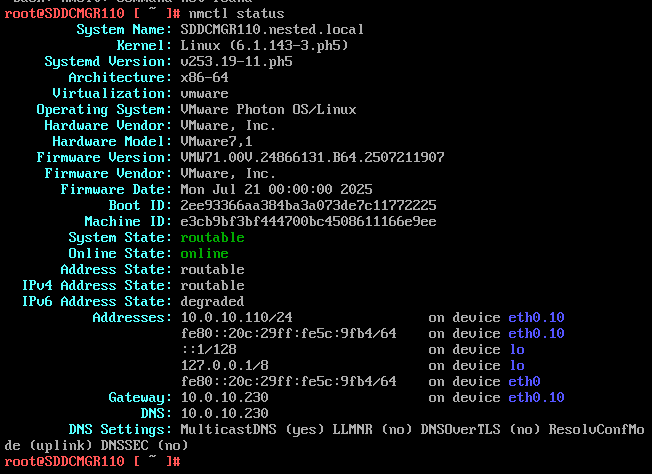
6) Check the network status of the newly created network eth0.10
nmctl status
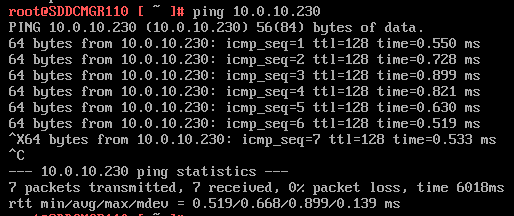
7) Do a ping test from the VCF Installer appliance.
Note – The firewall needs to be adjusted to allow other devices to ping the VCF Installer appliance.
Ping 10.0.10.230
Next I do ping to an internet location to confirm this appliance can route to the internet.

8) Allow SSH access to the VCF Installer Appliance
Follow this BLOG to allow SSH Access.
From the Windows AD server or other device on the same network, putty into the VCF Installer Appliance.
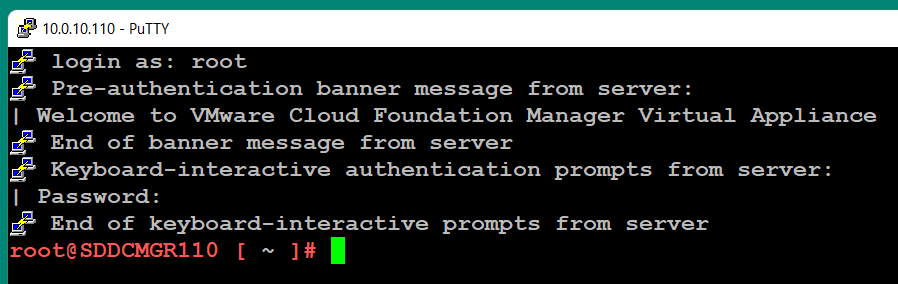
Adjust the VCF Installer Firewall to allow inbound traffic to the new adapter
Note – Might be a good time to make a snapshot of this VM.
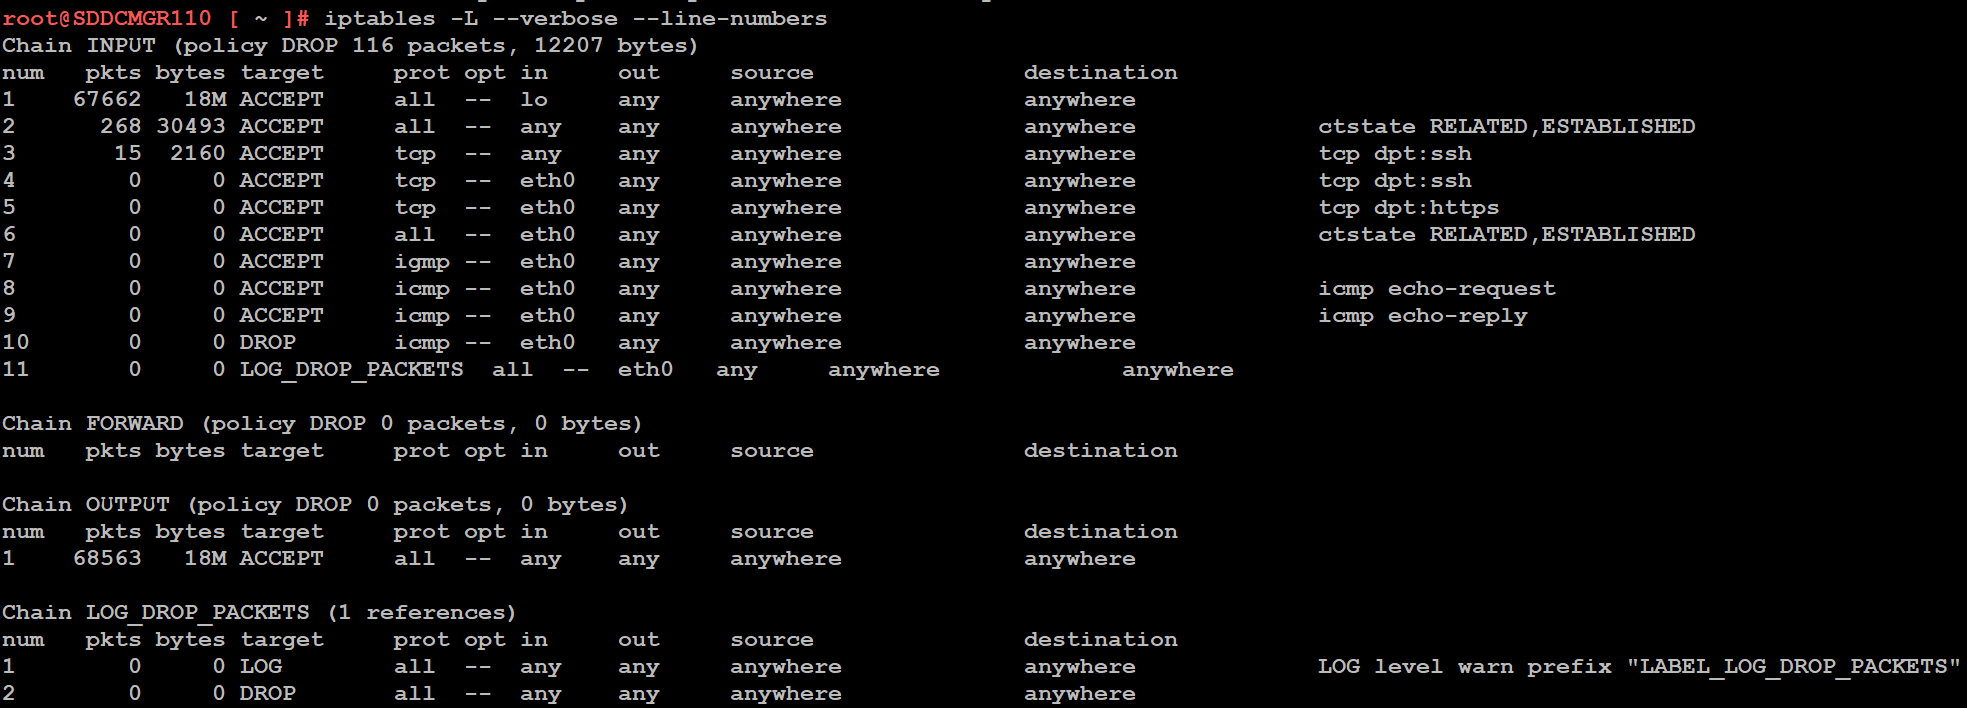
1) From SSH check the firewall rules for the VCF Installer with the following command.
iptables -L –verbose –line-numbers
From this output I can see that eth0 is set up to allow access to https, ping, and other services. However, there are no rules for the eth0.10 adapter. I’ll need to adjust the firewall to allow this traffic.
Next I insert a new rule allowing all traffic to flow through e0.10 and check the rule list.
iptables -I INPUT 4 -i eth0.10 -j ACCEPT

The firewall rules are not static. To make the current firewall rules stay static I need to save the rules.
Save Config Commands

Restart and make sure you can now access the VCF Installer webpage, and I do a ping test again just to be sure.
Now that I got VCF Installer installed and working on VLANs I’m now ready to deploy the VCF Offline Depot tool into my environment and in my next blog post I’ll do just that.
VMware Workstation Gen 9 Part 4 ESX Host Deployment and initial configuration
Now that I created 3 ESX hosts from templates it is time to install ESX. To do this I simply power on the Hosts and follow the prompts. The only requirement at this point is my Windows Server and Core Services be up and functional. In this blog we’ll complete the installation of ESX.
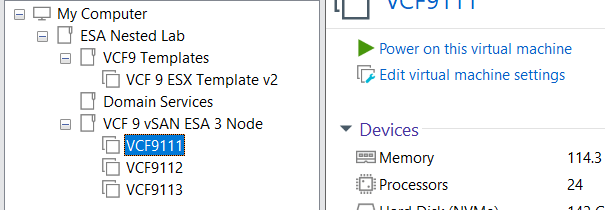
Choose a host then click on “Power on this virtual machine”.
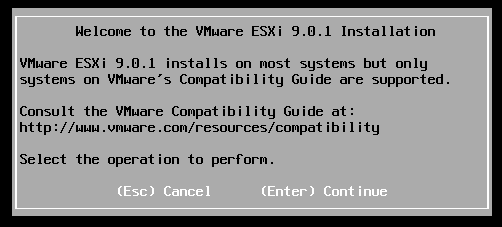
The host should boot to the ESX ISO I choose when I created my template.
Choose Enter to Continue
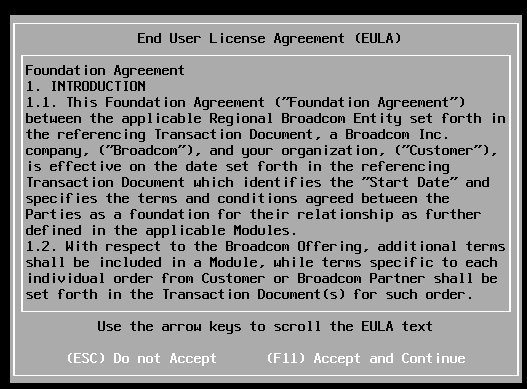
Choose F11 to Accept and Continue
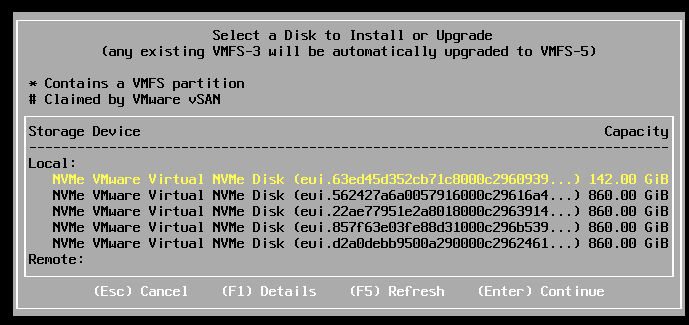
If the correct boot disk is selected, press Enter to continue.
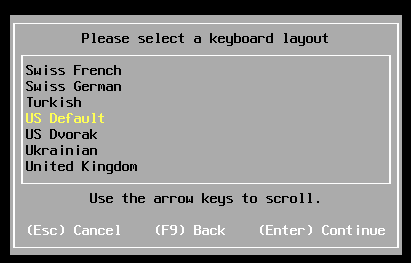
Choose pressed enter to accept the US Default keyboard layout
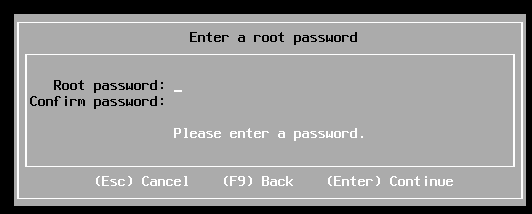
Entered a root password and pressed enter.
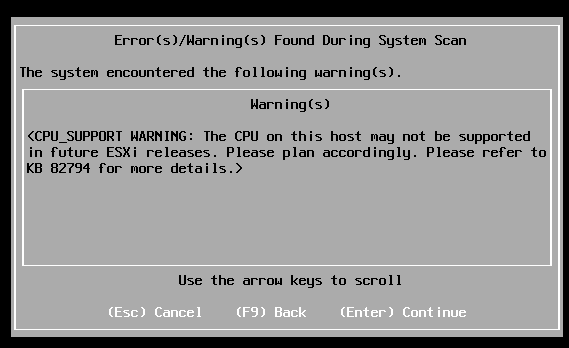
Pressed enter at the warning of CPU support.
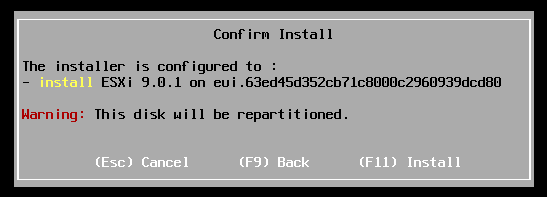
Pushed F11 to install
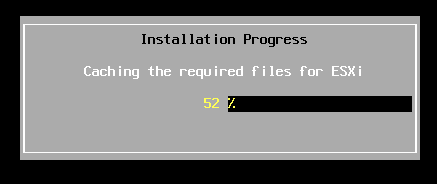
Allowed ESX to install.
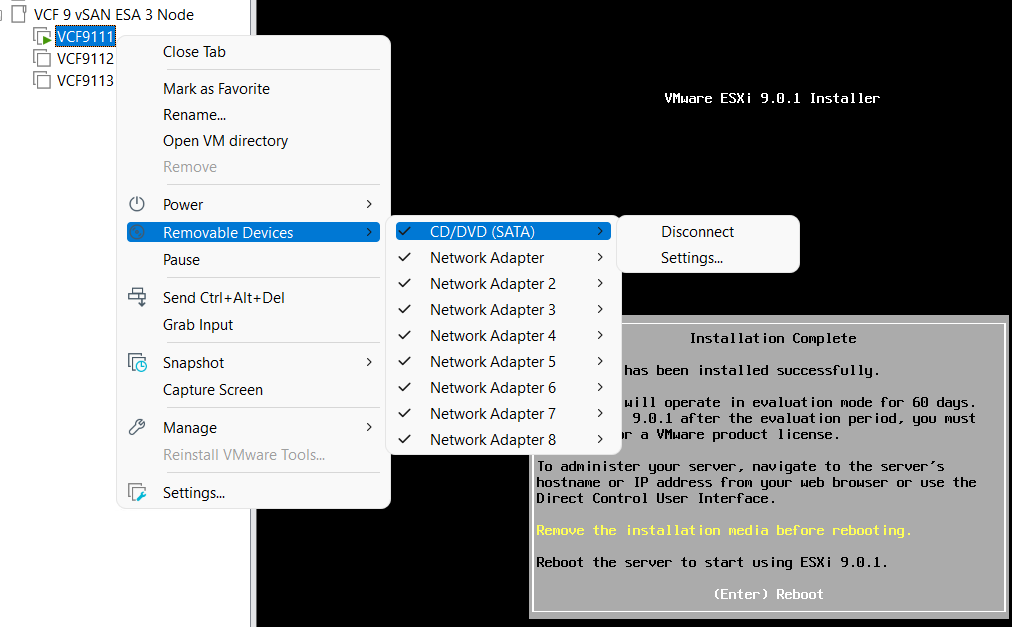
Disconnected the media and pressed enter to reboot
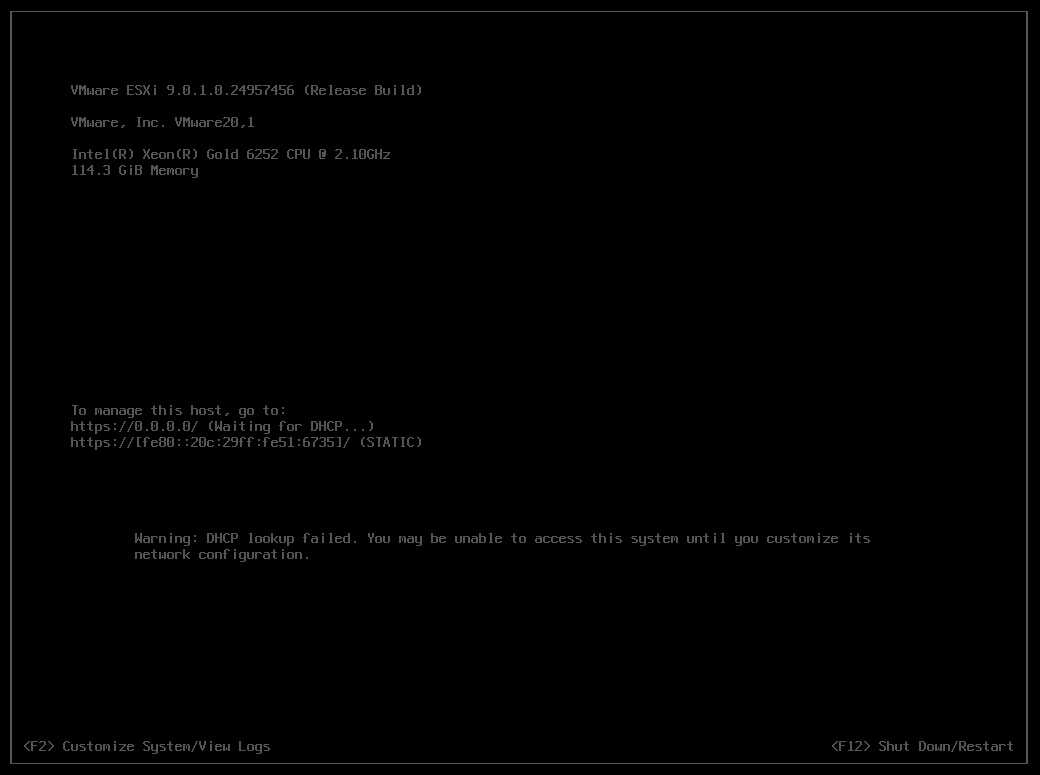
Once rebooted I choose F2 to customize the system and logged in with my root password
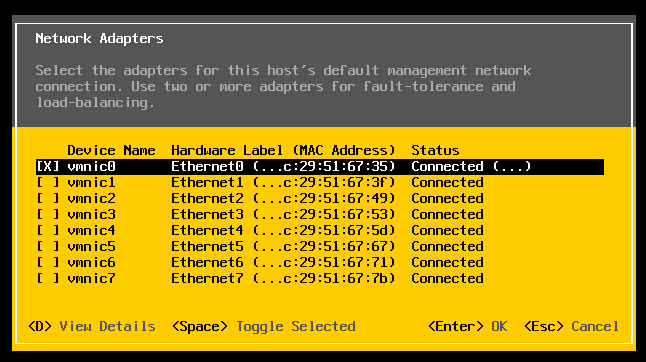
Choose Configure Management Network > Network Adapters, and validate the vmnic0 is selected, then pressed escape
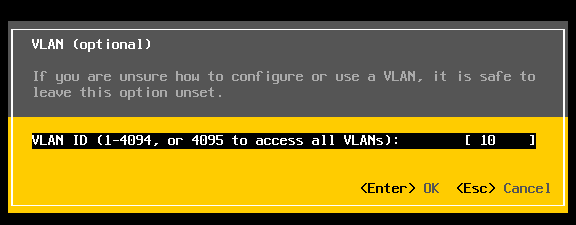
Choose VLAN (optional) > Entered in 10 for my VLAN > pressed enter to exit
Choose IPv4 Configuration and enter the following for VCF9111 host and then pressed enter.

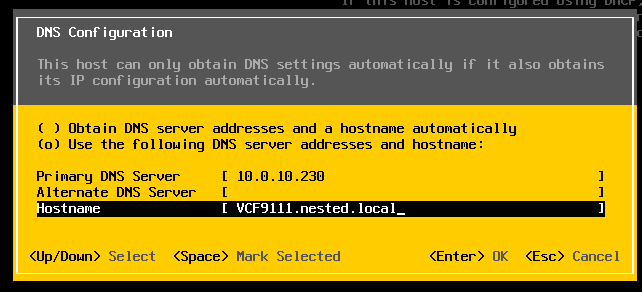
Choose DNS Configuration and enter the following.
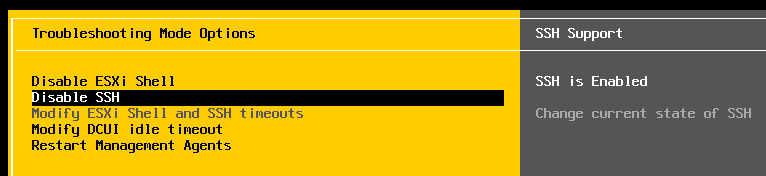
Press Escape to go to the main screen. Press Y to restart management. Arrow down to ‘Enable ESXi Shell” and press enter, then the same for SSH. Both should now be enabled.
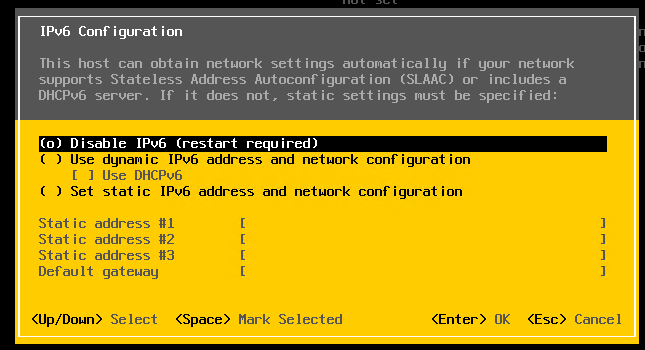
Press Escape and choose Configure Management Network. Next choose IPv6 Configuration, choose “Disable IPv6” and press enter.
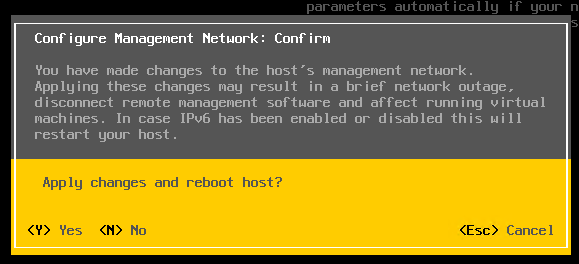
Press Escape and the host will prompt you to reboot, press Y to reboot.
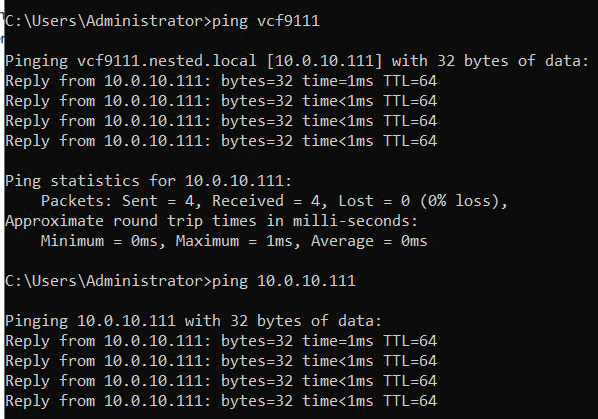
Test connectivity
From the AD server simply ping the VCF9111 host. This test ensures DNS is working properly and the LAN Segment is passing VLAN10.
From here I repeat this process for the other 2 hosts, only assigning them unique IPs.
Next up Deploying the VCF Installer with VLANs.
VMware Workstation Gen 9: Part 3 Windows Core Services and Routing
A big part of my nested VCF 9 environment relies on core services. Core services are AD, NTP, DHCP, and RAS. Core services are supplied by my Windows Server (aka AD230.nested.local). Of those services, RAS will enable routing between the LAN Segments and allow for Internet access. Additionally, I have a VM named DomainTools. DomainTools is used for testing network connectivity, SSH, WinSCP, and other tools. In this blog I’ll create both of these VMs and adapt them to work in my new VCF 9 environment.
Create the Window Server and establish core services
A few years back I published a Workstation 17 YouTube multipart series on how to create a nested vSphere 8 with vSAN ESA. Part of that series was creating a Windows Server with core services. For my VCF 9 environment I’ll need to create a new Windows server with the same core services. To create a similar Windows Server I used my past 2 videos: VMware Workstation 17 Nested Home Lab Part 4A and 4B.
Windows Server updates the VCF 9 environment
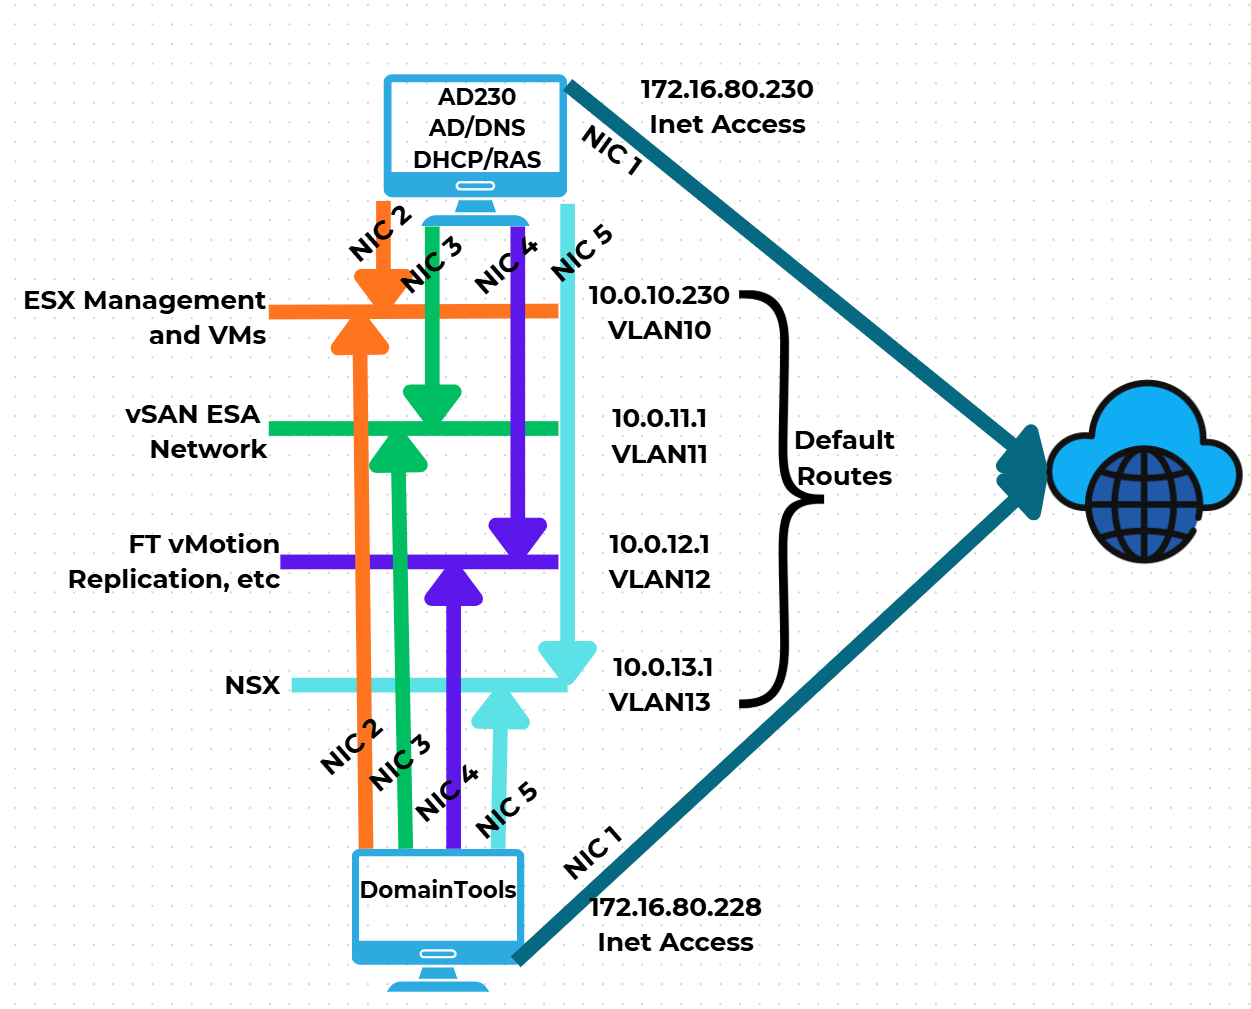
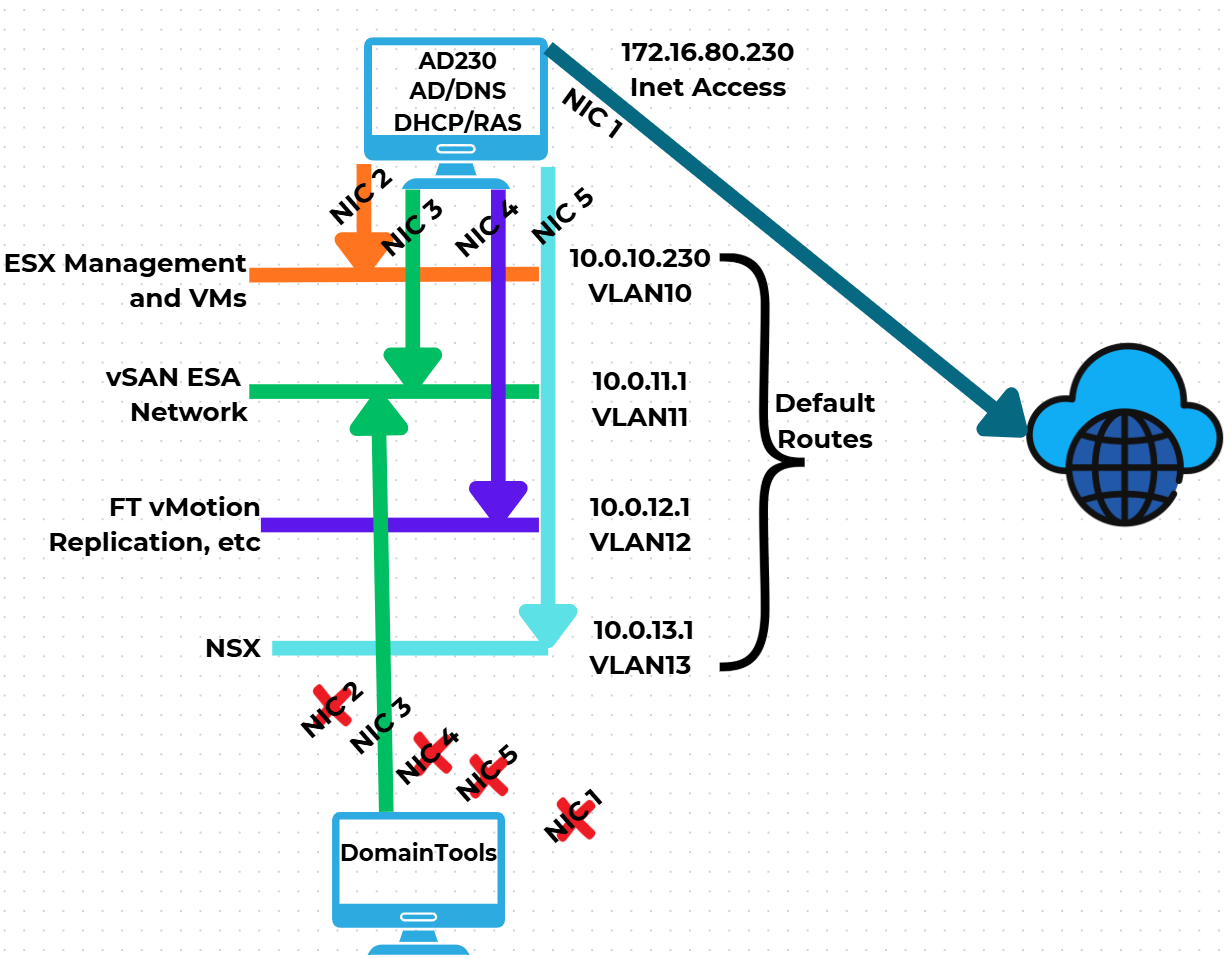
Now that I have established AD230 I need to update it to match the VCF 9 networks. I’ll be adding additional vNICs, attaching them to networks, and then ensuring traffic can route via the RAS service. Additionally, I created a new Windows 11 VM named DomainTools. I’ll use DomainTools for network connectivity testing and other functions. Fig-1 shows the NIC to network layout that I will be following.
(Fig-1)
Adjustments to AD230 and DomainTools
I power off AD230 and DomainTools. On both I add the appropriate vNICs and align them to the LAN segments. Next, I edit their VMware VM configuration file changing the vNICs from “e1000e” to “vmxnet3”.

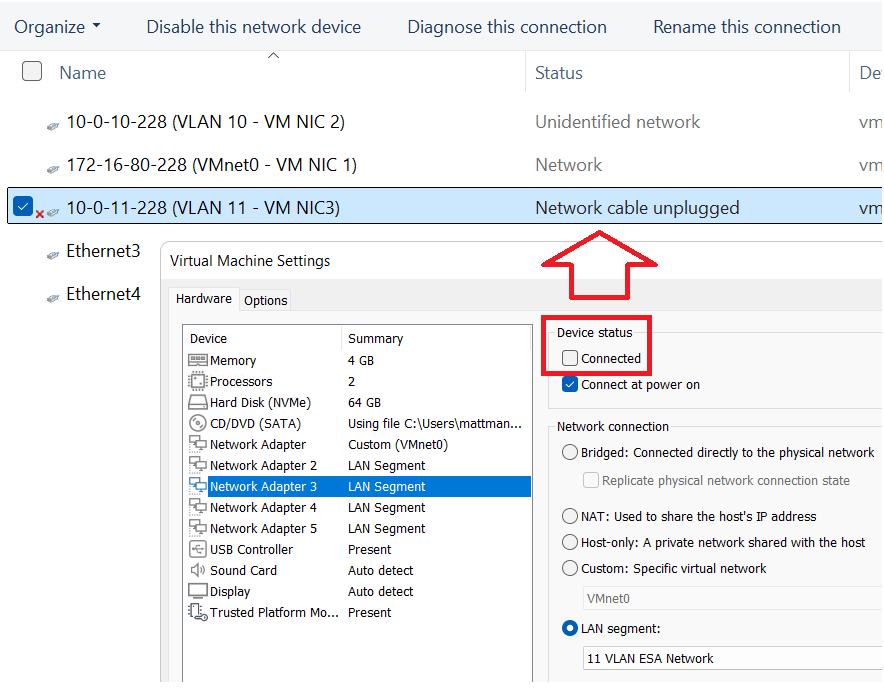
Starting with DomainTools for each NIC, I power it on, input the IPv4 information (IP Address, Subnet, VLAN ID), and optionally disable IPv6. The only NIC to get a Default Gateway is NIC1. TIP – To ID the NICs, I disconnect the NIC in the VM settings and watch for it to show unplugged in Windows Networking. This way I know which NIC is assigned to which LAN Segment. Additionally, in Windows Networking I add a verbose name to the NIC to help ID it.
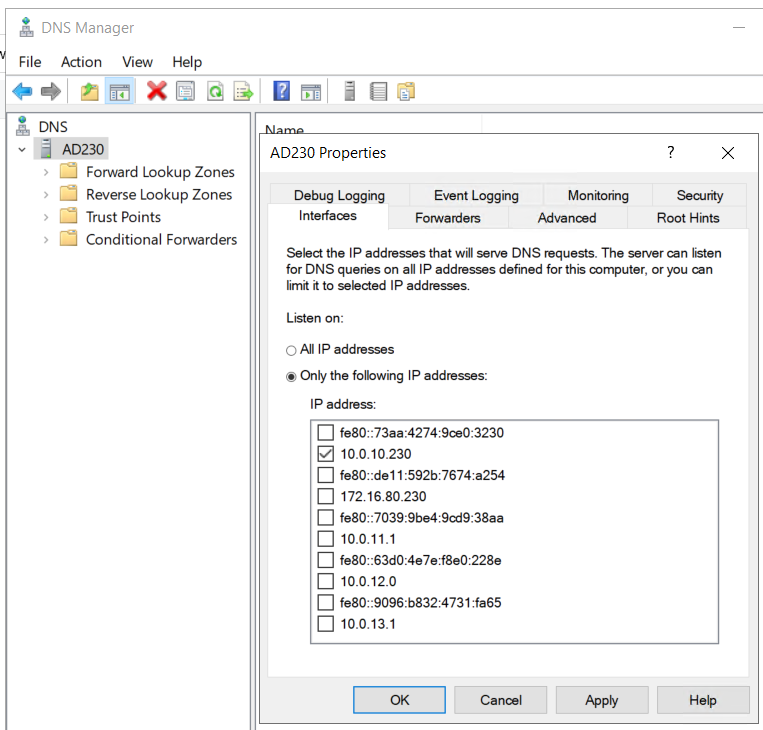
I make the same network adjustments to AD230 and I update its DNS service to only supply DNS from the 10.0.10.230 network adapter.
Once completed I do a ping test between all the networks for AD230 and DomainTools to validate IP Connectivity works. TIP – Use ipconfig at the CLI to check your adapter IP settings. If ping is not working there may be firewall enabled.
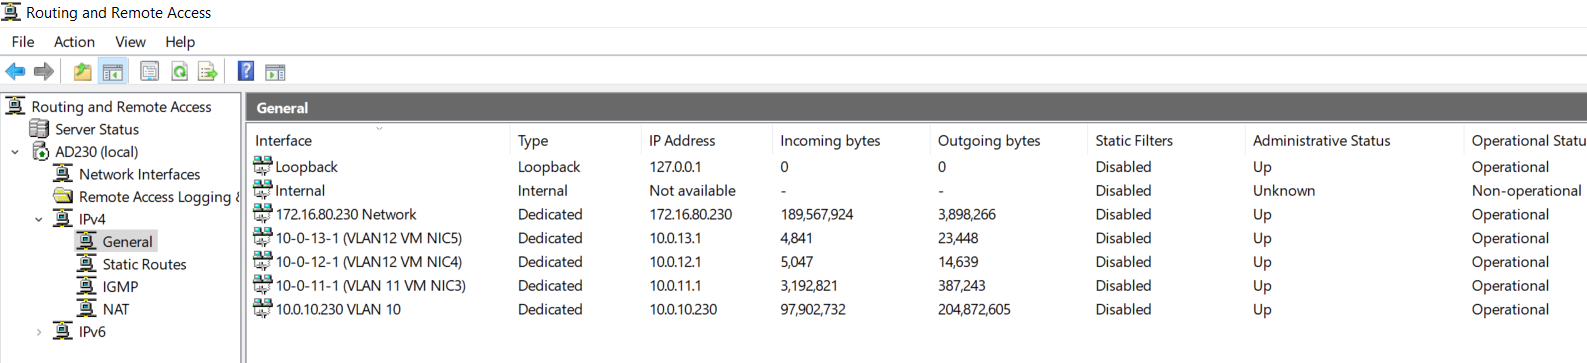
Setting up RAS on AD230
Once you have your network setup correctly validate that RAS has accepted your new adapters and their information. On AD230 I go in to RAS > IPv4 > General
I validate that my network adapters are present.
Looking ahead — RAS seemed to work right out of the box with no config needed. In all my testing below it worked fine, this may change as I advance my lab. If so, I’ll be sure to update my blog.
Next I need to validate routing between the different LAN Segments. To do this I’ll use the DomainTools VM to ensure routing is working correctly. You may notice in some of my testing results that VCF Appliances are present. I added this testing part after I had completed my VCF deployment.
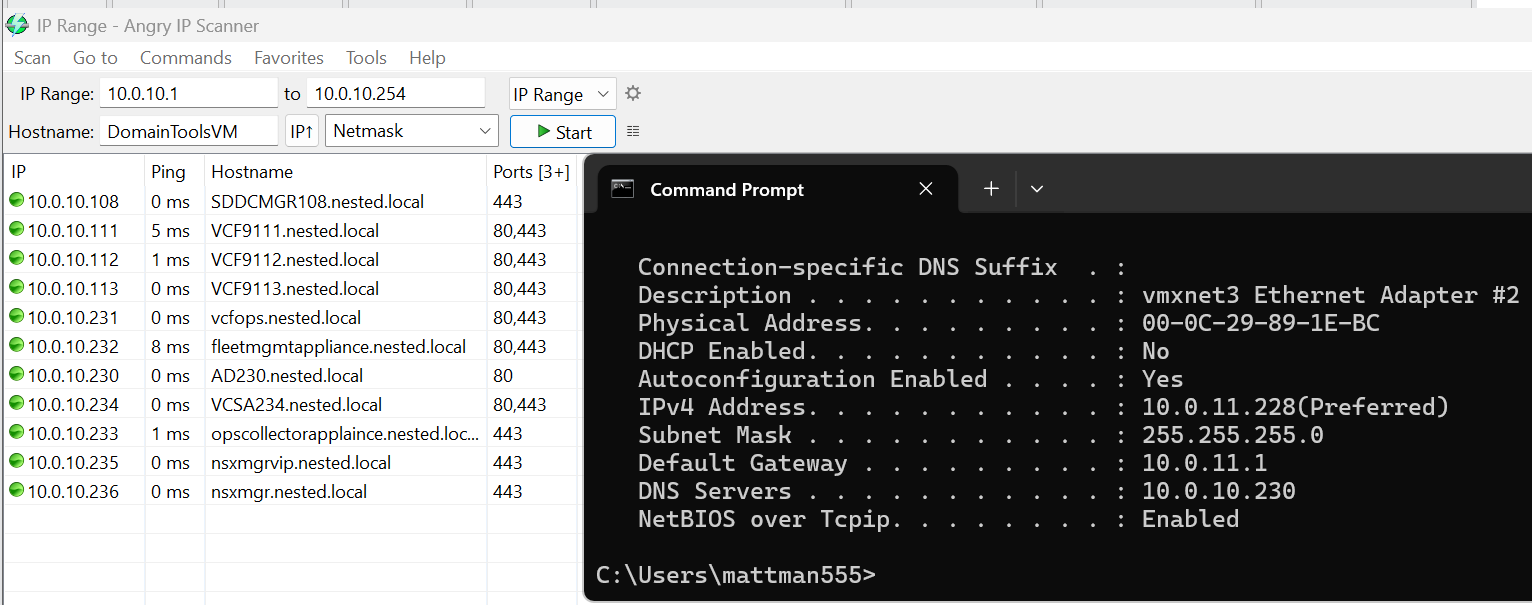
I need to test all of the VLAN networks. On the DomainTools VM, I disable each network adapter except for the one I want to test. In this case I disabled every adapter except for 10-0-11-228 (VLAN 11 – VM NIC3). I then add the gateway IP of 10.0.11.1 (this is the IP address assigned to my AD230 RAS server).
Next I do an ipconfig to validate the IP address, and use Angry IP Scanner to locate devices on the 10.0.10.x network. Several devices responded, plus resolving their DNS name, proving that DomainTools is successfully routing from the 11 network into the 10 network. I’ll repeat this process, plus do an internet check, on all the remaining networks.
Now that we have a stable network and core Window services established we are ready to move on to ESX Host Deployment and initial configuration.
VMware Workstation Gen 9: Part 2 Using Workstation Templates
Workstation templates are a quick and easy way to create VMs with common settings. My nested VCF 9 ESX Hosts have some commonalities where they could benefit from template deployments. In this blog post I’ll show you how I use Workstation templates to quickly deploy these hosts and the hardware layout.
My nested ESX Hosts have a lot of settings. From RAM, CPU, DISK, and networking there are tons of clicks per host which is prone to mistakes. The LAN Segments as an example entail 8 clicks per network adapter. That’s 192 clicks to set up my 3 ESX hosts. Templates cover about 95% of all the settings, the only caveat is the disk deployment. Each host has a unique disk deployment which I cover below.
There are 2 things I do first before creating my VM templates. 1) I need to set up my VM folder Structure, and 2) Setup LAN Segments.
VM folder Structure
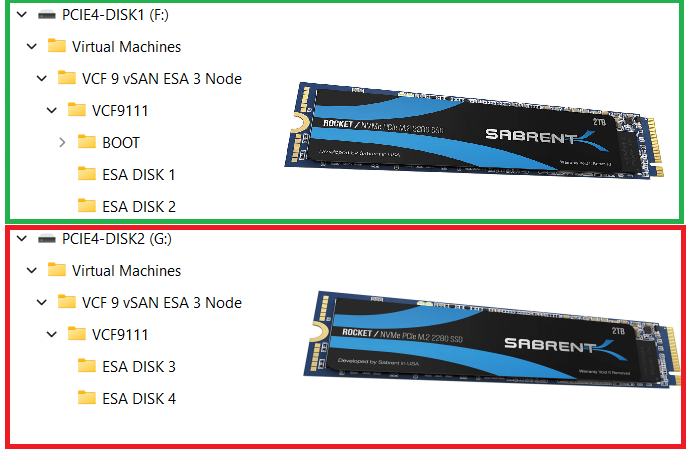
The 3 x Nested ESX hosts in my VCF 9 Cluster will be using vSAN ESA. These nested ESX Hosts will have 5 virtual NVMe disks (142GB Boot, and 4 x 860GB for vSAN). These virtual NVMe disks will be placed on to 2 physical 2TB NVMe Disks. At the physical Windows 11 layer I created folders for the 5 virtual NVMe disks on each Host. On physical disk 1 I create a BOOT, ESA DISK 1, and ESA DISK 2 folders. Then on physical disk 2 I created ESA DISK 3 and ESA DISK 4. By doing this I have found it keeps my VMs disks more organized and running efficiently. Later in this post we’ll create and position these disks into the folder.
Setup LAN Segments
Prior to creating a Workstation VM Template I need to create my LAN Segments. Workstation LAN Segments allow VLAN traffic to pass. VLANs are a requirement of VCF 9. Using any Workstation VM, choose a network adapter > LAN Segments > LAN Segments Button. The “Global LAN Segments” window appears, click on Add, name your LAN Segment, and OK when you are done.
For my use case I need to make 4 LAN Segments to support the network configuration for my VCF 9 deployment.

Pro-Tip: These are Global LAN Segments, which makes them universally available—once created, every VM can select and use them. Create these first before you create your ESX VM’s or Templates.
Create your ESX Workstation Template
To save time and create all my ESX hosts with similar settings I used a Workstation Template.
NOTE: The screenshot to the right it is the final configuration.
1) I created an ESX 9 VM in Workstation:
- Click on File > New Virtual Machine
- Chose Custom
- For Hardware I chose Workstation 25H2
- Chose my Installer disc (iso) for VCF 9
- Chose my directory and gave it a name of VCF9 ESX Template
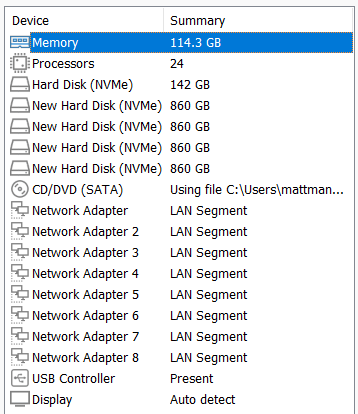
- Chose 1 Processor with 24 Cores (Matches my underlying hardware)
- 117GB of RAM > Next
- Use NAT on the networking > Next
- Paravirtualized SCSI > Next
- NVMe for the Disk type > Next
- Create a new Virtual Disk > Next
- 142GB for Disk Size > Store as a Single File > Next
- Confirm the correct Directory > Next
- Click on the Customize Hardware button
- Add in 8 NICs > Close
- Make sure Power on this VM after creation is NOT checked > Finish
- Go back in to VM Settings and align your Network adapters to your LAN Segments
- NIC 0 and 2 > 10 VLAN Management
- NIC 3 and 4 > 11 VLAN ESA Network
- NIC 5 and 6 > 12 VLAM FT vMo RPL
- NIC 7 and 8 > 13 VLAN VM Network

Note: You might have noticed we didn’t add the vSAN disks in this deployment, we’ll create them manually below.
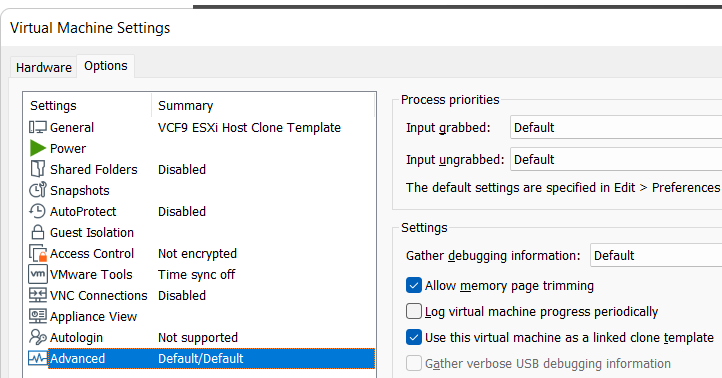
2) Next we’ll turn this VM into a Template
Go to VM Settings > Options > Advanced > Check Box “Use this virtual machine as a linked clone template” and click on ok.
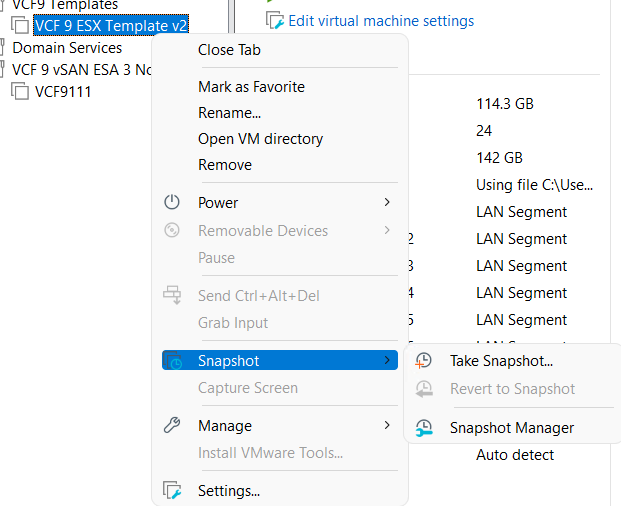
Next, make a snapshot of the VM. Right click on VM > chose Snapshot > Take Snapshot. In the description I put in “Initial hardware configuration.”
Deploy the ESX Template
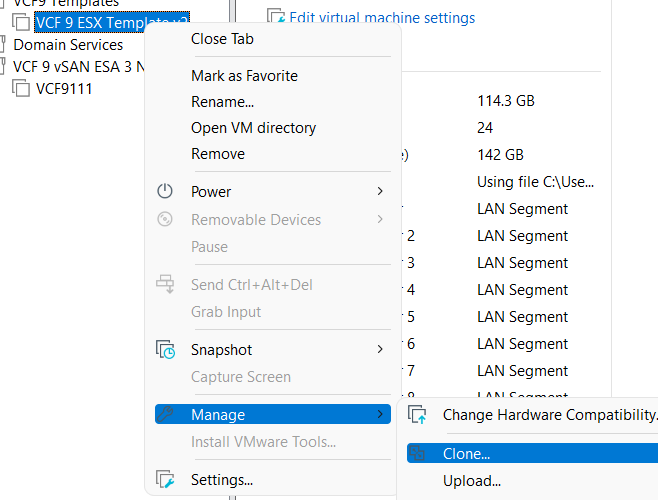
I’ll need to create 3 ESX Hosts base off of the ESX template. I’ll use my template to create these VM’s, and then I’ll add in their unique hard drives.
Right click on the ESX Template > Manage > Clone
Click Next > Choose “The current state of the VM” > Choose “Create a full clone”
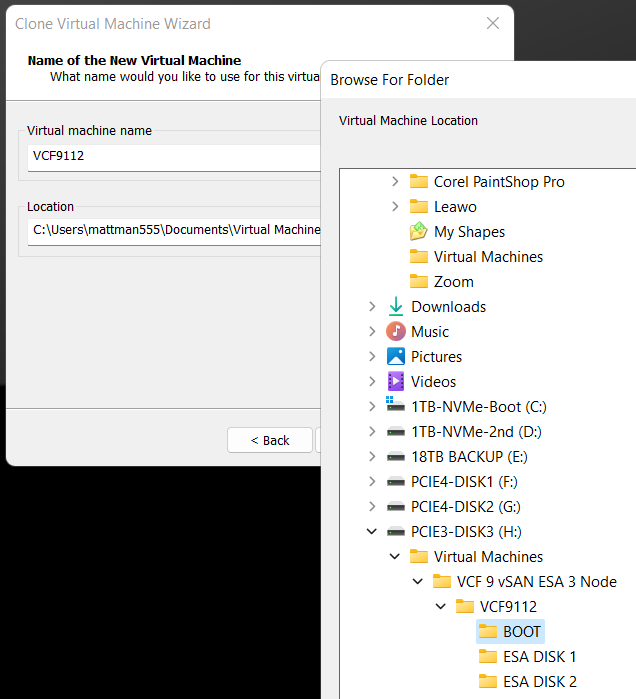
Input a name for the VM
MOST Important – Make sure you select the correct disk and folder you want the boot disk to be deployed to. In the Fig-1 below, I’m deploying my second ESX host boot disk so I chose its BOOT folder.
Click on finish > The VM is created > click on close
(Fig-1)
Adding the vSAN Disks
Since we are using unique vSAN disk folders and locations we need to add our disks manually.
For each nested ESX host I right click on the VM > Settings
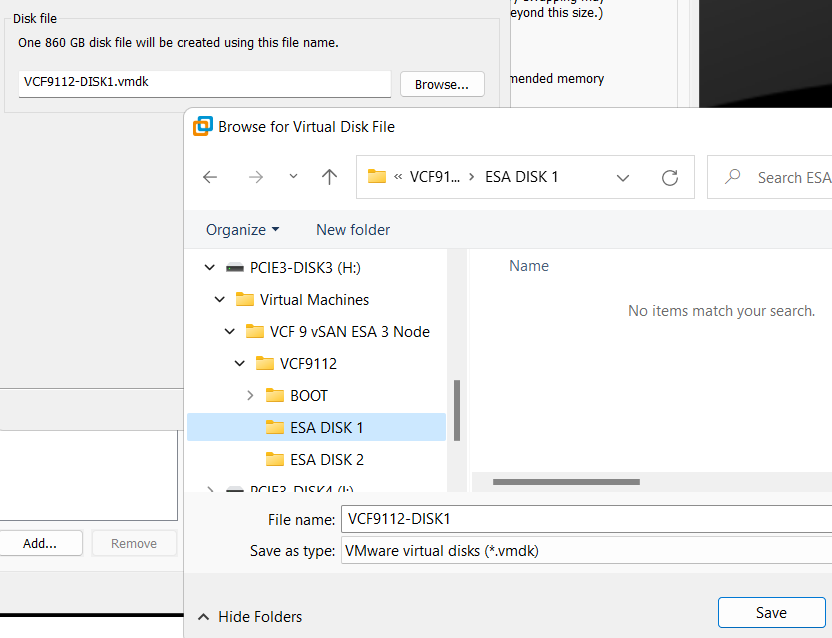
Click on Add > chose Hard disk > Next > NVMe > Create New Virtual Disk
Type in the size (860GB) > Store as a single file > Next
Rename the disk filename to reflect the nested vSAN ESA disk number
Choose the correct folder > Save
Repeat for the next 3 disks, placing each one in the correct folder
When I’m done I created 4 x 860GB disks for each host, all as single files, and all in unique folders and designated physical disks.
(Fig-2, below) I’m creating the first vSAN ESA disk named VCF9112-DISK1.vmdk
That’s it!
Workstation Templates save me a bunch of time when creating these 3 ESX Hosts. Next we’ll cover Windows Core Services and Routing.
VMware Workstation Gen 9: Part 1 Goals, Requirements, and a bit of planning
It’s time to build my VMware Workstation–based home lab with VCF 9. In a recent blog post, I documented my upgrade journey from VMware Workstation 17 to 25H2. In this installment, we’ll go deeper into the goals, requirements, and overall planning for this new environment. As you read through this series, you may notice that I refer to VCF 9.0.1 simply as VCF 9 or VCF for brevity.
Important Notes:
- VMware Workstation Gen 9 series is still a work in progress. Some aspects of the design and deployment may change as the lab evolves, so readers should consider this a living build. I recommend waiting until the series is complete before attempting to replicate the environment in your own lab.
- There are some parts in this series where I am unable to assist users. In lieu I provide resources and advice to help users through this phase. These areas are VCF Offline Depot and Licensing your environment. As a Broadcom/VMware employee, we are not granted the same access as users. I have an internal process to access resources and these processes would not be helpful to users.
Overall Goals
- Build a nested minimal VCF 9.0.1 environment based on VMware Workstation 25H2 running on Windows 11 Pro.
- Both Workload and Management Domains will run on the same set of nested ESX Hosts.
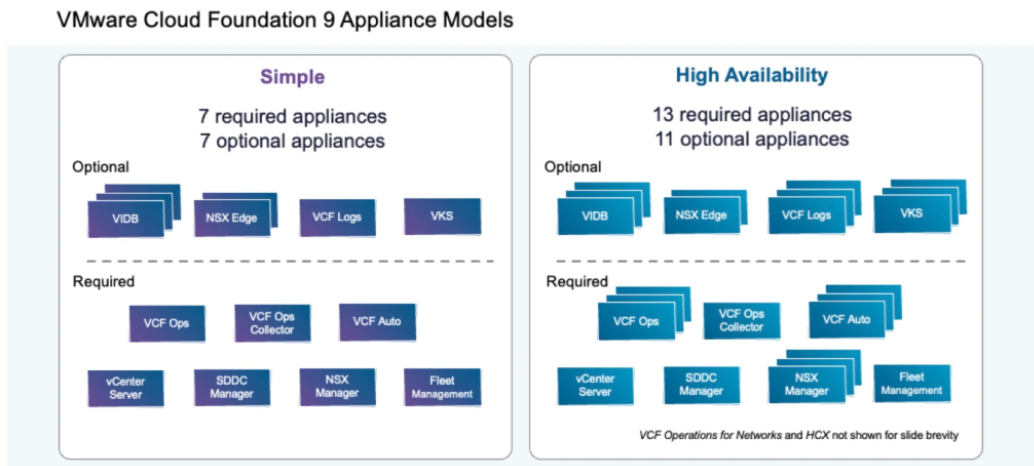
- Using the VCF Installer I’ll initially deploy the VCF 9 Management Domain Components as a Simple Model.
- Initial components include: VCSA, VCF Operations, VCF Collector, NSX Manager, Fleet Manager, and SDDC Manager all running on the 3 x Nested ESX Hosts.
- Workstation Nested VMs are:
- 3 x ESX 9.0.1 Hosts
- 1 x VCF Installer
- 1 x VCF Offline Depot Appliance
- 1 x Windows 2022 Server (Core Services)
- Core Services supplied via Windows Server: AD, DNS, NTP, RAS, and DHCP.
- Networking: Private to Workstation, support VLANs, and support MTU of 9000. Routing and internet access supplied by the Windows Server VM.
- Should be able to run minimal workload VM’s on nested ESX Hosts.
Hardware BOM
If you are interested in the hardware I’m running to create this environment please see my Build of Materials (BOM) page.
Additionally, check out the FAQ page for more information.
Deployment Items
To deploy the VCF Simple model I’ll need to make sure I have my ESX 9.0.1 Hosts configured properly. With a simple deployment we’ll deploy the 7 required appliances running on the Nested ESX hosts. Additionally, directly on Workstation we’ll be running the AD server, VCF Offline Depot tool, and the VCF Installer appliance.
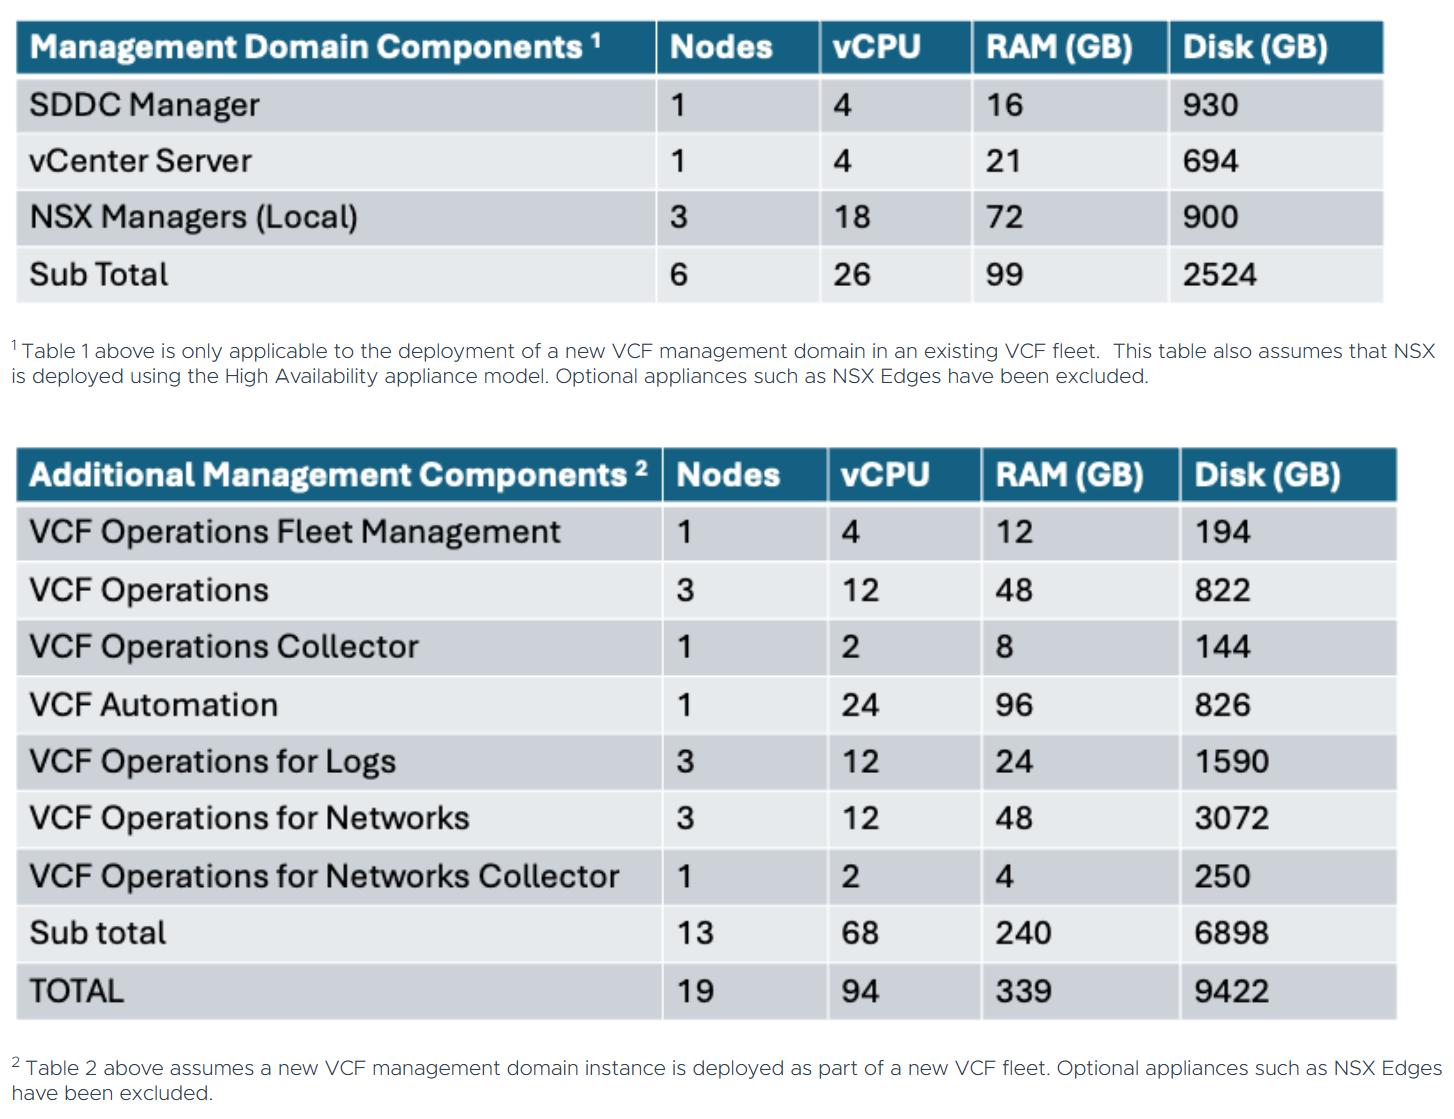
Using the chart below I can get an idea of how many cores, ram, and disk that will be needed. The one item that stands out to me is the component with the highest core count. In this case it’s VCF Automation at 24 cores. This is important as I’ll need to make sure my nested ESX Servers match or exceed 24 cores. If not, VCF Automation will not be able to deploy. Additionally, I’ll need to make sure I have enough RAM, Disk, and space for Workload VM’s.
Workstation Items
My overall plan is to build out a Windows Server, 3 x ESX 9 hosts, VCF Installer, and the VCF Depot Appliance. Each one of these will be deployed directly onto Workstation. Once the VCF Installer is deployed it will take care of deploying and setting up the necessary VMs.
NOTE: In the network layout below, hosts that are blue in color are running directly on Workstation, and those in purple will be running on the nested ESX hosts.
Network Layout
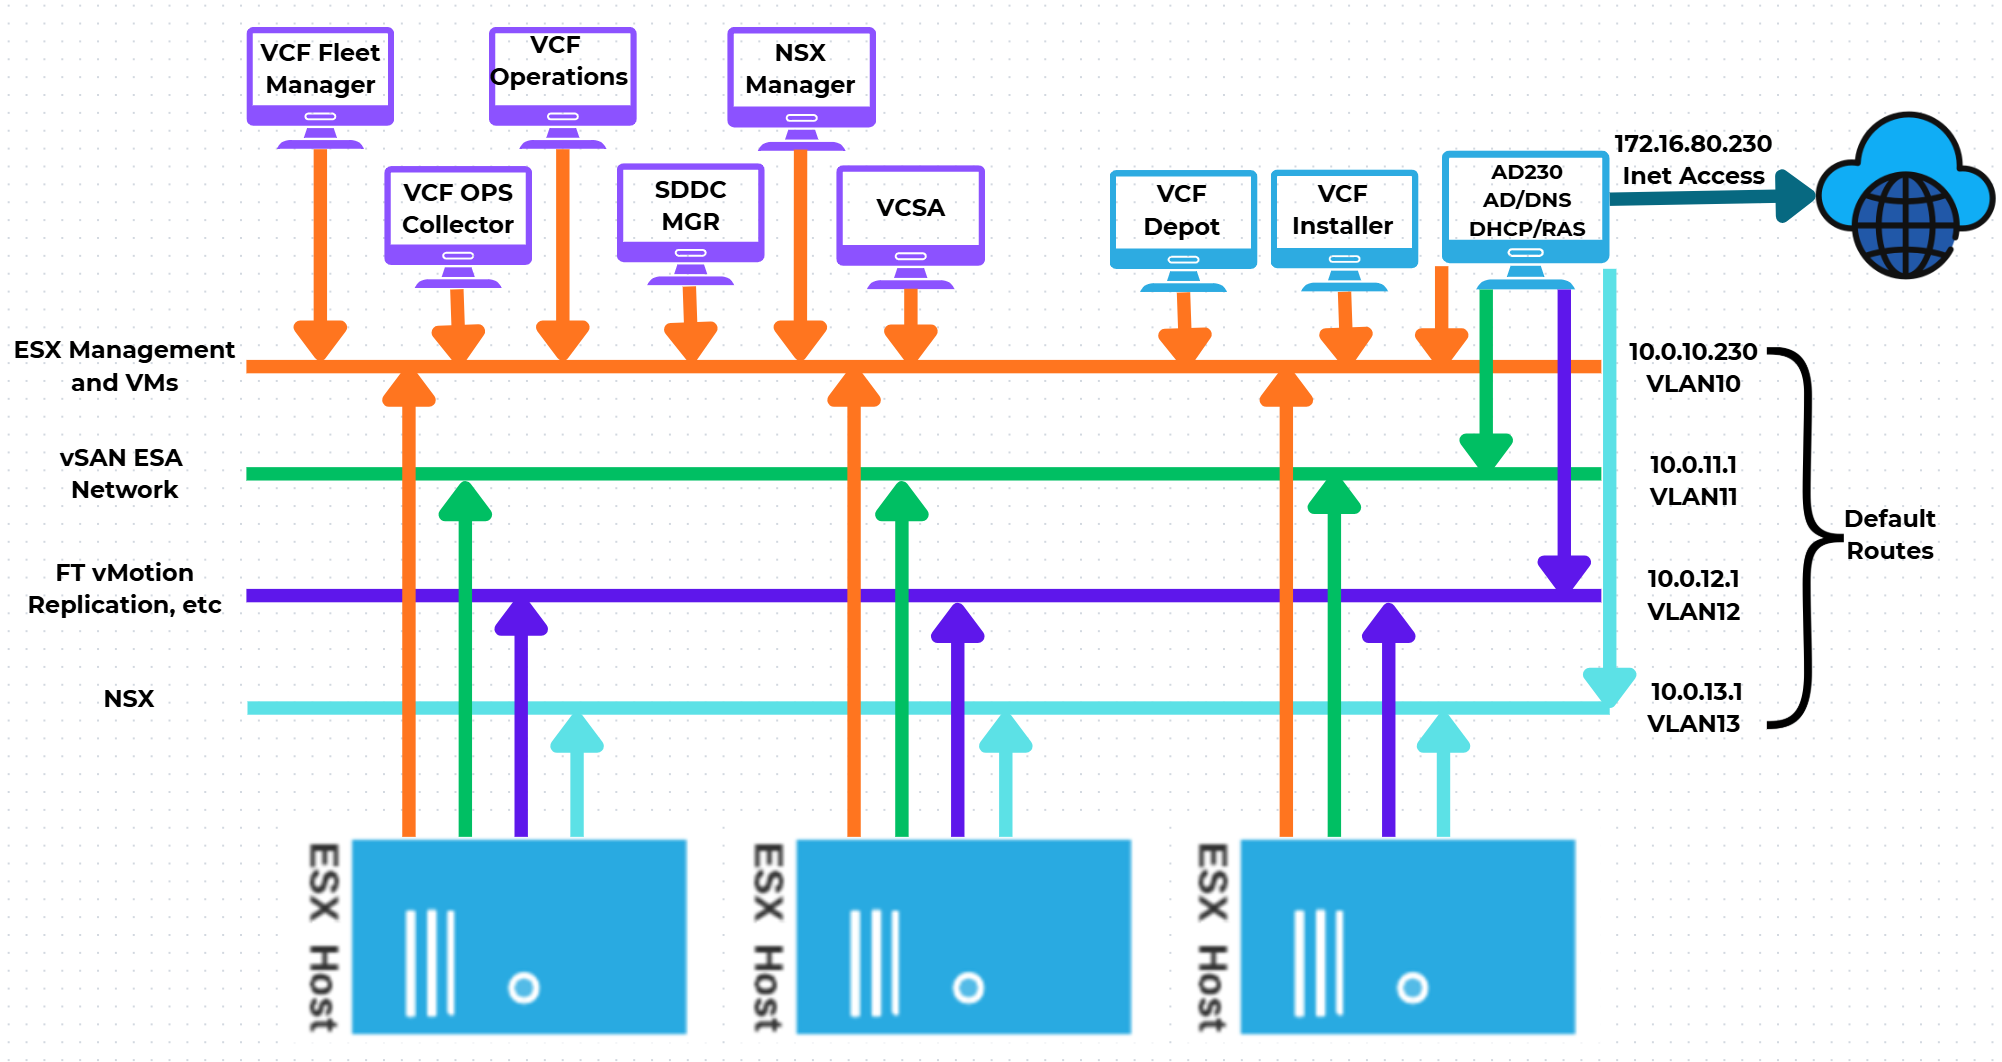
One of the main network requirements for VCF is supporting VLAN networks. My Gen8 Workstation deployment did not use VLAN networks. Workstation can pass tagged VLAN packets via LAN Segments. The configuration of LAN Segments are done at the VM’s Workstation settings, not via the Virtual Network Editor. We’ll cover this creation soon.
In the next part of this series I’ll show how I used Workstation Templates to create my VMs and align them to the underlying hardware.
Resources:
Backing up Workstation VMs with PowerShell
It’s pretty common for me to backup my Workstation VMs and I’m always looking for quick way to accomplish this. I’ve been using SyncBack Free for many years but most recently I’ve out grown. In this blog I’ll show you the script I wrote to backup my VM’s to a target location.
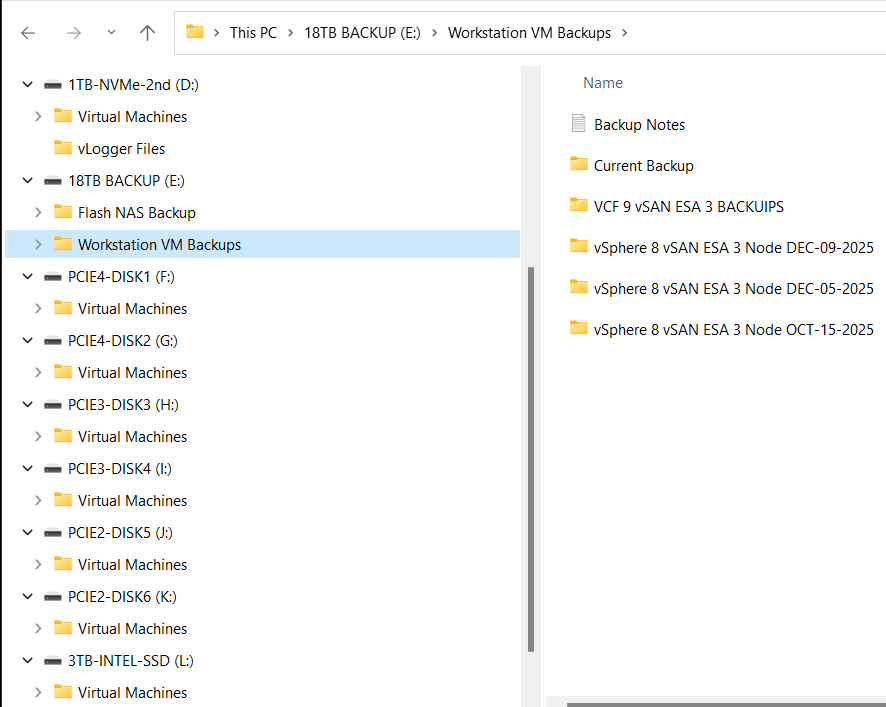
My Workstation server has many data disks with many folders for my VM’s. I backup my VM’s to a large hard disk and then regularly I’ll off load these backups to a NAS for archive purposes. This keeps the VM’s local for quick restores and the NAS provides some further protection.
My PowerShell 7 script is rather simple.
- Define my sources
- Choose a target folder
- Asks if you want to simulate a backup
- Robocopy copies or simulates a copy of the files while appending to a logfile
- Appends the folders and log file with a date stamp
It’s a pretty simple process but it works quite well.
Write-Output "`n**** Workstation VM Backups for VCF 9 vSAN ESA 3 Node *****`n"

# Define Sources
$source1 = "d:\Virtual Machines\VCF 9 vSAN ESA 3 Node"
$source2 = "f:\Virtual Machines\VCF 9 vSAN ESA 3 Node"
$source3 = "g:\Virtual Machines\VCF 9 vSAN ESA 3 Node"
$source4 = "h:\Virtual Machines\VCF 9 vSAN ESA 3 Node"
$source5 = "i:\Virtual Machines\VCF 9 vSAN ESA 3 Node"
$source6 = "j:\Virtual Machines\VCF 9 vSAN ESA 3 Node"
$source7 = "k:\Virtual Machines\VCF 9 vSAN ESA 3 Node"
$source8 = "l:\Virtual Machines\VCF 9 vSAN ESA 3 Node"
$source8 = "D:\Virtual Machines\Domain Services\DomainToolsVM - 12 05 2025"

# Function user selected destination folder
function Select-FolderDialog {
param([string]$Description="Select a EMPTY folder",
[string]$RootFolder="MyComputer")

# Load the necessary assembly
Add-Type -AssemblyName System.Windows.Forms

# Create an instance of the FolderBrowserDialog object
$objForm = New-Object System.Windows.Forms.FolderBrowserDialog
$objForm.RootFolder = $RootFolder
$objForm.Description = $Description

# Show the dialog box
$Show = $objForm.ShowDialog()

# Check if the user clicked 'OK' and return the selected path
if ($Show -eq "OK") {
return $objForm.SelectedPath
} else {
Write-Error "****Operation cancelled by user****"
pause
exit 1
}

# Clean up the object
$objForm.Dispose()
}

Write-Output "`n***** Choose Destination Folder *****"
# Prompt User for desintation folder
$selectedFolderPath = Select-FolderDialog -Description "Please choose the destination folder"
if ($selectedFolderPath) {
Write-Host "You selected: $selectedFolderPath"
# You can now use $selectedFolderPath in the rest of your script
}


Write-output "`n****Choose Robo options****"

# Robocopy options
# /E Copies subdirectories. This option automatically includes empty directories.
# /TEE Writes the status output to the console window, and to the log file.
# /ZB Restart Mode, if denied back to backup mode
# /R:# Retires
# /W:# Wait time between retires
# /J Unbuffered IO for faster large file backups
# /L Simulate backup
# https://learn.microsoft.com/en-us/windows-server/administration/windows-commands/robocopy


#To simulate backup or not
$question = "Do you want run a simulated backup? (Y/N)"
do {
$response = Read-Host -Prompt $question
# Use ToLower() for case-insensitive comparison
$response = $response.ToLower()
} until ($response -eq 'y' -or $response -eq 'n')

if ($response -eq 'y') {
Write-Host "Continuing... with Simulated Robocopy backup`n"
$robocopyoptions = $roboOptions = @("/E", "/TEE", "/ZB", "/R:2", "/W:10", "/J", "/L")


} else {
Write-Host "Continuing.... with Robocopy backup`n"
$robocopyoptions = $roboOptions = @("/E", "/TEE", "/ZB", "/R:2", "/W:10", "/J")


}


Write-Output "`n****Robocopy START****"

#Define Log loction
$logfile = $selectedFolderPath + "\WorkstationBackupLog.txt"

# Start Robocopy and append to log file
robocopy $source1 $selectedFolderPath $robocopyoptions /LOG+:$logfile
robocopy $source2 $selectedFolderPath $robocopyoptions /LOG+:$logfile
robocopy $source3 $selectedFolderPath $robocopyoptions /LOG+:$logfile
robocopy $source4 $selectedFolderPath $robocopyoptions /LOG+:$logfile
robocopy $source5 $selectedFolderPath $robocopyoptions /LOG+:$logfile
robocopy $source6 $selectedFolderPath $robocopyoptions /LOG+:$logfile
robocopy $source7 $selectedFolderPath $robocopyoptions /LOG+:$logfile
robocopy $source8 $selectedFolderPath $robocopyoptions /LOG+:$logfile
robocopy $source9 $selectedFolderPath $robocopyoptions /LOG+:$logfile

Write-Output "****Robocopy FINISH****"

Write-Output "`n****Rename Files START****"
#Rename Folders/file with date stamp
$DateStamp = Get-Date -Format "_yyyy-MM-dd"

Get-ChildItem -Path $selectedFolderPath -Directory | ForEach-Object {
# Construct the new name: original name + date stamp
$NewName = $_.Name + $DateStamp

# Rename the item (folder)
Rename-Item -Path $_.FullName -NewName $NewName
}

Get-ChildItem -Path $selectedFolderPath -File | Rename-Item -NewName {
$_.BaseName + $DateStamp + $_.Extension
}

Write-Output "****Rename Files FINISH****"

# Exit
Write-Output "`n`n****Script finished. Press Enter to exit.****"

pause
The simple and quick way to access to Windows 11 Network Connections
Using VMware Workstation I commonly have a need to change the IP information on my test VM’s quickly. No matter the GUI or shortcuts I find myself going through several clicks to get there. What if there was a more direct path to these options, and in this blog I’ll show you how.
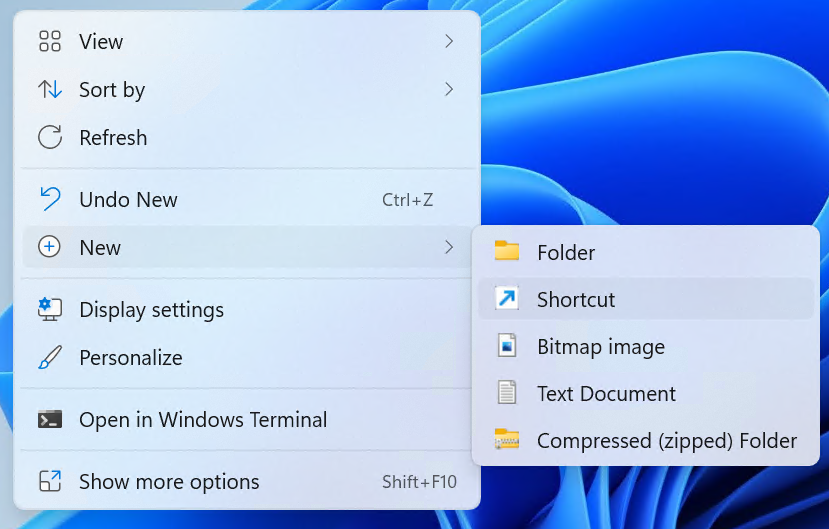
From the desktop, right click and choose New > Shortcut
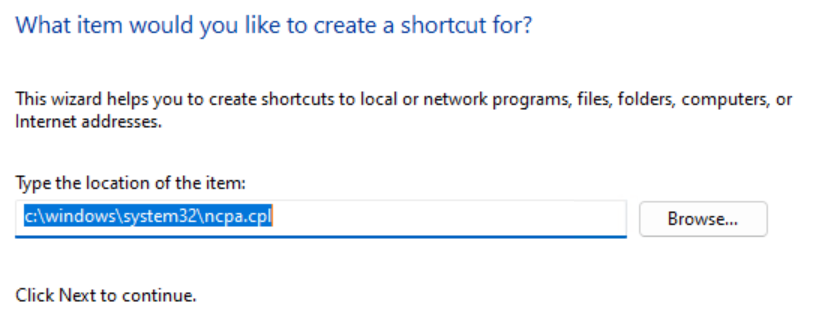
Type in the path below and choose next.
Type in a name you’ll remember and click on Finish.
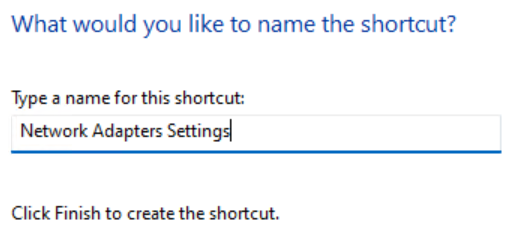
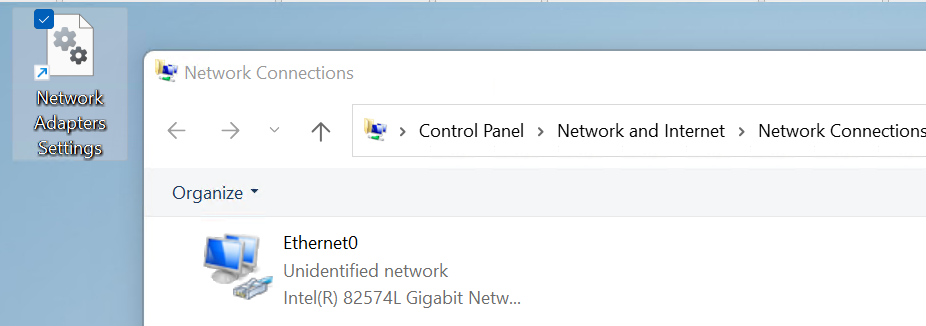
Double click on your new ICON and you’ll be redirect right into the Network Connections giving you access to your network adapters.
Allow SSH root access to VCF SDDC Manger
While creating a new VCF 9 test deployment I recently had the need to allow root user SSH access to the VCF SDDC Manager Appliance or also known as the VCF Installer. The SDDC Manager is the first appliance you deploy when creating a VCF 9 deployment. It allows you to create your VCF 9 environment. Though I would not recommend these actions for a production environment, sometimes in a test environment you may want to enable this.
Here are the steps –
- Gain direct console access to the already deployed SDDC Manager Appliance. In my case I have it deployed in VMware Workstation.
- Login to the SDDC Manager as root.
- Note: See Other Commands below if you want to backup your files first.
- Use the vi editor and enter the following command.

- In vi, press esc, then /, finally type in
PermitRootLoginenter. This will take you to the option to allow SSH login by root
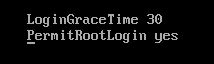
- Next change the
PermitRootLoginfrom no to yes - Press esc
- Enter :wq! to save the file
- Reboot the SDDC Manager Appliance and try using Putty to login as root.

Other Commands:
You might want to do a quick backup of the sshd_config file before and after modification. This way you can easily shift the config file to allow and not allow root access.
First Backup the config file using the extra name of ‘NOROOTACCESS’

Make the changes listed above to allow root access, then backup the config file with the extra name of ‘ALLOWROOTACCESS’

Check to make sure your configurations are there.

Now all you have to do is restore the file you want to the sshd_config file and restart.

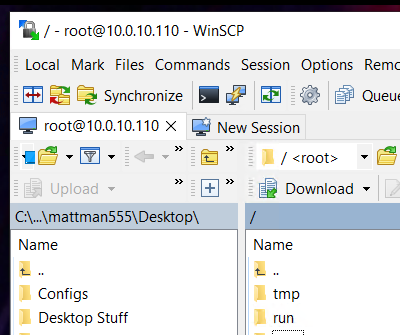
Alternate Benefits:
Now that you have set up root level SSH access you can use programs like WinSCP to access files.
REF:
- ← Previous
- 1
- 2
- 3
- …
- 9
- Next →
