Update to my Home Lab with VMware Workstation 8 – Part 2 Fun with a Windows 7 Installer
Part 1 of this series outlined the hardware I wanted to purchase and some of the ideas I had around the products.
I created an image of the current install of Windows 7, then booted it to my new hardware, and to my surprise there were not any hidden files or drivers that needed adjusted.
It worked quite well, so well it was scary but simply Impressive…. Sure beats those old XP days when you had to just about tear it apart to get it to work.
However I would like this install of Workstation 8 to run on a fresh copy of Windows 7 so I have decided to reinstall it.
Now this shouldn’t warrant a blog post however they way I had to get Windows 7 to behave is why I’m posting.
In this post I go into getting Windows 7 to install properly when you don’t have proper installation CD.
The CD I own for Windows 7 is an Windows based Installation only, you cannot create boot CD to install the OS fresh.
Trust me I tired many ways but it just doesn’t work…
Here is what I wanted to accomplish –
1. I’d like a fresh copy of Windows 7 Installed on to my system
2. I need to enable AHCI in my system BIOS (for more info see here http://en.wikipedia.org/wiki/Advanced_Host_Controller_Interface)
I found on the corsair blogs that my SSD drive will run much better if you enable AHCI in your BIOS.
Unfortunately this pretty much deems a reinstall. I’m okay with this because it is what I’m wanting to do.
Issues –
1. The version of Windows 7 I have is an upgrade or restore only version.
2. Currently AHCI is not enabled in my BIOS
Here’s how I did it… Oh, did it take some trickery and learning but it worked..
Know this…
Windows 7 will do a recovery install to your current HD (C:) or to a new HD (E:).
If you install to your current HD, C:, then it will install in to a WINDOWS.001 folder, and leave lots of old files laying around.
Not ideal as I want a pristine Install
Do this…
From Windows I initiated the install, choose custom install and choose my E: drive (At the time E: was just a blank HD)

Windows did it typical install, Copying files, and they rebooted the system.
During the reboot I enabled AHCI on ALL controllers in the BIOS << THIS IS VERY important step, if you miss this Windows will install in IDE Mode
Windows completed the install and boots to your E: drive.
Having E:\ be the boot and E:\Windows is not ideal. I really want Windows 7 on my C: drive.
I formatted my C: drive and ran the windows install, only this time choose the C: HD.
Windows completes the install and reboots.
When I was done Windows 7 is a fresh install and running on the C: drive.
Summary…
I got to tell you it was a chore figuring this out, it seems very simple now but I went through imaging processes, partition changing, drive renames, lots of blog posts, KB’s, etc…
Nothing worked well and it took up hours of my time. This pattern worked for me, Windows 7 installed properly and its working quite well.
Now its on to installing Workstation 8…
Update to my Home Lab with VMware Workstation 8 – Part 1 Why
Over the couple of years my home lab running VMware Workstation 7 has served me quite well. I’ve been able to deploy VM’s as needed (Windows, ESX, etc) and attach it to my shared storage.
However as my role has changed to a TAM at VMware I’ve needed to depend on my lab to interface with my customers and keep my technical skills up. VMware supplies labs and access to many of their products and this approach is a good one, however there is something said for building it yourself.
Before I just start setting up software, hardware, SAN’s, network, etc I needed to reevaluate my current home lab and setup my new objectives / goals —
“To update a home lab one must look back to move forward” – Matt Mancini ![]()
What were some of the objectives and goals I chose back then?
What do you want to accomplish by setting up a home lab or work test environment?
I wanted to setup a home lab with a couple of ESX servers and shared storage
I wanted to do this so I could testing basic ESX functions and new versions
What are the expectations for uptime and performance?
I’d like the system to perform well as a home PC and a test lab
I’d like to use it to do basic functions and run my lab quickly keeping delays to a minimum
What equipment do I have access to and what do would I need to purchase?
Have – High End PC, Home Network
Purchase – More RAM, Shared Storage, Workstation Software
I built the following environment based on my objectives and goals–
Hardware / Software –

Network –
Internal networks to support vMotion and ESX Management Network
External Single NIC to support VM’s

Storage —
iSCSI, NFS – To support ESX Hosts
CIFS Shares – for a Public Share
Single NIC from home lab to support connection to IX4
500GB HD – Boot OS and Some Workstation VM’s
300GB HD – For Workstation VM’s
160GB HD – For Workstation VM’s
Current VM’s –
Web Safe – XP VM’s used for surfing the web
Home VM – Used for Home / Personal Use
ESX 3.5 Cluster – built but rarely used
ESX 4.0 Cluster – Used but not fully configured
vCenter Server VM – Windows 2003 x32 running vCenter Server 4.0

Outcomes for 09/2011 –
Currently my home lab is struggling to keep up. As my role has changed the demands on my home lab have increased. The main constraint appears to be RAM, 8GB of RAM won’t cut it anymore. So now I’m faced with updating or replacing my home lab.
The Update Plan 10/2011 –
Generally the home lab is doing okay but it is struggling with local RAM. If I run more then 3 VM’s (1 – vCenter Server, and 2 – ESX) there isn’t really much left and paging begins.
I start to look to update my current Mother board (MoBo) to 16GB of RAM, it’s MAX. As I start to research 4 x 4GB DDR2, I find that DDR3 has consumed the market. and DDR2 is so far past its prime that updating it would cost about ~$250 for RAM.
It’s time for a major overhaul for my home lab – What are the new objectives and considerations?
What do you want to accomplish by setting up a home lab or work test environment?
I wanted to setup my home lab to be able to run One vCenter Server, 2 – ESX servers w/ shared storage iSCSI and NFS, maybe on other XP VM, at the same time with out paging to disk
I to test basic ESX functions, new versions, explore options for customers, work with beta code, etc
What are the expectations for uptime and performance?
I’d like the system to perform well as a home PC and a test lab
I’d like to use it to do basic functions and run my lab quickly keeping delays to a minimum
What equipment do I have access to and what do would I need to purchase?
Have – High End PC, Home Network, Shared Storage, Workstation Software
What newer hardware update should be considered?
i7 Core CPU, MoBo with 32GB support, USB 3.0, onboard mSATA, SSD Drives, SATA 6.0 Support
With these things in mind I decided on the following items…

Let chats a bit about the Buy items and reasons why I choose them…
Gigabyte GA-Z68XP-UD3 Mobo
Here are the key drivers why I choose this motherboard –
Price and options were my number one driver, I had looked at other MoBo’s but when I narrowed it down this one kept coming up…
4 x SATAIII – 6.0Gbs Support – Really the MoBo out there with this (Note – this MoBo uses 2 different Chipsets to achieve this (2 x on the Intel Z68 and 2 x on the Marvell chipset)
4 x SATAII – 3.0Gbs Support – Uses the Z68 Chipset
32GB RAM Max
USB 3.0 Support
Good PCI Support – PCI Express 2.0 x16 2 (x16, x8), PCI Express x1, 3 PCI Slots 2 (I did look at PCI Express 3.0 boards but at this point they are more of a fad then reality)
Here are the details on this board — http://www.newegg.com/Product/Product.aspx?Item=N82E16813128512
60GB SSD SATAIII aka 6.0Gbs
The key driver for this product was Speed and Price.
I got the “Corsair Force Series 3 CSSD-F60GB3A-BK 2.5″ 60GB SATA III Internal Solid State Drive (SSD)”
I got this drive at Fry’s for $80 and it stated it could do 500MB/s Read and Write.
Come to find out it can only do 250MB/s RorW however if you buy the GT Model it will.
Don’t take my word for it read about it on the Corsair forums — http://forum.corsair.com/v3/forumdisplay.php?f=188
Other Caveats – Don’t use SSD for your boot drive, before you buy read reviews
I’m not happy about this but the drive still preforms well and I use it to boot VM’s it flys!
Here are the deailts on the SSD – http://www.newegg.com/Product/Product.aspx?Item=N82E16820233223
16GB DDR3 RAM
Key driver here was Size and Price
Once again Frys had the best price and it got 16GB of RAM for $79
Here are the details on the RAM – http://www.newegg.com/Product/Product.aspx?Item=N82E16820233143
With new hardware in hand, let the fun and rebuilding begin – I’m off to Part II of this blog “Update to my Home Lab with VMware Workstation 8 – Part 2 Fun with a Windows 7 Installer“
Passed the VCP4
I recently passed my VCP4 today. It’s been a long road getting here but I’m glad it’s behind me.
I was slated to take it 12/2009 time frame, but we had 4 deaths in the family within a 4 month period!
Needless to say that delay caused me to miss the opportunity to take the test without taking training
However at some point I thought I would get the training I needed to take the VCP but this never came to pass and I remained uncertified until most recently.
Last Summer I took a job with VMware as a TAM and I got the vSphere 4 training I needed. Finally I can say I am a VCP4!
With this behind me it’s time to study for my VCP5, which needs to be completed by end of year 2011 :) or in less than 2 months!
What do I have to add for all of you taking the test?
– Read those documents, know your stuff, take the mock exams, follow the blue prints
– Notice this about the questions… There are plays on words and metrics
Example –
A VM has the following performance counters – paging reads 0 and ballooning reads 240
Or I’ve seen it as
A VM has the following performance counters – paging reads 240 and ballooning reads 0
Also, I’ve seen a bunch of play on words like changing is to isn’t – This changes the answer you choose.
So word to the wise – I believe they are doing this to counter potential VCP’s just studying questions from TestKing, Cerfityme, etc… So if you are, Good Luck – You’ll need it — Its plain and simple – Study hard = Passing the test
9 Great vSphere 5 documents everyone should read
Here are 9 Great vSphere 5 documents everyone should read! Enjoy!
- What’s New in VMware vSphere 5.0 Platform
- What’s New in VMware vSphere 5.0 Storage
- What’s New in VMware vSphere 5.0 Networking
- What’s New in VMware vSphere 5.0 Performance
- What’s New in VMware vSphere 5.0 Availability
- vSphere Storage Appliance
- What’s New in VMware Data Recovery 2.0
- What’s New in VMware vCenter Site Recovery Manager 5.0
- What’s New in VMware vCloud Director 1.5
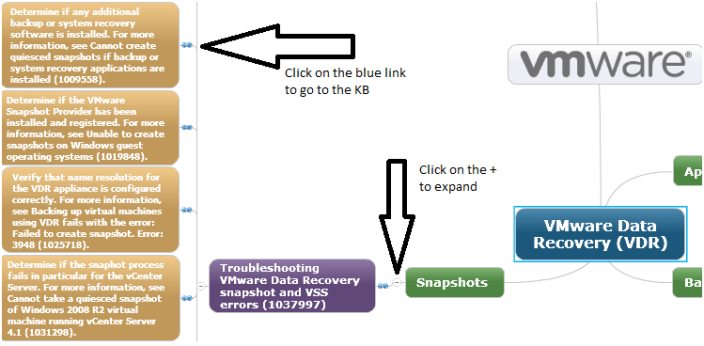
18 of the best VMware Resolution Path KB Articles
You might be asking yourself what are a Resolution Path KB articles? Resolution path articles are product specific PDF’s that lead you to common answers.
They help you to resolve common issues visually and link you to the KB to help in resolution.
In their own words –
“Mind Maps are a visualization of our Resolution Path KB articles, which are collections of modular steps that can be used to solve tech support issues. Being modular, they can be re-used in other resolution paths. A good example is using the ping command to test network connectivity. This step is used in all kinds of troubleshooting procedures. Put a number of these steps together, and you have a method.”
Here is the URL to the articles –
http://blogs.vmware.com/kb/2011/08/index-of-resolution-path-kb-articles.html
Here’s a quick screenshot but basically expand a category, and choose a link to a KB.
icade review
For father’s day 2011 I got what every retro game junkie wants and icade.
I mean who wouldn’t want a fully functional mini arcade controller for their ipad that plays a lot Atari Arcade & 2600 classics.
The concept is simple –
Buy an ipad, buy an icade (sold here), assemble icade, download Atari’s Greatest Hits (Most of these games are 2600 based), and connect the ipad/icade via Bluetooth.
The icade’s controls are responsive when playing games. The buttons feel like the real thing and the joystick is good but it’s not arcade quality.
The ipad mounts on the icade vertically however there is a tray that allows you to place your ipad in a horizontal manner.
Most of the games play pretty well. I found Asteroid played better using the buttons only and Tempest worked best with a combo slider ipad touch screen / fire buttons on the icade.
One down side is the noise – the buttons and joystick switches make loud clicking noises when you use them, but don’t most arcade game cabinets?
Now for the biggest problem – Will dad ever get a chance to play with it? Probably not L
Test Lab – Day 6 Xsigo Redundancy testing with ESXi under load (Final Post)
Today I plan to setup the environment to simulate high disk I/O and re-run most the Xsigo tests from Day 4. My thoughts behind these tests are the Xisgo ran well under a minimal load but how would it perform when stressed.
Note: This blog post only covers how I setup testing but doesn’t have the final results. See A change of plans below for more information.
The environment layout will stay the same (4 x ESXi 4.1 hosts, each host with 10 VM’s, 2 Xsigo VP780’s and one IOMega IX12 with a 4 spindle NFS Datastore)
I’ll auto create about ~40 Windows 2003 VM’s and use PassMarks Burin Test to simulate a NFS load.
I plan to drive the IOMega to ~1Gbs of sustained NFS I/O by driving each VM’s hard disk.
While the load simulation is happening I’ll re-run the testing from Day 4, and record the results.
I do wish we could simulate a larger load however our NFS datastores are only across 4 Spindles. If we simulate a heavier load I believe it will “tank” the datastore making our testing pretty much worthless.
Preparing for the load Test.. In this step I setup my default template
I spun up a Windows 2003 server and installed the Burn in Test program.
I launched the BurnIn Test, clicked on Preferences, uncheck all, checked Disks, and entered a duty cycle of 25
Tip: BurnIn Test can be used for a wide range of load testing including CPU & Network (See below)
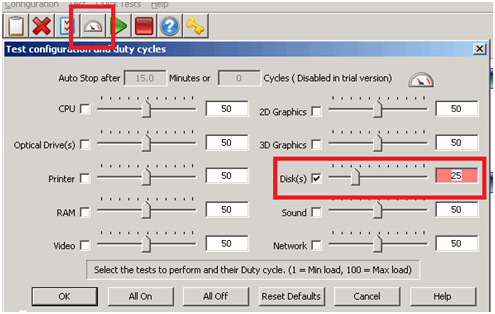
I saved the configuration file in the default folder.
I repeated this process and created 4 more config files driving the Disk to duty cycles of 5, 10, 50 and 100.
Writing the batch file to launch the BurnIn Test config file was simple (see below) and I created one for each duty cycle.

Tip: Before changing this VM into a template I tested my batch files to ensure all was working well.
Next I wrote a simple vSphere PowerCLI script to create the VM’s, it nothing complex but it did the trick..
I simply opened the vSphere PowerCLI prompt and pasted in the following lines…
|
$server_address = “vCenter Server IP” $username = “Administrator” $password = “your password here” $template_name = “w2003Template” $datastore_name = “NFS” $customization = “W23K” $location = “LoadTest” $destination_host = “ESX Host 1 IP Address” New-VM -Name 2003VMT21 -Location $location -Template $template_name -Host $destination_host -Datastore $datastore_name -OSCustomizationSpec $customization New-VM -Name 2003VMT22 -Location $location -Template $template_name -Host $destination_host -Datastore $datastore_name -OSCustomizationSpec $customization New-VM -Name 2003VMT23 -Location $location -Template $template_name -Host $destination_host -Datastore $datastore_name -OSCustomizationSpec $customization New-VM -Name 2003VMT24 -Location $location -Template $template_name -Host $destination_host -Datastore $datastore_name -OSCustomizationSpec $customization New-VM -Name 2003VMT25 -Location $location -Template $template_name -Host $destination_host -Datastore $datastore_name -OSCustomizationSpec $customization New-VM -Name 2003VMT26 -Location $location -Template $template_name -Host $destination_host -Datastore $datastore_name -OSCustomizationSpec $customization New-VM -Name 2003VMT27 -Location $location -Template $template_name -Host $destination_host -Datastore $datastore_name -OSCustomizationSpec $customization New-VM -Name 2003VMT28 -Location $location -Template $template_name -Host $destination_host -Datastore $datastore_name -OSCustomizationSpec $customization New-VM -Name 2003VMT29 -Location $location -Template $template_name -Host $destination_host -Datastore $datastore_name -OSCustomizationSpec $customization New-VM -Name 2003VMT30 -Location $location -Template $template_name -Host $destination_host -Datastore $datastore_name -OSCustomizationSpec $customization $destination_host = “ESX Host 2 IP Address” New-VM -Name 2003VMT31 -Location $location -Template $template_name -Host $destination_host -Datastore $datastore_name -OSCustomizationSpec $customization New-VM -Name 2003VMT32 -Location $location -Template $template_name -Host $destination_host -Datastore $datastore_name -OSCustomizationSpec $customization New-VM -Name 2003VMT33 -Location $location -Template $template_name -Host $destination_host -Datastore $datastore_name -OSCustomizationSpec $customization New-VM -Name 2003VMT34 -Location $location -Template $template_name -Host $destination_host -Datastore $datastore_name -OSCustomizationSpec $customization New-VM -Name 2003VMT35 -Location $location -Template $template_name -Host $destination_host -Datastore $datastore_name -OSCustomizationSpec $customization New-VM -Name 2003VMT36 -Location $location -Template $template_name -Host $destination_host -Datastore $datastore_name -OSCustomizationSpec $customization New-VM -Name 2003VMT37 -Location $location -Template $template_name -Host $destination_host -Datastore $datastore_name -OSCustomizationSpec $customization New-VM -Name 2003VMT38 -Location $location -Template $template_name -Host $destination_host -Datastore $datastore_name -OSCustomizationSpec $customization New-VM -Name 2003VMT39 -Location $location -Template $template_name -Host $destination_host -Datastore $datastore_name -OSCustomizationSpec $customization New-VM -Name 2003VMT40 -Location $location -Template $template_name -Host $destination_host -Datastore $datastore_name -OSCustomizationSpec $customization
This pattern was repeated on the other ESX hosts until ~40 VM’s were created… |
Test Procedure…
Using the Burn In test program I will drive the utilization on the ~40 VM’s until 1Gbs of sustained NFS I/O is achieved.
I’ll use vCenter Server to ensure NFS traffic is passing through XSA and then start the tests below.
All of the ESX Hosts are attached to the IOMega via NFS, this means all traffic has to pass through the Xsigo and our network to get to the IOMega.
I used a Laptop, the ESXi console in tech support, vCenter Server mode to capture and validate the results.
Keep in mind this deployment is a SINGLE site scenario and for accuracy we allowed the environment to settle between tests.
A Change in plans.…
At this point the testing had to stop. Reason why – I put in my two weeks’ notice and had to focus on a transition plan and less on testing.
My hopes are if you’re reading this post it will give you a baseline for testing.
4 Books in 4 Weeks – Book 3 How to compare Terminator 2 to VMware vSphere 4.1 HA and DRS Technical Deepdive
I got a chance over the past few weeks to complete Book 3 VMware vSphere 4.1 HA and DRS Technical Deepdive by Duncan Epping and Frank Dennerman
I’ve read a lot of the reviews about this book and I must say they say about the same thing.
- This book makes the HA/DRS VMware white paper easier to read and understand
- I learned a bit more about HA/DRS then the VMware white paper
- The book is well-organized and makes great sense.
- Buy this book and read it
I agree with all of these basic statements. However I never read the white paper, shame on me :), as I felt the cluster I administrated never really needed in-depth settings HA or DRS provided. When I changed jobs to a much larger environment I needed the advanced functions of HA/DRS and I needed to get up to speed quite quickly. I read this book, and then I went back and read the white paper. What an eye opener.
This scenario reminded me of how I saw Terminator 2. How does T2 fit in to a book review about HA and DRS you might ask. Simple, when T2 was released I didn’t want to know anything about it, kind of like the VMware HA/DRS White paper I knew it was there but ignored it. All I wanted to know about T2 was its release date, I didn’t let anyone tell me about it, and I turned off any marketing about it. When I finally saw the movie it was awesome. What a surprise to find out that Arnie was reprogrammed for aiding and not killing, TOTAL Surprise. This book VMware vSphere 4.1 HA and DRS Technical Deepdive was my in-depth technical intro to HA/DRS, and like the way I viewed T2 it was awesome! It was nice to really learn this topic in reverse order (Book first then Whitepaper) as the book really does a great job laying it all out in an easy to follow and understand format.
As I was reading this book I noticed how physically easy it was to read. Here’s what I mean. The book and font size with large Left/Right paragraph indentations made the book easy to read visually. With most books you would have to flatten or shift the book around to reveal words hidden by the crease or binding of the book. The large paragraph indentations meant I didn’t have to shift the book around to see the words. This made it less physical to read which helped me to read it quite quickly. I noticed this when I was on airplane and the space was pretty tight. Not sure if this is by design, but just the same it made a difference for me.
Summary…
Read this book, suggest others do, buy it and buy the next version!
Up next Book 4 – Mr. Lowe and Friends, sorry to keep you waiting but your book (VMware vSphere Design) is up next!
4 Books in 4 Weeks – Book 2 VMware ESX and ESXi in the Enterprise 2nd Edition
The task to complete 4 books in 4 weeks reminded me of a joke. A guy walks up to a 7/11 store and the clerk is locking the entrance. The guy asks “I thought you were open 24 hours?” The Clerk replies “Yes we are open 24 hours, just not in a row!” With that said I’m still on course to finish my books in 4 weeks, just not 4 weeks in a row!
About 4 years ago I purchased VMware ESX in the Enterprise. Back then it was based on ESX 3.x. It was a well written book and I had recommended it many times. When I saw the 2nd Edition published I knew I had to read it. This book covers ESX 3 – 4 and ESXi – Very cool!
Book Review / Summary
The book is comprised of 12 chapters ranging from hardware considerations through disaster recovery & backup. Like the previous book it includes lots of best practice guides, well written how to’s and superior charts/tables. According to the author the book is an attempt at a “Soup to Nuts” description of ESX/ESXi best practices, from what I read he did just fine at his attempt!
TIP: Read the Preface, usually I skip this part but I found this one to be worth the 6 pages, at least breeze through it. Also, there is a nice reference to my beloved Commodore 64.
Things I liked about this book….
- Book is not limited to VMware only, it covers some 3rd party tools as well
- Charts and Tables – I don’t think I’ve seen a technical book having more well written and meaningful charts and tables then this one.
- Throughout the book there are nicely highlighted Best Practices and tips – you would benefit if you just read these alone
- I can’t say this enough, and so do did the book – Check the VMware HCL prior to buying hardware
- 20 vCPU per pCPU core — of course don’t take my word read this book and find out why
- Nice tips on NUMA based pCPU’s and vCPU’s that will make you rethink your design
- Real world Examples throughout the book that get you thinking about your environment
- Great tips on BIOS settings, Especially around APCI
-
Chapter 7 Networking is pretty detailed and has some great comparison charts
Things I didn’t like about this book…
- The occasional entire page or two of text without breaks in the flow, sorry I’m a sucker for charts and graphs
- Some of the how to guides seemed right from the manuals you get from VMware
- Chapter 3 – about 40+ pages in painstaking detail of how to install ESX/ESXi and boot it to SAN/iSCSI but less the 3 pages on Automating the process
- The writing style of the book sometimes drags on with play by play explanations and multiple versions of the play by play, for a beginner okay I get it, but for others it’s a bit painful
Quick Summary…
This books is worth every dollar you buy it for, granted you actually read it. 541 Pages is a bit long and it drags in places. However the Charts, graphs, and pics are PRICELESS.
If your new to VM this books is up your alley, if you’ve been around for a while you’ll pick up some good tips and tricks, and if your experienced suggest others read it.
Thanks for reading my post… I’m off to read my 3rd book of 4 VMWare vSphere 4.1 HA and DRS Technical Deepdive 215 Pages by Duncan Epping and Frank Dennerman
Paging Dr. Epping and Dr. Dennerman, your up…
4 Books in 4 Weeks – Book 1 Storage Area Networks for Dummies
In 2004 I bought the 1st Edition Storage Area Networks for Dummies (now in its 2nd Edition) and read 100 pages or so, life got in the way, and now 2011 I’ve decide to finish it. I know what you’re thinking, “Why read a Dummies book?” Back in the day this book had the information I was looking for and it helped me on my first virtualization design. In today’s world some of the information is somewhat outdated however it still has a lot of the basic SAN fundamentals and concepts of today’s SAN’s.
An Easy Read and my own personal Dummies Tip…
Going through the book I kept in mind this is a dummies book and it’s meant to be an easy read. This book was an easy read and it was a great refresh on SAN technologies. There was quite a bit of outdated material in this book (I expected this) and it was interesting to see how technology had progressed since 2003 days. Example – In 2003 FCoIP was referred as FCIP or iFCP. The basic book layout comprises of 5 different parts ranging from SAN 101 through Management & Configuration. One thing I dislike about technical books is when an author spells out an acronym once, never to return to it, and then references the acronym over and over. I couldn’t tell you how many times I go back to find out the meaning of an acronym. This book overcomes this issue and it does it so well it becomes unnecessary. Example, they mention FC-AL (See Cliff notes below), and talk about how FC-AL (For more information about Fibre Channel Arbitrated Loop – Please see my cliff notes under the section “Some General cliff notes below”) is an old technology. Only a fool would use FC-AL (Tip: if you’d like to know more about FC-AL see my cliff notes below). Hopefully you get my point. It was nice to have the reference but mentioning it too often (it seemed like 40 times) got a bit annoying. Here’s a Dummies Tip: Authors reading this blog – please find a happy medium, do it, and don’t blame your editor for taking it out. I mean after all it’s your book, right?
Something Unexpected…
While I was reading the book we had several vendors present their products at my current employer. They mentioned a lot of the terms I listed below. So yes this books still has value and for a person who wants to learn the basics I would recommend they read the 2nd edition and then on to “higher education”. I noted lots of errors in the book especially around their math or what appeared to be simple cut/paste issues. I did go to the www.dummies.com site to see if they printed book corrections but I was unable to find it.
Some General Cliff Notes…
Fibre Channel protocol is spelled fibRE not Fiber – http://en.wikipedia.org/wiki/Fibre_Channel << My spell checker really hates fibre J
Single Mode Fiber Cable – Smaller diameter means a more direct path for the beam, usually yellow, for long distances (Up to 10K), usually uses a higher powered laser
Multi Mode Fiber Cable – Larger diameter means a less direct path for the beam, usually Orange, for shorter distances (<500M, Normal 10 to 20M), can use an LED or vertical-cavity surface-emitting lasers (VCSELs)
Common fiber connectors – LC – Most common, SC – Older Larger connector, ST – Older BNC Twist on style http://en.wikipedia.org/wiki/Fiber_connector
FC-AL – Fibre Channel Arbitrated Loop Protocol, used with a SAN hub – RARE replaced by SAN Switches, not one device can exceed the max speed, the more devices the more congestion occours, MAX of 128 devices per hub, common use might be for SAN based TAPE.
FC-SW – Fibre Channel Switched Protocol, used with a SAN Switch, more efficient then HUBS, devices can cross communicate with each other, 1000’s of devices can be connected, each device is assigned a WWN(World Wide Name)
Modular class SAN – Use Controllers which are separate from disk shelves
MonoLithic class SAN – Use disks that are assembled inside the array frame, -these disks are connected to many internal controllers through lots of cache memory
Storage Bus Architecture Array – One thing can happen on the array at a time (Like a Hub Switch)
Storage Switch Architecture Array – Multiple things can be going on at the same time with less of an impact on I/O performance.
LUN – Logical Unit Number, usually represents a RAID set represents all the smaller physical drives as one logical disk to your server.
RAID – It depends on who you ask it can mean Redundant Array of Inexpensive Disks or Redundant array of Independent Disks. Funny thing this book was pre NetApp, they mention RAID 4 is no longer in use. Oh contraire NetApp uses it!
LUNS – Logical Unit Numbers represent the storage space formed by a RAID set. It may contain the partial or entire space.
Fiber Optic Cable – When Fiber Optic cables are used within a storage network they are spelled fibre channel cables. This helps to distinguish their meaning from other fiber based cables such as telecommunications.
ISL (Inter-switch link) – the term used to describe the connection between two switches in a fabric
Fabric Protocol – A SAN fabric may include Routing and conversation between switches, Listing Services, and Security
WWN (World Wide Name) – Devices in the SAN fabric are addressed by the World Wide Name. WWN’s consists of a 16 HEX numbers which make a 64 Bit Address.
Three Layers to a SAN Design AKA the Basic SAN topology – Host, SAN, and Storage
DAS – Direct Attached Storage AKA Local Host Storage
Point to Point – Host to disk Storage via a Fibre Cable (Require dedicated Storage Ports)
Arbitrated Loop Topology – Most likely you can find these devices on ebay, they might even pay you to take them off their hands. Basic designs around FC-AL hubs are cascading, fault-tolerant loops and your basic hub loops.
Switch Fabric Topology – Most prevalent for today’s fibre networks. Switch types include smaller modular (usually single failure) and larger director class (very redundant) switches.
Basic Switch Fabric Topologies – Dual Switch, Loop of Switches, Meshed Fabric, Star, Core-Edge
Zoning – Is a method used to segregate or separate devices connected to a switch fabice via switch based security. A Zone in many ways is similar to an IP Switch VLAN. They can span multiple switches. Zoning is typically used to separate storage from different operating systems. If by chance a windows server could see all the storage it might write a signature. If this space belonged to a UNIX server this could make it unusable. Other uses could be zoning storage by QA, Test, DEV, and Production networks. Zoning can come in two forms – Soft AKA by WWN or Hard AKA by physical switch port.
Quick Summary…
It’s a good starting place for those interested in SAN technologies, this books has some value in today’s world BUT if you choose this book then I suggest you read the latest edition…
Thanks for reading my post… I’m off to read my 2nd book of 4 VMware ESX and ESXi in the Enterprise 2nd Edition by Edward Halekty
