linux
VMware Workstation Gen 9: Part 5 Deploying the VCF Installer with VLANs
The VCF Installer (aka SDDC Manager Appliance) is the appliance that will allow me to deploy VCF on to my newly created ESX hosts. The VCF Installer can be deployed on to a ESX Host or directly on Workstation. There are a couple of challenges with this deployment in my Home lab and in this blog post I’ll cover how I overcame this. It should be noted, the modifications below are strictly for my home lab use.
Challenge 1: VLAN Support
By default the VCF Installer doesn’t support VLANS. It’s a funny quandary as VCF 9 requires VLANS. Most production environments will allow you to deploy the VCF Installer and be able to route to a vSphere environment. However, my Workstation Home Lab uses LAN Segments which are local to Workstation. To communicate over LAN Segments all VMs must have a VLAN ID. To overcome this issue I’ll need to add VLAN support to the VCF Installer.
Challenge 2: Size Requirements
The installer takes up a massive 400+ GB of disk space, 16GB of RAM, and 4 vCPUs. The current configuration of my ESX hosts don’t have a datastore large enough to deploy it to, plus vSAN is not set up. To overcome this issue I’ll need to deploy it as a Workstation VM and attach it to the correct LAN Segment.
In the steps below I’ll show you how I added a VLAN to the VCF Installer, deployed it directly on Workstation, and ensure it’s communicating with my ESX Hosts.
Deploy the VCF Installer
Download the VCF Installer OVA and place the file in a location where Workstation can access it.
In Workstation click on File > Open. Choose the location of your OVA file and click open.
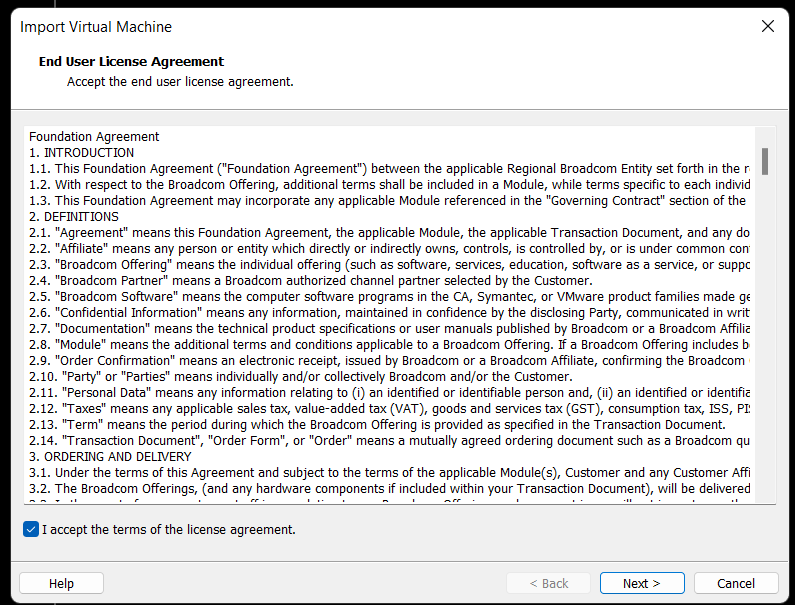
Check the Accept box > Next
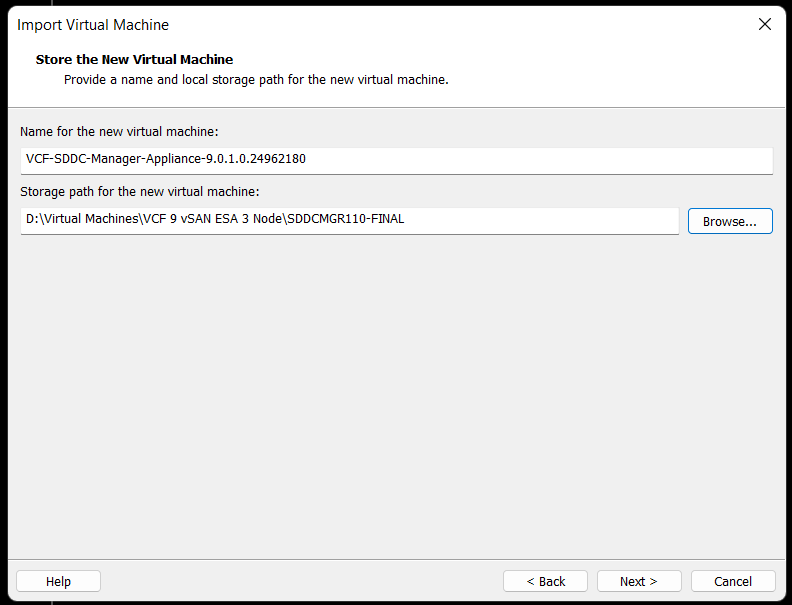
Choose your location for the VCF Installer Appliance to be deployed. Additionally, you can change the name of the VM. Then click Next.
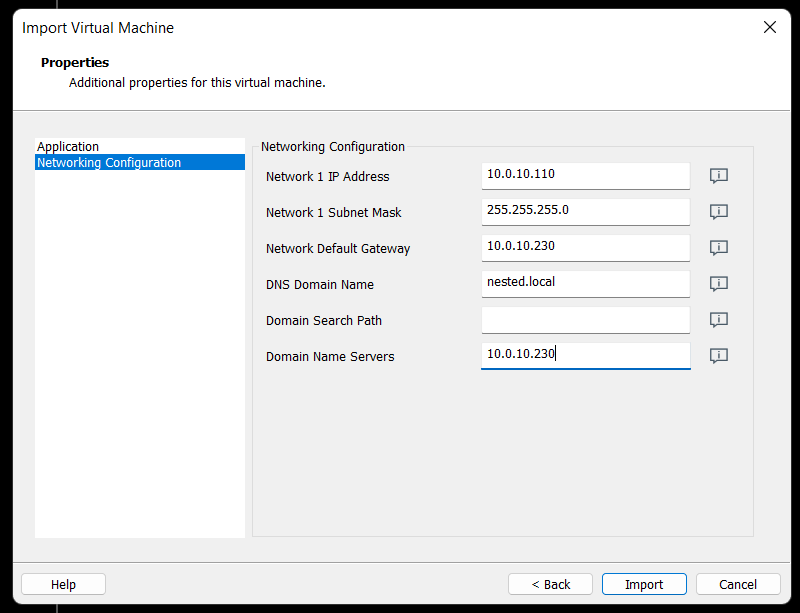
Fill in the passwords, hostname, and NTP Server. Do not click on Import at this time. Click on ‘Network Configuration’.

Enter the network configuration and click on import.
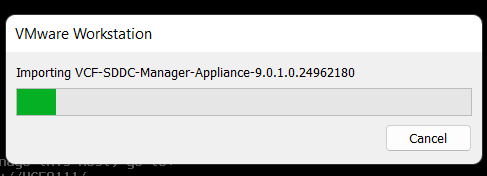
Allow the import to complete.
Allow the VM to boot.

Change the VCF Installer Network Adapter Settings to match the correct LAN Segment. In this case I choose 10 VLAN Management.

Enable VLAN support in the VCF Installer
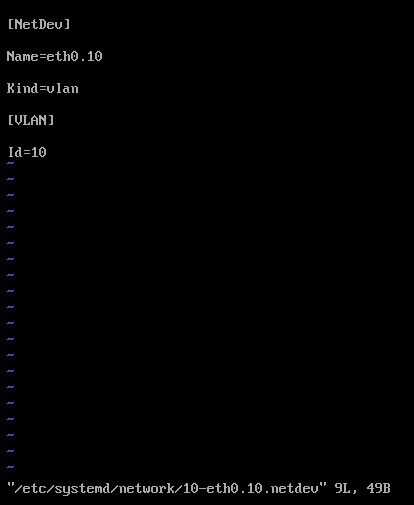
1) Login as root and create the following file.

vi /etc/systemd/network/10-eth0.10.netdev
Press Insert the add the following
[NetDev]
Name=eth0.10
Kind=vlan
[VLAN]
Id=10
Press Escape, Press :, Enter wq! and press enter to save
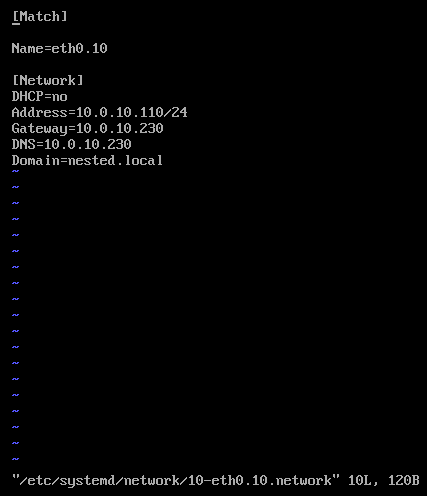
2) Create the following file.
vi /etc/systemd/network/10-eth0.10.network
Press insert and add the following
[Match]
Name=eth0.10
[Network]
DHCP=no
Address=10.0.10.110/24
Gateway=10.0.10.230
DNS=10.0.10.230
Domain=nested.local
Press Escape, Press :, Enter wq! and press enter to save
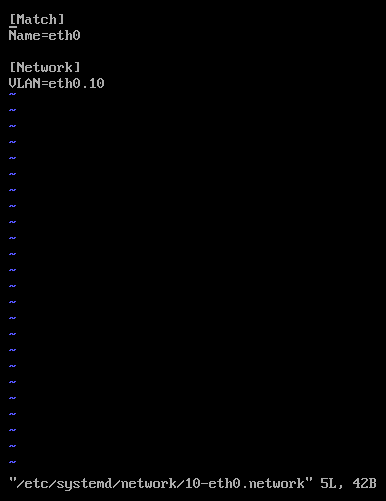
3) Modify the original network file
vi /etc/systemd/network/10-eth0.network
Press Escape, Press Insert, and remove the static IP address configuration and change the configuration as following:
[Match]
Name=eth0
[Network]
VLAN=eth0.10
Press Escape, Press :, Enter wq! and press enter to save
4) Update the permissions to the newly created files
chmod 644 /etc/systemd/network/10-eth0.10.netdev
chmod 644 /etc/systemd/network/10-eth0.10.network
chmod 644 /etc/systemd/network/10-eth0.network
5) Restart services or restart the vm.
systemctl restart systemd-networkd
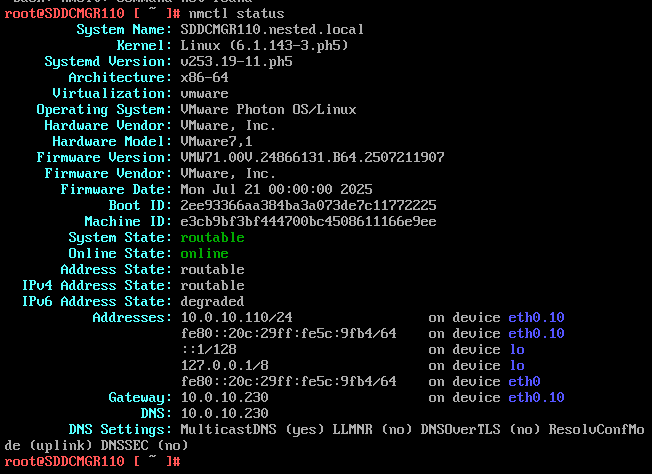
6) Check the network status of the newly created network eth0.10
nmctl status
7) Do a ping test from the VCF Installer appliance.
Note – The firewall needs to be adjusted to allow other devices to ping the VCF Installer appliance.
Ping 10.0.10.230
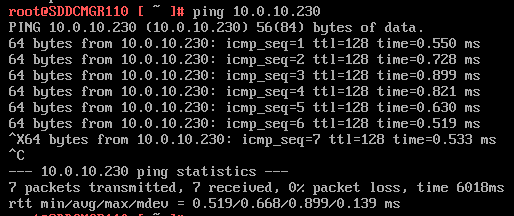
Next I do ping to an internet location to confirm this appliance can route to the internet.

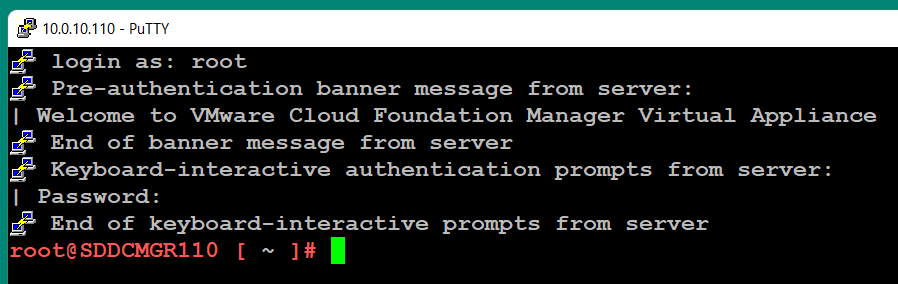
8) Allow SSH access to the VCF Installer Appliance
Follow this BLOG to allow SSH Access.
From the Windows AD server or other device on the same network, putty into the VCF Installer Appliance.
Adjust the VCF Installer Firewall to allow inbound traffic to the new adapter
Note – Might be a good time to make a snapshot of this VM.
1) From SSH check the firewall rules for the VCF Installer with the following command.
iptables -L –verbose –line-numbers
From this output I can see that eth0 is set up to allow access to https, ping, and other services. However, there are no rules for the eth0.10 adapter. I’ll need to adjust the firewall to allow this traffic.
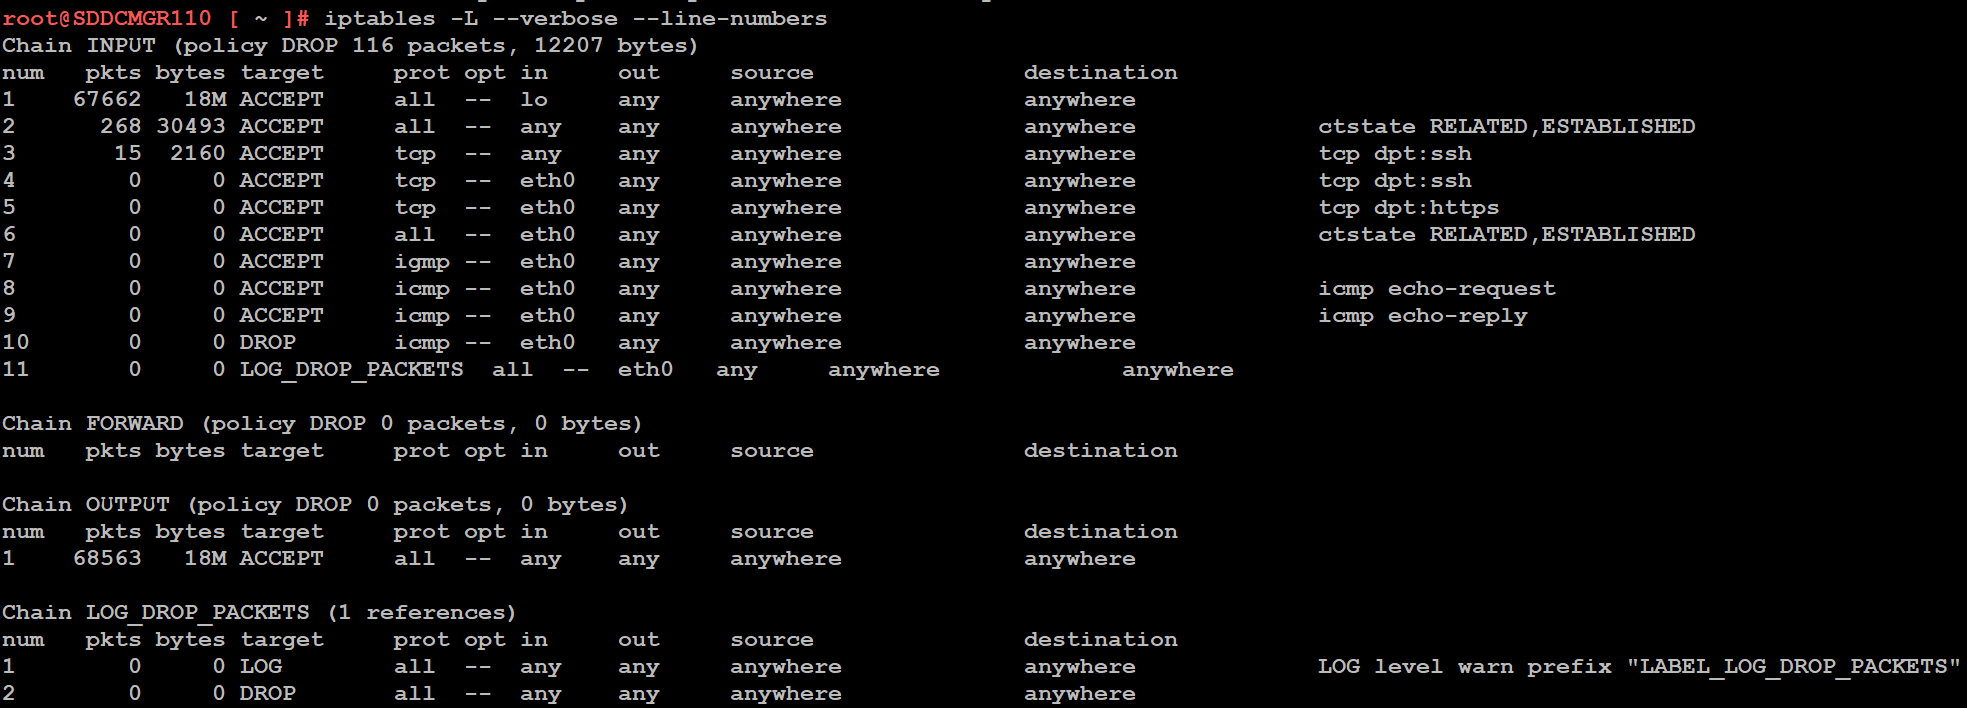
Next I insert a new rule allowing all traffic to flow through e0.10 and check the rule list.
iptables -I INPUT 4 -i eth0.10 -j ACCEPT

The firewall rules are not static. To make the current firewall rules stay static I need to save the rules.
Save Config Commands

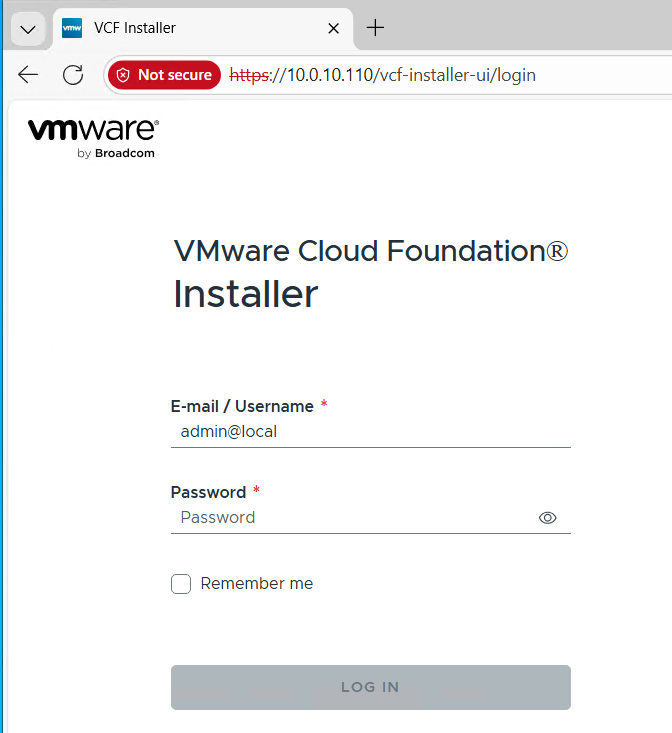
Restart and make sure you can now access the VCF Installer webpage, and I do a ping test again just to be sure.
Now that I got VCF Installer installed and working on VLANs I’m now ready to deploy the VCF Offline Depot tool into my environment and in my next blog post I’ll do just that.
VMware Workstation Gen 9 Part 4 ESX Host Deployment and initial configuration
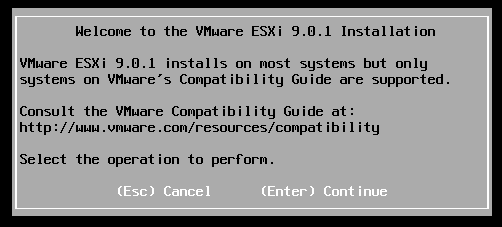
Now that I created 3 ESX hosts from templates it is time to install ESX. To do this I simply power on the Hosts and follow the prompts. The only requirement at this point is my Windows Server and Core Services be up and functional. In this blog we’ll complete the installation of ESX.
Choose a host then click on “Power on this virtual machine”.
The host should boot to the ESX ISO I choose when I created my template.
Choose Enter to Continue
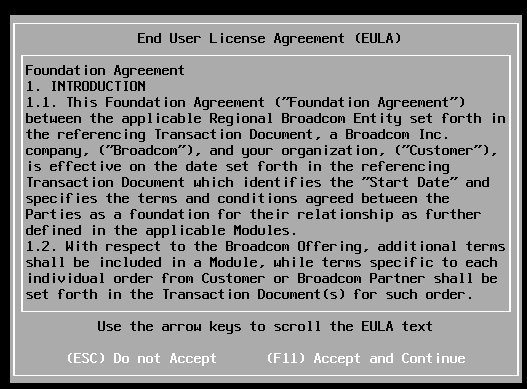
Choose F11 to Accept and Continue
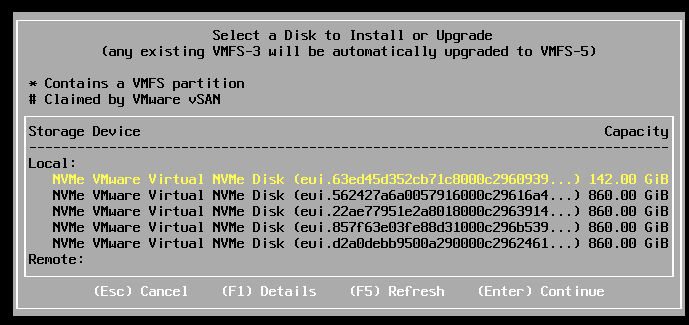
If the correct boot disk is selected, press Enter to continue.
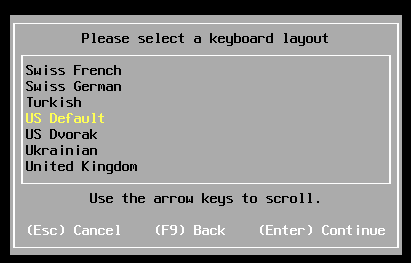
Choose pressed enter to accept the US Default keyboard layout
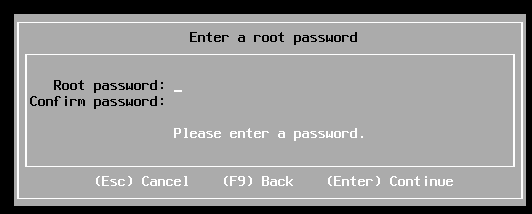
Entered a root password and pressed enter.
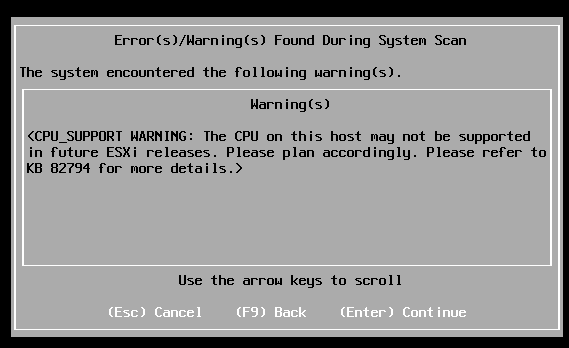
Pressed enter at the warning of CPU support.
Pushed F11 to install
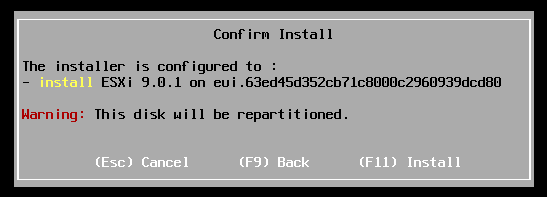
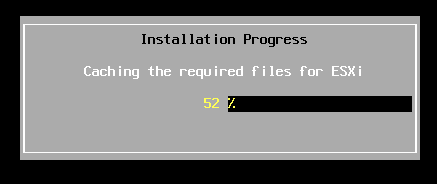
Allowed ESX to install.
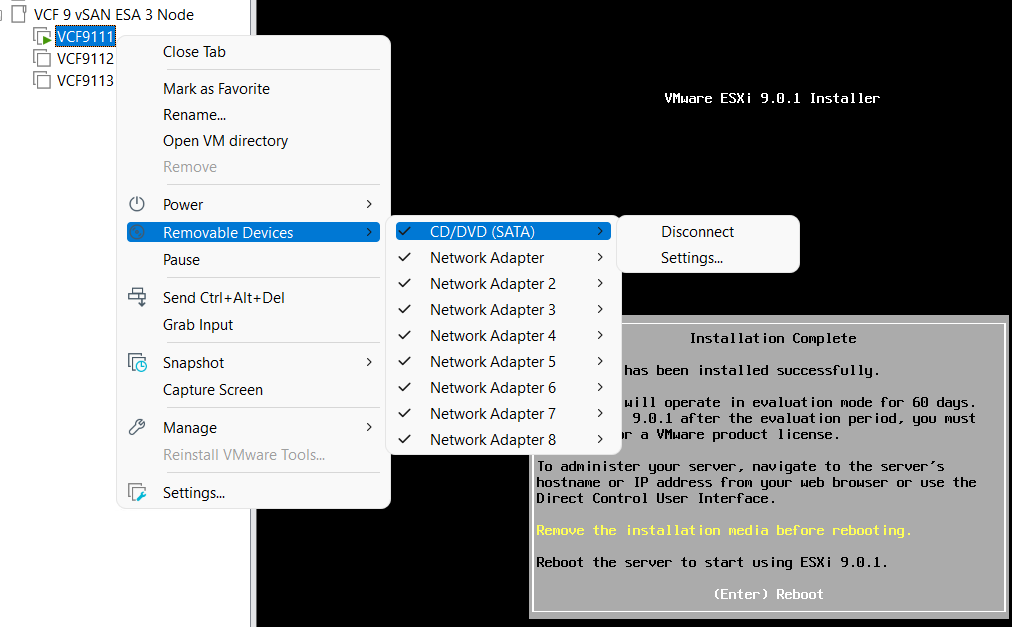
Disconnected the media and pressed enter to reboot
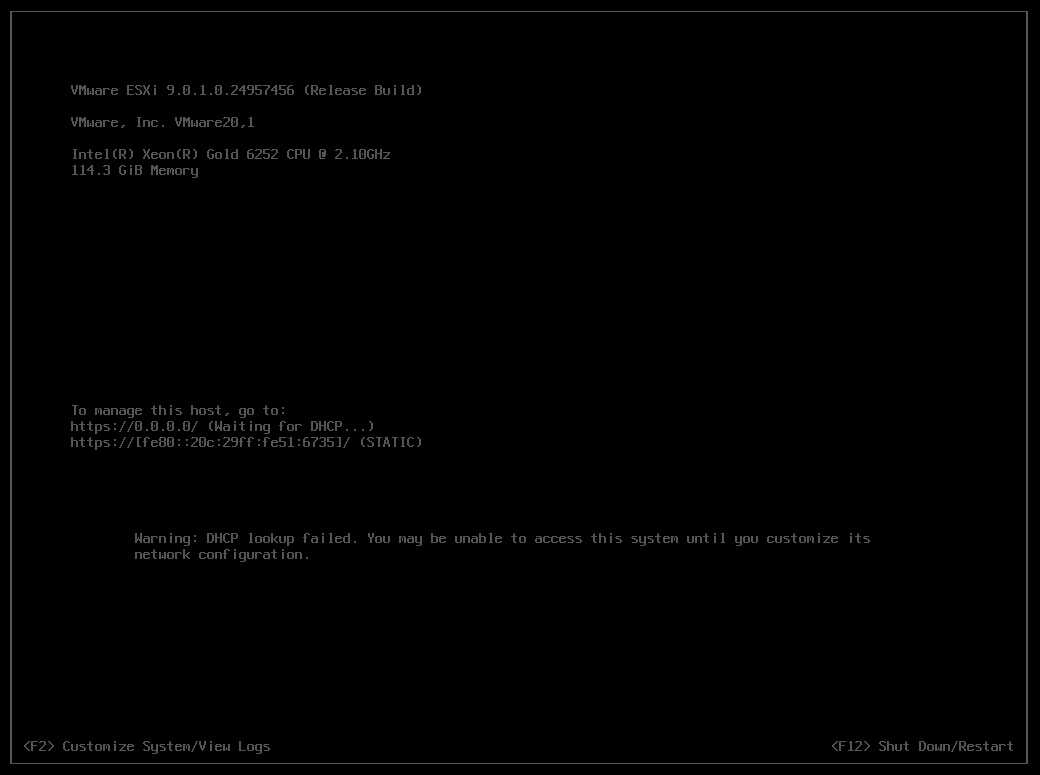
Once rebooted I choose F2 to customize the system and logged in with my root password
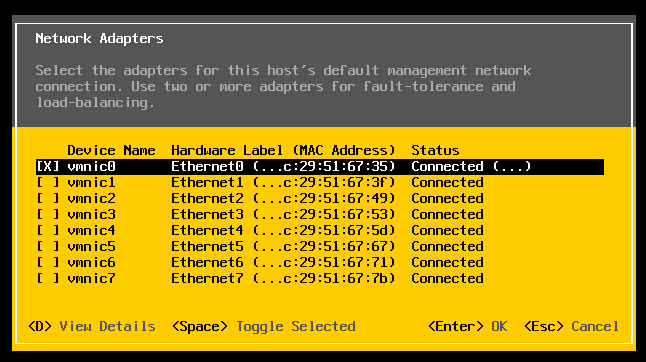
Choose Configure Management Network > Network Adapters, and validate the vmnic0 is selected, then pressed escape
Choose VLAN (optional) > Entered in 10 for my VLAN > pressed enter to exit
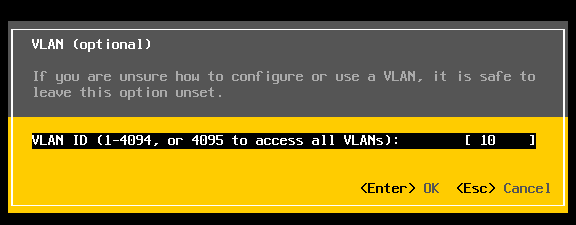
Choose IPv4 Configuration and enter the following for VCF9111 host and then pressed enter.

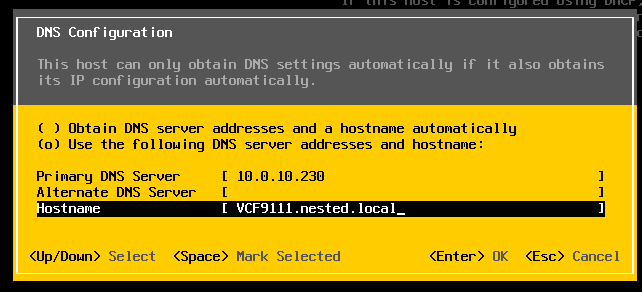
Choose DNS Configuration and enter the following.
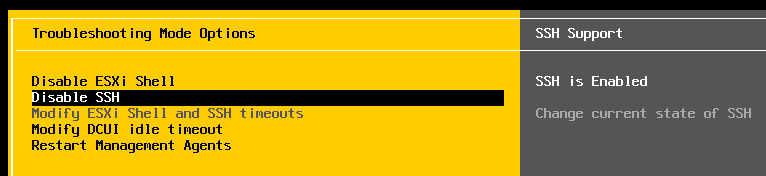
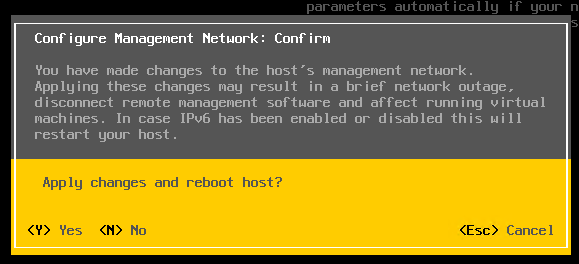
Press Escape to go to the main screen. Press Y to restart management. Arrow down to ‘Enable ESXi Shell” and press enter, then the same for SSH. Both should now be enabled.
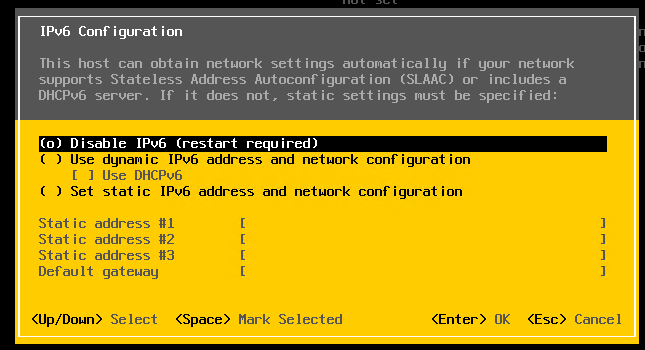
Press Escape and choose Configure Management Network. Next choose IPv6 Configuration, choose “Disable IPv6” and press enter.
Press Escape and the host will prompt you to reboot, press Y to reboot.
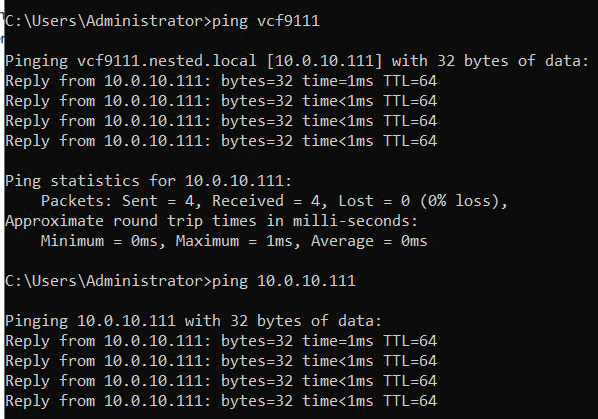
Test connectivity
From the AD server simply ping the VCF9111 host. This test ensures DNS is working properly and the LAN Segment is passing VLAN10.
From here I repeat this process for the other 2 hosts, only assigning them unique IPs.
Next up Deploying the VCF Installer with VLANs.
VMware Workstation Gen 9: Part 2 Using Workstation Templates
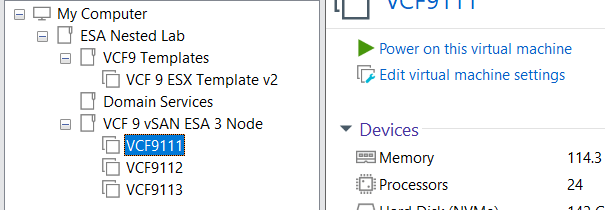
Workstation templates are a quick and easy way to create VMs with common settings. My nested VCF 9 ESX Hosts have some commonalities where they could benefit from template deployments. In this blog post I’ll show you how I use Workstation templates to quickly deploy these hosts and the hardware layout.
My nested ESX Hosts have a lot of settings. From RAM, CPU, DISK, and networking there are tons of clicks per host which is prone to mistakes. The LAN Segments as an example entail 8 clicks per network adapter. That’s 192 clicks to set up my 3 ESX hosts. Templates cover about 95% of all the settings, the only caveat is the disk deployment. Each host has a unique disk deployment which I cover below.
There are 2 things I do first before creating my VM templates. 1) I need to set up my VM folder Structure, and 2) Setup LAN Segments.
VM folder Structure
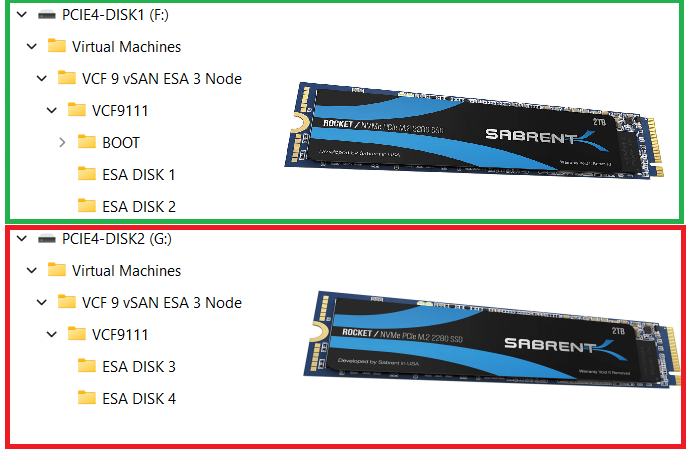
The 3 x Nested ESX hosts in my VCF 9 Cluster will be using vSAN ESA. These nested ESX Hosts will have 5 virtual NVMe disks (142GB Boot, and 4 x 860GB for vSAN). These virtual NVMe disks will be placed on to 2 physical 2TB NVMe Disks. At the physical Windows 11 layer I created folders for the 5 virtual NVMe disks on each Host. On physical disk 1 I create a BOOT, ESA DISK 1, and ESA DISK 2 folders. Then on physical disk 2 I created ESA DISK 3 and ESA DISK 4. By doing this I have found it keeps my VMs disks more organized and running efficiently. Later in this post we’ll create and position these disks into the folder.
Setup LAN Segments
Prior to creating a Workstation VM Template I need to create my LAN Segments. Workstation LAN Segments allow VLAN traffic to pass. VLANs are a requirement of VCF 9. Using any Workstation VM, choose a network adapter > LAN Segments > LAN Segments Button. The “Global LAN Segments” window appears, click on Add, name your LAN Segment, and OK when you are done.
For my use case I need to make 4 LAN Segments to support the network configuration for my VCF 9 deployment.

Pro-Tip: These are Global LAN Segments, which makes them universally available—once created, every VM can select and use them. Create these first before you create your ESX VM’s or Templates.
Create your ESX Workstation Template
To save time and create all my ESX hosts with similar settings I used a Workstation Template.
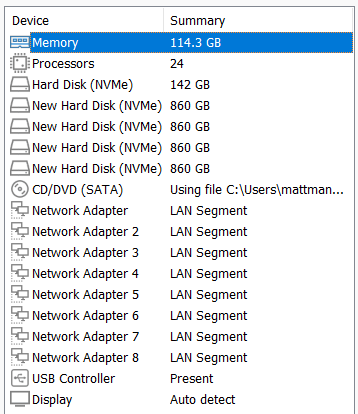
NOTE: The screenshot to the right it is the final configuration.
1) I created an ESX 9 VM in Workstation:
- Click on File > New Virtual Machine
- Chose Custom
- For Hardware I chose Workstation 25H2
- Chose my Installer disc (iso) for VCF 9
- Chose my directory and gave it a name of VCF9 ESX Template
- Chose 1 Processor with 24 Cores (Matches my underlying hardware)
- 117GB of RAM > Next
- Use NAT on the networking > Next
- Paravirtualized SCSI > Next
- NVMe for the Disk type > Next
- Create a new Virtual Disk > Next
- 142GB for Disk Size > Store as a Single File > Next
- Confirm the correct Directory > Next
- Click on the Customize Hardware button
- Add in 8 NICs > Close
- Make sure Power on this VM after creation is NOT checked > Finish
- Go back in to VM Settings and align your Network adapters to your LAN Segments
- NIC 0 and 2 > 10 VLAN Management
- NIC 3 and 4 > 11 VLAN ESA Network
- NIC 5 and 6 > 12 VLAM FT vMo RPL
- NIC 7 and 8 > 13 VLAN VM Network

Note: You might have noticed we didn’t add the vSAN disks in this deployment, we’ll create them manually below.
2) Next we’ll turn this VM into a Template
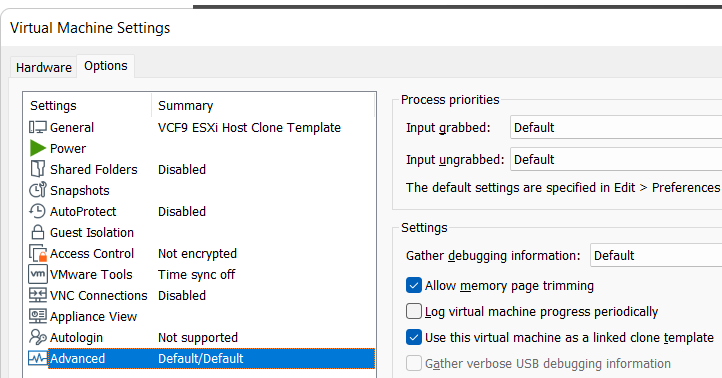
Go to VM Settings > Options > Advanced > Check Box “Use this virtual machine as a linked clone template” and click on ok.
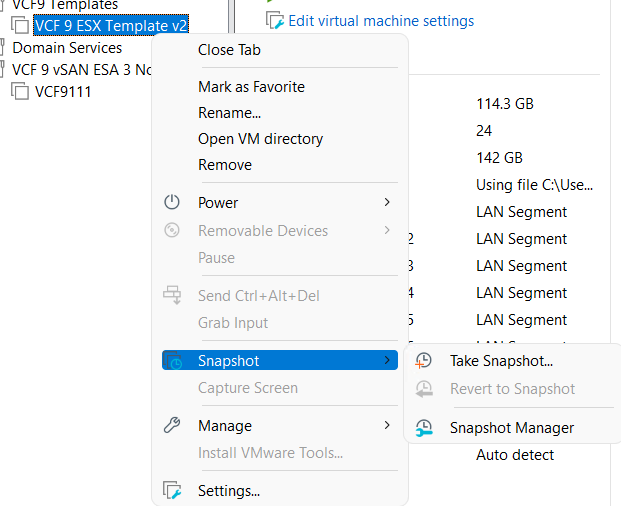
Next, make a snapshot of the VM. Right click on VM > chose Snapshot > Take Snapshot. In the description I put in “Initial hardware configuration.”
Deploy the ESX Template
I’ll need to create 3 ESX Hosts base off of the ESX template. I’ll use my template to create these VM’s, and then I’ll add in their unique hard drives.
Right click on the ESX Template > Manage > Clone
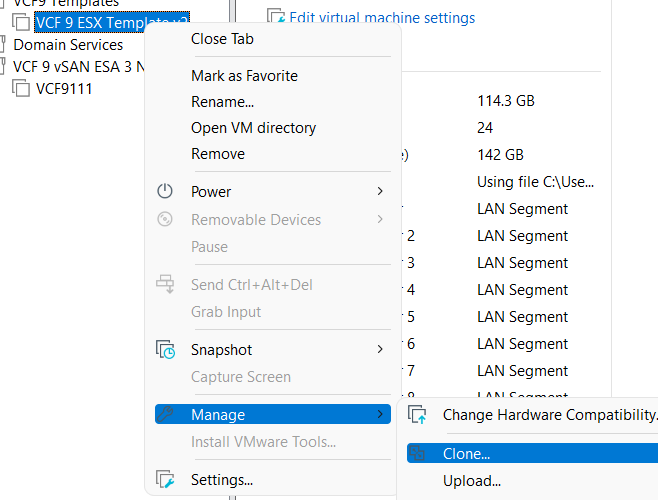
Click Next > Choose “The current state of the VM” > Choose “Create a full clone”
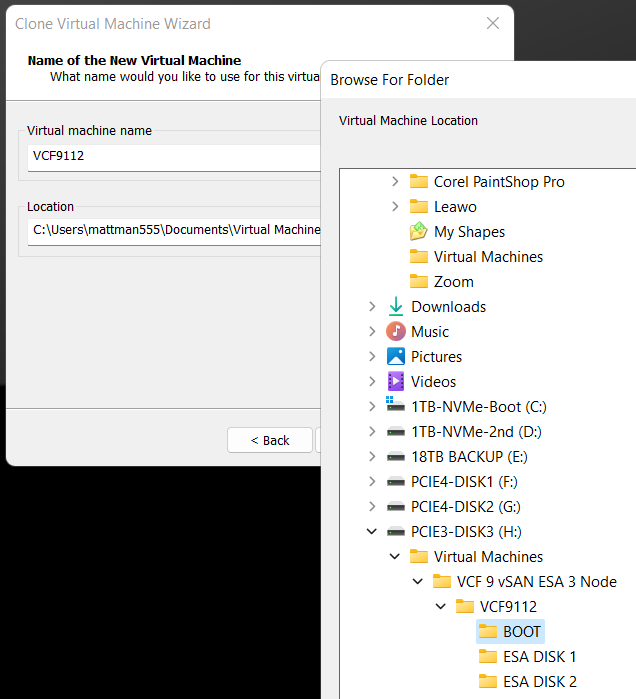
Input a name for the VM
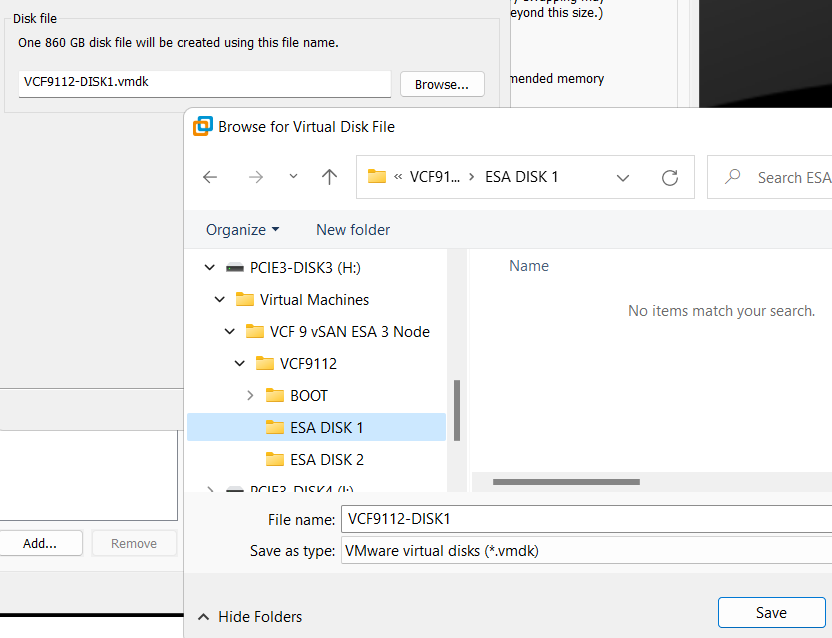
MOST Important – Make sure you select the correct disk and folder you want the boot disk to be deployed to. In the Fig-1 below, I’m deploying my second ESX host boot disk so I chose its BOOT folder.
Click on finish > The VM is created > click on close
(Fig-1)
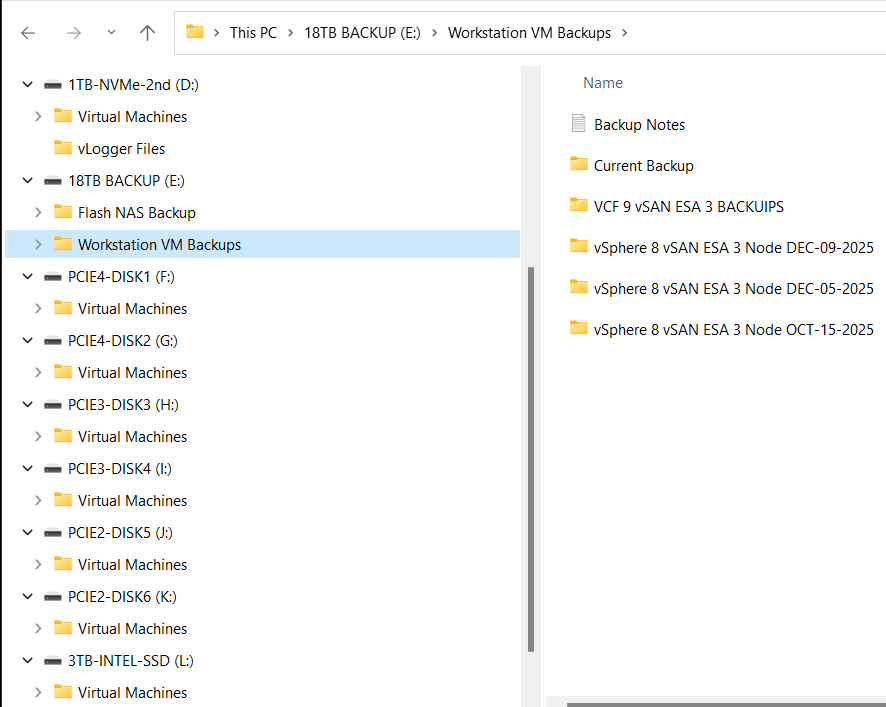
Adding the vSAN Disks
Since we are using unique vSAN disk folders and locations we need to add our disks manually.
For each nested ESX host I right click on the VM > Settings
Click on Add > chose Hard disk > Next > NVMe > Create New Virtual Disk
Type in the size (860GB) > Store as a single file > Next
Rename the disk filename to reflect the nested vSAN ESA disk number
Choose the correct folder > Save
Repeat for the next 3 disks, placing each one in the correct folder
When I’m done I created 4 x 860GB disks for each host, all as single files, and all in unique folders and designated physical disks.
(Fig-2, below) I’m creating the first vSAN ESA disk named VCF9112-DISK1.vmdk
That’s it!
Workstation Templates save me a bunch of time when creating these 3 ESX Hosts. Next we’ll cover Windows Core Services and Routing.
Backing up Workstation VMs with PowerShell
It’s pretty common for me to backup my Workstation VMs and I’m always looking for quick way to accomplish this. I’ve been using SyncBack Free for many years but most recently I’ve out grown. In this blog I’ll show you the script I wrote to backup my VM’s to a target location.
My Workstation server has many data disks with many folders for my VM’s. I backup my VM’s to a large hard disk and then regularly I’ll off load these backups to a NAS for archive purposes. This keeps the VM’s local for quick restores and the NAS provides some further protection.
My PowerShell 7 script is rather simple.
- Define my sources
- Choose a target folder
- Asks if you want to simulate a backup
- Robocopy copies or simulates a copy of the files while appending to a logfile
- Appends the folders and log file with a date stamp
It’s a pretty simple process but it works quite well.
Write-Output "`n**** Workstation VM Backups for VCF 9 vSAN ESA 3 Node *****`n"

# Define Sources
$source1 = "d:\Virtual Machines\VCF 9 vSAN ESA 3 Node"
$source2 = "f:\Virtual Machines\VCF 9 vSAN ESA 3 Node"
$source3 = "g:\Virtual Machines\VCF 9 vSAN ESA 3 Node"
$source4 = "h:\Virtual Machines\VCF 9 vSAN ESA 3 Node"
$source5 = "i:\Virtual Machines\VCF 9 vSAN ESA 3 Node"
$source6 = "j:\Virtual Machines\VCF 9 vSAN ESA 3 Node"
$source7 = "k:\Virtual Machines\VCF 9 vSAN ESA 3 Node"
$source8 = "l:\Virtual Machines\VCF 9 vSAN ESA 3 Node"
$source8 = "D:\Virtual Machines\Domain Services\DomainToolsVM - 12 05 2025"

# Function user selected destination folder
function Select-FolderDialog {
param([string]$Description="Select a EMPTY folder",
[string]$RootFolder="MyComputer")

# Load the necessary assembly
Add-Type -AssemblyName System.Windows.Forms

# Create an instance of the FolderBrowserDialog object
$objForm = New-Object System.Windows.Forms.FolderBrowserDialog
$objForm.RootFolder = $RootFolder
$objForm.Description = $Description

# Show the dialog box
$Show = $objForm.ShowDialog()

# Check if the user clicked 'OK' and return the selected path
if ($Show -eq "OK") {
return $objForm.SelectedPath
} else {
Write-Error "****Operation cancelled by user****"
pause
exit 1
}

# Clean up the object
$objForm.Dispose()
}

Write-Output "`n***** Choose Destination Folder *****"
# Prompt User for desintation folder
$selectedFolderPath = Select-FolderDialog -Description "Please choose the destination folder"
if ($selectedFolderPath) {
Write-Host "You selected: $selectedFolderPath"
# You can now use $selectedFolderPath in the rest of your script
}


Write-output "`n****Choose Robo options****"

# Robocopy options
# /E Copies subdirectories. This option automatically includes empty directories.
# /TEE Writes the status output to the console window, and to the log file.
# /ZB Restart Mode, if denied back to backup mode
# /R:# Retires
# /W:# Wait time between retires
# /J Unbuffered IO for faster large file backups
# /L Simulate backup
# https://learn.microsoft.com/en-us/windows-server/administration/windows-commands/robocopy


#To simulate backup or not
$question = "Do you want run a simulated backup? (Y/N)"
do {
$response = Read-Host -Prompt $question
# Use ToLower() for case-insensitive comparison
$response = $response.ToLower()
} until ($response -eq 'y' -or $response -eq 'n')

if ($response -eq 'y') {
Write-Host "Continuing... with Simulated Robocopy backup`n"
$robocopyoptions = $roboOptions = @("/E", "/TEE", "/ZB", "/R:2", "/W:10", "/J", "/L")


} else {
Write-Host "Continuing.... with Robocopy backup`n"
$robocopyoptions = $roboOptions = @("/E", "/TEE", "/ZB", "/R:2", "/W:10", "/J")


}


Write-Output "`n****Robocopy START****"

#Define Log loction
$logfile = $selectedFolderPath + "\WorkstationBackupLog.txt"

# Start Robocopy and append to log file
robocopy $source1 $selectedFolderPath $robocopyoptions /LOG+:$logfile
robocopy $source2 $selectedFolderPath $robocopyoptions /LOG+:$logfile
robocopy $source3 $selectedFolderPath $robocopyoptions /LOG+:$logfile
robocopy $source4 $selectedFolderPath $robocopyoptions /LOG+:$logfile
robocopy $source5 $selectedFolderPath $robocopyoptions /LOG+:$logfile
robocopy $source6 $selectedFolderPath $robocopyoptions /LOG+:$logfile
robocopy $source7 $selectedFolderPath $robocopyoptions /LOG+:$logfile
robocopy $source8 $selectedFolderPath $robocopyoptions /LOG+:$logfile
robocopy $source9 $selectedFolderPath $robocopyoptions /LOG+:$logfile

Write-Output "****Robocopy FINISH****"

Write-Output "`n****Rename Files START****"
#Rename Folders/file with date stamp
$DateStamp = Get-Date -Format "_yyyy-MM-dd"

Get-ChildItem -Path $selectedFolderPath -Directory | ForEach-Object {
# Construct the new name: original name + date stamp
$NewName = $_.Name + $DateStamp

# Rename the item (folder)
Rename-Item -Path $_.FullName -NewName $NewName
}

Get-ChildItem -Path $selectedFolderPath -File | Rename-Item -NewName {
$_.BaseName + $DateStamp + $_.Extension
}

Write-Output "****Rename Files FINISH****"

# Exit
Write-Output "`n`n****Script finished. Press Enter to exit.****"

pause
How to reset the remembered password requirements for VCSA root account
Having a home lab sometimes means using a common password to access accounts. While I wouldn’t recommend this in a production environment, it’s a fairly common approach for home lab use. One challenge with password policies is their ability to remember your previous passwords. If you prefer to reuse a common password, this can make things difficult. In this blog post, I’ll show you how to reset the remembered password requirements for the VCSA root account, allowing you to reuse your preferred passwords.
Note: the commands below were performed on VCSA 8u3. For prior versions please see the REF links below. Also, the fix uses a command common to Photon 4.0. Many VMware appliances run Photon, so there’s a good chance this fix will apply to them as well. I highly recommend doing research before applying any of my stated fixes below.
Wanna get right to the fix, then click here.
A bit of background:
First let’s look at the current expiration requirements for the root account. via SSH into the VCSA server I enter the following command >> chage -l root

From this we can see that the password is set to never expire. To do this, I followed KB 32247 and step 14 had me enter the following command to ensure the password would not expire >> chage -I -1 -m 0 -M 99999 -E -1 root

Additionally, under the VCSA Management console > Administration we can see what the current password requirements are, change the password, and change the Password expiration settings.

Next, I check to make sure it still has the remember password.
- VCSA Management GUI I try to change it to a remembered password and I get the following error.
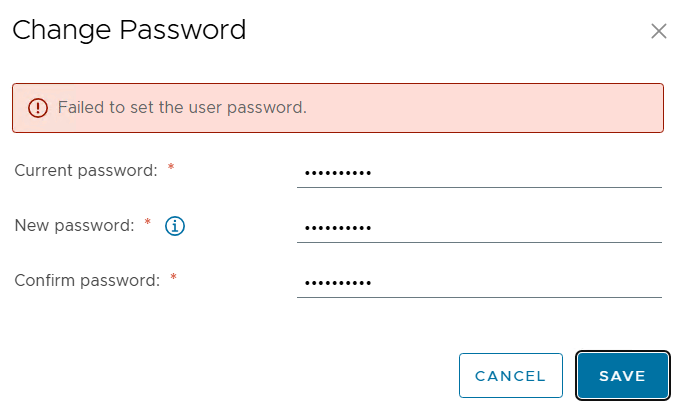
- via SSH I tried the passwd command and got the following error.

So both ways to reset the password will not allow it due to a remember password.
The Fix:
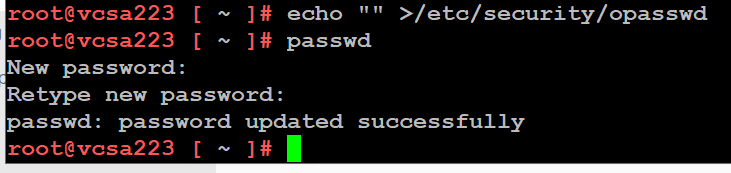
After the VCSA server has fully booted, I ssh into it and enter the echo command below. Next retry the passwd command with a previously used password and it works.
echo “” >/etc/security/opasswd then the passwd command
REF Links:
