devops
Using PowerShell to setup AV exceptions for Workstation 25H2u1 and Windows 11
Adding AV exceptions to your Workstation deployment on Windows 11 can really improve the overall performance. In this blog post I’ll share my exclusion script recently used on my environment.
NOTE: You cannot just cut, paste, and run the script below. There are parts of the script that have to be configured for the intended system.
What the script does.
- For Windows 11 users with Microsoft’s Virus & threat protection enabled this script will tell AV to not scan specific file types, folders, and processes related to VMware Workstation.
- It will ignore exceptions that already exist.
- It will display appropriate messages (Successful, or Already Exists) as it completes tasks.
What is the risk?
- Adding an exception (or exclusion) to antivirus (AV) software, while sometimes necessary for application functionality, significantly lowers the security posture of a device. The primary risk is creating a security blind spot where malicious code can be downloaded, stored, and executed without being detected.
- Use at your own risk. This code is for my personal use.
What will the code do?
It will add several exclusions listed below.
- File Type: Exclude these specific VMware file types from being scanned:
- .vmdk: Virtual machine disk files (the largest and most I/O intensive).
- .vmem: Virtual machine paging/memory files.
- .vmsn: Virtual machine snapshot files.
- .vmsd: Metadata for snapshots.
- .vmss: Suspended state files.
- .lck: Disk consistency lock files.
- .nvram: Virtual BIOS/firmware settings.
- Folder: Unique to my deployment it will exclude the following directories to prevent your antivirus from interfering with VM operations
- VMware Installation folder
- VM Storage Folders: Exclude the main directory where I store my virtual machines.
- Installation Folder: Exclude the VMware Workstation installation path ((default: C:\Program Files (x86)\VMware\VMware Workstation).
- Process:
- vmware.exe: The main Workstation interface.
- vmware-vmx.exe: The core process that actually runs each virtual machine.
- vmnat.exe: Handles virtual networking (NAT).
- vmnetdhcp.exe: Handles DHCP for virtual networks.
The Script
Under the section ‘#1. Define your exclusions ‘ is where I adapted this code to match my environment
# Check for Administrator privileges
if (-not ([Security.Principal.WindowsPrincipal][Security.Principal.WindowsIdentity]::GetCurrent()).IsInRole([Security.Principal.WindowsBuiltInRole]::Administrator)) {
Write-Warning "Please run this script as an Administrator."
break
}

# 1. Define your exclusions

# This is where you put in YOUR folder exclusions
$folders = @("C:\Program Files (x86)\VMware\VMware Workstation", "D:\Virtual Machines", "F:\Virtual Machines", "G:\Virtual Machines", "H:\Virtual Machines", "I:\Virtual Machines", "J:\Virtual Machines", "K:\Virtual Machines", "L:\Virtual Machines")

# These are the common process exclusions

$processes = @("C:\Program Files (x86)\VMware\VMware Workstation\vmware.exe", "C:\Program Files (x86)\VMware\VMware Workstation\x64\vmware-vmx.exe", "C:\Program Files (x86)\VMware\VMware Workstation\vmnat.exe", "C:\Program Files (x86)\VMware\VMware Workstation\vmnetdhcp.exe")

# These are the common extension exclusions

$extensions = @(".vmdk", ".vmem", ".vmsd", ".vmss", ".lck", ".nvram")

# Retrieve current settings once for efficiency
$currentPrefs = Get-MpPreference
Write-Host "Checking and applying Windows Defender Exclusions..." -ForegroundColor Cyan

# --- Validate and Add Folders ---
foreach ($folder in $folders) {
if ($currentPrefs.ExclusionPath -contains $folder) {
Write-Host "Note: Folder exclusion already exists, skipping: $folder" -ForegroundColor Yellow
} else {
Add-MpPreference -ExclusionPath $folder
Write-Host "Successfully added folder: $folder" -ForegroundColor Green
}
}

# --- Validate and Add Processes ---
foreach ($proc in $processes) {
if ($currentPrefs.ExclusionProcess -contains $proc) {
Write-Host "Note: Process exclusion already exists, skipping: $proc" -ForegroundColor Yellow
} else {
Add-MpPreference -ExclusionProcess $proc
Write-Host "Successfully added process: $proc" -ForegroundColor Green
}
}

# --- Validate and Add Extensions ---
foreach ($ext in $extensions) {
if ($currentPrefs.ExclusionExtension -contains $ext) {
Write-Host "Note: Extension exclusion already exists, skipping: $ext" -ForegroundColor Yellow
} else {
Add-MpPreference -ExclusionExtension $ext
Write-Host "Successfully added extension: $ext" -ForegroundColor Green
}
}

Write-Host "`nAll exclusion checks complete." -ForegroundColor Cyan
The Output
In the output below, when the script creates an item successfully it will show in green. If it detects a duplicate it will output a message in yellow. I ran the script with a .vmdk exclusion already existing to test it out.

When its complete the AV exclusions in Windows should looks similar to the partial screenshot below.
To view the exclusions, in Win 11 open ‘Virus & Threat Protection’ > Manage Settings > Under Exclusions chose ‘Add or remove exclusion’

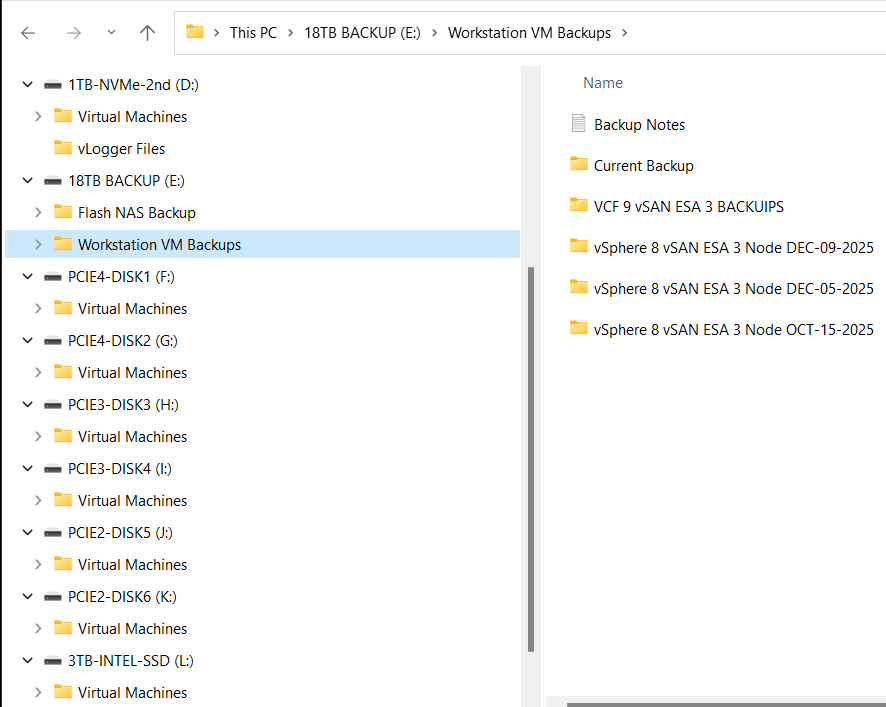
Backing up Workstation VMs with PowerShell
It’s pretty common for me to backup my Workstation VMs and I’m always looking for quick way to accomplish this. I’ve been using SyncBack Free for many years but most recently I’ve out grown. In this blog I’ll show you the script I wrote to backup my VM’s to a target location.
My Workstation server has many data disks with many folders for my VM’s. I backup my VM’s to a large hard disk and then regularly I’ll off load these backups to a NAS for archive purposes. This keeps the VM’s local for quick restores and the NAS provides some further protection.
My PowerShell 7 script is rather simple.
- Define my sources
- Choose a target folder
- Asks if you want to simulate a backup
- Robocopy copies or simulates a copy of the files while appending to a logfile
- Appends the folders and log file with a date stamp
It’s a pretty simple process but it works quite well.
Write-Output "`n**** Workstation VM Backups for VCF 9 vSAN ESA 3 Node *****`n"

# Define Sources
$source1 = "d:\Virtual Machines\VCF 9 vSAN ESA 3 Node"
$source2 = "f:\Virtual Machines\VCF 9 vSAN ESA 3 Node"
$source3 = "g:\Virtual Machines\VCF 9 vSAN ESA 3 Node"
$source4 = "h:\Virtual Machines\VCF 9 vSAN ESA 3 Node"
$source5 = "i:\Virtual Machines\VCF 9 vSAN ESA 3 Node"
$source6 = "j:\Virtual Machines\VCF 9 vSAN ESA 3 Node"
$source7 = "k:\Virtual Machines\VCF 9 vSAN ESA 3 Node"
$source8 = "l:\Virtual Machines\VCF 9 vSAN ESA 3 Node"
$source8 = "D:\Virtual Machines\Domain Services\DomainToolsVM - 12 05 2025"

# Function user selected destination folder
function Select-FolderDialog {
param([string]$Description="Select a EMPTY folder",
[string]$RootFolder="MyComputer")

# Load the necessary assembly
Add-Type -AssemblyName System.Windows.Forms

# Create an instance of the FolderBrowserDialog object
$objForm = New-Object System.Windows.Forms.FolderBrowserDialog
$objForm.RootFolder = $RootFolder
$objForm.Description = $Description

# Show the dialog box
$Show = $objForm.ShowDialog()

# Check if the user clicked 'OK' and return the selected path
if ($Show -eq "OK") {
return $objForm.SelectedPath
} else {
Write-Error "****Operation cancelled by user****"
pause
exit 1
}

# Clean up the object
$objForm.Dispose()
}

Write-Output "`n***** Choose Destination Folder *****"
# Prompt User for desintation folder
$selectedFolderPath = Select-FolderDialog -Description "Please choose the destination folder"
if ($selectedFolderPath) {
Write-Host "You selected: $selectedFolderPath"
# You can now use $selectedFolderPath in the rest of your script
}


Write-output "`n****Choose Robo options****"

# Robocopy options
# /E Copies subdirectories. This option automatically includes empty directories.
# /TEE Writes the status output to the console window, and to the log file.
# /ZB Restart Mode, if denied back to backup mode
# /R:# Retires
# /W:# Wait time between retires
# /J Unbuffered IO for faster large file backups
# /L Simulate backup
# https://learn.microsoft.com/en-us/windows-server/administration/windows-commands/robocopy


#To simulate backup or not
$question = "Do you want run a simulated backup? (Y/N)"
do {
$response = Read-Host -Prompt $question
# Use ToLower() for case-insensitive comparison
$response = $response.ToLower()
} until ($response -eq 'y' -or $response -eq 'n')

if ($response -eq 'y') {
Write-Host "Continuing... with Simulated Robocopy backup`n"
$robocopyoptions = $roboOptions = @("/E", "/TEE", "/ZB", "/R:2", "/W:10", "/J", "/L")


} else {
Write-Host "Continuing.... with Robocopy backup`n"
$robocopyoptions = $roboOptions = @("/E", "/TEE", "/ZB", "/R:2", "/W:10", "/J")


}


Write-Output "`n****Robocopy START****"

#Define Log loction
$logfile = $selectedFolderPath + "\WorkstationBackupLog.txt"

# Start Robocopy and append to log file
robocopy $source1 $selectedFolderPath $robocopyoptions /LOG+:$logfile
robocopy $source2 $selectedFolderPath $robocopyoptions /LOG+:$logfile
robocopy $source3 $selectedFolderPath $robocopyoptions /LOG+:$logfile
robocopy $source4 $selectedFolderPath $robocopyoptions /LOG+:$logfile
robocopy $source5 $selectedFolderPath $robocopyoptions /LOG+:$logfile
robocopy $source6 $selectedFolderPath $robocopyoptions /LOG+:$logfile
robocopy $source7 $selectedFolderPath $robocopyoptions /LOG+:$logfile
robocopy $source8 $selectedFolderPath $robocopyoptions /LOG+:$logfile
robocopy $source9 $selectedFolderPath $robocopyoptions /LOG+:$logfile

Write-Output "****Robocopy FINISH****"

Write-Output "`n****Rename Files START****"
#Rename Folders/file with date stamp
$DateStamp = Get-Date -Format "_yyyy-MM-dd"

Get-ChildItem -Path $selectedFolderPath -Directory | ForEach-Object {
# Construct the new name: original name + date stamp
$NewName = $_.Name + $DateStamp

# Rename the item (folder)
Rename-Item -Path $_.FullName -NewName $NewName
}

Get-ChildItem -Path $selectedFolderPath -File | Rename-Item -NewName {
$_.BaseName + $DateStamp + $_.Extension
}

Write-Output "****Rename Files FINISH****"

# Exit
Write-Output "`n`n****Script finished. Press Enter to exit.****"

pause
How to reset the remembered password requirements for VCSA root account
Having a home lab sometimes means using a common password to access accounts. While I wouldn’t recommend this in a production environment, it’s a fairly common approach for home lab use. One challenge with password policies is their ability to remember your previous passwords. If you prefer to reuse a common password, this can make things difficult. In this blog post, I’ll show you how to reset the remembered password requirements for the VCSA root account, allowing you to reuse your preferred passwords.
Note: the commands below were performed on VCSA 8u3. For prior versions please see the REF links below. Also, the fix uses a command common to Photon 4.0. Many VMware appliances run Photon, so there’s a good chance this fix will apply to them as well. I highly recommend doing research before applying any of my stated fixes below.
Wanna get right to the fix, then click here.
A bit of background:
First let’s look at the current expiration requirements for the root account. via SSH into the VCSA server I enter the following command >> chage -l root

From this we can see that the password is set to never expire. To do this, I followed KB 32247 and step 14 had me enter the following command to ensure the password would not expire >> chage -I -1 -m 0 -M 99999 -E -1 root

Additionally, under the VCSA Management console > Administration we can see what the current password requirements are, change the password, and change the Password expiration settings.

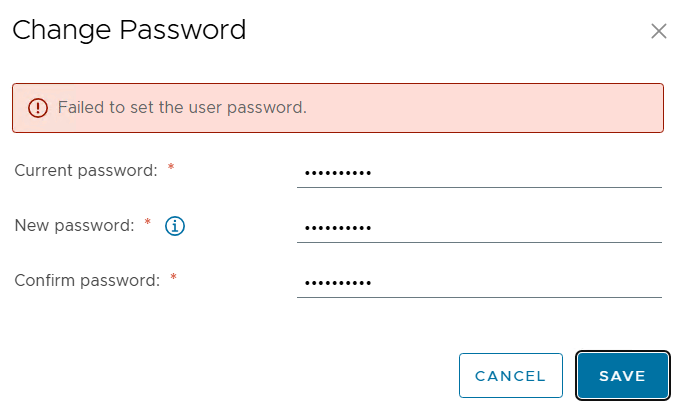
Next, I check to make sure it still has the remember password.
- VCSA Management GUI I try to change it to a remembered password and I get the following error.
- via SSH I tried the passwd command and got the following error.

So both ways to reset the password will not allow it due to a remember password.
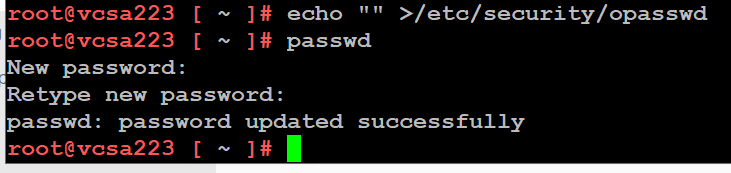
The Fix:
After the VCSA server has fully booted, I ssh into it and enter the echo command below. Next retry the passwd command with a previously used password and it works.
echo “” >/etc/security/opasswd then the passwd command
REF Links:
