vmware
4 Books in 4 Weeks
Over the next month or so I plan to read 4 technical books and write up a review / cliff notes. I choose the books below based on current needs as a VMware Senior Engineer. However one was chosen as a personal goal (okay its unfinished business). Another reason for reading (except the obvious – staying current) is the training budget over the past years has been non-existent and I felt it was time for me to move my education forward by reading up.
Here are the FANTASTIC 4 –
Book 1 Storage Area for Dummies (2003) 380 pages by Christopher Poelker and Alex Nikitin (both of Hitachi Data Systems) – Okay this is the unfinished business I was talking about. Back in 2004 I got my first vmware position. I was asked to help re-design and deploy a failing nationwide project based on VMware 2.5. Back then we were using a pair of DL380s with 8GB of RAM connected to an EMC SAN. I had a pretty good idea about SANs but I needed a general guide hence this book. I read the first hundred pages and feel off track. However the project went on and was a big success.
Book 2 VMware ESX and ESXi in the Enterprise 2nd Edition 541 pages by Edward Halekty – I read VMware ESX Server (3.X) in the Enterprise in late 2007 and I must say it was one of the better books of its time. This is why I choose to read the updated version covering ESXi and vSphere.
Book 3 VMware vSphere 4.1 HA and DRS Technical Deepdive 215 Pages by Duncan Epping and Frank Dennerman – If you are in certain VMware social circles (Twitter) you know this is one of the “must” read books of its time. Though currently they are writing an update to it I felt it best to read the original. My hopes are to get a better understating of HA and DRS for some upcoming challenges I’m facing at work.
Book 4 VMware vSphere Design 340 Pages by Forbes Guthrie, Maish Saidel-kessing and Scott Lowe – Of these authors I have meet fellow vExpert Scott Lowe and I must say he’s the nicest person you could ever meet. Not only does he author many books, work a full time job, donate his time/talents to VMUGs but he’s also a father too. By reading this book I hope to gain a better understanding of design processes around vSphere.
So those are the 4 books I plan to read…. Wish me luck I’m off to start reading Book 1 Storage Area for Dummies!
The future is only ESXi
Here is a great document that I found on ESXi, good reference…
http://communities.vmware.com/docs/DOC-11113
ESXi vs Full ESX VERSION 14  Created on: Oct 31, 2009 3:07 AM by AndreTheGiant – Last Modified: Jul 25, 2010 12:50 AM by AndreTheGiant
The future is only ESXi
With the new release of vSphere 4.1 there are some changes and news:
- the terminology as changed and now ESXi is ESXi Hypervisor Architecture
- the “old” ESX (or full ESX or legacy ESX or ESX with the service console) is available in the last release, from next version ONLY ESXi will be available.
VMware suggest to migrate to ESXi, the preferred hypervisor architecture from VMware. ESXi is recommended for all deployments of the new vSphere 4.1 release. For planning purposes, it is important to know that vSphere 4.1 is the last vSphere release to support both ESX and ESXi hypervisor architectures; all future releases of vSphere will only support the ESXi architecture.
On how to migrate see: http://www.vmware.com/products/vsphere/esxi-and-esx/
–
ESX vs ESXi
ESX and ESXi official comparison:
http://kb.vmware.com/kb/1006543 – VMware ESX and ESXi 3.5 Comparison
http://kb.vmware.com/kb/1015000 – VMware ESX and ESXi 4.0 Comparison
Probably the big difference is that ESXi has a POSIX Management Appliance that runs within the vmkernel and ESX has a GNU/Linux Management Appliance that runs within a VM.
ESX vs. ESXi which is better?
http://communities.vmware.com/blogs/vmmeup/2009/04/07/esx-vs-esxi-which-is-better
Dilemma: buy vSphere with ESXi4 or with ESX4?
http://www.vknowledge.nl/2009/01/15/to-esxi-or-not-to-esxi-thats-the-question/
ESXi vs. ESX: A comparison of features
http://blogs.vmware.com/esxi/2009/06/esxi-vs-esx-a-comparison-of-features.html
Note that HCL can be differed from ESX and ESXi:
ESX vs ESXi on the HCL
–
ESXi limitations
- No official interactive console (there is only a “unsupported” hidden console: http://www.virtualizationadmin.com/articles-tutorials/vmware-esx-articles/general/how-to-access-the-vmware-esxi-hidden-console.html) – With 4.1 the Tech mode support is now fully supported
- ESXi 4.0 has no official supported SSH access (there is only a “unsupported” access: http://www.yellow-bricks.com/2008/08/10/howto-esxi-and-ssh/) – Changed in 4.1, where SSH is a service
- No /etc/ssh/sshd_config file for SSH non-root access (but is still possible: http://www.yellow-bricks.com/2008/08/14/esxi-ssh-and-non-root-users/)
- No support for some 3th part backup programs (see also Backup solutions for VMware ESXi) – Resolved with “last” version of those programs
- No support for some 3th part programs
- ESXi 4.0 hasn’t Active Directory authentication for “local” user – Implemented in 4.1
- No full crontab for schedule jobs and scripts locally (but there is a root crontab in /var/spool/cron/crontabs/root)
- No hot-add feature for virtual disk in ESXi 4.0, but only on ESXi 3.5 (or also on ESXi Advanced with hot-add license) – resolved with first updates
- No SNMP “get” polling”
- No virtual Serial or Parallel port
- No USB disk in the “console”
- No support for mount ext2/ext3/ntfs/cifs filesystem in the console
- No fully functional esxtop
- No fully functional esxcfg-mpath
- No vscsiStats tool
- ESXi 4.0 has only experimental support for boot from SAN – Resolved with 4.1
- ESXi 4.0 has limited PXE install or scriptable installation (but seems that there is a solution: http://www.vmware.com/pdf/vsp_4_pxe_boot_esxi.pdf and http://www.mikedipetrillo.com/mikedvirtualization/2008/11/howto-pxe-boot-esxi.html) – Resolved with ESXi 4.1
- Normally with a standalone ESXi host you’ll get 1 hour of performance data, the graph should be set to reset every 20 seconds (you can also extend the performance data to 36 hours will a simple hack – http://www.vm-help.com/esx/esx3i/extending_performance_data.php)
–
Free ESXi (or VMware vSphere Hypervisor 4.1) limitations
- ESXi 4.x free can not be connected to a vCenter Center (it required a VC agent license)
- VCB does not work (it require a VCB license)
- Lot of 3th part backup programs does not work with free ESXi (see also: Backup solutions for VMware ESXi)
- RCLI and VMware Infrastructure toolkit are limited to read-only access for ESXi free
- Free ESXi does not support SNMP
- Free ESXi does not support Active Directory integration at this time
- Free ESXi does not support Jumbo Frame – http://kb.vmware.com/kb/1012454
- Free ESXi EULA has some interesting restrictions including enforced read only mode for v4 and later versions of v3.5.
See also: What’s the difference between free ESXi and licensed ESXi?
VMware ESX/ESXi EULA – http://www.vmware.com/download/eula/esx_esxi_eula.html
Re: EULA restrictions for free ESXi 4
–
ESXi advantages
- Fast to install / reinstall
- Can be installed on a SD flash card or USB key (there is also an embedded version that is pre-installed) – ESXi installation – Flash memory vs Hard disk
- Easy to configure (there is a simple configuration menu)
- Small footprint = fast and easy to patch + (maybe) more secure
- Extremely thin = fast installation + faster boot
- Does not use a vmdk for console filesystems (as ESX 4.0 does)
- There is a tool for dump ESXi configuration
- Near to be “plug and play” (for example with the embedded version and the Host Profile feature)
VM Check Alignment Tool
**Update 09/2016 — This 2011 version of the alignment tool wasn’t quite accurate, it was solely based sector alignment for EMC storage and I believe the author made several adjustments based on user feedback and comments. The current version seems to do a better job, but you don’t need any tools to check alignment just read this blog I wrote as it’s so simple to check **
Original Post below —
A work colleague led me to this program the other day.
This tool couldn’t be simpler to use. Download the EXE, place it on our VM and Click Check Alignment.
It’s a real quick way to ensure your aligned…
TIP: Don’t assume Windows 2008 is aligned out of the box, as you can see here this VM needs to be aligned… It’s out of alignment because of the deployment/unified server image process used to push the OS to the VM. READ this blog for more information
2008 R2

2003

Unforutnally, this tool is no longer availible for download.
Staying Current with VMware Technology
One of the common question I’m asked is- How do I stay current with virtualization technology
The answer is – Staying current takes time and work. Here are my Tips for staying current…
1. Join your Local User Group, show up, and get to know “Who are the People in your Neighborhood”
- In Phoenix we have one of the best VMware Users group in the world. 800+ Strong and they come from all over the state
- There are MANY vendors from all types of technologies (Storage, Backups, Networking, Server hardware, etc)
- User and Vendors alike present information in a Technical Fashion
- Phoenix VMUG regional meeting draws about ~300 Attendees from all types of industry
- Use these meetings to find out Who’s Who in the virtualization community and then starting asking LOTS of questions
2. Blog Sites – Read these sites frequently…
- Duncan Epping’s Blog – Yellow Bricks – http://www.yellow-bricks.com/ << TOP Rated VMware Blog
- Vaughan Stewart – The Virtual Storage Guy — http://blogs.netapp.com/virtualstorageguy/ << Mr. Vmware for NetApp
- Chad Sakac’s Blog – Virtual Geek – http://virtualgeek.typepad.com/virtual_geek/ <<< Mr. VMware for EMC (Has an army called Chad Army)
- Gabe Van Zanten’s Blog – Gabe’s Virtual World – http://www.gabesvirtualworld.com/
- Mike Laverick’s Blog – RTFM Ed. – http://www.rtfm-ed.co.uk/
- Scott Lowe’s Blog – ScottLowe.org – http://blog.scottlowe.org/ << Great author of many books and an EMC vSpecialist
- Jason Boche – Vmware Virtualization Evangelist – http://www.boche.net/blog/ << Old VMUG Minneapolis Leader, now works for Dell
- Local guy(Arizona) – Adam Baum – http://itvirtuality.wordpress.com/ <<< works for VCE and knows Cisco UCS
3. RSS Feeds
- Setup RSS Feeds to your Favorite Blogs sites – AND read them – Put your Smart Phone to use…
- VMWare has done a great job with Planetv12n. It is a blog consolidation of top bloggers
4. PodCasts
- John Troyer with VMware has done a great job putting together a weekly podcast around VMware based topics — http://www.talkshoe.com/talkshoe/web/talkCast.jsp?masterId=19367
- One thing I like about TalkShoe is all the previous pod casts are there for you to review.
5. LinkedIN
- Join a group, build your network, and start communicating
- This is a great way to track those people you meet
6. Twitter
- Twitter Really? Yes Really…. Companies like VMware use twitter to get information out to customers
- Find your favorite companies, find out their twitter feeds and follow them.
- If used properly Twitter is a great resource for valuable information
7. YouTube
- YouTube Really? Yes Really… Like Twitter YouTube is a great resource for quality information.
- Do simple searches for information or product, you’ll be surpised how much information you’ll find
- Companies like VMware have specific YouTube Channels and they frequently post Product and How To information
Here is my last link… This link contains most of the VMware Bloggers, Twitter Accounts, and RSS feeds in one spot.. http://vlp.vsphere-land.com/ << Priceless
All of this might seem a bit overbearing, and it can be at first. My recommendation is — start out small, read a few blogs, view some online content, ask questions, and repeat..
Before you know it you’ll be on the right track to staying current with virtualization.
What are some of the ways you stay current? Please post up!
Slow Windows 2008 VM Video Performance when viewing through an ESX console
Today one of my colleagues mentioned he was experiencing poor video performance with a windows 2008 VM. When he accessed the VM via vCenter Server Console the mouse was performing poorly..
We did a bit of research and found the article below… it fixed our issue in a jiffy..
Note: This post/notes are simply for my reference and I don’t recommend you apply this to your environment…
Troubleshooting SVGA drivers installed with VMware Tools on Windows 7 and Windows 2008 R2 running on ESX 4.0
Details
- You receive a black screen on the virtual machine when using Windows 7 or Windows 2008 R2 as a guest operating system on ESX 4.0.
- You experience slow mouse performance on Windows 2008 R2 virtual machine.
Solution
This issue can occur due to the XPDM (SVGA) driver provided with VMware Tools. This is a legacy Windows driver and is not supported on Windows 7 and Windows 2008 R2 guest operating systems.
To workaround this issue, replace the Display Adapter default-installed driver within the virtual machine with the driver contained in the wddm_video folder. In vCenter Server 4.1 (for Windows 2008 R2 operating systems), the wddm_video folder is in C:\Program Files\Common Files\VMware\Drivers.
To move a copy of this driver from the vCenter Server to the virtual machine:
- Open a command line share to the vCenter Server from the virtual machine:
c$ share
- Navigate to C:\Program Files\Common Files\VMware\Drivers and copy the driver to a location on the virtual machine (C:\, for example).
- Within the virtual machine, right-click Computer > Manage > Diagnostics > Device Manager, then expand the Display Adapters selection.
- Right-click the Driver that is currently installed and choose Update Driver Software. Browse to the folder that you copied from vCenter Server, select it, then follow the wizard.
- When the wizard completes, reboot the virtual machine.
To resolve this issue, update to ESX 4.0 Update 1. A new WDDM driver is installed with the updated VMware Tools and is compatible with Windows 7 and Windows 2008 R2.
If you are able to update to ESX 4.0 Update 1, but receive a black screen on the virtual machine after changing to the new driver, click Edit Settings and change the video settings to 32MB.
If you cannot update to ESX 4.0 Update 1:
- Deselect the driver included with ESX 4.0.
- When you install VMware Tools, select Custom or Modify in the VMware Tools installation wizard
- Deselect the SVGA (XPDM) driver.
You can also remove the VMware Tools SVGA driver from the Device Manager after installing VMware Tools.
Note: To install the drivers successfully, ensure that the virtual machine hardware version is 7.
Test Lab – Day 5 Expanding the IOMega ix12-300r
Recently I installed an IOMega ix12-300r for our ESX test lab and it’s doing quite will
However I wanted to push our Iomega to about 1Gbs of sustained NFS traffic of the available 2Gbs.
To do this I needed to expand our 2 drive storage pool to 4 drives.
From a previous post we created 3 storage pools as seen below.
Storage Pool 0 (SP0) 4 Drives for basic file shares (CIFS)
Storage Pool 1 (SP1_NFS) 2 drives for ESX NFS Shares only
Storage Pool 2 (SP2_iSCSI) 2 drives dedicated for ESX iSCSI only
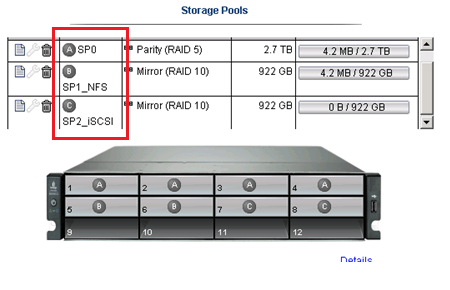
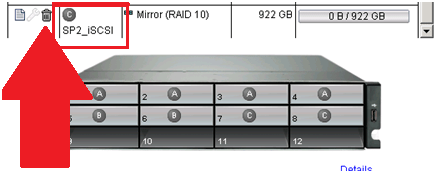
In this post I’m going to delete the unused SP2_iSCSI and add those drives to SP1_NFS
Note: This procedure is simply the pattern I used in my environment. I’m not stating this is the right way but simply the way it was done. I don’t recommend you use this pattern or use it for any type of validation. These are simply my notes, for my personal records, and nothing more.
Under settings select storage pools

Select the Trash Can to delete the storage pools..
It prompted me to confirm and it deleted the storage pool.
Next I choose the Edit icon on SP2_NFS, selected the drives I wanted, choose RAID 5, and pressed apply.

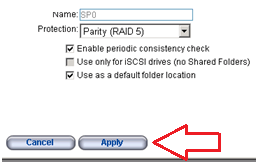
From there it started to expand the 2 disk RAID1 to a 4 disk RAID5 storage pool..
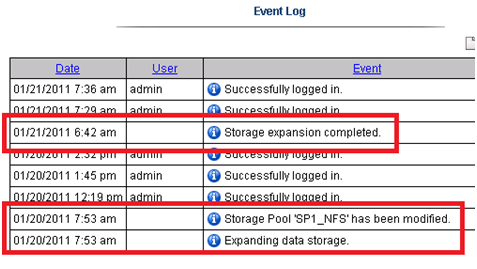
Screenshot from the IOMega ix12 while it is being expanded…

I then went to the Dashboard and under status I can view its progress…

ALL this with NO Down time to ESX, in fact I’m writing this post from a VM at the expansion is happening.
It took about 11 Hours to rebuild the RAID set.
Tip: Use the event log under settings to determine how long the rebuild took.
The next day I checked in on ESX and it was reporting the updated store size.

Summary…
To be able to expand your storage pool that houses your ESXi test environment with no down time is extremely beneficial and a very cool feature.
Once again IOMega is living up to its tag line – IOmega Kicks NAS!
Tomorrow we’ll see how it performs when we push a higher load to it.
Test Lab – Day 4 Xsigo Redundancy testing with ESXi
Today I tested Xsigo redundancy capabilities within the ESXi test environment.
So far I have built up an environment with 4 x ESXi 4.1 hosts, each with a Single VM, and 2 Xsigo VP780’s.
Each VM is pretty much idle for this test, however tomorrow I plan to introduce some heavier IP and NFS traffic and re-run the tests below.
I used a Laptop and the ESXi console in tech support mode to capture the results.
Keep in mind this deployment is a SINGLE site scenario.
This means both Xsigo are considered at the same site and each ESXi host is connected to the A & B Xsigo.

Note: This test procedure is simply the pattern I used to test my environment. I’m not stating this is the right way to test an environment but simply the way it was done. I don’t recommend you use this pattern to test your systems or use it for validation. These are simply my notes, for my personal records, and nothing more.
Reminder:
XNA, XNB are Xsigo Network on Xsigo Device A or B and are meant for IP Network Traffic.
XSA, XSB are Xsigo Storage or NFS on Xsigo Device A or B and are meant for NFS Data Traffic.
Test 1 – LIVE I/O Card Replacement for Bay 10 for IP Networking
Summary –
Xsigo A sent a message to Xsigo support stating the I/O Module had an issue. Xsigo support contacted me and mailed out the replacement module.
The affected module controls the IP network traffic (VM, Management, vMotion).
Usually, an I/O Module going out is bad news. However, this is a POC (Proof of Concept) so I used this “blip” to our advantage and captured the test results.
Device – Xsigo A
Is the module to be affected currently active? Yes
Pre-Procedure –
Validate by Xsigo CLI – ‘show vnics’ to see if vnics are in the up state – OKAY
Ensure ESX Hosts vNICs are in Active mode and not standby – OKAY
Ensure ESX Hosts network configuration is setup for XNA and XNB in Active Mode – OKAY
Procedure –
Follow replacement procedure supplied with I/O Replacement Module
Basic Steps supplied by Xsigo –
- Press the Eject button for 5 seconds to gracefully shut down the I/O card
- Wait LED to go solid blue
- Remove card
- Insert new card
-
Wait for I/O card to come online LED will go from Blue to Yellow/Green
- The Xsigo VP780 will update card as needed Firmware & attached vNIC’s
- Once the card is online your ready to go
Expected results –
All active IP traffic for ESXi (including VM’s) will continue to pass through XNB
All active IP traffic for ESXi (including VM’s) might see a quick drop depending on which XN# is active
vCenter Server should show XNA as unavailable until new I/O Module is online
The I/O Module should take about 5 Minutes to come online
How I will quantify results –
All active IP traffic for ESXi (including VM’s) will continue to pass through XNB
- Active PING to ESXi Host (Management Network, VM’s) and other devices to ensure they stay up
All active IP traffic for ESXi (including VM’s) might see a quick drop depending on which XN# is active
- Active PING to ESXi Host (Management Network, VM’s)
vCenter Server should show XNA as unavailable until new I/O Module is online
- In vCenter Server under Network Configuration check to see if XNA goes down and back to active
The I/O Module should take about 5 Minutes to come online
- I will monitor the I/O Module to see how long it takes to come online
Actual Results –
Pings –
| From Device | Destination Device | Type | Result During | Result coming online / After |
| External Laptop | Windows 7 VM | VM | No Ping Loss | No Ping Loss |
| External Laptop | vCenter Server | VM | One Ping Loss | No Ping Loss |
| External Laptop | ESX Host 1 | ESX | One Ping Loss | One Ping Loss |
| External Laptop | ESX Host 2 | ESX | One Ping Loss | One Ping Loss |
| External Laptop | ESX Host 3 | ESX |
No Loss |
One Ping Loss |
| External Laptop | ESX Host 4 | ESX | No Loss | No Loss |
| ESX Host | IOMega Storage | NFS | No Loss | No Loss |
From vCenter Server –
XNA status showing down during module removal on all ESX Hosts
vCenter Server triggered the ‘Network uplink redundancy lost’ – Alarm
I/O Module Online –
The I/O Module took about 4 minutes to come online.
Test 1 Summary –
All results are as expected. There was only very minor ping loss, which for us is nothing to be worried about
Test 2 – Remove fibre 10gig Links on Bay 10 for IP Networking
Summary –
This test will simulate fibre connectivity going down for the IP network traffic.
I will simulate the outage by disconnecting the fibre connection from Xsigo A, measure/record the results, return the environment to normal, and then repeat for Xsigo B.
Device – Xsigo A and B
Is this device currently active? Yes
Pre-Procedure –
Validate by Xsigo CLI – ‘show vnics’ to see if vnics are in up state
- Xsigo A and B are reporting both I/O Modules are functional
Ensure ESX Host vNICs are in Active mode and not standby
- vCenter server is reporting all communication is normal
Procedure –
Remove the fibre connection from I/O Module in Bay 10 – Xsigo A
Measure results via Ping and vCenter Server
Replace the cable, ensure system is stable, and repeat for Xsigo B device
Expected results –
All active IP traffic for ESXi (including VM’s) will continue to pass through the redundant XN# adapter
All active IP traffic for ESXi (including VM’s) might see a quick drop if it’s traffic is flowing through the affected adapter.
vCenter Server should show XN# as unavailable until fibre is reconnected
How I will quantify results –
All active IP traffic for ESXi (including VM’s) will continue to pass through XNB
- Using PING the ESXi Hosts (Management Network, VM’s) and other devices to ensure they stay up
All active IP traffic for ESXi (including VM’s) might see a quick drop depending on which XN# is active
- Active PING to ESXi Host (Management Network, VM’s)
vCenter Server should show XNA as unavailable until new I/O Module is online
- In vCenter Server under Network Configuration check to see if XNA goes down and back to active
Actual Results –
Xsigo A Results…
Pings –
| From Device | Destination Device | Type | Result During | Result coming online / After |
| External Laptop | Windows 7 VM | VM | No Ping Loss | No Ping Loss |
| External Laptop | vCenter Server | VM | No Ping Loss | One Ping Loss |
| External Laptop | ESX Host 1 | ESX | One Ping Loss | No Ping Loss |
| External Laptop | ESX Host 2 | ESX | No Ping Loss | One Ping Loss |
| External Laptop | ESX Host 3 | ESX |
No Ping Loss |
One Ping Loss |
| External Laptop | ESX Host 4 | ESX | One Ping Loss | One Ping Loss |
| ESX Host | IOMega Storage | NFS | No Ping Loss | No Ping Loss |
From vCenter Server –
XNA status showing down during module removal on all ESX Hosts
vCenter Server triggered the ‘Network uplink redundancy lost’ – Alarm
Xsigo B Results…
Pings –
| From Device | Destination Device | Type | Result During | Result coming on line / After |
| External Laptop | Windows 7 VM | VM | One Ping Loss | One Ping Loss |
| External Laptop | vCenter Server | VM | No Ping Loss | No Ping Loss |
| External Laptop | ESX Host 1 | ESX | No Ping Loss | No Ping Loss |
| External Laptop | ESX Host 2 | ESX | No Ping Loss | No Ping Loss |
| External Laptop | ESX Host 3 | ESX |
No Ping Loss |
No Ping Loss |
| External Laptop | ESX Host 4 | ESX | No Ping Loss | One Ping Loss |
| ESX Host | IOMega Storage | NFS | No Ping Loss | No Ping Loss |
From vCenter Server –
XNB status showing down during module removal on all ESX Hosts
vCenter Server triggered the ‘Network up link redundancy lost’ – Alarm
Test 2 Summary –
All results are as expected. There was only very minor ping loss, which for us is nothing to be worried about
Test 3 – Remove fibre 10g Links to NFS
Summary –
This test will simulate fibre connectivity going down for the NFS network.
I will simulate the outage by disconnecting the fibre connection from Xsigo A, measure/record the results, return the environment to normal, and then repeat for Xsigo B.
Device – Xsigo A and B
Is this device currently active? Yes
Pre-Procedure –
Validate by Xsigo CLI – ‘show vnics’ to see if vnics are in up state
- Xsigo A and B are reporting both I/O Modules are functional
Ensure ESX Host vNICs are in Active mode and not standby
- vCenter server is reporting all communication is normal
Procedure –
Remove the fibre connection from I/O Module in Bay 11 – Xsigo A
Measure results via Ping, vCenter Server, and check for any VM GUI hesitation.
Replace the cable, ensure system is stable, and repeat for Xsigo B device
Expected results –
All active NFS traffic for ESXi (including VM’s) will continue to pass through the redundant XS# adapter
All active NFS traffic for ESXi (including VM’s) might see a quick drop if it’s traffic is flowing through the affected adapter.
vCenter Server should show XS# as unavailable until fibre is reconnected
I don’t expect for ESXi to take any of the NFS datastores off line
How I will quantify results –
All active NFS traffic for ESXi (including VM’s) will continue to pass through XSB
- Active PING to ESXi Host (Management Network, VM’s) and other devices to ensure they stay up
All active NFS traffic for ESXi (including VM’s) might see a quick drop depending on which XN# is active
- Active PING to ESXi Host (Storage, Management Network, VM’s)
vCenter Server should show XS# as unavailable until fibre is reconnected
- In vCenter Server under Network Configuration check to see if XS# goes down and back to active
I don’t expect for ESXi to take any of the NFS datastores offline
- In vCenter Server under storage, I will determine if the store goes offline
Actual Results –
Xsigo A Results…
Pings –
| From Device | Destination Device | Type | Result During | Result coming online / After |
| External Laptop | Windows 7 VM | VM | No Ping Loss | No Ping Loss |
| External Laptop | vCenter Server | VM | No Ping Loss | No Ping Loss |
| External Laptop | ESX Host 1 | ESX | No Ping Loss | No Ping Loss |
| External Laptop | ESX Host 2 | ESX | No Ping Loss | No Ping Loss |
| External Laptop | ESX Host 3 | ESX |
No Ping Loss |
No Ping Loss |
| External Laptop | ESX Host 4 | ESX | No Ping Loss | No Ping Loss |
| ESX Host | IOMega Storage | NFS | No Ping Loss | Two Ping Loss |
From vCenter Server –
XSA & XSB status showing down during fibre removal on all ESX Hosts
vCenter Server triggered the ‘Network uplink redundancy lost’ – Alarm
No VM GUI Hesitation reported
Xsigo B Results…
Pings –
| From Device | Destination Device | Type | Result During | Result coming online / After |
| External Laptop | Windows 7 VM | VM | No Ping Loss | No Ping Loss |
| External Laptop | vCenter Server | VM | No Ping Loss | No Ping Loss |
| External Laptop | ESX Host 1 | ESX | No Ping Loss | No Ping Loss |
| External Laptop | ESX Host 2 | ESX | No Ping Loss | No Ping Loss |
| External Laptop | ESX Host 3 | ESX |
No Ping Loss |
No Ping Loss |
| External Laptop | ESX Host 4 | ESX | No Ping Loss | No Ping Loss |
| ESX Host | IOMega Storage | NFS | No Ping Loss | No Ping Loss |
From vCenter Server –
XNB status showing down during module removal on all ESX Hosts
vCenter Server triggered the ‘Network up link redundancy lost’ – Alarm
No VM GUI Hesitation reported
Test 3 Summary –
All results are as expected. There was only very minor ping loss, which for us is nothing to be worried about
Test 4 – Remove Infiniband cables from the ESXi HBA.
Summary –
During this test, I will remove all the Infiniband cables (4 of them) from the ESXi HBA.
I will disconnect the Infiniband connection to Xsigo A first, measure/record the results, return the environment to normal, and then repeat for Xsigo B.
Pre-Procedure –
Validate by Xsigo CLI – ‘show vnics’ to see if vnics are in upstate
- Xsigo A and B are reporting both I/O Modules are functional
Ensure ESX Host vNICs are in Active mode and not standby
- vCenter server is reporting all communication is normal
Procedure –
Remove the InfiniBand cable from each ESXi Host attaching to Xsigo A
Measure results via Ping, vCenter Server, and check for any VM GUI hesitation.
Replace the cables, ensure system is stable, and repeat for Xsigo B device
Expected results –
ALL active traffic (IP or NFS) for ESXi (including VM’s) will continue to pass through the redundant XNB or XSB accordingly.
All active traffic (IP or NFS) for ESXi (including VM’s) might see a quick drop if it’s traffic is flowing through the affected adapter.
vCenter Server should show XNA and XSA as unavailable until cable is reconnected
I don’t expect for ESXi to take any of the NFS datastores offline
How I will quantify results –
ALL active traffic (IP or NFS) for ESXi (including VM’s) will continue to pass through the redundant XNB or XSB accordingly.
- Active PING to ESXi Host (Management Network, VM’s) and other devices to ensure they stay up
All active traffic (IP or NFS) for ESXi (including VM’s) might see a quick drop if it’s traffic is flowing through the affected adapter.
- Active PING to ESXi Host (Storage, Management Network, VM’s)
vCenter Server should show XNA and XSA as unavailable until cable is reconnected
- In vCenter Server under Network Configuration check to see if XS# goes down and back to active
I don’t expect for ESXi to take any of the NFS datastores offline
- In vCenter Server under storage, I will determine if the store goes offline
Actual Results –
Xsigo A Results…
Pings –
| From Device | Destination Device | Type | Result During | Result coming online / After |
| External Laptop | Windows 7 VM | VM | No Ping Loss | Two Ping Loss |
| External Laptop | vCenter Server | VM | No Ping Loss | No Ping Loss |
| External Laptop | ESX Host 1 | ESX | No Ping Loss | No Ping Loss |
| External Laptop | ESX Host 2 | ESX | No Ping Loss | No Ping Loss |
| External Laptop | ESX Host 3 | ESX |
No Ping Loss |
No Ping Loss |
| External Laptop | ESX Host 4 | ESX | No Ping Loss | No Ping Loss |
| ESX Host | IOMega Storage | NFS | No Ping Loss | No Ping Loss |
From vCenter Server –
XSA & XNA status showing down during fibre removal on all ESX Hosts
vCenter Server triggered the ‘Network uplink redundancy lost’ – Alarm
No VM GUI Hesitation reported
NFS Storage did not go offline
Xsigo B Results…
Pings –
| From Device | Destination Device | Type | Result During | Result coming on line / After |
| External Laptop | Windows 7 VM | VM | No Ping Loss | No Ping Loss |
| External Laptop | vCenter Server | VM | One Ping Loss | One Ping Loss |
| External Laptop | ESX Host 1 | ESX | No Ping Loss | No Ping Loss |
| External Laptop | ESX Host 2 | ESX | No Ping Loss | One Ping Loss |
| External Laptop | ESX Host 3 | ESX |
No Ping Loss |
No Ping Loss |
| External Laptop | ESX Host 4 | ESX | One Ping Loss | No Ping Loss |
| ESX Host | IOMega Storage | NFS | No Ping Loss | No Ping Loss |
From vCenter Server –
XNB & XSB status showing down during module removal on all ESX Hosts
vCenter Server triggered the ‘Network up link redundancy lost’ – Alarm
NFS Storage did not go offline
Test 4 Summary –
All results are as expected. There was only very minor ping loss, which for us is nothing to be worried about
Test 5 – Pull Power on active Xsigo vp780
Summary –
During this test, I will remove all the power cords from Xsigo A.
I will disconnect the power cords from Xsigo A first, measure/record the results, return the environment to normal, and then repeat for Xsigo B.
Pre-Procedure –
Validate by Xsigo CLI – ‘show vnics’ to see if vnics are in up state
- Xsigo A and B are reporting both I/O Modules are functional
Ensure ESX Host vNICs are in Active mode and not standby
- vCenter server is reporting all communication is normal
Procedure –
Remove power cables from Xsigo A
Measure results via Ping, vCenter Server, and check for any VM GUI hesitation.
Replace the cables, ensure system is stable, and repeat for Xsigo B device
Expected results –
ALL active traffic (IP or NFS) for ESXi (including VM’s) will continue to pass through the redundant XNB or XSB accordingly.
All active traffic (IP or NFS) for ESXi (including VM’s) might see a quick drop if it’s traffic is flowing through the affected adapter.
vCenter Server should show XNA and XSA as unavailable until cable is reconnected
I don’t expect for ESXi to take any of the NFS datastores offline
How I will quantify results –
ALL active traffic (IP or NFS) for ESXi (including VM’s) will continue to pass through the redundant XNB or XSB accordingly.
- Active PING to ESXi Host (Management Network, VM’s) and other devices to ensure they stay up
All active traffic (IP or NFS) for ESXi (including VM’s) might see a quick drop if it’s traffic is flowing through the affected adapter.
- Active PING to ESXi Host (Storage, Management Network, VM’s)
vCenter Server should show XNA and XSA as unavailable until cable is reconnected
- In vCenter Server under Network Configuration check to see if XS# goes down and back to active
I don’t expect for ESXi to take any of the NFS datastores offline
- In vCenter Server under storage, I will determine if the store goes offline
Actual Results –
Xsigo A Results…
Pings –
| From Device | Destination Device | Type | Result During | Result coming online / After |
| External Laptop | Windows 7 VM | VM | No Ping Loss | No Ping Loss |
| External Laptop | vCenter Server | VM | One Ping Loss | One Ping Loss |
| External Laptop | ESX Host 1 | ESX | One Ping Loss | One Ping Loss |
| External Laptop | ESX Host 2 | ESX | One Ping Loss | One Ping Loss |
| External Laptop | ESX Host 3 | ESX |
No Ping Loss |
No Ping Loss |
| External Laptop | ESX Host 4 | ESX | No Ping Loss | One Ping Loss |
| ESX Host | IOMega Storage | NFS | No Ping Loss | No Ping Loss |
From vCenter Server –
XSA & XNA status showing down during the removal on all ESX Hosts
vCenter Server triggered the ‘Network uplink redundancy lost’ – Alarm
No VM GUI Hesitation reported
NFS Storage did not go offline
Xsigo B Results…
Pings –
| From Device | Destination Device | Type | Result During | Result coming online / After |
| External Laptop | Windows 7 VM | VM | One Ping Loss | No Ping Loss |
| External Laptop | vCenter Server | VM | One Ping Loss | One Ping Loss |
| External Laptop | ESX Host 1 | ESX | No Ping Loss | No Ping Loss |
| External Laptop | ESX Host 2 | ESX | No Ping Loss | One Ping Loss |
| External Laptop | ESX Host 3 | ESX |
One Ping Loss |
One Ping Loss |
| External Laptop | ESX Host 4 | ESX | One Ping Loss | No Ping Loss |
| ESX Host | IOMega Storage | NFS | One Ping Loss | No Ping Loss |
From vCenter Server –
XNB & XSB status showing down during module removal on all ESX Hosts
vCenter Server triggered the ‘Network uplink redundancy lost’ – Alarm
No VM GUI Hesitation reported
NFS Storage did not go offline
Test 5 Summary –
All results are as expected. There was only very minor ping loss, which for us is nothing to be worried about
It took about 10 Mins for the Xsigo come up and online from the point I pulled the power cords to the point ESXi reported the vnics were online..
Overall Thoughts…
Under very low load the Xsigo it performed as expected with ESXi. So far the redundancy testing is going well.
Tomorrow I plan to place a pretty hefty load on the Xsigo and IOMega to see how they will perform under the same conditions.
I’m looking forward to seeing if the Xsigo can perform just as well under load.
Trivia Question…
How do you know if someone has rebooted and watched an Xsigo boot?
This very cool logo comes up on the bootup screen! Now that’s Old School and very cool!

Great Post on ESXi 4.1
I was doing some exploring for HA / LDvmotion setup today and I came across this great post on ESXi 4.1 today.
It contains a lot of great information on ESXi 4.1.
I know a lot of you have questions about ESXi 4.1 and I thought I would share it out…
Here’s the link to the post…
http://blog.mvaughn.us/2010/07/13/vsphere-4-1/
The entire blog was really well done and I really liked the links at the end…
- KB Article:
1022842 – Changes to DRS in vSphere 4.1 - KB Article:
1022290 – USB support for ESX/ESXi 4.1 - KB Article:
1022263 – Deploying ESXi 4.1 using the Scripted Install feature - KB Article:
1021953 – I/O Statistics in vSphere 4.1 - KB Article:
1022851 – Changes to vMotion in vSphere 4.1 - KB Article:
1022104 – Upgrading to ESX 4.1 and vCenter Server 4.1 best practices - KB Article:
1023118 – Changes to VMware Support Options in vSphere 4.1 - KB Article:
1021970 – Overview of Active Directory integration in ESX 4.1 and ESXi 4.1 - KB Article:
1021769 – Configuring IPv6 with ESX and ESXi 4.1 - KB Article:
1022844 – Changes to Fault Tolerance in vSphere 4.1 - KB Article:
1023990 – VMware ESX and ESXi 4.1 Comparison - KB Article:
1022289 – Changing the number of virtual CPUs per virtual socket in ESX/ESXi 4.1
Test Lab – Day 3 ESXi 4.1 Setup with Xsigo, NFS, and the ix12
During Day 1 and 2 we installed the Xsigo hardware, IOMega ix12, ESXi 4.1, interconnected hardware, and ensure it all communicated well.
Today’s Goals…
- Copy vCenter Server & other VM’s from Production to this test environment
- Configure ESXi with the Xsigo vNIC’s
- Setup the ix12 to communicate via NFS to the ESX Hosts
Day 3 Overview…
On Day 2 we configured the Xsigos to present vNIC’s to the ESXi hosts. This will allow for network and storage (NFS) traffic in our test lab.
Keep in mind the ESXi test network is an isolated network. However I plan to transfer clones of a pre-made vm’s by placing a Test ESXi Host out and in of the test environment..
Today I’ll setup the ESXi hosts to talk to the new vCenter Server and get it communicating with our IOMega Shared storage
Copy vCenter Server & other VM’s from Production to this test environment…
Currently the ESXi Management NIC’s are using the Xsigo vNICs (xna, xnb) for host communication.
However I need to swap ESXi Management Network to a different network so I can transfer a VM clone to its local storage.
The vm clone I’m transferring is a pre-made vCenter Server 4.1 and when transferred it will assist us with configuration.
Basically I am swapping which vCenter Server controls the Test ESXi host by changing the Management NIC from Test to Production and back.
The Swap…
In this step I am selecting the local onboard pNIC (vmnic0) as the Management NIC and deselecting the Xsigo vNIC’s (Xsigo_xna & xnb) from the ESXi host.
This will place the host in a network that will allow for the clone transfer.
- From the ESXi host press F2 to ‘Customize System’
- Logon as root
- Choose Configure Management Network
- Choose Network Adapters
- Select vmnic0 as the Management NIC and disconnect all others
- Save up and it should restart the Management Network

Once I have selected the appropricate pNIC as my management adapter, I attached this ESXi host to the other vCenter Server, and then transfer the VM clone to the local VMFS storage.
Once the VM is transferred I configured its networking adapters to adapt to the new test network and powered up the VM.
I logged in to the VM and ensure it is operational.
With the VM still powered up I transferred the Management Network back to the Xsigo vNIC’s and then RDP into the cloned vCenter Server.
Tip: Make sure you know your local Administrator password. After the transfer AD won’t be around for authentication.
Configure ESXi with the Xsigo vNIC’s…
Once the test vCenter Server is booted, I completed the IP setup of the other ESXi test hosts ensuring their management networks were using their assigned Xsigo_xna and xnb adapters.
I then attached all the ESXi Test Hosts to the test vCenter server and configured their networking.
Here is what ESXi looks like when all the adapters are recognized..

NOTE: the Xsigo adapters are showing 10gig Full. You might be asking yourself “I thought Infiniband was faster than 10gig” It is, we’ll address this note later in my posts..
The next step is to create your vSwitches…
I created vSwitch0 for VM’s, vMotion, and Host Management and vSwitch1 for NFS traffic to my storage.
XNA and XNB will be connected to vSwitch0
XSA and XSB will be connected to vSwitch1

NOTE: As of this writing Xsigo supports vSwitches only, sorry no Distributed Switches at this time.
Setup the IOmega ix12 to communicate via NFS to the ESX Hosts…
First step is to ensure your ix12 is online and the network is functioning properly.
After confirming the network logon to its web admin tool, choose settings, network services, and then network settings.
We choose link aggregation, ensure the IP was correct, and bonded NIC 3 and 4 on this ix12.

Tip: One cool thing about the ix12 is we can allocate NICs for different functions, in this case NIC3 & 4 is for our esxi test environment and nic1 is for another purpose.
Note: By changing the network information usually means a reboot of the device L
I logged into my ESXi host, placed it in Techsupport mode and used ping to test ix12 interface.
Once the network was sound, I enabled NFS on the ix12 and setup a NFS folder
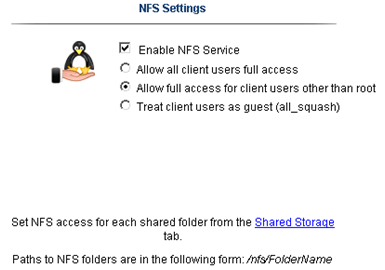
Yes folks, it’s that easy to enable NFS on the ix12…
The only step not show here was setting up a storage pool for NFS and associating the shared folder to it.
Back to ESXi… Let’s setup the NFS Connection…
In vCenter server simply click on the host > Configuration > Storage > Add Storage
A new window appears, choose Network File System then next
Fill in the IP of the ix12, the folder name, and datastore name > click next
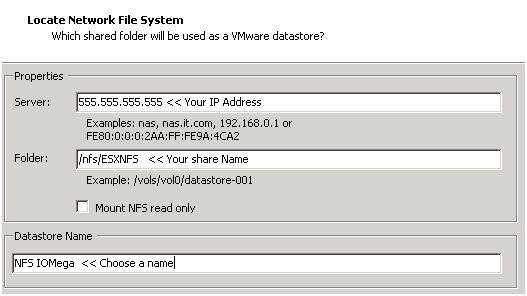
Confirm and you’re done!

Next steps are to use Storage vMotion (aka Migrate Virtual Machines datastore) the Test vCenter Server from local storage to our new NFS Share..
When I completed this step we transferred about 40GB from the local ESXi storage to the IOMega ix12 in about 20Mins.
Summary…
Today was mainly about configuring ESXi and shared storage.
We were able setup all our ESXi hosts to the Xsigo, configured the shared storage, enable NFS and get a vCenter Server VM up and running.
Tomorrow the fun begins… Testing and more Testing!
Test Lab – Day 2 CLI with the Xsigo!
Yesterday I did about 90% of the hardware install. Today, Day 2, our Xsigo SE will be here to assist with the installation and configuration of the Xsigo to the ESX Hosts..
Today’s Goals..
- Install 2nd Xsigo VP780
- Install vmware ESXi 4.1 on 4 servers with Xsigo Drivers
- Configure both Xsigo vp780’s
Install 2nd Xsigo VP780…
Day 2 started out with a gift from Mr. FedEx, it was the parts we needed to install the 2nd Xsigo. Only yesterday afternoon we discovered we were missing some power cords and mounting brackets. A couple quick calls to Xsigo and viola parts are on their way. Props to Xsigo for a VERY quick response to this issue!
Based on the lessons learned from Day 1 we mounted the 2nd Xsigo VP780 and it went much smoother. Notice the WE part of installing the VP780, these things are heavy & large and you’ll need some help or a giant with huge hands to install them into a rack. See their install manual for more information.
When we powered them up I was amazed by the amount of air they moved through the device >> Very NICE!
Keep in mind at this point all the test lab hardware including the Xsigo fiber modules (2 x 10gig Fiber modules per device), and networking is mounted and interconnected…

Install vmware ESXi 4.1 on 4 servers with Xsigo Drivers…
You’ll need the Xsigo Drivers installed for ESXi to recognize the infiniband cards and for proper communication.
There are two installation options…
- Install ESXi 4.1 and add the Xsigo Drivers after the install.
- Download the drivers and re-master the ESXi ISO yourself (This is a good option if your building / rebuilding lots of servers)
We chose to re-master the ESXi ISO with the Xsigo drivers.
Here is the link to master the ISO
I won’t bore you with the details of installing ESXi, however the only gotcha I ran into was the Dell R5400 SATA RAID controller.
I setup a SATA RAID group, during the ESXi install it recognized the RAID volume, and ESXi installed to it without issue.
However after the reboot of the host it would not boot to this volume.
I didn’t have time to troubleshoot, for now we just broke the RAID group, reinstalled, and it worked perfectly.
ESXi Management NICS’s..
Our test lab network will be isolated from production network traffic. However, one of our servers will need to be in the production environment. We setup one physical NIC (pNIC) on to our production environment. This will allow us to temporarily transfer VM’s from production to test, we’ll then disconnect this pNIC and setup ESXi to use the Xsigo NIC for management.
(More to come on this on Day 3)
Configure both Xsigo vp780’s…
Configuring the vp780 was very simple. We attached a laptop to the Xsigo and in about 20 commands our Xsigo was up and running..
These are the basic commands we used to setup our pair of Xsigo’s (A and B), the commands below reflect B only.
The commands would be the same for the A Xsigo simply change the appropriate parameters…
NOTE: I don’t recommend you execute these commands in your environment, keep in mind these are for my reference ONLY… I also recommend you contact your Xsigo representative for assistance.
Here are the commands we executed..
Getting into the Xsigo VP780…
We used a standard Xsigo provided rollover cable plugged into Serial1. (Serial2 is for Tech / Debug – Don’t use)
We connected to the console via Putty or Absolute Telnet (COM Settings are 115200,8,1,None,None)
Tip: All default passwords are in the CLI Config Guide by Xsigo
Setup the Xsigo via the Wizard…
Once the connected we used the XgOS config Wizard and entered in the following..
|
Welcome to XgOS Copyright (c) 2007-2010 Xsigo Systems, Inc. All rights reserved.
Enter “help” for information on available commands.
Would you like to use the XgOS Configuration Wizard? [Y/n] Hostname: xsigo-b Domain: YOURDOMAIN.COM Is this Director to be designated as the IB subnet manager (leave as Y unless using an external, non-Xsigo subnet manager) ? [Y/n] Do you want this Director to send diagnostic data to Xsigo periodically? [Y/n] Please input the ‘root’ password: **** Please confirm the ‘root’ password: **** Please input the ‘admin’ password: ***** Please confirm the ‘admin’ password: ***** Please input the ‘recovery-password’: **** Please confirm the ‘recovery-password’: **** IP Address [static/DHCP]: 555.555.555.555 IP Address [static/DHCP]: Enter NTP Server 1: 555.555.555.555 Enter NTP Server 2: Enter Timezone [<Tab><Tab> for the list of Timezones]: America_Phoenix Welcome to XgOS Copyright (c) 2007-2010 Xsigo Systems, Inc. All rights reserved.
Enter “help” for information on available commands. admin@xsigo-b[xsigo] |
Now it’s time to setup the Xsigo…
Place the Xsigo into Trunk Mode..
Port 10 and Port 11 are the 10gig Fibre Modules; this command places them in Trunk Mode
set ethernet-port 10/1 -mode=trunk << Port 10 will be used for our IP Network (Vlans for Guests, vmotion, hosts, etc)
set ethernet-port 11/1 -mode=trunk << Port 11 will be used for our NFS
Rear of VP780

Ensure Trunk Mode is activated..
Use the command ‘show ethernet-port ‘
|
admin@xsigo-b[xsigo] show ethernet-port
name type state descr mode flags lag access-vlan vnics vlans ——————————————————————————- 10/1 nwEthernet10GbPort up/up trunk -s— 1 0 none 11/1 nwEthernet10GbPort up/up trunk -s— 1 0 none 2 records displayed |
Setup Phone Home for Support…
set system phone-home -customer-name=”YOUR COMPANY NAME HERE”
set system phone-home -contact-email-address=YOURNAME@YOURDOMAIN.COM
set system phone-home -contact-phone-numbers=”555-555-5555″
set system phone-home proxy [YOUR PROXY IP HERE] [PROXY PORT if needed, default is 3128]
Note: For this command the syntax is [PROXY IP Address] one space [PROXY PORT], don’t use ‘:’ to as the separator.
Once completed then check confirm your information…
Enter the command ‘show system phone-home’
|
admin@xsigo-b[xsigo] show system phone-home ——————————————————————————- enabled true freq weekly next Fri Jan 14 12:44:52 MST 2011 notify no strip yes alarm yes name COMPANYNAME email EMAIL@EMAIL.com phone 5555555555 copy p-host 555.555.555.555:3128 p-user ——————————————————————————- 1 record displayed admin@xsigo-b[xsigo] |
Check on the Phone Home Log….
admin@xsigo-b[xsigo] showlog phonehome.log
Wed Jan 5 17:30:33 MST 2011: Phone home successful to http://phone-home.xsigo.com:6522
Wed Jan 5 18:04:14 MST 2011: Phone home successful to http://phone-home.xsigo.com:6522
Wed Jan 5 18:04:38 MST 2011: Phone home successful to http://phone-home.xsigo.com:6522
[Press CRTL-C to Exit]
admin@xsigo-b[xsigo]
Tip: your log might be empty until it has something to send
Ensure your Physical servers are attached…
As expected all 4 servers are attached to this Xsigo.. (If they don’t show up here it could be an interconnect or ESXi issue)
Enter the command ‘show physical-server’ to view your connected servers.
|
admin@xsigo-b[xsigo] show physical-server ——————————————————————————- name localhost <<< This is the ESXi Hostname guid 2c903000b4df5 descr port xsigo-001397001:ServerPort2 << This is the Xsigo Port the Server is connected to os VMware/ESXi-4.1.0:xg-3.5.0-1-246491/x86_64 << This is the version of ESX & Xsigo Driver version 2.7.0/3.0.0 server-profile << Notice this is blank, We configured it next ——————————————————————————- name localhost guid 2c903000b4ea5 descr port xsigo-001397001:ServerPort3 os VMware/ESXi-4.1.0:xg-3.5.0-1-246491/x86_64 version 2.7.0/3.0.0 server-profile ——————————————————————————- name localhost guid 2c903000b4ea9 descr port xsigo-001397001:ServerPort4 os VMware/ESXi-4.1.0:xg-3.5.0-1-246491/x86_64 version 2.7.0/3.0.0 server-profile ——————————————————————————- name localhost guid 2c903000b5095 descr port xsigo-001397001:ServerPort1 os VMware/ESXi-4.1.0:xg-3.5.0-1-246491/x86_64 version 2.7.0/3.0.0 server-profile ——————————————————————————- 4 records displayed |
Create Server Profiles…
Creating a server profile enables you to assign devices to your specific host.
In our case we used the ESX Hostname as the Xsigo Server Profile name.
This will help us to keep the profiles well organized.
Keep in mind YOURSERVERNAME# equals your ESX Hostname and it will become your Xsigo Server Profile Name…
Long way to create a Server Profile…
add server-profile [server profile name]
View the new server profile…
|
admin@xsigo-b[xsigo] show server-profile name state descr connection def-gw vnics vhbas ——————————————————————————- YOURSERVER1 up/unassigned 0 0 1 record displayed |
Assign the server profile to a port on the Xsigo…
set server-profile YOURSERVER1 connect localhost@xsigo-001397001:ServerPort1
Short way to create a Server Profile…
add server-profile YOURSERVER2 localhost@xsigo-001397001:ServerPort2
add server-profile YOURSERVER1 localhost@xsigo-001397001:ServerPort3
add server-profile YOURSERVER1 localhost@xsigo-001397001:ServerPort4
Then use show server-profile to confirm your entries…
|
admin@xsigo-b[xsigo] show server-profile name state descr connection def-gw vnics vhbas ——————————————————————————- Yourserver3 up/up localhost@xsigo-001397001:ServerPort3 0 0 Yourserver4 up/up localhost@xsigo-001397001:ServerPort4 0 0 Yourserver1 up/up localhost@xsigo-001397001:ServerPort1 0 0 Yourserver2 up/up localhost@xsigo-001397001:ServerPort2 0 0 4 records displayed admin@xsigo-b[xsigo] |
Set Up and attach the virtual NICS to your server profile…
In this step we created our Xsigo vNICS, attached them to the appropriate server profiles, and the 10gig Modules.
When complete each of our ESXi servers will have 4 Xsigo vNICS.
(2 vNICs for IP Network, 2 vNICs for Storage network)
Decoding the command…
The command ‘add vnic xnb.yourservername1 10/1 -mode=trunk’ breaks down to…
add vnic << Add vNIC Command
xnb << The vNIC Name (xnb = Xsigo, IP Network, B Xsigo Device, Xsb = Xsigo, Storage Network, B Xsigo Device)
yourservername1 << Which profile to attach to
10/1 << Which Module on the Xsigo to attach to
-mode=trunk << What transport mode
These are the command we entered..
|
IP Network vNICS admin@xsigo-b[xsigo] add vnic xnb.yourservername1 10/1 -mode=trunk admin@xsigo-b[xsigo] add vnic xnb.yourservername2 10/1 -mode=trunk admin@xsigo-b[xsigo] add vnic xnb.Yourservername3 10/1 -mode=trunk admin@xsigo-b[xsigo] add vnic xnb.Yourservername4 10/1 -mode=trunk
Storage vNICS admin@xsigo-b[xsigo] add vnic xsb.Yourservername1 11/1 -mode=trunk admin@xsigo-b[xsigo] add vnic xsb.Yourservername2 11/1 -mode=trunk admin@xsigo-b[xsigo] add vnic xsb.Yourservername3 11/1 -mode=trunk admin@xsigo-b[xsigo] add vnic xsb.Yourservername4 11/1 -mode=trunk |
Results from ESXi…

Other Information…
Set System back to factory Defaults…
If needed, you can set the System back to factory Defaults by the following command.
When complete you will need to access the system via Serial Cable.
Here are the steps:
set system factory-default
confirm << type in Confirm, my Putty will exited and the system will shutdown
NOTE: This command will erase the configuration from the Xsigo. Do it with caution
Tip: Note this will cause the system to shutdown, this means someone will have to manually power it back on.
Upgrade the XgOS via USB…
Download the GOS 2.8.5 to a USB Stick..
We inserted the stick into the USB Port on the VP780, then executed this command
system upgrade file://usb/xsigo-2.8.5.xpf
Other Handy commands…
show system status
show system
show system version
show system warnings
show serial
show system info
history
CLI Fun…
One thing I like about the CLI for Xsigo is TAB at the end of the command (most modern CLI’s have this and it sure is handy)
If I type in set system phone-home[Press TAB] it displays possible completions and qualifiers and then it displays the last command I typed in.
admin@ xsigo-b[xsigo] set system phone-home [Press TAB]
Possible completions:
disable Disable phone home
enable Enable phone home
noproxy Don’t use HTTP Proxy
proxy HTTP Proxy config
snooze Hit the snooze button
[Optional qualifiers]
-contact-email-address Email address for Xsigo technical support to contact when a problem is discovered. (or ‘none’)
-contact-phone-numbers Telephone number for Xsigo technical support to contact when a problem is discovered. (comma separated, or ‘none’)
-copy-url URL to send audit copy to
-customer-name Customer name (or ‘none’)
-frequency Phone home frequency (relative to when it is set)
-notify Will Xsigo notify you when problems are detected?
-send-alarms Send major alarms to Xsigo?
-strip-private Strip private information from phone-home data
Repeat ‘?’ for detailed help.
admin@xsigo-b[xsigo] set system phone-home
Day 2 Summary..
The pair of Xsigo’s were very easy to configure and install. I enjoyed working with Xsigo CLI, it is very well thought out, and I plan do to write additional blog about it alone.
Besides for the very few and sometime self-inflicted gotchas things went smooth.
It was nice to have a Xsigo SE on site to assist with the initial install and I’m looking forward to tomorrow when we spin up some VM’s and then test!
Still to do…
- Copy vCenter Server & other VM’s from Production to this test environment
- Test, Test, Test and more testing..
