vmware
Home Lab Generation 7: Part 2 – New Hardware and Software Updates
In the final part of this 2 part series, I’ll be documenting the steps I took to update my Home Lab Generation 7 with the new hardware and software changes. There’s quite a bit of change going on and these steps worked well for my environment.Pre-Update-Steps:
- Check Product Interoperability Matrix (VCSA, ESXi, NSX, vRNI, VRLI)
- Check VMware Compatibility Guide (Network Cards, JBOD)
- Ensure the vSAN Cluster is in a health state
- Backup VM’s
- Ensure your passwords are updated
- Document Basic Host settings (Network, vmks, NTP, etc.)
- Backup VCSA via the Management Console > Backup
- NOTE: I used /n software SFTP server to receive backup files
Steps to update vCenter Server from 7U2d (7.0.2.00500) to 7U3a (7.0.3.00100):
- Downloaded VCSA 7U3a VMware-vCenter-Server-Appliance-7.0.3.00100-18778458-patch-FP.iso
- Use WinSCP to connect to an ESXi host and upload the update/patch to vSAN ISO-Images Folder
- Mount the ISO from step 1 to VCSA 7U2d VM
- NOTE: A reboot of the VCSA my be necessary for it to recognize the attached ISO
- Went to VCSA Management Console > Update > Check Updates should auto-start
- NOTE: It might fail to find the ISO. If so, choose CD ROM to detect the ISO
- Expanded the Version > Run Pre-Update checks
- Once it passed pre-checks, choose Stage and Install > Accept the Terms > Next
- Check ‘I have backed up vCenter Server…’
- NOTE: Clicking on ‘go to Backup’ will Exit out and you’ll have to start over
- Click Finish and allow it to complete
- Once done log back into the Management console > Summary and validate the Version
- Lastly, detach the datastore ISO, I simple choose ‘Client Device’
Change Boot USB to SSD and upgrade to ESXi 7U3 on Host at a time:
- Remove Host from NSX-T Manager (Follow these steps)
- In vCenter Server
- Put Host 1 in Maintenance Mode Ensure Accessibility (better if you can evacuate all data | run pre-check validation)
- Shut down the host
- Remove Host from Inventory (NOTE: Wait for host to go to not responding first)
- On the HOST
- Precautionary step – Turn off the power supply on the host, helps with the onboard management ability to detect changes
- Remove the old USB boot device
- Install Dell HBA330 and M.2/NVMe PCIe Card w/ 240GB SSD into the Host
- Power On the Host and validate firmware is updated (Mobo, Disk, Network, etc.)
- Here is how I updated the Dell HBA330 Firmware (SEE VIDEO HERE)
- During boot ensure the Dell HBA330 POST screen displays (optional hit CTRL-C to view its options)
- In the Host BIOS Update the boot disk to the new SSD Card
- ESXi Install
- Boot the host to ESXi 7.0U3 ISO (I used SuperMicro Virtual Media to boot from)
- Install ESXi to the SSD Card, Remove ISO, Reboot
- Update Host boot order in BIOS for the SSD Card and boot host
- In the ESXi DUCI, configure host with correct IPv4/VLAN, DNS, Host Name, enable SSH/Shell, disable IPv6 and reboot
- From this ESXi host and from another connected device, validate you can ping the Host IP and its DNS name
- Add Host to the Datacenter (not vSAN Cluster)
- Ensure Host is in Maintenance mode and validate health
- Erase all partitions on vSAN Devices (Host > Configure > Storage Devices > Select devices > Erase Partitions)
- Rename the new SSD datastore (Storage > R-Click on datastore > Rename)
- Add Host to Cluster (but do not add to vSAN)
- Add Host to vDS Networking, could be multiple vDS switches (Networking > Target vDS > Add Manage Hosts > Add Hosts > Migrate VMKernel)
- Complete the Host configuration settings (NTP, vmks)
- Create vSAN Disk Groups (Cluster > Configure > vSAN > Disk Management)
- Monitor and allow to complete, vSAN Replication Objects (Cluster > Monitor > vSAN > Resyncing Objects)
- Extract a new Host Profile and use it to build out the other hosts in the cluster
- ESXi Install – Additional Hosts
- Repeat Steps 1, 2, 3, and only Steps 4.1-4.10
- Attach Host Profile created in Step 4.15
- Check Host Profile Compliance
- Edit and update Host Customizations
- Remediate the host (the remediation will to a pre-check too)
- Optional validate host settings
- Exit Host from Maintenance mode
- Before starting next host ensure vSAN Resyncing Objects is completed
Other Notes / Thoughts:
Host Profiles: You may be thinking “why didn’t he use ESXi Backup/Restore or Host Profiles to simply this migration vs. doing all these steps?”. Actually, at first I did try both but they didn’t work due to the add/changes of PCIe devices and upgrade of the ESXi OS. Backup/Restore and Host Profiles really like things to not change for them to work with out error. Now there are adjustments one could make and I tried to adjust them but in the end I wasn’t able to get them to adjust to the new hosts. They were just the wrong tool for the first part of this job. However, Host Profiles did work well post installation after all the changes were made. vSAN Erase Partitions Step 4.8: This step can be optional it just depends on the environment. In-fact I skipped this step on the last host and vSAN imported the disks with out issue. Granted most of my vm’s are powered off, which means the vSAN replicas are not changing. In an environment where there are a lot of powered on VM’s vSAN doing step 4.8 might be best. Again, it just depends on the environment state. If you like my ‘no-nonsense’ videos and blogs that get straight to the point… then post a comment or let me know… Else, I’ll start posting really boring content!
Home Lab Generation 7: Updating the Dell HBA330 firmware without a Dell Server
In this quick video I review how I updated the Dell HBA330 firmware using a Windows 10 PC.
This video was made as a supplement to my 2 Part blog post around updating my Home Lab Generation 7.
See:
Firmware >> https://www.dell.com/support/home/en-ng/drivers/driversdetails?driverid=tf1m6
Quick NAS Topics Changing Storage Pool from RAID 1 to RAID5 with the Synology 1621+
In this not so Quick NAS topic I cover how to expand a RAID 1 volume and migrate it to a RAID 5 storage pool with the Synology 1621+. Along the way we find a disk that has some bad sectors, run an extended test and then finalize the migration.
** Products / Links Seen in this Video **
Synology DiskStation DS1621+ — https://www.synology.com/en-us/products/DS1621+

Home Lab Generation 7: Part 1 – Change Rational for software and hardware changes
Well its that time of year again, time to deploy new changes, upgrades, and add some new hardware. I’ll be updating my ESXi hosts and vCenter Server to the latest vSphere 7 Update 3a from 7U2d. Additionally, I’ll be swapping out the IBM 5210 JBOD for a Dell HBA330+ and lastly I’ll change my boot device to a more reliable and persistent disk. I have 3 x ESXi hosts with VSAN, vDS switches, and NSX-T. If you want to better understand my environment a bit better check out this page on my blog. In this 2 part blog I’ll go through the steps I took to update my home lab and some of the rational behind it.
There are two main parts to the blog:
- Part 1 – Change Rational for software and hardware changes – In this part I’ll explain some of my thoughts around why I’m making these software and hardware changes.
- Part 2 – Installation and Upgrade Steps – These are the high level steps I took to change and upgrade my Home lab
Part 1 – Change Rational for software and hardware changes:
There are three key changes that I plan to make to my environment:
- One – Update to vSphere 7U3a
- vSphere 7U3 has brought many new changes to vSphere including many needed features updates to vCenter server and ESXi. Additionally, there have been serval important bug fixes and corrections that vSphere 7U3 and 7U3a will address. For more information on the updates with vSphere 7U3 please see the “vSphere 7 Update 3 – What’s New” by Bob Plankers. For even more information check out the release notes.
- Part of my rational in upgrading is to prepare to talk with my customers around the benefits of this update. I always test out the latest updates on Workstation first then migrate those learnings in to Home Lab.
- Two – Change out the IBM 5210 JBOD
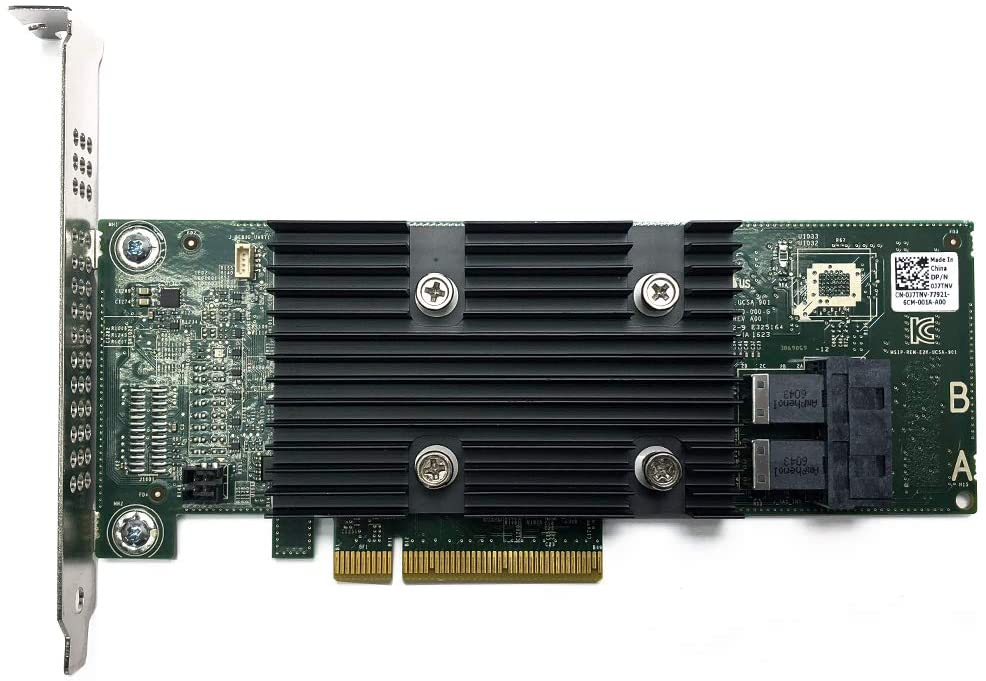
- The IBM 5210 JBOD is a carry over component from my vSphere 6.x vSAN environment. It worked well with vSphere 6.x and 7U1. However, starting in 7U2 it started to exhibit stuck IO issues and the occasional PSOD. This card was only certified with vSphere/vSAN 6.x and at some point the cache module became a requirement. My choices at this point are to update this controller with a cache module (~$50 each) and hope it works better or make a change. In this case I decided to make a change to the Dell HBA330 (~$70 each). The HBA330 is a JBOD controller that Dell pretty much worked with VMware to create for vSAN. It is on the vSphere/vSAN 7U3 HCL and should have a long life there too. Additionally, the HBA330 edge connectors (Mini SAS SFF-8643) line up with the my existing SAS break-out cables. When I compare the benefits of the Dell HBA330 to upgrading the cache module for the IBM 5210 the HBA330 was the clear choice. The trick is finding a HBA330 that is cost effective and comes with a full sized slot cover. Its a bit tricky but you can find them on eBay, just have to look a bit harder.
- Three – Change my boot disk
- Last September-2021, VMware announced boot from USB is going to change and customers were advised to plan ahead for these upcoming changes. My current hosts are using cheap SanDisk USB 64GB memory sticks. Its something I would never recommend for a production environment, but for a Home Lab these worked okay. I originally chose them during my Home Lab Gen 5 updates as I need to do testing with USB booted Hosts. Now that VMware has deprecated support for USB/SD devices it’s time to make a change. Point of clarity: the word deprecated can mean different things to different people. However, in the software industry deprecated means “discourage the use of (something, such as a software product) in favor of a newer or better alternative”. vSphere 7 is in a deprecated mode when it comes to USB/SD booted hosts, they are still supported, and customers are highly advised to plan ahead. As of this writing, legacy (legacy is a fancy word for vSphere.NEXT) USB hosts will require a persistent disk and eventually (Long Term Supported) USB/SD booted hosts will no longer be supported. Customers should seek guidance from VMware when making these changes.

-
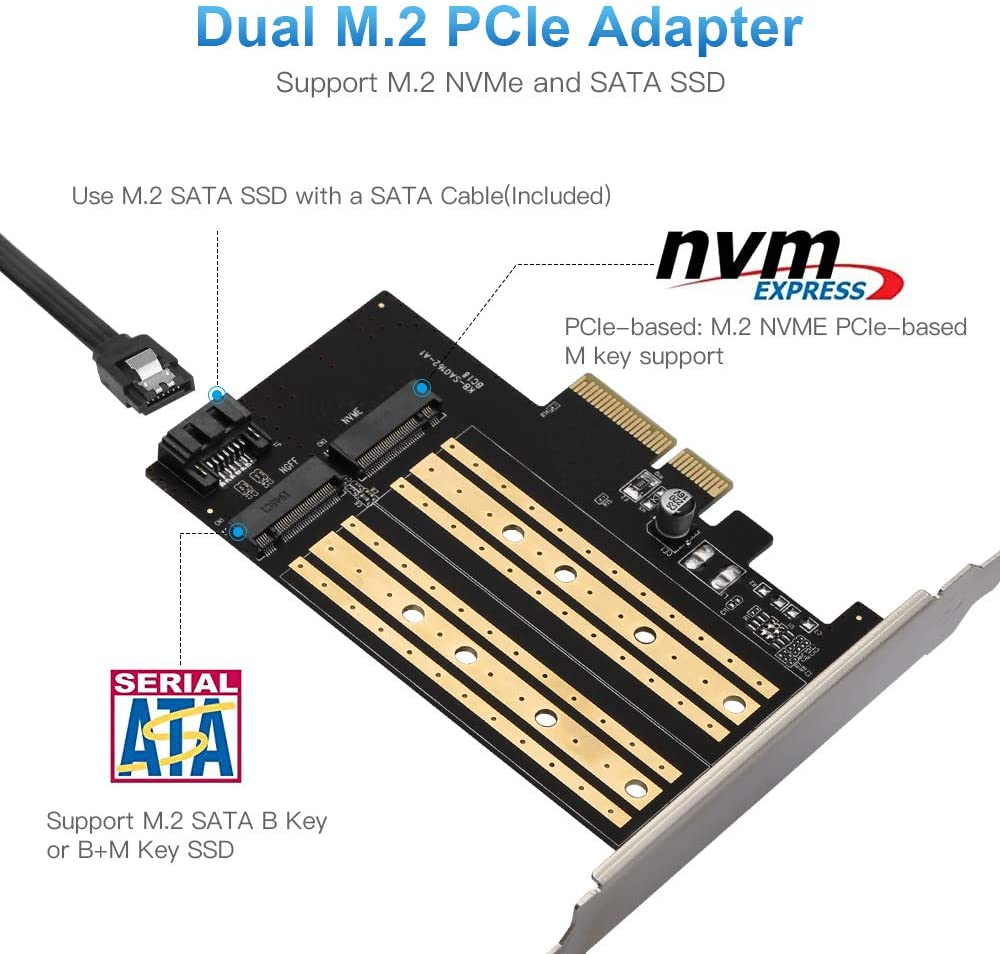
- The requirement to be in a “Long Term Supported” mode is to have a ESXi host be booted from HDD, SSD, or a PCIe device. In my case, I didn’t want to add more disks to my system and chose to go with a PCIe SSD/NVMe card. I chose this PCIe device that will support M.2 (SATA SSD) and NMVe devices in one slot and I decided to go with a Kingston A400 240G Internal SSD M.2 as my boot disk. The A400 with 240GB should be more than enough to boot the ESXi hosts and keep up with its disk demands going forward.

Final thoughts and a important warning. Making changes that affect your current environment are never easy but are sometimes necessary. With a little planning it can make the journey a bit easier. I’ll be testing these changes over the next few months and will post up if issues occur. However, a bit of warning – adding new devices to an environment can directly impact your ability to migrate or upgrade your hosts. Due to the hardware decisions I have made a direct ESXi upgrade is not possible and I’ll have to back out my current hosts from vCenter Server plus other software and do a new installation. However, those details and more will be in Part 2 – Installation and Upgrade Steps.
Opportunity for vendor improvement – If backup vendors like Synology, asustor, Veeam, Veritas, naviko, and Arcoins could really shine. If they could backup and restore a ESXi host to dislike hardware or boot disks this would be a huge improvement for VI Admin, especially when they have tens of thousands of hosts the need to change from their USB to persistent disks. This is not a new ask, VI admins have been asking for this option for years, now maybe these companies will listen as many users and their hosts are going to be affected by these upcoming requirements.
Set NSX-T 3.1.1 Password Expiration Policy for Home Labs
If you run a home lab like I do then sometimes VM’s are powered off until you need them. In my case I use NSX but not as frequently as I’d like to. So its not uncommon for my NSX manager passwords to expire. VMware NSX-T has a preconfigured password expiration policy of 90 days. When the password expiration day is near, a notification is displayed in the Web interface OR in my case they already expired so you can’t login. There are 3 preconfigured local users: admin, audit, and root. All passwords have to be changed after 90 days. In this blog I’m going to cover how I set the policy to not expire.
First off a bit of warning — I wouldn’t recommend this for a production environment and I’d follow your best practices around password policies.
Environment:
There are 3 x ESXi 7u2d Hosts with 3 NSX-T 3.1.1 Manager Nodes in my enviroment. The NSX-T Manager Nodes have a virtual IP (VIP) that allows me to access the NSX Web GUI. No Edge Nodes are installed.
Pre-Steps:
- Ensure your vSphere Hosts are in a health state and all NSX Manager VM’s are powered on
- Ensure you can logon to the NSX-T Environment as Admin and Root on all Management nodes. Update Passwords if needed.
- If your admin password has already expired then, logon via SSH to the NSX VIP as admin and update the password. If you logon as root it will not enable the NSX CLI commands.
Steps:
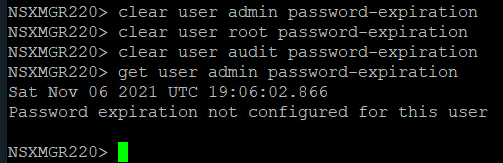
The following commands can be used to remove the password expiration policy. If you have multiple manager appliances, the commands only need to be executed on one node.
- Connect directly to a NSX-T Manager or the VIP address with SSH
- Login as admin << this is key to enable the NSX CLI Command set
- Enter clear user [username] password-expiration
- NSXMGR220> clear user admin password-expiration
NSXMGR220> clear user root password-expiration
NSXMGR220> clear user audit password-expiration
- NSXMGR220> clear user admin password-expiration
- Validate the password expiration with get user [username] password-expiration
- NSXMGR220> get user admin password-expiration
Sat Nov 06 2021 UTC 18:52:00.552
Password expiration not configured for this user
- NSXMGR220> get user admin password-expiration
kubeAcademy Building Applications for Kubernetes: Docker Desktop Installation for Windows 10
While taking the course on kubeAcademy ‘Building Applications for Kubernetes’ the first lesson was about setting up your workstation to complete the course. Though the first lesson was good, the instructions were based on the MAC OS and how to install on Windows was very lightly touched on. I soon found out why, the Windows 10 install of Docker Desktop and Tools isn’t a simple process. In this video I go through the choices I made to get my workstation up and running. Moving past lesson one it became obvious that most of these courses are based on CLI commands common on the MAC (example cat, v, and rm). If you choose the Windows install be aware you’ll need to translate commands like these and more. I highly recommend the MAC OS install if you want to really align to these courses.
Post Video Corrections and Observations:
- In the video I showed how to remove the Ubuntu Image via containers and apps. To fully remove the ubuntu image, do so in Docker Desktop > Images > 3Dots > Delete, wait about a min or two and it will disappear.
Some Links from this video:
- kubeAcademy https://kube.academy/pro
- Install Docker Desktop on Windows https://docs.docker.com/desktop/windows/install/#install-docker-desktop-on-windows
- kubeAcademy Course: Building Applications for Kubernetes https://kube.academy/courses/building-applications-for-kubernetes
- WSL 2: Getting started — https://www.youtube.com/watch?v=_fntjriRe48
- WSL 2 with Docker getting started — https://www.youtube.com/watch?v=5RQbdMn04Oc
Quick NAS Topics: One Touch Backup with the LOCKERSTOR 10
In this quick video I go through the basics of setting up the One Touch Backup with the LOCKERSTOR 10 on ADM 3.5.x.
10Gbe NAS Home Lab Part 6 Initial Setup Synology 1621+
In this video I start to setup the DS1621+. I cover where to find the basic information on this NAS and its alignment to the VMware HCL. From there I demonstrate the initial setup of the DS1621+.
** URLS Seen in this Video **
10Gbe NAS Home Lab Part 5 Initial Setup DRIVESTOR 2 Pro and LOCKERSTOR 10
In this super long video I review over some of the basic key features with the DRIVESTOR 2 Pro (AS3302T) and LOCKERSTOR 10 (AS6510T). From there I demonstrate the initial setup of both NAS devices. Finally, I install Asustor Control Center and review the VMware HCL around Asustor products.
** Products / Links Seen in this Video **
DRIVESTOR 2 PRO
asustor – https://www.asustor.com/en/product?p_id=72 and https://www.asustor.com/datasheet?p_id=72
Amazon – https://www.amazon.com/Asustor-Drivestor-Pro-AS3302T-Attached/dp/B08ZD7R72P
LOCKERSTOR10
asustor – https://www.asustor.com/product?p_id=64 and https://www.asustor.com/datasheet?p_id=64
Amazon – https://www.amazon.com/Asustor-Lockerstor-Enterprise-Attached-Quad-Core/dp/B07Y2BJWLT/
10Gbe NAS Home Lab Part 4: asustor DRIVESTOR 2 PRO and LOCKERSTOR10 Teardown
In part 4 of this series I tear down the asustor DRIVESTOR 2 PRO and LOCKERSTOR10. These are demo non-warranty units which allow me to tear them down. I highly recommend you work with asustor prior to any disassembly and warranty information.
** Products Seen in this Video **
DRIVESTOR 2 PRO
asustor – https://www.asustor.com/en/product?p_id=72
Amazon – https://www.amazon.com/Asustor-Drivestor-Pro-AS3302T-Attached/dp/B08ZD7R72P
LOCKERSTOR10
asustor – https://www.asustor.com/product?p_id=64
Amazon – https://www.amazon.com/Asustor-Lockerstor-Enterprise-Attached-Quad-Core/dp/B07Y2BJWLT/
- ← Previous
- 1
- 2
- 3
- …
- 26
- Next →
