Virtual SAN
VSAN – What’s new in vSAN 6.6 Video Demo
What a great video posted by Duncan and VMware! In a short 10 minute video, he is able to hit upon some of the new features within vSAN 6.6
Honeywells Next Generation Platform powered by Dell FX2 and VMware vSAN
I wished over these past years I could blog in technical detail about all the great things I’ve experienced working for VMware. A big part of my job as a VMware TAM is being a trusted advisor and helping VMware Embedded OEM Partners build products they can resell to their customers. These past years I’ve worked directly with Honeywell Process Solutions to build a better offering. The entire team (Honeywell, Dell, and VMware) have been working tirelessly to make this product great. It’s been a long haul with so many late nights and deadlines but we were all proud to see this product be released.
The Honeywell Dell VMware Solution I helped Honeywell to create went on to win multiple awards.
- 2016 VMware award for OEM Partner Innovation
- 2017 TAM Customer award for Emerging Technology & Trends
- Q4-2017 Americas Co-Innovation
- 2018 WWKO ‘Best Co-Innovation’ Global Accounts

Just before VMworld 2017 Michael Dell tweeted about the great work we had all accomplished and released a video.

Home Lab Gen IV – Part I: To InfiniBand and beyond!
I’ve been running ESXi 5.5 with VSAN using a Netgear 24 Port Managed Gig switch for some time now, and though it has performed okay I’d like to step up my home lab to be able to support the emerging vSphere features (VSAN 6.x, FT-SMP, and faster vMotion). To support some of these features 10Gb/s is HIGHLY recommend if not fully required. Looking at 10Gbe switches and pNICS the cost is very prohibitive for a home lab. I’ve toyed around with InfiniBand in the past (See my Xsigo Posts here) and since then I’ve always wanted to use this SUPER fast and cost effective technology. Initially, the cost to do HPC (High-performance computing) has always been very expensive. However, in recent years the InfiniBand price per port has become very cost effective for the home lab.
Let’s take a quick peek at the speed InfiniBand brings. When most of us were still playing around with 100Mb/s Ethernet InfiniBand was able to provide 10Gb/s since 2001. When I state 10Gb/s I’m talking about each port being able to produce 10Gb/s and in most cases Infiniband switches have a non-blocking backplane. So a 24 Port InfiniBand Switch, 10Gb/s per port, Full duplex, Non-blocking switch will support 480Gb/s! Over time InfiniBand speed has greatly increased and over time the older switches have dropped in price making InfiniBand a good choice for a growing home lab. For most home labs a 40Gb/s per port QDR switch is financial achievable. Even the 20Gb/s DDR or 10Gb/s SDR switch give ample speed and are VERY cost effective. However, step above QDR and you’ll find the price point is a bit too steep for home lab use.

So let’s take a look at the price / speed comparisons for InfiniBand vs. 10Gb/s Ethernet.
| 10Gb/s | 20Gb/s | 40Gb/s | |
| InfiniBand HCA | 2 Port 10Gb/s ($15-$75) | 2 Port 20Gb/s ($20-$100) | 2 Ports 40GB/s ($30-$150) |
| InfiniBand Switch | 24 Ports SDR (~$30-$70) | 24 Ports DDR (~$70-$120) | 8-36 Ports QDR (~$250-$500) |
| InfiniBand Cable | CX4 (SFF-8470) ($15-$30) | CX4 (SFF-8470) ($15-$30) | QSFP (SFF-8436) ($15-$30) |
| Ethernet Switch | 8 Ports 10Gbe ($700-$900) | ||
| Ethernet pNIC | 2 Port 10Gbe ($300-$450) | ||
| Ethernet Cable | 1M / 3ft. CAT 6a ($5-$10) |
Let’s break this down a bit further. I used the high dollar from each line item above and figured 3 x HCAs or pNICs and 6 cables for my 3 hosts.
Ethernet 10Gb/s – (3 Host Total cost $2310)
- Cost Per Switch – $900 Switch / 8 Ports = $112 per port
- Cost to enable 3 Hosts with 3 pNICs and 2 Cables -(3 Hosts x $450 pNICS) + ((2 Cables x 3 Hosts) x $10 each) = $1410 for three hosts or $470 per Host
- Total Cost to enable 3 hosts and switch cost – $1410 + $900 = $2310
- Fully populated 8 Port switch supporting 4 hosts = $2776
InfiniBand SDR 10Gb/s – (3 Host Total Costs $385)
- Cost Per Switch Port – $70 / 24 Ports = $2.91 per port
- Host Costs – (3 Hosts x $75 HCA) + ((2 Cables x 3 Hosts) x $30 = $315 (Per Host $105)
- Total Cost to enable 3 hosts and switch cost – $315 + $70 = $385
- Fully populated 24 port switch supporting 12 hosts = $1330
InfiniBand DDR 20Gb/s – (3 Host Total Cost $510)
- Cost Per Switch Port – $120 / 24 Ports = $5 per port
- Host Costs – (3 Hosts x $100 HCA) + ((2 Cables x 3 Hosts) x $30 = $390 (Per Host $130)
- Total Cost to enable 3 hosts and switch cost – $390 + $120 = $510
- Fully populated 24 port switch supporting 12 hosts = $1680
InfiniBand QDR 40Gb/s – (3 Host Total Cost $1040)
- Cost Per Switch Port – $500 / 24 Ports = $20.83 per port
- Host Costs – (3 Hosts x $150 HCA) + ((2 Cables x 3 Hosts) x $30 = $540 (Per Host $180)
- Total Cost to enable 3 hosts and switch cost – $540 + $500 = $1040
- Fully populated 24 port switch supporting 12 hosts = $2660
From these costs you can clearly see that InfiniBand is TRULY the best value for speed and port price. Even if you got a great deal, let’s say 50% off on 10Gbe, it still would be slower and it would cost you more. Heck, for the price you could easily buy an extra switch as a backup.
With this in mind my plan it to replace my backend Gbe network with InfiniBand. Using IPoIB (IP over InfiniBand) for VSAN, vMotion, and FT traffic and my 1Gbe network for the VM’s and ESXi management traffic. However, without knowledge wisdom cannot be achieved. So, my next steps are to learn more about InfiniBand and review these great videos by Mellanox. Then come up with a plan to move forward using this technology.
Check out these Videos: InfiniBand Principles Every HPC Expert MUST Know!
VSAN – Performance Degradation of Hybrid disk groups on VSAN 6.2 Deployments (2146267)
What >> Upgraded Hybrid (SDD and HDD) VSAN 6.2 deployments are being affected by a new service causing performance issues
Current fix and more advisement >>KB2146267
Automate this fix >> You can give this script a go BUT play at your own riskLINK (Thanks Jase!)
Next Steps >> This should be resolved in an upcoming patch release (don’t ask me how soon, but it’ll be soon)
If you like my ‘no-nonsense’ blog articles that get straight to the point… then post a comment or let me know… Else, I’ll start writing boring blog content.
How to find Dell PERC FD332 or H330 Firmware Versions in ESXi 6
Today’s adventure seemed an easy task but ended up taking much too long to find the right answer.
The task… ‘Is there a way to find the firmware version of a Dell Perc FD332 or H330 controller using command line in ESXi 6?’
The answer:
‘zcat /var/log/boot.gz |grep -i firm’

Things that didn’t work –
http://www.yellow-bricks.com/2014/04/08/updating-lsi-firmware-esxi-commandline/
Thanks going out to my fellow VMware TAMs for helping me to locate this answer.
If you like my ‘no-nonsense’ blog articles that get straight to the point… then let me know…
Else, I’ll start writing boring blog content.
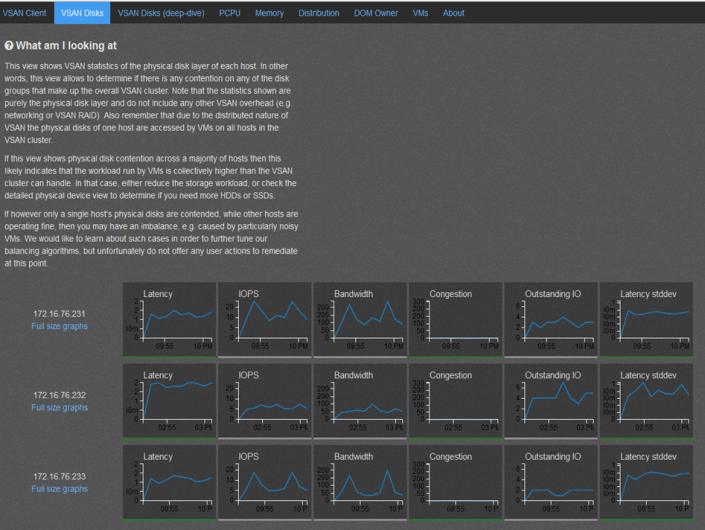
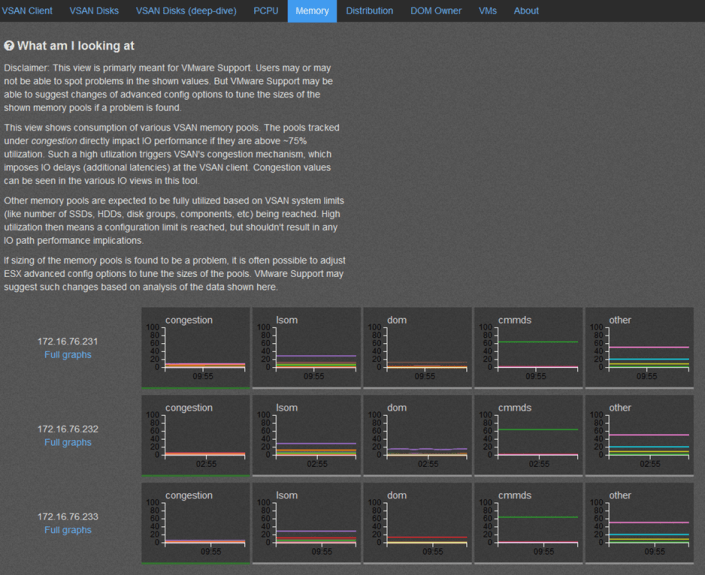
VSAN – Setting up VSAN Observer in my Home Lab
VSAN Observer is a slick way to display diagnostic statics not only around how the VSAN is performing but how the VM’s are as well.
Here are the commands I entered in my Home Lab to enable and disable the Observer.
Note: this is a diagnostic tool and should not be allowed to run for long periods of time as it will consume many GB of disk space. Ctrl+C will stop the collection
How to Start the collection….
- vCenter239:~ # rvc root@localhost << Logon into vCenter Server Appliance | Note you may have to enable SSH
- password:
- /localhost> cd /localhost/Home.Lab
- /localhost/Home.Lab> cd computers/Home.Lab.C1 << Navigate to your cluster | Mine Datacenter is Home.Lab, and cluster is Home.Lab.C1
- /localhost/Home.Lab/computers/Home.Lab.C1> vsan.observer ~/computers/Home.Lab.C1 –run-webserver –force << Enter this command to get things started, keep in mind double dashes “—” are used in front of run-webserver and force
- [2014-09-17 03:39:54] INFO WEBrick 1.3.1
- [2014-09-17 03:39:54] INFO ruby 1.9.2 (2011-07-09) [x86_64-linux]
- [2014-09-17 03:39:54] WARN TCPServer Error: Address already in use – bind(2)
- Press <Ctrl>+<C> to stop observing at any point ...[2014-09-17 03:39:54] INFO WEBrick::HTTPServer#start: pid=25461 port=8010 << Note the Port and that Ctrl+C to stop
- 2014-09-17 03:39:54 +0000: Collect one inventory snapshot
- Query VM properties: 0.05 sec
- Query Stats on 172.16.76.231: 0.65 sec (on ESX: 0.15, json size: 241KB)
- Query Stats on 172.16.76.233: 0.63 sec (on ESX: 0.15, json size: 241KB)
- Query Stats on 172.16.76.232: 0.68 sec (on ESX: 0.15, json size: 257KB)
- Query CMMDS from 172.16.76.231: 0.74 sec (json size: 133KB)
- 2014-09-17 03:40:15 +0000: Live-Processing inventory snapshot
- 2014-09-17 03:40:15 +0000: Collection took 20.77s, sleeping for 39.23s
- 2014-09-17 03:40:15 +0000: Press <Ctrl>+<C> to stop observing
How to stop the collection… Note: the collection has to be started and running to web statics as in the screenshots below
- ^C2014-09-17 03:40:26 +0000: Execution interrupted, wrapping up … << Control+C is entered and the observer goes into shutdown mode
- [2014-09-17 03:40:26] INFO going to shutdown …
- [2014-09-17 03:40:26] INFO WEBrick::HTTPServer#start done.
- /localhost/Home.Lab/computers/Home.Lab.C1>
How to launch the web interface…
I used Firefox to logon to the web interface of VSAN Observer, IE didn’t seem to function correctly
Simply go to http://[IP of vCenter Server]:8010 Note: this is the port number noted above when starting and its http not https
So what does it look like and what is the purpose of each screen… Note: By Default the ‘? What am I looking at’ is not displayed, I expanded this view to enhance the description of the screenshot.


References:
http://www.yellow-bricks.com/2013/10/21/configure-virtual-san-observer-monitoring/
VSAN – The Migration from FreeNAS
Well folks it’s my long awaited blog post around moving my Homelab from FreeNAS to VMware VSAN.
Here are the steps I took to migrate my Home Lab GEN II with FreeNAS to Home Lab GEN III with VSAN.
Note –
- I am not putting a focus on ESXi setup as I want to focus on the steps to setup VSAN.
- My home lab is in no way on the VMware HCL, if you are building something like this for production you should use the VSAN HCL as your reference
The Plan –
- Meet the Requirements
- Backup VM’s
- Update and Prepare Hardware
- Distribute Existing hardware to VSAN ESXi Hosts
- Install ESXi on all Hosts
- Setup VSAN
The Steps –
Meet the Requirements – Detailed list here
- Minimum of three hosts
- Each host has a minimum of one SSD and one HDD
- The host must be managed by vCenter Server 5.5 and configured as a Virtual SAN cluster
- Min 6GB RAM
- Each host has a Pass-thru RAID controller as specified in the HCL. The RAID controller must be able to present disks directly to the host without a RAID configuration.
- 1GB NIC, I’ll be running 2 x 1Gbs NICs. However 10GB and Jumbo frames are recommended
- VSAN VMkernel port configured on every host participating in the cluster.
- All disks that VSAN will be allocated to should be clear of any data.
Backup Existing VMs
- No secret here around backups. I just used vCenter Server OVF Export to a local disk to backup all my critical VM’s
- More Information Here
Update and Prepare Hardware
- Update all Motherboard (Mobo) BIOS and disk Firmware
- Remove all HDD’s / SDD’s from FreeNAS SAN
-
Remove any Data from HDD/SDD’s . Either of these tools do the job
- Windows Tools – “MiniTool Partition Wizard”
- Boot ISO – GParted
Distribute Existing hardware to VSAN ESXi Hosts
- Current Lab – 1 x VMware Workstation PC, 2 x ESXi Hosts boot to USB (Host 1 and 2), 1 x FreeNAS SAN
- Desired Lab – 3 x ESXi hosts with VSAN and 1 x Workstation PC
-
End Results after moves
- All Hosts ESXi 5.5U1 with VSAN enabled
- Host 1 – MSI 7676, i7-3770, 24GB RAM, Boot 160GB HDD, VSAN disks (2 x 2TB HDD SATA II, 1 x 60GB SSD SATA III), 5 xpNICs
- Host 2 – MSI 7676, i7-2600, 32 GB RAM, Boot 160GB HDD, VSAN disks (2 x 2TB HDD SATA II, 1 x 90 GB SSD SATA III), 5 x pNICs
- Host 3 – MSI 7676, i7-2600, 32 GB RAM, Boot 160GB HDD, VSAN disks (2 x 2TB HDD SATA II, 1 x 90 GB SSD SATA III), 5 x pNICs
- Note – I have ditched my Gigabyte z68xp-UD3 Mobo and bought another MSI 7676 board. I started this VSAN conversion with it and it started to give me fits again similar to the past. There are many web posts with bugs around this board. I am simply done with it and will move to a more reliable Mobo that is working well for me.

Install ESXi on all Hosts
-
Starting with Host 1
- Prior to Install ensure all data has been removed and all disk show up in BIOS in AHCI Mode
-
Install ESXi to Local Boot HD
- After the install I experienced the ESXi hanging at Boot – ‘Starting up Services – Running usbarbitrator start’
- Solution – Stop usbarbitrator service
- http://kb.vmware.com/selfservice/microsites/search.do?language=en_US&cmd=displayKC&externalId=1023976
- Setup ESXi base IP address via direct Console, DNS, disable IP 6, enable shell and SSH
- Using the VI Client setup the basic ESXi networking and vSwitch
- Using VI Client I restored the vCSA and my AD server from OVF and powered them on
- Once booted I logged into the vCSA via the web client
- I built out Datacenter and add host 1
- Create a cluster but only enabled EVC to support my different Intel CPU’s
- Cleaned up any old DNS settings and ensure all ESXi Hosts are correct
- From the Web client Validate that 2 x HDD and 1 x SDD are present in Host
- Installed ESXi Host 2 / 3, followed most of these steps, and added them to the cluster
Setup VSAN
-
Logon to the Webclient
-
Ensure on all the hosts
- Networking is setup and all functions are working
- NTP is working
- All expected HDD’s for VSAN are reporting in to ESXi
-
Create a vSwitch for VSAN and attach networking to it
- I attached 2 x 1Gbs NICs for my load that should be enough
-
Assign the VSAN License Key
- Click on the Cluster > Manage > Settings > Virtual SAN Licensing > Assign License Key
-

-
Enable VSAN
- Under Virtual SAN click on General then Edit
- Choose ‘Turn on Virtual SAN’
- Set ‘Add disks to storage’ to Manual
-
Note – for a system on the HCL, chances are the Automatic setting will work without issue. However my system is not on the any VMware HCL and I want to control the drives to add to my Disk Group.

-
Add Disks to VSAN
- Under Virtual SAN click on ‘Disk Management’
- Choose the ICON with the Check boxes on it
- Finally add the disks you want in your disk group

- Allow VSAN to complete its tasks, you can check on its progress by going to ‘Tasks’

- Once complete ensure all disks report in as healthy.

-
Ensure VSAN General tab is coming up correct
- 3 Hosts
- 3 of 3 SSD’s
- 6 of 6 Data disks
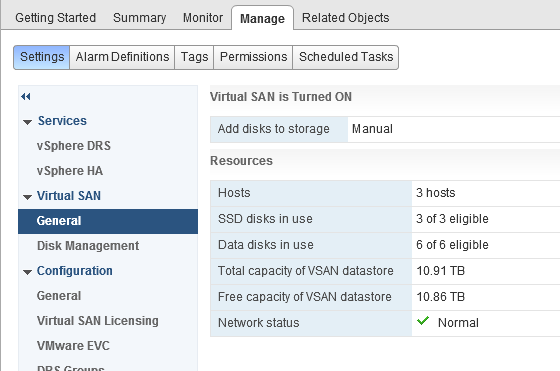
- Check to see if the data store is online

Summary –
Migrating from FreeNAS to VSAN was relatively a simple process. I simply moved, prepared, and installed and the product came right up. My only issue was working with a faulty Gigabyte Mobo which I resolved by replacing it. I’ll post up more as I continue to work with VSAN. If you are interested in more detail around VSAN I would recommend the following book.
- ← Previous
- 1
- 2
