vSphere 4 – Increase a VMs Hard disk under Windows 2008
Here’s how I recently changed the C: boot drive on a Windows 2008 VM
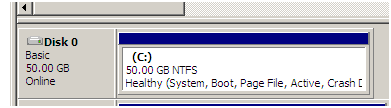
One of our older Windows 2008 templates has a 40GB C:\ hard disk, however I’d like it to be 50GB.
With the combination of vCenter Server 4, Windows 2008 and vSphere 4 this couldn’t be easier!
Prerequisites:
- Have admin access to vCenter Server and the Windows server
- A quick snapshot is always a good idea
Steps:
- While the server is still ON, yes I said “While the server is still on”, in vCenter Server right click on the VM
-
Choose Edit Settings, Choose the Hard disk you want to expand and type in the new size, Choose OK

- In Windows 2008 server open Server Manager, Click on Storage, Click on Disk Manager
- Note the extra space on your hard disk

- Right Click on the C: drive and choose Extend Volume
- Choose Next on the Welcome Screen
- Type in the amount you want to extend by or just click next the max
-
Click Finish to start the expansion, in about 2 seconds you’re done…
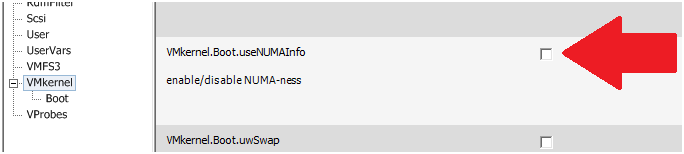
vSphere: NUMA 706: Can’t boot system as genuine NUMA
If you install vSphere on NON-NUMA hardware the following warning message will be displayed on the Service Console splash screen
cpu0:0)NUMA: 706: Can’t boot system as genuine NUMA. Booting with 1 fake node(s)
To resolve the warning message uncheck the option setting vmkernel.boot.usenumainfo
Windows 2003 – Page Faults (Soft and Hard)
Here is one way you can determine if your server is doing soft or hard Page faults.
Hard vs. Soft
Hard Page faults indicate the server is going to the Hard Disk to retrieve needed data and place it in RAM.
Soft Page faults indicate it is going to RAM or Cache to get the data it needs. This is a normal for most programs
Performance Monitor
Setup Windows performance monitor with the following…
SOFT Page Faults = Cache Faults/sec & Page Faults/sec
Hard Page Faults = Page Reads/sec & Avg. Disk Sec/Read
As you can see from this screen shot this server isn’t doing any hard page faults.
If you notice consistent hard page faults, this could be by design, or you need to add RAM to the server or allocate appropriate RAM to the application. Either way, I’d recommend consulting with the application owner or company who created the application for proper guidance.

Reference…
http://blogs.technet.com/b/askperf/archive/2008/06/10/the-basics-of-page-faults.aspx
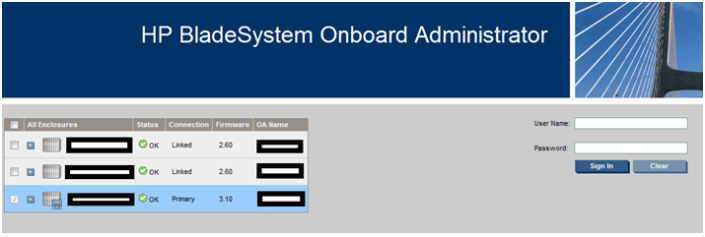
c7000 – Enclosure Interlink
Today I was able to interlink my 3 HP c7000 blade chassis. I used the document listed below as guidance and here are some of my brief note/findings around this.
- Interlinking the HP c7000 blade chassis (BC) is simple as connecting a CAT5e or better network cable to the UP and DOWN interlinks ports on the back of your C7000.
- Keep in mind the BC at the top of the link (or last BC pointing down) will become the master.
- Per the document link below, HP recommends you interlink BC’s per rack vs. across multiple racks and the max BC’s to be interlinked is 7.
- The linked enclosures will enforce a common rack name on all the linked enclosures; however, the enclosure name will remain unique.
- Interlinking the c7000 chassis allowed me to have a one-stop web page for the BC’s. However, the BC’s are still unique in their settings, user accounts, etc.
Note: If you’re using local accounts then the account names and passwords for each BC need to match for single login to work.
Reference Links…
Updated link on 09-20-2017 http://h20565.www2.hpe.com/hpsc/doc/public/display?sp4ts.oid=1844065&docId=emr_na-c00698286&docLocale=en_US
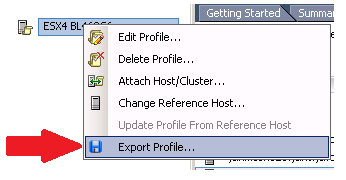
ESX 4.1 Host Profile Copy
Wouldn’t it be nice be able to make a copy of an existing host profile allowing you to create new profile?
vCenter Server 4.1.0 doesn’t have a copy function but you can export the profile then import it with a different name.
Note – Keep in mind this might not work on your destination hardware, you should use a base profile that is simlar and go fromt there. You also might have to tweek the copied profile for it work properly.
In vCenter Server 4.1.0 go to the Host Profiles area on you vCenter server

Simply right click and choose export profile
Choose ok to this warning…

Choose a good name and click on save

When the creation is complete from the main window Choose “Create a new host profile” > Import Profile >, Browse to the Import location and choose your file > Enter a new Name for the profile > Choose Finish
Once your done you can now edit this profile, updated it, add hosts, etc..
EMC VPLEX – vMotion over Distance
Here are some links I’ve been using to research the EMC VPLEX Technology…
VMware and EMC – The Value of EMC VPLEX in the Virtual Data Center
http://www.youtube.com/watch?v=8zf-5NNDFKI&feature=related
EMC VPLEX – Simple, Scalable vMotion over distance
http://www.youtube.com/watch?v=fKKhrI7A7Og&feature=related
vMotion over Distance support with EMC VPLEX Metro
vmworld 2010 – The Schedule
Here is my schedule for vmworld 2010… This year I plan to hit the self-paced labs in the morning, followed up by super-sessions, performance, and cloud computing throughout the week. Hopefully I’ll have time for lunch and the vendor area!
| EA7850 — Design, Deploy, and Optimize Microsoft SQL 2008 |
| SS1055 — Partner Track Super Session |
| TA8102 — Tuning Linux for Virtual Machines |
| EA8210 — Zimbra and The Future for Mission Critical Apps in the Virtualized Enterprise |
| ALT3005 — VMware vCenter™ Orchestrator – Orchestrating the Cloud |
| ALT2004 — Building the VMworld Lab Cloud Infrastructure |
| EA7829 — Panel Discussion: Virtualization’s Impact on the Delivery of Healthcare IT Services |
| TA9420 — vSphere 4.1 Overview |
| SP9820 — Getting the Most Out of Your Storage Infrastructure with Client and Server Virtualization |
| TA6720 — Troubleshooting using ESXTOP for Advanced Users |
| TA8133 — Best Practices to Increase Availability and Throughput for VMware |
| SS1011 — How Cisco, EMC and VMware Are Changing the IT Landscape with Vblock Converged Infrastructure |
| TA8623 — Storage Super-Heavyweight Challenge |
| SP9721 — How to Use Virtual I/O to Provision and Manage Networks and Storage Resources in a Private Cloud |
| TA6944 — PowerCLI Is For Administrators! |
| TA8051 — Infrastructure Technologies to Long Distance VMotion – What Is “VM Teleportation”? |
| TA8101 — Virtual Storage and VMware vSphere: Best Practices and Design Considerations |
| TA7994 — vStorage Update for vSphere 4.1 |
EMC Ionix UIM 2.0 and VMware Project Redwood Preview
I got a chance to review this you video and must say the “cloud” / vblock is starting to take a real form. Imagine if you could provision you servers + storage + networking with simple clicks… with EMC vblock you can…
At vmworld 2010 I plan to sit in as many of the Ionix UIM / Vmware Redwood seminars as I can…
Very cool!
SQL Server Performance Issues
This is an on going post that I am updating as it progresses… the issue start in early July of 2010 – Present date…
The Issue..
Recently I was working on a MS SQL 2000 Server and it was having some performance issues. Users were reporting random slowness and disconnects. Three other servers would feed this server SQL based data and a MS SQL 2008 Reporting server would occasionally connect and retrieve data for reporting services. Keep in mind this is non-clustered production server and the business needs to have up 24/7, and rebooting it is close to impossible. Hence this drove some of our decisions…
What we know about the server…
- Server is a HP DL380 G5 server, Single Socket Quad Core Xeon 5160, 4GB RAM (4x 1GB Sticks) , 2 x 36GB SAS 10K Drives (C Drive) , 5 x 146GB SAS 10K Drives (D Drive)
- OS is Windows 2003 SP2
- SQL Enterprise Edition 2000 SP 4
- HP Management Tools are installed
- C: Drive is 33GB / 14GB Free and is ~ 75% Fragmented
- D: Drive is 410GB / 172GB Free and is ~100% Fragmented
- SQL is taking 1.7GB of RAM as of 07/28/2010
- SQL is taking 5 to 20% of the CPU
- 980MB of RAM is average Free Space
Items we tried… (Keep in mind the order we could attempt analysis was partially based on the business)
- Basic analysis – No issues found, memory okay, disk okay, etc..
- Checked Network connections (cable, switch), and Error Logs – Found HP NIC was reporting disconnects since 2008
- Reseated and tested cables, okay no issues
- Updated with MS Updates and rebooted
- Updated firmware (HP FW 9.00), Software Drivers (PSP 8.40), and Rebooted
- Noted that PSP8.40 NIC driver was dated update Driver manually to latest
- After updates users reported no change still slow
- Found the TCP Off Load Chimney issue (kb/942861) but we decided to explore other options first
- Monitored the server via Task Manager / Process Explorer, Nothing definitive found
- Vendor Ran the SQL Profiler Program to determine issues, Nothing definitive found
- Vendor believed that Hard Page Faults were the issue based on Task Manager Reports. I used the link below with Performance Monitor & Process Explorer to prove the server was not paging to disk.
- Noted the SQL Data disk and Boot Disk were fragmented
- Noted that SQL Maintenance was never run
- Noted that the /3GB Switch could be implemented & vendor concurred it is being used in other locations without issue
- Implemented the TCP Off Load Chimney and the /3GB, users reported improvements
- Contacted HP about the issue with Windows 2003 SP2, NC373i, and the TCP OffLoad issue
- HP Confirms NIC driver is up today
- HP would like to run HPS Reports, I ran/emailed them the reports
- HP Responds, Nothing definitive found in the HPS Reports
- HP will escalate to their network team for further analysis
Still to do…
- Database Maintenance & De-fragment hard disks
Summary so far..
It does appear that specific types of NIC controllers are having issues after the Windows 2003 SP2 update with the TCP Offload feature. Even updated drivers and firmware at this time don’t fix this. In-fact we even had one P2V VM that was having the same issue (I still need to look at this one)
Helpful Links….
Defrag Link –
http://technet.microsoft.com/en-us/library/cc966523.aspx
SysInternals Links –
http://technet.microsoft.com/en-us/sysinternals/bb963887.aspx
Basic of Page Faults –
http://blogs.technet.com/b/askperf/archive/2008/06/10/the-basics-of-page-faults.aspx
The effect of TCP Chimney off load –
Symantec In-depth explanation of TCP Chimney off load – (a great read)
http://seer.entsupport.symantec.com/docs/290098.htm
SQL Profiler
http://msdn.microsoft.com/en-us/library/aa173918(SQL.80).aspx
Memory Management – Demystifying /3GB
http://blogs.technet.com/b/askperf/archive/2007/03/23/memory-management-demystifying-3gb.aspx
Error message when an application connects to SQL Server on a server that is running Windows Server 2003: “General Network error,” “Communication link failure,” or “A transport-level error”
http://support.microsoft.com/kb/942861
An update to turn off default SNP features is available for Windows Server 2003-based and Small Business Server 2003-based computers
Book – Virtualizing Microsoft Tier 1 Applications with VMware vSphere 4
I got the honor of talking with Charles Windom today. He is the author of “Virtualizing Microsoft Tier 1 Applications with VMware vSphere 4”
We were concerned about Exchange performance with our SAN being setup as a large aggregate of drives vs. discrete drives.
All the best practices I read specifically stated discrete drives for performance reasons with Exchange 2003. However our SAN is setup as a large aggregate of drives.
Sean Dehlinger of vmware set me up with Charles and in about 2 minutes I had the confirmation that I needed.. (Thanks Sean!)
Here is the feed back from Charles…
1. Exchange 2003 Database does lots of Random R/W’s to the LUN, if the LUN is not discrete then you will see delays. The Logs and C: Drive are doing more Sequential R/W’s and the LUN aggregate should be okay.
2. IF your using Exchange 2010 Database or Logs then the R/W’s are Sequential and LUN discreteness is a non-issue.
It was nice to talk to an true expert and I look forward to meeting him at vmworld 2010 or having him talk at our Phoenix event..
