Submit a proposal to present at a VMUG Usercon or Supercon!
As many of you know I have a long history of being part of the Phoenix VMUG and the Global board of director for VMUG. Now, as VMware employee I continue to support the VMUG organization however I can. Just this week they announced that users can submit a proposal to present their content at their User/Super Cons globally! This is a great opportunity for users to contribute to the virtualization community and be a thought leader not only to your VMUG community but your working peers too. Over the past almost 10 years I have presented multiple times at VMUG events, from keynotes to users presentation’s, and even open mic user discussions. In this blog post I wanted to show the process I took to submit a proposal. It’s a great primer to get you ready to submit your own proposal, not to mention I’ll put in some tips and tricks along the way.
START HERE:
First off — Keep this in mind: Submitting a proposal doesn’t mean you must have all your presentation content ready, it just means you are ready to submit an overview and outline of your session.
Before writing up your proposal, I would recommend reviewing all the information in this link — https://community.vmug.com/blogs/katie-lyons/2017/11/28/2018-vmug-call-for-content
From that link you may notice there are many 4 different types of speaking sessions to choose from. This is great news as it allows you to choose a session type that aligns better to your goals. Maybe you have a topic you are very deeply engaged with and could carry a 60-90 minutes session, or maybe you got a quick 15 minute session topic in mind. Either way there is a session for that.

From the link above, move on to getting yourself ready to produce your talking points (See Below). I think this is great advice to get things ready, and these are things you’ll need to answer when you submit.

Understand submission proposal review process. My tip here: Figure our who is on this Planning committee and reach out to them for further success tips.

As of this writing (12/1/2017) the dead line to submit is December 8, 2017 for the Feb and April Events. It will stay open for others to submit for other events, but I would try to submit by 12/08 – Yes its s tight time frame, so get moving…

Finally, review the schedule and pick a session or session you’d like to present at. Keep in mind this is a community volunteer organization, and by submitting to present you volunteering your time, travel costs, etc. to do so.

One last note towards the bottom of the page – Got Questions? Questions can be directed to Molly Hewitt at mhewitt@vmug.com
NEXT SUBMIT THE PROPOSAL:
In this section I wanted to show you the fields you’ll need to fill in to submit a proposal. It should give you a good idea what you submit.
Here is the link to start your submission and log on with your ‘planion’ user account – https://vmug.planion.com/Web.User/LogReg?ACCOUNT=VMUG&CONF=CFC18&FT=ABSREG

NOTE: When you click on the submit proposal link just note the username is NOT your VMUG User ID it is a ID for a different site. So, you’ll need to create a new user account to submit.
After you logon, you’ll see a page similar to the link/information above, simply scroll to the bottom and click on ‘Begin the Abstract Submission Process’

After clicking start the submission, simply type in your title, your speaker category (VMware, Partner, Community), session format, and length of session (90,60,40,30,15)

In the next section you will need to choose a topic focus. Be ready to make further selections as each topic focus has subcategories.
TIP: All topic focus categories have the same subcategories. Don’t over think this too much just choose what you think would be relevant to the listener.

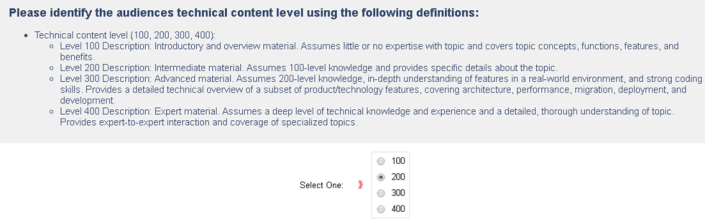
Next choose your technical content level. For my session I’m keeping it at a 200 level as it meets with the content and over all them I have. I would recommend if you are a high level say, 300 or 400 GREAT this is the type of presentations VMUG needs, please submit those too!
Be specific when you fill out ‘Identify the need” Think of it this way… Why would you attend this session? What would you want to get out of a session like this? If you can answer those questions, then you are hitting the mark.

With your Session Description have a bit of fun with it, show your passion for your topic and show why others would enjoy this session as well.

Finally, on this page fill out the remaining questions, and click save and continue.
TIP: Before clicking on Save and Continue, make sure all fields are filled out, else the form will not alert you until you are at the end of this process. If you missed anything required then you have to go back and fill all the missing items which takes you through the process again. Yes, this happened to me

Next question is – Who is presenting? Add folks if need be.

Attestation is a funny word for “Confirmation” or ‘Agreement’ review them and if all are okay, check those boxes and click submit.

Finally, you get a long page with all the content and choices you made, review them and if okay click on continue

When you all done submitting you can now view your submission.

And that’s it… Good luck submitting and if you need any help with your submittal please do reach out I’m always glad to help!
If you like my ‘no-nonsense’ blog articles that get straight to the point… then post a comment or let me know… Else, I’ll start writing boring blog content.
Limited vCenter Server options with Windows 2016
If you plan to update your vCenter Server to Windows 2016 then you might want to make sure you do your homework. Recently after reviewing the following KB its apparent that vCenter Server for Windows 2016 is only supported with vCenter Server 6.5. This might be a great time to consider moving to the vCenter Server Appliance (aka VCSA).
Here is the KB around the compatibility – https://kb.vmware.com/s/article/2091273?language=en_US

vSphere 6.0 / 6.5 Cross reference build release for ESXi, vSAN, and vCenter Server
I love the Correlating build numbers and versions of VMware products (1014508). This one KB has made my job, and I’m sure yours too, so much easier. Before this KB was released it was a bit difficult to correlate build, patch, and update levels to vSphere Environments. Now with just a few clicks one can find out all this information and more. However, I really need the ability to correlate multiple core products. Typically, I work with — ESXi, vCenter Server, and vSAN. So, today I took the time today to align all this information.
It took me about 5 mins to build the chart below but it will save me loads of time. Can’t tell you how many times I’ve been asked which version of ESXi was related to which version of vSAN and Oh, what version of vCenter Server was released with it? Well with this cart below you can answer those questions and more.
~ Enjoy!
|
vSAN version |
ESXi version |
Release Date |
Build Number |
vCenter Server Version |
Release Date |
Build Number |
|
vSAN 6.6.1 |
ESXi 6.5 Update 1 |
7/27/2017 |
5969303 |
vCenter Server 6.5 Update 1 |
7/27/2017 |
5973321 |
|
vCenter Server 6.5 0e Express Patch 3 |
6/15/2017 |
5705665 |
||||
|
vSAN 6.6 |
ESXi 6.5.0d |
4/18/2017 |
5310538 |
vCenter Server 6.5 0d Express Patch 2 |
4/18/2017 |
5318154 |
|
vSAN 6.5 Express Patch 1a |
ESXi 6.5 Express Patch 1a |
3/28/2017 |
5224529 |
vCenter Server 6.5 0c Express Patch 1b |
4/13/2017 |
5318112 |
|
vSAN 6.5 Patch 01 |
ESXi 6.5 Patch 01 |
3/9/2017 |
5146846 |
vCenter Server 6.5 0b Patch 1 |
2017-03-14 |
5178943 |
|
vSAN 6.5.0a |
ESXi 6.5.0a |
2/2/2017 |
4887370 |
vCenter Server 6.5 0a Express Patch 1 |
2/2/2017 |
4944578 |
|
vSAN 6.5 |
ESXi 6.5 GA |
11/15/2016 |
4564106 |
vCenter Server 6.5 GA |
11/15/2016 |
4602587 |
|
vSAN 6.2 Patch 5 |
ESXi 6.0 Patch 5 |
7/11/2017 |
5572656 |
|||
|
vSAN 6.2 Express Patch 7c |
ESXi 6.0 Express Patch 7c |
3/28/2017 |
5251623 |
vCenter Server 6.0 Update 3b |
4/13/2017 |
5318200/5318203 |
|
vSAN 6.2 Express Patch 7a |
ESXi 6.0 Express Patch 7a |
3/28/2017 |
5224934 |
vCenter Server 6.0 Update 3a |
3/21/2017 |
5183549 |
|
vSAN 6.2 Update 3 |
ESXi 6.0 Update 3 |
2/24/2017 |
5050593 |
vCenter Server 6.0 Update 3 |
2/24/2017 |
5112527 |
|
vSAN 6.2 Patch 4 |
ESXi 6.0 Patch 4 |
11/22/2016 |
4600944 |
vCenter Server 6.0 Update 2a |
11/22/2016 |
4541947 |
|
vSAN 6.2 Express Patch 7 |
ESXi 6.0 Express Patch 7 |
10/17/2016 |
4510822 |
|||
|
vSAN 6.2 Patch 3 |
ESXi 6.0 Patch 3 |
8/4/2016 |
4192238 |
|||
|
vSAN 6.2 Express Patch 6 |
ESXi 6.0 Express Patch 6 |
5/12/2016 |
3825889 |
|||
|
vSAN 6.2 |
ESXi 6.0 Update 2 |
3/16/2016 |
3620759 |
vCenter Server 6.0 Update 2 |
3/16/2016 |
3634793 |
|
vSAN 6.1 Express Patch 5 |
ESXi 6.0 Express Patch 5 |
2/23/2016 |
3568940 |
|||
|
vSAN 6.1 Update 1b |
ESXi 6.0 Update 1b |
1/7/2016 |
3380124 |
vCenter Server 6.0 Update 1b |
1/7/2016 |
3339083 |
|
vSAN 6.1 Express Patch 4 |
ESXi 6.0 Express Patch 4 |
11/25/2015 |
3247720 |
|||
|
vSAN 6.1 U1a (Express Patch 3) |
ESXi 6.0 U1a (Express Patch 3) |
10/6/2015 |
3073146 |
|||
|
vSAN 6.1 |
ESXi 6.0 U1 |
9/10/2015 |
3029758 |
vCenter Server 6.0 Update 1 |
9/10/2015 |
3018524 |
|
vSAN 6.0.0b |
ESXi 6.0.0b |
7/7/2015 |
2809209 |
vCenter Server 6.0.0b |
7/7/2015 |
2776511 |
|
vSAN 6.0 Express Patch 2 |
ESXi 6.0 Express Patch 2 |
5/14/2015 |
2715440 |
|||
|
vSAN 6.0 Express Patch 1 |
ESXi 6.0 Express Patch 1 |
4/9/2015 |
2615704 |
vCenter Server 6.0.0a |
4/16/2015 |
2656760 |
|
vSAN 6.0 |
ESXi 6.0 GA |
3/12/2015 |
2494585 |
vCenter Server 6.0 GA |
3/12/2015 |
2559268 |
If you like my ‘no-nonsense’ blog articles that get straight to the point… then post a comment or let me know… Else, I’ll start writing boring blog content.
2 VMTools Secrets your mother never told you about!
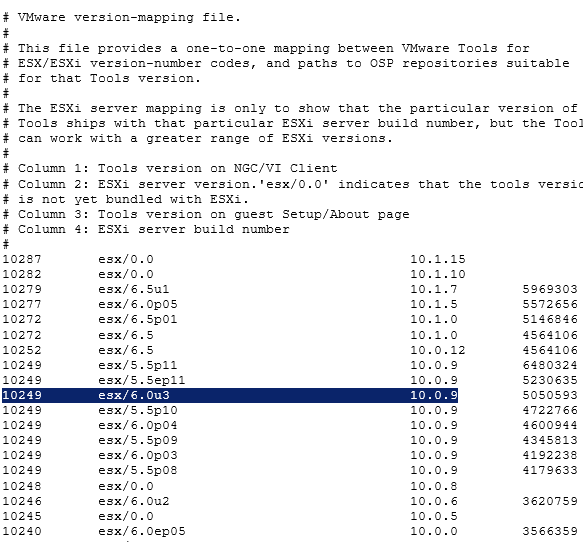
These are pretty common asks amongst operators of ESXi – ‘Which VMtools version came with my ESXi Host’ and ‘Where can I view and download all the VMTools directly?’ The answers are below and the outputs aren’t pretty but they sure are useful!
1st – Check out the URL below to see all the ESXi Host build to released versions.
https://packages.vmware.com/tools/versions
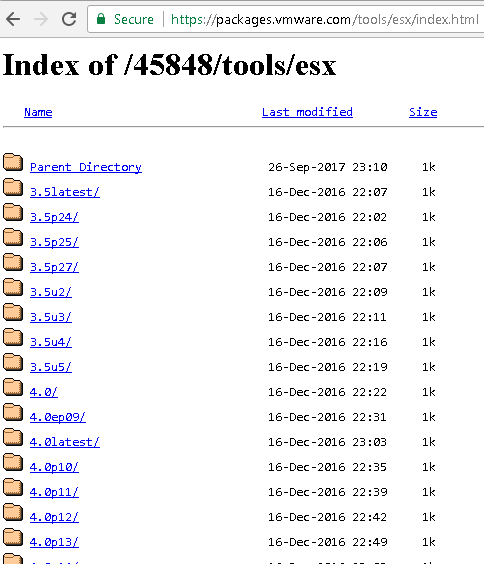
2nd – Where can I view and download all the VMTools directly
https://packages.vmware.com/tools/esx/index.html
Finally, if you read this far then you are in luck here is the best tip — Watch this video and you’ll know more about VMtools than your mom :)
http://vmware.mediasite.com/mediasite/Play/6d33be3f5da840a19ec1997e220aedfe1d
If you like my ‘no-nonsense’ blog articles that get straight to the point… then post a comment or let me know… Else, I’ll start writing boring blog content.
Home Lab Gen IV – Part IV: Overcoming installation challenges
One of the joys of working with a home lab is doing something that no one has done before. Sure, your configuration might be similar to others, but in a way your home lab is unique. However, with this uniqueness comes its share of installation challenges. My new lab was no exception, there were a few challenges and one major issue I uncovered while setting up this new environment. In this blog post I am going review the environment I am working on, break down some of the hardware layout placement challenges, fun using the MAC PowerBook to complete the installation, and finally overcoming ESXi installation challenges.
Here is my new environment:
- Mac Powerbook with macOS Sierra (Used for remote connection into my environment, normally I use a PC)
- Gigabyte MX31-BS0
- Intel Xeon E3-1230 v5
- 32GB DDR4 RAM
- 1 x Mellanox Connectx InfiniBand HCA
- 4 x 200GB SSD, 1 x 64GB USB (Boot)
- 1 x IBM M5210 JBOD SAS Controller
- 1 x Mini SAS SFF-8643 to (4) 29pin SFF-8482
- 1 x 64GB USB Boot Stick:
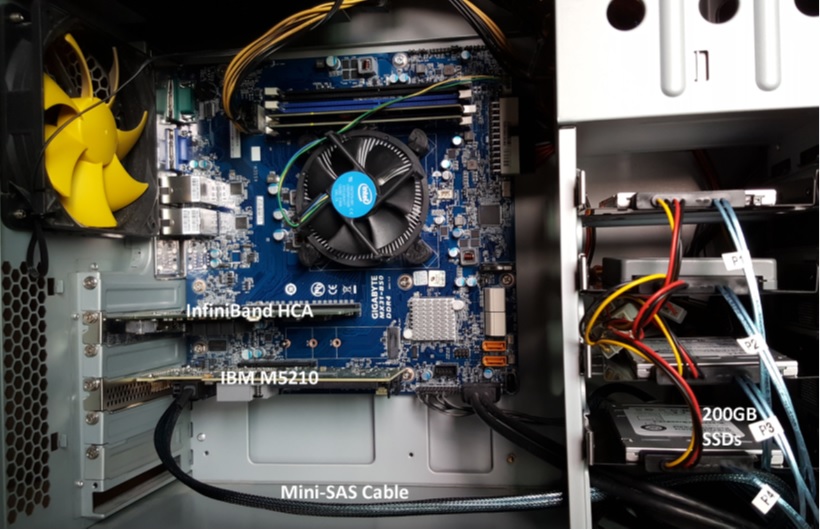
Hardware layout/placement challanges:
32GB of RAM: Pay attention to the placement of the RAM. As Channel 1 for the RAM are the two closest slots to the CPU, channel 2 being the two farthest away. Normally you would place the RAM pairs in like colors however this Mobo is a bit different
Mellanox Connectx InfiniBand HCA: Placed it in the 16x slot right next to the CPU. The HCA requires an 8x slot so this slot should not slow it down. No BIOS changes were required and I could see this HCA in the BIOS.
IBM M5210 JBOD SAS Controller: Placed it in the 8x slot which goes through the C232 chipset on the motherboard. Next, I needed to update the firmware but this proved to be a challenge. Keep in mind the M5210 with NO cache will not allow you to enter its BIOS management page (aka MegaRAID webbios). This means you’ll need to use the command line or other software to update and view its information. Initially, I tried several command line options (UEFI Shell, DOS CLI, etc.) with the MegaRAID CLI but I just could not find the right combination to get it to work. My solution — I simply used an older SSD drive, installed Windows Server 2012 on it, and used the Windows exe to update the firmware. It worked perfectly with no issues.
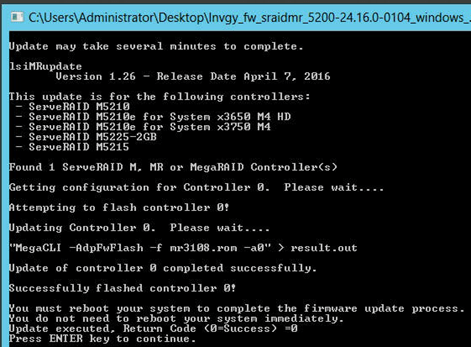
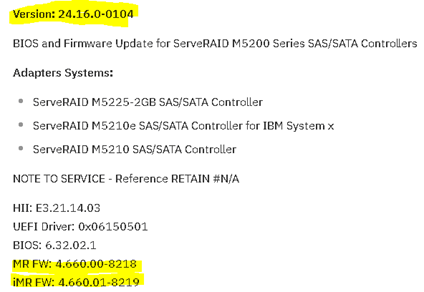
After the update, I had some issues decoding the M5210 running firmware version vs. the vSAN HCL. As you know when running vSAN in a home lab the closer you are to the HCL and vSAN HCL the better. (NOTE: as I’m sure you know production environments MUST match the HCLs). The published firmware version on the vSAN HCL is 4.660.00-8218. However, when the M5210 boots it shows 24.16.0-0104.
Solution: When you are looking at the boot screen you are seeing the FW Package number not the Firmware of your controller. Simply look at the release notes for the ‘FW Package’ and you’ll find the correct MR FW versions that match the vSAN HCL.
IBM / Lenovo doesn’t make it easy to find the firmware for this device.
Here are a few more recent links:
Boot Screen

Release notes
200GB SSD: The Sonata cases I am using are a bit dated but they fully meet my needs so there is no need to replace them. There are 4 x 3.5″ bottom mount disk trays in each case. Bottom mount means you insert your 3.5″ drive into the tray and bolt it to the tray from the bottom. I bought several 3.5″ to 2.5″ converters which will allow me to mount my 2.5″ SSDs. However, the converters didn’t have bottom mount holes that lined up with the standard 3.5″ holes. Fix — I used a hole in the existing tray to secure the converter to the tray. I also made sure I mounted the converter as far back as I could to ensure the SAS cables would not be on the side of the case. This mount position moved the drives back about 1.5″(38mm). The red line in the PIC show where the original mount point was.
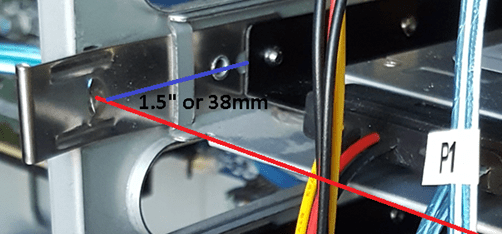
Mini SAS SFF-8643 to (4) 29pin SFF-8482: From the PIC above you can see the disk end of the SAS cables. What is nice about them is each one has a disk number labeled and has integrated power and all 4 drives go back to a single connector. The only downside to the cable I bought was they seemed a bit frail, so I’d recommend if you plan to mod your environment frequently look into a better-quality cable. If you interested more in SAS and the associated cables I would recommend this wiki page – https://en.wikipedia.org/wiki/Serial_Attached_SCSI

64GB USB Boot Stick: I decided to use the internal USB port freeing up the rear ports for other items. The USB stick I am using is the SanDisk Ultra Fit 64GB USB 3.0 Flash Drive. ESXi will only take up ~10GB of this stick, so is 64GB overkill? Keep in mind I plan to run vSAN 6.6.x and one of the benefits is the log files now write to RAM and in case of a system failure, they can write these logs to the USB stick. However, the default partition sizes (2.5GB for diags) might not be large enough. The vSAN team as released a nifty script that will estimate and resize you USB partitions. I’ll cover this topic in later posts and show you how to “auto-resize” your USB storage after you have installed vSAN.

Fun with the MAC:
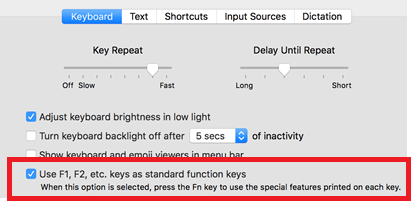
Function Keys: One of the challenges was MAC keyboard mapping into the remote KVM. For some reason, the function keys on a MAC always assume you want to their special function vs. the F# key you are pushing. This proves to be a challenge when you are trying to pass standard function keys. Simple fix: System Preferences > Keyboard > Ensure ‘Use F1, F2, etc. as standard function keys’ is checked.
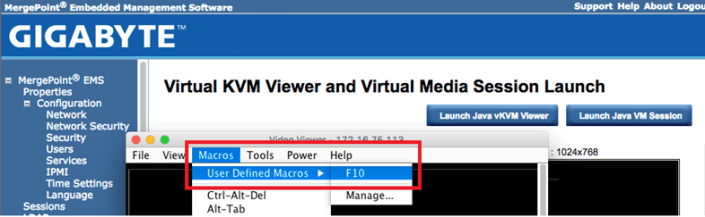
Another option for F# keys is to create a macro inside of the vKVM Viewer to pass the key. The screenshot below shows where you can setup user defined Macros and in the background is the MeregPoint console for one of my ESXi hosts.
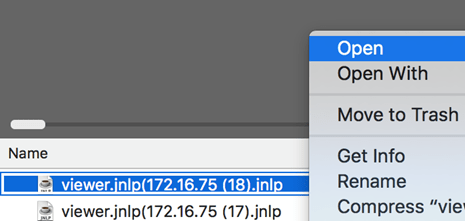
Java: One of the joys of this motherboard is the use of vKVM viewer and VM Media. However, these functions need JAVA installed and up to date to function properly. If your JAVA is behind, trust me just update it’ll save you hours of pain. Here is the remaining gotcha. In the Mergpoint web page, you simply click on the ‘Launch Java vKVM Viewer’ button to start your host remote session. The webpage will download a .jnlp file. If you just click on this file you are presented with an error stating it can’t be opened because it is from an unidentified developer. Solution – After the java app downloads, click on the down arrow next to the file and choose ‘Show in finder’. When finder launches select that file by holding down the control key and right-clicking on it. A pop-up window will appear, release the control key and finally choose open. This allows you to override the ‘unidentified developer’ error and launch the viewer.
ESXi Installation:
Setting up the ESXi hosts had one big challenge – after the install of ESXi I could not see my SAS disks. I am using the ESXi 6.5U1 Rollup.iso to do my installs and my main goal was to install and boot ESXi from the 64GB USB stick and be able to access the 4 x 200GB SSD attached to the IBM M5210
Problem – During the install of ESXi, I booted the host using the ESXi6.5 ISO via virtual media console. The installer program would recognize the IBM M5210 controller, the attached 4 x SAS disks, and the 64GB USB stick. The installation would complete without issue. However, after ESXi booted the SAS disks and the controller would not appear but I could see the 64GB USB stick.
Other observations –
First, in the ESXi Log files I noticed the megasas was having firmware issues:
2017-09-21T10:26:31.310Z cpu5:66065)<6>megasas: Waiting for FW to come to ready state 2017-09-21T10:26:31.310Z cpu5:66065)<7>megasas: FW in FAULT state!!
ESC[7m2017-09-21T10:26:31.310Z cpu5:66065)WARNING: vmklinux: pci_announce_device:1486: PCI: driver megaraid_sas probe failed for device 0000:07:00.0ESC[0m 2017-09-21T10:26:31.310Z cpu5:66065)LinPCI: LinuxPCI_DeviceUnclaimed:257: Device 0000:07:00.0 unclaimed.
And… even though ESXi saw the M5210 as vmhba1, its status was unknown
vmhba1 Avago (LSI) MegaRAID SAS Invader Controller
vmhba1 0000:07:00.0 PCI 0:0:29:0 PCI 0:7:0:0 Slot1 UNKNOWN
Second, I use Partition Wizard bootable ISO to remove all partitions prior to installing ESXi. I noted that sometimes after I booted to it as virtual media it would see the 4 x SAS disks and other times it would not.
Third, Installation of ESXI onto SAS or SATA SSD as the boot disk worked perfectly. After booting I could see the M5210 and SAS disks but my goal of using the 64GB USB stick for the boot device was not achieved.
Fourth, occasionally when I booted the ESXi host to the USB stick it would work okay, but upon reboot would not
Final Solution – The core reason why I could not see the SAS disks with ESXi or Partition Wizard was the boot type was UEFI and not legacy. During boot time the boot order would sometimes change if I had virtual media connected, meaning sometimes it would boot the 64GB USB stick or Partition Wizard as UEFI and other times as legacy. Apparently, UEFI boot was giving the M5210 firmware issues not allowing the SAS disk to come online.
FIX – I went into the BIOS of the motherboard > Advanced > CSM Configuration > changed ‘Boot option filter’ to ‘Legacy Only’ and all my issues went away.
Summary – I spent a lot of after-hours and weekends working out all various installation tweaks but what can I say, this is the joy of setting up a home lab! My hopes are in some way this post helps you move your home lab forward too. In my next post, I’ll be going over how to enable the InfiniBand HCA in ESXi 6.5.
If you like my ‘no-nonsense’ blog articles that get straight to the point… then post a comment or let me know… Else, I’ll start writing boring blog content.
Home Lab Gen IV – Part II: Design Considerations
I have decided to move my Home Lab away from Gen III into Gen IV. In doing this I am going to follow my best practices laid out in my ‘Home Lab Generations’ and ‘VMware Home Labs: a Definitive guide’. As you read through the “Home Lab Generations page” you should notice a theme around planning each generation and documenting its outcomes and unplanned items. In this blog post, I am going to start laying out Design Considerations which include the ‘Initial use case/goals and needed Resources as they relate to GEN IV.
Design Considerations:
Initial Use case / goals:
- Support vSphere 6.5 and vSAN 6.6 All Flash Environment
- Move networking vSAN and FT to high-speed InfiniBand
- Support headless ESXi Environment
Resources needed:
- To meet the initial use case/goals I’m will be investing quite a bit into this total refresh.
- Some initial GEN IV resource choices (Still in the works and not all proven)
- Reuse the 3 x Antec Cases / Power Supplies (No cost)
- BitFenix Case to support Windows 10 PC
- Mobo: Gigabyte MX31-BSO ($140 x 3 Ebay)
- RAM: 32GB DDR4 ($144 x 3 Jet.com)
- CPU: E3-1230v5 Xeon ($245 x 3 Jet.com)
- IBM M5210 SAS RAID (Found on Ebay $75 x 3)
- Mini SAS SFF-8643 to (4) 29pin SFF-8482 (Amazon 3 x $18)
- 12 x 200GB Enterprise Class SDD (Found on an Ebay lot deal)
- InfiniBand (All on Ebay)
- Mellanox IS5022 40Gb/s 8 Port Switch ($250) << Do not recommend, no Subnet Manager
- Mellanox ConnectX HCA rebranded as HP INFINIBAND 4X DDR PCI-E HCA CARD 452372-001 ($35 x 3)
- 6 x Infiniband Cables (Mellanox MCC4N26C-003 Cable ($60)
Notes around some of the choices above:
Mellanox IS5022 – I liked the footprint of this device over it not having built-in IB subnet manager. An IB subnet manager is required to manage the “network paths” on an IB network. Without an active IB subnet manager available your IB HCAs will not connect. Since the IS5022 I chose does not have an IB Subnet manager I will need a place to supply this service. I can choose an ESXi Host or a Windows Host. Since my ESXi hosts will be going up and down I plan to use my Windows PC as my subnet manager as it is always on and available.
Mellanox ConnectX HCA rebranded as HP INFINIBAND 4X DDR PCI-E HCA CARD 452372-001 – I initially choose these HCAs based on some other blog posts. They are at an attractive price point but they are much older and no longer have driver support. I was able to get them operational with ESXi 6.0 and will be soon working with them on ESXi 6.5 My advice is Mellanox has great products and support, however, I would recommend if you can afford it to go with a newer card that supports ESXi and save yourself the trouble of modifying ESXi software vibs. I’ll post more on this topic as I start deploying them with ESXi 6.5
Windows PC – I repurposed my Gigabyte Z68XP-UD3, i7 CPU, 90GB SSD, 16GB of DDR3 and then bought a cheap BitFenix case to build out my Windows PC. This PC will serve as my Plex Home Media Server and IB Subnet Manager. I also plan to run Workstation 10 and set up various service VM’s (AD, vCenter Server / VUM, DNS, etc). So far it’s working pretty well but this Mobo has been known to give me issues.
ESXi Hosts – I have 3 Antec Sonata cases, one that I have had since 2003 that I will reuse in this environment. I choose the following parts to make up my new ESXi Hosts: Mobo: Gigabyte MX31-BSO, 32GB DDR4, E3-1230v5 Xeon, and 4 x 200GB SSDs per host. This mobo is a bit limited on the ports but so far it seems to be working out well. For the boot disk, I plan to use the onboard USB port and a 64GB USB Stick. However, the question should be – What am I going to so with those 6 x 1TB SATA disks from GEN III — I put them into my old IX4
Here are a few PICs of the current build:

Next Post I’ll be going over the Gigabyte Motherboard.
If you like my ‘no-nonsense’ blog articles that get straight to the point… then post a comment or let me know… Else, I’ll start writing boring blog content.
Create an ESXi 6.0U2 installation ISO with Realtek 8168 Drivers
02/2021 Update – I was asked to try these steps with ESXi 7.x and I can confirm this driver will not work. I stopped running Realtek NICs quite a while ago. It’s not an issue with the steps but with ESXi 7.0. It does not support drivers with Linux dependencies. The driver ‘net55-r8168 8.045a-napi’ has a Linux dependence that is not part of ESXi 7.0 and this is why it will not install. See the error message below. If you want to install ESXi 7.0, I’d recommend going with NIC that is on the VMware HCL or very close to it.
Add-EsxSoftwarePackage : VIB Realtek_bootbank_net55-r8168_8.045a-napi requires vmkapi_2_2_0_0, but the requirement cannot be satisfied within the ImageProfile.
09/2019 Update – I have created a updated blog and video showing how to create custom ISOs for ESXi. Though it doesn’t include the Realtek drivers, one could use it for the same purpose. Check it out here – Create-an-esxi-installation-iso-with-custom-drivers-in-9-easy-steps
ESXi no longer supports Realtek Network drivers nor are they included on the installation ISO. However, if you want to install ESXi 5.x and 6.x (7.x is not supported) with the Realtek drivers, then users will have to create a custom ISO. Keep in mind these drivers are NOT supported by VMware and should be used at your own risk. Normally, I would use my trusty ESXi-Customizer GUI program but it is no longer supported for ESXi 6. In replacement they offer a CLI supported program. However, instead of learning another 3rd party tool I’d rather rely on the VMware tools provided to me. VMware enables users to create custom ISOs via PowerCLI and in this blog I’ll explain how I used PowerCLI create my ISO. Keep in mind these are the steps that worked for me and your environment may vary.
NOTE: These steps do not work with ESXi 7.0.
— Required Tools and Files —
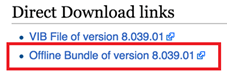
To get started you will need two files and PowerCLI Installed on a Windows PC. You can skip these steps if you have the ESXi Offline Bundle, PowerCLI installed, and the RealTek Drivers.
STEP1: File 1: Download VMware 6.0U2 Offline Bundle ZIP >> www.vmware.com/download

STEP 2: File 2: Download RealTek 8186 Offline bundle >> https://vibsdepot.v-front.de/wiki/index.php/Net55-r8168
STEP 3: If you haven’t yet download and install PowerCLI >> https://communities.vmware.com/community/vmtn/automationtools/powercli
Tip: If you don’t know PowerCLI try starting here
STEP 4: Next Place the files from Step 1 and 2 into c:\tmp folder

–POWERCLI COMMANDS—
Now that you have your files and PowerCLI ready follow these steps. For the steps below I included a screenshot and the actual commands. This will allow you to copy, paste, and edit these commands directly into your environment.
STEP 1: Open PowerCLI (Tip: If you don’t know PowerCLI try starting here)
STEP 2: Add ESXi 6.0u2 and RealTek8186 products to the local Software Depot (Tip: All commands below assume your files are located in the c:\tmp folder)

Add-EsxSoftwareDepot C:\tmp\update-from-esxi6.0-6.0_update02.zip

Add-EsxSoftwareDepot C:\tmp\net55-r8168-8.039.01-napi-offline_bundle.zip
STEP 3: Confirm the products are in the depot

Get-EsxSoftwareDepot
STEP 4: List out the ESXi Image Profiles

Get-EsxImageProfile
TIP: Use ‘Get-EsxImageProfile | select name’ for a better view of the list.
STEP 5: Create a Clone Image to be modified – Ensure you are targeting the “ESXi…..standard” profile from STEP 4

New-EsxImageProfile -cloneprofile ESXi-6.0.0-20160302001-standard -Name “RealTek8186a”
Forward-Looking Tip: Whatever ‘-Name’ you choose, it will show up in your boot ISO

STEP 6: You’ll have 2 entries in this step. First, we’ll Set the Acceptance Level to Community Supported (Remember RealTek is unsupported by VMware, hence “community supported”) and Second, for the ImageProfile you’ll enter the ‘-Name’ you choose in Step 5.

Set-EsxImageProfile -Name RealTek8186a -AcceptanceLevel CommunitySupported
For ImageProfile Enter the ‘-Name’ you choose in Step 5. I entered – RealTek8186a
STEP 7: Ensure the RealTek ‘net55-r8186’ driver is loaded from the local depot (Screenshot shortened)

Get-EsxSoftwarePackage
STEP 8: 3 Entries on this step. First, we add the RealTek software package to the profile. Second, we put in the ImageProfile ‘-Name’ from step 5, and third we enter the SoftwarePackage name.

Add-EsxSoftwarePackage
ImageProfile: RealTek8186a
SoftwarePackage[0]: net55-r8168 8.039.01-napi
Tip: For the SoftwarePackage you MUST enter the full name, if you just use the short name it will not work
STEP 9: Validate the RealTek drivers are now part of the RealTek8186a Profile (Screenshot shortened)

(Get-EsxImageProfile “RealTek8186a”).viblist
STEP 10: Export the profile to an ISO

Export-EsxImageProfile -ImageProfile “RealTek8186a” -ExportToIso -FilePath c:\tmp\RealTek8186a.iso
And that’s it… You should find your new ISO in the c:\tmp folder. From here you can burn your ISO to a media of your choice or boot the ISO via ilo, iDRAC, virtual media etc.
If you like my ‘no-nonsense’ blog articles that get straight to the point… then post a comment or let me know… Else, I’ll start writing boring blog content.
How to pinpoint ESXi hardware devices with vmkchdev
Have ever had trouble identifying specific hardware devices (NIC’s, Storage Adapters, Disks, etc.) on the vSphere compatibly guide (VCG)? If so, then following command is for you! As I’m sure you know, there can be multiple device descriptions listed on the VCG and it can be confusing to know which device matches the device you have. When this happens, it is necessary to locate the following ID’s:
- VID = Vendor Id
- DID = Device Id
- SVID = Sub-Vendor Id
- SSID = Sub-Device Id (aka Max SSID)
These IDs enable users to pinpoint the device without question and help to ensure you have the correct hardware guidance. VMware’s guidance to pinpoint devices is outlined in KB1021534. I found this KB to be very helpful and its where I found my new favorite command. With this one command it will produce nearly all the IDs in one shot vs. multiple commands.
vmkchdev -l << that is -l as in lama

In this example, I am looking to identify vmhba1.

I simply input the ID numbers into the VGC and it pinpoints the product, NO more guessing.

Summary – By using this simple command and the associated ID’s you’ll be sure you are identifying your hardware devices properly.
If you like my ‘no-nonsense’ blog articles that get straight to the point… then post a comment or let me know… Else, I’ll start writing boring blog content.
Shutting down Windows 10 leaves PC on but display off
If you have ever shutdown an unmodified version of Windows 10 then you’ve been there >> PC still powered on and your display is at a black screen. Then a bit later the PC powers off. From my point, I’d prefer the monitor to stay active until the PC powers off. Shutting down the monitor early is a bit annoying and leads me to believe the PC is off when it’s not.
I’ve created this blog post so I won’t forget how to disable this functionality as I’m sure in time I will forget.
Changing the setting is quite easy:
- In the Control Panel go to Power Options and click on ‘Choose what the power button does’
- From there choose ‘Change Settings that are currently unavailable’

- You should notice the options below are no longer grayed out.
- Remove the checkmark by ‘Turn on fast startup’

After changing these settings my PC shutdown normally, the display stated active, and then the PC powered off. For good measure, I power on my PC I didn’t notice any change in the amount of time for it to startup.
If you like my ‘no-nonsense’ blog articles that get straight to the point… then post a comment or let me know… Else, I’ll start writing boring blog content.
Enabling Service advisories for VMware vSAN and other products
One question I get a lot as a TAM is – “How can users of VMware products, such as vSAN, stay current with various service advisories?” One very simple way is to enable your my.vmware.com profile for product subscriptions. Product subscriptions allow you to choose products of interest and then you will receive emails around the various service advisories. It’s a very simple way to keep up to date and it only takes a few minutes to enable.
Here are the steps:
- Log on to your my.vmware.com portal account
- In the upper right-hand corner choose your name then click on profile

- After the profile page loads click on Subscriptions

- Under Product subscriptions, click edit

- You’ll find vSAN under ‘Datacenter & Cloud Infrastructure, simply choose it and/or other products, then click on save

- From there periodically, you’ll receive information and advisories around the products you select.
Sum it up: I have had these subscription services enabled for years now and I have only received valuable and timely information and not SPAM emails.
If you like my ‘no-nonsense’ blog articles that get straight to the point… then post a comment or let me know… Else, I’ll start writing boring blog content.
