Month: January 2026
VMware Workstation Gen 9: Part 1 Goals, Requirements, and a bit of planning
It’s time to build my VMware Workstation–based home lab with VCF 9. In a recent blog post, I documented my upgrade journey from VMware Workstation 17 to 25H2. In this installment, we’ll go deeper into the goals, requirements, and overall planning for this new environment. As you read through this series, you may notice that I refer to VCF 9.0.1 simply as VCF 9 or VCF for brevity.
Important Notes:
- VMware Workstation Gen 9 series is still a work in progress. Some aspects of the design and deployment may change as the lab evolves, so readers should consider this a living build. I recommend waiting until the series is complete before attempting to replicate the environment in your own lab.
- There are some parts in this series where I am unable to assist users. In lieu I provide resources and advice to help users through this phase. These areas are VCF Offline Depot and Licensing your environment. As a Broadcom/VMware employee, we are not granted the same access as users. I have an internal process to access resources and these processes would not be helpful to users.
Overall Goals
- Build a nested minimal VCF 9.0.1 environment based on VMware Workstation 25H2 running on Windows 11 Pro.
- Both Workload and Management Domains will run on the same set of nested ESX Hosts.
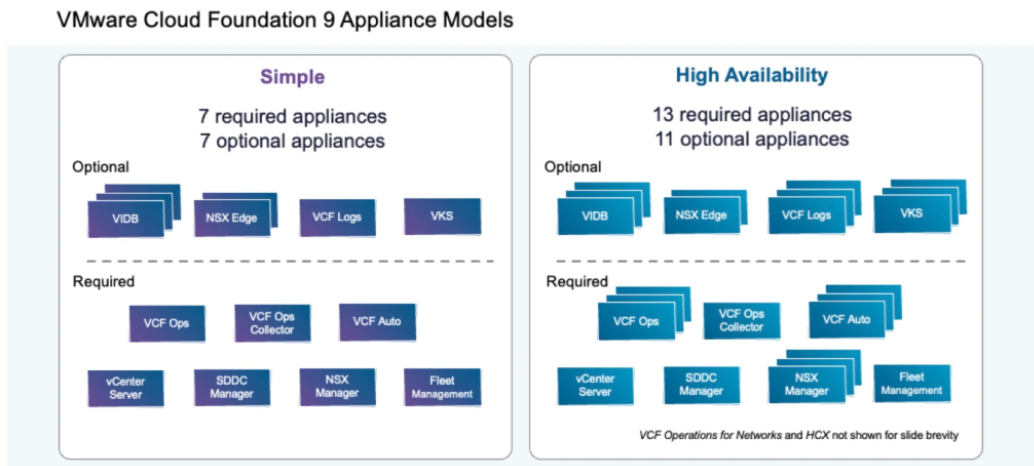
- Using the VCF Installer I’ll initially deploy the VCF 9 Management Domain Components as a Simple Model.
- Initial components include: VCSA, VCF Operations, VCF Collector, NSX Manager, Fleet Manager, and SDDC Manager all running on the 3 x Nested ESX Hosts.
- Workstation Nested VMs are:
- 3 x ESX 9.0.1 Hosts
- 1 x VCF Installer
- 1 x VCF Offline Depot Appliance
- 1 x Windows 2022 Server (Core Services)
- Core Services supplied via Windows Server: AD, DNS, NTP, RAS, and DHCP.
- Networking: Private to Workstation, support VLANs, and support MTU of 9000. Routing and internet access supplied by the Windows Server VM.
- Should be able to run minimal workload VM’s on nested ESX Hosts.
Hardware BOM
If you are interested in the hardware I’m running to create this environment please see my Build of Materials (BOM) page.
Additionally, check out the FAQ page for more information.
Deployment Items
To deploy the VCF Simple model I’ll need to make sure I have my ESX 9.0.1 Hosts configured properly. With a simple deployment we’ll deploy the 7 required appliances running on the Nested ESX hosts. Additionally, directly on Workstation we’ll be running the AD server, VCF Offline Depot tool, and the VCF Installer appliance.
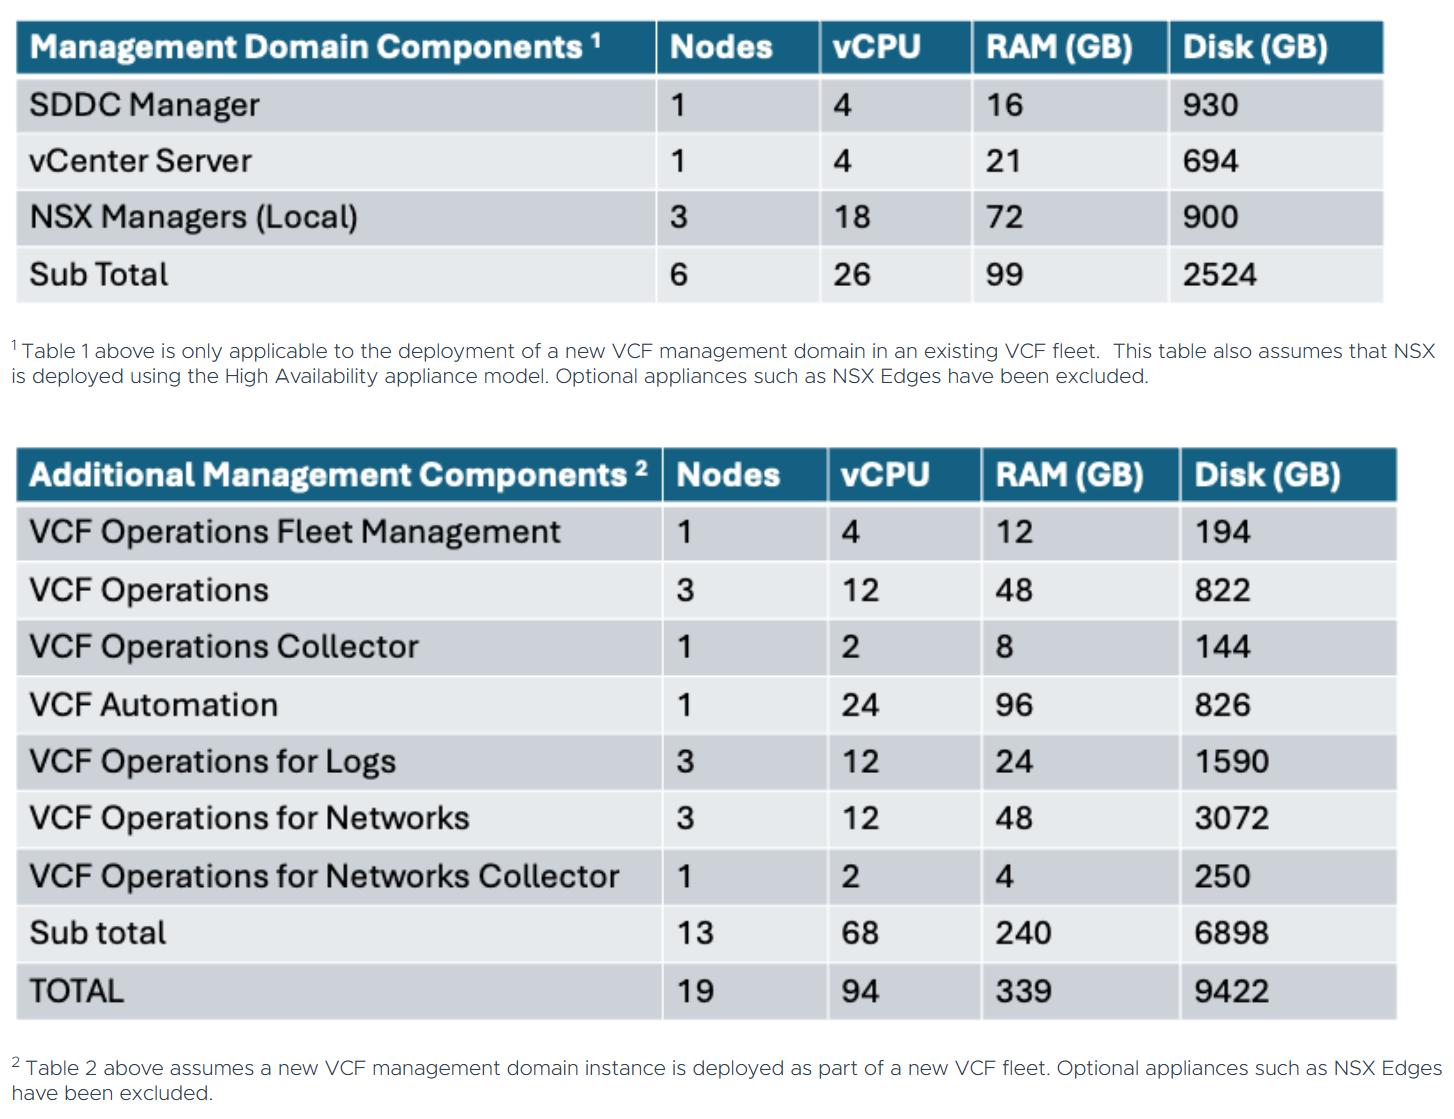
Using the chart below I can get an idea of how many cores, ram, and disk that will be needed. The one item that stands out to me is the component with the highest core count. In this case it’s VCF Automation at 24 cores. This is important as I’ll need to make sure my nested ESX Servers match or exceed 24 cores. If not, VCF Automation will not be able to deploy. Additionally, I’ll need to make sure I have enough RAM, Disk, and space for Workload VM’s.
Workstation Items
My overall plan is to build out a Windows Server, 3 x ESX 9 hosts, VCF Installer, and the VCF Depot Appliance. Each one of these will be deployed directly onto Workstation. Once the VCF Installer is deployed it will take care of deploying and setting up the necessary VMs.
NOTE: In the network layout below, hosts that are blue in color are running directly on Workstation, and those in purple will be running on the nested ESX hosts.
Network Layout
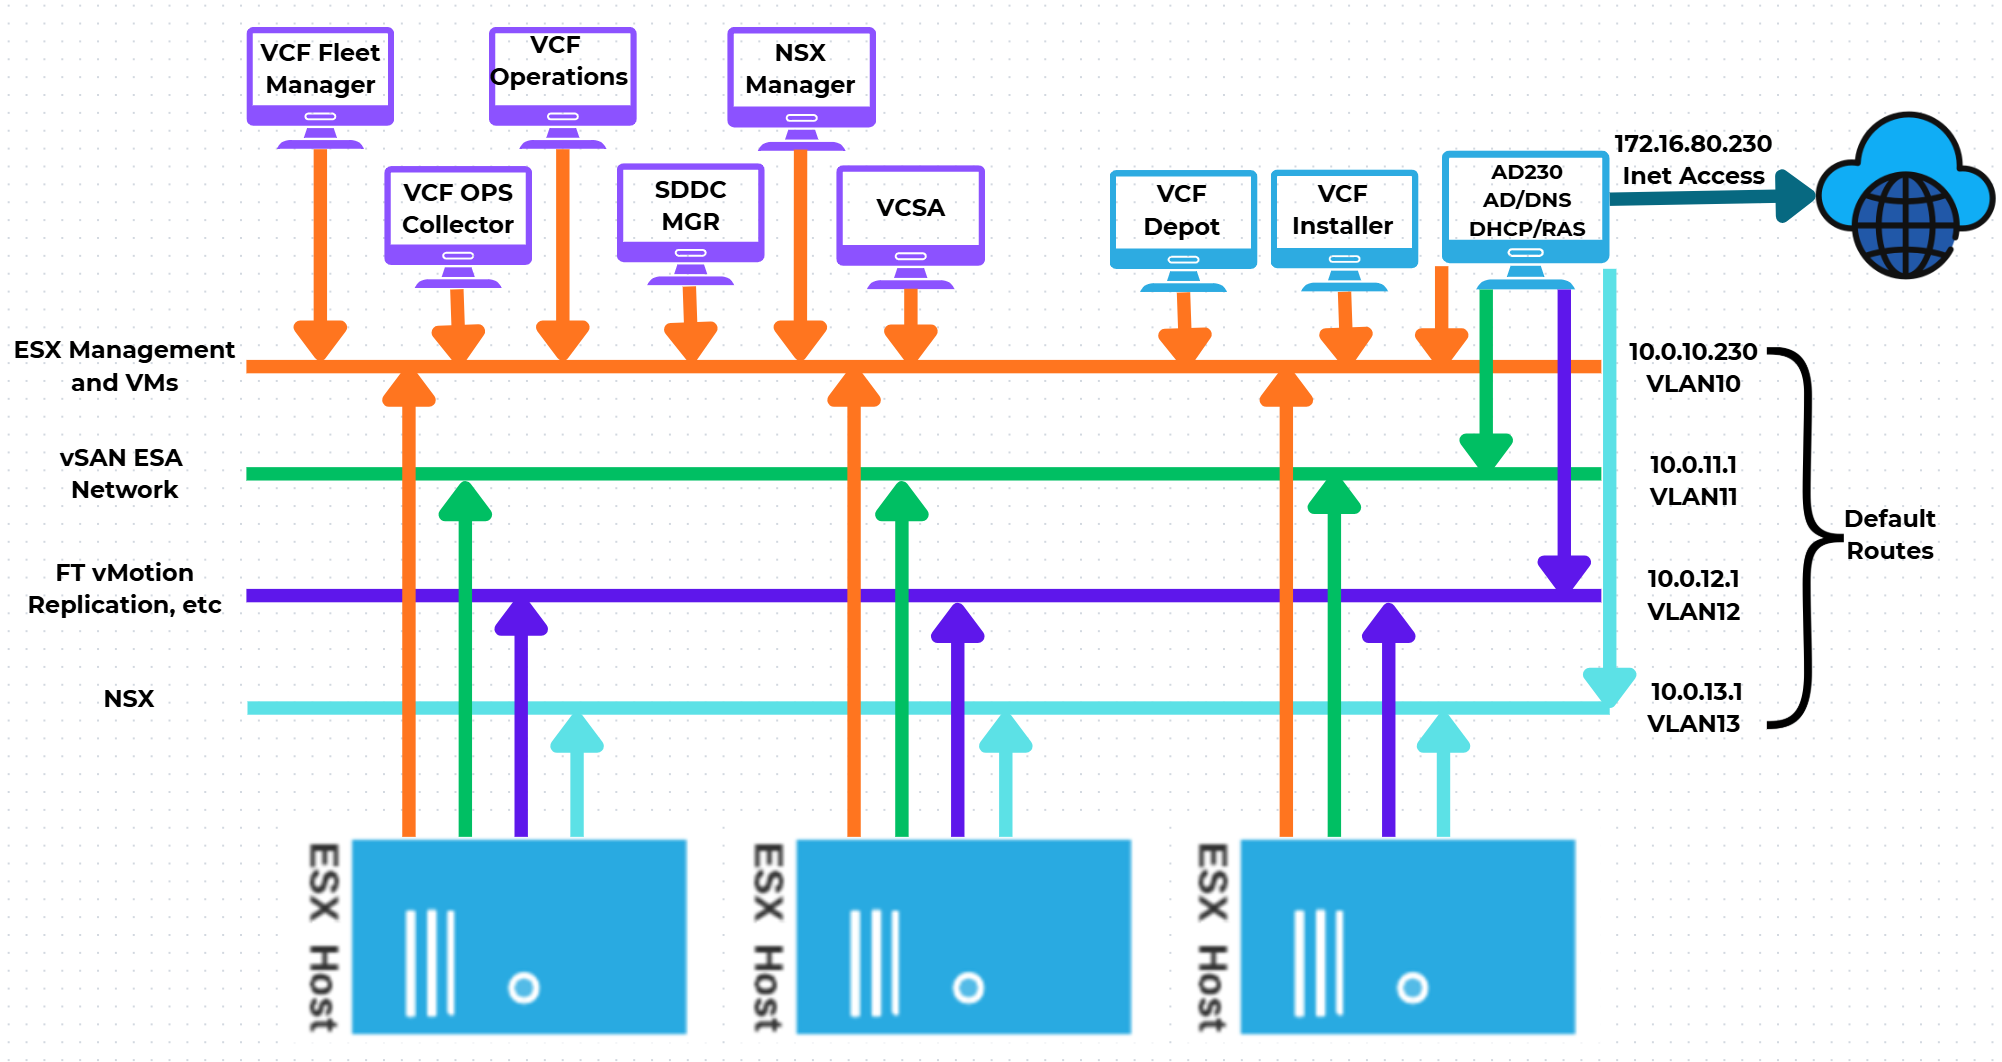
One of the main network requirements for VCF is supporting VLAN networks. My Gen8 Workstation deployment did not use VLAN networks. Workstation can pass tagged VLAN packets via LAN Segments. The configuration of LAN Segments are done at the VM’s Workstation settings, not via the Virtual Network Editor. We’ll cover this creation soon.
In the next part of this series I’ll show how I used Workstation Templates to create my VMs and align them to the underlying hardware.
Resources:
Backing up Workstation VMs with PowerShell
It’s pretty common for me to backup my Workstation VMs and I’m always looking for quick way to accomplish this. I’ve been using SyncBack Free for many years but most recently I’ve out grown. In this blog I’ll show you the script I wrote to backup my VM’s to a target location.
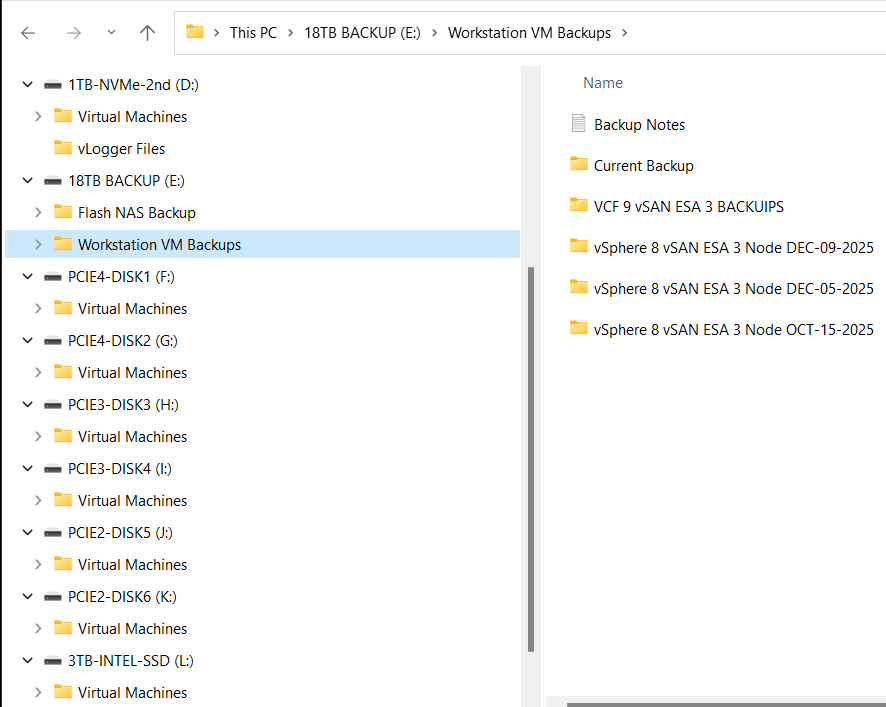
My Workstation server has many data disks with many folders for my VM’s. I backup my VM’s to a large hard disk and then regularly I’ll off load these backups to a NAS for archive purposes. This keeps the VM’s local for quick restores and the NAS provides some further protection.
My PowerShell 7 script is rather simple.
- Define my sources
- Choose a target folder
- Asks if you want to simulate a backup
- Robocopy copies or simulates a copy of the files while appending to a logfile
- Appends the folders and log file with a date stamp
It’s a pretty simple process but it works quite well.
Write-Output "`n**** Workstation VM Backups for VCF 9 vSAN ESA 3 Node *****`n"

# Define Sources
$source1 = "d:\Virtual Machines\VCF 9 vSAN ESA 3 Node"
$source2 = "f:\Virtual Machines\VCF 9 vSAN ESA 3 Node"
$source3 = "g:\Virtual Machines\VCF 9 vSAN ESA 3 Node"
$source4 = "h:\Virtual Machines\VCF 9 vSAN ESA 3 Node"
$source5 = "i:\Virtual Machines\VCF 9 vSAN ESA 3 Node"
$source6 = "j:\Virtual Machines\VCF 9 vSAN ESA 3 Node"
$source7 = "k:\Virtual Machines\VCF 9 vSAN ESA 3 Node"
$source8 = "l:\Virtual Machines\VCF 9 vSAN ESA 3 Node"
$source8 = "D:\Virtual Machines\Domain Services\DomainToolsVM - 12 05 2025"

# Function user selected destination folder
function Select-FolderDialog {
param([string]$Description="Select a EMPTY folder",
[string]$RootFolder="MyComputer")

# Load the necessary assembly
Add-Type -AssemblyName System.Windows.Forms

# Create an instance of the FolderBrowserDialog object
$objForm = New-Object System.Windows.Forms.FolderBrowserDialog
$objForm.RootFolder = $RootFolder
$objForm.Description = $Description

# Show the dialog box
$Show = $objForm.ShowDialog()

# Check if the user clicked 'OK' and return the selected path
if ($Show -eq "OK") {
return $objForm.SelectedPath
} else {
Write-Error "****Operation cancelled by user****"
pause
exit 1
}

# Clean up the object
$objForm.Dispose()
}

Write-Output "`n***** Choose Destination Folder *****"
# Prompt User for desintation folder
$selectedFolderPath = Select-FolderDialog -Description "Please choose the destination folder"
if ($selectedFolderPath) {
Write-Host "You selected: $selectedFolderPath"
# You can now use $selectedFolderPath in the rest of your script
}


Write-output "`n****Choose Robo options****"

# Robocopy options
# /E Copies subdirectories. This option automatically includes empty directories.
# /TEE Writes the status output to the console window, and to the log file.
# /ZB Restart Mode, if denied back to backup mode
# /R:# Retires
# /W:# Wait time between retires
# /J Unbuffered IO for faster large file backups
# /L Simulate backup
# https://learn.microsoft.com/en-us/windows-server/administration/windows-commands/robocopy


#To simulate backup or not
$question = "Do you want run a simulated backup? (Y/N)"
do {
$response = Read-Host -Prompt $question
# Use ToLower() for case-insensitive comparison
$response = $response.ToLower()
} until ($response -eq 'y' -or $response -eq 'n')

if ($response -eq 'y') {
Write-Host "Continuing... with Simulated Robocopy backup`n"
$robocopyoptions = $roboOptions = @("/E", "/TEE", "/ZB", "/R:2", "/W:10", "/J", "/L")


} else {
Write-Host "Continuing.... with Robocopy backup`n"
$robocopyoptions = $roboOptions = @("/E", "/TEE", "/ZB", "/R:2", "/W:10", "/J")


}


Write-Output "`n****Robocopy START****"

#Define Log loction
$logfile = $selectedFolderPath + "\WorkstationBackupLog.txt"

# Start Robocopy and append to log file
robocopy $source1 $selectedFolderPath $robocopyoptions /LOG+:$logfile
robocopy $source2 $selectedFolderPath $robocopyoptions /LOG+:$logfile
robocopy $source3 $selectedFolderPath $robocopyoptions /LOG+:$logfile
robocopy $source4 $selectedFolderPath $robocopyoptions /LOG+:$logfile
robocopy $source5 $selectedFolderPath $robocopyoptions /LOG+:$logfile
robocopy $source6 $selectedFolderPath $robocopyoptions /LOG+:$logfile
robocopy $source7 $selectedFolderPath $robocopyoptions /LOG+:$logfile
robocopy $source8 $selectedFolderPath $robocopyoptions /LOG+:$logfile
robocopy $source9 $selectedFolderPath $robocopyoptions /LOG+:$logfile

Write-Output "****Robocopy FINISH****"

Write-Output "`n****Rename Files START****"
#Rename Folders/file with date stamp
$DateStamp = Get-Date -Format "_yyyy-MM-dd"

Get-ChildItem -Path $selectedFolderPath -Directory | ForEach-Object {
# Construct the new name: original name + date stamp
$NewName = $_.Name + $DateStamp

# Rename the item (folder)
Rename-Item -Path $_.FullName -NewName $NewName
}

Get-ChildItem -Path $selectedFolderPath -File | Rename-Item -NewName {
$_.BaseName + $DateStamp + $_.Extension
}

Write-Output "****Rename Files FINISH****"

# Exit
Write-Output "`n`n****Script finished. Press Enter to exit.****"

pause
- ← Previous
- 1
- 2
