Workstation
Updating VMware Workstation 17 to 25H2
** Update – Workstation 25H2u1 has been released 02/2026. Upgrade from 25H2 to 25H2u1 blog here **
Last October 2025 VMware changed the naming convention of their Workstation product. They moved from traditional version numbers (e.g., Workstation 17.6.x) and are adopting a new naming format that reflects the year (2025) and the half of the year (H2). This provides a more consistent naming across releases and helps to ensures version clarity. With the name change of VMware Workstation from 17 to 25H2 so has the update process. In this blog I cover some of those changes and the steps I took to update my system.
Why can’t I download updates via Workstation 17 Updater?
The product update feature is no longer available in VMware Workstation 17, Player, Fusion. See Article ID: 395172 Moving forward, updates will need to be manually downloaded from the Broadcom Support Portal. Once the appropriate product update is downloaded, it can be manually installed.
Where can I download the Update?
Follow the step-by-step instructions provided in the following articles for the respective products: Download Desktop Hypervisor (Workstation and Fusion) Products
What are the requirements to install Workstation 25H2?
See Host System Requirements for Workstation Pro
What are the steps to upgrade to Workstation 25H2?
Once you have downloaded the product, open it, and then click next on this screen.

Accept the EULA.

Click next on the ‘Compatible Setup’
NOTE: If you have having issues with Hyper-V there is a good chance your Windows OS is not setup properly. See my guide that can help resolve this.

Select the Install directory

Check or Un-Check Product updates and Join CEIP.

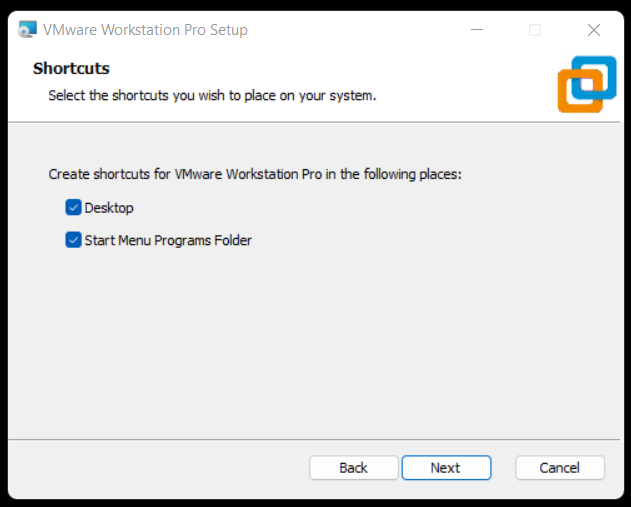
Choose where you want your shortcuts.
Choose upgrade to begin the installation.
Note: This step will vary if you are doing a fresh install of Workstation.

Allow it to complete its install.

Click Finish.

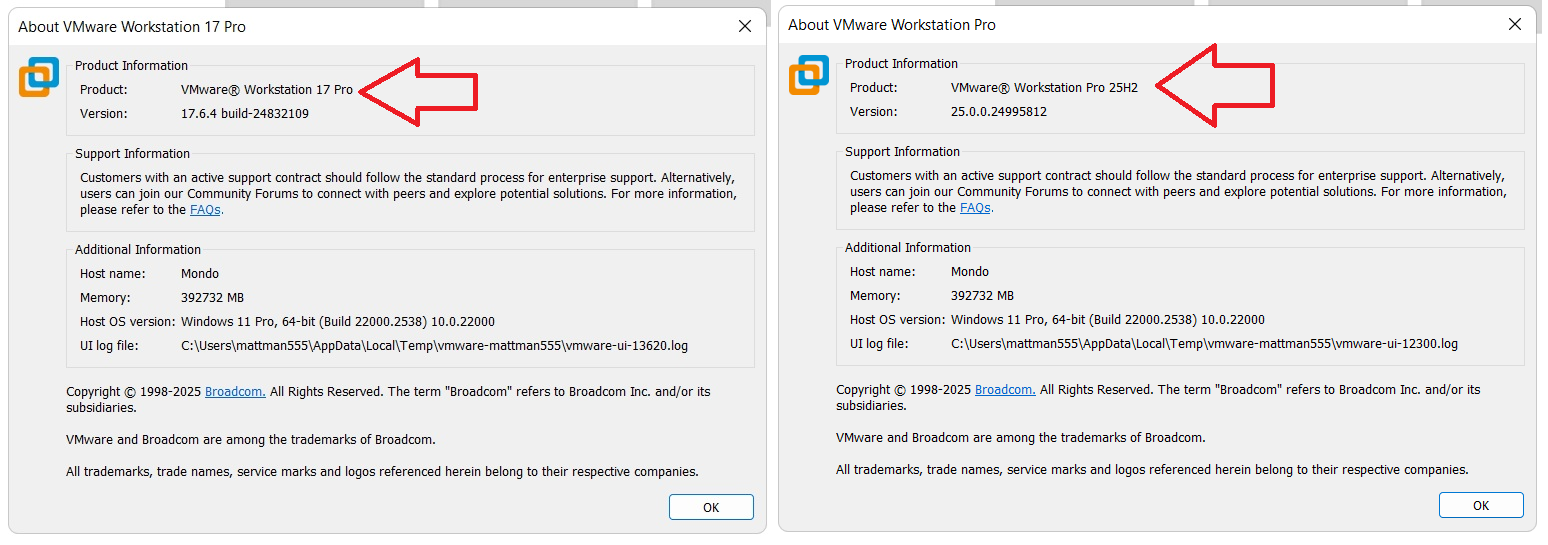
After opening Workstation 25H2 here is the new ‘About’ screen. The about screen is found under Help > About VMware Workstation

VMware Workstation & Fusion 25H2 Released

A VMware Workstation and Fusion update was released Mid-Oct-2025 and it comes with a new name. In this blog I outline some of the changes to Workstation and supply several helpful links.
Why 25H2?
VMware has decided to move away from their past version numbers (e.g., Workstation 17.6.x, Fusion 13.6.x) and is adopting a new naming format — 25H2. This change reflects the year (2025) and the half of the year (H2) and provides consistency across releases plus helps to ensure better clarity for customers. This simple change should make it easier to understand when a release was published and plan upgrades accordingly.
What are some of the important changes with Workstation 25H2?
- VMware Workstation Pro 25H2 provides the following new capabilities.
- Introducing dictTool: A command-line tool to examine and modify VMware configuration files, such as a vmx file or user preferences file. For more information, see Using dictTool to Modify Configuration Files.
- Added support for USB 3.2
- Added support for virtual hardware version 22
- Added support for Hyper-V/WHP detection
- Added support for new guest operating systems
- Red Hat Enterprise Linux 10
- Fedora Linux 42
- openSUSE Leap 16.0 (RC)
- SUSE Linux 16 (Beta)
- Debian 13
- Oracle Linux 10
- VMware ESX 9.0
- Added support for new host operating systems
- Red Hat Enterprise Linux 10
- Fedora Linux 42
- openSUSE Leap 16.0 (RC)
- SUSE Linux 16 (Beta)
- Debian 13
What do the new ‘About’ screens look like?
Helpful Links:
VMware Workstation & Fusion 25H2: Embracing Calendar Versioning and New Features
VMware Workstation 17 Nested Home Lab Part 2
In Part 2, I go into a physical hardware overview, show how to enable VT-X and VT-D, installation of Windows 11 (which includes a trick to disable the TPM requirement), install of Workstation 17, and review common issues when Hyper V is enabled. At the end of this video #windows11 and #workstation 17 are installed and operational. Coming up in Part 3 we’ll build out or Workstations Networks, start building the Windows 2022 server with AD, DNS, RAS, DHCP, and other services.

#Optane #IntelXeon #Xeon #vExpert #VMware #Cloud #datacenter
VMware Workstation 17 Nested vSAN ESA Overview
In this high level video I give an overview of my #VMware #workstation running 3 x nested ESXi 8 Hosts, vSAN ESA, VCSA, and a Windows 2022 AD. Additionally, I show some early performance results using HCI Bench.
I got some great feedback from my subscribers after posting this video. They were asking for a more detailed series around this build. You can find this 8 Part Series under Best of VMX > ‘VMware Workstation Generation 8 : Complete Software Build Series’.
For more information around my VMware Workstation Generation 8 Build check out my latest BOM here

Tips for installing Windows 7 x32 SP1 on Workstation 16.1.2
This past weekend I needed to install Windows 7 x32 to support some older software. After installing Windows 7 x32 I noticed VMware tools is grayed out. I then tried to install VMware tools manually but it failed. There are a few tricks to overcome this issue and in this blog I’ll cover the steps I took to resolve.
So what changed and why all these extra steps?
You may recall that Workstation 16.0.0 could install Windows 7SP1 x32 without any additional intervention. Starting September 2019, Microsoft added SHA-2 algorithm requirements for driver signing. As Workstation 16 released updates it too included updated VMtools that were complaint with the Microsoft SHA-2 requirements. So if you deploy the Windows 7 SP1 x32 ISO (which doesn’t have the SHA-2 patch) the vmtools install will fail because it cannot validate the drivers. For a bit more information See VMware KB 78655.
What are options to fix this?
By default Windows 7×32 SP1 doesn’t include the needed SHA-2 updates. Users have 2 options when doing new installs.
Option 1: Create an updated Windows 7SP1 ISO by slip streaming in the Convenience Rollup Patch (More details here) and then use this slipstreamed ISO to do the install on Workstation. From there you should be able to install VMTools.
Option 2: After Windows 7 SP1 installation is complete, manually install the SHA-2 update, and then install VMtools. See steps below.
Steps for Option 2:
- First I created a new Workstation VM. When creating it I made sure the ISO path pointed to the Windows 7 SP1 ISO and Workstation adjusted the VM hardware to be compatible with Windows 7 SP1. I allowed the OS installation to complete.
- After the OS was installed I applied the following MS Patch.
- VMware Tools requires Windows 7 SP1 to have KB4474419 update installed, See https://kb.vmware.com/s/article/78708
- I downloaded this patch (2019-09 Security Update for Windows 7 for x86-based Systems (KB4474419)) directly to the newly create Windows 7 VM and installed it.
- Download TIP – To download this update, I needed to right click on the *.msu link > choose save link as > pushed the up arrow next to ‘Discard’ and choose ‘Keep’ > and saved it to a folder

- After the rebooted, I went into Workstation and did the following:
- Right clicked on the VM > Settings > CD/DVD
- Made sure ‘Devices status’ was check for connected and connect at power on
- Clicked on ‘Use ISO Image’ > Browse
- Browsed to this folder ‘C:\Program Files (x86)\VMware\VMware Workstation’
- Choose ‘windows.iso’
- Choose OK to closed the VM Settings
- Back in the Windows 7 VM I went into File Explorer opened up the CD and ran setup.exe
- From there I followed the default steps to install VM Tools and rebooted
- Screenshot of the final outcome

Caching your Windows 8 / 10 Domain Credentials via VPN
I was setting up a fresh Windows 8 Fusion 6 VM last weekend and realized I needed to cache my home domain credentials. I was remote to my home office and the only way I could access the domain was via VPN.
With only the ability to logon locally and then launch the VPN I was prompted for my password and security keys multiple times a day – Not a fun experience. To fix this I really needed my domain user account credentials cached so that I could initially log on to Windows 8 without the VPN, and then launch the VPN connection after logon.
Here is how I solved this issue…
- Logged in with my local account
- Attached to the VPN
- Added my Windows 8 VM to the domain
- Added my domain account to a Local group
- Rebooted (Just adding my Win 8 VM to domain, doesn’t cache my credentials)
- Logged in with my local account
- Attached to the VPN
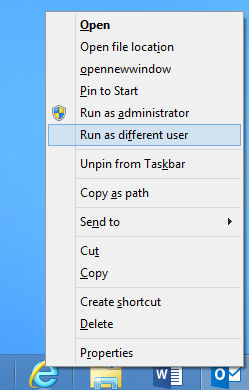
- Closed all Internet Explorer (IE) windows, held down CTRL+Shift, right click on IE, and finally choose ‘Run as Different User’ (PIC1)
- I typed in my domain user account/password and allowed IE to load << This should cache your credentials (PIC2)
- Close all windows, restart, and I was able to logon with my Domain Account
- Attached to the web based VPN and viola… all is working well
Pic 1 – hold down CTRL+Shift then right click on IE, and finally choose ‘Run as Different User’
PIC 2 – Enter your Credentials

Summary – Using ‘Run as Different User’ ensures you have a local account cached from the domain your attempting to log on to. Your experience may vary depending on your rights as a domain user and the security policies enforced in your domain.
** Update 12/18/2017**
Recently I tired this same process with Windows 10 and it worked like a charm!
Home Lab – freeNAS build with LIAN LI PC-Q25, and Zotac M880G-ITX
I’ve decided to repurpose my IOMega IX4 and build out a freeNAS server for my ever growing home lab. In this blog post I’m not going to get in to the reasons why I choose freeNAS, trust me I ran through lot of open source NAS software, but rather on the actual hardware build of the NAS device.
Here are the hardware components I choose to build my freeNAS box with…
- LIAN LI PC-Q25 Case – NewEgg ~$120, it goes on sale from time to time…
- Cooler Master 500W PS – ValleySeek ~$34, on sale
Zotac M880G-ITX – Valleyseek ~$203<< 10/07/2013 This MOBO had BIOS issues with detecting HDDs. I moved to a ASRock FM2A85X-ITX- SYBA Dual NIC SY-PEX24028 – NewEgg ~$37
- 8GB Corsair RAM – I owned this bought a Frys in a 16GB Kit for $49
- 5 x Seagate ST2000DM001 2TB SATAIII – Superbiiz ~$89, onsale and free shipping
- 1 x Corsair 60GB SSD SATAIII – I owned this bought at Frys for ~$69
Tip – Watch for sales on all these items, the prices go up and down daily…
Factors in choosing this hardware…
- Case – the Lian LI case supports 7 Hard disks (5 being hotswap) in a small and very quiet case, Need I say more…
- Power supply – Usually I go with a Antec Power supply, however this time I’m tight on budget so I went with a Cooler Master 80PLUS rated Power supply
- Motherboard – The case and the NAS software I choose really drove the Mobo selection, I played with a bunch of Open soruce NAS software on VM’s, once I made my choice on the case and choosing freeNAS it was simple as finding one that fit both. However 2 options I was keen on – 1) 6 SATA III Ports (To support all the Hard disks), 2) PCIex1 slot (to support the Dual Port NIC). Note – I removed the onboard Wireless NIC and the antenna, no need for them on this NAS device
- NIC – the SYBA Dual NIC I have used in both of my ESXi hosts, they run on the Realtek 8111e chipset and have served me well. The Mobo I choose has the same chipset and they should integrate well into my environment.
- RAM – 8GB of RAM, since I will have ~7TB of usable space with freeNAS, the general rule of thumb is to use 1GB of RAM per 1TB of storage, 8GB should be enough.
- Hard Disks – I choose the hard disks mainly on Price, speed, and size. These hard disks are NOT rated above RAID 1 however I believe they will serve my needs accordingly. If you looking for HIGH performance and duty cycle HD’s then go with an enterprise class SAS or SATA disk.
- SSD – I’ll use this for cache setup with freeNAS, I just wanted it to be SATA III
Install Issues and PIC’s
What went well…
- Hard disk installs into case went well
- Mobo came up without issue
- freeNAS 8.3.xx installed without issue
Minor Issues….
- Had to modify (actually drill out) the mounting plate on the LIAN LI case to fit the Cooler Master Power supply
- LIAN LI Mobo Mount points were off about a quarter inch, this leaves a gap when installing the NIC card
- LIAN LI case is tight in areas where the Mobo power supply edge connector meets the hard disk tray
PICS…
LIAN LI Case

5 Seagate HD’s installed…

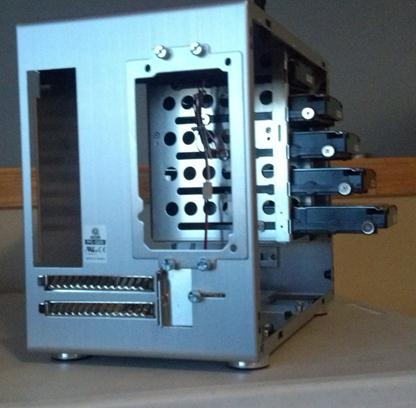
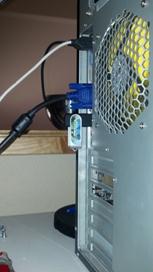
Rear view…
Side Panel…

Zotac Mobo with RAM

Removal of the Wireless NIC….
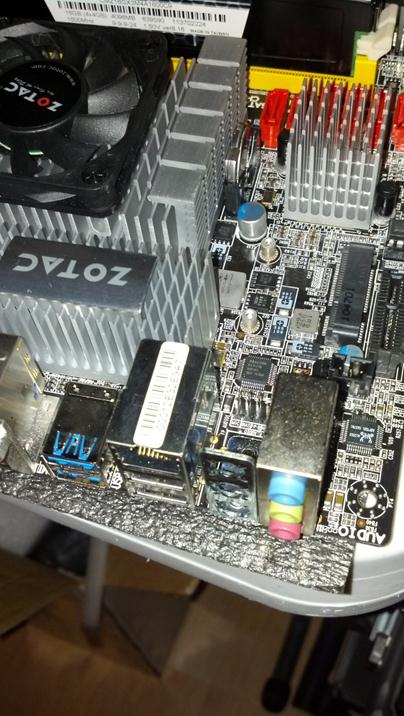
Zotac Mobo installed in case with dual NIC…

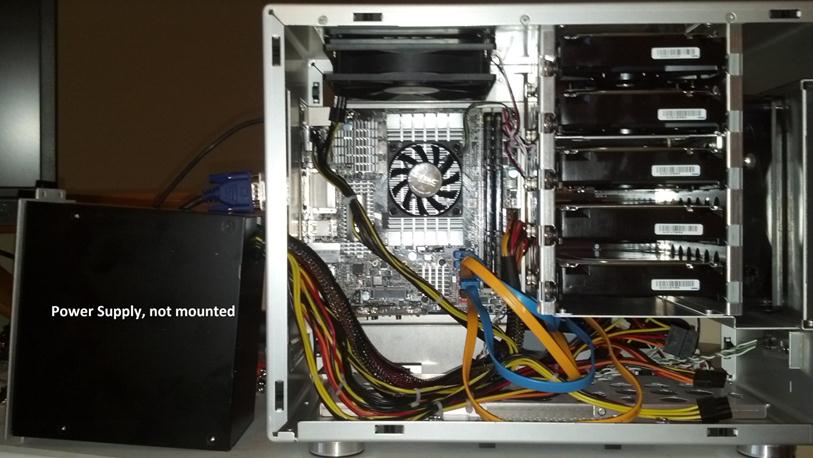
Everything Mounted (Except for the SSD)….
Home Lab – More updates to my design
Most recently I posted about adding a Layer 3 switch to my growing home lab. The Netgear Layer 3 switch I added (GSM7324) is preforming quite well in my home lab. In fact it’s quite zippy compared to my older switches and for the price it was worth it. However my ever growing home lab is having some growing pains, 2 to be exact.
In this post I’ll outline the issues, the solutions I’ve chosen, and my new direction for my home lab.
The issues…
Initially my thoughts were I could use my single ESXi Host and Workstation with specific VM’s to do most of my lab needs.
There were two issues I ran into, 1 – Workstation doesn’t support VLANs and 2 – my trusty IOMega IX4 wasn’t preforming very well.
Issue 1 – Workstation VLANs
Plain and simple Workstation doesn’t support VLANs and working with one ESXi Host is prohibiting me from fully using my lab and switch.
Issues 2 – IOMega IX4 Performance
My IOMega IX4 has been a very reliable appliance and it has done its job quite well.
However when I put any type of load on it (More than One or Two VM’s booting) its performance becomes a bit intolerable.
The Solutions…
Issue 1 – Workstation VLANs
I plan to still use Workstation for testing of newer ESXi platforms and various software components
I will install a second ESXi host similar to the one I built earlier this year only both Hosts will have 32GB of RAM.
The second Host will allow me to test more advanced software and develop my home lab further.
Issues 2 – IOMega IX4 Performance
I’ve decided to separate my personal data from my home lab data.
I will use my IX4 for personal needs and build a new NAS for my home lab.
A New Direction…
My intent is to build out a second ESXi Physical Host and ~9TB FreeNAS server so that I can support a vCloud Director lab environment.
vCD will enable me to spin up multiple test labs and continue to do the testing that I need.
So that’s it for now… I’m off to build my second host and my freeNAS server…
Thank you Computer Gods for your divine intervention and BIOS Settings
I’ve been in IT for over 20 years now and in my time I’ve seen some crazy stuff like –
- Grass growing in a Unisys Green Screen terminal that was sent in for repair by a Lumber yard
- A Disney Goofy screen saver on a IBM PS/2 running OS/2 kept bringing down Token Ring every time it went in to screen saver mode.
But this friend is one of the more weird issues I’ve come across….
This all started last March 2012. I bought some more RAM and a pair of 2TB Hitachi HD’s for my Workstation 8 PC. I needed to expand my system and Newegg had a great deal on them. I imaged up my existing Windows 7 OS and pushed it down to the new HD. When the system booted I noticed that is was running very slow. I figured this to be an issue with the image process. So I decided to install from Windows 7 from scratch but I ran into various installation issues and slowness problems. I put my old Samsung HD back in my system and it booted fine. When I plugged the new Hitachi HD as a second HD via SATA or USB the problems started again, basically it was decreased performance, programs not loading, and choppy video. I repeated these same steps with the 2nd Hitachi HD that I bought and it had the same issues.
A bit perplexed at this point I figure I have a pair of bad HD’s or bad HD BIOS. Newegg would not take back the HD’s, so I start working with Hitachi. I tried a firmware HD update, I RMA both HD’s and I still have the same issue. Hitachi sends me different model but slower HD and it works fine. So now I know there is something up with this model of HD.
 I start working with Gigabyte – Same deal as Hitachi BIOS Update, RMA for a new System board Revision (Now I’m at a Rev 1.3) and I still have the same issue. I send an HD to Gigabyte in California and they cannot reproduce the problem. I’ll spare you all the details but trust me I try every combination I can think of. At this point I’m now at this for 5 Months, I still cannot use my new HD, and then I discover the following – I put in a PCI (Not PCIe) VGA video card into my system and it works and then it hit me – “I wonder if this is some weird HDMI Video HD conflict problem”
I asked Gigabyte if disabling onboard HDMI video might help. They were unsure but I try it anyway and sure enough I found the solution!

It felt like the computer gods had finally shone down on me from above and preformed a PC miracle – hallelujah. 5 plus months of troubleshooting and I finally have a solution.
Here are the overall symptoms….
Observation 1) Windows 7 x64 Enterprise or Professional the installer fails to load or fully complete OR, the installation does complete, but mouse movements are choppy, and then the system locks up or will not boot.
Observation 2) When booting from a different drive I attach the new Hitachi HD to a booted system via USB, then the PC will start to exhibit performance issues.
Here is what I found out….
Any Combination of the following products will result with these symptoms. Change any one out and it works!
1 x Gigabyte Z68XP-UD3 (Rev 1.0 and 1.3)
1 x Hitachi GST Deskstar 5K3000 HDS5C3020ALA632
1 x PCIe Video Card with HDMI Output (I tried the following card with the same Results – ZOTAC ZT-40604-10L GeForce GT 430 and EVGA – GeForce GT 610)
Here is the solution to making them work together….
In the system board BIOS, under Advanced BIOS Settings – Change On Board VGA to ‘Enable if No Ext PEG’
This simple setting disabled the on board HDMI Video and resolved the conflicts with the products not working together.
Summary….
I got to meet some really talented engineers at Hitachi and Gigabyte. All were friendly and worked with me to solve my issue. One person Danny from Gigabyte was the most responsive and talented MoBo engineer I’ve meet. Even though in the end I found my own solution, I wouldn’t have made it there without some of their expert guidance!
Whitebox ESXi 5.x Diskless install
I wanted to build a simple diskless ESXi 5.x server that I could use as an extension to my Workstations 8 LAB.
Here’s the build I completed today….
- Antec Sonata Gen I Case (Own, Buy for ~$59)
- Antec Earth Watts 650 PS (Own, Buy for ~$70)
- MSI Z68MS-G45(B3) Rev 3.0 AKA MS-7676 (currently $59 at Fry’s)
- Intel i7-2600 CPU LGA 1155 (Own, Buy for ~$300)
- 16GB DDR3-1600 Corsair RAM (Own, Buy for ~$80)
- Intel PCIe NIC (Own, Buy for ~$20)
- Super Deluxe VMware 1GB USB Stick (Free!)
- Classy VMware Sticker on front (Free)
Total Build Cost New — $590
My total Cost as I already owned the Hardware – $60 J
ESXi Installation –
- Installed ESXi 5.0 via USB CD ROM to the VMware 1GB USB Stick
- No install issues
- All NIC’s and video recognized
- It’s a very quiet running system that I can use as an extension from my Workstation 8 Home lab…
| Front View with Nice VMware Sticker! |
 |
| Rear View with 1GB VMware USB Stick |
 |
| System Board with CPU, RAM and NIC – Look Mom no Hard Disks! |
 |
| Model Detail on the MSI System board, ESXi reports the Mobo as a MS-7676 |
 |
