VSAN
Home Lab Gen IV – Part V Installing Mellanox HCAs with ESXi 6.5
The next step on my InfiniBand home lab journey was getting the InfiniBand HCAs to play nice with ESXi. To do this I need to update the HCA firmware, this proved to be a bit of a challenge. In this blog post I go into how I solved this issue and got them working with ESXi 6.5.
My initial HCA selection was the ConnectX aka HP INFINIBAND 4X DDR PCI-E HCA CARD 452372-001, and Mellanox MHGA28-XTC InfiniHost III HCA these two cards proved to be a challenge when updating their firmware. I tried all types of operating systems, different drivers, different mobos, and MFT tools versions but they would not update or be OS recognized. Only thing I didn’t try was Linux OS. The Mellanox forums are filled with folks trying to solve these issues with mixed success. I went with these cheaper cards and they simply do not have the product support necessary. I don’t recommend the use of these cards with ESXi and have migrated to a ConnectX-3 which you will see below.
Updating the ConnectX 3 Card:
After a little trial and error here is how I updated the firmware on the ConnectX 3. I found the ConnectX 3 card worked very well with Windows 2012 and I was able to install the latest Mellanox OFED for Windows (aka Windows Drivers for Mellanox HCA card) and updated the firmware very smoothly.
First, I confirm the drivers via Windows Device Manager (Update to latest if needed)
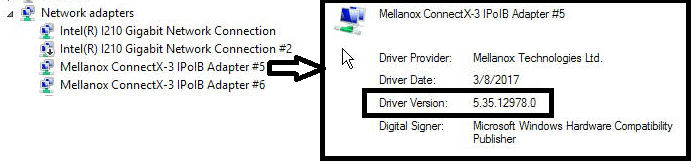
Once you confirm Windows device functionality then install the Mellanox Firmware Tools for windows (aka WinMFT)
Next, it’s time to update the HCA firmware. To do this you need to know the exact model number and sometimes the card revision. Normally this information can be found on the back of your HCA. With this in hand go to the Mellanox firmware page and locate your card then download the update.

After you download the firmware place it in an accessible directory. Next use the CLI, navigate to the WinMFT directory and use the ‘mst status’ command to reveal the HCA identifier or the MST Device Name. If this command is working, then it is a good sign your HCA is working properly and communicating with the OS. Next, I use the flint command to update my firmware. Syntax is — flint -d <MST Device Name> -i <Firmware Name> burn

Tip: If you are having trouble with your Mellanox HCA I highly recommend the Mellanox communities. The community there is generally very responsive and helpful!
Installation of ESXi 6.5 with Mellanox ConnectX-3
I would love to tell you how easy this was, but the truth is it was hard. Again, old HCA’s with new ESXi doesn’t equal easy or simple to install but it does equal Home lab fun. Let me save you hours of work. Here is the simple solution when trying to get Mellanox ConnextX Cards working with ESXi 6.5. In the end I was able to get ESXi 6.5 working with my ConnectX Card (aka HP INFINIBAND 4X DDR PCI-E HCA CARD 452372-001) and with my ConnectX-3 CX354A.
Tip: I do not recommend the use of the ConnectX Card (aka HP INFINIBAND 4X DDR PCI-E HCA CARD 452372-001) with ESXi 6.x. No matter how I tried I could not update its firmware and it has VERY limited or non-existent support. Save time go with ConnectX-3 or above.
After I installed ESXi 6.5 I followed the following commands and it worked like a champ.
Disable native driver for vRDMA
- esxcli system module set –enabled=false -m=nrdma
- esxcli system module set –enabled=false -m=nrdma_vmkapi_shim
- esxcli system module set –enabled=false -m=nmlx4_rdma
- esxcli system module set –enabled=false -m=vmkapi_v2_3_0_0_rdma_shim
- esxcli system module set –enabled=false -m=vrdma
Uninstall default driver set
- esxcli software vib remove -n net-mlx4-en
- esxcli software vib remove -n net-mlx4-core
- esxcli software vib remove -n nmlx4-rdma
- esxcli software vib remove -n nmlx4-en
- esxcli software vib remove -n nmlx4-core
- esxcli software vib remove -n nmlx5-core
Install Mellanox OFED 1.8.2.5 for ESXi 6.x.
- esxcli software vib install -d /var/log/vmware/MLNX-OFED-ESX-1.8.2.5-10EM-600.0.0.2494585.zip
Ref Links:
After a quick reboot, I got 40Gb networking up and running. I did a few vmkpings between hosts and they ping perfectly.

So, what’s next? Now that I have the HCA working I need to get VSAN (if possible) working with my new highspeed network, but this folks is another post.
If you like my ‘no-nonsense’ blog articles that get straight to the point… then post a comment or let me know… Else, I’ll start writing boring blog content.
The 3 Amigos – NUC, LIAN LI, and Cooler Master
Today I wanted to look at the Cooler Master Elite 110 and compare it a bit to some other cases.
Let’s see how its foot print measures up to some familiar cases. I stacked it up to the Intel NUC5i7RYH and my Lian Li PC-Q25 and surprisingly the Elite 110 is like a big cube that is reminiscent of older Shuttle cases. The size is nice for a small foot print PC but depending on your use it may be too bulky for appliance based work. One thing I did note the manufacture states the case is 20.8 mm but my measurements are coming out close to 21.2 mm

Note: I used my Lian Li case for my FreeNAS build, it’s a great case for those wanting to build a NAS (Click here for more PICS)
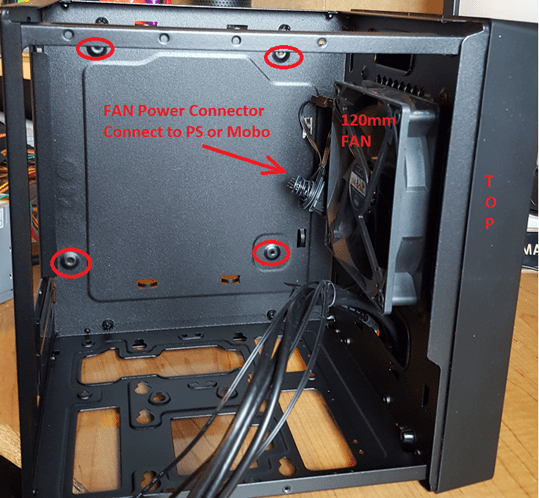
Inside the Elite 110, there are your standard edge cables (USB, Audio, Switches, and lights). The Power button is located in front bottom center and is the Cool Master logo. On the right hand side are all your typical USB 3.0, Audio, Reset and HDD LED.

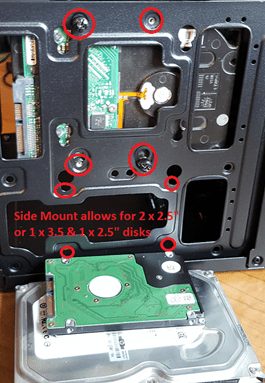
The case allows for a maximum of 3 x 3.5″ or 4 x 2.5″ disk drives. You can also work this into different combinations. For example – 3 x 3.5″ HDD and 1 x 2.5″ SDD, could make a VSAN Hybrid combination or 3 x 2.5″ SDD for VSAN All Flash and 1 x 3.5″ for the boot disk.
The mount point for these disk drives can be mount to the lefthand side and top. When mounting the disks I found it better to mount the SATA and power connectors to the rear.
Top Mount – Allows for 2 x 3.5″ or 2 x 2.5″. In the photo below I’m using 1 x 3.5″ and 1 x 2.5″
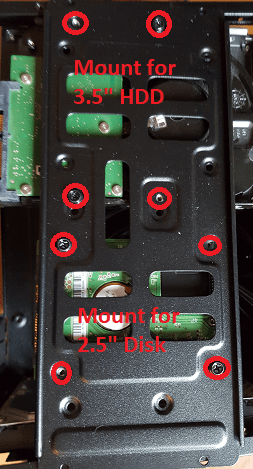
Left Side Mount – Only allows for 1 x 3.5″ or 2 x 2.5″ disk drives. In this photo I’m showing the 3.5″ disk mounted in its only position and the 2.5″ disk is unmounted to show some of the mount points.
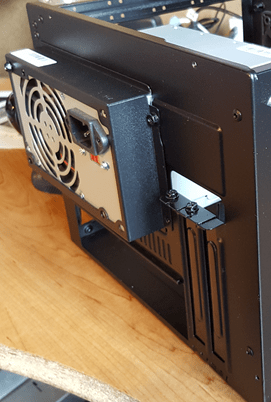
The Rear of the case will allow for a standard ATX power supply, which sticks out about an inch. The case also supports two PCI Slots which should be enough for most ITX motherboards with one or two PCI Slots.
Inside we find only 4 Motherboard pre-threaded mount points and a 120 mm fan. The fans power cable can connect to the power supply or to your motherboard.
Quick Summary – The Elite 110 is a nice budget case. Depending on your use case it could make a nice case for your home lab, NAS server or even a VSAN box. Its footprint is a bit too big for those appliance-based needs and the case metal is thin. I don’t like the fact there are only 4 mount points for your motherboard, this is great for an ITX Single PCI Slot but not so good for Dual. This is not a fault of the Elite 110 but more of an ATX/mATX/ITX standards problem. With no mount points for the second PCI slot it puts a lot of pressure on your motherboard during insertion. This could lead to cards being miss-inserted.
Overall for the $35 I spent on this case it’s a pretty good value. Further photos can be found here on NewEgg and if you hurry the case is $28 with a rebate.
Manufacture Links:
- Cooler Mater – http://www.coolermaster.com/case/mini-itx-elite-series/elite110/
- Lian Li – http://www.lian-li.com/pc-q25/
- Intel NUC – https://ark.intel.com/products/87570/Intel-NUC-Kit-NUC5i7RYH
If you like my ‘no-nonsense’ blog articles that get straight to the point… then post a comment or let me know… Else, I’ll start writing boring blog content.
Great VSAN 6.6 Network Primer Video!
At VMworld 2017 Cormac Hogan and Andreas Scherr did a great job going over the basics and gotchas around VSAN 6.6 Networking. Additionally, towards the end of the video they went through a Demo on performance and talked about the different VSAN Network topologies. The video is about an hour long and I know finding the time to watch it all can be hard sometimes. However, I took the time to breakdown the video and I listed when each topic started at. (just incase you want to jump to a specific topic of interest)
What I found beneficial was the information around the Network Unicast and vCenter Server new role with VSAN host tracking. Both topics are well work a look and it starts @19:22 in the video.
Here is the link to: VMworld 2017 – STO1193BE – Closer Look at VMware vSAN Networking and Configuration Considerations
https://www.youtube.com/watch?v=h-Ad4OSzS1Y
Here is the topic breakdown if you want to go to a specific section.
- @3:42 – Major Component overview
- @5:09 — Ports and Firewall
- Encryption need 3rd Party KMS provider
- @6:54 — IPv6
- Don’t rung IPv6 and IPv4 mixed mode, okay to run to migrate but not run over a long time
- @7:57 – Min NIC Requirements
- Great chart on min / Max, see attached screen shot
- @10:00 – Discussion around vSS vs vDS
- Major difference is vDS can use lag groups
- @13:17 – Network IO Control with vDS
- Can help with vMotion traffic over whelming VSAN track
- @14:17 – NIC Teaming and Failover Options
- Load balancing options are a bit weak
- LAG tends to be the best for load balancing (vDS and Physical Switch config needed)
- @15:55 – Multicast
- @19:22 – Unicast
- vCenter Server now tracks who is in the cluster and what core info
- @22:15 – Upgrade / Mixed Cluster Considerations with Unicast
- Great chart around upgrading to vSAN 6.6
- @22:24 – Considerations for DHCP
- Not a good idea to run DHCP
- @26:22 – Unicast CLI Commands
- @27:25 – NIC Teaming and Load Balancing
- @28:07 – NIC Teaming Pros/Cons
- @33:58 – Supported Network Topologies
- @36:06 – Layer2, Single site, Single Rack
- @36:55 – Layer2, Single Site, Multi Rack (pre-VSAN-6.6)
- @37:51 – Layer2, Single Site, Multi Rack VSAN 6.6 and later Unicast
- @38:38 – Stretch Cluster (SC) L2 Data, L3 Witness
- @39:37 – SC Why not L2 only traffic?
- @41:15 – 2 Node Robo
- @42:08 – 2 Node Direct Connect and Witness Traffic Separation
- @43:57 – VSAN and Network Performance (General Concept)
- @46:46 – Host Network Performance
- @48:05 – Network Latency Demo
If you like my ‘no-nonsense’ blog articles that get straight to the point… then post a comment or let me know… Else, I’ll start writing boring blog content.
vSphere 6.0 / 6.5 Cross reference build release for ESXi, vSAN, and vCenter Server
I love the Correlating build numbers and versions of VMware products (1014508). This one KB has made my job, and I’m sure yours too, so much easier. Before this KB was released it was a bit difficult to correlate build, patch, and update levels to vSphere Environments. Now with just a few clicks one can find out all this information and more. However, I really need the ability to correlate multiple core products. Typically, I work with — ESXi, vCenter Server, and vSAN. So, today I took the time today to align all this information.
It took me about 5 mins to build the chart below but it will save me loads of time. Can’t tell you how many times I’ve been asked which version of ESXi was related to which version of vSAN and Oh, what version of vCenter Server was released with it? Well with this cart below you can answer those questions and more.
~ Enjoy!
|
vSAN version |
ESXi version |
Release Date |
Build Number |
vCenter Server Version |
Release Date |
Build Number |
|
vSAN 6.6.1 |
ESXi 6.5 Update 1 |
7/27/2017 |
5969303 |
vCenter Server 6.5 Update 1 |
7/27/2017 |
5973321 |
|
vCenter Server 6.5 0e Express Patch 3 |
6/15/2017 |
5705665 |
||||
|
vSAN 6.6 |
ESXi 6.5.0d |
4/18/2017 |
5310538 |
vCenter Server 6.5 0d Express Patch 2 |
4/18/2017 |
5318154 |
|
vSAN 6.5 Express Patch 1a |
ESXi 6.5 Express Patch 1a |
3/28/2017 |
5224529 |
vCenter Server 6.5 0c Express Patch 1b |
4/13/2017 |
5318112 |
|
vSAN 6.5 Patch 01 |
ESXi 6.5 Patch 01 |
3/9/2017 |
5146846 |
vCenter Server 6.5 0b Patch 1 |
2017-03-14 |
5178943 |
|
vSAN 6.5.0a |
ESXi 6.5.0a |
2/2/2017 |
4887370 |
vCenter Server 6.5 0a Express Patch 1 |
2/2/2017 |
4944578 |
|
vSAN 6.5 |
ESXi 6.5 GA |
11/15/2016 |
4564106 |
vCenter Server 6.5 GA |
11/15/2016 |
4602587 |
|
vSAN 6.2 Patch 5 |
ESXi 6.0 Patch 5 |
7/11/2017 |
5572656 |
|||
|
vSAN 6.2 Express Patch 7c |
ESXi 6.0 Express Patch 7c |
3/28/2017 |
5251623 |
vCenter Server 6.0 Update 3b |
4/13/2017 |
5318200/5318203 |
|
vSAN 6.2 Express Patch 7a |
ESXi 6.0 Express Patch 7a |
3/28/2017 |
5224934 |
vCenter Server 6.0 Update 3a |
3/21/2017 |
5183549 |
|
vSAN 6.2 Update 3 |
ESXi 6.0 Update 3 |
2/24/2017 |
5050593 |
vCenter Server 6.0 Update 3 |
2/24/2017 |
5112527 |
|
vSAN 6.2 Patch 4 |
ESXi 6.0 Patch 4 |
11/22/2016 |
4600944 |
vCenter Server 6.0 Update 2a |
11/22/2016 |
4541947 |
|
vSAN 6.2 Express Patch 7 |
ESXi 6.0 Express Patch 7 |
10/17/2016 |
4510822 |
|||
|
vSAN 6.2 Patch 3 |
ESXi 6.0 Patch 3 |
8/4/2016 |
4192238 |
|||
|
vSAN 6.2 Express Patch 6 |
ESXi 6.0 Express Patch 6 |
5/12/2016 |
3825889 |
|||
|
vSAN 6.2 |
ESXi 6.0 Update 2 |
3/16/2016 |
3620759 |
vCenter Server 6.0 Update 2 |
3/16/2016 |
3634793 |
|
vSAN 6.1 Express Patch 5 |
ESXi 6.0 Express Patch 5 |
2/23/2016 |
3568940 |
|||
|
vSAN 6.1 Update 1b |
ESXi 6.0 Update 1b |
1/7/2016 |
3380124 |
vCenter Server 6.0 Update 1b |
1/7/2016 |
3339083 |
|
vSAN 6.1 Express Patch 4 |
ESXi 6.0 Express Patch 4 |
11/25/2015 |
3247720 |
|||
|
vSAN 6.1 U1a (Express Patch 3) |
ESXi 6.0 U1a (Express Patch 3) |
10/6/2015 |
3073146 |
|||
|
vSAN 6.1 |
ESXi 6.0 U1 |
9/10/2015 |
3029758 |
vCenter Server 6.0 Update 1 |
9/10/2015 |
3018524 |
|
vSAN 6.0.0b |
ESXi 6.0.0b |
7/7/2015 |
2809209 |
vCenter Server 6.0.0b |
7/7/2015 |
2776511 |
|
vSAN 6.0 Express Patch 2 |
ESXi 6.0 Express Patch 2 |
5/14/2015 |
2715440 |
|||
|
vSAN 6.0 Express Patch 1 |
ESXi 6.0 Express Patch 1 |
4/9/2015 |
2615704 |
vCenter Server 6.0.0a |
4/16/2015 |
2656760 |
|
vSAN 6.0 |
ESXi 6.0 GA |
3/12/2015 |
2494585 |
vCenter Server 6.0 GA |
3/12/2015 |
2559268 |
If you like my ‘no-nonsense’ blog articles that get straight to the point… then post a comment or let me know… Else, I’ll start writing boring blog content.
Home Lab Gen IV – Part IV: Overcoming installation challenges
One of the joys of working with a home lab is doing something that no one has done before. Sure, your configuration might be similar to others, but in a way your home lab is unique. However, with this uniqueness comes its share of installation challenges. My new lab was no exception, there were a few challenges and one major issue I uncovered while setting up this new environment. In this blog post I am going review the environment I am working on, break down some of the hardware layout placement challenges, fun using the MAC PowerBook to complete the installation, and finally overcoming ESXi installation challenges.
Here is my new environment:
- Mac Powerbook with macOS Sierra (Used for remote connection into my environment, normally I use a PC)
- Gigabyte MX31-BS0
- Intel Xeon E3-1230 v5
- 32GB DDR4 RAM
- 1 x Mellanox Connectx InfiniBand HCA
- 4 x 200GB SSD, 1 x 64GB USB (Boot)
- 1 x IBM M5210 JBOD SAS Controller
- 1 x Mini SAS SFF-8643 to (4) 29pin SFF-8482
- 1 x 64GB USB Boot Stick:
Hardware layout/placement challanges:
32GB of RAM: Pay attention to the placement of the RAM. As Channel 1 for the RAM are the two closest slots to the CPU, channel 2 being the two farthest away. Normally you would place the RAM pairs in like colors however this Mobo is a bit different
Mellanox Connectx InfiniBand HCA: Placed it in the 16x slot right next to the CPU. The HCA requires an 8x slot so this slot should not slow it down. No BIOS changes were required and I could see this HCA in the BIOS.
IBM M5210 JBOD SAS Controller: Placed it in the 8x slot which goes through the C232 chipset on the motherboard. Next, I needed to update the firmware but this proved to be a challenge. Keep in mind the M5210 with NO cache will not allow you to enter its BIOS management page (aka MegaRAID webbios). This means you’ll need to use the command line or other software to update and view its information. Initially, I tried several command line options (UEFI Shell, DOS CLI, etc.) with the MegaRAID CLI but I just could not find the right combination to get it to work. My solution — I simply used an older SSD drive, installed Windows Server 2012 on it, and used the Windows exe to update the firmware. It worked perfectly with no issues.
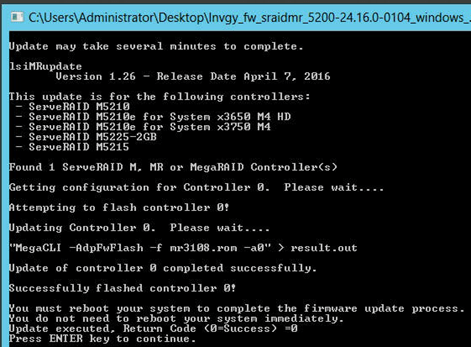
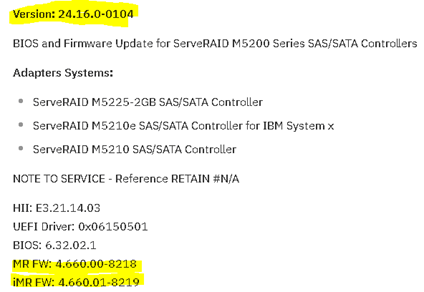
After the update, I had some issues decoding the M5210 running firmware version vs. the vSAN HCL. As you know when running vSAN in a home lab the closer you are to the HCL and vSAN HCL the better. (NOTE: as I’m sure you know production environments MUST match the HCLs). The published firmware version on the vSAN HCL is 4.660.00-8218. However, when the M5210 boots it shows 24.16.0-0104.
Solution: When you are looking at the boot screen you are seeing the FW Package number not the Firmware of your controller. Simply look at the release notes for the ‘FW Package’ and you’ll find the correct MR FW versions that match the vSAN HCL.
IBM / Lenovo doesn’t make it easy to find the firmware for this device.
Here are a few more recent links:
Boot Screen

Release notes
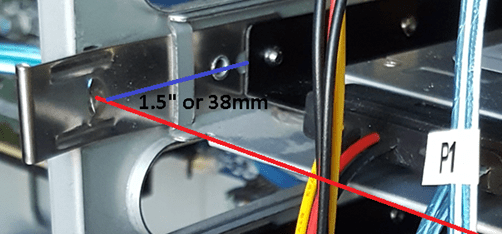
200GB SSD: The Sonata cases I am using are a bit dated but they fully meet my needs so there is no need to replace them. There are 4 x 3.5″ bottom mount disk trays in each case. Bottom mount means you insert your 3.5″ drive into the tray and bolt it to the tray from the bottom. I bought several 3.5″ to 2.5″ converters which will allow me to mount my 2.5″ SSDs. However, the converters didn’t have bottom mount holes that lined up with the standard 3.5″ holes. Fix — I used a hole in the existing tray to secure the converter to the tray. I also made sure I mounted the converter as far back as I could to ensure the SAS cables would not be on the side of the case. This mount position moved the drives back about 1.5″(38mm). The red line in the PIC show where the original mount point was.
Mini SAS SFF-8643 to (4) 29pin SFF-8482: From the PIC above you can see the disk end of the SAS cables. What is nice about them is each one has a disk number labeled and has integrated power and all 4 drives go back to a single connector. The only downside to the cable I bought was they seemed a bit frail, so I’d recommend if you plan to mod your environment frequently look into a better-quality cable. If you interested more in SAS and the associated cables I would recommend this wiki page – https://en.wikipedia.org/wiki/Serial_Attached_SCSI

64GB USB Boot Stick: I decided to use the internal USB port freeing up the rear ports for other items. The USB stick I am using is the SanDisk Ultra Fit 64GB USB 3.0 Flash Drive. ESXi will only take up ~10GB of this stick, so is 64GB overkill? Keep in mind I plan to run vSAN 6.6.x and one of the benefits is the log files now write to RAM and in case of a system failure, they can write these logs to the USB stick. However, the default partition sizes (2.5GB for diags) might not be large enough. The vSAN team as released a nifty script that will estimate and resize you USB partitions. I’ll cover this topic in later posts and show you how to “auto-resize” your USB storage after you have installed vSAN.

Fun with the MAC:
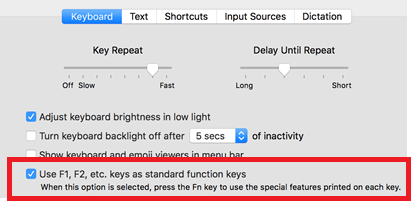
Function Keys: One of the challenges was MAC keyboard mapping into the remote KVM. For some reason, the function keys on a MAC always assume you want to their special function vs. the F# key you are pushing. This proves to be a challenge when you are trying to pass standard function keys. Simple fix: System Preferences > Keyboard > Ensure ‘Use F1, F2, etc. as standard function keys’ is checked.
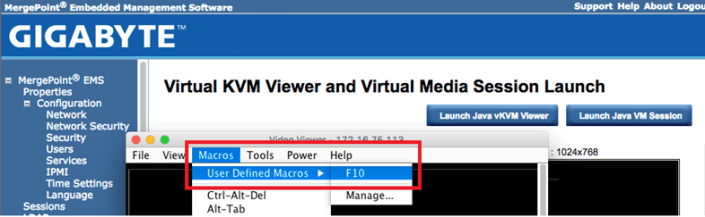
Another option for F# keys is to create a macro inside of the vKVM Viewer to pass the key. The screenshot below shows where you can setup user defined Macros and in the background is the MeregPoint console for one of my ESXi hosts.
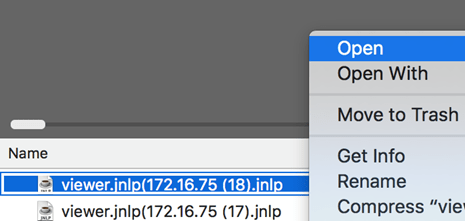
Java: One of the joys of this motherboard is the use of vKVM viewer and VM Media. However, these functions need JAVA installed and up to date to function properly. If your JAVA is behind, trust me just update it’ll save you hours of pain. Here is the remaining gotcha. In the Mergpoint web page, you simply click on the ‘Launch Java vKVM Viewer’ button to start your host remote session. The webpage will download a .jnlp file. If you just click on this file you are presented with an error stating it can’t be opened because it is from an unidentified developer. Solution – After the java app downloads, click on the down arrow next to the file and choose ‘Show in finder’. When finder launches select that file by holding down the control key and right-clicking on it. A pop-up window will appear, release the control key and finally choose open. This allows you to override the ‘unidentified developer’ error and launch the viewer.
ESXi Installation:
Setting up the ESXi hosts had one big challenge – after the install of ESXi I could not see my SAS disks. I am using the ESXi 6.5U1 Rollup.iso to do my installs and my main goal was to install and boot ESXi from the 64GB USB stick and be able to access the 4 x 200GB SSD attached to the IBM M5210
Problem – During the install of ESXi, I booted the host using the ESXi6.5 ISO via virtual media console. The installer program would recognize the IBM M5210 controller, the attached 4 x SAS disks, and the 64GB USB stick. The installation would complete without issue. However, after ESXi booted the SAS disks and the controller would not appear but I could see the 64GB USB stick.
Other observations –
First, in the ESXi Log files I noticed the megasas was having firmware issues:
2017-09-21T10:26:31.310Z cpu5:66065)<6>megasas: Waiting for FW to come to ready state 2017-09-21T10:26:31.310Z cpu5:66065)<7>megasas: FW in FAULT state!!
ESC[7m2017-09-21T10:26:31.310Z cpu5:66065)WARNING: vmklinux: pci_announce_device:1486: PCI: driver megaraid_sas probe failed for device 0000:07:00.0ESC[0m 2017-09-21T10:26:31.310Z cpu5:66065)LinPCI: LinuxPCI_DeviceUnclaimed:257: Device 0000:07:00.0 unclaimed.
And… even though ESXi saw the M5210 as vmhba1, its status was unknown
vmhba1 Avago (LSI) MegaRAID SAS Invader Controller
vmhba1 0000:07:00.0 PCI 0:0:29:0 PCI 0:7:0:0 Slot1 UNKNOWN
Second, I use Partition Wizard bootable ISO to remove all partitions prior to installing ESXi. I noted that sometimes after I booted to it as virtual media it would see the 4 x SAS disks and other times it would not.
Third, Installation of ESXI onto SAS or SATA SSD as the boot disk worked perfectly. After booting I could see the M5210 and SAS disks but my goal of using the 64GB USB stick for the boot device was not achieved.
Fourth, occasionally when I booted the ESXi host to the USB stick it would work okay, but upon reboot would not
Final Solution – The core reason why I could not see the SAS disks with ESXi or Partition Wizard was the boot type was UEFI and not legacy. During boot time the boot order would sometimes change if I had virtual media connected, meaning sometimes it would boot the 64GB USB stick or Partition Wizard as UEFI and other times as legacy. Apparently, UEFI boot was giving the M5210 firmware issues not allowing the SAS disk to come online.
FIX – I went into the BIOS of the motherboard > Advanced > CSM Configuration > changed ‘Boot option filter’ to ‘Legacy Only’ and all my issues went away.
Summary – I spent a lot of after-hours and weekends working out all various installation tweaks but what can I say, this is the joy of setting up a home lab! My hopes are in some way this post helps you move your home lab forward too. In my next post, I’ll be going over how to enable the InfiniBand HCA in ESXi 6.5.
If you like my ‘no-nonsense’ blog articles that get straight to the point… then post a comment or let me know… Else, I’ll start writing boring blog content.
Enabling Service advisories for VMware vSAN and other products
One question I get a lot as a TAM is – “How can users of VMware products, such as vSAN, stay current with various service advisories?” One very simple way is to enable your my.vmware.com profile for product subscriptions. Product subscriptions allow you to choose products of interest and then you will receive emails around the various service advisories. It’s a very simple way to keep up to date and it only takes a few minutes to enable.
Here are the steps:
- Log on to your my.vmware.com portal account
- In the upper right-hand corner choose your name then click on profile

- After the profile page loads click on Subscriptions

- Under Product subscriptions, click edit

- You’ll find vSAN under ‘Datacenter & Cloud Infrastructure, simply choose it and/or other products, then click on save

- From there periodically, you’ll receive information and advisories around the products you select.
Sum it up: I have had these subscription services enabled for years now and I have only received valuable and timely information and not SPAM emails.
If you like my ‘no-nonsense’ blog articles that get straight to the point… then post a comment or let me know… Else, I’ll start writing boring blog content.
vSAN – Working with the vSAN HCL Database
The vSAN HCL DB is a local file enabling vCenter Server to validate your vSAN hardware deployment. This local DB file contains information around the supported products on the VMware compatibility guides. Part of the vSAN Health checks is validating the age of the vSAN HCL DB file. The initial release of the health feature ships with a copy of the vSAN HCL DB, which was current when released. This copy of the database will become outdated over time. The file can be updated via an internet connection or through manual download (See KB’s below). However, if the HCL DB file is not updated and is 90 days past you will see a warning and at 180 days past you’ll receive an error. These alerts in no way will affect your vSAN cluster as they are merely non-impactful alarms.
You can find this check by clicking on your vSAN Cluster > Monitor > Virtual SAN > Health and then expand Hardware compatibility (See the PIC below). Under Hardware compatibility, you will see various checks that validate your installation. The ‘vSAN HCL DB up to date’ is the check that will alarm when needed.
You might be thinking –
“I validated my vSAN deployment against the HCL & VCL’s when it was initially built, so why do I need to recheck it over and over?” There are a few good reasons why this validation is important. First off – New firmware and drivers are validated on a routine basis, keeping on top of these will help to ensure your vSAN cluster is able to work optimally and is less problematic. Second – Just because a component was listed on the VGC, doesn’t necessarily mean it will stay on the VGC. Allowing vSAN to self-check itself not only will save you time but will identify any potential issues.
“My vSAN cluster doesn’t have an internet connection and I am pretty good about keeping up to date on the VGC. Do I really need these checks, and if not how can I disable them” Frist off I would not recommend disablement but there may be a need for this. It could be very true that your company does a good job of manually checking the VCG but automating these check would only help your efforts and would be more efficient. However, there are some deployments where automated checks may not be desirable. For those cases follow this guidance to disable: Cluster > Manage > Virtual SAN > General > Internet Connectivity > Disable Auto HCL update
For more information around the vSAN HCL DB, including how to disable and update, please see the following KB’s
- vSAN Health Service – Hardware compatibility – vSAN HCL DB Auto Update (2146132) << Great information on disablement
- vSAN Health Service – vSAN HCL Health – vSAN HCL DB up-to-date (2109870) << Good information on the checks basic functions
In this PIC I’m showing where you can locate the vSAN HCL DB Check status.

If you like my ‘no-nonsense’ blog articles that get straight to the point… then post a comment or let me know… Else, I’ll start writing boring blog content.
VSAN – vSAN 6.6 Release resources
Here is a great list of vSAN 6.6 release resources. Enjoy!
Quotes / Webinars:
- Press Release Partner Quotes Supporting Launch: http://www.vmware.com/company/news/releases/vsan-partner-quotes.html
- On-demand Launch Video – Registration Link: Modernize Your IT with vSAN Innovations
- VMUG Webinar: What’s New Technical Deep dive (Tuesday, April 18, 2017)
Blogs:
- What’s New Blogs: https://blogs.vmware.com/virtualblocks/2017/04/11/whats-new-vmware-vsan-6-6/
- Native Data-at-Rest Encryption: https://blogs.vmware.com/virtualblocks/2017/04/11/vsan-6-6-native-data-at-rest-encryption/
Web Assets / Documentation :
- What’s New Page: http://www.vmware.com/products/whats-new-virtual-san.html
- vSAN 6.6 Datasheet (PDF): http://www.vmware.com/content/dam/digitalmarketing/vmware/en/pdf/products/vsan/vmware-virtual-san-datasheet.pdf
- vSAN Customer Page: http://www.vmware.com/products/virtual-san/customers.html
- Storage Hub: https://storagehub.vmware.com/
- Security Infographic: http://www.vmware.com/content/dam/digitalmarketing/vmware/en/pdf/products/vsan/vmware-vsan66-security-infographic.pdf
VSAN – What’s new in vSAN 6.6 Video Demo
What a great video posted by Duncan and VMware! In a short 10 minute video, he is able to hit upon some of the new features within vSAN 6.6
Home Lab Gen IV – Part I: To InfiniBand and beyond!
I’ve been running ESXi 5.5 with VSAN using a Netgear 24 Port Managed Gig switch for some time now, and though it has performed okay I’d like to step up my home lab to be able to support the emerging vSphere features (VSAN 6.x, FT-SMP, and faster vMotion). To support some of these features 10Gb/s is HIGHLY recommend if not fully required. Looking at 10Gbe switches and pNICS the cost is very prohibitive for a home lab. I’ve toyed around with InfiniBand in the past (See my Xsigo Posts here) and since then I’ve always wanted to use this SUPER fast and cost effective technology. Initially, the cost to do HPC (High-performance computing) has always been very expensive. However, in recent years the InfiniBand price per port has become very cost effective for the home lab.
Let’s take a quick peek at the speed InfiniBand brings. When most of us were still playing around with 100Mb/s Ethernet InfiniBand was able to provide 10Gb/s since 2001. When I state 10Gb/s I’m talking about each port being able to produce 10Gb/s and in most cases Infiniband switches have a non-blocking backplane. So a 24 Port InfiniBand Switch, 10Gb/s per port, Full duplex, Non-blocking switch will support 480Gb/s! Over time InfiniBand speed has greatly increased and over time the older switches have dropped in price making InfiniBand a good choice for a growing home lab. For most home labs a 40Gb/s per port QDR switch is financial achievable. Even the 20Gb/s DDR or 10Gb/s SDR switch give ample speed and are VERY cost effective. However, step above QDR and you’ll find the price point is a bit too steep for home lab use.

So let’s take a look at the price / speed comparisons for InfiniBand vs. 10Gb/s Ethernet.
| 10Gb/s | 20Gb/s | 40Gb/s | |
| InfiniBand HCA | 2 Port 10Gb/s ($15-$75) | 2 Port 20Gb/s ($20-$100) | 2 Ports 40GB/s ($30-$150) |
| InfiniBand Switch | 24 Ports SDR (~$30-$70) | 24 Ports DDR (~$70-$120) | 8-36 Ports QDR (~$250-$500) |
| InfiniBand Cable | CX4 (SFF-8470) ($15-$30) | CX4 (SFF-8470) ($15-$30) | QSFP (SFF-8436) ($15-$30) |
| Ethernet Switch | 8 Ports 10Gbe ($700-$900) | ||
| Ethernet pNIC | 2 Port 10Gbe ($300-$450) | ||
| Ethernet Cable | 1M / 3ft. CAT 6a ($5-$10) |
Let’s break this down a bit further. I used the high dollar from each line item above and figured 3 x HCAs or pNICs and 6 cables for my 3 hosts.
Ethernet 10Gb/s – (3 Host Total cost $2310)
- Cost Per Switch – $900 Switch / 8 Ports = $112 per port
- Cost to enable 3 Hosts with 3 pNICs and 2 Cables -(3 Hosts x $450 pNICS) + ((2 Cables x 3 Hosts) x $10 each) = $1410 for three hosts or $470 per Host
- Total Cost to enable 3 hosts and switch cost – $1410 + $900 = $2310
- Fully populated 8 Port switch supporting 4 hosts = $2776
InfiniBand SDR 10Gb/s – (3 Host Total Costs $385)
- Cost Per Switch Port – $70 / 24 Ports = $2.91 per port
- Host Costs – (3 Hosts x $75 HCA) + ((2 Cables x 3 Hosts) x $30 = $315 (Per Host $105)
- Total Cost to enable 3 hosts and switch cost – $315 + $70 = $385
- Fully populated 24 port switch supporting 12 hosts = $1330
InfiniBand DDR 20Gb/s – (3 Host Total Cost $510)
- Cost Per Switch Port – $120 / 24 Ports = $5 per port
- Host Costs – (3 Hosts x $100 HCA) + ((2 Cables x 3 Hosts) x $30 = $390 (Per Host $130)
- Total Cost to enable 3 hosts and switch cost – $390 + $120 = $510
- Fully populated 24 port switch supporting 12 hosts = $1680
InfiniBand QDR 40Gb/s – (3 Host Total Cost $1040)
- Cost Per Switch Port – $500 / 24 Ports = $20.83 per port
- Host Costs – (3 Hosts x $150 HCA) + ((2 Cables x 3 Hosts) x $30 = $540 (Per Host $180)
- Total Cost to enable 3 hosts and switch cost – $540 + $500 = $1040
- Fully populated 24 port switch supporting 12 hosts = $2660
From these costs you can clearly see that InfiniBand is TRULY the best value for speed and port price. Even if you got a great deal, let’s say 50% off on 10Gbe, it still would be slower and it would cost you more. Heck, for the price you could easily buy an extra switch as a backup.
With this in mind my plan it to replace my backend Gbe network with InfiniBand. Using IPoIB (IP over InfiniBand) for VSAN, vMotion, and FT traffic and my 1Gbe network for the VM’s and ESXi management traffic. However, without knowledge wisdom cannot be achieved. So, my next steps are to learn more about InfiniBand and review these great videos by Mellanox. Then come up with a plan to move forward using this technology.
Check out these Videos: InfiniBand Principles Every HPC Expert MUST Know!
- ← Previous
- 1
- 2
- 3
- Next →
