Storage
VSAN – Performance Degradation of Hybrid disk groups on VSAN 6.2 Deployments (2146267)
What >> Upgraded Hybrid (SDD and HDD) VSAN 6.2 deployments are being affected by a new service causing performance issues
Current fix and more advisement >>KB2146267
Automate this fix >> You can give this script a go BUT play at your own riskLINK (Thanks Jase!)
Next Steps >> This should be resolved in an upcoming patch release (don’t ask me how soon, but it’ll be soon)
If you like my ‘no-nonsense’ blog articles that get straight to the point… then post a comment or let me know… Else, I’ll start writing boring blog content.
Updating the Dell FX2 Backplane and Non-Backplane firmware based on VMWare KB 2109665
The Fun:
Recently I was working with a Dell FX2 + VSAN environment and came across this VMware KB (2109665) around updating the Backplane and Non-Backplane Expander firmware. I’m not going to get into the details of this KB as others have rehashed it in multiple blogs. Here is a good example: http://anthonyspiteri.net/vsan-dell-perc-important-driver-and-firmware-updates/
However, what I find is the KB, blogs, and Dell just merely tell you to update the firmware but they don’t tell you how or where to. If you have worked with the FX2 you’d know there are the many ways you can update the firmware but finding the right on one, of the 6 different ways, can be a bit frustrating.
A Simple Solution:
To update the Backplane Expander and Non-Backplane Expander you will need to boot the server into the Lifecycle Controller at boot time. Then I choose to use a USB key to update the firmware.
Glorious Screenshots:
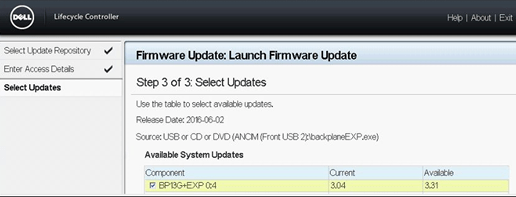
Launch the Lifecycle Controller during boot time then choose Firmware Update >> Launch Firmware Update

I choose to use USB. Tip: Make sure your USB ports are enabled in the BIOS

Choose your file to be updated. Tip: I renamed the firmware file to something easier to type.

Click on next and let it finish the process…
If you like my ‘no-nonsense’ blog articles that get straight to the point… then post a comment or let me know…
Else, I’ll start writing boring rehashed blog content.
How to find Dell PERC FD332 or H330 Firmware Versions in ESXi 6
Today’s adventure seemed an easy task but ended up taking much too long to find the right answer.
The task… ‘Is there a way to find the firmware version of a Dell Perc FD332 or H330 controller using command line in ESXi 6?’
The answer:
‘zcat /var/log/boot.gz |grep -i firm’

Things that didn’t work –
http://www.yellow-bricks.com/2014/04/08/updating-lsi-firmware-esxi-commandline/
Thanks going out to my fellow VMware TAMs for helping me to locate this answer.
If you like my ‘no-nonsense’ blog articles that get straight to the point… then let me know…
Else, I’ll start writing boring blog content.
Quick ways to check disk alignment for ESXi Datastores and Windows VM’s
There are two simple checks a virtual infrastructure (VI) admin should be doing to ensure ESXi Datastores and the Windows VM’s are properly aligned. If either are misaligned then performance issues will follow. Though I’m not going to get into the whys and how’s of alignment issues I will show you how to quickly check.
1 – ESXi Datastores (DS)
By default if the VI admin formats a target datastore with vCenter Server or directly connected to a host via the VI Client the starting sector will be 2048. A starting sector of 2048 will satisfy nearly all of the storage vendors out there, however a 2048 starting sector should be validated with your storage vendor.
If the VI Admin chose to format the DS via a script then they should choose a starting sector of 2048 or what the storage vendor recommends
Example — partedUtil setptbl \$disk gpt “1 2048…..” More info here on partedUtil
Here is a simple command to check your “Start Sector”. SSH or Direct console into a host that has DSs you want to check and run this command.
~ # esxcli storage core device partition list

Some note about this –
RED Box – Is the local boot disk, so its starting sector will be 64, this is not an issue as this is the ESXi Boot disk
Yellow, Green, and Blue – Are all VSAN Disks and all have a starting sector of 2048 << This is what I’m looking for, I want to make sure all DS disks start at 2048, if not they could experience performance issues.
2 – Windows VM Check
Windows checks are pretty easy too, the starting sector offset should be 2048. Note the screenshot below shows the Partition starting offset of 1,048,576, also note it’s labeled in bytes not sectors. To find the starting sector just divide the Partition Starting Offset by the Bytes/Sector. Simple math tells us its right — 1048576/512 = 2048 Sector. If your Partition Starting offset is anything other than 1,048,576 Bytes or 2048 Sectors then the VM is not aligned and will need adjusted.
To find your Partition Starting offset, from a Windows Command Prompt, type in ‘msinfo32.exe’, go to Components > Storage > Disks, and note your Partition Starting Offset.

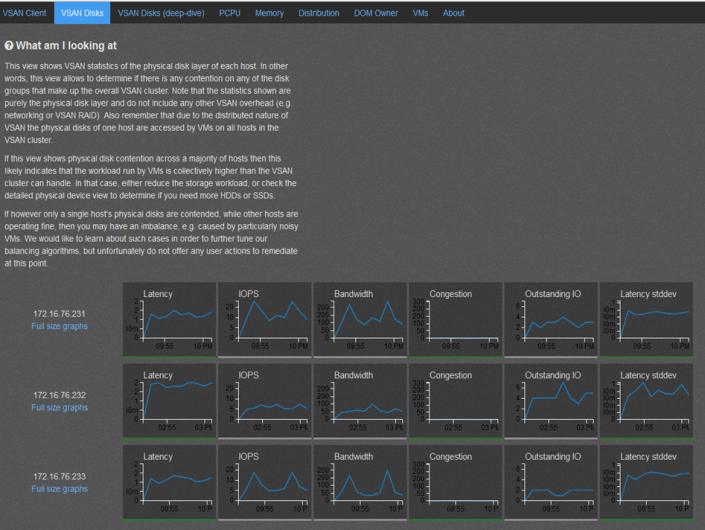
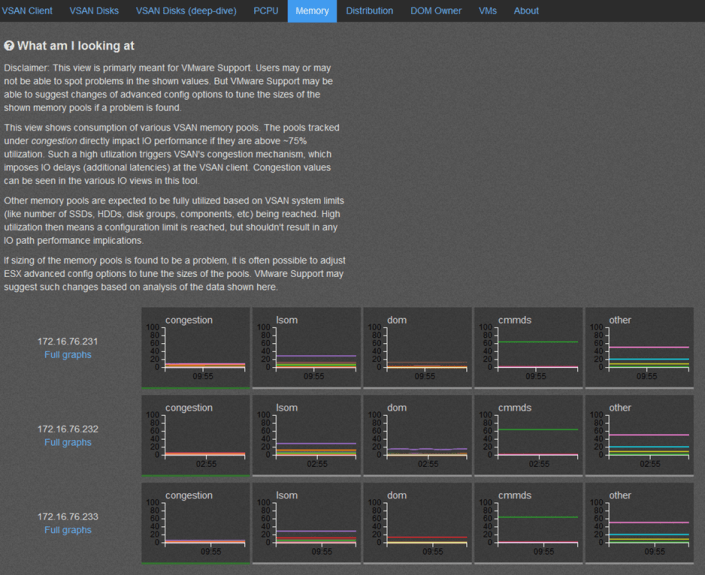
VSAN – Setting up VSAN Observer in my Home Lab
VSAN Observer is a slick way to display diagnostic statics not only around how the VSAN is performing but how the VM’s are as well.
Here are the commands I entered in my Home Lab to enable and disable the Observer.
Note: this is a diagnostic tool and should not be allowed to run for long periods of time as it will consume many GB of disk space. Ctrl+C will stop the collection
How to Start the collection….
- vCenter239:~ # rvc root@localhost << Logon into vCenter Server Appliance | Note you may have to enable SSH
- password:
- /localhost> cd /localhost/Home.Lab
- /localhost/Home.Lab> cd computers/Home.Lab.C1 << Navigate to your cluster | Mine Datacenter is Home.Lab, and cluster is Home.Lab.C1
- /localhost/Home.Lab/computers/Home.Lab.C1> vsan.observer ~/computers/Home.Lab.C1 –run-webserver –force << Enter this command to get things started, keep in mind double dashes “—” are used in front of run-webserver and force
- [2014-09-17 03:39:54] INFO WEBrick 1.3.1
- [2014-09-17 03:39:54] INFO ruby 1.9.2 (2011-07-09) [x86_64-linux]
- [2014-09-17 03:39:54] WARN TCPServer Error: Address already in use – bind(2)
- Press <Ctrl>+<C> to stop observing at any point ...[2014-09-17 03:39:54] INFO WEBrick::HTTPServer#start: pid=25461 port=8010 << Note the Port and that Ctrl+C to stop
- 2014-09-17 03:39:54 +0000: Collect one inventory snapshot
- Query VM properties: 0.05 sec
- Query Stats on 172.16.76.231: 0.65 sec (on ESX: 0.15, json size: 241KB)
- Query Stats on 172.16.76.233: 0.63 sec (on ESX: 0.15, json size: 241KB)
- Query Stats on 172.16.76.232: 0.68 sec (on ESX: 0.15, json size: 257KB)
- Query CMMDS from 172.16.76.231: 0.74 sec (json size: 133KB)
- 2014-09-17 03:40:15 +0000: Live-Processing inventory snapshot
- 2014-09-17 03:40:15 +0000: Collection took 20.77s, sleeping for 39.23s
- 2014-09-17 03:40:15 +0000: Press <Ctrl>+<C> to stop observing
How to stop the collection… Note: the collection has to be started and running to web statics as in the screenshots below
- ^C2014-09-17 03:40:26 +0000: Execution interrupted, wrapping up … << Control+C is entered and the observer goes into shutdown mode
- [2014-09-17 03:40:26] INFO going to shutdown …
- [2014-09-17 03:40:26] INFO WEBrick::HTTPServer#start done.
- /localhost/Home.Lab/computers/Home.Lab.C1>
How to launch the web interface…
I used Firefox to logon to the web interface of VSAN Observer, IE didn’t seem to function correctly
Simply go to http://[IP of vCenter Server]:8010 Note: this is the port number noted above when starting and its http not https
So what does it look like and what is the purpose of each screen… Note: By Default the ‘? What am I looking at’ is not displayed, I expanded this view to enhance the description of the screenshot.


References:
http://www.yellow-bricks.com/2013/10/21/configure-virtual-san-observer-monitoring/
VSAN – The Migration from FreeNAS
Well folks it’s my long awaited blog post around moving my Homelab from FreeNAS to VMware VSAN.
Here are the steps I took to migrate my Home Lab GEN II with FreeNAS to Home Lab GEN III with VSAN.
Note –
- I am not putting a focus on ESXi setup as I want to focus on the steps to setup VSAN.
- My home lab is in no way on the VMware HCL, if you are building something like this for production you should use the VSAN HCL as your reference
The Plan –
- Meet the Requirements
- Backup VM’s
- Update and Prepare Hardware
- Distribute Existing hardware to VSAN ESXi Hosts
- Install ESXi on all Hosts
- Setup VSAN
The Steps –
Meet the Requirements – Detailed list here
- Minimum of three hosts
- Each host has a minimum of one SSD and one HDD
- The host must be managed by vCenter Server 5.5 and configured as a Virtual SAN cluster
- Min 6GB RAM
- Each host has a Pass-thru RAID controller as specified in the HCL. The RAID controller must be able to present disks directly to the host without a RAID configuration.
- 1GB NIC, I’ll be running 2 x 1Gbs NICs. However 10GB and Jumbo frames are recommended
- VSAN VMkernel port configured on every host participating in the cluster.
- All disks that VSAN will be allocated to should be clear of any data.
Backup Existing VMs
- No secret here around backups. I just used vCenter Server OVF Export to a local disk to backup all my critical VM’s
- More Information Here
Update and Prepare Hardware
- Update all Motherboard (Mobo) BIOS and disk Firmware
- Remove all HDD’s / SDD’s from FreeNAS SAN
-
Remove any Data from HDD/SDD’s . Either of these tools do the job
- Windows Tools – “MiniTool Partition Wizard”
- Boot ISO – GParted
Distribute Existing hardware to VSAN ESXi Hosts
- Current Lab – 1 x VMware Workstation PC, 2 x ESXi Hosts boot to USB (Host 1 and 2), 1 x FreeNAS SAN
- Desired Lab – 3 x ESXi hosts with VSAN and 1 x Workstation PC
-
End Results after moves
- All Hosts ESXi 5.5U1 with VSAN enabled
- Host 1 – MSI 7676, i7-3770, 24GB RAM, Boot 160GB HDD, VSAN disks (2 x 2TB HDD SATA II, 1 x 60GB SSD SATA III), 5 xpNICs
- Host 2 – MSI 7676, i7-2600, 32 GB RAM, Boot 160GB HDD, VSAN disks (2 x 2TB HDD SATA II, 1 x 90 GB SSD SATA III), 5 x pNICs
- Host 3 – MSI 7676, i7-2600, 32 GB RAM, Boot 160GB HDD, VSAN disks (2 x 2TB HDD SATA II, 1 x 90 GB SSD SATA III), 5 x pNICs
- Note – I have ditched my Gigabyte z68xp-UD3 Mobo and bought another MSI 7676 board. I started this VSAN conversion with it and it started to give me fits again similar to the past. There are many web posts with bugs around this board. I am simply done with it and will move to a more reliable Mobo that is working well for me.

Install ESXi on all Hosts
-
Starting with Host 1
- Prior to Install ensure all data has been removed and all disk show up in BIOS in AHCI Mode
-
Install ESXi to Local Boot HD
- After the install I experienced the ESXi hanging at Boot – ‘Starting up Services – Running usbarbitrator start’
- Solution – Stop usbarbitrator service
- http://kb.vmware.com/selfservice/microsites/search.do?language=en_US&cmd=displayKC&externalId=1023976
- Setup ESXi base IP address via direct Console, DNS, disable IP 6, enable shell and SSH
- Using the VI Client setup the basic ESXi networking and vSwitch
- Using VI Client I restored the vCSA and my AD server from OVF and powered them on
- Once booted I logged into the vCSA via the web client
- I built out Datacenter and add host 1
- Create a cluster but only enabled EVC to support my different Intel CPU’s
- Cleaned up any old DNS settings and ensure all ESXi Hosts are correct
- From the Web client Validate that 2 x HDD and 1 x SDD are present in Host
- Installed ESXi Host 2 / 3, followed most of these steps, and added them to the cluster
Setup VSAN
-
Logon to the Webclient
-
Ensure on all the hosts
- Networking is setup and all functions are working
- NTP is working
- All expected HDD’s for VSAN are reporting in to ESXi
-
Create a vSwitch for VSAN and attach networking to it
- I attached 2 x 1Gbs NICs for my load that should be enough
-
Assign the VSAN License Key
- Click on the Cluster > Manage > Settings > Virtual SAN Licensing > Assign License Key
-

-
Enable VSAN
- Under Virtual SAN click on General then Edit
- Choose ‘Turn on Virtual SAN’
- Set ‘Add disks to storage’ to Manual
-
Note – for a system on the HCL, chances are the Automatic setting will work without issue. However my system is not on the any VMware HCL and I want to control the drives to add to my Disk Group.

-
Add Disks to VSAN
- Under Virtual SAN click on ‘Disk Management’
- Choose the ICON with the Check boxes on it
- Finally add the disks you want in your disk group

- Allow VSAN to complete its tasks, you can check on its progress by going to ‘Tasks’

- Once complete ensure all disks report in as healthy.

-
Ensure VSAN General tab is coming up correct
- 3 Hosts
- 3 of 3 SSD’s
- 6 of 6 Data disks
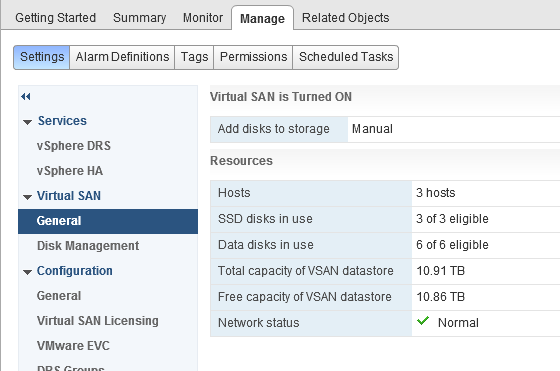
- Check to see if the data store is online

Summary –
Migrating from FreeNAS to VSAN was relatively a simple process. I simply moved, prepared, and installed and the product came right up. My only issue was working with a faulty Gigabyte Mobo which I resolved by replacing it. I’ll post up more as I continue to work with VSAN. If you are interested in more detail around VSAN I would recommend the following book.
Turning a ‘No you cannot attend’ to a ‘Yes’ for VMworld
 I’ve been lucky enough to make it to every VMworld since 2008 and 2014 will be my 7th. time in a row. In this blog post I wanted to share with you a breakdown of some of the tips and tricks I’ve used to get to these events. Being the former Phoenix VMUG leader I’ve shared these tips with fellow VMUG users and now I’m sharing them with all of you. Users would tell me cost is the number one reason why they don’t go – “My Company sees value in this event but will not pay for it”. This breaks down to Food, Hotel, Travel, and the infamous golden ticket, aka the VMworld pass. So how do users overcome the cost to attend? This is what this blog post is all about…
Working with your employer –
Having your employer pick up the tab not only benefits them as a company but yourself too. As you know VMworld is full of great content and the socialization aspects are second to none. Chances are you’ll be asked to put together a total cost to attend and this cost can be quite high for some companies on a tight budget. My suggestion is if you are getting the big ‘No’ then work with your boss around the total costs. First find out why it’s a ‘No’ and look for opportunities to overcome this. Maybe your company will pay for some of the items. Example – They might be able to cover airfare, but the rest is on you. Don’t forget if your company has a VMware TAM (Technical Account Manager) reach out them. Even if you are not directly working with the TAM they are your best resource not only for VMware Technology but also for getting you to VMworld. They don’t have passes but they usually know the community very well and can assist.
Sometimes I hear “My employer will not allow me to accept gifts”. True your company may have a policy around the type of gifts you can receive and by all means follow this policy. However, keep in mind you may be able to take vacation time and represent yourself at this event not your employer. Then there is a possibility gifts could be accepted but on the premises you don’t represent your company. Some companies are okay with this but just make sure they are. If you are able to do this I would suggest you represent it as ‘personal development’.
How do I get a free VMworld Pass?
This can be your biggest challenge. However here are some ways to get your hands on one.
-
Give-a-ways
- I can’t tell you how many vendors have giveaways contests right now — hit them early and enter as many contests as you can find
-
Tips-
- When you enter, find out who your local vendor contact is and let them know you entered. Then stay in contact with them.
- Keep in mind not all contests are the same, some are based on random drawing and others are not. This is why I say keep in contact with the vendor.
- How do I find give-a-ways >> Google ‘VMworld getting there for free’
-
Get the word out
- Tell your boss, workmates, vendors, and partners. Post on Twitter, Linked-In, etc. and Repeat again and again. By doing this you let others know about your strong interest in getting there, in turn they might get a lead for you.
- Most importantly, reach out to your local VMUG leader and ask them for tips in your area. They are usually well connected and might have a lead for you as well.
-
Follow Twitter and Linked-In – You never know who is going to post up “I have a pass and need to give it to someone”. Yes that is right, before the event you can transfer a pass to someone.
- New to Twitter, need contacts? It’s a pretty simple to get started. Simply find the #VMworld hastag, see who is posting to it and start following them. Then look at all their contacts and follow them too, soon you’ll have a gaggle of folks.
- This sound like work. Why do all this? Simple, distributed coverage model. The more people know the more likely they are to help and in turn the more likely you’ll succeed
-
Don’t forgo an Expo-Only or Solutions Exchange Pass
- If you get offered this pass take it. I can’t tell you how many vendors have these passes and have trouble giving them away, seriously this is gold but folks don’t know how to leverage them.
- First off this pass has great value, there is a TON of value here.
-
Second this pass can get you on to the Solutions Exchange floor where all the vendors and partners are.
- Once there start talking to all the vendors, fellow attendee, all those folks you meet on Twitter, etc. as you never know who has a full pass they couldn’t get rid of, take it and upgrade yours.
- Third, while you are there with an Expo Pass use Twitter and the VMworld hash tags to let folks know you’re here and you are looking for a full pass.
- Stop by the VMUG booth on the Expo floor, you never know who will be there and you never know if users there might be able to help you.
-
Vendors and Partners
-
Find out who is sponsoring VMworld this year, and then…
- Start calling the ones you know well, ask them for support getting there.
- Don’t forget to call the ones you don’t know so well too.
- If you have an upcoming deal on the table with a vendor, inquire if they will throw in passes, travel, etc.
-
What about Food, Hotel, and Travel Costs?
-
Food
- There will be free food everywhere, in-fact feel free to give some to the homeless I usually do.
- If you get a pass then lunch and usually breakfast are included.
- For dinner, find out where the nightly events are as they usually have food.
- Talk with Vendors as they might take you out, you never know.
-
Hotel
- Ask a Vendor to pay for just the room or ask them to gift hotel points to you.
- Room Share with someone at the event << Think about it, you won’t be in the room that often and chances are from 7AM till 10PM you’ll be out of your room.
-
Use travel sites to cut down the cost.
- Secret Hotels: Best Western Carriage Inn and The Mosser. Good if you’re on a budget but chances are they are full this year (2014).
- Use your hotel or other travel points to book the hotel for free.
- Get a low cost hotel away from the event, but watch your travel costs.
-
Travel
-
Airfare
- Ask a vendor to pay for just the airfare, or maybe they have points they can gift you.
- Use your own travel points to pay for this.
-
Rideshare to the event
- See if one of your connections are driving to the event, offer to split fuel costs.
- You drive someone to the event, and they pick up the hotel or vise versa.
-
Local Travel
-
Use the following –
- VMworld Shuttle
- Bus
- Uber
- BART
- Once again hit up those vendors, they might have a way to get you around for free
-
-
Finally here is a breakdown of how I got to so many events and how/who paid for it….
| Year | Pass | Travel | Food | Hotel |
| 2008 VMworld | Vendor Sponsor – Full Pass | Employer Paid | Vendor / Event | Employer Paid |
| 2009 VMworld | VMUG Sponsored – Full Pass | Vendor paid for Airfare with Miles | Vendor / Event | Employer Paid |
| 2010 VMworld | VMUG Sponsored – Full Pass | Vendor paid for Airfare with Miles | Vendor / Event | Vendor Sponsored |
| 2011 VMworld | Vendor Sponsor – Expo Pass but I got an upgrade to Full by asking others | I drove two others and I paid for the fuel | Vendor / Event | Travel Companion paid for room |
| 2012 VMworld | Employee Labs | Employer Paid | Employer Paid | Employer Paid |
| 2013 VMworld | Employee TAM | Employer Paid | Employer Paid | Employer Paid |
| 2014 VMworld | Employee TAM | Employer Paid | Employer Paid | Employer Paid |
Summing it up…
My take is this, if you REALLY want to go you’ll get there but sometimes it takes effort to do so and if you do it right it might not cost you a thing. Don’t let anything stop you and find your way there.
Finally, after you’ve been to the event don’t forget about the folks who got you there and say ‘Thank you’. Then over the next year continue to build this relationship, as you never know if you’ll need help again, or you want to help someone else get there.
vSAN 1.0 Released Home lab update here I come!
In case you missed the vSAN announcement and demo on www.vmware.com/now Here is a quick review…
- General Availability of Virtual SAN 1.0 the week of March 10th
- vSphere 5.5 Update 1 will support VSAN GA
- Support for 32 hosts in a Virtual SAN cluster
-
Support for 3200 VMs in a Virtual SAN cluster
- Note, due to HA restrictions only 2048 VMs can be HA protected
- Full support for VMware Horizon / View
- Elastic and Linear Scalability for both capacity and performance
- VSAN is not a virtual storage appliance (VSA). Performance is much better than any VSA!
- 2 Million IOPS validated in a 32 host Virtual SAN cluster
- ~ 4.5PB in a 32 host cluster
- 13 different VSAN Ready Node configurations between Cisco IBM Fujitsu and Dell available at GA, with more coming soon
Elaboration and analysis: http://www.theregister.co.uk/2014/03/06/vsan_emerges_at_a_whopping_32_nodes_and_two_meeelion_iops/
VSAN Hands-on Labs (already available): https://blogs.vmware.com/hol/2014/03/click-go-take-vsan-hands-labs.html
Cormac as always does a great review as well — http://cormachogan.com/2014/03/06/virtual-san-vsan-announcement-review/
vSAN will be the next direction for my home lab as I plan to move away from in my opinion a buggy FreeNAS product.
High speed networking is required for the replication network and my back plane will be something like this — http://www.bussink.ch/?p=1183
I’ll post up more as it progresses.
Enjoy!
Top Blogger Voting for 2014 is now open
For many years now Eric Siebert has held voting for the top Virtualization Bloggers. This is no easy task, and this year he has over 300 blogs listed.
If you found any of my blog posts useful, then please, do take a few minutes out of your busy schedule and vote. Every vote really does count, and the higher you rate a blog the more weight it gets in the final tally. Ratings do make a difference, and feedback is great. As any blogger will tell you, frequently writing quality content takes a lot of time.
Please, take a few minutes out of your day and vote. I’ll be voting for bloggers myself, including MIchael Webster and Jason Boche.
Voting is now open, and will continue through 3/17/2014 >> http://vsphere-land.com/news/voting-now-open-for-the-2014-top-vmware-virtualization-blogs.html
Enjoy!
vCenter Server datastores for heartbeats
I recently did some exploring on my home lab around datastore heatbeats and came up with the following notes around how to determine which ones are active, how to change the defaults, and why vCenter Server might now choose a datastore.
Page 16
vCenter Server selects a preferred set of datastores for heartbeating. This selection is made to maximize the
number of hosts that have access to a heartbeating datastore and minimize the likelihood that the datastores
are backed by the same storage array or NFS server. To replace a selected datastore, use the Cluster Settings
dialog box of the vSphere Client to specify the heartbeating datastores. The Datastore Heartbeating tab lets
you specify alternative datastores. Only datastores mounted by at least two hosts are available. You can also
see which datastores vSphere HA has selected for use by viewing the Heartbeat Datastores tab of the HA
Cluster Status dialog box.

Only use these settings if you want to override the default vCenter Server Choice

Here is an article around why it might not choose a Datastore…
User-Preferred Datastore is Not Chosen
vCenter Server might not choose a datastore that you specify as a preference for vSphere HA storage heartbeating.
Problem
You can specify the datastores preferred for storage heartbeating, and based on this preference, vCenter Server determines the final set of datastores to use. However, vCenter Server might not choose the datastores that you specify.
Cause
This problem can occur in the following cases:
■ The specified number of datastores is more than is required. vCenter Server chooses the optimal number of required datastores out of the stated user preference and ignores the rest.
■ A specified datastore is not optimal for host accessibility and storage backing redundancy. More specifically, the datastore might not be chosen if it is accessible to only a small set of hosts in the cluster. A datastore also might not be chosen if it is on the same LUN or the same NFS server as datastores that vCenter Server has already chosen.
■ A specified datastore is inaccessible because of storage failures, for example, storage array all paths down or permanent device loss.
■ If the cluster contains a network partition, or if a host is unreachable or isolated, the host continues to use the existing heartbeat datastores even if the user preferences change.
Solution
Verify that all the hosts in the cluster are reachable and have the vSphere HA agent running.
Also, ensure that the specified datastores are accessible to most, if not all, hosts in the cluster and that the datastores are on different LUNs or NFS servers.
- ← Previous
- 1
- …
- 4
- 5
- 6
- Next →
