VMware Workstation & Fusion 25H2 Released

A VMware Workstation and Fusion update was released Mid-Oct-2025 and it comes with a new name. In this blog I outline some of the changes to Workstation and supply several helpful links.
Why 25H2?
VMware has decided to move away from their past version numbers (e.g., Workstation 17.6.x, Fusion 13.6.x) and is adopting a new naming format — 25H2. This change reflects the year (2025) and the half of the year (H2) and provides consistency across releases plus helps to ensure better clarity for customers. This simple change should make it easier to understand when a release was published and plan upgrades accordingly.
What are some of the important changes with Workstation 25H2?
- VMware Workstation Pro 25H2 provides the following new capabilities.
- Introducing dictTool: A command-line tool to examine and modify VMware configuration files, such as a vmx file or user preferences file. For more information, see Using dictTool to Modify Configuration Files.
- Added support for USB 3.2
- Added support for virtual hardware version 22
- Added support for Hyper-V/WHP detection
- Added support for new guest operating systems
- Red Hat Enterprise Linux 10
- Fedora Linux 42
- openSUSE Leap 16.0 (RC)
- SUSE Linux 16 (Beta)
- Debian 13
- Oracle Linux 10
- VMware ESX 9.0
- Added support for new host operating systems
- Red Hat Enterprise Linux 10
- Fedora Linux 42
- openSUSE Leap 16.0 (RC)
- SUSE Linux 16 (Beta)
- Debian 13
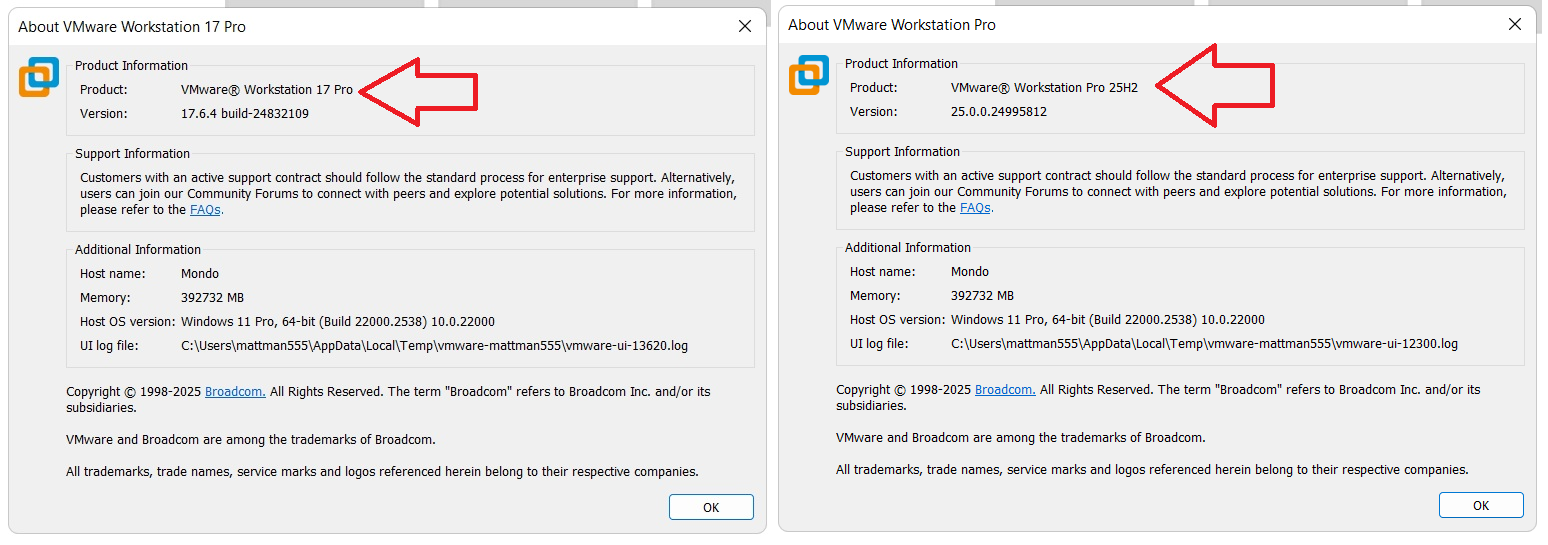
What do the new ‘About’ screens look like?
Helpful Links:
VMware Workstation & Fusion 25H2: Embracing Calendar Versioning and New Features
My notes and tips around taking the 2V0-17.25 – VMware Cloud Foundation 9.0 Administrator

This past week I passed the 2V0-17.25 – VMware Cloud Foundation 9.0 Administrator. The VMware Cloud Foundation 9.0 Administrator certification is an excellent entry point into the VCF certification ecosystem. Preparing for this credential deepens your understanding of the architecture, capabilities, and operational workflows that make up the VCF 9.0 platform. In this blog I’m going to share information about taking a proctored exam, and study tips.
** UPDATE 12/04/2025 ** At the bottom of this post check out the downloadable study guide by Broadcom’s own Hersey Cartwright!! He did a great job aligning the test objectives to public resources.
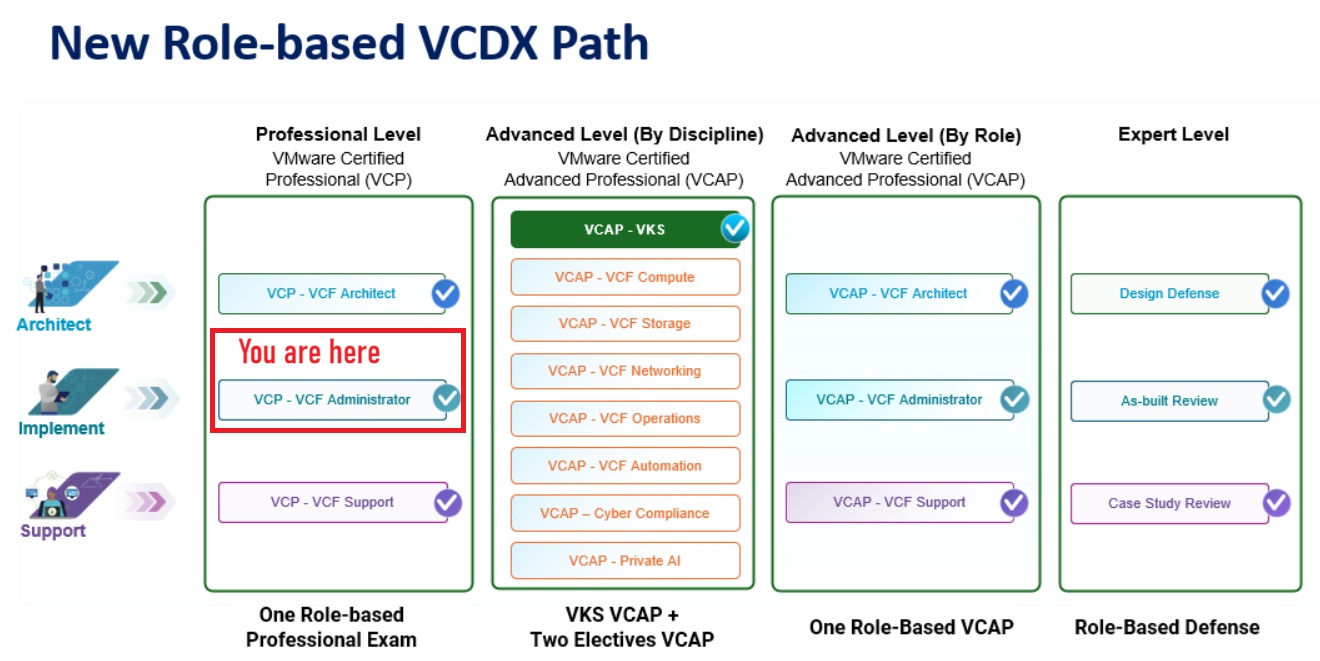
How does the 2V0-17.25 – VMware Cloud Foundation 9.0 Administrator certification fit into the new VMware training model?
The VMware Cloud Foundation 9.0 Administrator certification is the starting point of your certification journey to an Expert level. From here, you can advance into more product-specific certifications on your way to becoming an Expert. For more information, check out this VMware document and for a deeper understanding check out Eric Sloof post.
What are the exam details?
- Duration: 135 Minutes
- Number of Questions: 60
- Format: Multiple Choice, Multiple Choice Multiple Selection
- Passing Score: 300
- Pricing: $250
Any discounts on the pricing?
If you are a VMUG Advantage member you receive $125 USD off VMware Certifications. For this exam that is a 50% savings. Check out the VMUG Advantage page for more information.
Besides becoming certified, what are some additional benefits?
License keys! When you pass the exam you are awarded vSphere Standard Edition 32 cores for 1 year. Requirements are passing one of the following VCP certification exams (VCP-VVF or VCP-VCF admin or architect)
OR
If you pass the VCP certification exam (VCP-VCF admin or architect) and have Purchased & Maintained VMUG Advantage then you get Cloud Foundation (VCF) 128 cores for 3 years. Plus you also receive vDefend 128 cores and ALB 12 tokens.
The vExpert perk benefit.
If you are a vExpert 2025, you have been awarded a complimentary subscription to VMUG Advantage. This grants you access to exclusive discounts and the VMUG keys!
Are you interested in learning more about the vExpert program or seeking tips on how to join? Feel free to reach out—I’d be happy to assist!
How can I take the test?
For me testing was done by Pearson VUE. They gave me two options for testing – In person or Remote (aka Proctored) exam. I chose Proctored.
What are the requirements for a Proctored exam?
There are several requirements for taking a proctored exam. I located a link that describes these requirements and helps test takers better understand. My best tip for taking a proctored exam is be ready, follow the link below and make sure you have everything they require. Most common mistakes are – Desktop not cleaned off, invalid ID, or didn’t run the pre-checks.
Go to Online testing for VMware for more information.
What are the questions like on the test?
The questions on my test consisted of both Multiple Choice, and Multiple Choice Multiple Selection. There were many Multiple Choice Multiple Selection, see examples below. Highly recommend knowing your topics and their details/options well.
Examples (not a real questions) –
- Of the 7 choices below, choose the 4 correct steps when upgrading a VCSA host.
- Which 3 of the 5 choices below meet the requirements for VCF 9.
Can I pass without having hands-on experience?
I would say at a minimum use the VMware HOL to study up. Its a free resource and there are many concepts in labs that you’ll find on the test.
Do I need a Home lab to pass this test?
Some individuals may find this necessary to succeed. However, having passed VMware exams for over 20 years, I can confidently say that the experience I gained from the VMware VCF Hands-On Labs was more than sufficient for this exam.
Are there any additional study guides you’d recommend?
I highly recommend this 15-part VCF technical series on YouTube. I found good value in this series, and I even remember several topics discussed that were on the test.
There is an excellent resource that was known as the VMware {code} VCP-VCF Study Group. The wealth of valuable and pertinent information they have produced is truly impressive. I highly recommend this group; even if you’re not preparing for the test, it remains an outstanding resource.
What are some of the core topics I should know?
Follow the VCF Admin Study Guide and make sure you go through all the documentation.
For me I doubled down on VCF Automation, VCF Upgrade paths, and Kubernetes.
Any other tips?
There is a significant chance that whenever something specific is highlighted in VMware documentation, it is crucial. I often notice this type of emphasis appearing in 2 forms — Important and Note. It’s easy to overlook these highlights while reading the document, so be on the lookout for these types of sections. I commonly notice these types of highlights in the form of a question on tests.
Examples –


Helpful Links / Guides:
Your #ChatGPT generated justification letter for attending #VMwareExplore 2025!
Question – What is one of the best use cases for ChatGPT?
Answer – Writing a justification letter to attend Explore 2025.
I simply asked ChatGPT: “Write me a justification letter for VMware Explore 2025”
Below was its reply. Feel free to edit, reuse, and share with others.
Subject: Justification for Attending VMware Explore 2025
Dear [Manager’s Name],
I am writing to request approval to attend VMware Explore 2025, taking place [insert date] in [insert location]. This event is VMware’s flagship conference and brings together industry leaders, technical experts, and peers from around the world to explore the latest advancements in cloud infrastructure, networking, security, AI integration, and modern application development.
Attending this conference will provide direct value to our organization in the following ways:
- Strategic Insight: I will gain firsthand knowledge of VMware’s latest product roadmap, innovations, and partner ecosystem strategies that can help us align our IT initiatives with future business needs.
- Technical Deep Dives: With access to hundreds of expert-led sessions, hands-on labs, and certification opportunities, I will be able to enhance my skills in areas such as vSphere, NSX, vSAN, Tanzu, and multi-cloud management—skills directly relevant to our current and upcoming projects.
- Problem Solving & Best Practices: I will engage with VMware engineers and fellow practitioners to discuss real-world use cases and learn best practices that we can apply immediately to optimize our infrastructure and reduce operational overhead.
- Cost Efficiency & ROI: By leveraging tools and techniques learned at the event, I aim to improve our existing VMware deployments and better manage our hybrid/multi-cloud environments, potentially saving costs and improving performance.
- Knowledge Sharing: Upon my return, I will prepare a comprehensive summary of key takeaways and recommendations to share with our team, helping to amplify the value of this investment across the organization.
The estimated cost for attendance, including registration, travel, and lodging, is approximately [insert cost estimate]. I believe this is a worthwhile investment in both my professional development and our organization’s ongoing IT strategy.
Thank you for considering this request. Please let me know if you would like any additional information or a more detailed breakdown of the conference schedule and sessions relevant to our priorities.
Sincerely,
[Your Full Name]
[Your Job Title]
[Your Department]
[Your Contact Information]
VCF9: What’s new in Licensing
VCF9 offers so many fantastic enhancements. There were many stand out items which are getting a fair share publicity. However, I wasn’t seeing many posts around the changes to licensing. There are several new and impactful requirements for licensing which deserve some attention. This post is a culmination of data and documentation I found on the Broadcom website and is publicly available. I just repurposed and organized it a bit.
Quick Summary –
- You now manage your licenses through VCF Operations across your entire fleet and can manage licenses for multiple VCF Operations instances from the VCF Business Services console (vcf.broadcom.com), a part of the Broadcom Support Portal.
- To license a VCF9 deployment customers must deploy VCF Operations and a vCenter server. Then in the VCF Business Services console attach their license key to their site ID and register the VCF Operation instance. Next, deploy a secure license file to VCF Operations. Lastly, VCF Operations deploys keys to the vCenter server to be attached to hosts.
Quick Walk Through:
- Your VCF9 Subscription is tied to your site ID.
- In this example we have 300 Cores of VCF.
- Your VCF Operations is registered in the VCF Business Services console and tied to this site ID.
- In the VCF Business Services console, you allocate cores and create a Secure license file.
- This Secure License file is deployed to VCF Operations.
- In this example 256 cores were allocated to a Secure license file.
- Via VCF Operation, the Secure License file is attached to a vCenter Sever Instance
- vCenter Server allocates cores to hosts
- In this example, you can see where Host 1& 2 received 128 cores each, but there were not enough cores for the 3rd cluster.
- 180 Days (6 Months) later VCF Operations automatically reaches out to VCF Business Services console and reports in.

What is the VCF Business Services console?
- VCF Business Services console provides the ability to manage licenses, VMware Cloud Foundation Usage Meter appliances, user roles, and resource access.
- More information here
Licensing Types:
- There are two types of licenses
- Primary licenses, such as VMware Cloud Foundation and VMware vSphere Foundation licenses.
- Add-on licenses, such as vSAN add-on capacity or VMware Private AI Foundation with NVIDIA licenses.
- NOTE: You no longer license individual components such as NSX, HCX, VCF Automation, and so on. Instead, for VCF and vSphere Foundation, you have a single license capacity provided for that product.
Licensing Modes:
- Connected Mode:
- Most customers will have a “connected” or what some call a phone home mode.
- License usage reports are required at least once every 180 days to maintain your licenses and you must update your license to confirm that the license usage report was submitted.
- This data is sent to the VCF Business Services console automatically, and licenses can be updated with a button click.
- Disconnected Mode:
- If VCF Operations is registered in disconnected mode, to report license usage, you generate a usage file and upload it in the VCF Business Services console. For detailed instructions for both connected and disconnected registration modes, see Updating Licenses.
- Critical Infrastructure Mode:
- This mode is reserved for critical infrastructure. Think military or federal use.
- This is a very uncommon mode and isn’t intended for customer consumption.
Other Notes:
- Manage licenses and assign them to vCenter instances from VCF Operations. All hosts and components connected to a vCenter instance with an assigned license are automatically licensed from vCenter assignments.
- VCF Operations can be connected to the VCF Business Services console for faster licensing, updates, and automated reporting. VCF Operations can also operate in disconnected mode.
- Fewer licenses to manage.
- Now, instead of 11 license keys, there are only two licenses for VCF – “VMware Cloud Foundation (cores)” and “VMware vSAN (TiBs)”. vSphere Foundation follows this same pattern.
- Multiple subscriptions pool together into a single license that can optionally be split later.
- All licenses can be applied into your environment by importing a single license file. For connected VCF Operations instances, the first license file will download automatically after you complete the registration.
- License your vCenter, ESX hosts, NSX , VCF Operations HCX, VCF Automation, and other components by assigning the license to the vCenter instance.
- License usage must be submitted from VCF Operations every 180 days, or hosts will disconnect from the vCenter instance and new workloads cannot be started (existing workloads will not be proactively stopped). If VCF Operations is in connected mode, license usage submission is automatic but still must be confirmed in VCF Operations by clicking Update Licenses. For VCF Operations in disconnected mode, follow the steps in the documentation to submit license usage.
- Hosts are automatically reconnected to the respective vCenter instance with full capabilities when a valid license is applied and/or license usage is submitted and license refreshed.
- Dynamic license quantity adjustment means that license changes made in the VCF Business Services console do not require reassignment.
- Visualize a unified view of your usage over time for your fleet in VCF Operations and across multiple VCF Operations instances in the VCF Business Services console.
- Evaluation Mode has been extended to 90 days.
- The license usage file only records the following license usage data points: the usage generation timestamp, utilization details for both post-version 9 and pre-version 9 licenses, the unique VCF Operations instance ID, a unique identifier for the usage report, a list of post-version 9 licenses added to VCF Operations but currently unused, any detected usage anomalies, and the active status. Note that the license usage file exclusively gathers this specific information and, for clarity, does not collect personal data and customer data.
REF:
VMware Workstation Gen 9: BOM2 P1 Motherboard upgrade (Failed Gigabyte board)
**Urgent Note ** The Gigabyte mobo in BOM2 initially was working well in my deployment. However, shortly after I completed this post the mobo failed. I was able to return it but to replace it the cost doubled. I replaced this mobo with a SuperMicro Board but am keeping this post up incase someone find it useful.
To take the next step in deploying a VCF 9 Simple stack with VCF Automation, I’m going to need to make some updates to my Workstation Home Lab. BOM1 simply doesn’t have enough RAM, and I’m a bit concerned about VCF Automation being CPU hungry. In this blog post I’ll cover some of the products I chose for BOM2.
Although my ASRock Rack motherboard (BOM1) was performing well, it was constrained by available memory capacity. I had additional 32 GB DDR4 modules on hand, but all RAM slots were already populated. I considered upgrading to higher-capacity DIMMs; however, the cost was prohibitive. Ultimately, replacing the motherboard proved to be a more cost-effective solution, allowing me to leverage the memory I already owned.
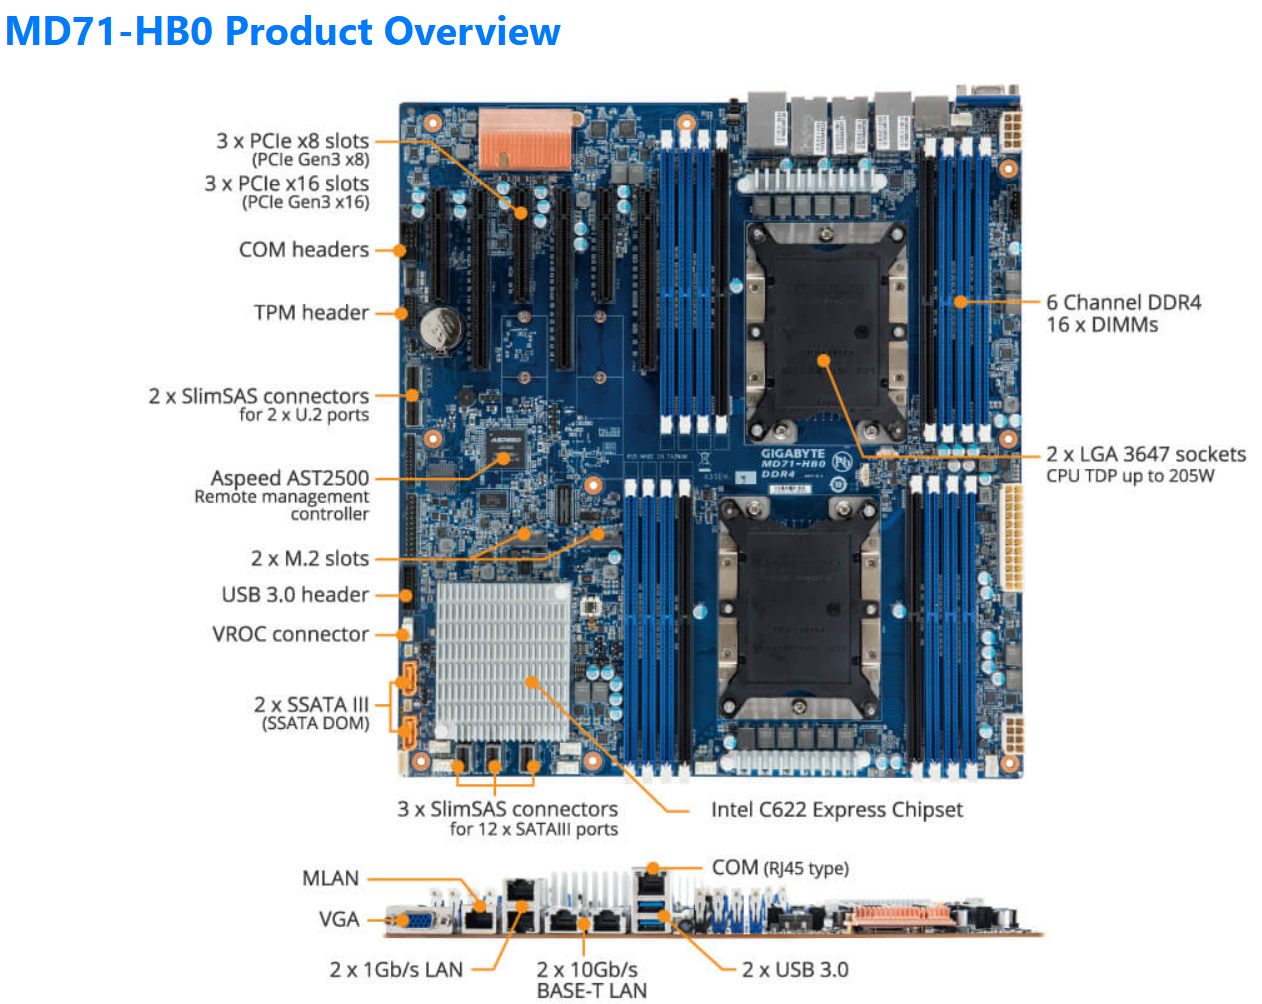
The mobo I chose was the Gigabyte Gigabyte MD71-HB0, it was rather affordable but it lacked PCIe bifurcation. Bifurcation is a feature I needed to support the dual NVMe disks into one PCIe slot. To overcome this I chose the RIITOP M.2 NVMe SSD to PCI-e 3.1 These cards essentially emulate a bifurcated PCIe slot which allows for the dual NVMe disks in a single PCIe slot.
The table below outlines the changes planned for BOM2. There was minimal unused products from the original configuration, and after migrating components, the updated build will provide more than sufficient resources to meet my VCF 9 compute/RAM requirements.
Pro Tip: When assembling new hardware, I take a methodical, incremental approach. I install and validate one component at a time, which makes troubleshooting far easier if an issue arises. I typically start with the CPUs and a minimal amount of RAM, then scale up to the full memory configuration, followed by the video card, add-in cards, and then storage. It’s a practical application of the old adage: don’t bite off more than you can chew—or in this case, compute.
| KEEP from BOM1 | Added to create BOM2 | UNUSED |
| Case: Phanteks Enthoo Pro series PH-ES614PC_BK Black Steel | Mobo: Gigabyte MD71-HB0 | Mobo: ASRack Rock EPC621D8A |
| CPU: 1 x Xeon Gold ES 6252 (ES means Engineering Samples) 24 pCores | CPU: 1 x Xeon Gold ES 6252 (ES means Engineering Samples) New net total 48 pCores | NVMe Adapter: 3 x Supermicro PCI-E Add-On Card for up to two NVMe SSDs |
| Cooler: 1 x Noctua NH-D9 DX-3647 4U | Cooler: 1 x Noctua NH-D9 DX-3647 4U | 10Gbe NIC: ASUS XG-C100C 10G Network Adapter |
| RAM: 384GB 4 x 64GB Samsung M393A8G40MB2-CVFBY 4 x 32GB Micron MTA36ASF4G72PZ-2G9E2 | RAM: New net total 640GB 8 x 32GB Micron MTA36ASF4G72PZ-2G9E2 | |
| NVMe: 2 x 1TB NVMe (Win 11 Boot Disk and Workstation VMs) | NVMe Adapter: 3 x RIITOP M.2 NVMe SSD to PCI-e 3.1 | |
| NVMe: 6 x Sabrent 2TB ROCKET NVMe PCIe (Workstation VMs) | Disk Cables: 2 x Slimline SAS 4.0 SFF-8654 | |
| HDD: 1 x Seagate IronWolf Pro 18TB | ||
| SSD: 1 x 3.84TB Intel D3-4510 (Workstations VMs) | ||
| Video Card: GIGABYTE GeForce GTX 1650 SUPER | ||
| Power Supply: Antec NeoECO Gold ZEN 700W | ||
PCIe Slot Placement:
For the best performance, PCIe Slot placement is really important. Things to consider – speed and size of the devices, and how the data will flow. Typically if data has to flow between CPUs or through the C622 chipset then, though minor, some latency is induced. If you have a larger video card, like the Super 1650, it’ll need to be placed in a PCIe slot that supports its length plus doesn’t interfere with onboard connectors or RAM modules.
Using Fig-1 below, here is how I laid out my devices.
- Slot 2 for Video Card. The Video card is 2 slots wide and covers Slot 1 the slowest PCIe slot
- Slot 3 Open
- Slot 4, 5, and 6 are the RIITOP cards with the dual NVMe
- Slimline 1 (Connected to CPU 1) has my 2 SATA drives, typically these ports are for U.2 drives but they also will work on SATA drives.
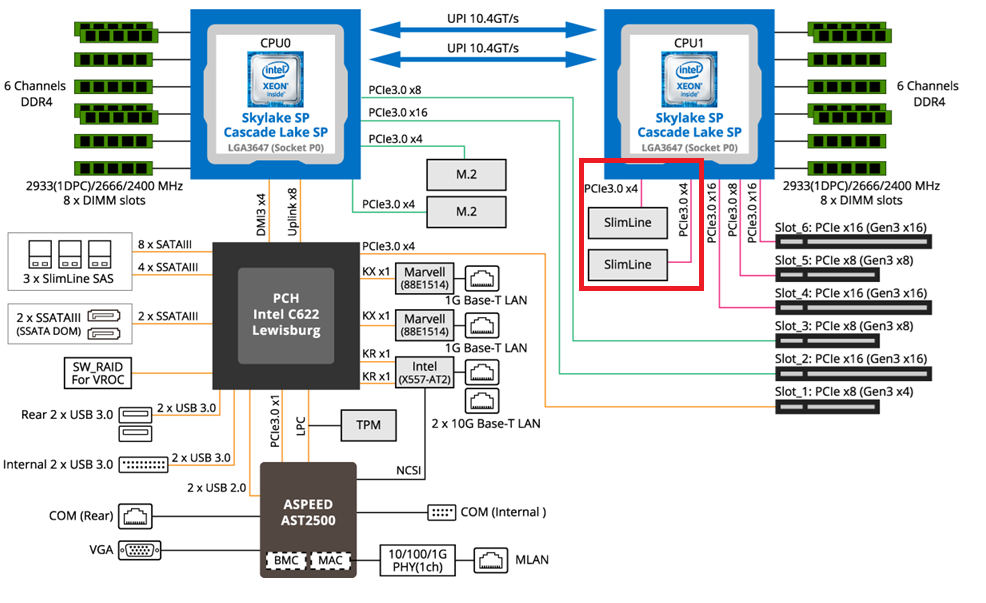
Why this PCIe layout? By isolating all my primary disks on CPU1 I don’t cross over the CPU nor do I go through the C622 chipset. My 2 NVMe disks will be attached to CPU0. They will be non-impactful to my VCF environment as one is used to boot the system and the other supports unimportant VCF VMs.
Other Thoughts:
- I did look for other mobos, workstations, and servers but most were really expensive. The upgrades I had to choose from were a bit constrained due to the products I had on hand (DDR4 RAM and the Xeon 6252 LGA-3647 CPUs). This narrowed what I could select from.
- Adding the RIITOP cards added quite a bit of expense to this deployment. Look for mobos that support bifurcation and match your needs. However, this combination + the additional parts were more than 50% less when compared to just updating the RAM modules.
- The Gigabyte mobo requires 2 CPUs if you want to use all the PCIe slots.
- Updating the Gigabyte firmware and BMC was a bit wonky. I’ve seen and blogged about these mobo issues before, hopefully their newer products have improved.
- The layout (Fig-1) of the Gigabyte mobo included support for SlimLine U.2 connectors. These will come in handy if I deploy my U.2 Optane Disks.
(Fig-1)
Now starts the fun, in the next posts I’ll reinstall Windows 11, performance tune it, and get my VCF 9 Workstation VMs operational.
On a Break
After 13+ years of blogging I’ve decided to take a break for awhile, and I’m not sure when or if I will start things up again. Any new content will be posted to my YouTube channel. Please subscribe to this channel for any updates. I appreciate all the community support over the years but for now its time to do something different.
Why is vmexplorer on a break?
Last August 2023 I spent 2 weeks working at the non-profit Pinball Hall of Fame in Las Vegas. I really enjoyed my time there fixing machines and working with their great customers. I learned that they give away 95% of their profits to local non-profits in need. Over the owners lifetime, he estimates a total of 30 Million dollars will have been donated all through the use of his personal pinball and arcade style game collection. For him it all started with a gumball machine and he worked + saved his way up.
This really got me thinking about what I could possibly do for my community. I love pinball/arcade games and I love helping non-profits, so why not see what impact I could have. Last fall 2023 I decided to create a business that would donate a portion of their proceeds to local non-profits in my community. This company is called amAZing Enterprises. Our plan is to raise funds through the deployment of Candy Machines, Arcade Gaming, and Green Screen Photos. In turn we donate a portion of our profits to help out non-profit organizations. We landed our first location at our local Ford Dealership and they were so happy to help our company start out. Soon we’ll be partnered with other non-profits and will grow our business.
So, its a start and its something I enjoy putting my free time into. Again, I’m always glad to respond to technical questions or comments from a reader, so do reach out.

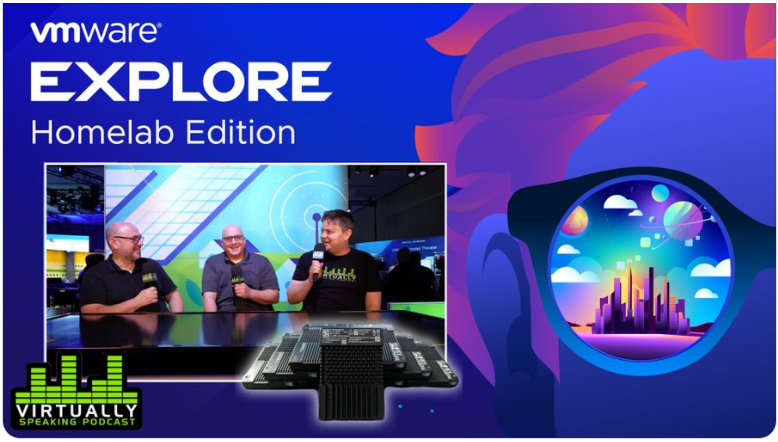
Home Lab Edition: My interview with the Virtually Speaking Podcast at Explore 2023!
I had the most amazing time at VMware Explore 2023, and let me tell you, it was an adventure packed with knowledge, networking, friendship, and some serious fun! 🚀
The highlight of my trip? Without a doubt, it was the incredible interview I had around HomeLabs, the vExpert Optane Giveaway, and The Pinball Hall of Fame!
Being a part of the #vExpert community has been a game-changer for me, and I’m always happy to pay it forward. If you need a helping hand with your #homelab experiments or have burning questions about VMware, feel free to reach out! 🛠️
Big shoutout to the Virtually Speaking Podcast with Pete Flecha and John Nicholson for giving so many attendees a voice to talk about and share their passions! Until next time, keep exploring, keep learning, and keep having a blast in the world of virtualization! 🌐✨
VMware Workstation 17 Nested Home Lab Part 8b: More on Networking
In Part 8 we installed and configured the vSAN ESA into our Nested vSphere environment. However, based on some comments the networking section was a bit short on how to. In this session, 8b, I demonstrate how I setup the vDS switch, create protogroups, import hosts, and align their uplinks to network adapters.
Note: I made a few mistakes in this video (a wrong IP address, a wrong nic teaming selection) but I do corrected those mistakes very shortly after making them :)

#Optane #IntelXeon #Xeon #vExpert #VMware #Cloud #datacenter
Unveiling the High-Performance FS6706T: All-Flash Storage Unboxing!
In this video I have something exciting to unbox and explore – the #asustor F6706T NVMe all-flash storage device. If you’re into tech, data storage, or even building your own media server, you won’t want to miss this.
In this quick video, we’ll start by unboxing the F6706T, giving you a glimpse of what’s inside and the quality of the components. This is just the first step in our exploration of the F6706T. In our upcoming videos, I have a lot more in store. I’ll guide you through the installation process for NVMe drives, setting up the device, and diving into the nitty-gritty details of how it performs when integrated with Plex.
If you’re as intrigued as I am about this high-performance storage solution, be sure to stay tuned for those videos. I’ll be sharing my experiences, tips, and insights to help you make an informed decision about whether the F6706T is the right choice for your media server needs.
And if you want more detailed information about this device, check out the official product page. There, you’ll find specs, features, and all the technical details you need to know.
So, let’s dive into this exciting journey of exploration together. Don’t forget to hit that subscribe button and turn on notifications so you won’t miss any of our upcoming F6706T adventures.
Preserving the Legacy of Gaming and Inspiring Future Engineers: My VMware Anniversary Celebration
A few weeks ago, I celebrated my remarkable 12-year journey with VMware, a company that truly values its employees and their passions. To commemorate this milestone, VMware generously offered to donate ~$3K USD to a non-profit of my choice and granted me two weeks of respite. After some consideration, I decided to direct the donation to the Pinball Hall of Fame Museum in Las Vegas. Beyond merely contributing to a unique and exciting attraction, my decision was fueled by a profound belief in preserving arcade games for future generations of IT engineers.
Why did I choose to preserve video games and support the Pinball Hall of Fame?
- The Pinball Hall of Fame A Beacon of Community Support: The Pinball Hall of Fame Museum is not just an ordinary arcade; it stands as a testament to the power of giving back to the community. A significant factor in my decision to support this establishment was its admirable mission of using its profits to reinvest in the local community. Knowing that my donation would directly contribute to the betterment of Las Vegas was incredibly fulfilling.
- Preserving the Past to Inspire the Future: Growing up in the 80s, I experienced an unforgettable event that profoundly influenced my career path. While playing Space Invaders on an Atari 2600, a simple question from my mother sparked an insatiable curiosity about computers and electronics. Her question was, “I wonder how they know when to shoot when you are under them.” From that moment on, my passion for technology became the driving force behind my education and career decisions. My story, though unique to me, resonates with countless IT professionals who also found their calling through the love of gaming.
- Arcade and Pinball Games: These games are more than entertainment. To me they are catalysts for aspiring engineers. Arcade and pinball games have served as unexpected gateways into the world of technology for many professionals like myself. It is awe-inspiring to discover the multitude of individuals in the IT industry who share similar stories of finding their passion through gaming. Supporting the Pinball Hall of Fame is not merely a gesture of nostalgia; it is a dedication to nurturing the next generation of engineers who may experience their own transformative moments within those vibrant halls.
- Volunteering for a Greater Cause: As part of my anniversary celebration, I chose to dedicate my 2 week respite by volunteering at the Pinball Hall of Fame Museum. Not only is this a wonderful opportunity to give back to the Las Vegas community, but it also allows me to witness firsthand how this extraordinary place continues to inspire young minds. By volunteering, I hope to contribute to the nurturing environment that fosters the technological geniuses of tomorrow.
My 12-year anniversary with VMware will be an opportunity to reflect on my journey and appreciate the pivotal role that arcade games played in shaping my life. Choosing to support the Pinball Hall of Fame Museum through VMware’s generous donation and volunteering is a way to give back to a community-focused organization and inspire future engineers to embrace their passions fearlessly. Let us continue to preserve the legacy of gaming and kindle the spark of curiosity in generations to come.

