Adjusting Windows 11 Power plan for max performance with Workstation 25H2u1
Windows 11 power plans are a great way for idle PCs to save power when not in use. However, when using a PC in a Workstation deployment having a power plan enabled can really have some adverse outcomes. In this blog post I document how I used PowerShell to create a custom power plan and adjust the power settings for my Workstation deployment.
NOTE: You cannot just cut, paste, and run the script below. There are parts of it that have to be configured for the indented system.
What the script does
This script will make a copy of the High Performance power plan, give it a new name, and adjust/disable the following settings.
- Sleep/Standby
- Hibernation
- Screen Time Outs
- CPU to MAX
- USB Suspend
- Hard disk turn off
- Disable power throttling for the workstation executable
Prerequisite
- PowerShell 7.x
- Visual Studio Code
- Knowing your device GUIDs
How to get the device GUIDs
Section 4 of ‘The Script’ requires unique GUIDs. This PowerShell command create a text file with the GUIDs I’ll need. Read the comments in section 4 for more information.
powercfg /list | Out-File -FilePath "$home\Desktop\PowerGUIDs.txt"
The Script
# Run as Administrator is required for these commands
if (-not ([Security.Principal.WindowsPrincipal][Security.Principal.WindowsIdentity]::GetCurrent()).IsInRole([Security.Principal.WindowsBuiltInRole]::Administrator)) {
Write-Warning "Please run this script as an Administrator."
exit
}
# 1. Create the new Workstation Performance plan
# Duplicate High Performance
$output = powercfg -duplicatescheme 8c5e7fda-e8bf-4a96-9a85-a6e23a8c635c
# Use Regex to grab ONLY the GUID from the text
if ($output -match "([a-z0-9]{8}-([a-z0-9]{4}-){3}[a-z0-9]{12})") {
$cleanGuid = $matches[1]
# Rename and Activate
powercfg -changename $cleanGuid "VMware Workstation Performance Plan"
powercfg -setactive $cleanGuid
Write-Host "Success: Plan '$cleanGuid' created and renamed." -ForegroundColor Green
}
powercfg -setactive $cleanGuid
# Adjust the New Workstation Performance Plan
# 2. Disable Sleep, Hibernate, and Screen Timeouts (for both AC and DC)
# Setting value to 0 means "Never"
powercfg -change -monitor-timeout-ac 0
powercfg -change -monitor-timeout-dc 0
powercfg -change -standby-timeout-ac 0
powercfg -change -standby-timeout-dc 0
powercfg -hibernate off
Write-Host "Disabled -- Sleep, Hibernate, and Screen Timeouts (for both AC and DC)" -ForegroundColor Green
powercfg -setactive $cleanGuid
# 3. CPU To MAX
# Set Min/Max Processor State to 100% (Plugged In)
powercfg -setacvalueindex $cleanGuid SUB_PROCESSOR PROCTHROTTLEMIN 100
powercfg -setacvalueindex $cleanGuid SUB_PROCESSOR PROCTHROTTLEMAX 100
# Optional Set thresholds for Battery power as well
powercfg -setdcvalueindex $cleanGuid SUB_PROCESSOR PROCTHROTTLEMIN 100
powercfg -setdcvalueindex $cleanGuid SUB_PROCESSOR PROCTHROTTLEMAX 100
Write-Host "Processor thresholds for are now locked at 100%." -ForegroundColor Green
powercfg -setactive $cleanGuid
# 4. Disable USB Selective Suspend
# NOTE -- GUIDs in this section are unique and will need to be changed to match the intended system
# Run this command to create a list of devices and GUIDs powercfg /QH > "$env:USERPROFILE\Desktop\PowerSettings.txt"
# Search the text file for USB Setting to find the First and Second GUIDs needed below
# In the text file the First GUID is a group name 'Subgroup GUID: 2a737441-1930-4402-8d77-b2bebba308a3 (USB settings)'
# Directly below the First GUID locate the GUID for the 'Power Setting GUID: 0853a681-27c8-4100-a2fd-82013e970683 (Hub Selective Suspend Timeout)'
# Next section below is the 'Power Setting GUID: 48e6b7a6-50f5-4782-a5d4-53bb8f07e226 (USB selective suspend setting)'
# These GUID will be used in the commands below
# These commands unhide the Power Hub Selective Suspend Time Out in the Power Plan USB Settings
# The first GUID is the Subgroup GUID: 2a737441-1930-4402-8d77-b2bebba308a3
# The second GUID is the Power Setting GUID: 0853a681-27c8-4100-a2fd-82013e970683
powercfg -attributes 2a737441-1930-4402-8d77-b2bebba308a3 0853a681-27c8-4100-a2fd-82013e970683 -ATTRIB_HIDE
# The first GUID is the Subgroup GUID: 2a737441-1930-4402-8d77-b2bebba308a3
# The second GUID is the Power Setting GUID: 48e6b7a6-50f5-4782-a5d4-53bb8f07e226
powercfg -attributes 2a737441-1930-4402-8d77-b2bebba308a3 48e6b7a6-50f5-4782-a5d4-53bb8f07e226 -ATTRIB_HIDE
# These commands Hub Selective Suspend Time Out to 0
# The first GUID is the Subgroup GUID: 2a737441-1930-4402-8d77-b2bebba308a3
# The second GUID is the Power Setting GUID: 0853a681-27c8-4100-a2fd-82013e970683
powercfg -setacvalueindex $cleanGuid 2a737441-1930-4402-8d77-b2bebba308a3 0853a681-27c8-4100-a2fd-82013e970683 0
# The first GUID is the Subgroup GUID: 2a737441-1930-4402-8d77-b2bebba308a3
# The second GUID is the Power Setting GUID: 48e6b7a6-50f5-4782-a5d4-53bb8f07e226
powercfg -setdcvalueindex $cleanGuid 2a737441-1930-4402-8d77-b2bebba308a3 48e6b7a6-50f5-4782-a5d4-53bb8f07e226 0
Write-Host "USB Selective Suspend Time out set to 0" -ForegroundColor Green
powercfg -setactive $cleanGuid
# 5. Disable "Allow the computer to turn off this device to save power" for all hardware
# This uses WMI to target the Power Management tab in Device Manager for all devices.
Get-CimInstance -Namespace "root\WMI" -ClassName "MSPower_DeviceEnable" | ForEach-Object {
Set-CimInstance -InputObject $_ -Property @{Enable = $false} -ErrorAction SilentlyContinue
}
Write-Host "Disabled -- Allow the computer to turn off this device to save power for all hardware" -ForegroundColor Green
powercfg -setactive $cleanGuid
# 6. Unhide the 'Turn off hard disk after' setting in Power Options
# This ensures the command works even if the UI has hidden the disk settings.
powercfg -attributes SUB_DISK 6738e2c4-e8a5-4a42-b16a-3971e75a7627 -ATTRIB_HIDE
# Set the 'Turn off hard disk after' timeout to 0 (Never)
powercfg -setacvalueindex SCHEME_CURRENT SUB_DISK 6738e2c4-e8a5-4a42-b16a-e040e769756e 0
powercfg -setactive SCHEME_CURRENT
Write-Host "Hard disk power-down has been disabled (Set to 'Never')." -ForegroundColor Green
# 7. Disable Powerthrottling for VMware Workstation executable.
powercfg /powerthrottling disable /path "C:\Program Files (x86)\VMware\VMware Workstation\x64\vmware-vmx.exe"
Write-Host "Disable Powerthrottling for VMware Workstation executable" -ForegroundColor Green
# 8. Apply changes immediately
powercfg -setactive SCHEME_CURRENT
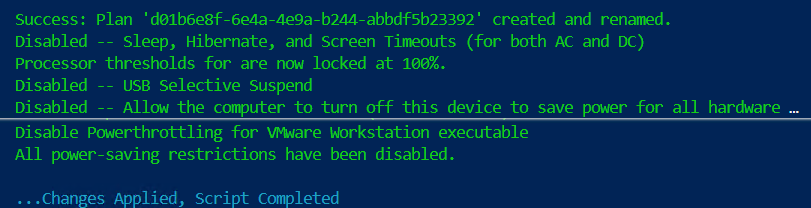
Write-Host "All power-saving restrictions have been disabled." -ForegroundColor Green
Write-Host "`n...Changes Applied, Script Completed" -ForegroundColor Cyan
The Output:
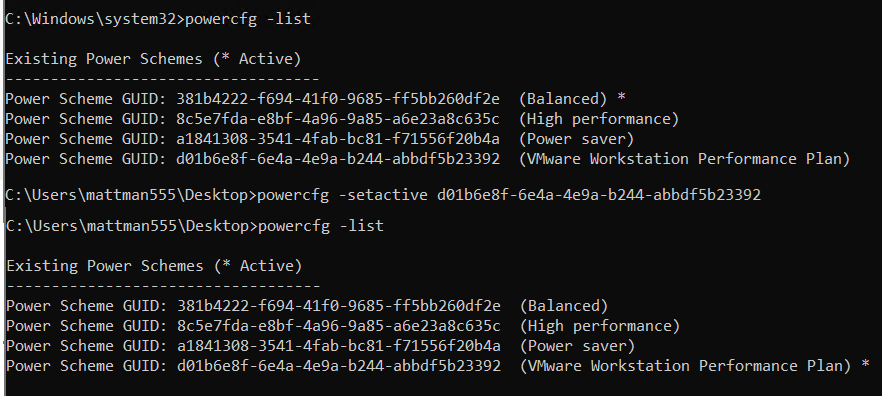
Lastly, I make sure the correct power plan is active. I used the commands ‘powercfg -list’ to show the active plan and then ‘powercfg -setactive GUID’, replacing GUID with the plan I wanted.
Other Items:
Command to reset power plan to default: powercfg -restoredefaultschemes

March 5, 2026 at 1:15 pm
[…] Script: I created a script that creates a custom power plan named “VMware Workstation Performance Plan” and makes all the needed changes for my system. You can find my blog here. […]
LikeLike
March 6, 2026 at 11:18 am
[…] 1) Script: I created a script that creates a custom power plan named “VMware Workstation Performance Plan” and makes all the needed changes for my system. You can find my blog here. […]
LikeLike