VMware Workstation Gen 9: Part 9 Shutting down and starting up the environment
Deploying the VCF 9 environment on to Workstation was a great learning process. However, I use my server for other purposes and rarely run it 24/7. After its initial deployment, my first task is shutting down the environment, backing it up, and then starting it up. In this blog post I’ll document how I accomplish this.
NOTE:
- License should be completed for a VCF 9 environment first before performing the steps below. If not, the last step, vSAN Shutdown will cause an error. There is a simple work around.
- I do fully complete each step before moving to the next. Some steps can take some time to complete.
How to shutdown my VCF Environment.
My main reference for VCF 9 Shut down procedures is the VCF 9 Documentation on techdocs.broadcom.com (See REF URLs below). The section on “Shutdown and Startup of VMware Cloud Foundation” is well detailed and I have placed the main URL in the reference URLs below. For my environment I need to focus on shutting down my Management Domains as it also houses my Workload VMs.
Here is the order in which I shutdown my environment. This may change over time as I add other components.
Note – it is advised to complete each step fully before proceeding to the next step.
| Shutdown Order | SDDC Component |
|---|---|
| In vCenter, shutdown all non-essential guest VM’s | |
| 1 – Not needed, not deployed yet | VCF Automation |
| 2 – Not needed, not deployed yet | VCF Operations for Networks |
| 3 – From VCSA234, locate a VCF Operations collector appliance.(opscollectorapplaince) – Right-click the appliance and select Power > Shut down Guest OS. – In the confirmation dialog box, click Yes. – Wait for it to fully power off | VCF Operations collector |
| 4 – Not needed, not deployed yet | VCF Operations for logs |
| 5 – Not needed, not deployed yet | VCF Identity Broker |
| 6 – From vcsa234, in the VMs and Templates inventory, locate the VCF Operations fleet management appliance (fleetmgmtappliance.nested.local) – Right-click the VCF Operations fleet management appliance and select Power > Shut down Guest OS. – In the confirmation dialog box, click Yes. – Wait for it to fully power off | VCF Operations fleet management |
| 7 – You shut down VCF Operations by first taking the cluster offline and then shutting down the appliances of the VCF Operations cluster. – Log in to the VCF Operations administration UI at the https://vcfcops.nested.local/admin URL as the admin local user. – Take the VCF Operations cluster offline. On the System status page, click Take cluster offline. – In the Take cluster offline dialog box, provide the reason for the shutdown and click OK. – Wait for the Cluster status to read Offline. This operation might take about an hour to complete. (With no data mine took <10 mins) – Log in to vCenter for the management domain at https://vcsa234.nested.local/ui as a user with the Administrator role. – There could be other options for shutting down this appliance. Using Broadcom KB 341964 as a reference, I determined my next step is to simply Right-click the vfccops appliance and select Power > Shut down Guest OS. – In the VMs and Templates inventory, locate a VCF Operations appliance. – Right-click the appliance and select Power > Shut down Guest OS. – In the confirmation dialog box, click Yes. – This operations takes several minutes to complete. – Wait for it to fully power off | VCF Operations |
| 8 – Not Needed, not deployed yet | VMware Live Site Recovery for the management domain |
| 9 – Not Needed, not deployed yet | NSX Edge nodes |
| 10 – I continue shutting down the NSX infrastructure in the management domain and a workload domain by shutting down the one-node NSX Manager by using the vSphere Client. – Log in to vCenter for the management domain at https://vcsa234.nested.local/ui as a user with the Administrator role. – Identify the vCenter instance that runs NSX Manager. – In the VMs and Templates inventory, locate the NSX Manager (nsxmgr.nested.local) appliance. – Right-click the NSX Manager appliance and select Power > Shut down Guest OS. – In the confirmation dialog box, click Yes. – This operation takes several minutes to complete. – Wait for it to fully power off | NSX Manager |
| 11 – Shut down the SDDC Manager appliance in the management domain by using the vSphere Client. – Log in to vCenter for the management domain at https://vcsa234.nested.local/ui as a user with the Administrator role. – In the VMs and templates inventory, expand the management domain vCenter Server tree and expand the management domain data center. – Right-click the SDDC Manager appliance (SDDCMGR108.nested.local) and click Power > Shut down Guest OS. – In the confirmation dialog box, click Yes. – This operation takes several minutes to complete. – Wait for it to fully power off | SDDC Manager |
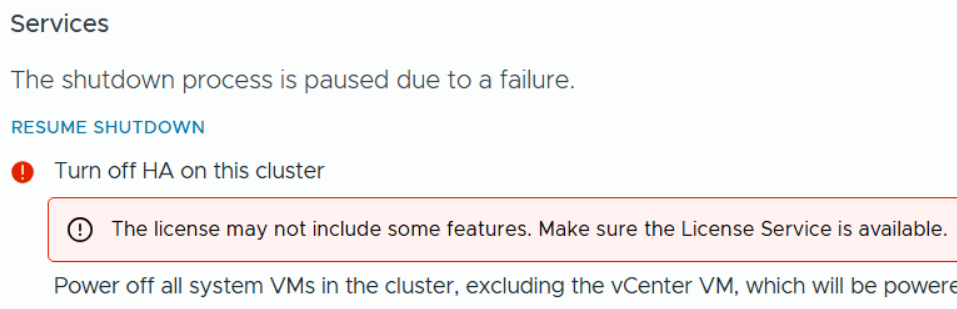
| 12 – You use the vSAN shutdown cluster wizard in the vSphere Client to shut down gracefully the vSAN clusters in a management domain. The wizard shuts down the vSAN storage and the ESX hosts added to the cluster. – Identify the cluster that hosts the management vCenter for this management domain. – This cluster must be shut down last. – Log in to vCenter for the management domain at https://vcsa234.nested.local/ui as a user with the Administrator role. – For a vSAN cluster, verify the vSAN health and resynchronization status. – In the Hosts and Clusters inventory, select the cluster and click the Monitor tab. – In the left pane, navigate to vSAN Skyline health and verify the status of each vSAN health check category. – In the left pane, under vSAN Resyncing objects, verify that all synchronization tasks are complete. – Shut down the vSAN cluster. – In the inventory, right-click the vSAN cluster and select vSAN > Shutdown cluster. – In the Shutdown Cluster wizard, verify that all pre-checks are green and click Next. – Review the vCenter Server notice and click Next. – Enter a reason for performing the shutdown, and click Shutdown. – Briefly monitor the progress of the vSAN shutdown in vCenter. Eventually, VCSA will be shutdown and connectivity to it will be lost. I then monitor the shut down of my ESX host in Workstation. – The shutdown operation is complete after all ESX hosts are stopped. | Shut Down vSAN and the ESX Hosts in the Management Domain OR Manually Shut Down and Restart the vSAN Cluster If vSAN Fails to shutdown due to a license issue, then under the vSAN Cluster > Configure > Services, choose ‘Resume Shutdown’ (Fig-3) |
| Next the ESX hosts will power off and then I can do a graceful shutdown of my Windows server AD230. In Workstation, simply right click on this VM > Power > Shutdown Guest. Once all Workstation VM’s are powered off, I can run a backup or exit Workstation and power off my server. | Power off AD230 |
(Fig-3)
Backing up my VCF Environment
With my environment fully shut down, now I can start the backup process. See my blog Backing up Workstation VMs with PowerShell for more details.
How to restart my VCF Environment.
| Startup Order | SDDC Component |
|---|---|
| PRE-STEP: – Power on my Workstation server and start Workstation. – In Workstation power on my AD230 VM and ensure / verify all the core services (AD, DNS, NTP, and RAS) are working okay. Start up the VCF Cluster: 1 – One at a time power on each ESX Host. – vCenter is started automatically. Wait until vCenter is running and the vSphere Client is available again. – Log in to vCenter at https://vcsa234.nested.local/ui as a user with the Administrator role. – Restart the vSAN cluster. In the Hosts and Clusters inventory, right-click the vSAN cluster and select vSAN Restart cluster. – In the Restart Cluster dialog box, click Restart. – Choose the vSAN cluster > Configure > vSAN > Services to see the vSAN Services page. This will display information about the restart process. – After the cluster has been restarted, check the vSAN health service and resynchronization status, and resolve any outstanding issues. Select the cluster and click the Monitor tab. – In the left pane, under vSAN > Resyncing objects, verify that all synchronization tasks are complete. – In the left pane, navigate to vSAN Skyline health and verify the status of each vSAN health check category. | Start vSAN and the ESX Hosts in the Management DomainStart ESX Hosts with NFS or Fibre Channel Storage in the Management Domain |
| 2 – From vcsa234 locate the sddcmgr108 appliance. – In the VMs and templates inventory, Right Click on the SDDC Manager appliance > Power > Power On. – Wait for this vm to boot. Check it by going to https://sddcmgr108.nested.local – As its getting ready you may see “VMware Cloud Foundation is initializing…” – Eventually you’ll be prompted by the SDDC Manager page. – Exit this page. | SDDC Manager |
| 3 – From the VCSA234 locate the nsxmgr VM then Right-click, select Power > Power on. – This operation takes several minutes to complete until the NSX Manager cluster becomes fully operational again and its user interface – accessible. – Log in to NSX Manager for the management domain at https://nsxmgr.nested.local as admin. – Verify the system status of NSX Manager cluster. – On the main navigation bar, click System. – In the left pane, navigate to Configuration > Appliances. – On the Appliances page, verify that the NSX Manager cluster has a Stable status and all NSX Manager nodes are available. Notes — Give it time. – You may see the Cluster status go from Unavailable > Degraded, ultimately you want it to show Available. – In the Node under Service Status you can click on the # next to Degraded. This will pop up the Appliance details and will show you which item are degraded. – If you click on Alarms, you can see which alarms might need addressed | NSX Manager |
| 4 – Not Needed, not deployed yet | NSX Edge |
| 5 – Not Needed, not deployed yet | VMware Live Site Recovery |
| 6 – From vcsa234, locate vcfops.nested.lcoal appliance. – Following the order described in Broadcom KB 341964. – For my environment I simply Right-click on the appliance and select Power > Power On. – Log in to the VCF Operations administration UI at the https://vcfops.nested.lcoal/admin URL as the admin local user. – You may see ‘Retrieving Cluster Status’ , give it time. Mine took about <2mins – On the System status page, Under Cluster Status, click Bring Cluster Online. – You may see ‘Retrieving Cluster Status’ , give it time. Mine took about <2mins Notes — Give it time. – This operation might take about an hour to complete. – Took <15 mins to come Online – Cluster Status update may read: ‘Going Online’ – To the right of the node name, all of the other columns continue to update, eventually showing ‘Running’ and ‘Online’ – Cluster Status will eventually go to ‘Online’ | VCF Operations |
| 7 – From vcsa234 locate the VCF Operations fleet management appliance (fleetmgmtappliance.nested.local) Right-click the VCF Operations fleet management appliance and select Power > Power On. – In the confirmation dialog box, click Yes. – Allow it to boot Note – Direct access to VCF Ops Fleet Management appliance is disabled. Go to VCF Operations > Fleet Mgmt > Lifecycle > VCF Management for appliance management. | VCF Operations fleet management |
| 8 – Not Needed, not deployed yet | VCF Identity Broker |
| 9 – Not Needed, not deployed yet | VCF Operations for logs |
| 10 – From vcsa234, locate a VCF Operations collector appliance. (opscollectorappliance) Right-click the VCF Operations collector appliance and select Power > Power On. In the configuration dialog box, click Yes. | VCF Operations collector |
| 11 – Not Needed, not deployed yet | VCF Operations for Networks |
| 12 – Not Needed, not deployed yet | VCF Automation |
REF:
