VMware Workstation Gen 8: Environment Revitalization
In my last blog post, I shared my journey of upgrading to Workstation build 17.6.4 (build-24832109), plus ensuring I could start up my Workstation VM’s. In this installment, we dive deeper into getting the environment ready, and perform a back up.
Keep in mind my Gen 8 Workstation has been powered down for almost a year, so there are some things I have to do to get it ready. I see this blog as more informational and if users already have a stable environment you can skip these sections. However, you may find value in these steps if you are trying to revitalize an environment that has been shut down for a long period of time.
Before we get started, a little background.
This revitalization follows my designs that were published on my Workstation Home Lab YouTube series. That series focused on building a nested home lab using Workstation 17 and vSphere 8. Nesting with Workstation can evoke comparisons to the movie Inception, where everything is multi-layered. Below is a brief overview of my Workstation layout, aimed at ensuring we all understand which layer we are at.
- Layer 1 – Physical Layer:
- The physical hardware I use to support this VMware Workstation environment is a super charged computer with lots of RAM, CPU, and highspeed drives. More information here.
- Base OS is Windows 11
- VMware Workstation build is 17.6.4 build-24832109
- Layer 2 – Workstation VMs: (Blue Box in diagram)
- I have 4 key VM’s that run directly on Workstation.
- These VM’s are: Win2022 Sever, VCSA 8u2, and 3 x ESXi 8u2 Hosts
- The Win2022 Server has the following services: AD, DNS, DHCP, and RAS
- Current state of these VM’s is suspended.
- Layer 3 – Workload VM’s: (Purple box)
- The 3 Nested ESXi Hosts have several VM’s

Lets get started!
Challenges:
1) Changes to License keys.
My vSphere environment vExpert license keys are expired. Those keys were based on vSphere 8.0u2 and were only good for one year. Since the release of vSphere 8.0u2b subscription keys are needed. This means to apply my new license keys I’ll have to upgrade vSphere.
TIP: Being a Broadcom VMware employee I’m not illegible for VMUG or vExpert keys, but if you are interested in the process check out a post by Daniel Kerr. He did a great write up.
2) Root Password is incorrect.
My root password into VCSA is not working and will need to be corrected.
3) VCSA Machine Certs need renewed.
There are several certificates that are expired and will need to be renewed. This is blocking me from being able to log on to the VCSA management console.
4) Time Sync needs to be updated.
I’ve change location and the time zone will need updated with NTP
Here are the steps I took to resume my vSphere Environment.
The beauty of working with Workstation is the ability to backup and/or snapshot Workstation VM’s as files and restore them when things fail. I took many snapshots and restored this lab a few times as I attempted to restart it. Restarting this Lab was a bit of a learning process as it took a few attempts to find everything that needed attention. Additionally, some of the processes you would follow in the real world didn’t apply here. So if you’re a bit concerned by some of the steps below, trust me I tried the correct way first and it simply didn’t work out.
1) Startup Workstation VM AD222:
At this point – I have only resumed AD222.
The other VMs rely on the Windows 2022 VM for its services. First, I need to get this system up and validate that all of its services are operational.
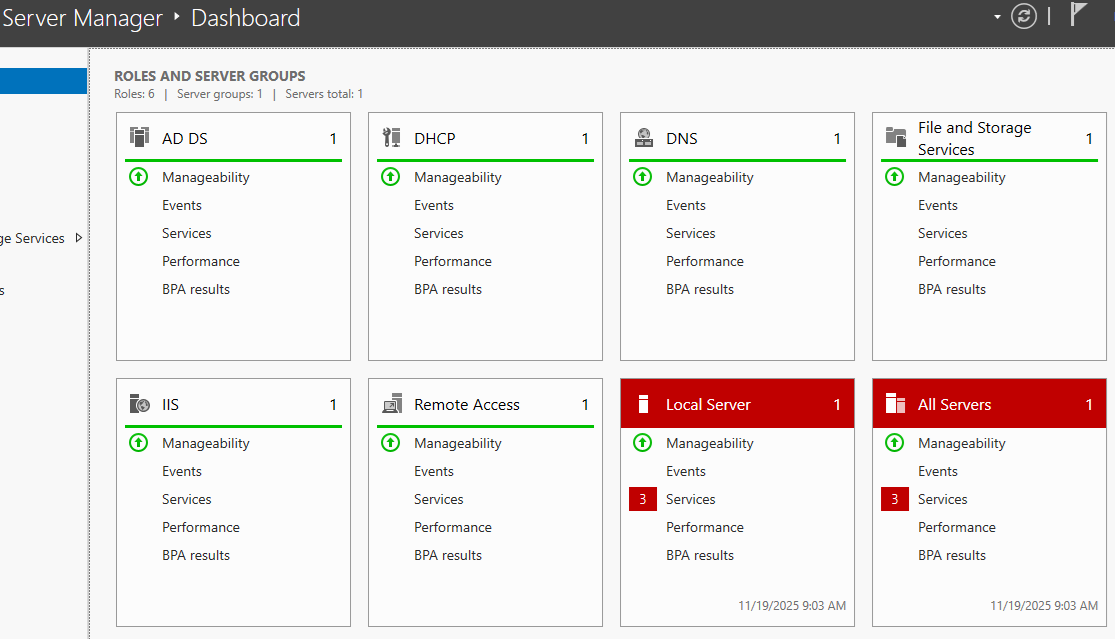
- I used the Server Manager Dash Board as a quick way to see if everything is working properly.
- From this dashboard I can see that my services are working and upon checking the red areas I found there was an non-issue with Google updater being stopped.
- Run and Install Windows Updates
- Network Time Checks (NTP)
- All my VM’s get their time from this AD server. So it being correct is important.
- I ensure the local time on the server is correct. From CLI I type in ‘w32tm /tz’ and confirm the time zone is correct.
- Using the ‘net time’ command I confirm the local date/time matches the GUI clock in the Windows server.
- Using ‘w32tm /query /status’ I confirm that time is syncing properly
- Note: My time ‘Source’ is noted as ‘Local CMOS Clock’. This is okay for my private Workstation environment. Had this been production, we would have wanted a better time source.

2) Fix VCSA223 Server Root Password:
At this point only – I have resumed power to VCSA223 and AD222 is powered on.
Though I was initially able to access VCSA via the vSphere Client, I eventually determined I was unable to log in to the VCSA appliance via DCUI, SSH, or management GUI. The root password was incorrect and needed to be reset.
To fix the password issue I need to gracefully shutdown the VCSA appliance and follow KB 322247. In Workstation I simply right clicked on the VCSA appliance > Power > Shutdown Guest

3) Cannot access the VCSA GUI Error 503-Service Not available.
After fixing the VCSA password I was now able to access it via the SSH and DCUI consoles. However, I was unable to bring up the vSphere Client or the VCSA Management GUI. The management GUI simply stated ‘503 service not available’.
To resolve this issue I used the following KB’s
- 344201 Verify and resolve expired vCenter Server certificates using the command line interface
- Used this KB to help determine which certificates needed attention.
- Found an expired machine certificate.
- 385107 vCert – Scripted vCenter expired certificate replacement
- Following this KB I downloading vCert via WinSCP to the VCSA appliance.
- I used KB 326317 WinSCP adjustment to help download the file.
- After I completed the install section I chose option 6 and reset all the certificates.
- Next I rebooted the VCSA appliance.
- After the reboot I was now able to access the VCSA vSphere Client and Management GUI.
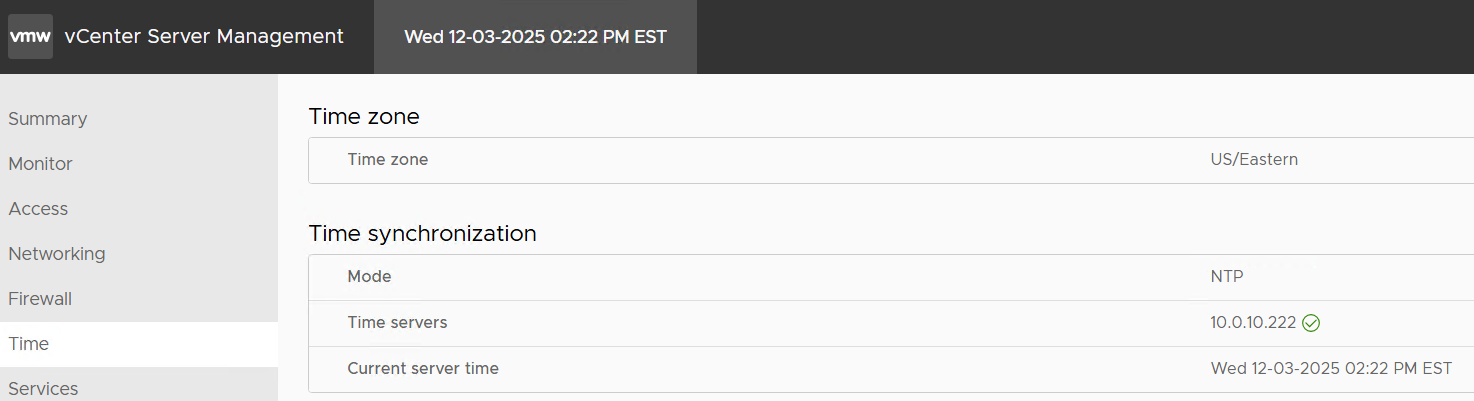
4) VCSA Management GUI Updates
- I accessed the VCSA Management GUI and validated/updated its NTP settings.
- Next I mounted the most recent VCSA ISO and updated the appliance to 8.0.3.24853646
5) Updating ESXi
- At this point only my AD and VCSA servers have been resumed. My ESXi hosts are still suspended.
- To start the update from 8.0.2ub to 8.0.3ue, I choose to resume then immediately shutdown all 3 ESXi hosts. This step may seem a bit harsh but no matter how I tried to be graceful about resuming these VM’s I ran into issues.
- While shut down I mounted VMware-VMvisor-Installer-8.0U3e-24677879.x86_64.ISO and booted/upgraded each ESXi host.
6) License keys in VCSA
Now that everything is powered on I was able to go onto the vSphere client. First thing I noticed was the VMware keys (VCSA, vSAN, ESXi) were all expired.
I updated the license keys in this order:
- First – Update the VCSA License Key
- Second – Update the vSAN License Key
- Third – Update the ESXi Host License Key
7) Restarting vSAN
- When I shut down or suspend my Workstation Home lab I always shut down my Workload VM’s and do a proper shutdown of vSAN.
- After I confirmed all my hosts were licensed and connected properly, I simply went into the cluster > configure > vSAN Services.
8) Backup VM’s
Now that my environment is properly working it’s time to do a proper shut down, remove all snapshots, and then take a backup of my Workstation VM’s.
With Workstation a simple Windows File copy from Source to target is all that is needed. In my case I have a large HDD where I store my backups. In Windows I simply right click on the Workstation VMs folder and chose copy. I then go to the target location right click and choose paste.
TIP: I keep track of my backups and notes with a simple notepad. This way I don’t forget their state.
And that’s it, after being down for over a year my Workstation Home lab Gen 8 is now fully functional and backed up. I’ll continue to use it for vSphere 8 testing as I build out a new VCF 9 enviroment.
Thanks for reading and please feel free to ask any questions or comments.

December 3, 2025 at 12:48 pm
[…] My next post on this topic I’ll be covering Environment Readiness. […]
LikeLike
December 8, 2025 at 8:13 am
[…] Note: These steps were performed on my Gen 8 Workstation Home lab as I start preparing it for Gen 9 with VCF 9. Though I will try to write this blog post rather generally it may contain references to my home lab. For more information around this Home Lab check out my recent blog post. […]
LikeLike