Month: September 2016
Home Lab Gen IV – Part II: Lab Clean Up and Adding Realtek 8186 NIC Drivers to ESXi 6u2 ISO
To prep my Home Lab for ESXi 6.0U2 with VSAN + IB. I wanted to ensure it was in pristine condition. It had been running ESXi 5.5 + VSAN for many years but it was in need of some updates. I plan to fully wipe my environment (no backups) and reinstall it all. Yes, that’s right I’m going to wipe it all – this means goodbye to those Windows 2008 VM’s I’ve been hanging on to for years now. Tip: If you’d like to understand my different Home lab generations please see my dedicated page around this topic.
In this post, I am going to focus on listing out my current to-do items, then describing how to flattening all SSD/HDD and finally building a custom ESXi 6.0U2 ISO with Realtek 8186 drivers.
Current to Do list –
Completed
- PM the Hosts – While they are off it’s a good time to do some routine PM (Complete)
- BIOS and Firmware – Check all MoBo BIOS, pNIC, and HDD/SDD firmware (Complete)
- Netgear Switch BIOS – It’s doubtful but always worth a check (Complete)
- Flatten all SDD / HDD with Mini-Partition Tool (This Post)
-
Create ISO with ESXi 6.0U2 and Realtek 8168 Drivers (This Post)
- Install Windows 2012 Server VM for DNS and AD Service (Local disk)
- Install vCenter Server Appliance (Local Disk)
- Get Infiniband Functional (Needs work)
- Setup FT and VSAN Networks
- Enable VSAN
- Rebuild VM Environment
Flatten all SDD / HDD with Mini-Partition Tool
Installing VSAN fresh on to an environment requires the SDD / HDD’s to be free of data and partition information. The Mini-Partition tool is a FREE bootable software product allowing you to remove all the partitions on your ESXi Hosts and other PCs. You can download it here >> https://www.partitionwizard.com/partition-wizard-bootable-cd.html
Once I created the BOOT CD and allowed the product to boot. I was quickly able to see all the HDD / SDD’s in my Host.

I simply right clicked on each host and choose ‘Delete All Partitions’
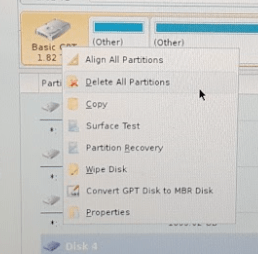
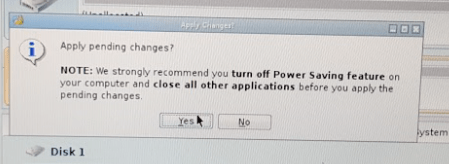
After choosing ‘Delete All Partitions’ for all my disks I clicked on ‘Apply’ in the upper right-hand corner. The following window appeared, I choose ‘Yes’ to Apply pending changes, and it removed all my partitions on all my disks quite quickly.
Create ISO with ESXi 6.0U2 and Realtek 8168 Drivers
ESXi no longer supports RealTek Network drivers, so home lab users who need these drivers will have to create a custom ISO to add these drivers back in. Keep in mind these are unsupported drivers by VMware, so use at your own risk. My trusty ESXi-Customizer GUI program is no more for ESXi 6. It has moved to a CLI based product. However, PowerCLI has all the functionality I need to build my customer ISO. In this section, I’ll be using PowerCLI to create my ISO. Keep in mind these are the steps that worked for me, your environment may vary.
To get started you will need two files and PowerCLI Installed on a Windows PC.
- File 1: VMware Offline ZIP >> www.vmware.com/download

2. RealTek 8186 Offline bundle >> https://vibsdepot.v-front.de/wiki/index.php/Net55-r8168

3. PowerCLI Download and install >> https://communities.vmware.com/community/vmtn/automationtools/powercli
Tip: If you don’t know PowerCLI try starting here
4. Place the files from Step 1 and 2 into c:\tmp folder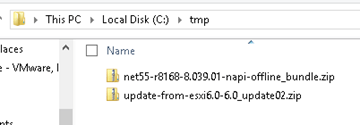
–POWERCLI COMMANDS— For each command, I have included a screenshot and the actual command allowing to copy, paste, and edit into your environment.
- Add ESXi 6.0u2 and RealTek8186 products to the local Software Depot

Add-EsxSoftwareDepot C:\tmp\update-from-esxi6.0-6.0_update02.zip

Add-EsxSoftwareDepot C:\tmp\net55-r8168-8.039.01-napi-offline_bundle.zip
2. Confirm the products are in the depot

Get-EsxSoftwareDepot
3. List out the ESXi Image Profiles

Get-EsxImageProfile4
4. Create a Clone Image to be modified – Ensure you are targeting the “ESXi…..standard” profile from step 3

New-EsxImageProfile -cloneprofile ESXi-6.0.0-20160302001-standard -Name “RealTek8186a”
Forward-Looking Tip: Whatever name you choose it will show up in your boot ISO

5. Set the Acceptance Level to Community Supported – Remember RealTek is unsupported by VMware

Set-EsxImageProfile -Name RealTek8186a -AcceptanceLevel CommunitySupported
For ImageProfile Enter – RealTek8186a
6. Ensure the RealTek net55-r8186 driver is loaded from the local depot (Screenshot shortened)

Get-EsxSoftwarePackage
7. Add the RealTek software package to the profile

Add-EsxSoftwarePackage
ImageProfile: RealTek8186a
SoftwarePackage[0]: net55-r8168 8.039.01-napi
Tip: You MUST enter the full name here if you just use the short name it will not work
8. Validate the RealTek drivers are now part of the RealTek8186a Profile (Screenshot shortened)

(Get-EsxImageProfile “RealTek8186a”).viblist
9. Export the profile to an ISO

Export-EsxImageProfile -ImageProfile “RealTek8186a” -ExportToIso -FilePath c:\tmp\RealTek8186a.iso
And that’s it… now with my clean/updated hosts, flatten HDD/SDD’s, and a newly pressed custom ISO I am ready to install ESXi onto my systems. Next Steps for me will be to install ESXi, AD/DNS VM, and vCenter Server Appliance. However, my next post will be focused on getting InfiniBand running in my environment.
If you like my ‘no-nonsense’ blog articles that get straight to the point… then post a comment or let me know… Else, I’ll start writing boring blog content.
P2V GOLD – Remove all Windows Non-Present devices at once via GUI and CLI!
Issue >> If you’ve done any type of Windows P2V (Physical 2 Virtual) then you’d know all about the value in removing non-present or ghosted devices. Normally non-present devices are harmless but from time to time they can cause you an issue or two. P2V best practice is to remove non-present devices enabling a pristine OS. The issue with removing non-present devices is the time to complete the task. Currently, with the manual way, you’d have to go to command line, enter a few commands, and then manually remove each non-present device from device manager. If you have to remove 200+ non-present devices that could take several hours to complete.
Manual Way:
Go to Start – Run and type CMD and press Enter.
At the CMD Prompt type:
- set devmgr_show_nonpresent_devices=1 (this will enable hidden devices)
- start devmgmt.msc (this will start device manager)
In device manager go to View > Show Hidden Devices
Manually look for and remove each device that is greyed out.
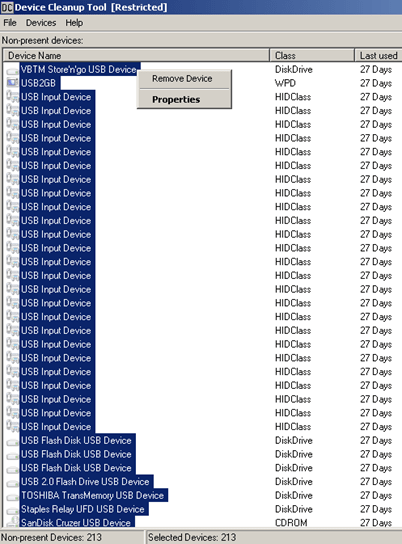
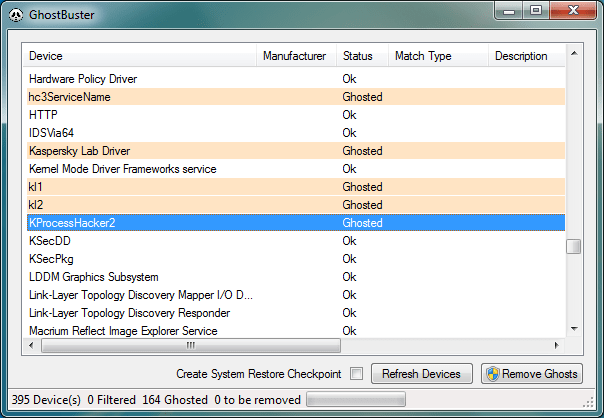
Automated Solution >> I located 3 great tools that remove all the non-present devices at once — Device Clean up Tool GUI based, Device Clean up Tool CLI based, and Ghostbuster GUI based. All the links are below.
Other Notes >> Personally, I used the Device Cleanup Tool GUI and I was able to remove 213 devices from my recent P2V. Not only did it clean up my OS but it also fixed a pesky USB issue I was having.
Device Cleanup Tool V0.5 – removes non-present devices from the Windows device management

If you like my ‘no-nonsense’ blog articles that get straight to the point… then post a comment or let me know… Else, I’ll start writing boring blog content.
Home Lab Gen IV – Part I: To InfiniBand and beyond!
I’ve been running ESXi 5.5 with VSAN using a Netgear 24 Port Managed Gig switch for some time now, and though it has performed okay I’d like to step up my home lab to be able to support the emerging vSphere features (VSAN 6.x, FT-SMP, and faster vMotion). To support some of these features 10Gb/s is HIGHLY recommend if not fully required. Looking at 10Gbe switches and pNICS the cost is very prohibitive for a home lab. I’ve toyed around with InfiniBand in the past (See my Xsigo Posts here) and since then I’ve always wanted to use this SUPER fast and cost effective technology. Initially, the cost to do HPC (High-performance computing) has always been very expensive. However, in recent years the InfiniBand price per port has become very cost effective for the home lab.
Let’s take a quick peek at the speed InfiniBand brings. When most of us were still playing around with 100Mb/s Ethernet InfiniBand was able to provide 10Gb/s since 2001. When I state 10Gb/s I’m talking about each port being able to produce 10Gb/s and in most cases Infiniband switches have a non-blocking backplane. So a 24 Port InfiniBand Switch, 10Gb/s per port, Full duplex, Non-blocking switch will support 480Gb/s! Over time InfiniBand speed has greatly increased and over time the older switches have dropped in price making InfiniBand a good choice for a growing home lab. For most home labs a 40Gb/s per port QDR switch is financial achievable. Even the 20Gb/s DDR or 10Gb/s SDR switch give ample speed and are VERY cost effective. However, step above QDR and you’ll find the price point is a bit too steep for home lab use.

So let’s take a look at the price / speed comparisons for InfiniBand vs. 10Gb/s Ethernet.
| 10Gb/s | 20Gb/s | 40Gb/s | |
| InfiniBand HCA | 2 Port 10Gb/s ($15-$75) | 2 Port 20Gb/s ($20-$100) | 2 Ports 40GB/s ($30-$150) |
| InfiniBand Switch | 24 Ports SDR (~$30-$70) | 24 Ports DDR (~$70-$120) | 8-36 Ports QDR (~$250-$500) |
| InfiniBand Cable | CX4 (SFF-8470) ($15-$30) | CX4 (SFF-8470) ($15-$30) | QSFP (SFF-8436) ($15-$30) |
| Ethernet Switch | 8 Ports 10Gbe ($700-$900) | ||
| Ethernet pNIC | 2 Port 10Gbe ($300-$450) | ||
| Ethernet Cable | 1M / 3ft. CAT 6a ($5-$10) |
Let’s break this down a bit further. I used the high dollar from each line item above and figured 3 x HCAs or pNICs and 6 cables for my 3 hosts.
Ethernet 10Gb/s – (3 Host Total cost $2310)
- Cost Per Switch – $900 Switch / 8 Ports = $112 per port
- Cost to enable 3 Hosts with 3 pNICs and 2 Cables -(3 Hosts x $450 pNICS) + ((2 Cables x 3 Hosts) x $10 each) = $1410 for three hosts or $470 per Host
- Total Cost to enable 3 hosts and switch cost – $1410 + $900 = $2310
- Fully populated 8 Port switch supporting 4 hosts = $2776
InfiniBand SDR 10Gb/s – (3 Host Total Costs $385)
- Cost Per Switch Port – $70 / 24 Ports = $2.91 per port
- Host Costs – (3 Hosts x $75 HCA) + ((2 Cables x 3 Hosts) x $30 = $315 (Per Host $105)
- Total Cost to enable 3 hosts and switch cost – $315 + $70 = $385
- Fully populated 24 port switch supporting 12 hosts = $1330
InfiniBand DDR 20Gb/s – (3 Host Total Cost $510)
- Cost Per Switch Port – $120 / 24 Ports = $5 per port
- Host Costs – (3 Hosts x $100 HCA) + ((2 Cables x 3 Hosts) x $30 = $390 (Per Host $130)
- Total Cost to enable 3 hosts and switch cost – $390 + $120 = $510
- Fully populated 24 port switch supporting 12 hosts = $1680
InfiniBand QDR 40Gb/s – (3 Host Total Cost $1040)
- Cost Per Switch Port – $500 / 24 Ports = $20.83 per port
- Host Costs – (3 Hosts x $150 HCA) + ((2 Cables x 3 Hosts) x $30 = $540 (Per Host $180)
- Total Cost to enable 3 hosts and switch cost – $540 + $500 = $1040
- Fully populated 24 port switch supporting 12 hosts = $2660
From these costs you can clearly see that InfiniBand is TRULY the best value for speed and port price. Even if you got a great deal, let’s say 50% off on 10Gbe, it still would be slower and it would cost you more. Heck, for the price you could easily buy an extra switch as a backup.
With this in mind my plan it to replace my backend Gbe network with InfiniBand. Using IPoIB (IP over InfiniBand) for VSAN, vMotion, and FT traffic and my 1Gbe network for the VM’s and ESXi management traffic. However, without knowledge wisdom cannot be achieved. So, my next steps are to learn more about InfiniBand and review these great videos by Mellanox. Then come up with a plan to move forward using this technology.
Check out these Videos: InfiniBand Principles Every HPC Expert MUST Know!
