Month: July 2011
icade review
For father’s day 2011 I got what every retro game junkie wants and icade.
I mean who wouldn’t want a fully functional mini arcade controller for their ipad that plays a lot Atari Arcade & 2600 classics.
The concept is simple –
Buy an ipad, buy an icade (sold here), assemble icade, download Atari’s Greatest Hits (Most of these games are 2600 based), and connect the ipad/icade via Bluetooth.
The icade’s controls are responsive when playing games. The buttons feel like the real thing and the joystick is good but it’s not arcade quality.
The ipad mounts on the icade vertically however there is a tray that allows you to place your ipad in a horizontal manner.
Most of the games play pretty well. I found Asteroid played better using the buttons only and Tempest worked best with a combo slider ipad touch screen / fire buttons on the icade.
One down side is the noise – the buttons and joystick switches make loud clicking noises when you use them, but don’t most arcade game cabinets?
Now for the biggest problem – Will dad ever get a chance to play with it? Probably not L
Test Lab – Day 6 Xsigo Redundancy testing with ESXi under load (Final Post)
Today I plan to setup the environment to simulate high disk I/O and re-run most the Xsigo tests from Day 4. My thoughts behind these tests are the Xisgo ran well under a minimal load but how would it perform when stressed.
Note: This blog post only covers how I setup testing but doesn’t have the final results. See A change of plans below for more information.
The environment layout will stay the same (4 x ESXi 4.1 hosts, each host with 10 VM’s, 2 Xsigo VP780’s and one IOMega IX12 with a 4 spindle NFS Datastore)
I’ll auto create about ~40 Windows 2003 VM’s and use PassMarks Burin Test to simulate a NFS load.
I plan to drive the IOMega to ~1Gbs of sustained NFS I/O by driving each VM’s hard disk.
While the load simulation is happening I’ll re-run the testing from Day 4, and record the results.
I do wish we could simulate a larger load however our NFS datastores are only across 4 Spindles. If we simulate a heavier load I believe it will “tank” the datastore making our testing pretty much worthless.
Preparing for the load Test.. In this step I setup my default template
I spun up a Windows 2003 server and installed the Burn in Test program.
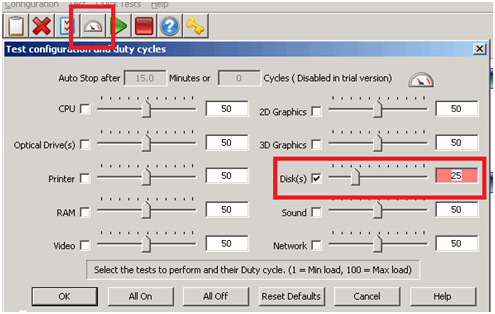
I launched the BurnIn Test, clicked on Preferences, uncheck all, checked Disks, and entered a duty cycle of 25
Tip: BurnIn Test can be used for a wide range of load testing including CPU & Network (See below)
I saved the configuration file in the default folder.
I repeated this process and created 4 more config files driving the Disk to duty cycles of 5, 10, 50 and 100.
Writing the batch file to launch the BurnIn Test config file was simple (see below) and I created one for each duty cycle.

Tip: Before changing this VM into a template I tested my batch files to ensure all was working well.
Next I wrote a simple vSphere PowerCLI script to create the VM’s, it nothing complex but it did the trick..
I simply opened the vSphere PowerCLI prompt and pasted in the following lines…
|
$server_address = “vCenter Server IP” $username = “Administrator” $password = “your password here” $template_name = “w2003Template” $datastore_name = “NFS” $customization = “W23K” $location = “LoadTest” $destination_host = “ESX Host 1 IP Address” New-VM -Name 2003VMT21 -Location $location -Template $template_name -Host $destination_host -Datastore $datastore_name -OSCustomizationSpec $customization New-VM -Name 2003VMT22 -Location $location -Template $template_name -Host $destination_host -Datastore $datastore_name -OSCustomizationSpec $customization New-VM -Name 2003VMT23 -Location $location -Template $template_name -Host $destination_host -Datastore $datastore_name -OSCustomizationSpec $customization New-VM -Name 2003VMT24 -Location $location -Template $template_name -Host $destination_host -Datastore $datastore_name -OSCustomizationSpec $customization New-VM -Name 2003VMT25 -Location $location -Template $template_name -Host $destination_host -Datastore $datastore_name -OSCustomizationSpec $customization New-VM -Name 2003VMT26 -Location $location -Template $template_name -Host $destination_host -Datastore $datastore_name -OSCustomizationSpec $customization New-VM -Name 2003VMT27 -Location $location -Template $template_name -Host $destination_host -Datastore $datastore_name -OSCustomizationSpec $customization New-VM -Name 2003VMT28 -Location $location -Template $template_name -Host $destination_host -Datastore $datastore_name -OSCustomizationSpec $customization New-VM -Name 2003VMT29 -Location $location -Template $template_name -Host $destination_host -Datastore $datastore_name -OSCustomizationSpec $customization New-VM -Name 2003VMT30 -Location $location -Template $template_name -Host $destination_host -Datastore $datastore_name -OSCustomizationSpec $customization $destination_host = “ESX Host 2 IP Address” New-VM -Name 2003VMT31 -Location $location -Template $template_name -Host $destination_host -Datastore $datastore_name -OSCustomizationSpec $customization New-VM -Name 2003VMT32 -Location $location -Template $template_name -Host $destination_host -Datastore $datastore_name -OSCustomizationSpec $customization New-VM -Name 2003VMT33 -Location $location -Template $template_name -Host $destination_host -Datastore $datastore_name -OSCustomizationSpec $customization New-VM -Name 2003VMT34 -Location $location -Template $template_name -Host $destination_host -Datastore $datastore_name -OSCustomizationSpec $customization New-VM -Name 2003VMT35 -Location $location -Template $template_name -Host $destination_host -Datastore $datastore_name -OSCustomizationSpec $customization New-VM -Name 2003VMT36 -Location $location -Template $template_name -Host $destination_host -Datastore $datastore_name -OSCustomizationSpec $customization New-VM -Name 2003VMT37 -Location $location -Template $template_name -Host $destination_host -Datastore $datastore_name -OSCustomizationSpec $customization New-VM -Name 2003VMT38 -Location $location -Template $template_name -Host $destination_host -Datastore $datastore_name -OSCustomizationSpec $customization New-VM -Name 2003VMT39 -Location $location -Template $template_name -Host $destination_host -Datastore $datastore_name -OSCustomizationSpec $customization New-VM -Name 2003VMT40 -Location $location -Template $template_name -Host $destination_host -Datastore $datastore_name -OSCustomizationSpec $customization
This pattern was repeated on the other ESX hosts until ~40 VM’s were created… |
Test Procedure…
Using the Burn In test program I will drive the utilization on the ~40 VM’s until 1Gbs of sustained NFS I/O is achieved.
I’ll use vCenter Server to ensure NFS traffic is passing through XSA and then start the tests below.
All of the ESX Hosts are attached to the IOMega via NFS, this means all traffic has to pass through the Xsigo and our network to get to the IOMega.
I used a Laptop, the ESXi console in tech support, vCenter Server mode to capture and validate the results.
Keep in mind this deployment is a SINGLE site scenario and for accuracy we allowed the environment to settle between tests.
A Change in plans.…
At this point the testing had to stop. Reason why – I put in my two weeks’ notice and had to focus on a transition plan and less on testing.
My hopes are if you’re reading this post it will give you a baseline for testing.
