NSX
VMware Workstation Gen 9: FAQs
I complied a list of frequently asked questions (FAQs) around my Gen 9 Workstation build. I’ll be updating it from time to time but do feel free to reach out if you have additional questions.
Last Update: 02/04/2026
General FAQs
Why Generation 9? Starting with my Gen 7 build the Gen Number aligns to the version of vSphere it was designed for. So, Gen 9 = VCF 9. It also helps my readers to track the Generations that interests them the most.
Why are you running Workstation vs. dedicated ESX servers? I’m pivoting my home lab strategy. I’ve moved from a complex multi-server setup to a streamlined, single-host configuration using VMware Workstation. Managing multiple hosts, though it gives real world experience, wasn’t meeting my needs when it came to roll back from a crash or testing different software versions. With Workstation, I can run multiple labs at once and use simple backup plus Workstation’s snapshot manager to recreate labs quite quickly. I find Workstation more adaptable, and making my lab time about learning rather than maintenance.
What are your goals with Gen 9? To develop and build a platform that is able to run the stack of VCF 9 product for Home Lab use. See Gen 9 Part 1 for more information on goals.
Where can I find your Gen 9 Workstation Build series? All of my most popular content, including the Gen 9 Workstation builds can be found under Best of VMX.
What version of Workstation are you using? Currently, VMware Workstation 25H2, this may change over time see my Home Lab BOM for more details.
How performant is running VCF 9 on Workstation? In my testing I’ve had adequate success with a simple VCF install on BOM1. Clicks through out the various applications didn’t seem to lag. I plan to expand to a full VCF install under BOM2 and will do some performance testing soon.
What core services are needed to support this VCF Deployment? Core Services are supplied via Windows Server. They include AD, DNS, NTP, RAS, and DHCP. DNS, NTP, and RAS being the most important.
BOM FAQs
Where can I find your Bill of Materials (BOM)? See my Home Lab BOM page.
Why 2 BOMs for Gen 9? Initially, I started with the hardware I had, this became BOM1. It worked perfectly for a simple VCF install. Eventually, I needed to expand my RAM to support the entire VCF stack. I had 32GB DDR4 modules on hand but the BOM1 motherboard was fully populated. It was less expensive to buy a motherboard that had enough RAM slots plus I could add in a 2nd CPU. This upgrade became BOM2. Additionally, It gives my readers some ideas of different configurations that might work for them.
What can I run on BOM1? I have successfully deployed a simple VCF deployment, but I don’t recommend running VCF Automation on this BOM. See the Best of VMX section for a 9 part series.
What VCF 9 products are running in BOM1? Initial components include: VCSA, VCF Operations, VCF Collector, NSX Manager, Fleet Manager, and SDDC Manager all running on the 3 x Nested ESX Hosts.
What are your plans for BOM2? Currently, under development but I would like to see if I could push the full VCF stack to it.
What can I run on BOM2? Under development, updates soon.
Are you running both BOMs configurations? No I’m only running one at a time. Currently, running BOM2.
Do I really need this much hardware? No you don’t. The parts listed on my BOM is just how I did it. I used some parts I had on hand and some I bought used. My recommendation is use what you have and upgrade when you need to.
What should I do to help with performance? Invest in highspeed disk, CPU cores, and RAM. I highly recommend lots of properly deployed NVMe disks for your nested ESX hosts.
What do I need for multiple NVMe Drives? If you plan to use multiple NVMe drives into a single PCIe slot you’ll need a motherboard that supports bifurcation OR you’ll need an NVMe adapter that will support it. Not all NVMe adapters are the same, so do your research before buying.
VMware Workstation Gen 9: Part 9 Shutting down and starting up the environment
Deploying the VCF 9 environment on to Workstation was a great learning process. However, I use my server for other purposes and rarely run it 24/7. After its initial deployment, my first task is shutting down the environment, backing it up, and then starting it up. In this blog post I’ll document how I accomplish this.
NOTE: Users should license their VCF 9 environment first before performing the steps below. If not, the last step, vSAN Shutdown will cause an error. There is a simple work around.
How to shutdown my VCF Environment.
My main reference for VCF 9 Shut down procedures is the VCF 9 Documentation on techdocs.broadcom.com. (See REF URLs below) The section on “Shutdown and Startup of VMware Cloud Foundation” is well detailed and I have placed the main URL in the reference URLs below. For my environment I need to focus on shutting down my Management Domains as it also houses my Workload VMs.
Here is the order in which I shutdown my environment. This may change over time as I add other components.
| Shutdown Order | SDDC Component |
|---|---|
| 1 – Not needed, not deployed yet | VCF Automation |
| 2 – Not needed, not deployed yet | VCF Operations for Networks |
| 3 – From VCSA234, locate a VCF Operations collector appliance.(opscollectorapplaince) – Right-click the appliance and select Power > Shut down Guest OS. – In the confirmation dialog box, click Yes. | VCF Operations collector |
| 4 – Not needed, not deployed yet | VCF Operations for logs |
| 5 – Not needed, not deployed yet | VCF Identity Broker |
| 6 – From vcsa234, in the VMs and Templates inventory, locate the VCF Operations fleet management appliance (fleetmgmtappliance.nested.local) – Right-click the VCF Operations fleet management appliance and select Power > Shut down Guest OS. – In the confirmation dialog box, click Yes. | VCF Operations fleet management |
| 7 – You shut down VCF Operations by first taking the cluster offline and then shutting down the appliances of the VCF Operations cluster. – Log in to the VCF Operations administration UI at the https://vcops.nested.local/admin URL as the admin local user. – Take the VCF Operations cluster offline. On the System status page, click Take cluster offline. – In the Take cluster offline dialog box, provide the reason for the shutdown and click OK. Wait for the Cluster status to read Offline. This operation might take about an hour to complete. (With no data mine took <10 mins) – Log in to vCenter for the management domain at https://vcsa234.nested.local/ui as a user with the Administrator role. – After reading Broadcom KB 341964, I determined my next step is to simply Right-click the vcops appliance and select Power > Shut down Guest OS. – In the VMs and Templates inventory, locate a VCF Operations appliance. – Right-click the appliance and select Power > Shut down Guest OS. – In the confirmation dialog box, click Yes.This operations takes several minutes to complete. | VCF Operations |
| 8 – Not Needed, not deployed yet | VMware Live Site Recovery for the management domain |
| 9 – Not Needed, not deployed yet | NSX Edge nodes |
| 10 – I continue shutting down the NSX infrastructure in the management domain and a workload domain by shutting down the one-node NSX Manager by using the vSphere Client. – Log in to vCenter for the management domain at https://vcsa234.nested.local/ui as a user with the Administrator role. – Identify the vCenter instance that runs NSX Manager. – In the VMs and Templates inventory, locate an NSX Manager (nsxmgr.nested.local) appliance. – Right-click the NSX Manager appliance and select Power > Shut down Guest OS. – In the confirmation dialog box, click Yes. – This operation takes several minutes to complete. | NSX Manager |
| 11 – Shut down the SDDC Manager appliance in the management domain by using the vSphere Client. – Log in to vCenter for the management domain at https://vcsa234.nested.local/ui as a user with the Administrator role. – In the VMs and templates inventory, expand the management domain vCenter Server tree and expand the management domain data center. – Expand the Management VMs folder. – Right-click the SDDC Manager appliance (SDDCMGR108.nested.local) and click Power > Shut down Guest OS. – In the confirmation dialog box, click Yes. This operation takes several minutes to complete. | SDDC Manager |
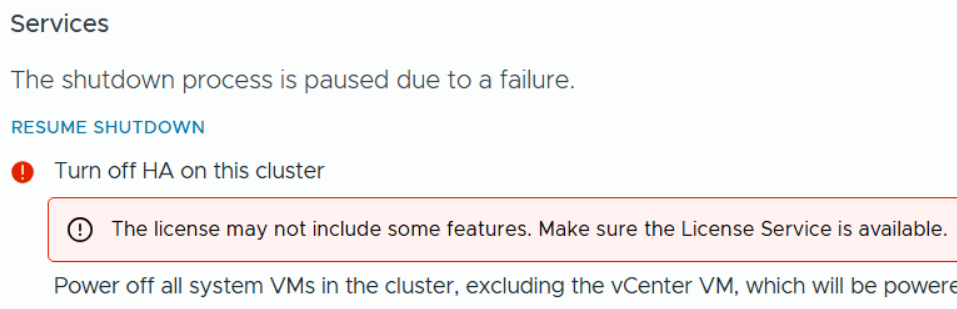
| 12 – You use the vSAN shutdown cluster wizard in the vSphere Client to shut down gracefully the vSAN clusters in a management domain. The wizard shuts down the vSAN storage and the ESX hosts added to the cluster. – Identify the cluster that hosts the management vCenter for this management domain. – This cluster must be shut down last. – Log in to vCenter for the management domain at https://vcsa234.nested.local/ui as a user with the Administrator role. – For a vSAN cluster, verify the vSAN health and resynchronization status. – In the Hosts and Clusters inventory, select the cluster and click the Monitor tab. – In the left pane, navigate to vSAN Skyline health and verify the status of each vSAN health check category. – In the left pane, under vSAN Resyncing objects, verify that all synchronization tasks are complete. – Shut down the vSAN cluster. In the inventory, right-click the vSAN cluster and select vSAN Shutdown cluster. – In the Shutdown Cluster wizard, verify that all pre-checks are green and click Next. Review the vCenter Server notice and click Next. – If vCenter is running on the selected cluster, note the orchestration host details. Connection to vCenter is lost because the vSAN shutdown cluster wizard shuts it down. The shutdown operation is complete after all ESXi hosts are stopped. – Enter a reason for performing the shutdown, and click Shutdown. | Shut Down vSAN and the ESX Hosts in the Management Domain OR Manually Shut Down and Restart the vSAN Cluster If vSAN Fails to shutdown due to a license issue, then under the vSAN Cluster > Configure > Services, choose ‘Resume Shutdown’ (Fig-3) |
| Next the ESX hosts will power off and then I can do a graceful shutdown of my Windows server AD230. In Workstation, simply right click on this VM > Power > Shutdown Guest. Once all Workstation VM’s are powered off, I can run a backup or exit Workstation and power off my server. | Power off AD230 |
(Fig-3)
How to restart my VCF Environment.
| Startup Order | SDDC Component |
|---|---|
| PRE-STEP: – Power on my Workstation server and start Workstation. – In Workstation power on my AD230 VM and ensure / verify all the core services (AD, DNS, NTP, and RAS) are working okay. Start up the VCF Cluster: 1 – One at a time power on each ESX Host. – vCenter is started automatically. Wait until vCenter is running and the vSphere Client is available again. – Log in to vCenter at https://vcsa234.nested.local/ui as a user with the Administrator role. – Restart the vSAN cluster. In the Hosts and Clusters inventory, right-click the vSAN cluster and select vSAN Restart cluster. – In the Restart Cluster dialog box, click Restart. – Choose the vSAN cluster > Configure > vSAN > Services to see he vSAN Services page. This will display information about the restart process. – After the cluster has been restarted, check the vSAN health service and resynchronization status, and resolve any outstanding issues. Select the cluster and click the Monitor tab. – In the left pane, under vSAN > Resyncing objects, verify that all synchronization tasks are complete. – In the left pane, navigate to vSAN Skyline health and verify the status of each vSAN health check category. | Start vSAN and the ESX Hosts in the Management DomainStart ESX Hosts with NFS or Fibre Channel Storage in the Management Domain |
| 2 – From vcsa234 locate the sddcmgr108 appliance. – In the VMs and templates inventory, Right Click on the SDDC Manager appliance > Power > Power On. – Wait for this vm to boot. Check it by going to https://sddcmgr108.nested.local – As its getting ready you may see “VMware Cloud Foundation is initializing…” – Eventually you’ll be prompted by the SDDC Manager page. – Exit this page. | SDDC Manager |
| 3 – From the VCSA234 locate the nsxmgr VM then Right-click, select Power > Power on. – This operation takes several minutes to complete until the NSX Manager cluster becomes fully operational again and its user interface – accessible. – Log in to NSX Manager for the management domain at https://nsxmgr.nested.local as admin. – Verify the system status of NSX Manager cluster. – On the main navigation bar, click System. – In the left pane, navigate to Configuration Appliances. – On the Appliances page, verify that the NSX Manager cluster has a Stable status and all NSX Manager nodes are available. Notes — Give it time – You may see the Cluster status go from Unavailable > Degraded, ultimately you want it to show Available. – In the Node under Service Status you can click on the # next to Degraded. This will pop up the Appliance details and will show you which item are degraded. – If you click on Alarms, you can see which alarms might need addressed | NSX Manager |
| 4 – Not Needed, not deployed yet | NSX Edge |
| 5 – Not Needed, not deployed yet | VMware Live Site Recovery |
| 6 – From vcsa234, locate vcfops.nested.lcoal appliance. – Following the order described in Broadcom KB 341964. For my environment I simply Right-click on the appliance and select Power > Power On. – Log in to the VCF Operations administration UI at the https://vcfops.nested.lcoal/admin URL as the admin local user. – On the System status page, click Bring Cluster Online. This operation might take about an hour to complete. Notes: – Cluster Status update may read: ‘Going Online’ and then finally ‘Online’ – Nodes Status may start to appear eventually showing ‘Running’ and ‘Online’ – Took <15 mins to come Online | VCF Operations |
| 7 – From vcsa234 locate the VCF Operations fleet management appliance (fleetmgmtappliance.nested.local) Right-click the VCF Operations fleet management appliance and select Power > Power On. In the confirmation dialog box, click Yes. | VCF Operations fleet management |
| 8 – Not Needed, not deployed yet | VCF Identity Broker |
| 9 – Not Needed, not deployed yet | VCF Operations for logs |
| 10 – From vcsa234, locate a VCF Operations collector appliance. (opscollectorappliance) Right-click the VCF Operations collector appliance and select Power > Power On. In the configuration dialog box, click Yes. | VCF Operations collector |
| 11 – Not Needed, not deployed yet | VCF Operations for Networks |
| 12 – Not Needed, not deployed yet | VCF Automation |
REF:
VMware Workstation Gen 9: Part 6 VCF Offline Depot
To deploy VCF 9 the VCF Installer needs access to the VCF installation media or binaries. This is done by enabling Depot Options in the VCF Installer. For users to move to the next part, they will need to complete this step using resources available to them. In this blog article I’m going to supply some resources to help users perform these functions.
Why only supply resources? When it comes to downloading and accessing VCF 9 installation media, as a Broadcom/VMware employee, we are not granted the same access as users. I have an internal process to access the installation media. These processes are not publicly available nor would they be helpful to users. This is why I’m supplying information and resources to help users through this step.
What are the Depot choices in the VCF Installer?
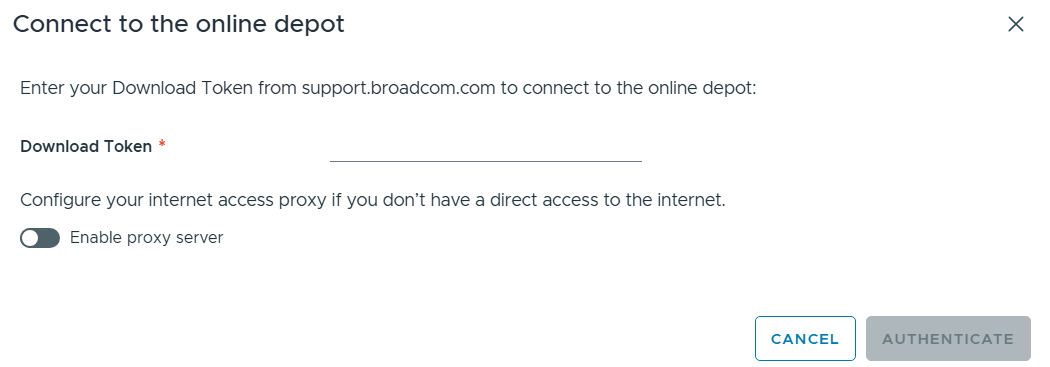
Users have 2 options. 1) Connect to an online depot or 2) Off Line Depot

What are the requirements for the 2 Depot options?
1) Connect to an online depot — Users need to have an entitled support.broadcom.com account and a download token. Once their token is authenticated they are enabled to download.
See These URL’s for more information:
2) Offline Depot – This option may be more common for users building out Home labs.
See these URLs for more information:
- Set Up an Offline Depot Web Server for VMware Cloud Foundation
- Set Up an Offline Depot Web Server for VMware Cloud Foundation << Use this method if you want to setup https on the Photon OS.
- How to deploy VVF/VCF 9.0 using VMUG Advantage & VCP-VCF Certification Entitlement
- Setting up a VCF 9.0 Offline Depot
I’ll be using the Offline Depot method to download my binaries and in the next part I’ll be deploying VCF 9.0.1.
