Home Lab
Home Lab – More updates to my design
Most recently I posted about adding a Layer 3 switch to my growing home lab. The Netgear Layer 3 switch I added (GSM7324) is preforming quite well in my home lab. In fact it’s quite zippy compared to my older switches and for the price it was worth it. However my ever growing home lab is having some growing pains, 2 to be exact.
In this post I’ll outline the issues, the solutions I’ve chosen, and my new direction for my home lab.
The issues…
Initially my thoughts were I could use my single ESXi Host and Workstation with specific VM’s to do most of my lab needs.
There were two issues I ran into, 1 – Workstation doesn’t support VLANs and 2 – my trusty IOMega IX4 wasn’t preforming very well.
Issue 1 – Workstation VLANs
Plain and simple Workstation doesn’t support VLANs and working with one ESXi Host is prohibiting me from fully using my lab and switch.
Issues 2 – IOMega IX4 Performance
My IOMega IX4 has been a very reliable appliance and it has done its job quite well.
However when I put any type of load on it (More than One or Two VM’s booting) its performance becomes a bit intolerable.
The Solutions…
Issue 1 – Workstation VLANs
I plan to still use Workstation for testing of newer ESXi platforms and various software components
I will install a second ESXi host similar to the one I built earlier this year only both Hosts will have 32GB of RAM.
The second Host will allow me to test more advanced software and develop my home lab further.
Issues 2 – IOMega IX4 Performance
I’ve decided to separate my personal data from my home lab data.
I will use my IX4 for personal needs and build a new NAS for my home lab.
A New Direction…
My intent is to build out a second ESXi Physical Host and ~9TB FreeNAS server so that I can support a vCloud Director lab environment.
vCD will enable me to spin up multiple test labs and continue to do the testing that I need.
So that’s it for now… I’m off to build my second host and my freeNAS server…
VMware Guest Operating System Installation Guide gets an Online Facelift
At some point in your VMware administrator career you discover you need information around the correct settings to deploy a VM properly.
You find that you need to answer questions like –
What is the supported network adapter for my Guest OS?
Are Paravirtualization adapters supported for my Guest OS?
Can I do Hot memory add?
A few years ago the default standard was the Guest Operating System Installation Guide.
It gave you all the information you needed to setup the virtual hardware or confirm what recommend virtual hardware should be by the OS Type.
Recently the compatibility and OS installation guides have come online and they can lead you to best practices around settings and KB’s too.
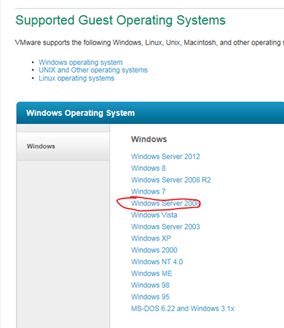
In this blog post I’m going to step you through how to find basic information around a Windows 2008 server.
Start here – http://partnerweb.vmware.com/GOSIG/home.html#other
This link will take you to the Guest Operating System Installation Guide.
Select your OS – In this case I choose Windows 2008 Server
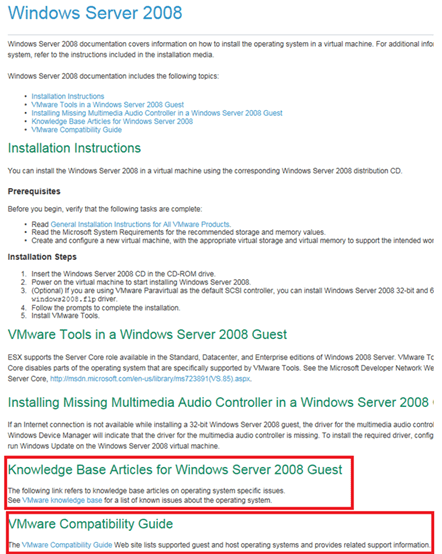
Here are the base install instructions for the Guest OS, note at the bottom the KB Articles and Guest OS Compatibility Guide.
The Guest OS Compatibility Guide can tell you what network drivers etc are support for the guest OS..
Click here to go to the VMware Compatibility Guide, Select your OS Family, OS Type and choose Update & Review…
Then select your ESX / ESXi version to see the details…
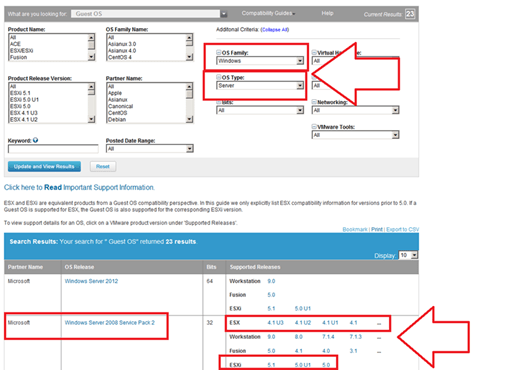
Here are the results… Also from this page you can choose a different product like ESXi 5.0U1 or other…

Home Lab – Adding a Layer 3 Switch to my growing Home Lab
Most recently I expanded my home lab to include a Layer 3 switch.
Why would I choose a Layer 3 switch and what/how would I use it is the topic of this blog post.
Here are my requirements for my home lab –
I would like to setup my home network to support multiple VLANs and control how they route.
This will enable me to control the network traffic and segment my network to allow for different types of testing.
I’d also like to be able to run all of these VM’s on Workstation 9, support remote access, and ESXi Hosts.
Frist thing I did was come up with a drawing of what I wanted. It included all my wants and needs…
This was my chance to brain storm a bit and I just wrote down everything I wanted or really needed.
From this drawing I came up with this list…
- Support Remote Access
- VLANS
- VLAN Routing
- VLAN Tagging
- ESXi Host with 5 NICs
- Workstation 9 Host with 5 NICs
- Support 5 Different VLANs
- Support Internet Access for VM’s
- Local Storage support for home files
- Printer / Scanner need to be on the network
- I’m going to need a switch with 24 Ports or better
- Design the network so that I can power down the test lab and allow home devices to print and access the Inet.
Second thing – What do I currently have to work with…
- Windows 7×64, Workstation 9, 32GB RAM, iCore 7, 2 x SATA3 2TB 6gbs HD, 2 x SATA3 SSD (60 & 120), 1 NIC
- IO Mega IX4 with Dual NICs
- Older Netgear 16 Port Gig Layer 2 Switch unmanaged
- Netgear N900 with Guest Network Support
Based on these lists I came up with my shopping list…
- I need a Layer 3 Switch to support all this
- I need some Multiport Giga Bit NICs
Let’s start with the switch…Here is what I looked for in a Switch –
Must Have –
- Layer 3 Routing
- VLANs
- VLAN Routing
- Managed
- Quiet – It is a must for home networking as I work from home and am frequently on calls.
- Cost effective – keep it below a few hundred
Nice to have –
- Quality Brand
- Support
- Community behind the product
- Non-Blocking Switch
- OSPF or RIP
Basically most good Layer 3 switches achieve the requirements for 1-4. However these switches usually run in a Data center or Networking closet and are quite loud
I did some looking around for different switches, mostly used Cisco and Extreme Networks. These are switches that I am familiar with and would fit my home lab. However I’ve seen my share of their innards, I know their fans are loud and cannot easily be replaced. When I was at VMworld 2012 I chatted quite a bit with the Netgear folk about their products and I remember talking with them about their products and how they fit SMB to Enterprise quite nicely. I started to look on Ebay and I found an affordable Netgear Switch. I did some research on line and found how others were modifying the fans to help them run more quietly.
My choice was the Netgear GSM7324. It is a 24 Port Layer 3 Managed Switch from 2008. It meets all my must have needs and it fulfilled all of the “Nice To haves”
I also bought the following to support this switch –
Startech Null Modem DB9 to USB to run the CLI on the Switch
Sunon MagLev HA40201V4-0000-C99, 40x20mm,Super Silent FAN for $10 apiece, they fit perfectly and they run the switch at a tolerable noise level
TIP – And this is important… I had to move the PIN outs on these fans to meet the PIN outs on the Switch. If I didn’t it could have damaged the switch…
Next I started looking for Multi-Port Gigabit NICS…
What do I have to work with?
I’m using the Gigabyte Z68XP-UD3 for Workstation 9 and MSI Z68MA-G45B3 for my ESXi 5.x Host.
What are the Must haves for the NIC’s?
- Dual Gigabit
- VLAN support
- Jumbo Frames
- Support for ESXi and Windows 7×64
- I need about 4 of these cards
I choose the SYBA SY-PEX24028. It’s a Dual NIC Gigabit card that meets my requirements. I found it for $39 on Newegg .
Tip – When choosing a network card I needed to ensure the card will fit into my motherboards, not all x1 PCIe slots are the same and when looking at Dual Gigabit NICs most only work in server class hardware.
Summary –
I achieved what I was looking to accomplish and with some good design work I should have a top notch home lab. All in all I spent about ~$400 to upgrade my home lab. Which is not a bad deal considering most Layer 3 switches cost $400+. All my toys have now come in and I’m off to rework my lab…. But that my friend is a different blog post…
Thank you Computer Gods for your divine intervention and BIOS Settings
I’ve been in IT for over 20 years now and in my time I’ve seen some crazy stuff like –
- Grass growing in a Unisys Green Screen terminal that was sent in for repair by a Lumber yard
- A Disney Goofy screen saver on a IBM PS/2 running OS/2 kept bringing down Token Ring every time it went in to screen saver mode.
But this friend is one of the more weird issues I’ve come across….
This all started last March 2012. I bought some more RAM and a pair of 2TB Hitachi HD’s for my Workstation 8 PC. I needed to expand my system and Newegg had a great deal on them. I imaged up my existing Windows 7 OS and pushed it down to the new HD. When the system booted I noticed that is was running very slow. I figured this to be an issue with the image process. So I decided to install from Windows 7 from scratch but I ran into various installation issues and slowness problems. I put my old Samsung HD back in my system and it booted fine. When I plugged the new Hitachi HD as a second HD via SATA or USB the problems started again, basically it was decreased performance, programs not loading, and choppy video. I repeated these same steps with the 2nd Hitachi HD that I bought and it had the same issues.
A bit perplexed at this point I figure I have a pair of bad HD’s or bad HD BIOS. Newegg would not take back the HD’s, so I start working with Hitachi. I tried a firmware HD update, I RMA both HD’s and I still have the same issue. Hitachi sends me different model but slower HD and it works fine. So now I know there is something up with this model of HD.
 I start working with Gigabyte – Same deal as Hitachi BIOS Update, RMA for a new System board Revision (Now I’m at a Rev 1.3) and I still have the same issue. I send an HD to Gigabyte in California and they cannot reproduce the problem. I’ll spare you all the details but trust me I try every combination I can think of. At this point I’m now at this for 5 Months, I still cannot use my new HD, and then I discover the following – I put in a PCI (Not PCIe) VGA video card into my system and it works and then it hit me – “I wonder if this is some weird HDMI Video HD conflict problem”
I asked Gigabyte if disabling onboard HDMI video might help. They were unsure but I try it anyway and sure enough I found the solution!

It felt like the computer gods had finally shone down on me from above and preformed a PC miracle – hallelujah. 5 plus months of troubleshooting and I finally have a solution.
Here are the overall symptoms….
Observation 1) Windows 7 x64 Enterprise or Professional the installer fails to load or fully complete OR, the installation does complete, but mouse movements are choppy, and then the system locks up or will not boot.
Observation 2) When booting from a different drive I attach the new Hitachi HD to a booted system via USB, then the PC will start to exhibit performance issues.
Here is what I found out….
Any Combination of the following products will result with these symptoms. Change any one out and it works!
1 x Gigabyte Z68XP-UD3 (Rev 1.0 and 1.3)
1 x Hitachi GST Deskstar 5K3000 HDS5C3020ALA632
1 x PCIe Video Card with HDMI Output (I tried the following card with the same Results – ZOTAC ZT-40604-10L GeForce GT 430 and EVGA – GeForce GT 610)
Here is the solution to making them work together….
In the system board BIOS, under Advanced BIOS Settings – Change On Board VGA to ‘Enable if No Ext PEG’
This simple setting disabled the on board HDMI Video and resolved the conflicts with the products not working together.
Summary….
I got to meet some really talented engineers at Hitachi and Gigabyte. All were friendly and worked with me to solve my issue. One person Danny from Gigabyte was the most responsive and talented MoBo engineer I’ve meet. Even though in the end I found my own solution, I wouldn’t have made it there without some of their expert guidance!
ESXi Q&A Boot Options – USB, SD, & HD
Here are some of my notes around boot options for ESXi.
The post covers a lot of information especially around booting to SD or USB.
Enjoy!
What are the Options to install ESXi?
- Interactive ESXi Installation
- Scripted ESXi Installation
- vSphere Auto Deploy ESXi Installation Option – vSphere 5 Only
- Customizing Installations with ESXi Image Builder CLI – vSphere 5 Only
What are the boot media options for ESXi Installs?
The following boot media are supported for the ESXi installer:
- Boot from a CD/DVD
- Boot from a USB flash drive.
- PXE boot from the network. PXE Booting the ESXi Installer
-
Boot from a remote location using a remote management application.
What are the acceptable targets to install/boot ESXi to and are there any dependencies?
ESXi 5.0 supports installing on and booting from the following storage systems:
-
SATA disk drives – SATA disk drives connected behind supported SAS controllers or supported on-board SATA controllers.
- Note -ESXi does not support using local, internal SATA drives on the host server to create VMFS datastores that are shared across multiple ESXi hosts.
- Serial Attached SCSI (SAS) disk drives. Supported for installing ESXi 5.0 and for storing virtual machines on VMFS partitions.
- Dedicated SAN disk on Fibre Channel or iSCSI
- USB devices. Supported for installing ESXi 5.0. For a list of supported USB devices, see the VMware Compatibility Guide at http://www.vmware.com/resources/compatibility.
Storage Requirements for ESXi 5.0 Installation
- Installing ESXi 5.0 requires a boot device that is a minimum of 1GB in size.
- When booting from a local disk or SAN/iSCSI LUN, a 5.2GB disk is required to allow for the creation of the VMFS volume and a 4GB scratch partition on the boot device.
- If a smaller disk or LUN is used, the installer will attempt to allocate a scratch region on a separate local disk.
- If a local disk cannot be found the scratch partition, /scratch, will be located on the ESXi host ramdisk, linked to /tmp/scratch.
-
You can reconfigure /scratch to use a separate disk or LUN. For best performance and memory optimization, VMware recommends that you do not leave /scratch on the ESXi host ramdisk.
- To reconfigure /scratch, see Set the Scratch Partition from the vSphere Client.
- Due to the I/O sensitivity of USB and SD devices the installer does not create a scratch partition on these devices. As such, there is no tangible benefit to using large USB/SD devices as ESXi uses only the first 1GB.
- When installing on USB or SD devices, the installer attempts to allocate a scratch region on an available local disk or datastore.
- If no local disk or datastore is found, /scratch is placed on the ramdisk. You should reconfigure /scratch to use a persistent datastore following the installation.
10 Great things to know about Booting ESXi from USB – http://blogs.vmware.com/esxi/2011/09/booting-esxi-off-usbsd.html <<< This is worth a read should clear up a LOT of questions….
How do we update a USB Boot Key?
It would follow the same procedure as any install or upgrades, to the infrastructure it acts all the same.
Can an ESXi Host access USB devices ie. Can an External USB Hard Disk be connected directly to the ESXi Host for copying of data?
- Yes this can be done, see the KB below – ‘Accessing USB storage and other USB devices from the service console’
- However the technology that supports USB device pass-through from an ESX/ESXi host to a virtual machine does not support simultaneous USB device connections from USB pass-through and from the service console.
- This means the host is in either Pass Through (to the VM) or service console mode.
References –
vSphere 5 Documentation Center (Mainly Under ‘vSphere Installation and Setup’)
Installing ESXi Installable onto a USB drive or SD flash card
USB support for ESX/ESXi 4.1 and ESXi 5.0
VMware support for USB/SD devices used for installing VMware ESXi
Installing ESXi 5.0 on a supported USB flash drive or SD flash card
Accessing USB storage and other USB devices from the service console
Whitebox ESXi 5.x Diskless install
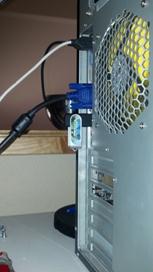
I wanted to build a simple diskless ESXi 5.x server that I could use as an extension to my Workstations 8 LAB.
Here’s the build I completed today….
- Antec Sonata Gen I Case (Own, Buy for ~$59)
- Antec Earth Watts 650 PS (Own, Buy for ~$70)
- MSI Z68MS-G45(B3) Rev 3.0 AKA MS-7676 (currently $59 at Fry’s)
- Intel i7-2600 CPU LGA 1155 (Own, Buy for ~$300)
- 16GB DDR3-1600 Corsair RAM (Own, Buy for ~$80)
- Intel PCIe NIC (Own, Buy for ~$20)
- Super Deluxe VMware 1GB USB Stick (Free!)
- Classy VMware Sticker on front (Free)
Total Build Cost New — $590
My total Cost as I already owned the Hardware – $60 J
ESXi Installation –
- Installed ESXi 5.0 via USB CD ROM to the VMware 1GB USB Stick
- No install issues
- All NIC’s and video recognized
- It’s a very quiet running system that I can use as an extension from my Workstation 8 Home lab…
| Front View with Nice VMware Sticker! |
 |
| Rear View with 1GB VMware USB Stick |
 |
| System Board with CPU, RAM and NIC – Look Mom no Hard Disks! |
 |
| Model Detail on the MSI System board, ESXi reports the Mobo as a MS-7676 |
 |
VMworld 2012 – Public Voting Now Open – Vote for my sessions!
For the first time I submitted sessions for VMworld 2012.
Please support me by going to vmworld.com and voting for my sessions…
Please visit VMworld 2012
Update to my Home Lab with VMware Workstation 8 – Part 2 Fun with a Windows 7 Installer
Part 1 of this series outlined the hardware I wanted to purchase and some of the ideas I had around the products.
I created an image of the current install of Windows 7, then booted it to my new hardware, and to my surprise there were not any hidden files or drivers that needed adjusted.
It worked quite well, so well it was scary but simply Impressive…. Sure beats those old XP days when you had to just about tear it apart to get it to work.
However I would like this install of Workstation 8 to run on a fresh copy of Windows 7 so I have decided to reinstall it.
Now this shouldn’t warrant a blog post however they way I had to get Windows 7 to behave is why I’m posting.
In this post I go into getting Windows 7 to install properly when you don’t have proper installation CD.
The CD I own for Windows 7 is an Windows based Installation only, you cannot create boot CD to install the OS fresh.
Trust me I tired many ways but it just doesn’t work…
Here is what I wanted to accomplish –
1. I’d like a fresh copy of Windows 7 Installed on to my system
2. I need to enable AHCI in my system BIOS (for more info see here http://en.wikipedia.org/wiki/Advanced_Host_Controller_Interface)
I found on the corsair blogs that my SSD drive will run much better if you enable AHCI in your BIOS.
Unfortunately this pretty much deems a reinstall. I’m okay with this because it is what I’m wanting to do.
Issues –
1. The version of Windows 7 I have is an upgrade or restore only version.
2. Currently AHCI is not enabled in my BIOS
Here’s how I did it… Oh, did it take some trickery and learning but it worked..
Know this…
Windows 7 will do a recovery install to your current HD (C:) or to a new HD (E:).
If you install to your current HD, C:, then it will install in to a WINDOWS.001 folder, and leave lots of old files laying around.
Not ideal as I want a pristine Install
Do this…
From Windows I initiated the install, choose custom install and choose my E: drive (At the time E: was just a blank HD)

Windows did it typical install, Copying files, and they rebooted the system.
During the reboot I enabled AHCI on ALL controllers in the BIOS << THIS IS VERY important step, if you miss this Windows will install in IDE Mode
Windows completed the install and boots to your E: drive.
Having E:\ be the boot and E:\Windows is not ideal. I really want Windows 7 on my C: drive.
I formatted my C: drive and ran the windows install, only this time choose the C: HD.
Windows completes the install and reboots.
When I was done Windows 7 is a fresh install and running on the C: drive.
Summary…
I got to tell you it was a chore figuring this out, it seems very simple now but I went through imaging processes, partition changing, drive renames, lots of blog posts, KB’s, etc…
Nothing worked well and it took up hours of my time. This pattern worked for me, Windows 7 installed properly and its working quite well.
Now its on to installing Workstation 8…
Update to my Home Lab with VMware Workstation 8 – Part 1 Why
Over the couple of years my home lab running VMware Workstation 7 has served me quite well. I’ve been able to deploy VM’s as needed (Windows, ESX, etc) and attach it to my shared storage.
However as my role has changed to a TAM at VMware I’ve needed to depend on my lab to interface with my customers and keep my technical skills up. VMware supplies labs and access to many of their products and this approach is a good one, however there is something said for building it yourself.
Before I just start setting up software, hardware, SAN’s, network, etc I needed to reevaluate my current home lab and setup my new objectives / goals —
“To update a home lab one must look back to move forward” – Matt Mancini ![]()
What were some of the objectives and goals I chose back then?
What do you want to accomplish by setting up a home lab or work test environment?
I wanted to setup a home lab with a couple of ESX servers and shared storage
I wanted to do this so I could testing basic ESX functions and new versions
What are the expectations for uptime and performance?
I’d like the system to perform well as a home PC and a test lab
I’d like to use it to do basic functions and run my lab quickly keeping delays to a minimum
What equipment do I have access to and what do would I need to purchase?
Have – High End PC, Home Network
Purchase – More RAM, Shared Storage, Workstation Software
I built the following environment based on my objectives and goals–
Hardware / Software –

Network –
Internal networks to support vMotion and ESX Management Network
External Single NIC to support VM’s

Storage —
iSCSI, NFS – To support ESX Hosts
CIFS Shares – for a Public Share
Single NIC from home lab to support connection to IX4
500GB HD – Boot OS and Some Workstation VM’s
300GB HD – For Workstation VM’s
160GB HD – For Workstation VM’s
Current VM’s –
Web Safe – XP VM’s used for surfing the web
Home VM – Used for Home / Personal Use
ESX 3.5 Cluster – built but rarely used
ESX 4.0 Cluster – Used but not fully configured
vCenter Server VM – Windows 2003 x32 running vCenter Server 4.0

Outcomes for 09/2011 –
Currently my home lab is struggling to keep up. As my role has changed the demands on my home lab have increased. The main constraint appears to be RAM, 8GB of RAM won’t cut it anymore. So now I’m faced with updating or replacing my home lab.
The Update Plan 10/2011 –
Generally the home lab is doing okay but it is struggling with local RAM. If I run more then 3 VM’s (1 – vCenter Server, and 2 – ESX) there isn’t really much left and paging begins.
I start to look to update my current Mother board (MoBo) to 16GB of RAM, it’s MAX. As I start to research 4 x 4GB DDR2, I find that DDR3 has consumed the market. and DDR2 is so far past its prime that updating it would cost about ~$250 for RAM.
It’s time for a major overhaul for my home lab – What are the new objectives and considerations?
What do you want to accomplish by setting up a home lab or work test environment?
I wanted to setup my home lab to be able to run One vCenter Server, 2 – ESX servers w/ shared storage iSCSI and NFS, maybe on other XP VM, at the same time with out paging to disk
I to test basic ESX functions, new versions, explore options for customers, work with beta code, etc
What are the expectations for uptime and performance?
I’d like the system to perform well as a home PC and a test lab
I’d like to use it to do basic functions and run my lab quickly keeping delays to a minimum
What equipment do I have access to and what do would I need to purchase?
Have – High End PC, Home Network, Shared Storage, Workstation Software
What newer hardware update should be considered?
i7 Core CPU, MoBo with 32GB support, USB 3.0, onboard mSATA, SSD Drives, SATA 6.0 Support
With these things in mind I decided on the following items…

Let chats a bit about the Buy items and reasons why I choose them…
Gigabyte GA-Z68XP-UD3 Mobo
Here are the key drivers why I choose this motherboard –
Price and options were my number one driver, I had looked at other MoBo’s but when I narrowed it down this one kept coming up…
4 x SATAIII – 6.0Gbs Support – Really the MoBo out there with this (Note – this MoBo uses 2 different Chipsets to achieve this (2 x on the Intel Z68 and 2 x on the Marvell chipset)
4 x SATAII – 3.0Gbs Support – Uses the Z68 Chipset
32GB RAM Max
USB 3.0 Support
Good PCI Support – PCI Express 2.0 x16 2 (x16, x8), PCI Express x1, 3 PCI Slots 2 (I did look at PCI Express 3.0 boards but at this point they are more of a fad then reality)
Here are the details on this board — http://www.newegg.com/Product/Product.aspx?Item=N82E16813128512
60GB SSD SATAIII aka 6.0Gbs
The key driver for this product was Speed and Price.
I got the “Corsair Force Series 3 CSSD-F60GB3A-BK 2.5″ 60GB SATA III Internal Solid State Drive (SSD)”
I got this drive at Fry’s for $80 and it stated it could do 500MB/s Read and Write.
Come to find out it can only do 250MB/s RorW however if you buy the GT Model it will.
Don’t take my word for it read about it on the Corsair forums — http://forum.corsair.com/v3/forumdisplay.php?f=188
Other Caveats – Don’t use SSD for your boot drive, before you buy read reviews
I’m not happy about this but the drive still preforms well and I use it to boot VM’s it flys!
Here are the deailts on the SSD – http://www.newegg.com/Product/Product.aspx?Item=N82E16820233223
16GB DDR3 RAM
Key driver here was Size and Price
Once again Frys had the best price and it got 16GB of RAM for $79
Here are the details on the RAM – http://www.newegg.com/Product/Product.aspx?Item=N82E16820233143
With new hardware in hand, let the fun and rebuilding begin – I’m off to Part II of this blog “Update to my Home Lab with VMware Workstation 8 – Part 2 Fun with a Windows 7 Installer“
Test Lab – Day 6 Xsigo Redundancy testing with ESXi under load (Final Post)
Today I plan to setup the environment to simulate high disk I/O and re-run most the Xsigo tests from Day 4. My thoughts behind these tests are the Xisgo ran well under a minimal load but how would it perform when stressed.
Note: This blog post only covers how I setup testing but doesn’t have the final results. See A change of plans below for more information.
The environment layout will stay the same (4 x ESXi 4.1 hosts, each host with 10 VM’s, 2 Xsigo VP780’s and one IOMega IX12 with a 4 spindle NFS Datastore)
I’ll auto create about ~40 Windows 2003 VM’s and use PassMarks Burin Test to simulate a NFS load.
I plan to drive the IOMega to ~1Gbs of sustained NFS I/O by driving each VM’s hard disk.
While the load simulation is happening I’ll re-run the testing from Day 4, and record the results.
I do wish we could simulate a larger load however our NFS datastores are only across 4 Spindles. If we simulate a heavier load I believe it will “tank” the datastore making our testing pretty much worthless.
Preparing for the load Test.. In this step I setup my default template
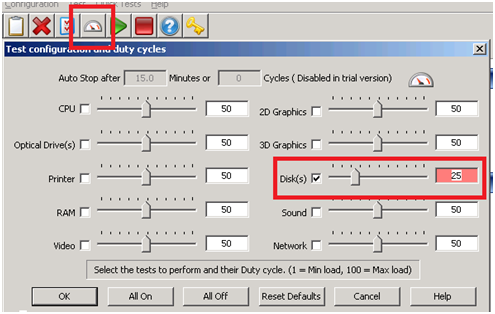
I spun up a Windows 2003 server and installed the Burn in Test program.
I launched the BurnIn Test, clicked on Preferences, uncheck all, checked Disks, and entered a duty cycle of 25
Tip: BurnIn Test can be used for a wide range of load testing including CPU & Network (See below)
I saved the configuration file in the default folder.
I repeated this process and created 4 more config files driving the Disk to duty cycles of 5, 10, 50 and 100.
Writing the batch file to launch the BurnIn Test config file was simple (see below) and I created one for each duty cycle.
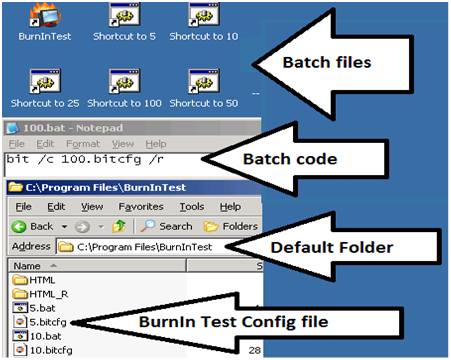
Tip: Before changing this VM into a template I tested my batch files to ensure all was working well.
Next I wrote a simple vSphere PowerCLI script to create the VM’s, it nothing complex but it did the trick..
I simply opened the vSphere PowerCLI prompt and pasted in the following lines…
|
$server_address = “vCenter Server IP” $username = “Administrator” $password = “your password here” $template_name = “w2003Template” $datastore_name = “NFS” $customization = “W23K” $location = “LoadTest” $destination_host = “ESX Host 1 IP Address” New-VM -Name 2003VMT21 -Location $location -Template $template_name -Host $destination_host -Datastore $datastore_name -OSCustomizationSpec $customization New-VM -Name 2003VMT22 -Location $location -Template $template_name -Host $destination_host -Datastore $datastore_name -OSCustomizationSpec $customization New-VM -Name 2003VMT23 -Location $location -Template $template_name -Host $destination_host -Datastore $datastore_name -OSCustomizationSpec $customization New-VM -Name 2003VMT24 -Location $location -Template $template_name -Host $destination_host -Datastore $datastore_name -OSCustomizationSpec $customization New-VM -Name 2003VMT25 -Location $location -Template $template_name -Host $destination_host -Datastore $datastore_name -OSCustomizationSpec $customization New-VM -Name 2003VMT26 -Location $location -Template $template_name -Host $destination_host -Datastore $datastore_name -OSCustomizationSpec $customization New-VM -Name 2003VMT27 -Location $location -Template $template_name -Host $destination_host -Datastore $datastore_name -OSCustomizationSpec $customization New-VM -Name 2003VMT28 -Location $location -Template $template_name -Host $destination_host -Datastore $datastore_name -OSCustomizationSpec $customization New-VM -Name 2003VMT29 -Location $location -Template $template_name -Host $destination_host -Datastore $datastore_name -OSCustomizationSpec $customization New-VM -Name 2003VMT30 -Location $location -Template $template_name -Host $destination_host -Datastore $datastore_name -OSCustomizationSpec $customization $destination_host = “ESX Host 2 IP Address” New-VM -Name 2003VMT31 -Location $location -Template $template_name -Host $destination_host -Datastore $datastore_name -OSCustomizationSpec $customization New-VM -Name 2003VMT32 -Location $location -Template $template_name -Host $destination_host -Datastore $datastore_name -OSCustomizationSpec $customization New-VM -Name 2003VMT33 -Location $location -Template $template_name -Host $destination_host -Datastore $datastore_name -OSCustomizationSpec $customization New-VM -Name 2003VMT34 -Location $location -Template $template_name -Host $destination_host -Datastore $datastore_name -OSCustomizationSpec $customization New-VM -Name 2003VMT35 -Location $location -Template $template_name -Host $destination_host -Datastore $datastore_name -OSCustomizationSpec $customization New-VM -Name 2003VMT36 -Location $location -Template $template_name -Host $destination_host -Datastore $datastore_name -OSCustomizationSpec $customization New-VM -Name 2003VMT37 -Location $location -Template $template_name -Host $destination_host -Datastore $datastore_name -OSCustomizationSpec $customization New-VM -Name 2003VMT38 -Location $location -Template $template_name -Host $destination_host -Datastore $datastore_name -OSCustomizationSpec $customization New-VM -Name 2003VMT39 -Location $location -Template $template_name -Host $destination_host -Datastore $datastore_name -OSCustomizationSpec $customization New-VM -Name 2003VMT40 -Location $location -Template $template_name -Host $destination_host -Datastore $datastore_name -OSCustomizationSpec $customization
This pattern was repeated on the other ESX hosts until ~40 VM’s were created… |
Test Procedure…
Using the Burn In test program I will drive the utilization on the ~40 VM’s until 1Gbs of sustained NFS I/O is achieved.
I’ll use vCenter Server to ensure NFS traffic is passing through XSA and then start the tests below.
All of the ESX Hosts are attached to the IOMega via NFS, this means all traffic has to pass through the Xsigo and our network to get to the IOMega.
I used a Laptop, the ESXi console in tech support, vCenter Server mode to capture and validate the results.
Keep in mind this deployment is a SINGLE site scenario and for accuracy we allowed the environment to settle between tests.
A Change in plans.…
At this point the testing had to stop. Reason why – I put in my two weeks’ notice and had to focus on a transition plan and less on testing.
My hopes are if you’re reading this post it will give you a baseline for testing.
