VMware Workstation Gen 9: BOM2 P1 Motherboard upgrade (Failed Gigabyte board)
**Urgent Note ** The Gigabyte mobo in BOM2 initially was working well in my deployment. However, shortly after I completed this post the mobo failed. I was able to return it but to replace it the cost doubled. I replaced this mobo with a SuperMicro Board but am keeping this post up incase someone find it useful.
To take the next step in deploying a VCF 9 Simple stack with VCF Automation, I’m going to need to make some updates to my Workstation Home Lab. BOM1 simply doesn’t have enough RAM, and I’m a bit concerned about VCF Automation being CPU hungry. In this blog post I’ll cover some of the products I chose for BOM2.
Although my ASRock Rack motherboard (BOM1) was performing well, it was constrained by available memory capacity. I had additional 32 GB DDR4 modules on hand, but all RAM slots were already populated. I considered upgrading to higher-capacity DIMMs; however, the cost was prohibitive. Ultimately, replacing the motherboard proved to be a more cost-effective solution, allowing me to leverage the memory I already owned.
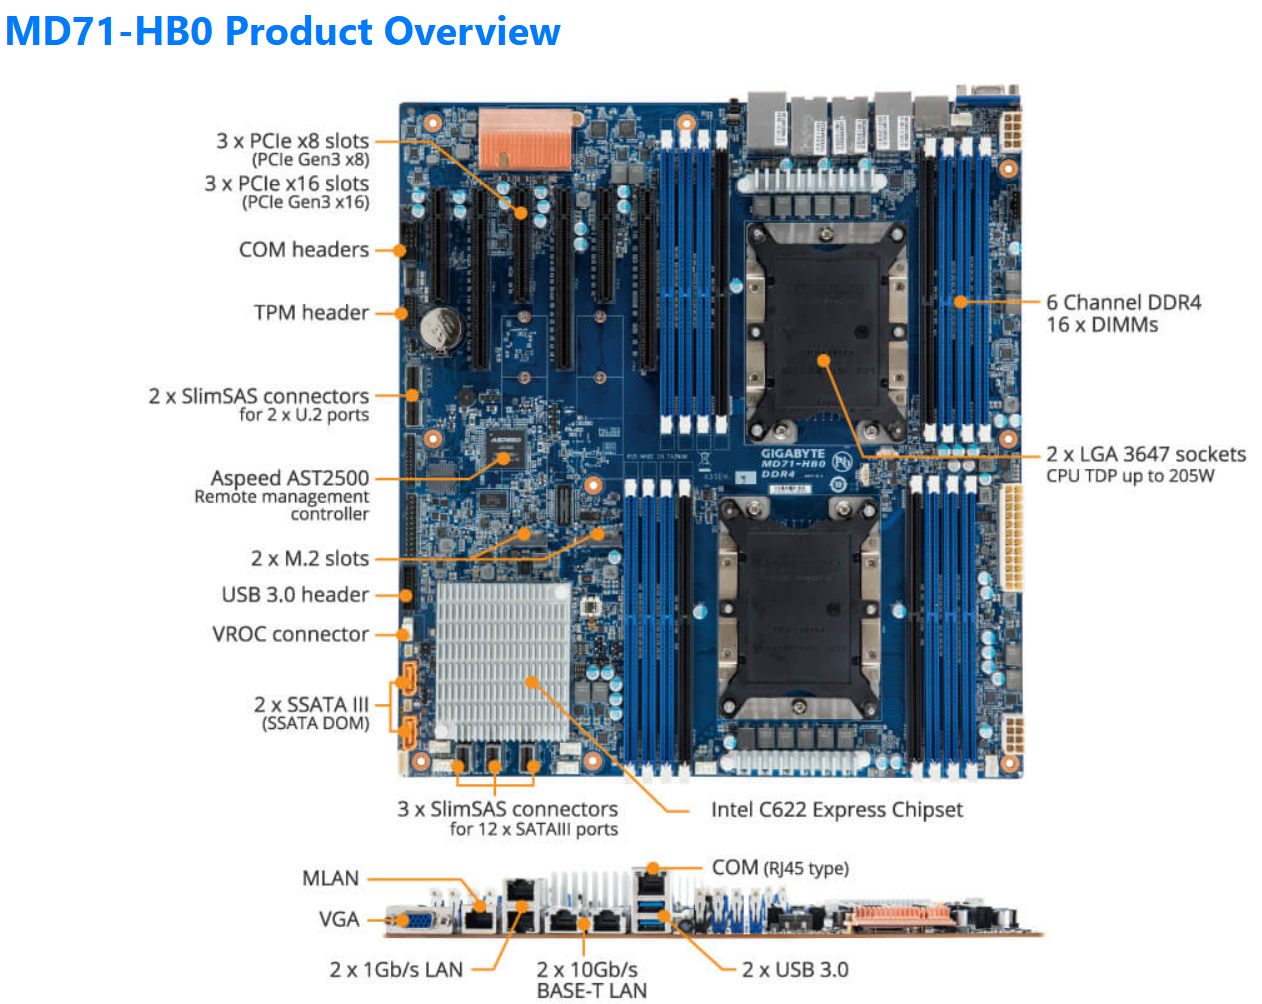
The mobo I chose was the Gigabyte Gigabyte MD71-HB0, it was rather affordable but it lacked PCIe bifurcation. Bifurcation is a feature I needed to support the dual NVMe disks into one PCIe slot. To overcome this I chose the RIITOP M.2 NVMe SSD to PCI-e 3.1 These cards essentially emulate a bifurcated PCIe slot which allows for the dual NVMe disks in a single PCIe slot.
The table below outlines the changes planned for BOM2. There was minimal unused products from the original configuration, and after migrating components, the updated build will provide more than sufficient resources to meet my VCF 9 compute/RAM requirements.
Pro Tip: When assembling new hardware, I take a methodical, incremental approach. I install and validate one component at a time, which makes troubleshooting far easier if an issue arises. I typically start with the CPUs and a minimal amount of RAM, then scale up to the full memory configuration, followed by the video card, add-in cards, and then storage. It’s a practical application of the old adage: don’t bite off more than you can chew—or in this case, compute.
| KEEP from BOM1 | Added to create BOM2 | UNUSED |
| Case: Phanteks Enthoo Pro series PH-ES614PC_BK Black Steel | Mobo: Gigabyte MD71-HB0 | Mobo: ASRack Rock EPC621D8A |
| CPU: 1 x Xeon Gold ES 6252 (ES means Engineering Samples) 24 pCores | CPU: 1 x Xeon Gold ES 6252 (ES means Engineering Samples) New net total 48 pCores | NVMe Adapter: 3 x Supermicro PCI-E Add-On Card for up to two NVMe SSDs |
| Cooler: 1 x Noctua NH-D9 DX-3647 4U | Cooler: 1 x Noctua NH-D9 DX-3647 4U | 10Gbe NIC: ASUS XG-C100C 10G Network Adapter |
| RAM: 384GB 4 x 64GB Samsung M393A8G40MB2-CVFBY 4 x 32GB Micron MTA36ASF4G72PZ-2G9E2 | RAM: New net total 640GB 8 x 32GB Micron MTA36ASF4G72PZ-2G9E2 | |
| NVMe: 2 x 1TB NVMe (Win 11 Boot Disk and Workstation VMs) | NVMe Adapter: 3 x RIITOP M.2 NVMe SSD to PCI-e 3.1 | |
| NVMe: 6 x Sabrent 2TB ROCKET NVMe PCIe (Workstation VMs) | Disk Cables: 2 x Slimline SAS 4.0 SFF-8654 | |
| HDD: 1 x Seagate IronWolf Pro 18TB | ||
| SSD: 1 x 3.84TB Intel D3-4510 (Workstations VMs) | ||
| Video Card: GIGABYTE GeForce GTX 1650 SUPER | ||
| Power Supply: Antec NeoECO Gold ZEN 700W | ||
PCIe Slot Placement:
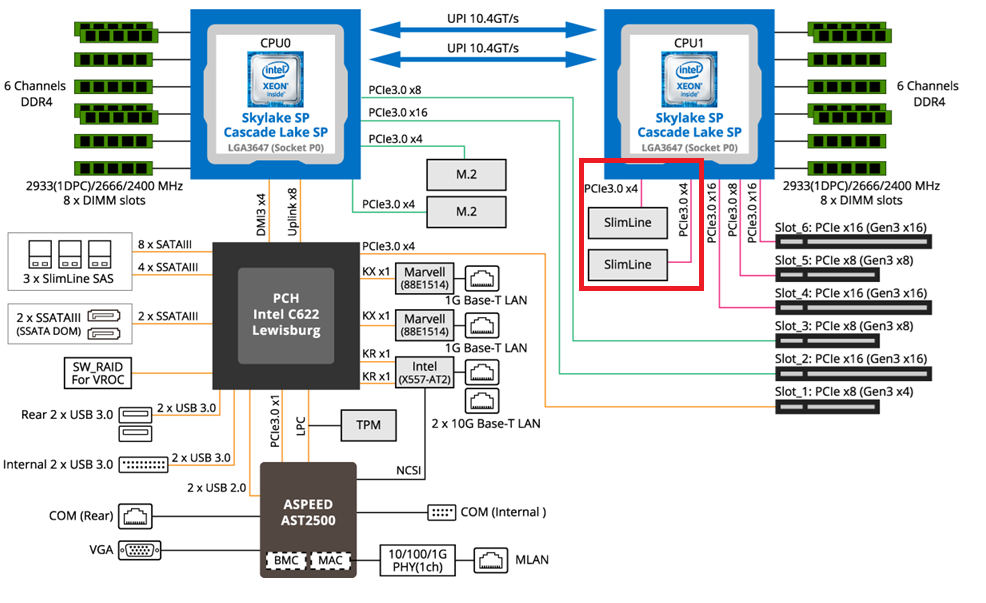
For the best performance, PCIe Slot placement is really important. Things to consider – speed and size of the devices, and how the data will flow. Typically if data has to flow between CPUs or through the C622 chipset then, though minor, some latency is induced. If you have a larger video card, like the Super 1650, it’ll need to be placed in a PCIe slot that supports its length plus doesn’t interfere with onboard connectors or RAM modules.
Using Fig-1 below, here is how I laid out my devices.
- Slot 2 for Video Card. The Video card is 2 slots wide and covers Slot 1 the slowest PCIe slot
- Slot 3 Open
- Slot 4, 5, and 6 are the RIITOP cards with the dual NVMe
- Slimline 1 (Connected to CPU 1) has my 2 SATA drives, typically these ports are for U.2 drives but they also will work on SATA drives.
Why this PCIe layout? By isolating all my primary disks on CPU1 I don’t cross over the CPU nor do I go through the C622 chipset. My 2 NVMe disks will be attached to CPU0. They will be non-impactful to my VCF environment as one is used to boot the system and the other supports unimportant VCF VMs.
Other Thoughts:
- I did look for other mobos, workstations, and servers but most were really expensive. The upgrades I had to choose from were a bit constrained due to the products I had on hand (DDR4 RAM and the Xeon 6252 LGA-3647 CPUs). This narrowed what I could select from.
- Adding the RIITOP cards added quite a bit of expense to this deployment. Look for mobos that support bifurcation and match your needs. However, this combination + the additional parts were more than 50% less when compared to just updating the RAM modules.
- The Gigabyte mobo requires 2 CPUs if you want to use all the PCIe slots.
- Updating the Gigabyte firmware and BMC was a bit wonky. I’ve seen and blogged about these mobo issues before, hopefully their newer products have improved.
- The layout (Fig-1) of the Gigabyte mobo included support for SlimLine U.2 connectors. These will come in handy if I deploy my U.2 Optane Disks.
(Fig-1)
Now starts the fun, in the next posts I’ll reinstall Windows 11, performance tune it, and get my VCF 9 Workstation VMs operational.
