Month: March 2017
Gigabyte MX31-BS0 Firmware / BIOS update for MergePoint Embedded Management Software and Motherboard
** Blog Updates / Notes **
I wrote this post when I first got my MX31-BS0 (2017), since then I have updated my BIOS several times using this process. Here are my notes around my most recent update experiences and blog comments.
- 07/2019 – Updated 1 host with MX-31BS0 BIOS from R10 to R11 and MergePoint EMS 8.73 to 8.85. This update didn’t go smooth and I cannot recommend it.
- Why did I update — I recently installed Java 9 and the vKVM under EMS 8.73 would not work. After installing R11/8.85 Java 9 seemed to work but I had issues
- Notes / Issues:
- Noted EMS 8.85 Changes: I didn’t dig in deep but the install log screen got a new look, and all the rest of the screens seemed to be the same. I had some random quirkiness (as stated int he blog post below) during the update, but nothing out of the ordinary.
- vKVM/vMedia Issues:
- EMS 8.85 with the vKVM or the vMedia would disconnect upon reboot of the host OR it would do this randomly. This is with the ‘Keep PHY link up’ enabled.
- Tested on a system with Java 8 and had the same results
- Downgraded to EMS 8.73 with BIOS R11 all issues went away
- I did not test EMS 8.80 or 8.83
- 09/2018 – Mix of updates for my three hosts — Updated MX-31BS0 BIOS from R03 or R08 to R10 and 2 hosts MergePoint 8.58 to 8.73, as one host was on 8.73 already
- Noted behavior:
- After BIOS update was completed the Mobo powered off vs. rebooting as with previous updates. Had to power on the mobo to complete the BIOS install. Then the mobo rebooted one more time as expected.
- Even though the Mobo had been warm booted the BIOS Version in MergePoint web interface still showed the old version. However, the Boot BIOS screen reflected the update. A full power disconnect of the Mobo and a few ‘refreshes’ of the web browser allowed the MergePoint to report R10. I did not see this behavior with the MergePoint EMS BIOS update, it promptly reported 8.73 properly.
- Noted behavior:
- 05/2018 –Updated on host to MX-31BS0 BIOS from R03 to R08 and MergePoint 8.58 to 8.73.
- Blog readers noted issues going to R08 and could not connect to vKVM, I didn’t have any issues with update. Looks like it was a JAVA 8 Update issue (See post comments for more info)
- 09/2017 – Updated MX-31BS0 BIOS from F10 to R03 and MergePoint 8.41 to 8.58.
- 03/2017 – Original update documented below. Updated MX-31BS0 BIOS from F01 to F10 and MergePoint 8.01 to 8.41.
**** Blog Post ****
You’d think by now manufactures would have a solid and concise process around updating their products. They are quick to warn users to not update their BIOS unless there is a problem and quick to state if there is a problem they usually won’t support it. This total cycle of disservice is a constant for low-end manufacturers, heck even some high server platforms have the same issues. I have these same concerns when I started to look into updating my current MX31-BS0 Motherboard (mobo).
What can soften this blow a bit? How about the ability to update your BIOS remotely? This is a great feature of the MX-31BS0 and in this blog post, I’ll show you how I updated the BIOS and the remote MergePoint EMS (MP-EMS) firmware too.
Initial Steps –
- My system is powered off and the power supply can supply power to the mobo.
- I have setup remote access to the MP-EMS site with an IP address and have access to it via a browser. Additionally, I have validated the vKVM function works without issue
- I downloaded the correct Mobo BIOS and BMC or MP-EMS Firmware and have extracted these files
- Steps below were completed on a Gigabyte MX31-BS0 from BIOS F01 > F10 and MP-EMS 8.01 > 8.41, your system may vary
1 – Access the MergePoint EMS site
Start out by going to the IP address for MP-EMS site. From the initial display screen, we can see the MP-EMS Firmware versions but not the Platform (or Mobo) BIOS Version. Why not you may ask? Well, the MP-EMS will only display Mobo information when the Mobo is powered on. Before you power on your Mobo I would recommend opening the vKVM session so that you can see the boot screen. When you power on your mobo (MP-EMS > Power > Control > Power On ) use the vKVM screen to halt at the ‘boot menu’ or even go into setup and disable all the boot devices.
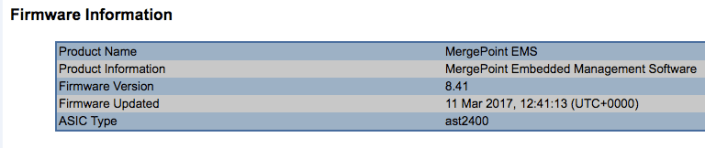
In this PIC, we can see my Firmware for the MP-EMS is 8.01 and the BIOS is blank as the Mobo is not powered on.

2- Selecting the Mobo BIOS Update
I choose the following to update the Mobo BIOS. Start out by uploading the file: Update > ‘BIOS & ME’ > Choose File > Image.RBU > Upload

Once the upload is complete, click on ‘Update’ to proceed. NOTE: a warning dialog box appeared for me stating the system would be powered off to update the BIOS. Good thing I’m in the Boot Menu as the system will just directly power off with no regard of the system state

3 – Installing the Mobo BIOS Update: Be Patient for the BIOS install to complete
Once I saw the message the ‘BIOS firmware image has been updated successfully’ I then exited the browser session and vKVM . Note: I’d recommend closing the browser out entirely and then reopening a new session.

Once I restarted my vKVM and MP-EMS sessions and then powered on my Mobo. This allowed the BIOS update to continue.
Here is the patience part – My system was going from BIOS F01 > F10 and it rebooted 2 times to complete the update. Be patient it will complete.
Here is the behavior I noted:
- First Reboot – The system posted normally, it cleared the screen, and then white text stated a warning message about the BIOS booted to default settings. Very shortly after it rebooted again.
- On the 2nd reboot, it posted normally and I pressed F10 to get back to the Boot menu. I did this because next, we’ll need to update the MP-EMS firmware.
Once the system had rebooted I then refreshed my MP-EMS screen and viola there it was BIOS Version F10.

** Note – Not every time but sometimes, I would notice the MP-EMS Screen would show the old BIOS Version #. However, in BIOS the updated BIOS Version # would be present. A cold boot didn’t always fix this, but eventually the MP-EMS would update and would reflect the correct BIOS #**
4 – Selecting the MP-EMS Firmware
While the Mobo is booted and I’m in the boot menu, I went into the MP-EMS session and choose the following Update > BMC > Choose File > 841.img > upload

5 – Installing the MP-EMS firmware update
Once the file was uploaded I could see the Current and New versions. I then choose Update button which promptly disconnected my vKVM session and Status changed from None to a % Completed.
Again, be patient and allow the system to update. For my systems the % Complete seemed to hang a few times but the total process, for me, took about 10 mins.

After the update was complete, the next screen let me know the update was successful, my system did an auto-reboot. When I heard my system beep I then closed my MP-EMS session and started a new browser session.

Shortly after the system booted I went into the MP-EMS and validated the firmware was now 8.41.
Wrapping this up…
Ever heard the saying “It really is a simple process we just make it complicated”? Recent BIOS updates and overall system management sometimes feel this way when trying to do simple processes. Not trying to date myself but BIOS/Firmware updates have been around for decades now. I’ve done countless updates where it was simply extracting an update to simple media and then it completes the update on its own. Now one could argue that systems are more complicated and local boot devices don’t scale well for large environments and I’d say both are very true but that doesn’t mean the process can’t be made more simple.
My recommendation to firmware / bios manufactures — invest in simplicity or make it a requirement for your suppliers. You’ll have happier customers, less service calls, and more $$ in your pocket but then again if you do, what would I have to blog about?
Am I happy with the way I have to update this Mobo? Yes, I am happy with it. For the price I paid it’s really nice to have a headless environment that I can remotely update. I won’t have to do it very often so I’m glad I wrote down my steps in this blog.
If you like my ‘no-nonsense’ blog articles that get straight to the point… then post a comment or let me know… Else, I’ll start writing boring blog content.
Home Lab Gen IV – Part III: Best ESXi White box Mobo yet?
Initially, when I decided to refresh my Home Lab to Generation IV I planned to wipe just the software and add InfiniBand. I would keep most of the hardware. However, as I started to get into this transformation I decided it was time for a hardware refresh too including moving to All Flash vSAN.
In this post, I wanted to write a bit more about my new motherboard (mobo) and why I think it’s a great choice for a home lab. The past workhorse of my home lab has been my trusty MSI Z68MS-G45(B3) Rev 3.0 (AKA MSI-7676). I bought 3 MSI-7676 in 2012 and this mobo has been a solid performer and they treated me very well. However, they were starting to age a bit so I sold them off to a good buddy of mine and I used those resources to fund my new items.
My new workhorse –
Items kept from Home Lab Gen III:
- 3 x Antec Sonata Gen I and III each with 500W PS by Antec: I’ve had one of these cases since 2003, now that is some serious return on investment
New Items:
- 3 x Gigabyte MX31-BS0 – So feature rich, I found them for $139 each, and this is partly why I feel it’s the best ESXi white box mobo
- 3 x Intel Xeon E3-1230 v5 – I bought the one without the GPU and saved some $$
- 3 x 32GB DDR4 RAM – Nothing special here, just 2133Mhz DDR4 RAM
- 3 x Mellanox Connectx InfiniBand cards (More to come on this soon)
- 4 x 200GB SSD, 1 x 64GB USB (Boot)
- 1 x IBM M5210 JBOD SAS Controller
Why I chose the Gigabyte MX31-BS0 –
Likes:
- Headless environment: This Mobo comes with an AST2400 headless chipset environment. This means I no longer am tied to my KVM. With a java enabled browser, I can view the host screen, reboot, go into BIOS, BIOS updates, view hardware, and make adjustments as if I was physically at the box
- Virtual Media: I now can virtually mount ISOs to the ESXi host without directly being at the console (Still to test ESXi install)
- Onboard 2D Video: No VGA card needed, the onboard video controller takes care of it all. Why is this important? You can save money by choosing a CPU that doesn’t have the integrated GPU, the onboard video does this for you
- vSphere HCL Support: Really? Yep, most of the components on this mobo are on the HCL and Gigabyte lists ESXi 6 as a supported OS, its not 100% HCL but for a white box its darn close
- Full 16x PCIe Socket: Goes right into the CPU << Used for the Infiniband HCA
- Full 8x PCIe Socket: Goes into the C232 << Used for the IBM M5210
- M.2 Socket: Supporting 10Gb/s for SSD cards
- 4 x SATA III ports (white)
- 2 x SATA III can be used for Satadom ports (orange) with onboard power connectors
- 2 x Intel i210 1Gbe (HCL supported) NICs
- E3 v5 Xeon Support
- 64GB RAM Support (ECC or Non-ECC Support)
- 1 x Onboard USB 2.0 Port (Great for a boot drive)
Dislikes: (Very little)
- Manual is terrible
- Mobo Power connector is horizontal with the mobo, this made it a bit tight for a common case
- 4 x SATA III Ports (White) are horizontal too, again hard to seat and maintain
- No Audio (Really not needed, but would be nice)
- For some installs, it could be a bit limited on PCIe Ports
Some PICS :
The pic directly below shows 2 windows: Window 1 has the large Gigabyte logo, this is the headless environmental controls. From here you can control your host and launch the video viewer (window 2). The video viewer allows you to control your host just as if you were physically there. In windows 2 I’m in the BIOS settings for the ESXi host.

This is a stock photo of the MX31-BS0. It’s a bit limited on the PCIe ports, however, I don’t need many ports as soon I’ll have 20Gb/s InfiniBand running on this board but that is another post soon to come!

If you like my ‘no-nonsense’ blog articles that get straight to the point… then post a comment or let me know… Else, I’ll start writing boring blog content.
