Month: September 2012
Home Lab – Adding a Layer 3 Switch to my growing Home Lab
Most recently I expanded my home lab to include a Layer 3 switch.
Why would I choose a Layer 3 switch and what/how would I use it is the topic of this blog post.
Here are my requirements for my home lab –
I would like to setup my home network to support multiple VLANs and control how they route.
This will enable me to control the network traffic and segment my network to allow for different types of testing.
I’d also like to be able to run all of these VM’s on Workstation 9, support remote access, and ESXi Hosts.
Frist thing I did was come up with a drawing of what I wanted. It included all my wants and needs…
This was my chance to brain storm a bit and I just wrote down everything I wanted or really needed.
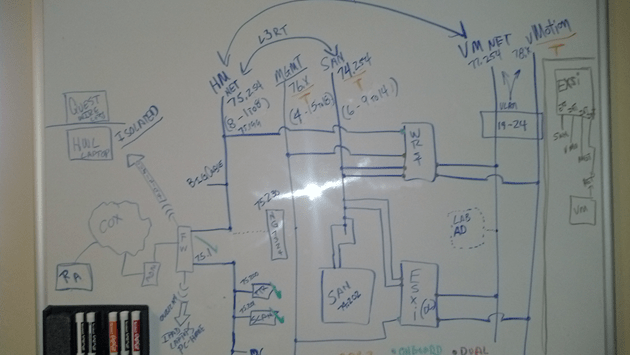
From this drawing I came up with this list…
- Support Remote Access
- VLANS
- VLAN Routing
- VLAN Tagging
- ESXi Host with 5 NICs
- Workstation 9 Host with 5 NICs
- Support 5 Different VLANs
- Support Internet Access for VM’s
- Local Storage support for home files
- Printer / Scanner need to be on the network
- I’m going to need a switch with 24 Ports or better
- Design the network so that I can power down the test lab and allow home devices to print and access the Inet.
Second thing – What do I currently have to work with…
- Windows 7×64, Workstation 9, 32GB RAM, iCore 7, 2 x SATA3 2TB 6gbs HD, 2 x SATA3 SSD (60 & 120), 1 NIC
- IO Mega IX4 with Dual NICs
- Older Netgear 16 Port Gig Layer 2 Switch unmanaged
- Netgear N900 with Guest Network Support
Based on these lists I came up with my shopping list…
- I need a Layer 3 Switch to support all this
- I need some Multiport Giga Bit NICs
Let’s start with the switch…Here is what I looked for in a Switch –
Must Have –
- Layer 3 Routing
- VLANs
- VLAN Routing
- Managed
- Quiet – It is a must for home networking as I work from home and am frequently on calls.
- Cost effective – keep it below a few hundred
Nice to have –
- Quality Brand
- Support
- Community behind the product
- Non-Blocking Switch
- OSPF or RIP
Basically most good Layer 3 switches achieve the requirements for 1-4. However these switches usually run in a Data center or Networking closet and are quite loud
I did some looking around for different switches, mostly used Cisco and Extreme Networks. These are switches that I am familiar with and would fit my home lab. However I’ve seen my share of their innards, I know their fans are loud and cannot easily be replaced. When I was at VMworld 2012 I chatted quite a bit with the Netgear folk about their products and I remember talking with them about their products and how they fit SMB to Enterprise quite nicely. I started to look on Ebay and I found an affordable Netgear Switch. I did some research on line and found how others were modifying the fans to help them run more quietly.
My choice was the Netgear GSM7324. It is a 24 Port Layer 3 Managed Switch from 2008. It meets all my must have needs and it fulfilled all of the “Nice To haves”
I also bought the following to support this switch –
Startech Null Modem DB9 to USB to run the CLI on the Switch
Sunon MagLev HA40201V4-0000-C99, 40x20mm,Super Silent FAN for $10 apiece, they fit perfectly and they run the switch at a tolerable noise level
TIP – And this is important… I had to move the PIN outs on these fans to meet the PIN outs on the Switch. If I didn’t it could have damaged the switch…
Next I started looking for Multi-Port Gigabit NICS…
What do I have to work with?
I’m using the Gigabyte Z68XP-UD3 for Workstation 9 and MSI Z68MA-G45B3 for my ESXi 5.x Host.
What are the Must haves for the NIC’s?
- Dual Gigabit
- VLAN support
- Jumbo Frames
- Support for ESXi and Windows 7×64
- I need about 4 of these cards
I choose the SYBA SY-PEX24028. It’s a Dual NIC Gigabit card that meets my requirements. I found it for $39 on Newegg .
Tip – When choosing a network card I needed to ensure the card will fit into my motherboards, not all x1 PCIe slots are the same and when looking at Dual Gigabit NICs most only work in server class hardware.
Summary –
I achieved what I was looking to accomplish and with some good design work I should have a top notch home lab. All in all I spent about ~$400 to upgrade my home lab. Which is not a bad deal considering most Layer 3 switches cost $400+. All my toys have now come in and I’m off to rework my lab…. But that my friend is a different blog post…
Thank you Computer Gods for your divine intervention and BIOS Settings
I’ve been in IT for over 20 years now and in my time I’ve seen some crazy stuff like –
- Grass growing in a Unisys Green Screen terminal that was sent in for repair by a Lumber yard
- A Disney Goofy screen saver on a IBM PS/2 running OS/2 kept bringing down Token Ring every time it went in to screen saver mode.
But this friend is one of the more weird issues I’ve come across….
This all started last March 2012. I bought some more RAM and a pair of 2TB Hitachi HD’s for my Workstation 8 PC. I needed to expand my system and Newegg had a great deal on them. I imaged up my existing Windows 7 OS and pushed it down to the new HD. When the system booted I noticed that is was running very slow. I figured this to be an issue with the image process. So I decided to install from Windows 7 from scratch but I ran into various installation issues and slowness problems. I put my old Samsung HD back in my system and it booted fine. When I plugged the new Hitachi HD as a second HD via SATA or USB the problems started again, basically it was decreased performance, programs not loading, and choppy video. I repeated these same steps with the 2nd Hitachi HD that I bought and it had the same issues.
A bit perplexed at this point I figure I have a pair of bad HD’s or bad HD BIOS. Newegg would not take back the HD’s, so I start working with Hitachi. I tried a firmware HD update, I RMA both HD’s and I still have the same issue. Hitachi sends me different model but slower HD and it works fine. So now I know there is something up with this model of HD.
 I start working with Gigabyte – Same deal as Hitachi BIOS Update, RMA for a new System board Revision (Now I’m at a Rev 1.3) and I still have the same issue. I send an HD to Gigabyte in California and they cannot reproduce the problem. I’ll spare you all the details but trust me I try every combination I can think of. At this point I’m now at this for 5 Months, I still cannot use my new HD, and then I discover the following – I put in a PCI (Not PCIe) VGA video card into my system and it works and then it hit me – “I wonder if this is some weird HDMI Video HD conflict problem”
I asked Gigabyte if disabling onboard HDMI video might help. They were unsure but I try it anyway and sure enough I found the solution!

It felt like the computer gods had finally shone down on me from above and preformed a PC miracle – hallelujah. 5 plus months of troubleshooting and I finally have a solution.
Here are the overall symptoms….
Observation 1) Windows 7 x64 Enterprise or Professional the installer fails to load or fully complete OR, the installation does complete, but mouse movements are choppy, and then the system locks up or will not boot.
Observation 2) When booting from a different drive I attach the new Hitachi HD to a booted system via USB, then the PC will start to exhibit performance issues.
Here is what I found out….
Any Combination of the following products will result with these symptoms. Change any one out and it works!
1 x Gigabyte Z68XP-UD3 (Rev 1.0 and 1.3)
1 x Hitachi GST Deskstar 5K3000 HDS5C3020ALA632
1 x PCIe Video Card with HDMI Output (I tried the following card with the same Results – ZOTAC ZT-40604-10L GeForce GT 430 and EVGA – GeForce GT 610)
Here is the solution to making them work together….
In the system board BIOS, under Advanced BIOS Settings – Change On Board VGA to ‘Enable if No Ext PEG’
This simple setting disabled the on board HDMI Video and resolved the conflicts with the products not working together.
Summary….
I got to meet some really talented engineers at Hitachi and Gigabyte. All were friendly and worked with me to solve my issue. One person Danny from Gigabyte was the most responsive and talented MoBo engineer I’ve meet. Even though in the end I found my own solution, I wouldn’t have made it there without some of their expert guidance!
