Test Lab
Test Lab – Day 5 Expanding the IOMega ix12-300r
Recently I installed an IOMega ix12-300r for our ESX test lab and it’s doing quite will
However I wanted to push our Iomega to about 1Gbs of sustained NFS traffic of the available 2Gbs.
To do this I needed to expand our 2 drive storage pool to 4 drives.
From a previous post we created 3 storage pools as seen below.
Storage Pool 0 (SP0) 4 Drives for basic file shares (CIFS)
Storage Pool 1 (SP1_NFS) 2 drives for ESX NFS Shares only
Storage Pool 2 (SP2_iSCSI) 2 drives dedicated for ESX iSCSI only
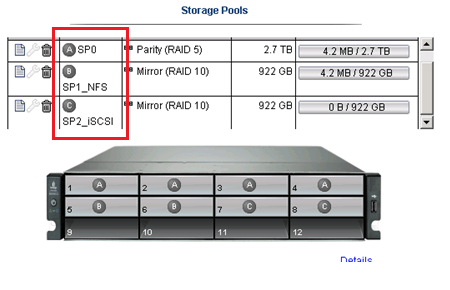
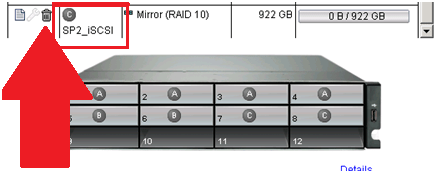
In this post I’m going to delete the unused SP2_iSCSI and add those drives to SP1_NFS
Note: This procedure is simply the pattern I used in my environment. I’m not stating this is the right way but simply the way it was done. I don’t recommend you use this pattern or use it for any type of validation. These are simply my notes, for my personal records, and nothing more.
Under settings select storage pools

Select the Trash Can to delete the storage pools..
It prompted me to confirm and it deleted the storage pool.
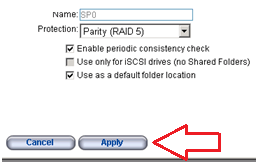
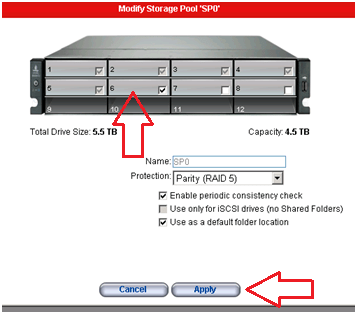
Next I choose the Edit icon on SP2_NFS, selected the drives I wanted, choose RAID 5, and pressed apply.

From there it started to expand the 2 disk RAID1 to a 4 disk RAID5 storage pool..
Screenshot from the IOMega ix12 while it is being expanded…

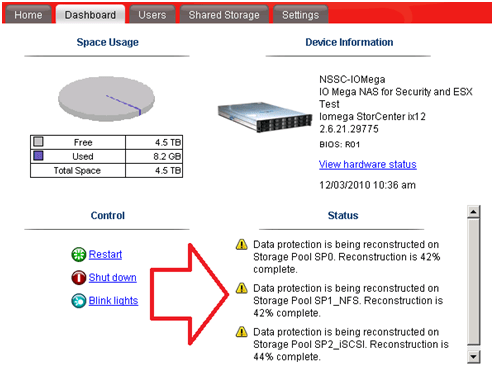
I then went to the Dashboard and under status I can view its progress…

ALL this with NO Down time to ESX, in fact I’m writing this post from a VM at the expansion is happening.
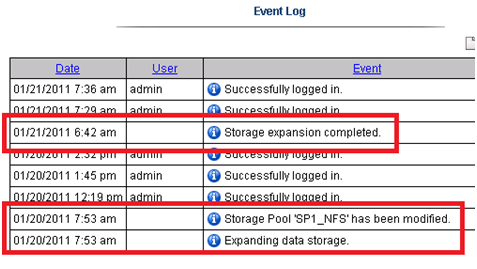
It took about 11 Hours to rebuild the RAID set.
Tip: Use the event log under settings to determine how long the rebuild took.
The next day I checked in on ESX and it was reporting the updated store size.

Summary…
To be able to expand your storage pool that houses your ESXi test environment with no down time is extremely beneficial and a very cool feature.
Once again IOMega is living up to its tag line – IOmega Kicks NAS!
Tomorrow we’ll see how it performs when we push a higher load to it.
Test Lab – Day 4 Xsigo Redundancy testing with ESXi
Today I tested Xsigo redundancy capabilities within the ESXi test environment.
So far I have built up an environment with 4 x ESXi 4.1 hosts, each with a Single VM, and 2 Xsigo VP780’s.
Each VM is pretty much idle for this test, however tomorrow I plan to introduce some heavier IP and NFS traffic and re-run the tests below.
I used a Laptop and the ESXi console in tech support mode to capture the results.
Keep in mind this deployment is a SINGLE site scenario.
This means both Xsigo are considered at the same site and each ESXi host is connected to the A & B Xsigo.

Note: This test procedure is simply the pattern I used to test my environment. I’m not stating this is the right way to test an environment but simply the way it was done. I don’t recommend you use this pattern to test your systems or use it for validation. These are simply my notes, for my personal records, and nothing more.
Reminder:
XNA, XNB are Xsigo Network on Xsigo Device A or B and are meant for IP Network Traffic.
XSA, XSB are Xsigo Storage or NFS on Xsigo Device A or B and are meant for NFS Data Traffic.
Test 1 – LIVE I/O Card Replacement for Bay 10 for IP Networking
Summary –
Xsigo A sent a message to Xsigo support stating the I/O Module had an issue. Xsigo support contacted me and mailed out the replacement module.
The affected module controls the IP network traffic (VM, Management, vMotion).
Usually, an I/O Module going out is bad news. However, this is a POC (Proof of Concept) so I used this “blip” to our advantage and captured the test results.
Device – Xsigo A
Is the module to be affected currently active? Yes
Pre-Procedure –
Validate by Xsigo CLI – ‘show vnics’ to see if vnics are in the up state – OKAY
Ensure ESX Hosts vNICs are in Active mode and not standby – OKAY
Ensure ESX Hosts network configuration is setup for XNA and XNB in Active Mode – OKAY
Procedure –
Follow replacement procedure supplied with I/O Replacement Module
Basic Steps supplied by Xsigo –
- Press the Eject button for 5 seconds to gracefully shut down the I/O card
- Wait LED to go solid blue
- Remove card
- Insert new card
-
Wait for I/O card to come online LED will go from Blue to Yellow/Green
- The Xsigo VP780 will update card as needed Firmware & attached vNIC’s
- Once the card is online your ready to go
Expected results –
All active IP traffic for ESXi (including VM’s) will continue to pass through XNB
All active IP traffic for ESXi (including VM’s) might see a quick drop depending on which XN# is active
vCenter Server should show XNA as unavailable until new I/O Module is online
The I/O Module should take about 5 Minutes to come online
How I will quantify results –
All active IP traffic for ESXi (including VM’s) will continue to pass through XNB
- Active PING to ESXi Host (Management Network, VM’s) and other devices to ensure they stay up
All active IP traffic for ESXi (including VM’s) might see a quick drop depending on which XN# is active
- Active PING to ESXi Host (Management Network, VM’s)
vCenter Server should show XNA as unavailable until new I/O Module is online
- In vCenter Server under Network Configuration check to see if XNA goes down and back to active
The I/O Module should take about 5 Minutes to come online
- I will monitor the I/O Module to see how long it takes to come online
Actual Results –
Pings –
| From Device | Destination Device | Type | Result During | Result coming online / After |
| External Laptop | Windows 7 VM | VM | No Ping Loss | No Ping Loss |
| External Laptop | vCenter Server | VM | One Ping Loss | No Ping Loss |
| External Laptop | ESX Host 1 | ESX | One Ping Loss | One Ping Loss |
| External Laptop | ESX Host 2 | ESX | One Ping Loss | One Ping Loss |
| External Laptop | ESX Host 3 | ESX |
No Loss |
One Ping Loss |
| External Laptop | ESX Host 4 | ESX | No Loss | No Loss |
| ESX Host | IOMega Storage | NFS | No Loss | No Loss |
From vCenter Server –
XNA status showing down during module removal on all ESX Hosts
vCenter Server triggered the ‘Network uplink redundancy lost’ – Alarm
I/O Module Online –
The I/O Module took about 4 minutes to come online.
Test 1 Summary –
All results are as expected. There was only very minor ping loss, which for us is nothing to be worried about
Test 2 – Remove fibre 10gig Links on Bay 10 for IP Networking
Summary –
This test will simulate fibre connectivity going down for the IP network traffic.
I will simulate the outage by disconnecting the fibre connection from Xsigo A, measure/record the results, return the environment to normal, and then repeat for Xsigo B.
Device – Xsigo A and B
Is this device currently active? Yes
Pre-Procedure –
Validate by Xsigo CLI – ‘show vnics’ to see if vnics are in up state
- Xsigo A and B are reporting both I/O Modules are functional
Ensure ESX Host vNICs are in Active mode and not standby
- vCenter server is reporting all communication is normal
Procedure –
Remove the fibre connection from I/O Module in Bay 10 – Xsigo A
Measure results via Ping and vCenter Server
Replace the cable, ensure system is stable, and repeat for Xsigo B device
Expected results –
All active IP traffic for ESXi (including VM’s) will continue to pass through the redundant XN# adapter
All active IP traffic for ESXi (including VM’s) might see a quick drop if it’s traffic is flowing through the affected adapter.
vCenter Server should show XN# as unavailable until fibre is reconnected
How I will quantify results –
All active IP traffic for ESXi (including VM’s) will continue to pass through XNB
- Using PING the ESXi Hosts (Management Network, VM’s) and other devices to ensure they stay up
All active IP traffic for ESXi (including VM’s) might see a quick drop depending on which XN# is active
- Active PING to ESXi Host (Management Network, VM’s)
vCenter Server should show XNA as unavailable until new I/O Module is online
- In vCenter Server under Network Configuration check to see if XNA goes down and back to active
Actual Results –
Xsigo A Results…
Pings –
| From Device | Destination Device | Type | Result During | Result coming online / After |
| External Laptop | Windows 7 VM | VM | No Ping Loss | No Ping Loss |
| External Laptop | vCenter Server | VM | No Ping Loss | One Ping Loss |
| External Laptop | ESX Host 1 | ESX | One Ping Loss | No Ping Loss |
| External Laptop | ESX Host 2 | ESX | No Ping Loss | One Ping Loss |
| External Laptop | ESX Host 3 | ESX |
No Ping Loss |
One Ping Loss |
| External Laptop | ESX Host 4 | ESX | One Ping Loss | One Ping Loss |
| ESX Host | IOMega Storage | NFS | No Ping Loss | No Ping Loss |
From vCenter Server –
XNA status showing down during module removal on all ESX Hosts
vCenter Server triggered the ‘Network uplink redundancy lost’ – Alarm
Xsigo B Results…
Pings –
| From Device | Destination Device | Type | Result During | Result coming on line / After |
| External Laptop | Windows 7 VM | VM | One Ping Loss | One Ping Loss |
| External Laptop | vCenter Server | VM | No Ping Loss | No Ping Loss |
| External Laptop | ESX Host 1 | ESX | No Ping Loss | No Ping Loss |
| External Laptop | ESX Host 2 | ESX | No Ping Loss | No Ping Loss |
| External Laptop | ESX Host 3 | ESX |
No Ping Loss |
No Ping Loss |
| External Laptop | ESX Host 4 | ESX | No Ping Loss | One Ping Loss |
| ESX Host | IOMega Storage | NFS | No Ping Loss | No Ping Loss |
From vCenter Server –
XNB status showing down during module removal on all ESX Hosts
vCenter Server triggered the ‘Network up link redundancy lost’ – Alarm
Test 2 Summary –
All results are as expected. There was only very minor ping loss, which for us is nothing to be worried about
Test 3 – Remove fibre 10g Links to NFS
Summary –
This test will simulate fibre connectivity going down for the NFS network.
I will simulate the outage by disconnecting the fibre connection from Xsigo A, measure/record the results, return the environment to normal, and then repeat for Xsigo B.
Device – Xsigo A and B
Is this device currently active? Yes
Pre-Procedure –
Validate by Xsigo CLI – ‘show vnics’ to see if vnics are in up state
- Xsigo A and B are reporting both I/O Modules are functional
Ensure ESX Host vNICs are in Active mode and not standby
- vCenter server is reporting all communication is normal
Procedure –
Remove the fibre connection from I/O Module in Bay 11 – Xsigo A
Measure results via Ping, vCenter Server, and check for any VM GUI hesitation.
Replace the cable, ensure system is stable, and repeat for Xsigo B device
Expected results –
All active NFS traffic for ESXi (including VM’s) will continue to pass through the redundant XS# adapter
All active NFS traffic for ESXi (including VM’s) might see a quick drop if it’s traffic is flowing through the affected adapter.
vCenter Server should show XS# as unavailable until fibre is reconnected
I don’t expect for ESXi to take any of the NFS datastores off line
How I will quantify results –
All active NFS traffic for ESXi (including VM’s) will continue to pass through XSB
- Active PING to ESXi Host (Management Network, VM’s) and other devices to ensure they stay up
All active NFS traffic for ESXi (including VM’s) might see a quick drop depending on which XN# is active
- Active PING to ESXi Host (Storage, Management Network, VM’s)
vCenter Server should show XS# as unavailable until fibre is reconnected
- In vCenter Server under Network Configuration check to see if XS# goes down and back to active
I don’t expect for ESXi to take any of the NFS datastores offline
- In vCenter Server under storage, I will determine if the store goes offline
Actual Results –
Xsigo A Results…
Pings –
| From Device | Destination Device | Type | Result During | Result coming online / After |
| External Laptop | Windows 7 VM | VM | No Ping Loss | No Ping Loss |
| External Laptop | vCenter Server | VM | No Ping Loss | No Ping Loss |
| External Laptop | ESX Host 1 | ESX | No Ping Loss | No Ping Loss |
| External Laptop | ESX Host 2 | ESX | No Ping Loss | No Ping Loss |
| External Laptop | ESX Host 3 | ESX |
No Ping Loss |
No Ping Loss |
| External Laptop | ESX Host 4 | ESX | No Ping Loss | No Ping Loss |
| ESX Host | IOMega Storage | NFS | No Ping Loss | Two Ping Loss |
From vCenter Server –
XSA & XSB status showing down during fibre removal on all ESX Hosts
vCenter Server triggered the ‘Network uplink redundancy lost’ – Alarm
No VM GUI Hesitation reported
Xsigo B Results…
Pings –
| From Device | Destination Device | Type | Result During | Result coming online / After |
| External Laptop | Windows 7 VM | VM | No Ping Loss | No Ping Loss |
| External Laptop | vCenter Server | VM | No Ping Loss | No Ping Loss |
| External Laptop | ESX Host 1 | ESX | No Ping Loss | No Ping Loss |
| External Laptop | ESX Host 2 | ESX | No Ping Loss | No Ping Loss |
| External Laptop | ESX Host 3 | ESX |
No Ping Loss |
No Ping Loss |
| External Laptop | ESX Host 4 | ESX | No Ping Loss | No Ping Loss |
| ESX Host | IOMega Storage | NFS | No Ping Loss | No Ping Loss |
From vCenter Server –
XNB status showing down during module removal on all ESX Hosts
vCenter Server triggered the ‘Network up link redundancy lost’ – Alarm
No VM GUI Hesitation reported
Test 3 Summary –
All results are as expected. There was only very minor ping loss, which for us is nothing to be worried about
Test 4 – Remove Infiniband cables from the ESXi HBA.
Summary –
During this test, I will remove all the Infiniband cables (4 of them) from the ESXi HBA.
I will disconnect the Infiniband connection to Xsigo A first, measure/record the results, return the environment to normal, and then repeat for Xsigo B.
Pre-Procedure –
Validate by Xsigo CLI – ‘show vnics’ to see if vnics are in upstate
- Xsigo A and B are reporting both I/O Modules are functional
Ensure ESX Host vNICs are in Active mode and not standby
- vCenter server is reporting all communication is normal
Procedure –
Remove the InfiniBand cable from each ESXi Host attaching to Xsigo A
Measure results via Ping, vCenter Server, and check for any VM GUI hesitation.
Replace the cables, ensure system is stable, and repeat for Xsigo B device
Expected results –
ALL active traffic (IP or NFS) for ESXi (including VM’s) will continue to pass through the redundant XNB or XSB accordingly.
All active traffic (IP or NFS) for ESXi (including VM’s) might see a quick drop if it’s traffic is flowing through the affected adapter.
vCenter Server should show XNA and XSA as unavailable until cable is reconnected
I don’t expect for ESXi to take any of the NFS datastores offline
How I will quantify results –
ALL active traffic (IP or NFS) for ESXi (including VM’s) will continue to pass through the redundant XNB or XSB accordingly.
- Active PING to ESXi Host (Management Network, VM’s) and other devices to ensure they stay up
All active traffic (IP or NFS) for ESXi (including VM’s) might see a quick drop if it’s traffic is flowing through the affected adapter.
- Active PING to ESXi Host (Storage, Management Network, VM’s)
vCenter Server should show XNA and XSA as unavailable until cable is reconnected
- In vCenter Server under Network Configuration check to see if XS# goes down and back to active
I don’t expect for ESXi to take any of the NFS datastores offline
- In vCenter Server under storage, I will determine if the store goes offline
Actual Results –
Xsigo A Results…
Pings –
| From Device | Destination Device | Type | Result During | Result coming online / After |
| External Laptop | Windows 7 VM | VM | No Ping Loss | Two Ping Loss |
| External Laptop | vCenter Server | VM | No Ping Loss | No Ping Loss |
| External Laptop | ESX Host 1 | ESX | No Ping Loss | No Ping Loss |
| External Laptop | ESX Host 2 | ESX | No Ping Loss | No Ping Loss |
| External Laptop | ESX Host 3 | ESX |
No Ping Loss |
No Ping Loss |
| External Laptop | ESX Host 4 | ESX | No Ping Loss | No Ping Loss |
| ESX Host | IOMega Storage | NFS | No Ping Loss | No Ping Loss |
From vCenter Server –
XSA & XNA status showing down during fibre removal on all ESX Hosts
vCenter Server triggered the ‘Network uplink redundancy lost’ – Alarm
No VM GUI Hesitation reported
NFS Storage did not go offline
Xsigo B Results…
Pings –
| From Device | Destination Device | Type | Result During | Result coming on line / After |
| External Laptop | Windows 7 VM | VM | No Ping Loss | No Ping Loss |
| External Laptop | vCenter Server | VM | One Ping Loss | One Ping Loss |
| External Laptop | ESX Host 1 | ESX | No Ping Loss | No Ping Loss |
| External Laptop | ESX Host 2 | ESX | No Ping Loss | One Ping Loss |
| External Laptop | ESX Host 3 | ESX |
No Ping Loss |
No Ping Loss |
| External Laptop | ESX Host 4 | ESX | One Ping Loss | No Ping Loss |
| ESX Host | IOMega Storage | NFS | No Ping Loss | No Ping Loss |
From vCenter Server –
XNB & XSB status showing down during module removal on all ESX Hosts
vCenter Server triggered the ‘Network up link redundancy lost’ – Alarm
NFS Storage did not go offline
Test 4 Summary –
All results are as expected. There was only very minor ping loss, which for us is nothing to be worried about
Test 5 – Pull Power on active Xsigo vp780
Summary –
During this test, I will remove all the power cords from Xsigo A.
I will disconnect the power cords from Xsigo A first, measure/record the results, return the environment to normal, and then repeat for Xsigo B.
Pre-Procedure –
Validate by Xsigo CLI – ‘show vnics’ to see if vnics are in up state
- Xsigo A and B are reporting both I/O Modules are functional
Ensure ESX Host vNICs are in Active mode and not standby
- vCenter server is reporting all communication is normal
Procedure –
Remove power cables from Xsigo A
Measure results via Ping, vCenter Server, and check for any VM GUI hesitation.
Replace the cables, ensure system is stable, and repeat for Xsigo B device
Expected results –
ALL active traffic (IP or NFS) for ESXi (including VM’s) will continue to pass through the redundant XNB or XSB accordingly.
All active traffic (IP or NFS) for ESXi (including VM’s) might see a quick drop if it’s traffic is flowing through the affected adapter.
vCenter Server should show XNA and XSA as unavailable until cable is reconnected
I don’t expect for ESXi to take any of the NFS datastores offline
How I will quantify results –
ALL active traffic (IP or NFS) for ESXi (including VM’s) will continue to pass through the redundant XNB or XSB accordingly.
- Active PING to ESXi Host (Management Network, VM’s) and other devices to ensure they stay up
All active traffic (IP or NFS) for ESXi (including VM’s) might see a quick drop if it’s traffic is flowing through the affected adapter.
- Active PING to ESXi Host (Storage, Management Network, VM’s)
vCenter Server should show XNA and XSA as unavailable until cable is reconnected
- In vCenter Server under Network Configuration check to see if XS# goes down and back to active
I don’t expect for ESXi to take any of the NFS datastores offline
- In vCenter Server under storage, I will determine if the store goes offline
Actual Results –
Xsigo A Results…
Pings –
| From Device | Destination Device | Type | Result During | Result coming online / After |
| External Laptop | Windows 7 VM | VM | No Ping Loss | No Ping Loss |
| External Laptop | vCenter Server | VM | One Ping Loss | One Ping Loss |
| External Laptop | ESX Host 1 | ESX | One Ping Loss | One Ping Loss |
| External Laptop | ESX Host 2 | ESX | One Ping Loss | One Ping Loss |
| External Laptop | ESX Host 3 | ESX |
No Ping Loss |
No Ping Loss |
| External Laptop | ESX Host 4 | ESX | No Ping Loss | One Ping Loss |
| ESX Host | IOMega Storage | NFS | No Ping Loss | No Ping Loss |
From vCenter Server –
XSA & XNA status showing down during the removal on all ESX Hosts
vCenter Server triggered the ‘Network uplink redundancy lost’ – Alarm
No VM GUI Hesitation reported
NFS Storage did not go offline
Xsigo B Results…
Pings –
| From Device | Destination Device | Type | Result During | Result coming online / After |
| External Laptop | Windows 7 VM | VM | One Ping Loss | No Ping Loss |
| External Laptop | vCenter Server | VM | One Ping Loss | One Ping Loss |
| External Laptop | ESX Host 1 | ESX | No Ping Loss | No Ping Loss |
| External Laptop | ESX Host 2 | ESX | No Ping Loss | One Ping Loss |
| External Laptop | ESX Host 3 | ESX |
One Ping Loss |
One Ping Loss |
| External Laptop | ESX Host 4 | ESX | One Ping Loss | No Ping Loss |
| ESX Host | IOMega Storage | NFS | One Ping Loss | No Ping Loss |
From vCenter Server –
XNB & XSB status showing down during module removal on all ESX Hosts
vCenter Server triggered the ‘Network uplink redundancy lost’ – Alarm
No VM GUI Hesitation reported
NFS Storage did not go offline
Test 5 Summary –
All results are as expected. There was only very minor ping loss, which for us is nothing to be worried about
It took about 10 Mins for the Xsigo come up and online from the point I pulled the power cords to the point ESXi reported the vnics were online..
Overall Thoughts…
Under very low load the Xsigo it performed as expected with ESXi. So far the redundancy testing is going well.
Tomorrow I plan to place a pretty hefty load on the Xsigo and IOMega to see how they will perform under the same conditions.
I’m looking forward to seeing if the Xsigo can perform just as well under load.
Trivia Question…
How do you know if someone has rebooted and watched an Xsigo boot?
This very cool logo comes up on the bootup screen! Now that’s Old School and very cool!

Test Lab – Day 2 CLI with the Xsigo!
Yesterday I did about 90% of the hardware install. Today, Day 2, our Xsigo SE will be here to assist with the installation and configuration of the Xsigo to the ESX Hosts..
Today’s Goals..
- Install 2nd Xsigo VP780
- Install vmware ESXi 4.1 on 4 servers with Xsigo Drivers
- Configure both Xsigo vp780’s
Install 2nd Xsigo VP780…
Day 2 started out with a gift from Mr. FedEx, it was the parts we needed to install the 2nd Xsigo. Only yesterday afternoon we discovered we were missing some power cords and mounting brackets. A couple quick calls to Xsigo and viola parts are on their way. Props to Xsigo for a VERY quick response to this issue!
Based on the lessons learned from Day 1 we mounted the 2nd Xsigo VP780 and it went much smoother. Notice the WE part of installing the VP780, these things are heavy & large and you’ll need some help or a giant with huge hands to install them into a rack. See their install manual for more information.
When we powered them up I was amazed by the amount of air they moved through the device >> Very NICE!
Keep in mind at this point all the test lab hardware including the Xsigo fiber modules (2 x 10gig Fiber modules per device), and networking is mounted and interconnected…

Install vmware ESXi 4.1 on 4 servers with Xsigo Drivers…
You’ll need the Xsigo Drivers installed for ESXi to recognize the infiniband cards and for proper communication.
There are two installation options…
- Install ESXi 4.1 and add the Xsigo Drivers after the install.
- Download the drivers and re-master the ESXi ISO yourself (This is a good option if your building / rebuilding lots of servers)
We chose to re-master the ESXi ISO with the Xsigo drivers.
Here is the link to master the ISO
I won’t bore you with the details of installing ESXi, however the only gotcha I ran into was the Dell R5400 SATA RAID controller.
I setup a SATA RAID group, during the ESXi install it recognized the RAID volume, and ESXi installed to it without issue.
However after the reboot of the host it would not boot to this volume.
I didn’t have time to troubleshoot, for now we just broke the RAID group, reinstalled, and it worked perfectly.
ESXi Management NICS’s..
Our test lab network will be isolated from production network traffic. However, one of our servers will need to be in the production environment. We setup one physical NIC (pNIC) on to our production environment. This will allow us to temporarily transfer VM’s from production to test, we’ll then disconnect this pNIC and setup ESXi to use the Xsigo NIC for management.
(More to come on this on Day 3)
Configure both Xsigo vp780’s…
Configuring the vp780 was very simple. We attached a laptop to the Xsigo and in about 20 commands our Xsigo was up and running..
These are the basic commands we used to setup our pair of Xsigo’s (A and B), the commands below reflect B only.
The commands would be the same for the A Xsigo simply change the appropriate parameters…
NOTE: I don’t recommend you execute these commands in your environment, keep in mind these are for my reference ONLY… I also recommend you contact your Xsigo representative for assistance.
Here are the commands we executed..
Getting into the Xsigo VP780…
We used a standard Xsigo provided rollover cable plugged into Serial1. (Serial2 is for Tech / Debug – Don’t use)
We connected to the console via Putty or Absolute Telnet (COM Settings are 115200,8,1,None,None)
Tip: All default passwords are in the CLI Config Guide by Xsigo
Setup the Xsigo via the Wizard…
Once the connected we used the XgOS config Wizard and entered in the following..
|
Welcome to XgOS Copyright (c) 2007-2010 Xsigo Systems, Inc. All rights reserved.
Enter “help” for information on available commands.
Would you like to use the XgOS Configuration Wizard? [Y/n] Hostname: xsigo-b Domain: YOURDOMAIN.COM Is this Director to be designated as the IB subnet manager (leave as Y unless using an external, non-Xsigo subnet manager) ? [Y/n] Do you want this Director to send diagnostic data to Xsigo periodically? [Y/n] Please input the ‘root’ password: **** Please confirm the ‘root’ password: **** Please input the ‘admin’ password: ***** Please confirm the ‘admin’ password: ***** Please input the ‘recovery-password’: **** Please confirm the ‘recovery-password’: **** IP Address [static/DHCP]: 555.555.555.555 IP Address [static/DHCP]: Enter NTP Server 1: 555.555.555.555 Enter NTP Server 2: Enter Timezone [<Tab><Tab> for the list of Timezones]: America_Phoenix Welcome to XgOS Copyright (c) 2007-2010 Xsigo Systems, Inc. All rights reserved.
Enter “help” for information on available commands. admin@xsigo-b[xsigo] |
Now it’s time to setup the Xsigo…
Place the Xsigo into Trunk Mode..
Port 10 and Port 11 are the 10gig Fibre Modules; this command places them in Trunk Mode
set ethernet-port 10/1 -mode=trunk << Port 10 will be used for our IP Network (Vlans for Guests, vmotion, hosts, etc)
set ethernet-port 11/1 -mode=trunk << Port 11 will be used for our NFS
Rear of VP780

Ensure Trunk Mode is activated..
Use the command ‘show ethernet-port ‘
|
admin@xsigo-b[xsigo] show ethernet-port
name type state descr mode flags lag access-vlan vnics vlans ——————————————————————————- 10/1 nwEthernet10GbPort up/up trunk -s— 1 0 none 11/1 nwEthernet10GbPort up/up trunk -s— 1 0 none 2 records displayed |
Setup Phone Home for Support…
set system phone-home -customer-name=”YOUR COMPANY NAME HERE”
set system phone-home -contact-email-address=YOURNAME@YOURDOMAIN.COM
set system phone-home -contact-phone-numbers=”555-555-5555″
set system phone-home proxy [YOUR PROXY IP HERE] [PROXY PORT if needed, default is 3128]
Note: For this command the syntax is [PROXY IP Address] one space [PROXY PORT], don’t use ‘:’ to as the separator.
Once completed then check confirm your information…
Enter the command ‘show system phone-home’
|
admin@xsigo-b[xsigo] show system phone-home ——————————————————————————- enabled true freq weekly next Fri Jan 14 12:44:52 MST 2011 notify no strip yes alarm yes name COMPANYNAME email EMAIL@EMAIL.com phone 5555555555 copy p-host 555.555.555.555:3128 p-user ——————————————————————————- 1 record displayed admin@xsigo-b[xsigo] |
Check on the Phone Home Log….
admin@xsigo-b[xsigo] showlog phonehome.log
Wed Jan 5 17:30:33 MST 2011: Phone home successful to http://phone-home.xsigo.com:6522
Wed Jan 5 18:04:14 MST 2011: Phone home successful to http://phone-home.xsigo.com:6522
Wed Jan 5 18:04:38 MST 2011: Phone home successful to http://phone-home.xsigo.com:6522
[Press CRTL-C to Exit]
admin@xsigo-b[xsigo]
Tip: your log might be empty until it has something to send
Ensure your Physical servers are attached…
As expected all 4 servers are attached to this Xsigo.. (If they don’t show up here it could be an interconnect or ESXi issue)
Enter the command ‘show physical-server’ to view your connected servers.
|
admin@xsigo-b[xsigo] show physical-server ——————————————————————————- name localhost <<< This is the ESXi Hostname guid 2c903000b4df5 descr port xsigo-001397001:ServerPort2 << This is the Xsigo Port the Server is connected to os VMware/ESXi-4.1.0:xg-3.5.0-1-246491/x86_64 << This is the version of ESX & Xsigo Driver version 2.7.0/3.0.0 server-profile << Notice this is blank, We configured it next ——————————————————————————- name localhost guid 2c903000b4ea5 descr port xsigo-001397001:ServerPort3 os VMware/ESXi-4.1.0:xg-3.5.0-1-246491/x86_64 version 2.7.0/3.0.0 server-profile ——————————————————————————- name localhost guid 2c903000b4ea9 descr port xsigo-001397001:ServerPort4 os VMware/ESXi-4.1.0:xg-3.5.0-1-246491/x86_64 version 2.7.0/3.0.0 server-profile ——————————————————————————- name localhost guid 2c903000b5095 descr port xsigo-001397001:ServerPort1 os VMware/ESXi-4.1.0:xg-3.5.0-1-246491/x86_64 version 2.7.0/3.0.0 server-profile ——————————————————————————- 4 records displayed |
Create Server Profiles…
Creating a server profile enables you to assign devices to your specific host.
In our case we used the ESX Hostname as the Xsigo Server Profile name.
This will help us to keep the profiles well organized.
Keep in mind YOURSERVERNAME# equals your ESX Hostname and it will become your Xsigo Server Profile Name…
Long way to create a Server Profile…
add server-profile [server profile name]
View the new server profile…
|
admin@xsigo-b[xsigo] show server-profile name state descr connection def-gw vnics vhbas ——————————————————————————- YOURSERVER1 up/unassigned 0 0 1 record displayed |
Assign the server profile to a port on the Xsigo…
set server-profile YOURSERVER1 connect localhost@xsigo-001397001:ServerPort1
Short way to create a Server Profile…
add server-profile YOURSERVER2 localhost@xsigo-001397001:ServerPort2
add server-profile YOURSERVER1 localhost@xsigo-001397001:ServerPort3
add server-profile YOURSERVER1 localhost@xsigo-001397001:ServerPort4
Then use show server-profile to confirm your entries…
|
admin@xsigo-b[xsigo] show server-profile name state descr connection def-gw vnics vhbas ——————————————————————————- Yourserver3 up/up localhost@xsigo-001397001:ServerPort3 0 0 Yourserver4 up/up localhost@xsigo-001397001:ServerPort4 0 0 Yourserver1 up/up localhost@xsigo-001397001:ServerPort1 0 0 Yourserver2 up/up localhost@xsigo-001397001:ServerPort2 0 0 4 records displayed admin@xsigo-b[xsigo] |
Set Up and attach the virtual NICS to your server profile…
In this step we created our Xsigo vNICS, attached them to the appropriate server profiles, and the 10gig Modules.
When complete each of our ESXi servers will have 4 Xsigo vNICS.
(2 vNICs for IP Network, 2 vNICs for Storage network)
Decoding the command…
The command ‘add vnic xnb.yourservername1 10/1 -mode=trunk’ breaks down to…
add vnic << Add vNIC Command
xnb << The vNIC Name (xnb = Xsigo, IP Network, B Xsigo Device, Xsb = Xsigo, Storage Network, B Xsigo Device)
yourservername1 << Which profile to attach to
10/1 << Which Module on the Xsigo to attach to
-mode=trunk << What transport mode
These are the command we entered..
|
IP Network vNICS admin@xsigo-b[xsigo] add vnic xnb.yourservername1 10/1 -mode=trunk admin@xsigo-b[xsigo] add vnic xnb.yourservername2 10/1 -mode=trunk admin@xsigo-b[xsigo] add vnic xnb.Yourservername3 10/1 -mode=trunk admin@xsigo-b[xsigo] add vnic xnb.Yourservername4 10/1 -mode=trunk
Storage vNICS admin@xsigo-b[xsigo] add vnic xsb.Yourservername1 11/1 -mode=trunk admin@xsigo-b[xsigo] add vnic xsb.Yourservername2 11/1 -mode=trunk admin@xsigo-b[xsigo] add vnic xsb.Yourservername3 11/1 -mode=trunk admin@xsigo-b[xsigo] add vnic xsb.Yourservername4 11/1 -mode=trunk |
Results from ESXi…

Other Information…
Set System back to factory Defaults…
If needed, you can set the System back to factory Defaults by the following command.
When complete you will need to access the system via Serial Cable.
Here are the steps:
set system factory-default
confirm << type in Confirm, my Putty will exited and the system will shutdown
NOTE: This command will erase the configuration from the Xsigo. Do it with caution
Tip: Note this will cause the system to shutdown, this means someone will have to manually power it back on.
Upgrade the XgOS via USB…
Download the GOS 2.8.5 to a USB Stick..
We inserted the stick into the USB Port on the VP780, then executed this command
system upgrade file://usb/xsigo-2.8.5.xpf
Other Handy commands…
show system status
show system
show system version
show system warnings
show serial
show system info
history
CLI Fun…
One thing I like about the CLI for Xsigo is TAB at the end of the command (most modern CLI’s have this and it sure is handy)
If I type in set system phone-home[Press TAB] it displays possible completions and qualifiers and then it displays the last command I typed in.
admin@ xsigo-b[xsigo] set system phone-home [Press TAB]
Possible completions:
disable Disable phone home
enable Enable phone home
noproxy Don’t use HTTP Proxy
proxy HTTP Proxy config
snooze Hit the snooze button
[Optional qualifiers]
-contact-email-address Email address for Xsigo technical support to contact when a problem is discovered. (or ‘none’)
-contact-phone-numbers Telephone number for Xsigo technical support to contact when a problem is discovered. (comma separated, or ‘none’)
-copy-url URL to send audit copy to
-customer-name Customer name (or ‘none’)
-frequency Phone home frequency (relative to when it is set)
-notify Will Xsigo notify you when problems are detected?
-send-alarms Send major alarms to Xsigo?
-strip-private Strip private information from phone-home data
Repeat ‘?’ for detailed help.
admin@xsigo-b[xsigo] set system phone-home
Day 2 Summary..
The pair of Xsigo’s were very easy to configure and install. I enjoyed working with Xsigo CLI, it is very well thought out, and I plan do to write additional blog about it alone.
Besides for the very few and sometime self-inflicted gotchas things went smooth.
It was nice to have a Xsigo SE on site to assist with the initial install and I’m looking forward to tomorrow when we spin up some VM’s and then test!
Still to do…
- Copy vCenter Server & other VM’s from Production to this test environment
- Test, Test, Test and more testing..
Test Lab – The Plan and Layout with Xsigo, juniper, IOMega, vmware, and HP/Dell servers)
This week I have the pleasure of setting up a pretty cool test lab with Xsigo, juniper, IOMega, vmware, and HP/Dell servers.
I’ll be posting up some more information as the days go on…
The idea and approval for the lab came up pretty quickly and we are still defining all the goals we’d like to accomplish.
I’m sure with time the list will grow, however here are the initial goals we laid out.
Goals…
-
Network Goals
- Deploy the vChissis solution by Juniper (Server Core and WAN Core)
- Deploy OSPF Routing (particularly between sites)
- Multicast Testing
- Layer 2 test for vm’s
- throughput Monitoring
-
VMware Goals
- Test EVC from Old Dell QuadCores Servers to new HP Nehalem
- Test Long Distance vMotion & long distance cluster failures from Site1 to Site 2
- Play around with ESXi 4.1
-
Xsigo Goals
- Test Redundant Controller failover with vmware
- Throughput between sites, servers, and storage
Caveats…
- We don’t have a dual storage devices to test SAN replication, however the IOMega will be “spanned” across the metro core
- Even though this is a “Site to Site” design, this is a lab and all equipment is in the same site
- The Simulated 10Gbs Site to Site vChassis Connection is merely a 10Gbs fibre cable (We are working on simulating latency)
- Xsigo recommends 2 controllers per site and DOES NOT recommend this setup for a production enviroment, however this is a test lab — not production.
The Hardware..
2 x Xsigo VP780’s with Dual 10Gbs Modules, All Server hardware will be Dual Connected
2 x HP DL360 G6, Single Quad Core Nehalem , 24GB RAM, Infinband DDR HBA, gNic’s for Mgt (Really not needed but nice to have)
2 x Dell Precision Workstation R5400, Dual QuadCore, 16GB RAM, Infiniband DDR HBA, gNic’s for Mgt (Really not needed but nice to have)
6 x Juniper EX4200’s (using Virtual Chassis and Interconnect Stacking Cables)

Working with the IOMega ix12-300r
I installed an IOMega ix12-300r for our ESX test lab and I must say it’s just as feature rich as my personal ix4 and ix2.
I enjoy working with this device for its simplicity and feature depth. It’s very easy to deploy and it’s a snap to integrate with ESX.
Here are some of the things I like about ix12 and a high level overview to enable it with esx.
Note: Keep in mind most of the
features below are available on the ix2 and ix4 line but not all..
See http://iomega.com/nas/us-nas-comp.html for more information about the ix line and their features…
The Drives…
Our ix12 (the ix## is the amount of possible drives in the unit, ie ix2 = 2 drives, ix4 = 4drives) is populated with 8 x 1TB drives.
By default the 8TB unit will come with 4 x 2TB drives, I opted to buy a 4TB unit and expand it by 4TB, giving us the 8 x 1TB drives.
The drives are Seagate Barracuda Green SATA 3Gb/s 1TB Hard Drive – ST31000520AS – SATA II (Rev 2.6 Drives) 5.9K RPM, they should perform nicely for our environment…
(Buts like most techies, I wish they were faster)
More information here about the drives and SATA 2.6 vs 3.x
http://www.serialata.org/documents/SATA-6-Gbs-The-Path-from-3gbs-to-6gbs.pdf
Storage Pools…
A storage pool is not a new concept but in a device this cost effective it’s unheard of.
Basically, I’m dividing up my 8 drives like this..
Storage Pool 0 (SP0) 4 Drives for basic file shares (CIFS)
Storage Pool 1 (SP1_NFS) 2 drives for ESX NFS Shares only
Storage Pool 2 (SP2_iSCSI) 2 drives dedicated for ESX iSCSI only

I could have placed all 8 drives into one Storage pool but…
One of our requirements was to have SP0 isolated from SP1 and SP2 for separation reasons…
NO Down time for RAID Expansion… Sweet…
Another great feature is NO down time to expand your RAID5 Set..
Simply edit the Storage pool, Choose your new drive, and click apply.

The Raid set will rebuild and you’re all done!
Note: the downside to this… If you decide to remove a drive from a RAID set, you’ll have to rebuild the entire set.
TIP: To check the status of your RAID reconstruction check on the Dashboard under status or the home page at the bottom.
Mine reconstructed the 3 Storage Pools or all 12 drives at the same time in about 4.5 hours…
Teaming your NIC’s!
The ix12 comes with 4 x 1gb NICS, these can be bonded together, stay separate, or a mix of both.
You can setup your bonded NICs as Adaptive Load Balancing, Link Aggregation (LG), or Failover modes.
In our case we bonded NIC 3 and 4 with LG for ESX NFS/iSCSI Traffic and set NIC 1 up for our CIFS traffic.
For the most part setting up the networking is simple and easy to do.
Simply enter your IP’s, choose to bond or not and click apply.

Note: Don’t uncheck DHCP from unused adapters, if you do you’ll get an invalid IP address error when you click apply.
Also, making changes to the network area, usually requires a reboot of the device.. Tip: Setup your Network First..
Adding the NFS Folder to your ESX server
Note: These steps assume you completed the Iomega installation (Enabled iSCSI, NFS, Files shares,etc), networking, and your ESX Environment…
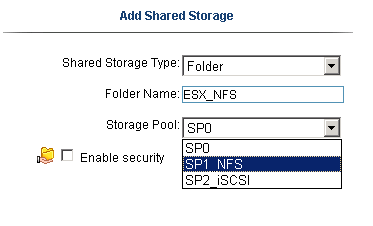
From the ix12 web interface simply add a folder on the correct Storage pool.
In our case I choose the folder name of ESX_NFS and the SP1_NFS storage pool
Tip: ALL Folders are broadcasted on all networks and protocols… I haven’t found a way to isolate folders to specific networks or protocols.
If needed make sure your security is enabled… I plan to talk with IOMega about this…
In vCenter Server, Add NAS storage and point it to the ix12.
Note: use /nfs/[folder name] for the folder name…
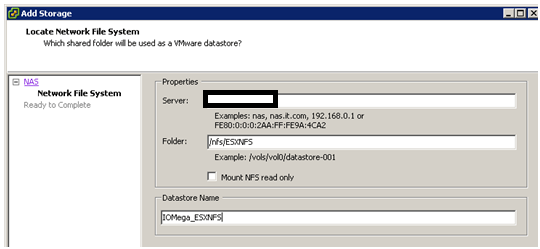
Once it’s connected it will show up as a NFS Data store!

Adding iSCSI to your ESX Server..
Note: This assumes you setup your esx environment to support iSCSI with the ix12…
Add your shared storage as an iSCSI Drive, set your iSCSI Drive name, and Select the correct Storage Pool.
Next is to set the Size of the iSCSI device, in this case we have 922GB free, but can only allocate 921.5GB

After clicking on apply, you should see the information screen…

In vCenter Server ensure you can see the iSCSI drive..

Add the iSCSI disk…
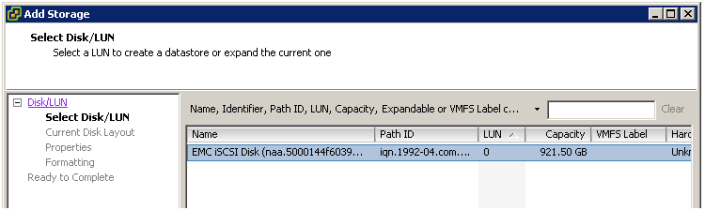
Give this disk a name…

Choose the right block size…

Finally there she is… one 920GB iSCSI disk…

Summary…
From a price vs. performance stand point the IOMega line of NAS devices (ix2, ix4, and our ix12) simply ROCK.
It will be hard to find such a feature rich product that will cost you so little.
This post has merely scratched the features of these devices. It is really hard to believe that 10+ years ago Iomega was known only for ZIP and Jazz Drives…
There new logo is IOMega Kicks NAS, and from what I’ve seen they do!
Follow up posts…
Over the next couple of months I hope to performance test my VM’s against the ix12
I’d like to figure out their protocol multi tendency issue (CIFS, NFS, iSCSI broadcasting over all NICS)
I’ll post of the results as they come in..
- ← Previous
- 1
- 2
