VMware Workstation Gen 9: Part 2 Using Workstation Templates
Workstation templates are a quick and easy way to create VMs with common settings. My nested VCF 9 ESX Hosts have some commonalities where they could benefit from template deployments. In this blog post I’ll show you how I use Workstation templates to quickly deploy these hosts and the hardware layout.
My nested ESX Hosts have a lot of settings. From RAM, CPU, DISK, and networking there are tons of clicks per host which is prone to mistakes. The LAN Segments as an example entail 8 clicks per network adapter. That’s 192 clicks to set up my 3 ESX hosts. Templates cover about 95% of all the settings, the only caveat is the disk deployment. Each host has a unique disk deployment which I cover below.
There are 2 things I do first before creating my VM templates. 1) I need to set up my VM folder Structure, and 2) Setup LAN Segments.
VM folder Structure
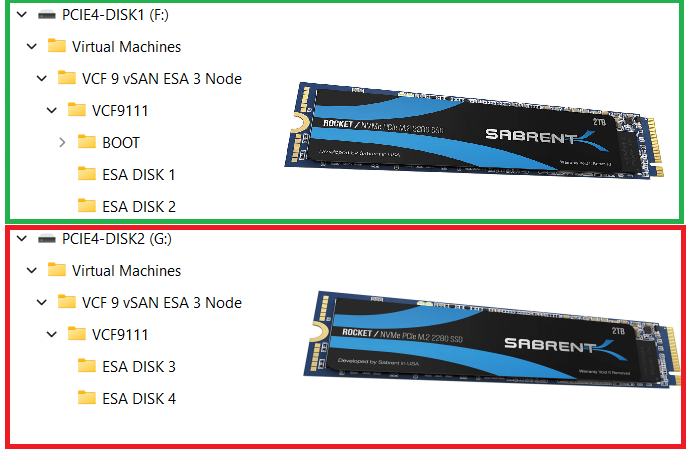
The 3 x Nested ESX hosts in my VCF 9 Cluster will be using vSAN ESA. These nested ESX Hosts will have 5 virtual NVMe disks (142GB Boot, and 4 x 860GB for vSAN). These virtual NVMe disks will be placed on to 2 physical 2TB NVMe Disks. At the physical Windows 11 layer I created folders for the 5 virtual NVMe disks on each Host. On physical disk 1 I create a BOOT, ESA DISK 1, and ESA DISK 2 folders. Then on physical disk 2 I created ESA DISK 3 and ESA DISK 4. By doing this I have found it keeps my VMs disks more organized and running efficiently. Later in this post we’ll create and position these disks into the folder.
Setup LAN Segments
Prior to creating a Workstation VM Template I need to create my LAN Segments. Workstation LAN Segments allow VLAN traffic to pass. VLANs are a requirement of VCF 9. Using any Workstation VM, choose a network adapter > LAN Segments > LAN Segments Button. The “Global LAN Segments” window appears, click on Add, name your LAN Segment, and OK when you are done.
For my use case I need to make 4 LAN Segments to support the network configuration for my VCF 9 deployment.

Pro-Tip: These are Global LAN Segments, which makes them universally available—once created, every VM can select and use them. Create these first before you create your ESX VM’s or Templates.
Create your ESX Workstation Template
To save time and create all my ESX hosts with similar settings I used a Workstation Template.
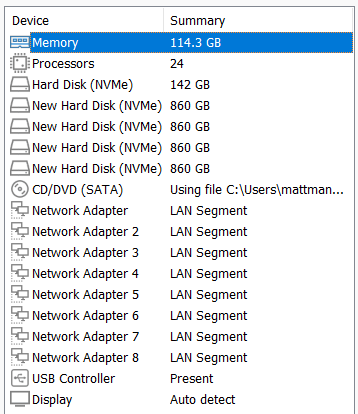
NOTE: The screenshot to the right it is the final configuration.
1) I created an ESX 9 VM in Workstation:
- Click on File > New Virtual Machine
- Chose Custom
- For Hardware I chose Workstation 25H2
- Chose my Installer disc (iso) for VCF 9
- Chose my directory and gave it a name of VCF9 ESX Template
- Chose 1 Processor with 24 Cores (Matches my underlying hardware)
- 117GB of RAM > Next
- Use NAT on the networking > Next
- Paravirtualized SCSI > Next
- NVMe for the Disk type > Next
- Create a new Virtual Disk > Next
- 142GB for Disk Size > Store as a Single File > Next
- Confirm the correct Directory > Next
- Click on the Customize Hardware button
- Add in 8 NICs > Close
- Make sure Power on this VM after creation is NOT checked > Finish
- Go back in to VM Settings and align your Network adapters to your LAN Segments
- NIC 0 and 2 > 10 VLAN Management
- NIC 3 and 4 > 11 VLAN ESA Network
- NIC 5 and 6 > 12 VLAM FT vMo RPL
- NIC 7 and 8 > 13 VLAN VM Network

Note: You might have noticed we didn’t add the vSAN disks in this deployment, we’ll create them manually below.
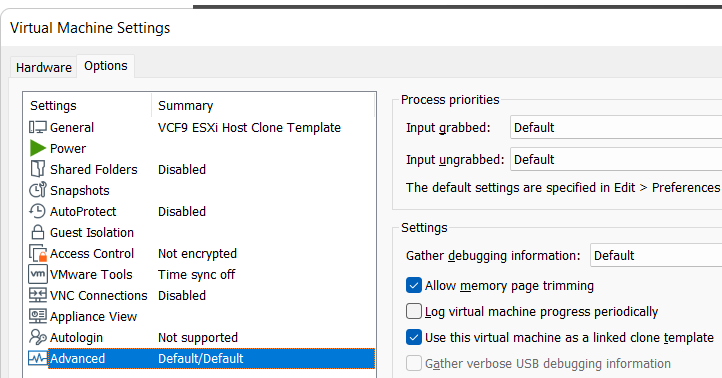
2) Next we’ll turn this VM into a Template
Go to VM Settings > Options > Advanced > Check Box “Use this virtual machine as a linked clone template” and click on ok.
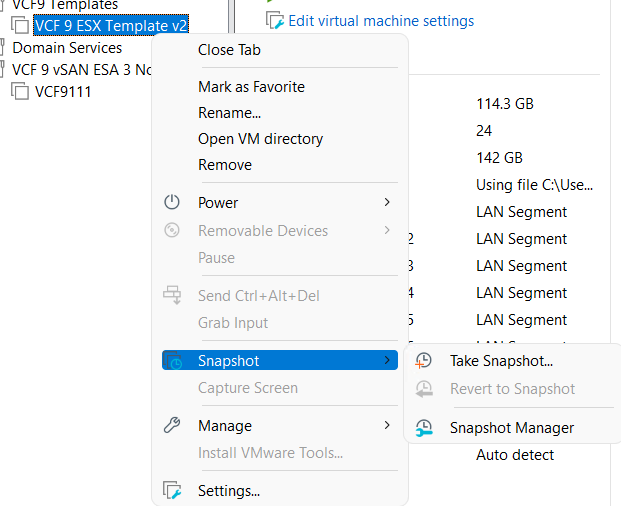
Next, make a snapshot of the VM. Right click on VM > chose Snapshot > Take Snapshot. In the description I put in “Initial hardware configuration.”
Deploy the ESX Template
I’ll need to create 3 ESX Hosts base off of the ESX template. I’ll use my template to create these VM’s, and then I’ll add in their unique hard drives.
Right click on the ESX Template > Manage > Clone
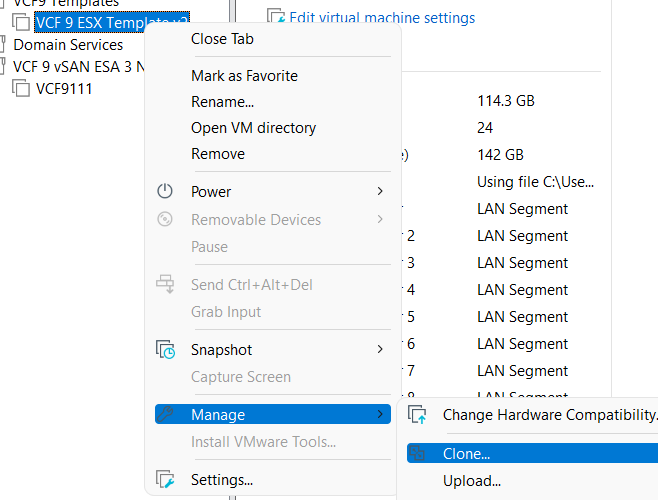
Click Next > Choose “The current state of the VM” > Choose “Create a full clone”
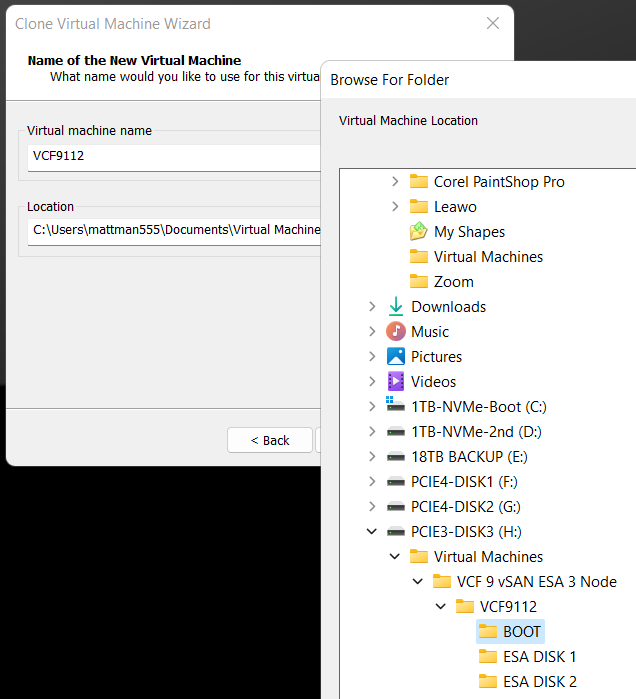
Input a name for the VM
MOST Important – Make sure you select the correct disk and folder you want the boot disk to be deployed to. In the Fig-1 below, I’m deploying my second ESX host boot disk so I chose its BOOT folder.
Click on finish > The VM is created > click on close
(Fig-1)
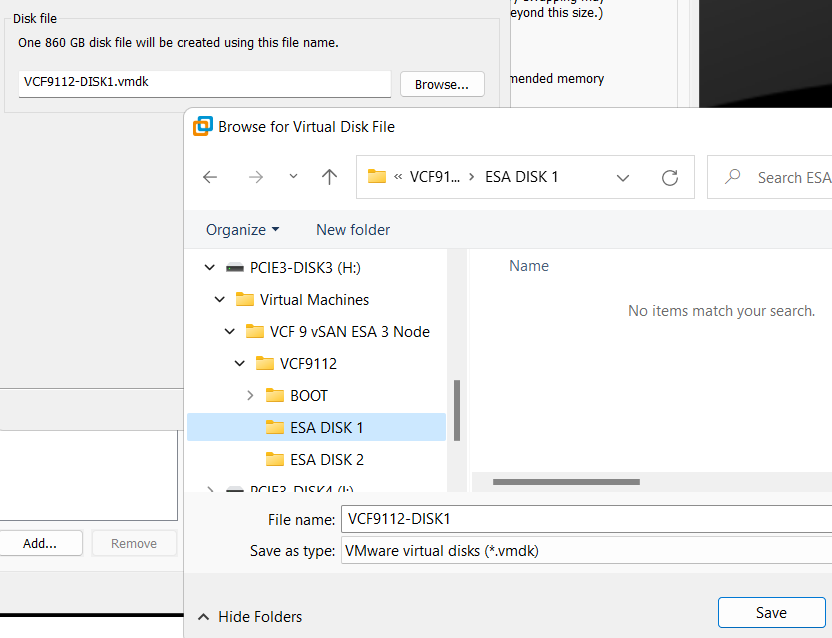
Adding the vSAN Disks
Since we are using unique vSAN disk folders and locations we need to add our disks manually.
For each nested ESX host I right click on the VM > Settings
Click on Add > chose Hard disk > Next > NVMe > Create New Virtual Disk
Type in the size (860GB) > Store as a single file > Next
Rename the disk filename to reflect the nested vSAN ESA disk number
Choose the correct folder > Save
Repeat for the next 3 disks, placing each one in the correct folder
When I’m done I created 4 x 860GB disks for each host, all as single files, and all in unique folders and designated physical disks.
(Fig-2, below) I’m creating the first vSAN ESA disk named VCF9112-DISK1.vmdk
That’s it!
Workstation Templates save me a bunch of time when creating these 3 ESX Hosts. Next we’ll cover Windows Core Services and Routing.
VMware Workstation Gen 9: Part 1 Goals, Requirements, and a bit of planning
It’s time to build my VMware Workstation–based home lab with VCF 9. In a recent blog post, I documented my upgrade journey from VMware Workstation 17 to 25H2. In this installment, we’ll go deeper into the goals, requirements, and overall planning for this new environment. As you read through this series, you may notice that I refer to VCF 9.0.1 simply as VCF 9 or VCF for brevity.
Important Notes:
- VMware Workstation Gen 9 series is still a work in progress. Some aspects of the design and deployment may change as the lab evolves, so readers should consider this a living build. I recommend waiting until the series is complete before attempting to replicate the environment in your own lab.
- There are some parts in this series where I am unable to assist users. In lieu I provide resources and advice to help users through this phase. These areas are VCF Offline Depot and Licensing your environment. As a Broadcom/VMware employee, we are not granted the same access as users. I have an internal process to access resources and these processes would not be helpful to users.
Overall Goals
- Build a nested minimal VCF 9.0.1 environment based on VMware Workstation 25H2 running on Windows 11 Pro.
- Both Workload and Management Domains will run on the same set of nested ESX Hosts.
- Using the VCF Installer I’ll initially deploy the VCF 9 Management Domain Components as a Simple Model.
- Initial components include: VCSA, VCF Operations, VCF Collector, NSX Manager, Fleet Manager, and SDDC Manager all running on the 3 x Nested ESX Hosts.
- Workstation Nested VMs are:
- 3 x ESX 9.0.1 Hosts
- 1 x VCF Installer
- 1 x VCF Offline Depot Appliance
- 1 x Windows 2022 Server (Core Services)
- Core Services supplied via Windows Server: AD, DNS, NTP, RAS, and DHCP.
- Networking: Private to Workstation, support VLANs, and support MTU of 9000. Routing and internet access supplied by the Windows Server VM.
- Should be able to run minimal workload VM’s on nested ESX Hosts.
Hardware BOM
If you are interested in the hardware I’m running to create this environment please see my Build of Materials (BOM) page.
Additionally, check out the FAQ page for more information.
Deployment Items
To deploy the VCF Simple model I’ll need to make sure I have my ESX 9.0.1 Hosts configured properly. With a simple deployment we’ll deploy the 7 required appliances running on the Nested ESX hosts. Additionally, directly on Workstation we’ll be running the AD server, VCF Offline Depot tool, and the VCF Installer appliance.
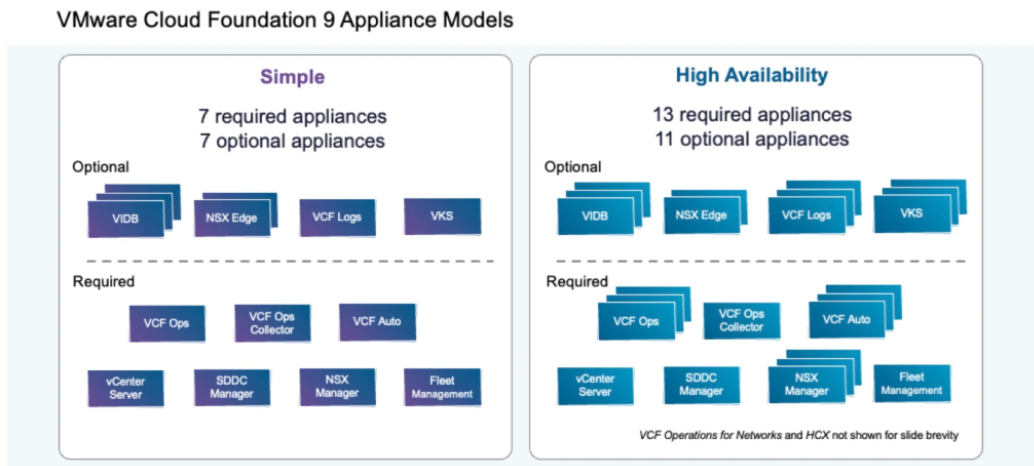
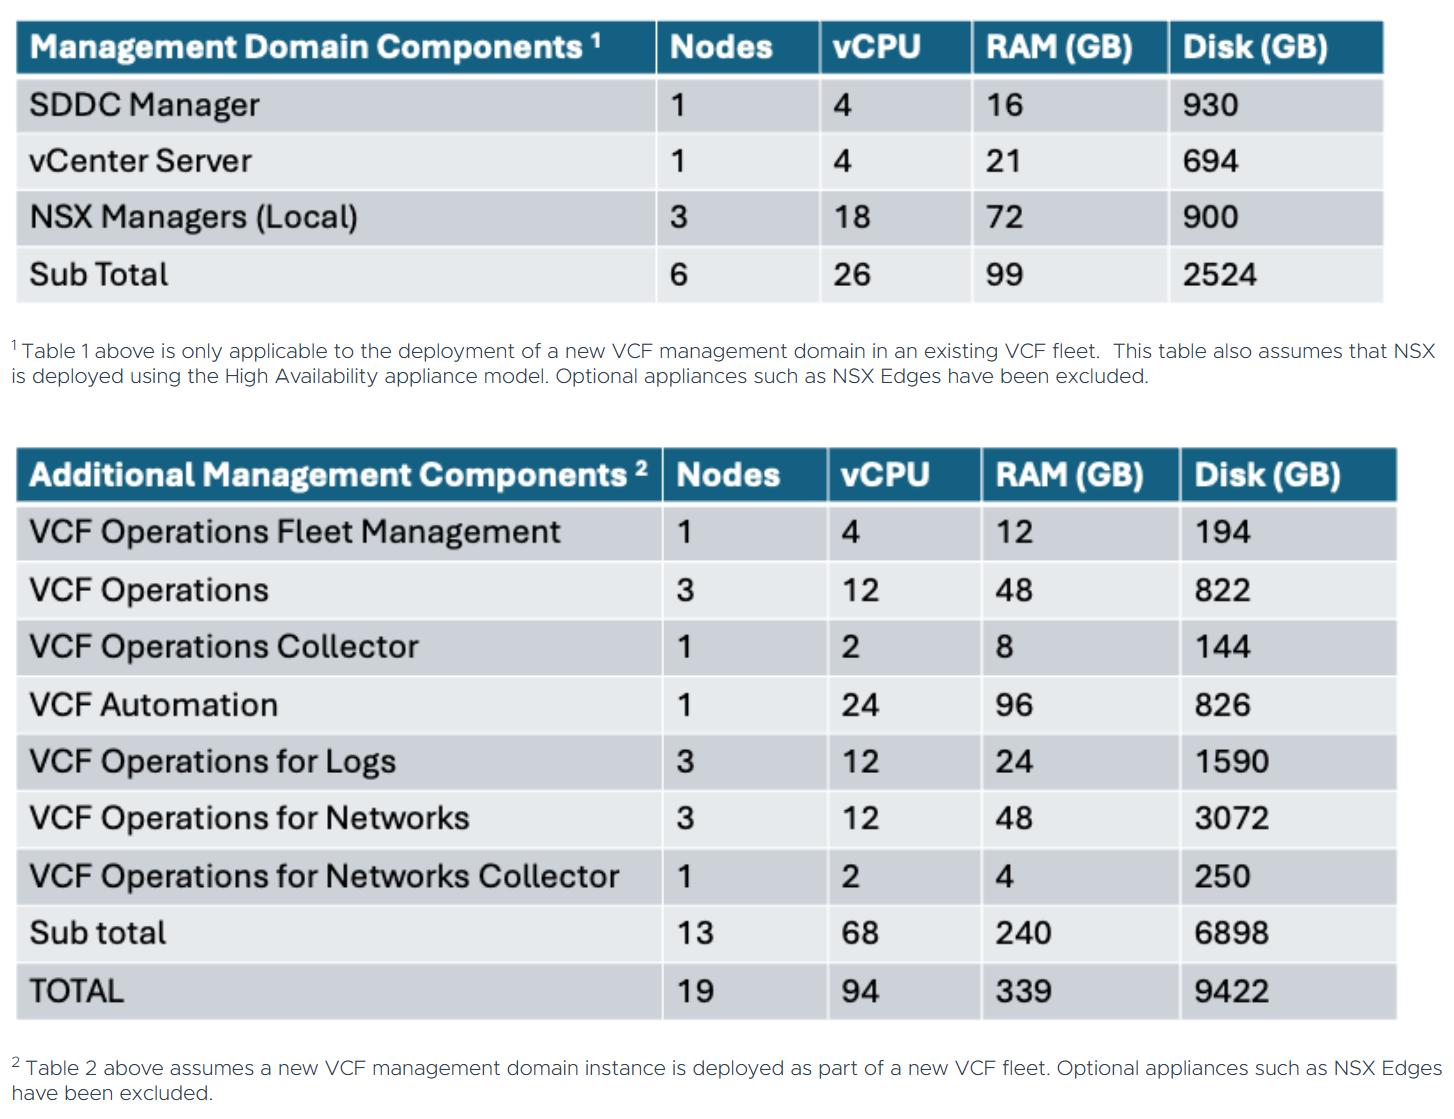
Using the chart below I can get an idea of how many cores, ram, and disk that will be needed. The one item that stands out to me is the component with the highest core count. In this case it’s VCF Automation at 24 cores. This is important as I’ll need to make sure my nested ESX Servers match or exceed 24 cores. If not, VCF Automation will not be able to deploy. Additionally, I’ll need to make sure I have enough RAM, Disk, and space for Workload VM’s.
Workstation Items
My overall plan is to build out a Windows Server, 3 x ESX 9 hosts, VCF Installer, and the VCF Depot Appliance. Each one of these will be deployed directly onto Workstation. Once the VCF Installer is deployed it will take care of deploying and setting up the necessary VMs.
NOTE: In the network layout below, hosts that are blue in color are running directly on Workstation, and those in purple will be running on the nested ESX hosts.
Network Layout
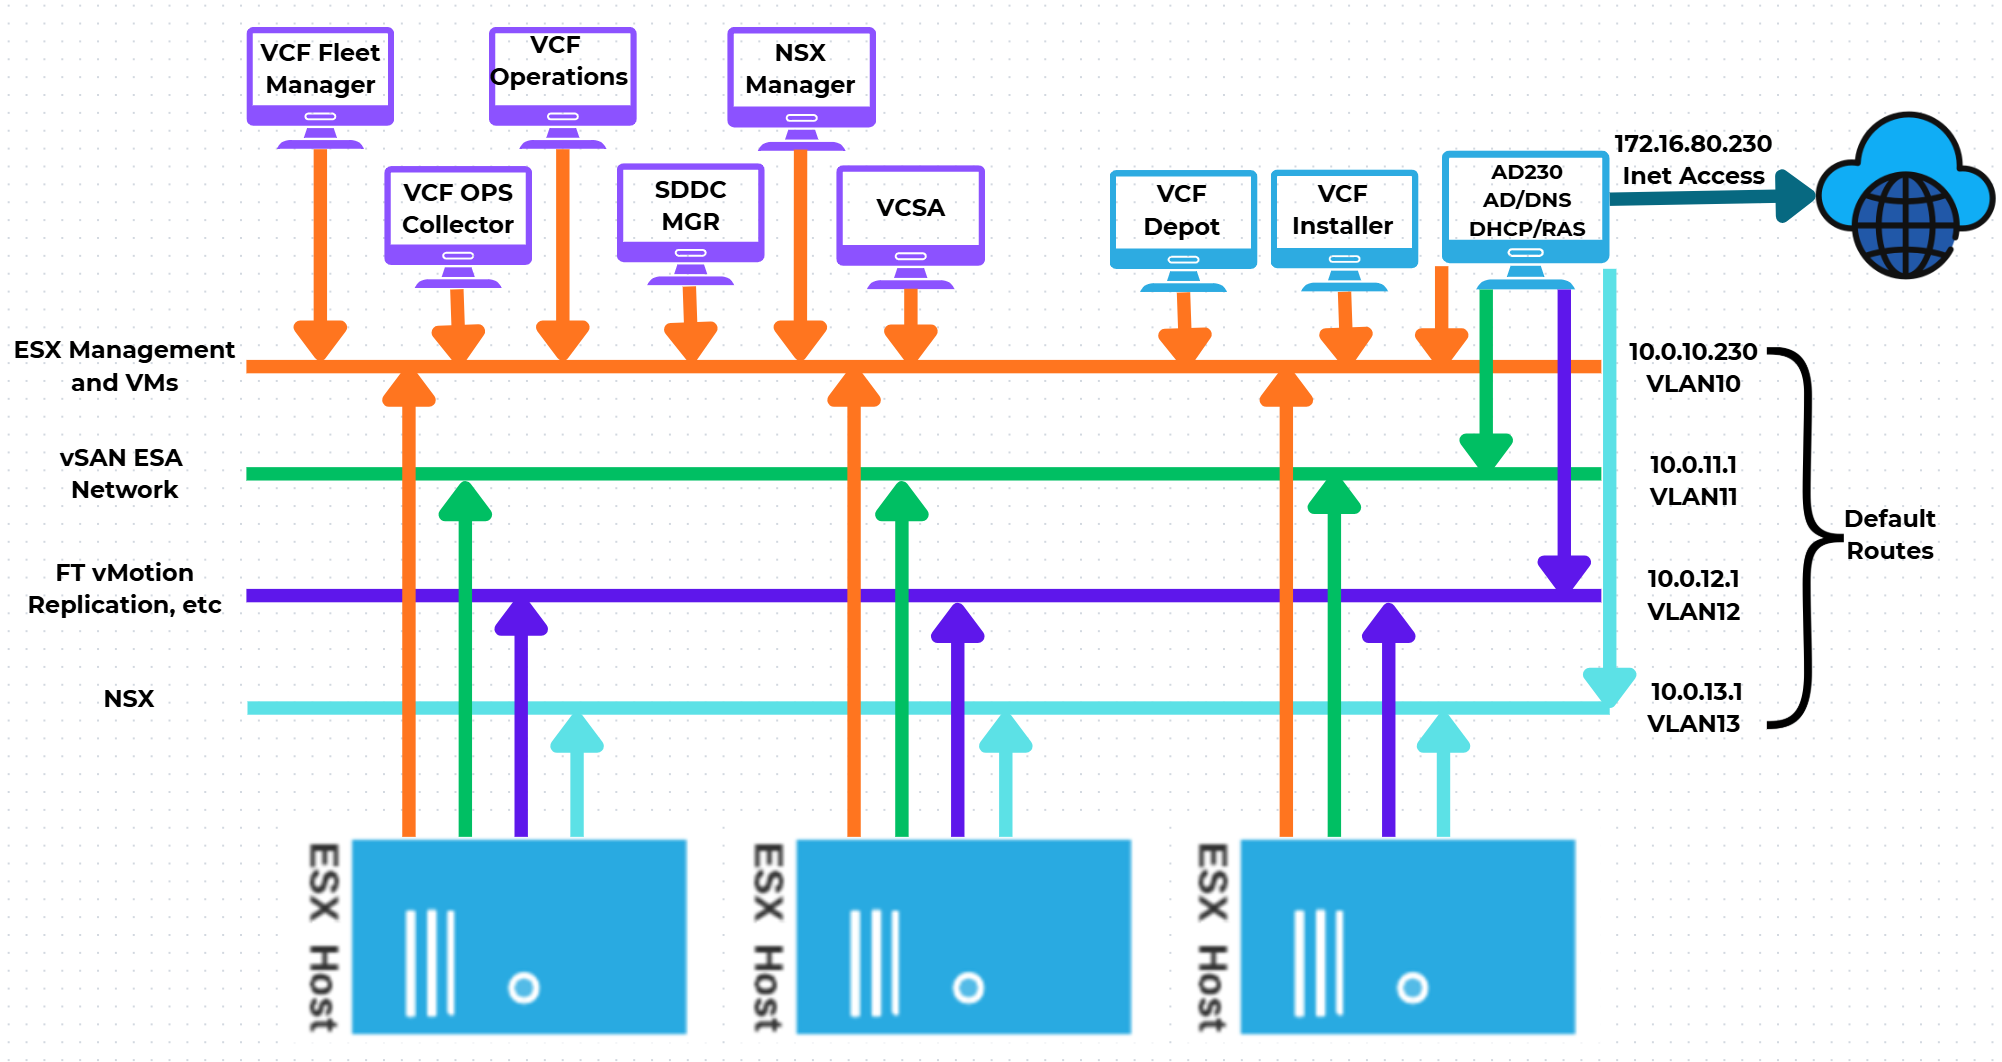
One of the main network requirements for VCF is supporting VLAN networks. My Gen8 Workstation deployment did not use VLAN networks. Workstation can pass tagged VLAN packets via LAN Segments. The configuration of LAN Segments are done at the VM’s Workstation settings, not via the Virtual Network Editor. We’ll cover this creation soon.
In the next part of this series I’ll show how I used Workstation Templates to create my VMs and align them to the underlying hardware.
Resources:
Backing up Workstation VMs with PowerShell
It’s pretty common for me to backup my Workstation VMs and I’m always looking for quick way to accomplish this. I’ve been using SyncBack Free for many years but most recently I’ve out grown. In this blog I’ll show you the script I wrote to backup my VM’s to a target location.
My Workstation server has many data disks with many folders for my VM’s. I backup my VM’s to a large hard disk and then regularly I’ll off load these backups to a NAS for archive purposes. This keeps the VM’s local for quick restores and the NAS provides some further protection.
My PowerShell 7 script is rather simple.
- Define my sources
- Choose a target folder
- Asks if you want to simulate a backup
- Robocopy copies or simulates a copy of the files while appending to a logfile
- Appends the folders and log file with a date stamp
It’s a pretty simple process but it works quite well.
Write-Output "`n**** Workstation VM Backups for VCF 9 vSAN ESA 3 Node *****`n"

# Define Sources
$source1 = "d:\Virtual Machines\VCF 9 vSAN ESA 3 Node"
$source2 = "f:\Virtual Machines\VCF 9 vSAN ESA 3 Node"
$source3 = "g:\Virtual Machines\VCF 9 vSAN ESA 3 Node"
$source4 = "h:\Virtual Machines\VCF 9 vSAN ESA 3 Node"
$source5 = "i:\Virtual Machines\VCF 9 vSAN ESA 3 Node"
$source6 = "j:\Virtual Machines\VCF 9 vSAN ESA 3 Node"
$source7 = "k:\Virtual Machines\VCF 9 vSAN ESA 3 Node"
$source8 = "l:\Virtual Machines\VCF 9 vSAN ESA 3 Node"
$source8 = "D:\Virtual Machines\Domain Services\DomainToolsVM - 12 05 2025"

# Function user selected destination folder
function Select-FolderDialog {
param([string]$Description="Select a EMPTY folder",
[string]$RootFolder="MyComputer")

# Load the necessary assembly
Add-Type -AssemblyName System.Windows.Forms

# Create an instance of the FolderBrowserDialog object
$objForm = New-Object System.Windows.Forms.FolderBrowserDialog
$objForm.RootFolder = $RootFolder
$objForm.Description = $Description

# Show the dialog box
$Show = $objForm.ShowDialog()

# Check if the user clicked 'OK' and return the selected path
if ($Show -eq "OK") {
return $objForm.SelectedPath
} else {
Write-Error "****Operation cancelled by user****"
pause
exit 1
}

# Clean up the object
$objForm.Dispose()
}

Write-Output "`n***** Choose Destination Folder *****"
# Prompt User for desintation folder
$selectedFolderPath = Select-FolderDialog -Description "Please choose the destination folder"
if ($selectedFolderPath) {
Write-Host "You selected: $selectedFolderPath"
# You can now use $selectedFolderPath in the rest of your script
}


Write-output "`n****Choose Robo options****"

# Robocopy options
# /E Copies subdirectories. This option automatically includes empty directories.
# /TEE Writes the status output to the console window, and to the log file.
# /ZB Restart Mode, if denied back to backup mode
# /R:# Retires
# /W:# Wait time between retires
# /J Unbuffered IO for faster large file backups
# /L Simulate backup
# https://learn.microsoft.com/en-us/windows-server/administration/windows-commands/robocopy


#To simulate backup or not
$question = "Do you want run a simulated backup? (Y/N)"
do {
$response = Read-Host -Prompt $question
# Use ToLower() for case-insensitive comparison
$response = $response.ToLower()
} until ($response -eq 'y' -or $response -eq 'n')

if ($response -eq 'y') {
Write-Host "Continuing... with Simulated Robocopy backup`n"
$robocopyoptions = $roboOptions = @("/E", "/TEE", "/ZB", "/R:2", "/W:10", "/J", "/L")


} else {
Write-Host "Continuing.... with Robocopy backup`n"
$robocopyoptions = $roboOptions = @("/E", "/TEE", "/ZB", "/R:2", "/W:10", "/J")


}


Write-Output "`n****Robocopy START****"

#Define Log loction
$logfile = $selectedFolderPath + "\WorkstationBackupLog.txt"

# Start Robocopy and append to log file
robocopy $source1 $selectedFolderPath $robocopyoptions /LOG+:$logfile
robocopy $source2 $selectedFolderPath $robocopyoptions /LOG+:$logfile
robocopy $source3 $selectedFolderPath $robocopyoptions /LOG+:$logfile
robocopy $source4 $selectedFolderPath $robocopyoptions /LOG+:$logfile
robocopy $source5 $selectedFolderPath $robocopyoptions /LOG+:$logfile
robocopy $source6 $selectedFolderPath $robocopyoptions /LOG+:$logfile
robocopy $source7 $selectedFolderPath $robocopyoptions /LOG+:$logfile
robocopy $source8 $selectedFolderPath $robocopyoptions /LOG+:$logfile
robocopy $source9 $selectedFolderPath $robocopyoptions /LOG+:$logfile

Write-Output "****Robocopy FINISH****"

Write-Output "`n****Rename Files START****"
#Rename Folders/file with date stamp
$DateStamp = Get-Date -Format "_yyyy-MM-dd"

Get-ChildItem -Path $selectedFolderPath -Directory | ForEach-Object {
# Construct the new name: original name + date stamp
$NewName = $_.Name + $DateStamp

# Rename the item (folder)
Rename-Item -Path $_.FullName -NewName $NewName
}

Get-ChildItem -Path $selectedFolderPath -File | Rename-Item -NewName {
$_.BaseName + $DateStamp + $_.Extension
}

Write-Output "****Rename Files FINISH****"

# Exit
Write-Output "`n`n****Script finished. Press Enter to exit.****"

pause
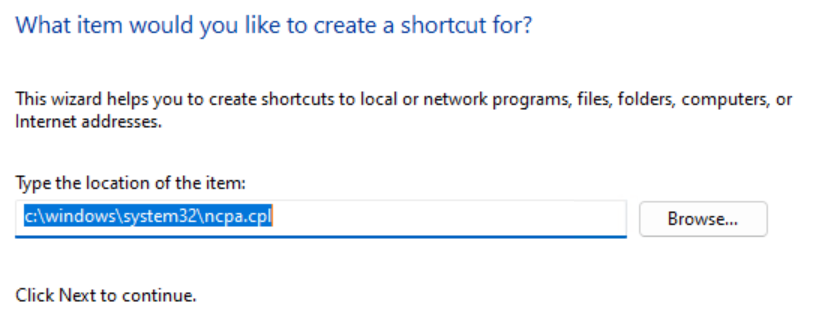
The simple and quick way to access to Windows 11 Network Connections
Using VMware Workstation I commonly have a need to change the IP information on my test VM’s quickly. No matter the GUI or shortcuts I find myself going through several clicks to get there. What if there was a more direct path to these options, and in this blog I’ll show you how.
From the desktop, right click and choose New > Shortcut
Type in the path below and choose next.
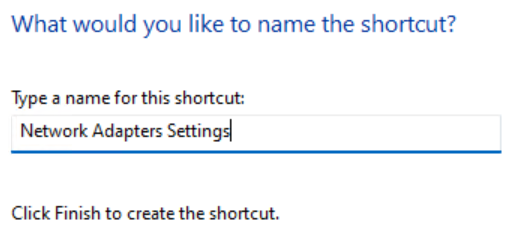
Type in a name you’ll remember and click on Finish.
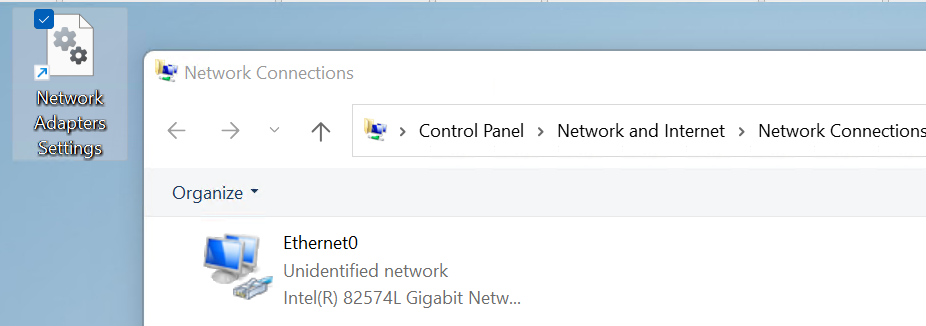
Double click on your new ICON and you’ll be redirect right into the Network Connections giving you access to your network adapters.
Allow SSH root access to VCF SDDC Manger
While creating a new VCF 9 test deployment I recently had the need to allow root user SSH access to the VCF SDDC Manager Appliance or also known as the VCF Installer. The SDDC Manager is the first appliance you deploy when creating a VCF 9 deployment. It allows you to create your VCF 9 environment. Though I would not recommend these actions for a production environment, sometimes in a test environment you may want to enable this.
Here are the steps –
- Gain direct console access to the already deployed SDDC Manager Appliance. In my case I have it deployed in VMware Workstation.
- Login to the SDDC Manager as root.
- Note: See Other Commands below if you want to backup your files first.
- Use the vi editor and enter the following command.

- In vi, press esc, then /, finally type in
PermitRootLoginenter. This will take you to the option to allow SSH login by root
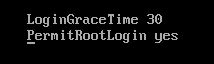
- Next change the
PermitRootLoginfrom no to yes - Press esc
- Enter :wq! to save the file
- Reboot the SDDC Manager Appliance and try using Putty to login as root.

Other Commands:
You might want to do a quick backup of the sshd_config file before and after modification. This way you can easily shift the config file to allow and not allow root access.
First Backup the config file using the extra name of ‘NOROOTACCESS’

Make the changes listed above to allow root access, then backup the config file with the extra name of ‘ALLOWROOTACCESS’

Check to make sure your configurations are there.

Now all you have to do is restore the file you want to the sshd_config file and restart.

Alternate Benefits:
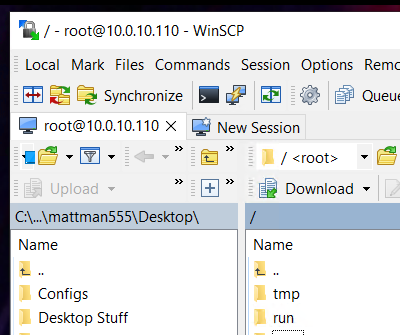
Now that you have set up root level SSH access you can use programs like WinSCP to access files.
REF:
Migrating VMs running on Workstation 25H2
I came across a need to migrate my Workstation based VCSA 8 appliance into the vSphere/vSAN cluster. Both the VCSA and vSphere Cluster are VM’s and both are running on my Gen8 Workstation Home Lab. In this case I need to complete this migration to prepare for a VCSA 9 upgrade. Part of the VCSA 9 upgrade process requires VCSA to be running directly on an ESXi host plus it will better align my Workstation environment to VCF 9 standards. In this blog I’m going to demonstrate how I migrated my VCSA 8 appliance.

Note: These steps were performed on my Gen 8 Workstation Home lab as I start preparing it for Gen 9 with VCF 9. Though I will try to write this blog post rather generally it may contain references to my home lab. For more information around this Home Lab check out my recent blog post.
Some options for migration:
- Connect to Server option in Workstation
- Workstation offers a convenient ‘Connect to Server’ feature. This allows users to connect to an ESX or VCSA server. When connected you can migrate VMs.
- However, this solution won’t work in my case, as my VCSA and ESXi hosts are on a private network that is inaccessible from my Workstation PC. Check out this link for more information >> ‘Connect to a Remote Server’
- VMware vCenter Converter Standalone (6.6.0 or 9.x)
- VMware vCenter Converter Standalone is a free product allowing for Live or Powered off P2V and V2V migrations. You simply install it on a supported OS and migrate your VM to a target Hosts.
- However, this solution doesn’t support migrating VMware Appliance VM’s.
- Use Workstation to Export to OVF
- OFV is a way to backup your VM’s to files and prepare them to be imported to a different host. Workstation allows users to export VM’s to an OVF file. Once exported I can go to the ESXi Host and import.
Option 3 is the one I choose and here are the steps:
Pre checks:
- I reviewed how many cores the ESXi target host supports (8 cores) and how many cores the VCSA 8 Appliance (4 cores) was deployed with. I do this check to ensure the ESXi host will support the workload.
- I check the HDD size of the VCSA VM (~120GB Used) and ensure I have enough vSAN Storage (~3TB Free) to support it.
- Ensure you have root access to the VCSA server and the ESXi hosts
- Important — Check to ensure a there is a ephemeral/non-static binding vDS port group and it is connected to the same network the VCSA server requires. For more information about static/non-static port groups, see my blog about setting this up.
Let’s migrate the VCSA server.
With the VM’s powered off, I remove any Workstation snapshots on the VCSA 8 Appliance and all 3 vSAN ESXi Hosts.

I power up the vSphere 8 environment (AD, VCSA, ESXi hosts) and ensure everything is functioning properly.
In the vSphere Client, I ensure there is an appropriate Ephemeral or non-static binding port group attached to the management network.

Then I gracefully shutdown the VCSA server. I do not power off the ESXi.
In Workstation I choose the VCSA appliance then choose File > Export to OVF

I choose a location, file name, and choose save.
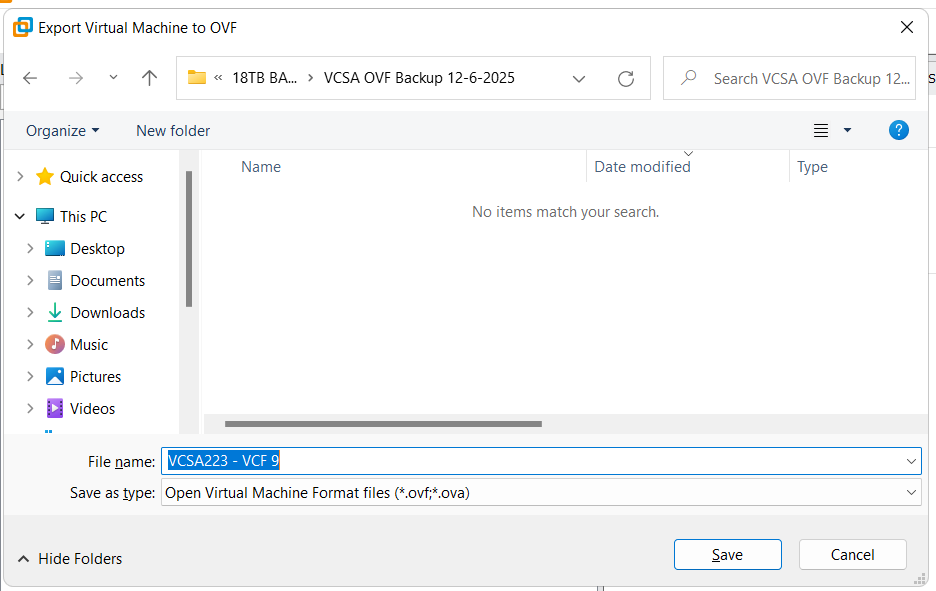
Workstation creates the OVF files and displays a progress bar. Depending on the size this could take some time to complete.

Once completed, I open up the ESXi Host Client on the target host. Then I right click on Host and choose Create/Register VM.

Choose ‘Deploy a virtual machine from an OVF or OVA file’ then Next.
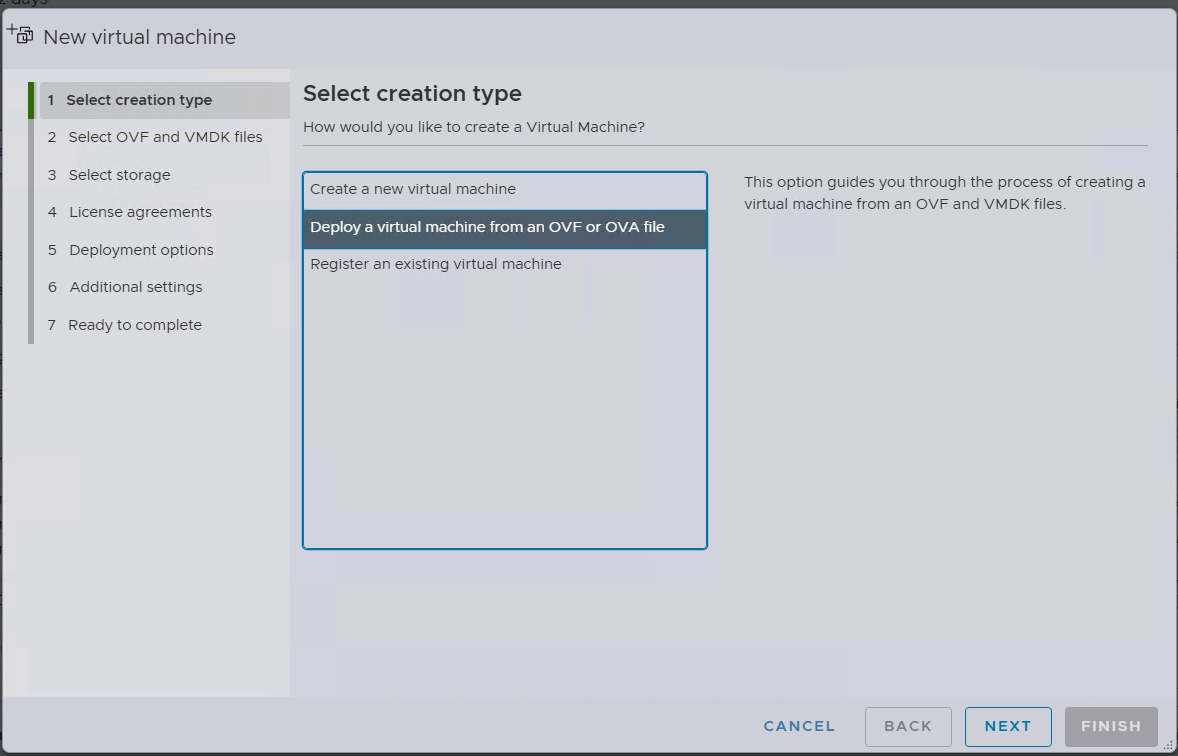
Enter the name you want for the VM. Choose ‘Click to Select files or drag/drop’, I choose the location where the OVF files are, select ALL the files (not just the OVF file), click on Open and then Next.

Next choose the target datastore. I choose the vsanDatastore.

Validate the Network Mappings is pointed to the Non-Static port group, then click on Next.
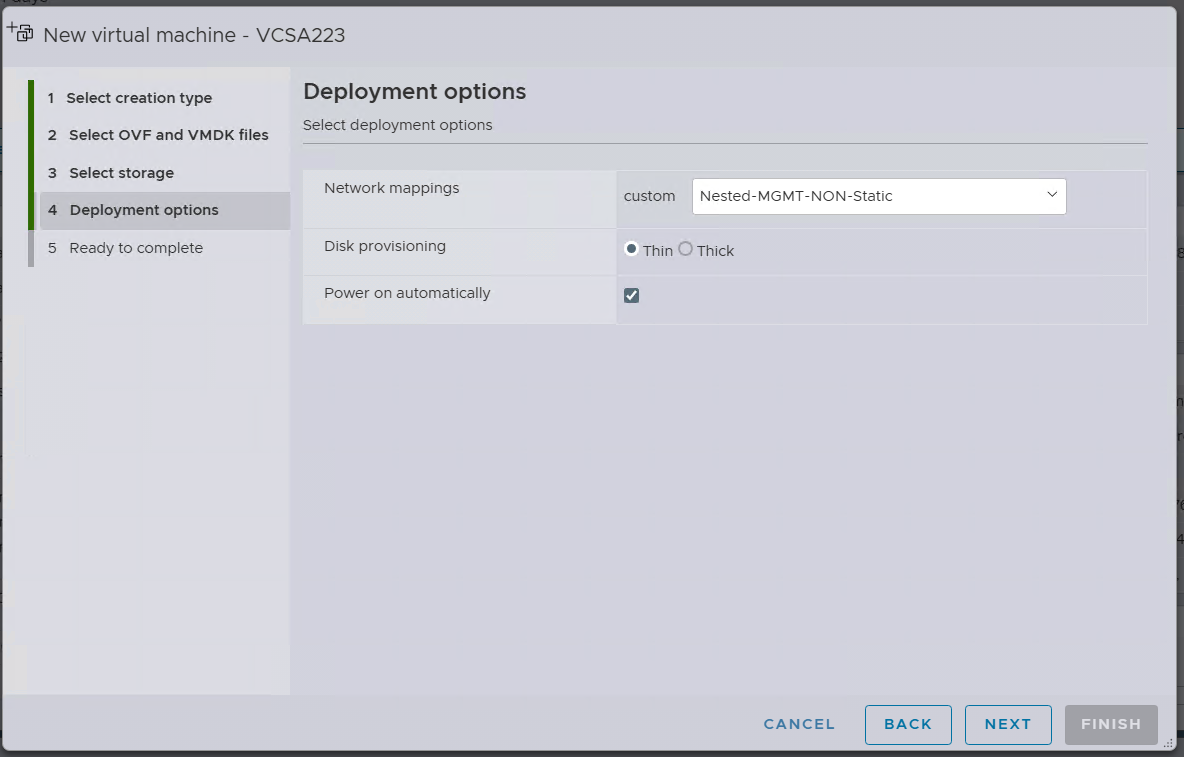
Then I click on Finish.

Several tasks are created and I monitor the progress in the Recent tasks display. The task named ‘Import VApp’ tracks the progress of the entire import. When its progress is completed the OVF import will be complete. Depending on the size this could take some time to complete.

Once the transfer is complete and I boot the VCSA server. Once it is ready I log into it via the vSphere Client. From there I right click on the VM > Settings > Network Adapter > Browse Network and choose the Static bound Port Group.

And, that’s all folks. My Workstation based VCSA 8 Appliance has been migrated to a vSphere Cluster which is running as Workstation VMs.
Thanks for reading and I do hope you picked up tip or two. Please do reach out if you have any questions or comments.
Why your Home Lab needs a non-static port group.
We’ve all been there, during a recovery or migration of a VCSA server we get the error – “Addition or reconfiguration of network adapters attached to non-ephemeral distributed virtual port groups is not supported.” But what does this mean and how do I prepare for this? In the blog post I’ll cover some of the basics and how I setup my home lab.

What does non-ephemeral and ephemeral mean?
- Non-ephemeral or static binding is a port group setting that guarantees a port in the vDS. Think of it like seats at a table and once a seat is assigned it’s always reserved for that assignment.
- Ephemeral or non-static binding will not guarantee a port in the switch. It’s kind of like first come first seated at the table, you leave the table someone else can take your spot.
- Of course you’d want to make sure your ESXi hosts and important VM’s like the VCSA appliance have a “reserved seat at the table” and this is why vDS port groups are static by default.
- See this KB for more information.
What are some of the impacts of not having a non-static port group?
- If you are doing an migration, or recovery of a VM you’ll sometimes end up at the ESXi Host Client.
- At some point during the network discovery process it’ll determine the target network is static bound.
- As an example, restoring a VCSA server if the vDS port group it’s using is static or non-ephemeral binding port group (vDS) then it will surely through the error.
How do I prepare my Home Lab?
- Choice 1 – simply create a vDS Port Group with the Ephemeral – no binding setting that uses the same uplinks as the network I want to communicate on.
- Choice 2 – set your managment vDS Port Group to Ephemeral – no binding
- By doing one of these 2 ahead of time, this will allow the correct network to be chosen.
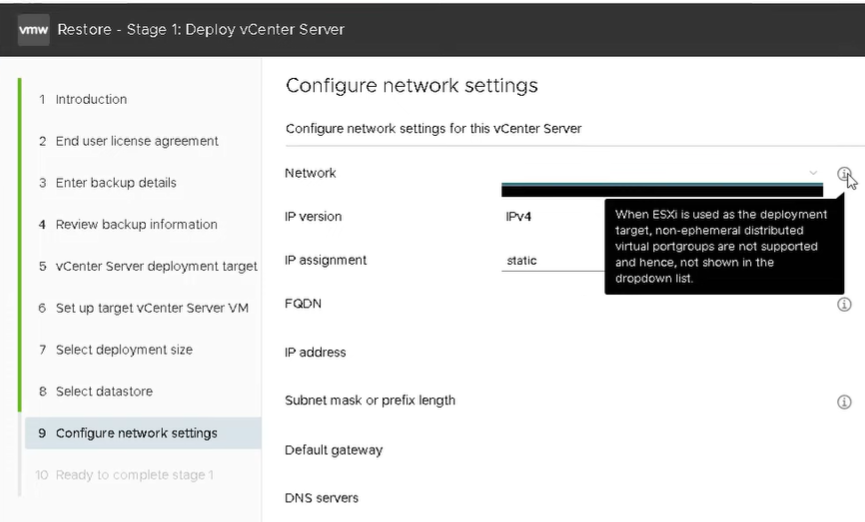
- Example – The screen shot below is a migration of a VCSA 8 server. When I get to step 4 I’m able to choose a non-static network. Had I not setup this port group ahead of time the migration would have been more difficult.
Want more information?
- Check out this design link that explains how VCF is assgined Static and Non-Static port groups
- Tech UnGlued did a good video around this topic.
How to reset the remembered password requirements for VCSA root account
Having a home lab sometimes means using a common password to access accounts. While I wouldn’t recommend this in a production environment, it’s a fairly common approach for home lab use. One challenge with password policies is their ability to remember your previous passwords. If you prefer to reuse a common password, this can make things difficult. In this blog post, I’ll show you how to reset the remembered password requirements for the VCSA root account, allowing you to reuse your preferred passwords.
Note: the commands below were performed on VCSA 8u3. For prior versions please see the REF links below. Also, the fix uses a command common to Photon 4.0. Many VMware appliances run Photon, so there’s a good chance this fix will apply to them as well. I highly recommend doing research before applying any of my stated fixes below.
Wanna get right to the fix, then click here.
A bit of background:
First let’s look at the current expiration requirements for the root account. via SSH into the VCSA server I enter the following command >> chage -l root

From this we can see that the password is set to never expire. To do this, I followed KB 32247 and step 14 had me enter the following command to ensure the password would not expire >> chage -I -1 -m 0 -M 99999 -E -1 root

Additionally, under the VCSA Management console > Administration we can see what the current password requirements are, change the password, and change the Password expiration settings.

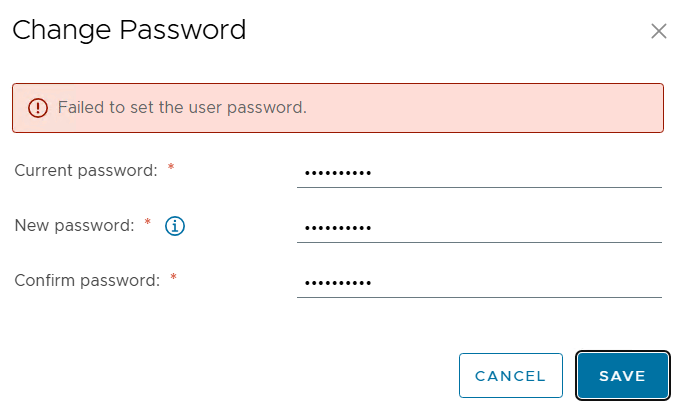
Next, I check to make sure it still has the remember password.
- VCSA Management GUI I try to change it to a remembered password and I get the following error.
- via SSH I tried the passwd command and got the following error.

So both ways to reset the password will not allow it due to a remember password.
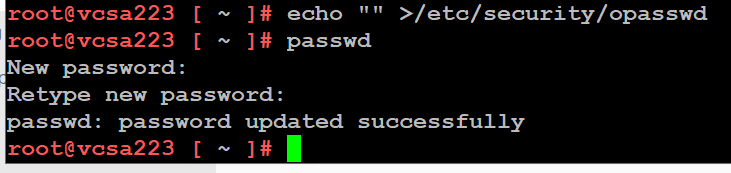
The Fix:
After the VCSA server has fully booted, I ssh into it and enter the echo command below. Next retry the passwd command with a previously used password and it works.
echo “” >/etc/security/opasswd then the passwd command
REF Links:
VMware Workstation Gen 8: Environment Revitalization
In my last blog post, I shared my journey of upgrading to Workstation build 17.6.4 (build-24832109), plus ensuring I could start up my Workstation VM’s. In this installment, we dive deeper into getting the environment ready, and perform a back up.
Keep in mind my Gen 8 Workstation has been powered down for almost a year, so there are some things I have to do to get it ready. I see this blog as more informational and if users already have a stable environment you can skip these sections. However, you may find value in these steps if you are trying to revitalize an environment that has been shut down for a long period of time.
Before we get started, a little background.
This revitalization follows my designs that were published on my Workstation Home Lab YouTube series. That series focused on building a nested home lab using Workstation 17 and vSphere 8. Nesting with Workstation can evoke comparisons to the movie Inception, where everything is multi-layered. Below is a brief overview of my Workstation layout, aimed at ensuring we all understand which layer we are at.
- Layer 1 – Physical Layer:
- The physical hardware I use to support this VMware Workstation environment is a super charged computer with lots of RAM, CPU, and highspeed drives. More information here.
- Base OS is Windows 11
- VMware Workstation build is 17.6.4 build-24832109
- Layer 2 – Workstation VMs: (Blue Box in diagram)
- I have 4 key VM’s that run directly on Workstation.
- These VM’s are: Win2022 Sever, VCSA 8u2, and 3 x ESXi 8u2 Hosts
- The Win2022 Server has the following services: AD, DNS, DHCP, and RAS
- Current state of these VM’s is suspended.
- Layer 3 – Workload VM’s: (Purple box)
- The 3 Nested ESXi Hosts have several VM’s

Lets get started!
Challenges:
1) Changes to License keys.
My vSphere environment vExpert license keys are expired. Those keys were based on vSphere 8.0u2 and were only good for one year. Since the release of vSphere 8.0u2b subscription keys are needed. This means to apply my new license keys I’ll have to upgrade vSphere.
TIP: Being a Broadcom VMware employee I’m not illegible for VMUG or vExpert keys, but if you are interested in the process check out a post by Daniel Kerr. He did a great write up.
2) Root Password is incorrect.
My root password into VCSA is not working and will need to be corrected.
3) VCSA Machine Certs need renewed.
There are several certificates that are expired and will need to be renewed. This is blocking me from being able to log on to the VCSA management console.
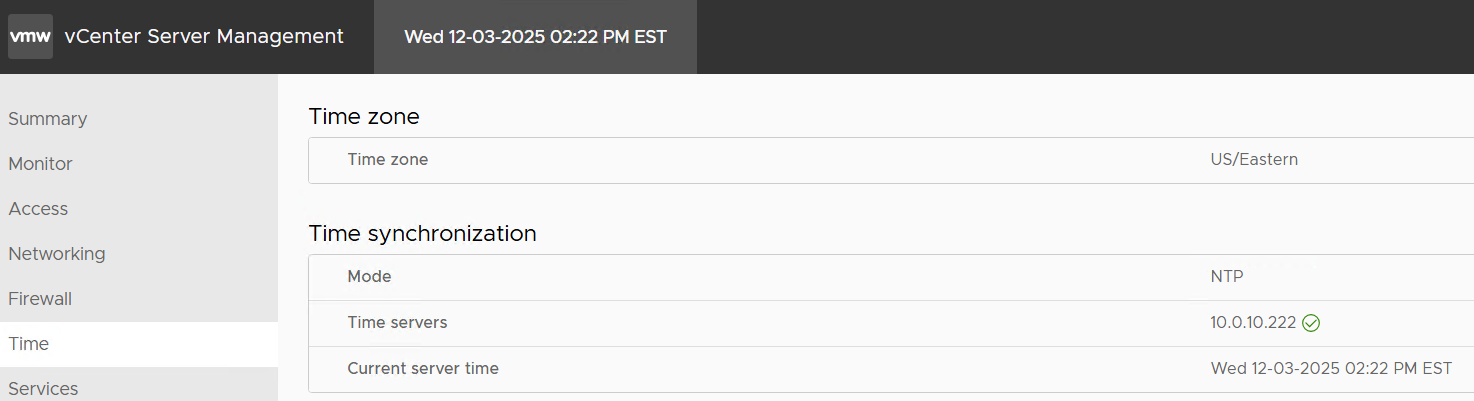
4) Time Sync needs to be updated.
I’ve change location and the time zone will need updated with NTP
Here are the steps I took to resume my vSphere Environment.
The beauty of working with Workstation is the ability to backup and/or snapshot Workstation VM’s as files and restore them when things fail. I took many snapshots and restored this lab a few times as I attempted to restart it. Restarting this Lab was a bit of a learning process as it took a few attempts to find everything that needed attention. Additionally, some of the processes you would follow in the real world didn’t apply here. So if you’re a bit concerned by some of the steps below, trust me I tried the correct way first and it simply didn’t work out.
1) Startup Workstation VM AD222:
At this point – I have only resumed AD222.
The other VMs rely on the Windows 2022 VM for its services. First, I need to get this system up and validate that all of its services are operational.
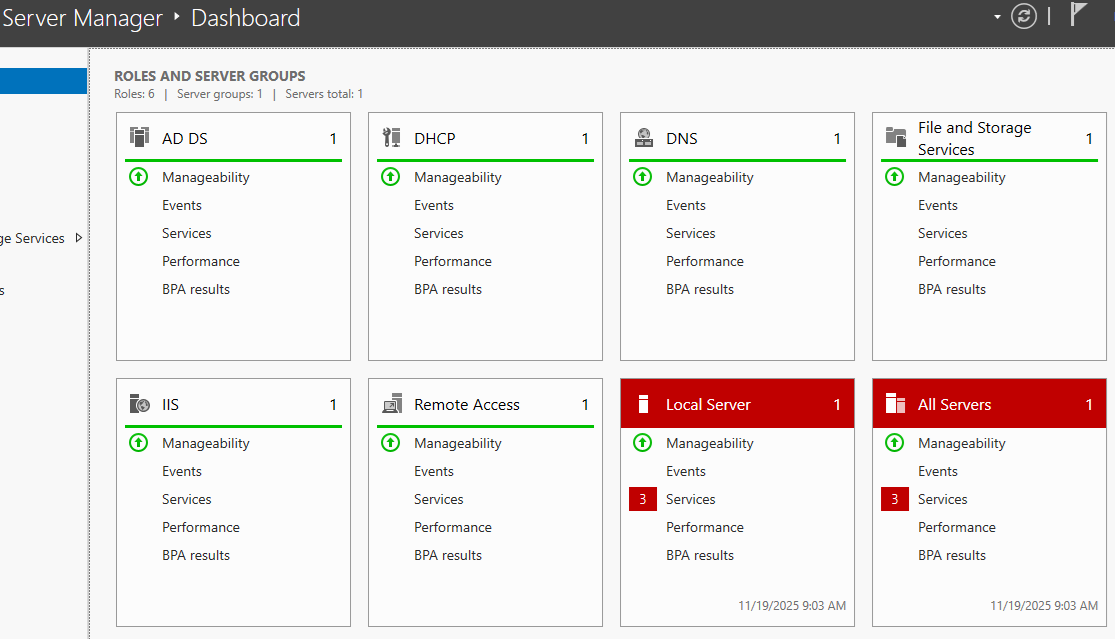
- I used the Server Manager Dash Board as a quick way to see if everything is working properly.
- From this dashboard I can see that my services are working and upon checking the red areas I found there was an non-issue with Google updater being stopped.
- Run and Install Windows Updates
- Network Time Checks (NTP)
- All my VM’s get their time from this AD server. So it being correct is important.
- I ensure the local time on the server is correct. From CLI I type in ‘w32tm /tz’ and confirm the time zone is correct.
- Using the ‘net time’ command I confirm the local date/time matches the GUI clock in the Windows server.
- Using ‘w32tm /query /status’ I confirm that time is syncing properly
- Note: My time ‘Source’ is noted as ‘Local CMOS Clock’. This is okay for my private Workstation environment. Had this been production, we would have wanted a better time source.

2) Fix VCSA223 Server Root Password:
At this point only – I have resumed power to VCSA223 and AD222 is powered on.
Though I was initially able to access VCSA via the vSphere Client, I eventually determined I was unable to log in to the VCSA appliance via DCUI, SSH, or management GUI. The root password was incorrect and needed to be reset.
To fix the password issue I need to gracefully shutdown the VCSA appliance and follow KB 322247. In Workstation I simply right clicked on the VCSA appliance > Power > Shutdown Guest

3) Cannot access the VCSA GUI Error 503-Service Not available.
After fixing the VCSA password I was now able to access it via the SSH and DCUI consoles. However, I was unable to bring up the vSphere Client or the VCSA Management GUI. The management GUI simply stated ‘503 service not available’.
To resolve this issue I used the following KB’s
- 344201 Verify and resolve expired vCenter Server certificates using the command line interface
- Used this KB to help determine which certificates needed attention.
- Found an expired machine certificate.
- 385107 vCert – Scripted vCenter expired certificate replacement
- Following this KB I downloading vCert via WinSCP to the VCSA appliance.
- I used KB 326317 WinSCP adjustment to help download the file.
- After I completed the install section I chose option 6 and reset all the certificates.
- Next I rebooted the VCSA appliance.
- After the reboot I was now able to access the VCSA vSphere Client and Management GUI.
4) VCSA Management GUI Updates
- I accessed the VCSA Management GUI and validated/updated its NTP settings.
- Next I mounted the most recent VCSA ISO and updated the appliance to 8.0.3.24853646
5) Updating ESXi
- At this point only my AD and VCSA servers have been resumed. My ESXi hosts are still suspended.
- To start the update from 8.0.2ub to 8.0.3ue, I choose to resume then immediately shutdown all 3 ESXi hosts. This step may seem a bit harsh but no matter how I tried to be graceful about resuming these VM’s I ran into issues.
- While shut down I mounted VMware-VMvisor-Installer-8.0U3e-24677879.x86_64.ISO and booted/upgraded each ESXi host.
6) License keys in VCSA
Now that everything is powered on I was able to go onto the vSphere client. First thing I noticed was the VMware keys (VCSA, vSAN, ESXi) were all expired.
I updated the license keys in this order:
- First – Update the VCSA License Key
- Second – Update the vSAN License Key
- Third – Update the ESXi Host License Key
7) Restarting vSAN
- When I shut down or suspend my Workstation Home lab I always shut down my Workload VM’s and do a proper shutdown of vSAN.
- After I confirmed all my hosts were licensed and connected properly, I simply went into the cluster > configure > vSAN Services.
8) Backup VM’s
Now that my environment is properly working it’s time to do a proper shut down, remove all snapshots, and then take a backup of my Workstation VM’s.
With Workstation a simple Windows File copy from Source to target is all that is needed. In my case I have a large HDD where I store my backups. In Windows I simply right click on the Workstation VMs folder and chose copy. I then go to the target location right click and choose paste.
TIP: I keep track of my backups and notes with a simple notepad. This way I don’t forget their state.
And that’s it, after being down for over a year my Workstation Home lab Gen 8 is now fully functional and backed up. I’ll continue to use it for vSphere 8 testing as I build out a new VCF 9 enviroment.
Thanks for reading and please feel free to ask any questions or comments.
Updating VMware Workstation 17 to 25H2
** Update – Workstation 25H2u1 has been released 02/2026. Upgrade from 25H2 to 25H2u1 blog here **
Last October 2025 VMware changed the naming convention of their Workstation product. They moved from traditional version numbers (e.g., Workstation 17.6.x) and are adopting a new naming format that reflects the year (2025) and the half of the year (H2). This provides a more consistent naming across releases and helps to ensures version clarity. With the name change of VMware Workstation from 17 to 25H2 so has the update process. In this blog I cover some of those changes and the steps I took to update my system.
Why can’t I download updates via Workstation 17 Updater?
The product update feature is no longer available in VMware Workstation 17, Player, Fusion. See Article ID: 395172 Moving forward, updates will need to be manually downloaded from the Broadcom Support Portal. Once the appropriate product update is downloaded, it can be manually installed.
Where can I download the Update?
Follow the step-by-step instructions provided in the following articles for the respective products: Download Desktop Hypervisor (Workstation and Fusion) Products
What are the requirements to install Workstation 25H2?
See Host System Requirements for Workstation Pro
What are the steps to upgrade to Workstation 25H2?
Once you have downloaded the product, open it, and then click next on this screen.

Accept the EULA.

Click next on the ‘Compatible Setup’
NOTE: If you have having issues with Hyper-V there is a good chance your Windows OS is not setup properly. See my guide that can help resolve this.

Select the Install directory

Check or Un-Check Product updates and Join CEIP.

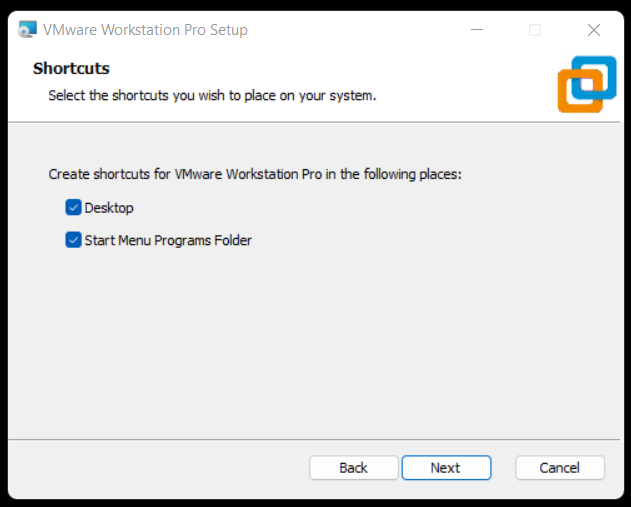
Choose where you want your shortcuts.
Choose upgrade to begin the installation.
Note: This step will vary if you are doing a fresh install of Workstation.

Allow it to complete its install.

Click Finish.

After opening Workstation 25H2 here is the new ‘About’ screen. The about screen is found under Help > About VMware Workstation

