VMware Workstation Gen 9: BOM2 P2 Device Checks and Windows 11 Install
For the Gen 9 BOM2 project, I have opted for a clean installation of Windows 11 to ensure a baseline of stability and performance. This transition necessitates a full reconfiguration of both the operating system and my primary Workstation environment. In this post, I will ensure devices are correctly deployed, installed Windows 11, and do a quick benchmark test. Please note that this is not intended to be an exhaustive guide, but rather a technical log of my personal implementation process.
Note: There really isn’t a playbook or documentation for what I am attempting to do with Workstation, VCF 9, and BOM2. I’m pushing it beyond it limits and it’s going to be a bit of hit or miss. Fair Warning — As I move forward everything I post is subject to be changed, updated, or corrected.
Validate Hardware Components
After the hardware configuration and assembly is complete its best to ensure the devices are recognized by the motherboard. There are quite a bit hardware items being carried over from BOM1 plus several new items, so its import these items are recognized before the installation of Windows 11.
IPMIView
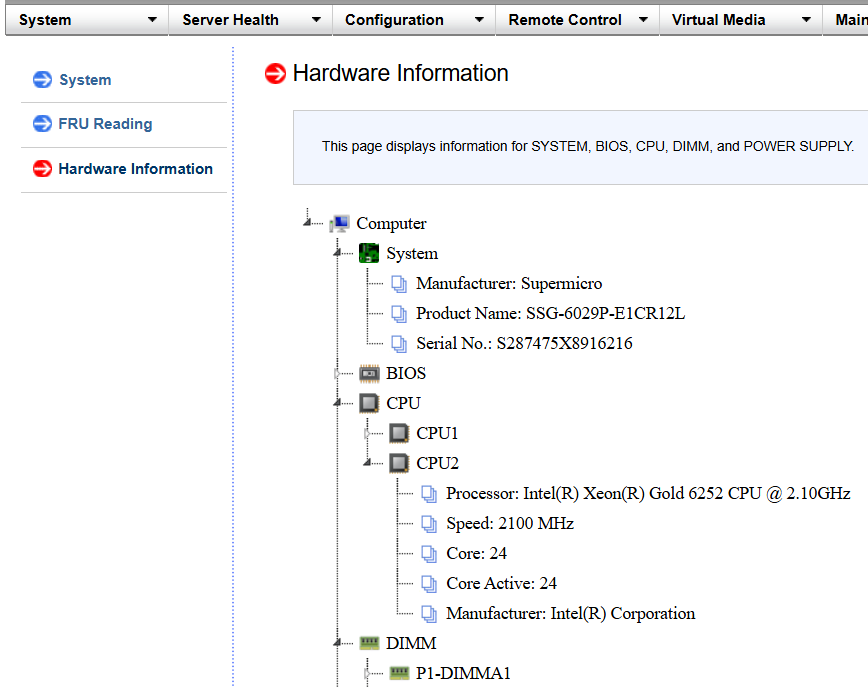
Using IPMIView with SuperMicro X11DPH-T is quite handy. IPMIView enables me to see all types of data and allows for remote console access without physically being at the console. Simply connect a network cable into the IPMI port (Fig-1) and by default it will get an DHCP address or you can set the IP address in the BIOS. Next via https go to the assigned address, log in (by default username and password are both ADMIN), and you’ll have access to the IPMIView console. From this console you can manually set the IP address, VLAN ID, remote access to the console, and so much more.
Fig-1

The SuperMicro IPMIView allows me to view some of the system hardware. After logging in I find the information under System > Hardware Information. I simply click on a device and it will expand more information.
Reset BIOS Settings
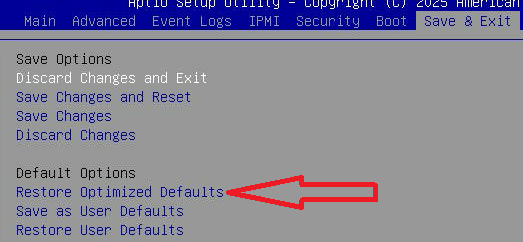
There are a couple of settings that need to be validated in the BIOS. Before I make adjustments it’s a good idea to reset the BIOS setting back to optimized defaults, especially when the motherboard is a refurbished or has been used in the past. On enterprise boards like the Supermicro X11DPH-T, a “Restore to Optimized Defaults” clears out “stale” resource assignments stuck in the NVRAM.
BIOS Settings
Boot Configuration settings are next. Set Boot Mode UEFI and disable all Boot options, leaving Boot option 1 to ‘UEFI Hard Disk’. After the installation of Windows 11, this should change to ‘Hard Disk: Windows Boot Manager’.

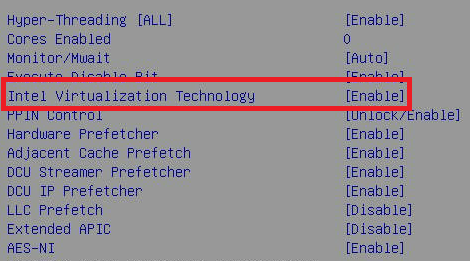
Next, I validate that the CPU settings have the Virtual-Machines Extensions (VMX) enabled. This is a requirement for Workstation. Advanced > CPU Configuration, the Intel Virtualization Technology set to Enable.
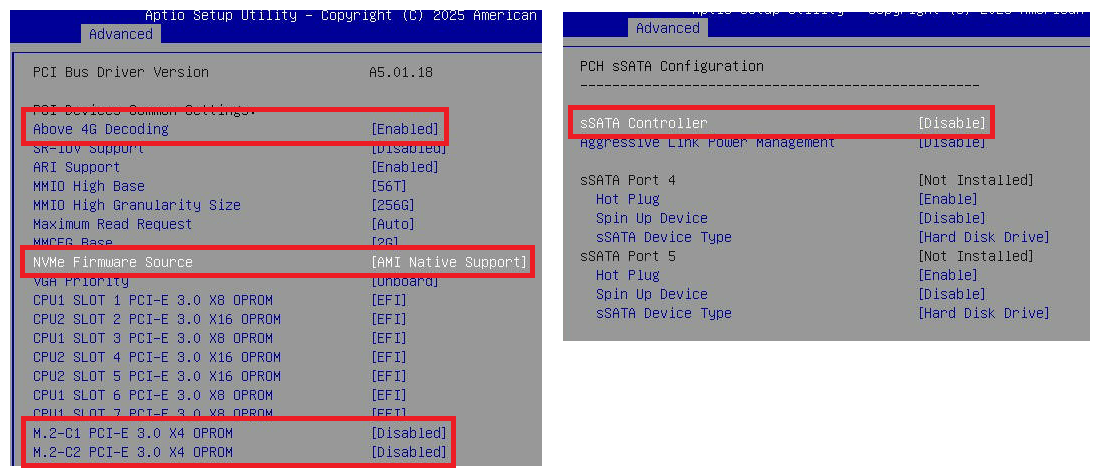
Staying in the Advanced main menu, under PCIe/PCI/PnP Config, I confirm ‘Above 4G Decoding’ is enabled, change ‘NVMe Firmware Source’ to AMI, and disable the unused ‘M.2 slots’. Also, under the Advanced menu, under PCH sSATA I disable the sSATA controller.
Understanding PCIe bifurcation
PCIe bifurcation device settings are important to review. They can be a bit confusing and the Supermicro manual is very short on details. To understand this better I first need to review the layout of my environment. Using the system diagram and PCIe slot layout in my previous blog I know the following:
- There are 7 PCIe slots on this motherboard.
- These PCIe slots are assigned to a port on one of the two CPU’s.
- There are a total of CPU 6 ports connected to the PCIe Slots.
- PCIe Slots might be shared with other PCIe slots or on board devices.
- On CPU1:
- Port 1 is shared with the PCH and PCIe Slot 1
- Port 2 is shared with Onboard NVMe and PCIe Slot 3
- Port 3 is shared between Slot 6 and Slot 7
- On CPU2:
- Port 1 is assigned to PCIe Slot 2
- Port 2 is assigned to PCIe Slot 5
- Port 3 is assigned to PCIe Slot 4
With this information I now can translate it to the BIOS Settings. In BIOS I went to ‘Advanced > Chipset Config > North Bridge > IIO Configuration > then chose CPU1 or CPU2’. Each Br# is related PCIe Slot or onboard device. Each Br# is associated to a CPU port number. In this example, CPU1 II0 PCIe Br3 (aka Slot 4) is associated to Port 3A and 3C.

Depending on the bifurcation setting you may see a different number of ports. The port number represents how the bifurcation is “splitting” up the PCIe Slot. In this example Br1 split the x16 PCIe slot into 4 – x4 PCIe slots. This allows cards like the quad NVMe to have a dedicate x4 slot per NVMe.
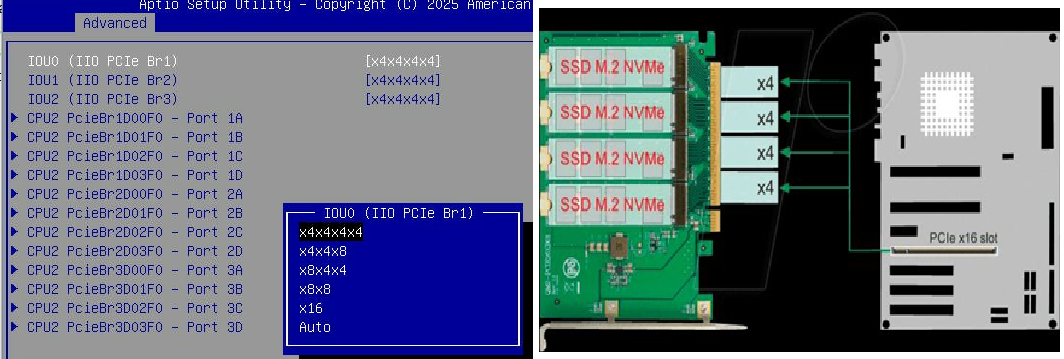
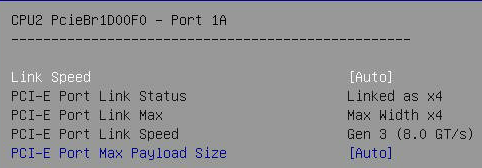
If I drill down on the ports 1A – 1D I can see that they linked at x4, they max width is x4, and they linked as Gen3. This is an important check to ensure the PCIe Card and attached device specifications align to this information.
Adjusting Bifurcation on my deployment
As I started to look at my system, I noticed the Auto setting for bifurcation were not always aligned to the cards I inserted. I needed to better align this to my system. Before I change it from Auto, it’s important to understand the types of PCIe devices, their installed slot, and how they map to the BIOS settings.
I use the system diagram and slot layout in my previous blog to create the table below. I went into BIOS ‘Advanced > Chipset Config > North Bridge > IIO Configuration > then chose CPU1 or CPU2’ to make and confirm the required adjustments.
| CPU | Slot # | PCIe Speed | Card Speed/ Device | I0U# & Bifurcation setting | Active Port(s) |
| CPU1 | 7 | x8 | x4 Optane Disk | I0U2, Br3, AUTO | 3A |
| CPU1 | 6 | x8 | x4 Optane Disk | I0U2, Br3, AUTO | 3C |
| CPU1 | 3 | x8 | x8 Dual 2TB NVMe | I0U1, Br2, x4x4x4x4 | 2C,D |
| CPU1 | 1 | x8 | x8 Video Card | I0U0, Br1, AUTO | 1A |
| CPU2 | 5 | x16 | x8 Dual 2TB NVMe | I0U2, Br3, x4x4x4x4 | 3A,C,D |
| CPU2 | 4 | x16 | x8 Dual 2TB NVMe | I0U1, Br2, x4x4x4x4 | 2C,D |
| CPU2 | 2 | x16 | x16 Quad 1TB NVMe | I0U0, Br1, x4x4x4x4 | 1A-D |
Note: Supermicro recommended using x4x4x4x4 for their NVMe cards. See Page 3-5 in their deployment manual.
Adjust Power Settings in BIOS
- There are several settings to ensure stable performance with a Supermicro X11DPH-T.
- Enter Setup, confirm/adjust the following, and save the changes:
- Advanced > CPU Configuration
- Hyper-Threading > Enabled
- Cores Enabled > 0
- Hardware Prefetcher > Enabled
- Advanced Power Management Configuration
- Power Technology > Custom
- Power Performance Tuning > BIOS Controls EPB
- Energy Performance BIAS Setting > Maximum Performance
- CPU C State Control, All Disabled
- Advanced > Chipset Configuration > North Bridge > Memory Configuration
- Memory Frequency > 2933
- Advanced > CPU Configuration
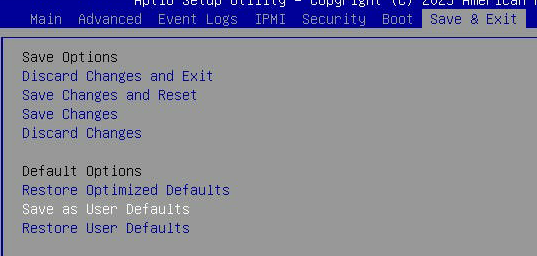
Saving Settings
Before I exit I choose ‘Save as User Defaults’. This allows me to maintain my settings for a quick roll back. Finally, I choose ‘Save Change and Reset’
Windows 11 Install
Once all the hardware is confirmed I create my Windows 11 boot USB using Rufus and boot to it. For more information on this process see my past video around creating it.
Next I install Windows 11 and after it’s complete I update the following drivers.
- Install Intel Chipset drivers
- Install Intel NIC Drivers
- Run Windows updates
At this point all the correct drivers should be installed, I validate this by going into Device Manager and ensuring all devices have been recognized.
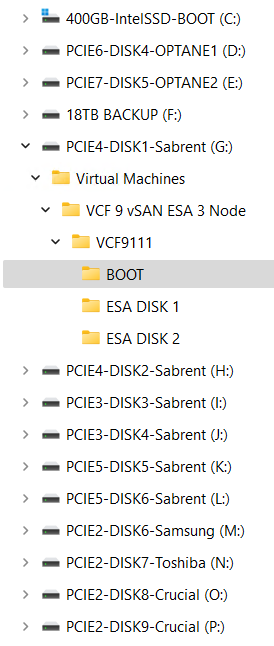
I then go into Disk Manager and ensure all the drives have the same drive letter as they did in BOM1. If they don’t match up I use Disk Manager to align them.
Install Other Software Tools
Quick Bench Mark
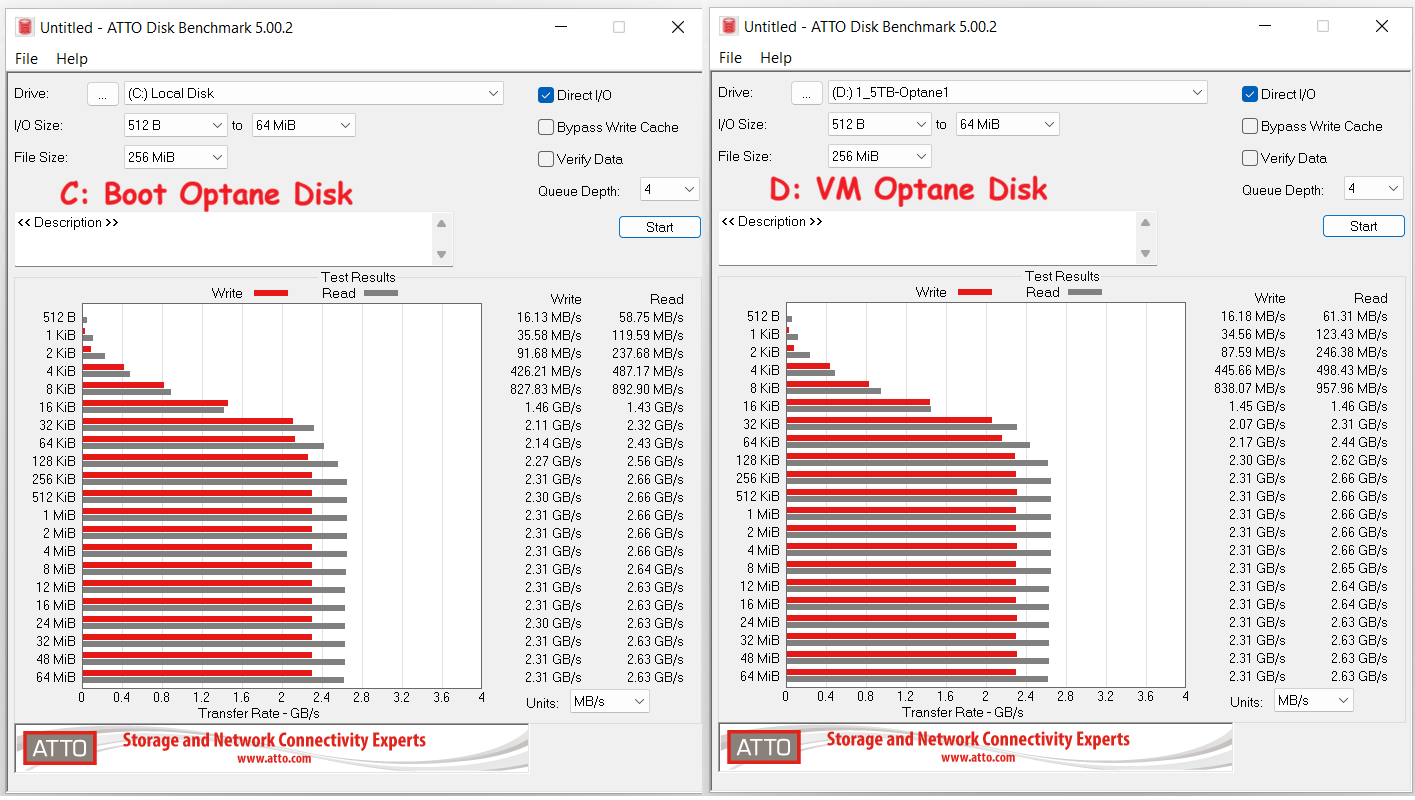
After I installed Windows 11 Pro, I ran a quick ATTO benchmark on my devices. I do this to ensure the drives are working optimally plus it’ll serve a baseline if I have issues in the future. There is nothing worse than having a disk that is not performing well, and it’s better to get performance issues sorted out early on.
These are the results of the 1.5TB Optane Disks.
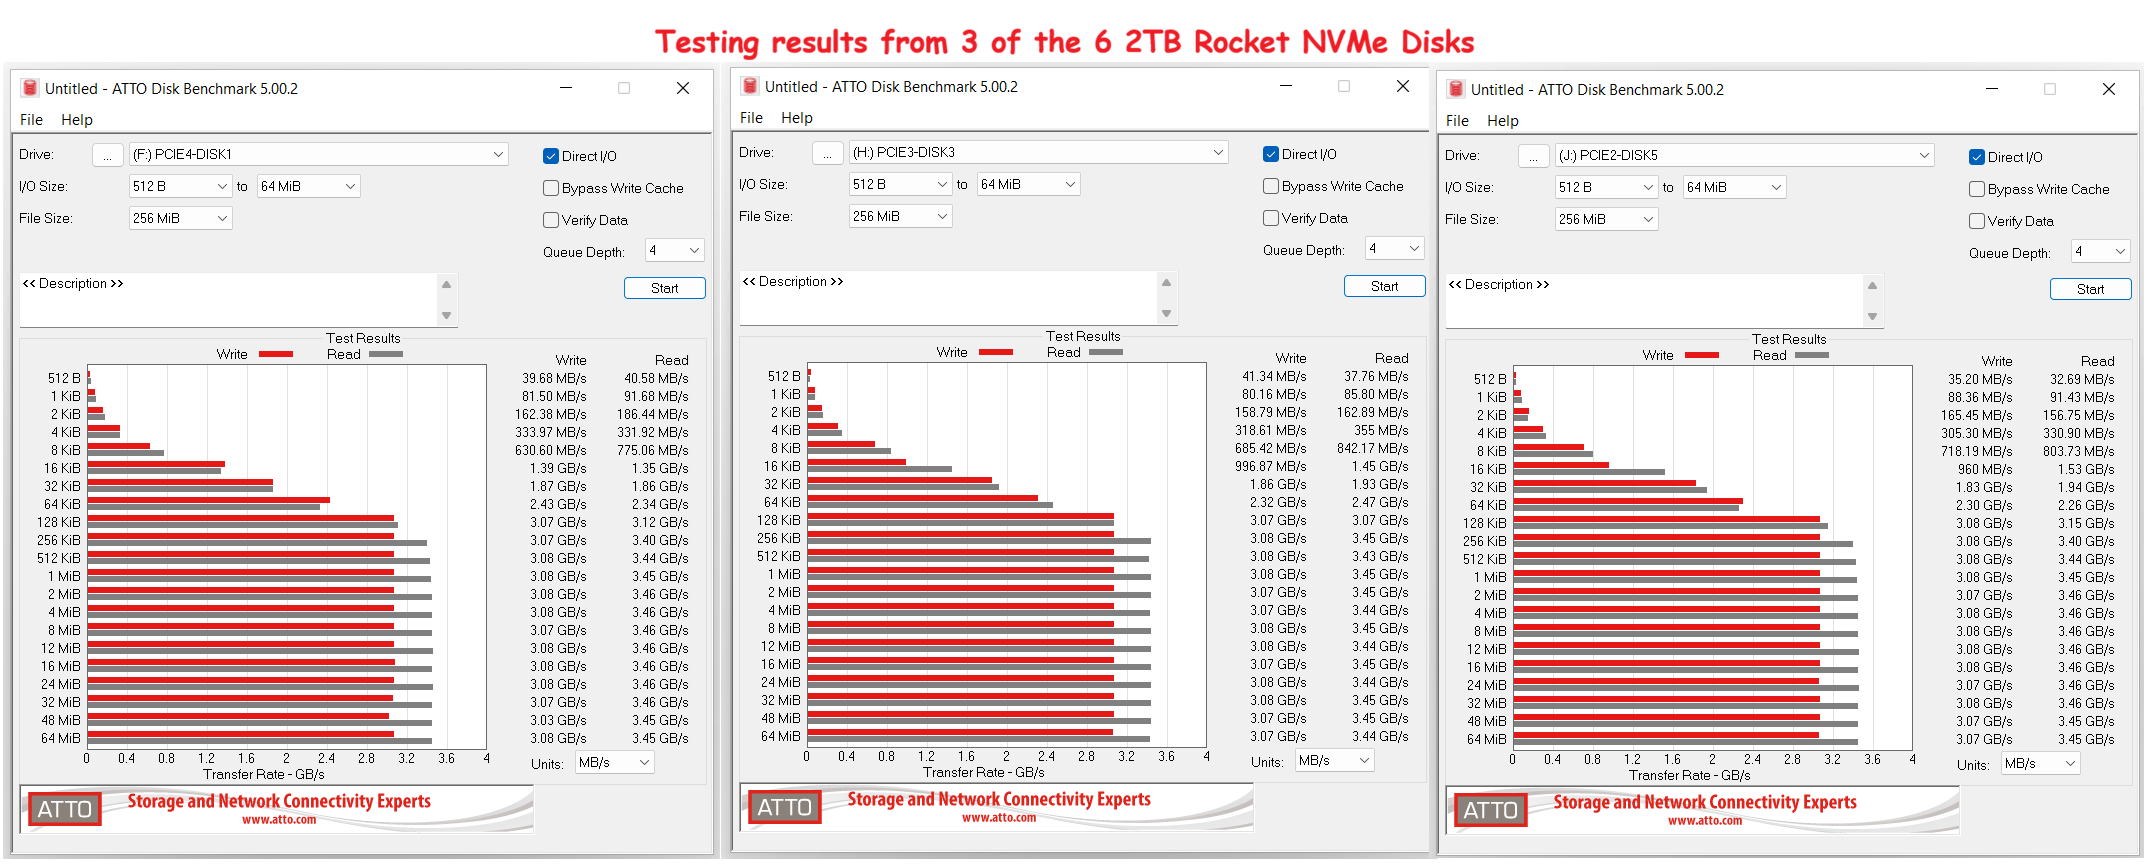
I tested all 6 of the Rocket 2TB NVMe Disks, here are results for 3 of them, each one on a different PCIe slot.
With the hardware confirmed and the OS installed I’m now ready to install Workstation 25H2 and configure it.
