Upgrading or adding New Hard Disks to the IOMega / EMC / Lenovo ix4-200d
I currently have an IOMega ix4-200d with 4 x 500GB Hard Disk Drives (HDD). I am in the process of rebuilding my vSAN Home lab to all flash. This means I’ll have plenty of spare 2TB HDDs. So why not repurpose them to upgrade my IOMega. Updating the HDDs in an IOMega is a pretty simple process. However, documenting and waiting are most of this battle.
There are 2 different ways you can update your IOMega: 1 via Command Line and 2 via the Web client. From what I understand the command line version is far faster. However, I wanted to document the non-command line version as most of the blogs around this process were a bit sparse on the details. I started off by reading a few blog posts on the non-command line version of this upgrade. From there I came up with the basic steps and filled in the blanks as I went along. Below are the steps I took to update mine, your steps might vary. After documenting this process I can now see why most of the blogs were sparse on the details, there are a lot of steps and details to complete this task. So, be prepared as this process can be quite lengthy.
NOTES:
- YOU WILL LOSE YOUR DATA, SO BACK IT UP
- You will lose the IOMega configuration (documenting it might be helpful)
Here are the steps I took:
- Ensure you can logon to the website of your IOMega Device (lost the password – follow these steps)
- Backup the IOMega Configuration
- If needed screen shot the configuration or document how it is setup
-
Backup the data (YOU WILL LOSE YOUR DATA)
- For me, I have an external 3TB USB disk and I used Syncback via my Windows PC to back up the data
-
Firmware: ensure the new HDDs and the IOMega IX4 are up to date
- Seagate Disks ST2000DM001 -9YN164
- Iomega IX4-200d (Product is EOL, no updates from Lenovo)
- After backing up the data, power off the IOMega, unplug the power, and remove the cover
- Remove the non-boot 500GB disks from the IOMega and label them (Disks 2-4), do not remove Disk 1
Special Notes:
- From what I read usually Disk 1 is the “boot” disk for the IOMega
- In my case, it was Disk 1
- For some of you, it may not be. One way to find this out is to remove disks 2-4 and see if the IOMega Boots, if so you found it, if not power off try with only disk 2 and so on till you find this right disk

- Replace Disks 2-4 with the new HDD, in my case I put in the 2TB HDDs
- Power on system (Don’t forget to plug it back in)
- The IOMega display may note there are new disks added, just push the down arrow till you see the main screen
- Also at this point, you won’t see the correct size as we need to adjust for the new disks
-
Go into IOMega web client
- Settings > Disks Storage
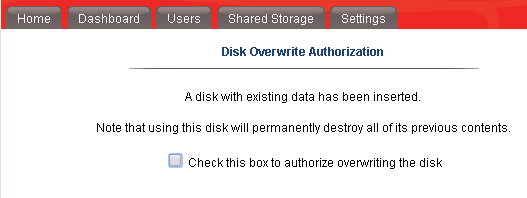
- Choose “Click here for steps…”
- Check box to authorize overwrite

- About a minute or two later my IOMega Auto Restarted
- Note: Yours may not, give it some time and if not go to the Dashboard and choose restart
- After reboot, I noted my configuration was gone but the Parity was reconstructing with 500GB disks
- This is expected, as the system is replicating the parity to the new disks
- This step took about +12 hours to complete
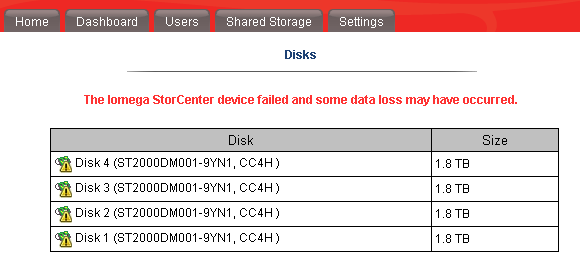
- After the reconstruction, I went into the Web client and the IOMega configuration was gone. It asked me to type in the device name, time zone, email, and then it auto Rebooted
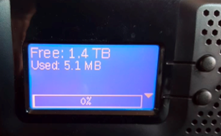
- After Reboot I noted all the disks are now healthy and part of the current 1.4TB parity set. This size is expected.

- Now that the Iomega has accepted the 3 x 2TB disks we need to break parity group and add the final 2TB HDD
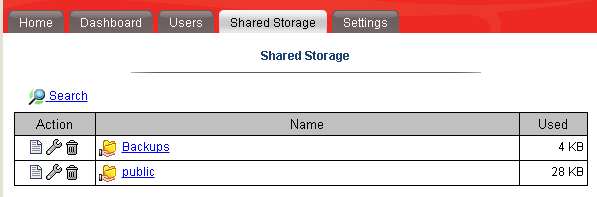
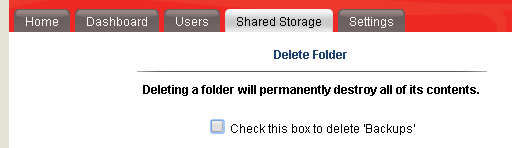
- First, you have to delete the shares before you can change the parity type.
- Shared Storage > Delete both shares and check to confirm delete
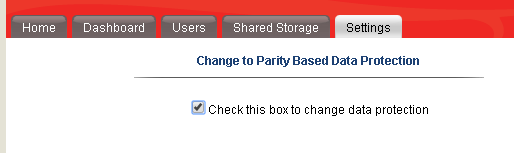
- Now go to — Settings > disks > Manage Disks > Data Protection
- Choose “Without data protection
- Check the box to change data protection


- Once complete the Power off the IOMega
- Dashboard > Shutdown > Allow device to shutdown
- After it powers off, replace Disk 1 with last 2TB Disk
- Power On
- Validate all disks are online
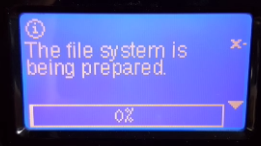
- Go to Settings > Disks > “Click here for steps….” Then check box to authorize overwrite, choose OK.


- After the last step observe the error message below and press ‘OK’
- Go to Dashboard > Restart to restart the IOMega
- After the restart the display should show “The filesystem is being prepared” with a progress bar, allow this to finish
- Now create the Parity set with the new 2TB Disks
- First, remove all Shared folders (See earlier steps if needed)
- Second go to Settings > Disks > Manage Disks > Data Protection > Choose Parity > Next

- Choose “check this box….” then click on apply…
- After clicking apply my screen updated with a reconstruction of 0% and the display screen on the IOMega showed a progress bar too.
- Mine took more than 24+ hours to complete the rebuild.

- After the rebuild is complete then restore the config
- Finally, restore your data. Again, I used syncback to copy my data back
If you like my ‘no-nonsense’ blog articles that get straight to the point… then post a comment or let me know… Else, I’ll start writing boring blog content.

April 8, 2018 at 12:49 pm
Matt, I’m wondering if you’ve tried erasing disks in the IX4-200d. I’m looking to sell mine, so wanted to erase it first. I’ve selected the “secure erase” option, and it’s been stuck on “Erasing drives, 0% complete” for almost a month. Pulling drives one by one and erasing them by a different means doesn’t work because once they’re reinserted, they get rebuilt (go RAID!), putting the old data back on them. I don’t know of a way to pull all the drives at once, erase separately, then reinstall and and copy the iomega firmware back to them.
Any thoughts?
LikeLike
April 9, 2018 at 9:29 am
Thanks for the post Greg. Great question. I have not had to do this and I’m not sure exactly how to solve this issue but I would approach it this way.
1. You may have done this already but I’d try to contact Lenovo support or hit up their community support.
2. If you map the the IOMega to a Windows or Linux system, can you run a DOD disk wipe program against the share?
3. This step may take some playing around but — If you remove all the data from the IO Mega (example: IOMega is mapped to your PC, just delete the data on it) then follow my blog on how to rebuild the IO Mega, when you remove the 3 non-boot disks I would wipe them with a DOD wipe program and reinsert, and then when you remove the first disk do the same?
Lastly, on your comment around the Erasing at 0%, I wonder if this is a Firmware issue? Might want to see if you can update the firmware and then try again?
I hope this helps, and do let us know how it works out for you.
LikeLike
April 14, 2018 at 3:56 pm
Thanks Matt. Unfortunately the IOMega web interface reports it’s in the midst of a drive erase and I can’t do anything else with it. It won’t let me mount the drives and through the web interface it just reports “erase in progress”.
I read through all the relevant threads on the IOMega community before beginning, and didn’t find anyone who was trying to erase the drives; the threads I read were about upgrading disks.
I only have a Mac and some of the utilities and upgrade procedures seem to require a PC.
At some point I’ll just give it up for lost, pull the drives and erase them individually. Not sure if I’ll be able to rebuild it with the IOMega firmware after that; I might just end up having to recycle the whole thing, which is a shame. Someone should be able to get use out of it.
LikeLike
October 7, 2020 at 1:47 pm
Hi! i bought one of these without disks, and installed my own ones. It is not booting. Is there any sort of installation too be done? thank you.
LikeLike
October 7, 2020 at 4:19 pm
From what I can remember there were 2 ways to upgrade this device. The way I posted about, and then “Hacking” into the device itself. I also recall it was important for the way I did it to not loose the first disk, it had the boot OS and got the system up and running. If you bought a device with no disks, its no surprise that it didn’t boot. However, in the research I did for this blog I vaguely remember reading about the “hacking” method didn’t require this boot disk. I have no information on the “hacking” method but I’m sure if you poke around a bit you might find someone who has done this. Good Luck and if you do find a way let me know.
LikeLike
June 19, 2022 at 3:23 pm
Hi, please, what’s the max HDD that the Iomega ix4-200d can support per slot? Mine has the black user interface with cloud capability (no longer working, lol). I want to upgrade mine from 2TB per slot to 4TB making it 16TB in total. Is that possible? The max I’ve seen is 3TB per slot sold by Iomega before Lenovo bought them out.
LikeLike
June 22, 2022 at 7:44 am
Hey Temidayo, I no longer have this unit so I have no way of testing it out and I do not know if 4TB is possible. A quick google search didn’t show any with 4TB drives. Best of luck.
LikeLike
June 5, 2023 at 11:43 am
hi,
I received my year exactly the same as you but I basically deleted the OS and it is no longer available on the official lenovo site does anyone by any chance have a version of the os so that I can reinstall it please
LikeLike
June 5, 2023 at 2:15 pm
This page has a link to download the firmware, not sure if that is what you are looking for. I don’t have an ix4-200d anymore but good luck with it. https://download.lenovo.com/lenovoemc/eu/en/app/answers/detail/a_id/22315.html
LikeLike
June 5, 2023 at 12:05 pm
hi , I received my year exactly the same as you but I basically deleted the OS and it is no longer available on the official lenovo site does anyone by any chance have a version of the os so that I can reinstall it please.
LikeLike