Home Lab
VMware Workstation 17 Nested Home Lab Part 2
In Part 2, I go into a physical hardware overview, show how to enable VT-X and VT-D, installation of Windows 11 (which includes a trick to disable the TPM requirement), install of Workstation 17, and review common issues when Hyper V is enabled. At the end of this video #windows11 and #workstation 17 are installed and operational. Coming up in Part 3 we’ll build out or Workstations Networks, start building the Windows 2022 server with AD, DNS, RAS, DHCP, and other services.

#Optane #IntelXeon #Xeon #vExpert #VMware #Cloud #datacenter
VMware Workstation 17 Nested vSAN ESA Overview
In this high level video I give an overview of my #VMware #workstation running 3 x nested ESXi 8 Hosts, vSAN ESA, VCSA, and a Windows 2022 AD. Additionally, I show some early performance results using HCI Bench.
I got some great feedback from my subscribers after posting this video. They were asking for a more detailed series around this build. You can find this 8 Part Series under Best of VMX > ‘VMware Workstation Generation 8 : Complete Software Build Series’.
For more information around my VMware Workstation Generation 8 Build check out my latest BOM here

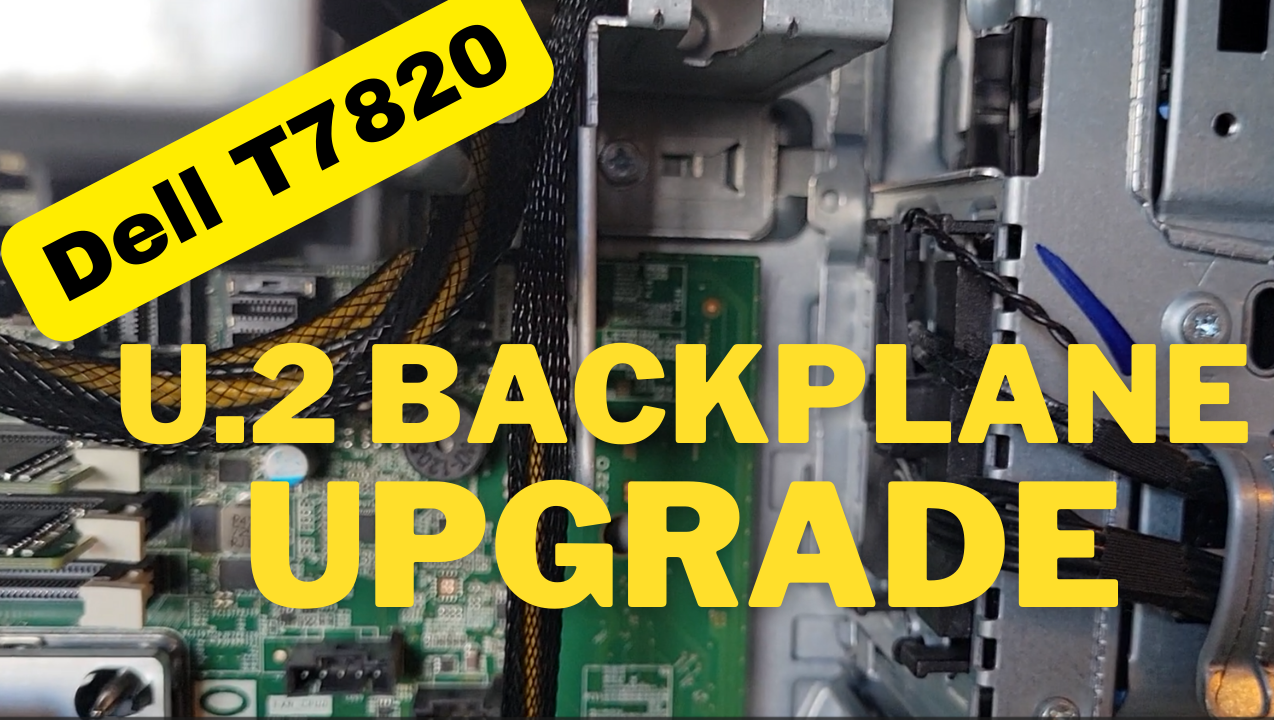
How to upgrade a Dell T7820 to a U.2 Backplane
In this video I show how I upgraded my Dell T7820 SATA backplane to a U.2 backplane. I’m doing this upgrade to enable support for 2 x #intel #Optane drives. I’ll be using these #Dell #T7820 Workstations for my Next Generation #homelab where I’ll need 4 x Intel Optane drives to support #VMware #vsan ESA.
Part Installed in this Video: (XN8TT) Dell Precision T7820 T5820 U.2 NVME Solid State Drive Backplane Kit found used on Ebay.
For more information around My Next Generation 8 Home Lab based on the Dell T7820 check out my blog series at https://vmexplorer.com/blog-series/
First Look GEN8 ESXi/vSAN ESA 8 Home Lab (Part 1)
I’m kicking off my next generation home lab with this first look in to my choice for an ESXi/vSAN 8 host. There will be more videos to come as this series evolves!

Why I didn’t choose a Noctua replacement fan
We’ve all been there, we’ve picked out a new router, switch, or other device for our home lab and the fans are LOUD. First thing we do is to replace those fans with something a little more quiet. We hit up our favorite online store, maybe read some reviews, and choose a fan that fits. Sometimes that fan is an expensive Noctua fan because its promise of being quiet is so alluring. After the fan is replaced it is a bit more quiet but now the fan error lights are on or it malfunctions. Clearly it’s the wrong fan for our device.
In this blog I’ll go over some of the items you should look for when buying a replacement fan for your devices that can help you find a better fit and not break your wallet. Fair warning, the stock fans in these engineered devices were designed to be optimal for said device. Altering them in any way can be harmful to the device plus working on electronics without proper training is never advised.
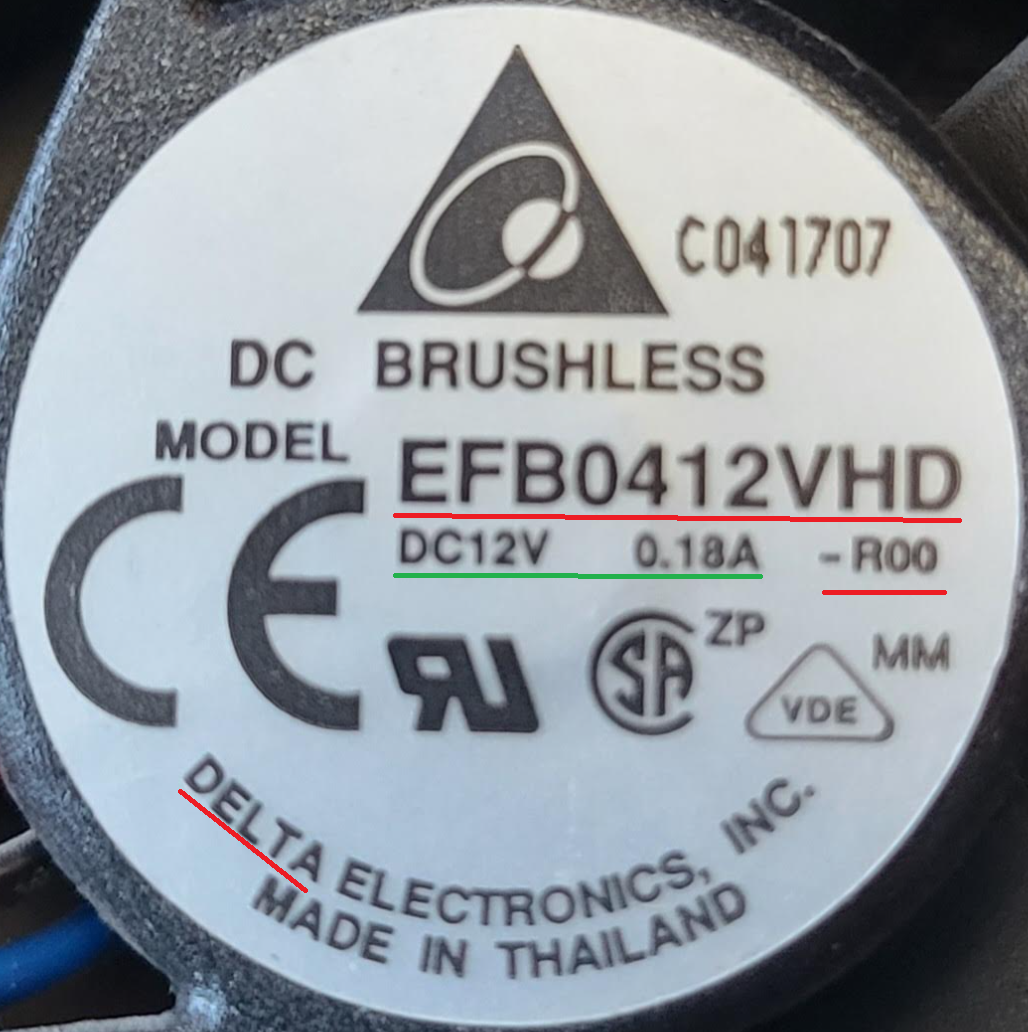
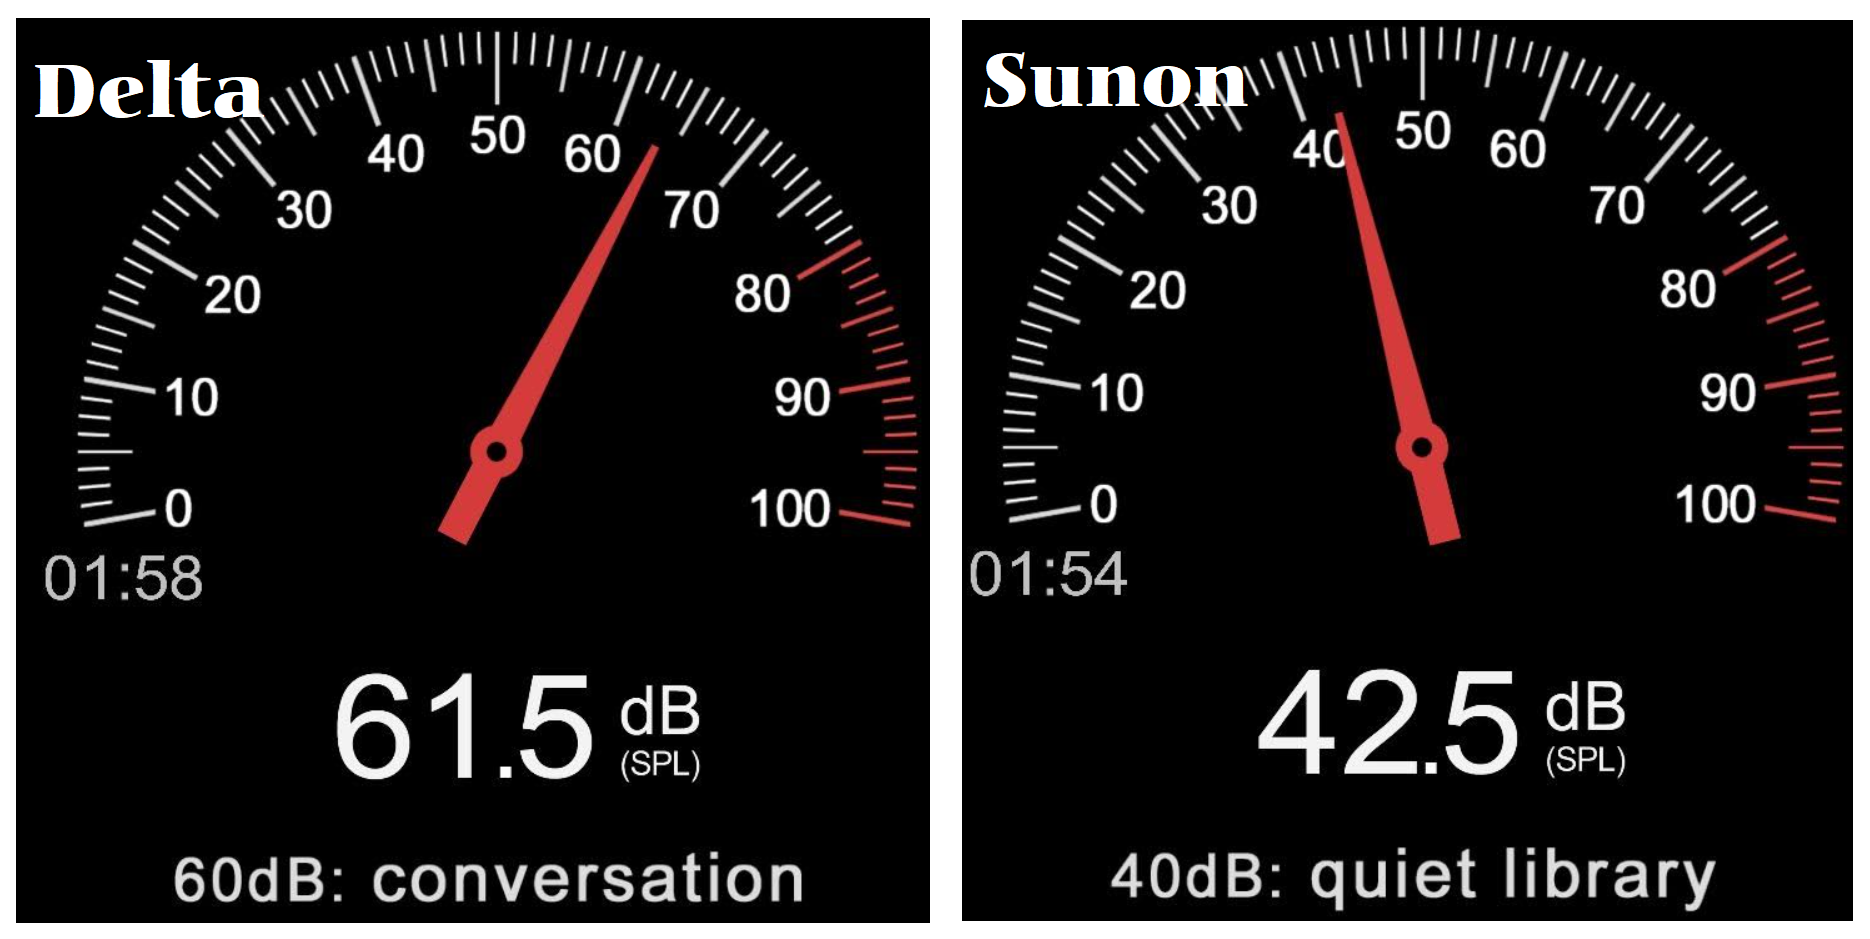
First, identify the stock fan in your device and find its datasheet. You may need to remove the fan from your device. I recently replaced some fans in my Mellanox IS5022 InfiniBand Switch. The stock fan was made by Delta, the make #EPB0142VHD Subtype -R00, it has 3 wires, 12 Volt DC Brushless, and draws .18 AMPS. I underlined Subtype as it is very important when identifying your stock fan. In this case if I just search for the make I’ll get the wrong fan information. In fact EPB0142VHD with no subtype only has 2 wires.
Second, I review the stock fan specification datasheet. I already know the Voltage and Amp rating but here are the things I also need:
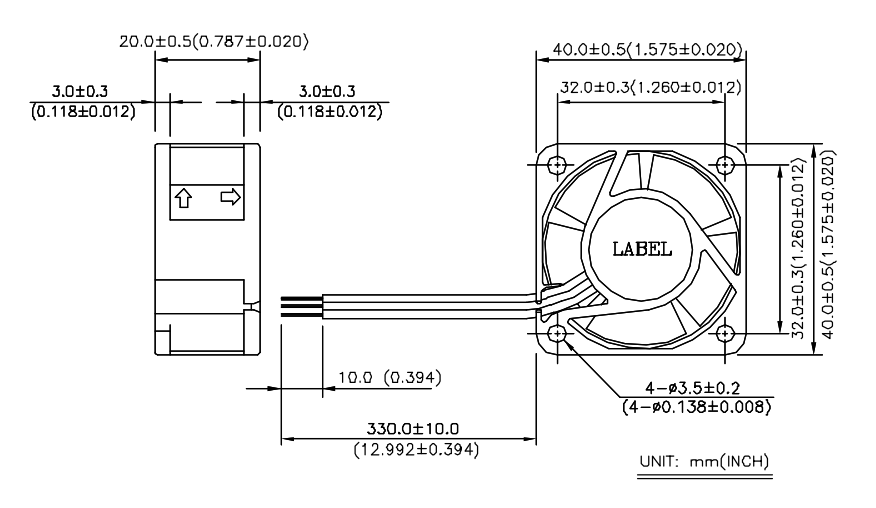
- Fan Size – 40mm x 40mm x 20mm
- Hole Mount Size – 32 mm between mount points
- Hole diameter – 3.5 mm diameter.
- Length of Wires – 330 mm
- Identify the 3 wires and their purpose – 12v, Ground, and Lock Rotor
- Db Noise rating – 32-36 Dba
- RPM – 9000 RPM
- CFM – 10
Not sure if you caught it but identifying the 3 wires on the stock fan is critical if you want to resolve these error lights. Most 3 wires fans are going to have 12v DC and Ground. It’s that 3rd wire that makes them unique and its one of the more important items you must find out to select the correct replacement fan.
The 3 most common types of 3 wire fans are:
- Step RPM Speed – think of this like gears on a bike. The fan speed steps from one RPM to another. Most have between 3-5 steps in RPM.
- PWM – Pulse Width Modulation, allows for granular speed control. Instead of instantly stepping to the next speed it is gradually sped up and down.
- Locked Rotor (sometimes called alert) – This is a fan spin error detection. Normally, the fan will spin at one speed. 40 mm Locked Rotor fans seem to be the most common for routers, switches, and other similar devices.
Another item is the length of the wires. The datasheet shows 330 mm (+-10mm), however the fan you order could be shorter. It’s best just to measure the stock fan, and make sure the replacement fan you ordered has enough length or room to stash the wires if they are too long.
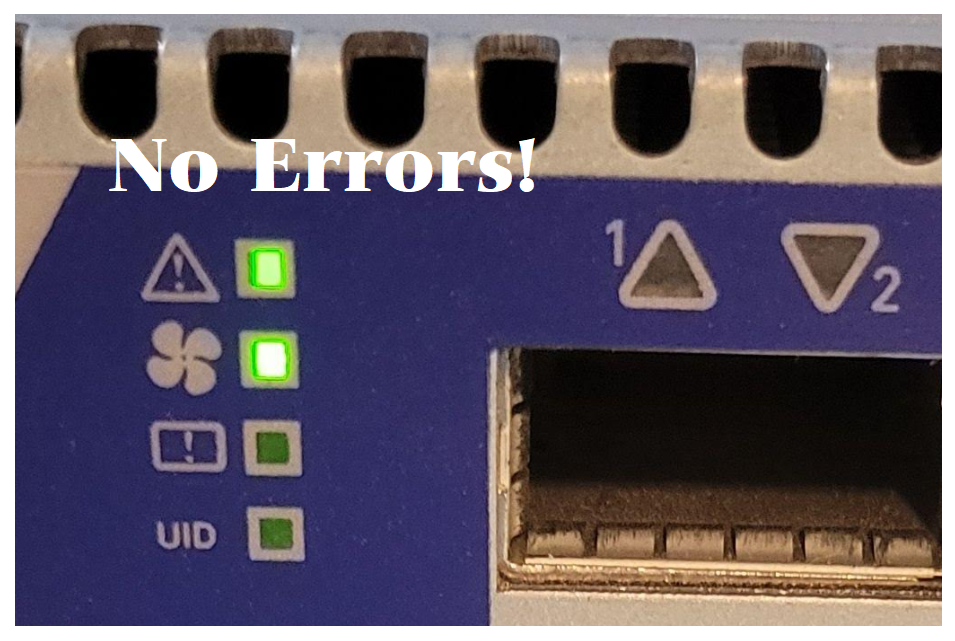
Third, now that I understand my stock fan I’m ready to choose a replacement fan that meets with my goal of reducing fan noise. In most cases, fan noise is reduced by slowing the RPM. Additionally, there are fans specifically designed to reduce noise but they can be expensive. I thoroughly looked at 40mm Noctua fans but none of them matched the voltage and Locked Rotor requirements. However, I still see a lot of folks buying Noctua 40mm fans and then complaining about the fan error lights or issues with it malfunctioning. Most just ignore these errors or alter the fan wires to send a false message to the device. Both I don’t recommend.
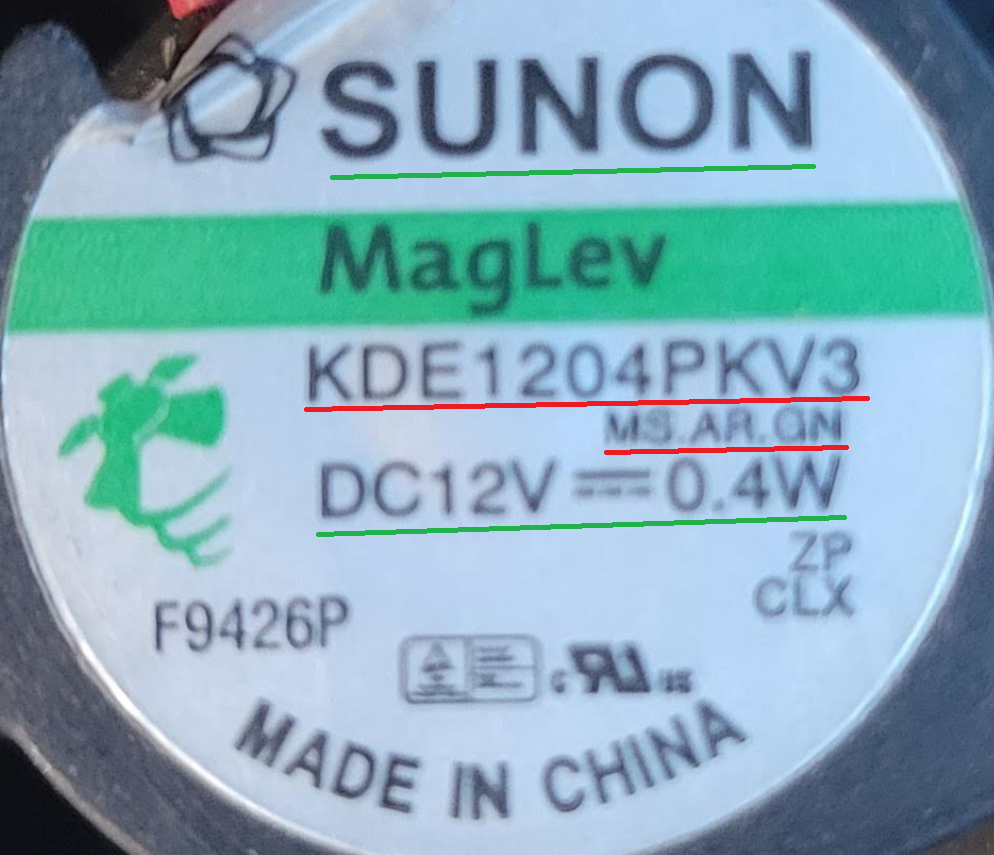
In this case I choose the Sunon MagLev KDE1204PKV3 MS.AR.GN 40x40x20mm 3pin Low-Speed 5200RPM 6.3CFM (Locked Rotor Alarm Signal). Cost is about $6.50 US, compared to a non-compliant Noctura $14 US
How do the stock and replacement fans compare:
| Item (recommendation) | Delta EPB0142VHD-R00 | Sunon KDE1204PKV3 MS.AR.GN |
| DC Volts (match) | 12 | 12 |
| Amps (do not exceed stock) | 0.18 | 0.03 |
| Fan Size (match) | 40mm x 40mm x 20mm | 40mm x 40mm x 20mm |
| Hole Mount Size (match) | 32 mm | 32 mm |
| Hole Diameter (close match) | 3.5 mm | 4 mm |
| Length of Wires (match) | 330 mm | 300 mm |
| 3 wire purpose (match) | 12v, Ground, Lock Rotor | 12v, Ground, Locked Rotor |
| Db Noise rating (reduce) | 32-36 Dba | 18 Dba |
| RPM (close match) | 9000 | 5200 |
| CFM (close match) | 10 | 6.3 |
Fourth, Prepare the fan to be installed. One item I didn’t mention was the fan edge connector. Most data sheets do not come with information on the edge connector as device manufactures may customize this. In this size of fan the edge connectors seem to be a standard size with some variants.
Some fans will need their wire order changed to match the circuitry on the device. Aligning these pins is critical, if they are wrong you could damage your device. For example your replacement fan came with Pin 1 12v Red, Pin 2 Ground Black, and Pin 3 Motor Lock Yellow (Sometimes White or Blue) you might need to reordered them to match your device. Simply use a wire pin removal tool, light pressure down, and push the pin out. Then, reorder the pins to match your device and you are good to go.

Next the replacement fan mount hole might be a factor. Some replacement fans come with screws or bolts that you may be able to use. If not, you may be able to use the stock hardware or hardware you provide. Either way, depending on the hole size you may have to work this out a bit. In my case, the stock fan screws worked perfectly. Tip – Don’t over crank or force in screws, it may damage your fan.
If your stock fan had a protection sleeve over the wires you may want to reuse it as some devices have sharp metal edges that may cut into your wires. Fan vibration may also cause this too. As an alternative, you may want to consider adding heat shrink when you re-pin the fan.
Lastly, how did my selection perform? Basically, the Sunon is a very close replacement to the Delta. It has a reduced RPM and CFM which drops its Db noise by 20 Db. Since I choose a replacement fan that is not an exact match, I’ll need to monitor the device and ensure its temps are within normal thresholds.
Very unscientifically, I used a Db meter app in my smartphone to measure the Db for the Delta and Sunon Fans. The noise reduction was notable and best of all no fan error lights.
Summary, there is no doubt that Noctua makes a quality fan product but they can be expensive and sometimes do not meet the requirements of your stock fans. If you can find one that does, it may be worth the extra spend. However, by doing just a bit of research you are sure to land on a replacement fan that will meet your goals and not break your wallet. My goal was to reduce fan noise for my home lab and by doing my homework I hit a home run with the first fan I chose.
Thanks for reading and do feel free to leave a comment or suggestion.
Will ESXi 8 install on to the ASRockRack EPC621D8A motherboard?
In this video I show how I installed ESXi 8 on to the ASRockRack EPC621D8A motherboard and discuss some of the caveats of doing so.
Links in the video:
ASRockRack EPC621D8A motherboard: https://www.asrockrack.com/general/productdetail.asp?Model=EPC621D8A#specifications
VMware Comptibility Guide: https://www.vmware.com/resources/compatibility/detail.php?deviceCategory=server&productid=47030&deviceCategory=server&details=1&partner=600&page=1&display_interval=10&sortColumn=Partner&sortOrder=Asc
H3C NIC-GE-4P-360T-L3 NIC: https://www.vmware.com/resources/compatibility/detail.php?deviceCategory=io&productid=50861&deviceCategory=io&details=1&VID=8086&DID=37d1&SVID=8086&page=1&display_interval=10&sortColumn=Partner&sortOrder=Asc

Noctua NH-D9 DX-3647 4U Install
There aren’t many choices when it comes to Socket LGA 3647 CPU coolers and Noctua seems to have a solid, yet expensive, option. Based on their reputation in the industry alone I expected better instructions but this cooler soon let me down. After reading the instructions serval times I got it all together. I choose to make a video on the installation of this CPU cooler and share a few tips that might help others with their install.
10Gbe NAS Home Lab: Part 8 Interconnecting MikroTik Switches
It’s been a long wait for Part 8 but I was able to release it today! If you are interested on how to network performance test your storage environment this session might help. The purpose of this session is to show how to interconnect two MikroTik switches and ensure their performance is optimal when compared to a single switch. The two NAS devices in this session have different physical capabilities and by no means is this a comparison of their performance. The results are merely data points. Users should work with their vendor of choice to ensure best performance and optimization.

3 Interesting DIY PC / Server Case Options for Home Labs
I’ve been building White box PCs since the early 90’s and if you seen my home lab blogs and videos its a passion that has continued on for so many years. When I look for a case, I’m usually looking for practicality and usability as it relates to the indented design. As a DIY home lab builder, using commodity cases is normal but unique cases for home labs are not always easy to find. When I do look for unique Home Lab case ideas, I usually run into lists of the gamer builds that are not so much meant for Home Labs. In this blog I wanted to compile a list of cases that are a bit more unique but someone might want to use for a home lab. For each case, I listed out some of my thoughts around home lab use cases. Of course, deeper research will be needed to determine if they fit your indented use.
#1 – Cryorig TAKU, The PC Monitor Stand Mini ITX PC Case

USE CASE: Could be used for a stackable home lab or workstations
PROS:
- ~1U Formfactor | ++ Coolness factor
- Portability | Light Weight | Low Noise
- The slide out system tray makes for easy access to internal components, especially when stacked
CONS:
- Tight form factor limiting options
- Sometimes limited SFX Power Supplies Options
- ITX Standard might be hard for Home Lab deployments
- Limited to 3 Drives
- When opening cables may have to slide with it or be disconnected
- Company just starting out, hard to find replacement parts
Other Links:
- Cost ~$200
- Video Review
- Amazon
#2 – Fractal Design Define 7

USE CASE: Sure this may look like a standard PC Case, but what’s unique about this case is the MANY ways it can be configured and re-configured. Because of this unique flexibility it would work well as a Workstation or ESXi Host.
PROS:
- MANY case configurations options
- Want even more space? Look at the Define 7 XL
- Supports ATX and some E-ATX configurations
- Clean case design with 3 Color Options
- Horizontal and vertical PCI Slots
- Wire management
- Air Filters
- 9 Fan Connections
- Lots of Disk space
CONS:
- No 5.25″ disk bays
- No front facing USB or external ports (all on top)
- It’s big and the XL even bigger
- Some options sold separately
Other Links:
- Standard ~$140 | XL Version $220
- Amazon
- Video Review
- Manufacture Site
#3 – JONSBO N1 Mini-ITX NAS Chassis

USE CASE: With so many disk options could see this case being used for FreeNAS or even a vSAN cluster
PROS:
- LOTS of disk space 5 x 3.5 and 1 2.5
- MINI-ITX / Small form factor
- PCI Low Profile slot
- Upright or Lie-down configurations
- Check out the manufacture site for more and similar case designs
CONS:
- Does require SFX power supply
- Power/Cables may be hard to work with in the upright position
- The size may limit flexibility
- Only one PCI slot
- No 5.25″ disk bays
Other Links:
10Gb Switch Options for VMware Home Lab
With so many 10Gbe Switch options out there for VMware Home Labs I thought I would take some time to create a list of some of the more common options.
Where did I get this data?
William Lam started the VMware Community Homelab project a few years ago. It allows Home Lab users to enter their information around their Home lab. As of this writing the VMware Home Lab community have entered over 125 different VMware Home Labs. When a user registers they provide a URL link which leads to their home lab build-of-materials (BOM) or a description of the users home lab. Its a great resource when you are looking to see what others are doing. This was my primary data source for the results below.
On to the Results!
Over this past weekend, I took some time to review all VMware Community Homelab project links and specifically documented all the folks that noted their 10Gb Switch. I found where 25 users listed the use of a 10Gbe Switch. As I went to each link I documented the switch, its 10Gb Port count, who made it, the model, a current price, and a helpful link.
Here are the TOP 3 most popular and a curious switch:
#1 – With a user count of 7 the Ubiquity Unifi US-16-XG was the most used switch by a single model. Additionally, I noticed many of their other products in users home labs.
#2 – MikroTik with a user count of 8 across 4 different models. Their products are know to be very cost effective for 10Gbe so its no wonder they are in the top 3.
#3 – Our surprise result with a user count of 4 across 2 models is Netgear. But, its no surprise that Netgear has been making great home lab products for decades and they seem to be a bit popular in this 10Gbe arena.
Lastly, a curious switch I noted was the Brocade Communications BR-VDX6720-24-R VDX 6720. With 24 Ports of SFP+ 10Gbe its got me curious why you can find these on Ebay for ~$150. This is one switch I’ll have to look into.
This table contains to total results and extra information :
| Count | 10Gb Ports | Ports | Manufacture | Product | USD Cost (05/2022) | Link | Notes |
| 7 | 16 | 12 x 10G SFP+ ports | 4 x 10Gbe RJ45 | Ubiquity | UniFi US-16-XG 10G | $600-800 | https://store.ui.com/collections/unifi-network-switching/products/unifi-switch-16-xg | |
| 4 | 8 | 8 x 10 Gb SFP+ | 1 x 1Gbe RJ45 | MikroTik | CRS309-1G-8S+IN | $269 | https://mikrotik.com/product/crs309_1g_8s_in | |
| 2 | 8 | 8 x 10Gbe RJ45 | 2 RJ45/SFP+ Combo Ports | Netgear | Prosafe XS708T | $850 | https://www.netgear.com/business/wired/switches/smart/xs708t/ | |
| 2 | 16 | 16 x 10 Gb SFP+ | 1 x 1Gbe RJ45 | MikroTik | CRS317-1G-16S+RM | $400 | https://mikrotik.com/product/crs317_1g_16s_rm | |
| 2 | 8 | 8 x 10Gbe RJ45 | 1 x 10GB RJ45/SFP+ Combo Ports | Netgear | XS708E | EOL | https://www.netgear.com/support/product/XS708E.aspx | EOL |
| 1 | 12 | 8 x 10Gbe RJ45| 4 x Combo (TP and SFP+) | 1 10/100Gbe RJ45 | MikroTik | CRS312-4C+8XG-RM | $625 | https://mikrotik.com/product/crs312_4c_8xg_rm | |
| 1 | 8 | 8 x 10Gbe RJ45 | Buffalo | BS-XP20 | EOL | https://www.buffalotech.com/resources/bs-mp20-10gbe-multi-gigabit-switch-replaces-the-bs-xp20-10gbe-switch | EOL |
| 1 | 24 | 24 x 10 Gb SFP+ | Lenovo | RackSwitch G8124E | EOL | https://lenovopress.lenovo.com/tips0787 | |
| 1 | 24 | 24 x 10 Gb SFP+ | Brocade Communications | BR-VDX6720-24-R VDX 6720 | EOL $150-400 | https://www.andovercg.com/datasheets/brocade-vdx-6720-switch-datasheet.pdf | Hard to find information on this switch |
| 1 | See Note | 48 x 1Gbe RG45 | 4 x QSFP+ 40GB | Cisco | N3K-C3064PQ-10GX Nexus 3064 | $1,200 | https://www.cisco.com/c/en/us/products/collateral/switches/nexus-3000-series-switches/data_sheet_c78-651097.html | Looks like the 4 x 40GB QSFP+ can be spilt into mutiple 10Gb SFP |
| 1 | 4 | 4 x 10Gb SFP+ | MikroTik | CRS305-1G-4S+IN | $140 | https://mikrotik.com/product/crs305_1g_4s_in | |
| 1 | 4 | 4 x 10GB SFP+ | 24 x 1Gbe RJ45 | Cisco | 3750-24P w/ Cisco C3KX-NM-10G 3K-X Network Module | https://www.cisco.com/c/en/us/products/collateral/switches/catalyst-3560-x-series-switches/data_sheet_c78-584733.html | ||
| 1 | 8 | 4 x 10GB SFP+ | 4 x 10Gb RJ45/SFP+ Combo Ports | Qnap | QSW-804-4C | $500 | https://www.qnap.com/en-us/product/qsw-804-4c |
Update: Here are a few switches that folks mentioned to me in their comments but were not part of the VMware Community HomeLab listing:
- Brocade icx-6610 ~$200 | 16x10G ports, 2x40G ports, 48x1G
- TP-Link TL-SG3428XMP $600 | 24xPOE 1G + 4xSFP+
- TP-Link TL-SX1008 | $400 | 8x10G Desktop/Rackmount Switch
- Netgear XS508M $600 | 8 x 10Gbe RJ45 1 x shared SFP+
- Ubiquity USW-Pro-Aggregation $899 | Layer 3 switch with (28) 10G SFP+ ports and (4) 25G SFP28 ports.
- Ubiquity USW-Aggregation $270 | L2 8x 10Gb SFP+
- Dell S4112T $1500-$5000 | Multi-function Rack Switch See docs
- D-LINK DX-1210-10TS $1200 | 8 x 10Gbe RJ50 2 x 10Gbe SFP+
- Dell X4012 ~$500-1500 | 12 x 10Gbe SFP+
- MokerLink 10G080GSM $250 | 8 x 10Gbe SFP+ Managed Switch
- MokerLInk 10G080GS $200 | 8 x 10Gbe SFP+ Unmanaged Switch
It was a bit of a surprise the the following switch vendors were not mentioned by users: Linksys, Aruba (now HPE), Juniper, and Extreme Networks.
For a really good list of Network Switch and Router vendors check out this wiki page.
Lastly, it should be noted, there is a another way for Home lab users to enter their BOMs. Most recently a VMware fling known as Solution Designer is allowing Home lab users to enter their data. Here is a quick description of the new service:
The Solution Designer Fling provides a platform to manage custom VMware solutions. Building a custom VMware solution involves many challenging tasks. One of the most difficult is continuous manual verifications: checking the interoperability of multiple VMware products and performing compatible hardware validations. Solution Designer seeks to resolve these issues by automating repetitive manual steps and collecting scattered resources in a single platform.
Note: The only downside to this fling is you can only see your data and not others.
To sum it up, I’m sure this table is less then 100% accurate when it comes to VMware Home Labs. In viewing the listings on the VMware Community Home lab project, I found many dead user links and incomplete BOMs. The list above is more about how many folks are using which switch vs. the specifics of the switch. The specifics are something you might want to review at a deeper level. However, its a good start and the table above should come in handy if you are looking to compare some common 10Gbe switches for your home lab.
Thanks for reading and if I missed your switch, please do comment below and I’ll be glad to add it!

